Distroless: Efficient Playwright Testing with Minimal Docker Images
 Thananjayan Rajasekaran
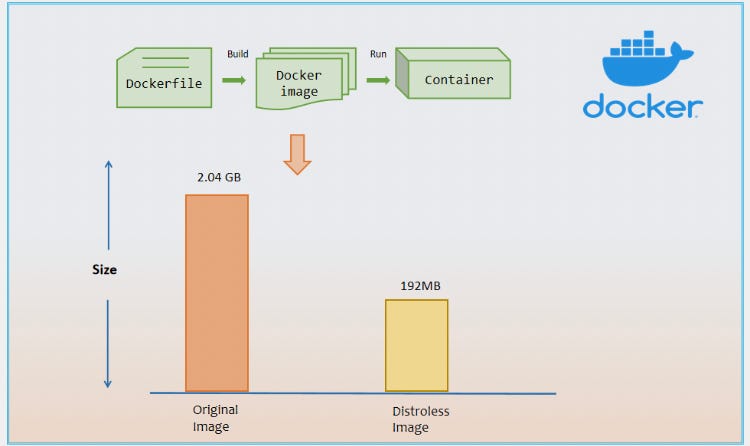
Size comparison between images
When setting up Playwright tests in a CI/CD pipeline, it’s common to configure the test scripts to execute in an isolated environment. In today’s tech landscape, containerization using Docker is one of the best options, as it has a large community to support users if they encounter any issues.
Build an image:
A typical Dockerfile consists of a set of instructions such as selecting a base image, installing dependencies, defining an entry point, and setting a default command to run..
# use any base node image
FROM node:22.9

# copy the current working directories, please add .dockerignore to commit unnecessay files
WORKDIR /app
COPY . /app

RUN npm cache clean --force
# install only the chromium based browser and dependencies
RUN npm install
RUN npx -y playwright install --with-deps chromium

ENTRYPOINT ["/bin/sh"]
This is a simple Dockerfile that uses Node v22.9 as a base image, copies the source code, installs the necessary dependencies, and sets the entry point as the shell.
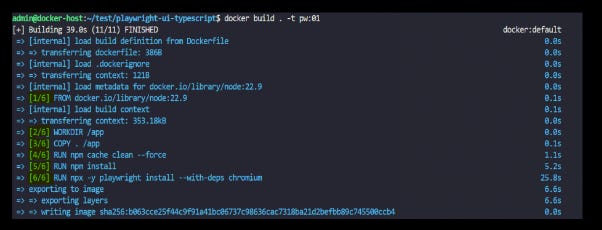
Once you build this Dockerfile using the command docker build -t pw:01, Docker will execute all the instructions from top to bottom. Each instruction adds a layer to the previous one. When you rebuild the same Dockerfile, Docker will reuse the existing layers up to the point where changes are made and rebuild from there. For example, if the Dockerfile contains five instructions and only the third one changes, Docker will rebuild from the third instruction onward while reusing the first two layers.

Image build as layer by layer and we can execute the test by running the below command
docker run -it -v $(pwd)/report:/app/playwright-report pw:01 -c “npx playwright test”
If you run the command docker images, you will likely notice the image size is in gigabytes. This is because most Docker images contain a full Linux distribution. Although this allows access to various features of the distribution, many of these features may be unnecessary for your application.

Using this image for test script execution is fine, but imagine if your customer is using a paid cloud service. In that case, they will be charged for resource utilization, data transfer, and more (though we won’t dive into that topic here). By optimizing the Docker image, we can reduce its size, improve caching, and enhance performance.
Using a Distroless Image
Distroless images contain only runtime dependencies and omit shells, package managers, text editors, and other utilities. This makes them fast, lightweight, and quicker to build. Tech giants like Amazon and Google use this type of image to ship their products to the market faster.
# Stage 1: Build the application using a standard Node image
FROM node:20-bookworm AS build

# Set the working directory in the container
WORKDIR /app

# Copy the current directory contents into the container
COPY . /app

# Clean npm cache
RUN npm cache clean --force

# Install necessary packages (only Chromium in this case)
RUN npm install
RUN npx -y playwright install --with-deps chromium

# Stage 2: Build a minimal distroless image
FROM gcr.io/distroless/nodejs20-debian11

# Copy the node\_modules and built app from the build stage
COPY --from=build /app /app

# Set the working directory
WORKDIR /app

# Define the entry point, since distroless doesn't have a shell, npm or npx
# all command directly pass to 'node' terminal
CMD ["/node\_modules/.bin/playwright", "test"]
In this Dockerfile, the base image and distroless image are used in a multi-stage build. In Stage 1, the base image is used to download all dependencies. In Stage 2, the app is run in the distroless image, with the source code and Node.js module dependencies copied over.
Once you build this image with docker build -t pw:02, and run command docker images you’ll see a significant difference in the image size.

Since the CMD is directly defined in Dockerfile itself,
docker run -it -v $(pwd)/report:/app/playwright-report pw:02
All source code can be found here.
Things to Keep in Mind When Using Distroless Images:
- The
ENTRYPOINTshould be defined in the form of an array (e.g.,ENTRYPOINT ['index.js']) and not as a string (e.g.,ENTRYPOINT "index.js"). - You need Docker version > 17.05 to use this image.
- Since this image doesn’t have access to a shell or terminal, if you need to debug, append
:debugto the distroless base image and run the container with--entrypoint=sh. - Try to execute the test cases in
headlessmode, if you want to execute in headed mode, thenXvfbto be pre-installed, again it will leads to increase in image size.
References:
Conclusion:
By using an optimized approach, the final image size can be drastically reduced. This allows for faster, more reliable container setups that consume fewer resources.
If you liked this article, give it a clap 👏👏👏
Happy Learning! 🚀
Subscribe to my newsletter
Read articles from Thananjayan Rajasekaran directly inside your inbox. Subscribe to the newsletter, and don't miss out.
Written by

Thananjayan Rajasekaran
Thananjayan Rajasekaran
TestOps Specialist: Bridging DevOps and Automated Testing for seamless integration and high-quality software delivery. 🚀