Day 22: Getting Started with Jenkins! 😃
 Dhruv Moradiya
Table of contents
- 🌐 What is Jenkins?
- 💡 Why Jenkins?
- 🛠️ Installing Jenkins on Ubuntu: Step-by-Step Guide 🖥️
- Step 1: Update Your System 🆙
- Step 2: Install Java 17 ☕
- Step 3: Add the Jenkins Repository 🔗
- Step 4: Update the Package List Again 📦
- Step 5: Install Jenkins 🚀
- Step 6: Start and Enable Jenkins 🔄
- Step 7: Check Jenkins Status ✅
- Step 8: Access Jenkins in Your Browser 🌐
- Checking Jenkins Version 🎉
- 🚀 Task 1: What Makes Jenkins So Essential? (In Your Words)
- 🛠️ Task 2: Create a Freestyle Pipeline to Print "Hello World" 🌍
- Step 1: Open Jenkins Dashboard and Start a New Project 🖥️
- Step 2: Configure the Freestyle Project 🔧
- Step 3: Set a Build Schedule ⏱️
- Step 4: Save and Run the Pipeline 🎬
- 🔄 Bonus: Customizing and Expanding the Pipeline
- Wrapping Up 🎉
Hello DevOps enthusiasts! 🌟 Today, we're diving into Jenkins, the powerful CI/CD tool that helps automate all those repetitive tasks in the software development lifecycle. Imagine never having to manually check if a code test passed or if your app deployed successfully. Jenkins does this for you and more! So let's jump in and explore how Jenkins works, why it’s essential, and how you can start using it today. 🚀
🌐 What is Jenkins?
Jenkins is an open-source tool that automates tasks in the DevOps lifecycle, specifically Continuous Integration (CI) and Continuous Deployment (CD). It’s written in Java, and as an open-source server, it allows developers to build, test, and deploy software automatically. 🛠️ This tool works like a conductor in an orchestra, ensuring that every part of the process flows smoothly from one stage to the next.
In simpler terms, Jenkins helps you:
Build 🏗️ - Compile code automatically.
Test ✅ - Run automated tests to check code quality.
Deploy 🚀 - Move code to staging or production environments seamlessly.
Imagine working with multiple developers on a project. Without automation, you'd have to manually verify each piece of code, test it, and then move it to production. But Jenkins does this all with just a few clicks, or even automatically on a schedule. Isn't that amazing? 🤩
💡 Why Jenkins?
In today's fast-paced tech world, automation is no longer a luxury but a necessity. Here’s why Jenkins is invaluable:
Time-saving ⏳: Jenkins automates repetitive tasks, letting developers focus on actual coding.
Consistency 🔄: No more "it works on my machine" issues! Jenkins makes sure the code works as expected every time.
Effortless collaboration 🤝: Multiple team members can see real-time updates, test results, and logs, making it easier to work together.
Reliable deployment 📈: Jenkins ensures smooth deployments, reducing the chances of errors when moving code to production.
Think of Jenkins as your software project’s personal assistant, constantly monitoring and executing tasks without needing breaks. 😴 Whether you’re integrating Git, Docker, or other tools, Jenkins has plugins that make automation possible for each stage of DevOps.
🛠️ Installing Jenkins on Ubuntu: Step-by-Step Guide 🖥️
Step 1: Update Your System 🆙
It’s always a good idea to start with updating the system package list to make sure all available packages are up-to-date.
sudo apt-get update
Step 2: Install Java 17 ☕
Jenkins requires Java to run, and we’ll be using OpenJDK 17. Run the following commands:
sudo apt-get install fontconfig openjdk-17-jre
Verify Java installation by checking the version:
java -version
Expected output:
openjdk version "17.0.8" 2023-07-18
OpenJDK Runtime Environment (build 17.0.8+7-Debian-1deb12u1)
OpenJDK 64-Bit Server VM (build 17.0.8+7-Debian-1deb12u1, mixed mode, sharing)
This confirms Java is installed correctly and is ready to support Jenkins.
Step 3: Add the Jenkins Repository 🔗
Since Jenkins is not in the default Ubuntu repositories, we’ll need to add the official Jenkins repository.
Download the Jenkins key and save it to your keyring:
 sudo wget -O /usr/share/keyrings/jenkins-keyring.asc \
 https://pkg.jenkins.io/debian-stable/jenkins.io-2023.key
Add the Jenkins repository to your system:
 echo "deb [signed-by=/usr/share/keyrings/jenkins-keyring.asc]" \
 https://pkg.jenkins.io/debian-stable binary/ | sudo tee \
 /etc/apt/sources.list.d/jenkins.list > /dev/null
Step 4: Update the Package List Again 📦
After adding the Jenkins repository, refresh the package list to include Jenkins:
sudo apt-get update
Step 5: Install Jenkins 🚀
Now, install Jenkins using the following command:
sudo apt-get install jenkins
This command will install Jenkins along with its necessary dependencies.
Step 6: Start and Enable Jenkins 🔄
Start Jenkins to ensure it’s running:
sudo systemctl start jenkinEnable Jenkins to automatically start on system boot:
sudo systemctl enable jenkins
Step 7: Check Jenkins Status ✅
To confirm Jenkins is running properly, check its status with:
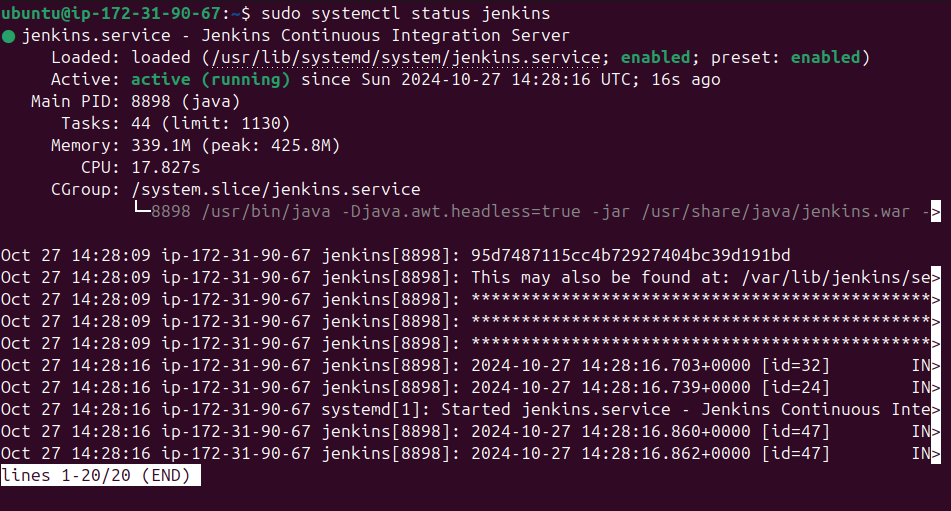
sudo systemctl status jenkins
If Jenkins is running correctly, you should see the status active (running).
Step 8: Access Jenkins in Your Browser 🌐
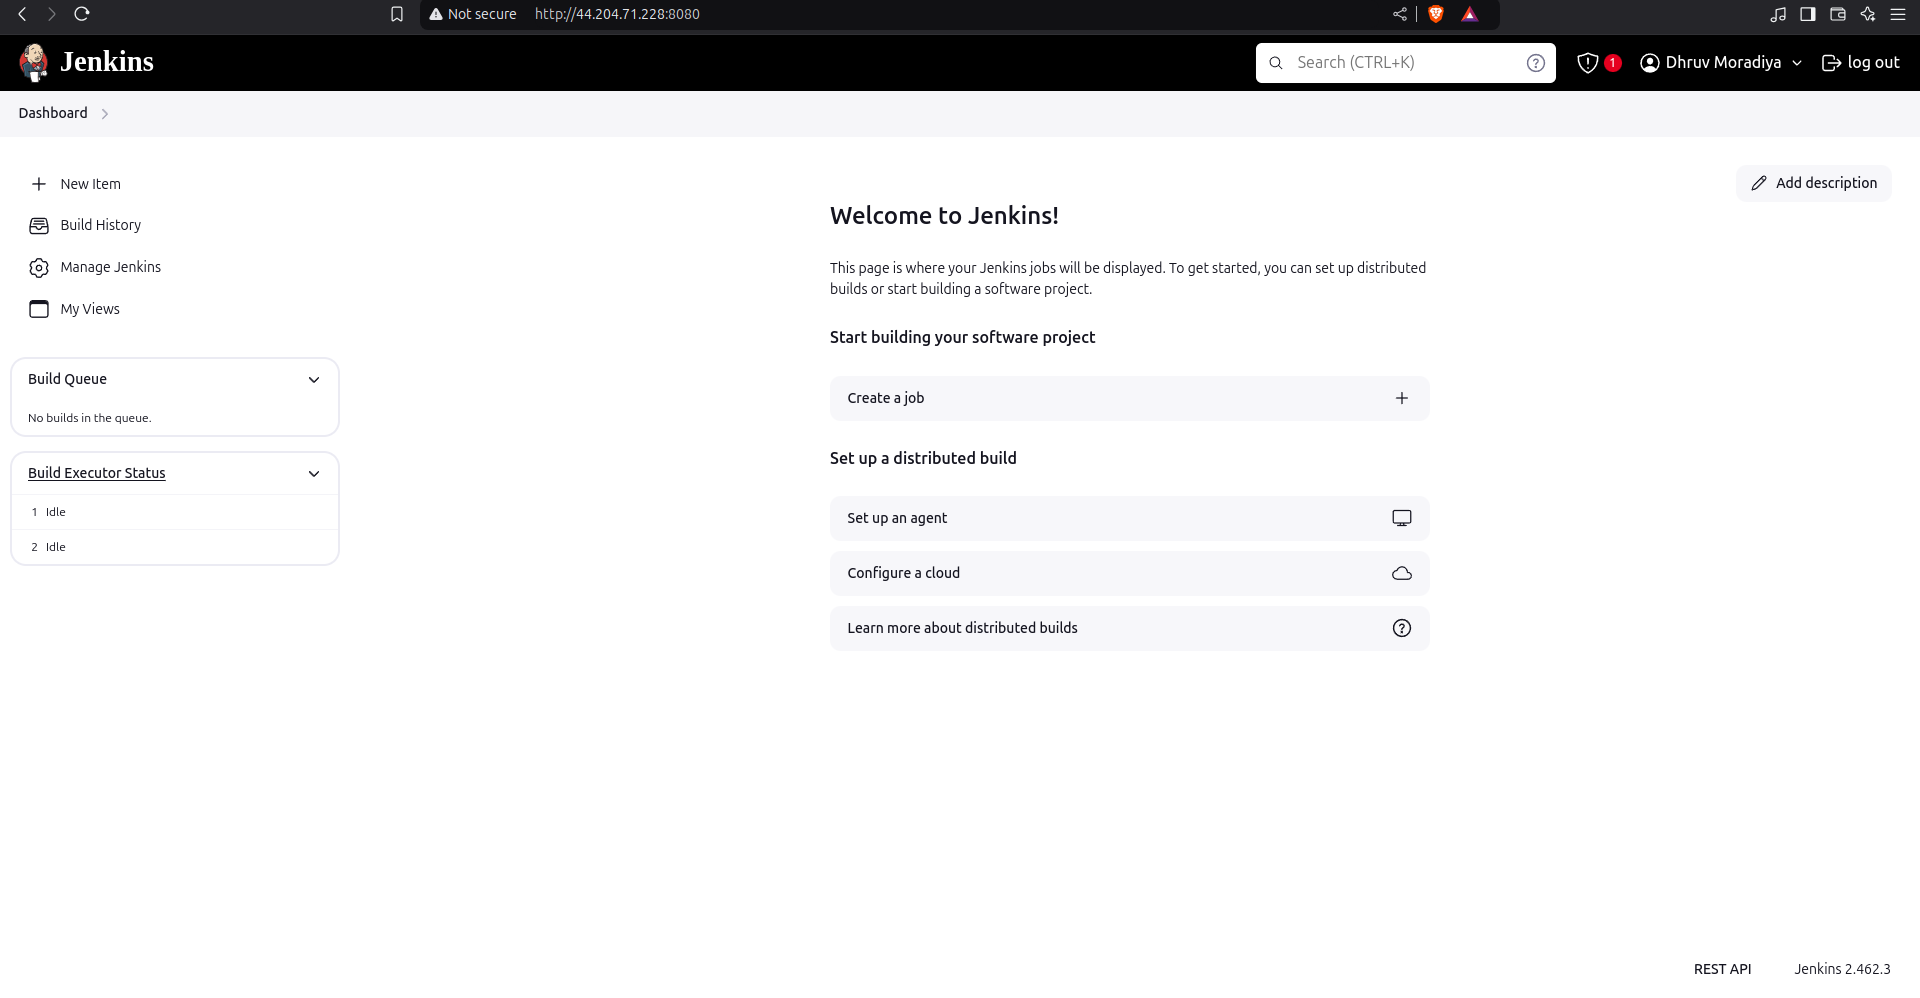
Once Jenkins is running, you can access its web interface:
Open a browser and go to:
http://localhost:8080(If you’re accessing Jenkins remotely, replace
localhostwith your server’s IP address.)Unlock Jenkins:
The first time you access Jenkins, it will ask for an Admin Password.
To find this password, run:
sudo cat /var/lib/jenkins/secrets/initialAdminPasswordCopy the password and paste it into the Jenkins setup screen.
Customize Jenkins:
- Follow the on-screen instructions to install suggested plugins and set up your first admin user.
Checking Jenkins Version 🎉
To confirm Jenkins was installed correctly, you can check its version. Although Jenkins doesn’t have a direct version command, you can verify it with:
dpkg -l | grep jenkins
This will display the version number of Jenkins installed on your machine.
🚀 Task 1: What Makes Jenkins So Essential? (In Your Words)
Jenkins plays a critical role in the DevOps lifecycle. Here’s a closer look at how it integrates and its benefits:
Continuous Integration: With Jenkins, new code is automatically tested as soon as it’s pushed to a shared repository (like GitHub). Jenkins runs the tests, letting you know immediately if there’s an issue.
Continuous Delivery: Once the code passes all tests, Jenkins helps deploy it to a staging environment. This allows developers to continuously release features to testers or users, resulting in faster feedback.
Continuous Deployment: Taking it one step further, Jenkins can deploy your code directly to production if needed, making your release cycles faster and more reliable.
In essence, Jenkins becomes the backbone of the automation pipeline, taking care of builds, tests, and deployments so you can focus on innovation! 💡
🛠️ Task 2: Create a Freestyle Pipeline to Print "Hello World" 🌍
This task will get you familiar with Jenkins basics and how to create automated workflows (or jobs). Let’s dive into each step!
Step 1: Open Jenkins Dashboard and Start a New Project 🖥️
Access the Jenkins Dashboard
Log In: Go to your Jenkins URL (often
http://localhost:8080if you’re running it locally) and log in with your credentials.Navigate to “New Item”:
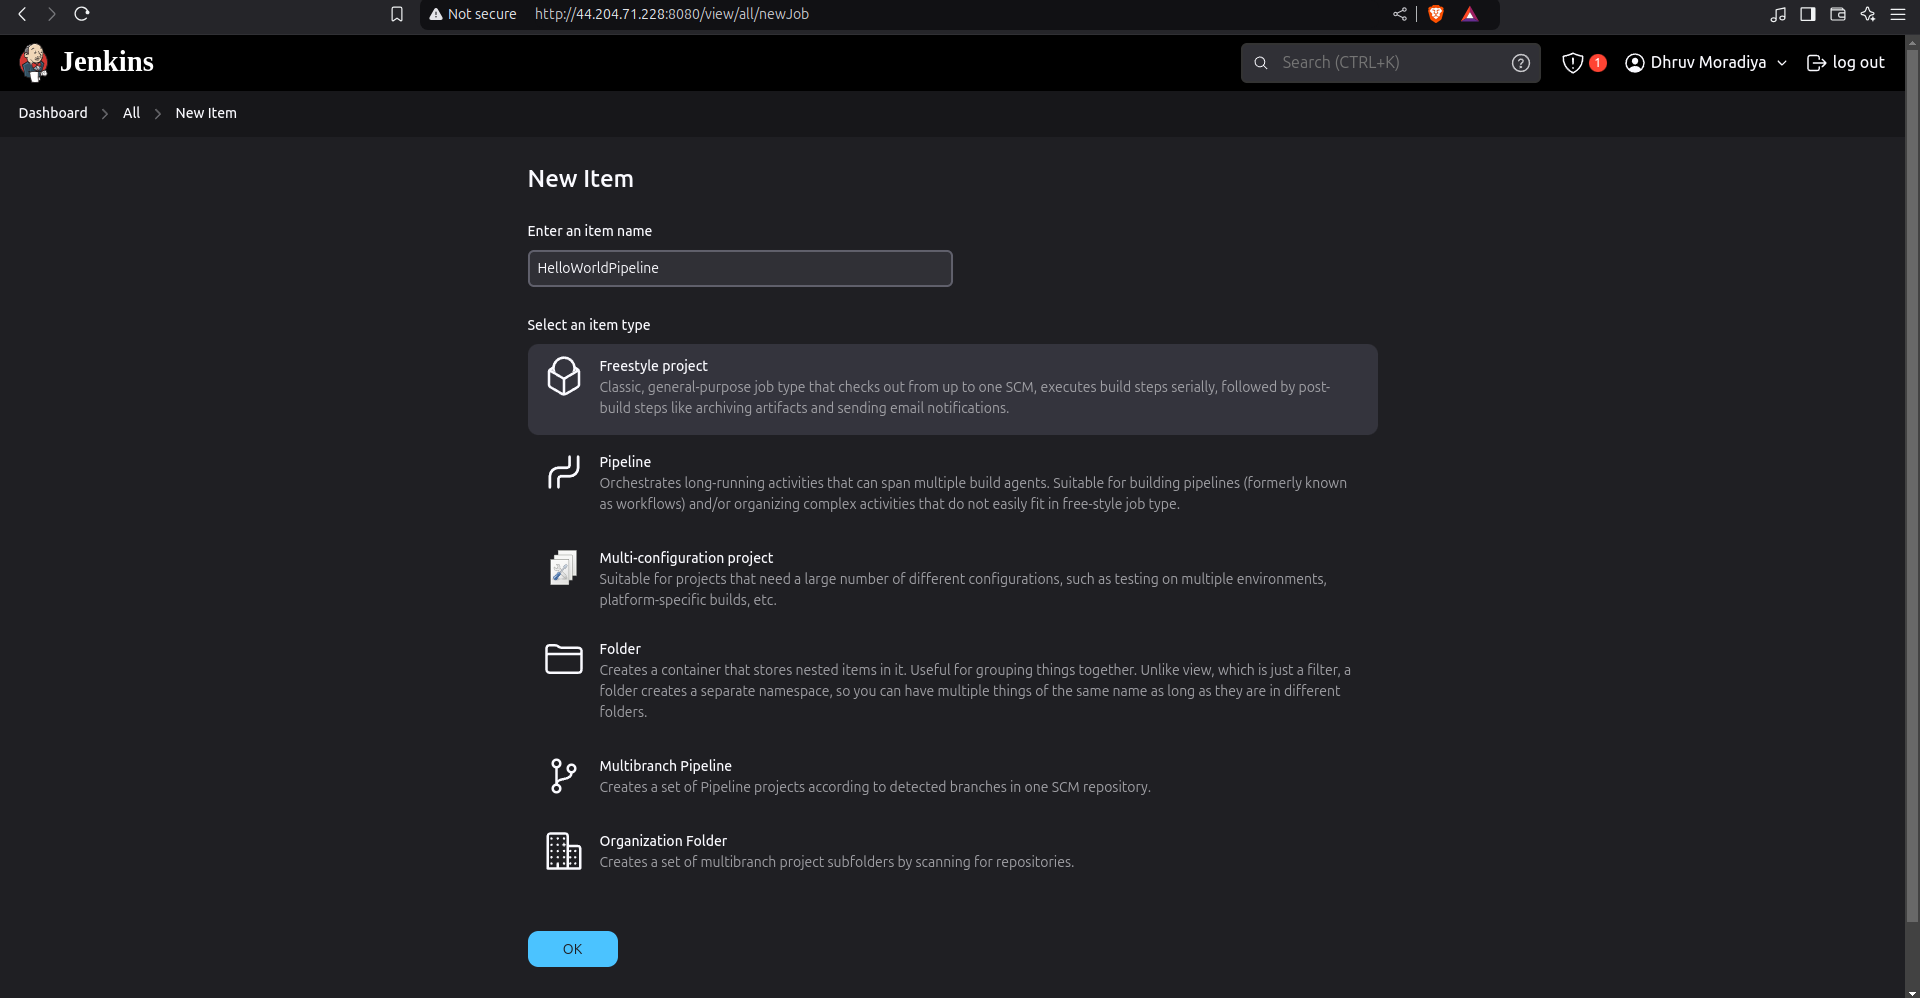
- On the dashboard, look for a menu option that says New Item. This is where we start our journey to creating a new Jenkins project.
Creating a New Project
Project Name:
- Enter a unique name for your project. For our example, let’s use
HelloWorldPipeline.
- Enter a unique name for your project. For our example, let’s use
Choose Project Type:
- Select Freestyle project. This option is best for beginners, allowing you to customize build steps without needing advanced configurations.
Click OK:
- After entering the name and selecting Freestyle project, click the OK button to create the project.
Great! Now we have a blank project ready for configuration. 🎉
Step 2: Configure the Freestyle Project 🔧
Now, we’ll configure what this project will do, including our specific tasks.
Adding Build Steps
Build steps are the actions Jenkins performs whenever it runs this job. Let’s add each task as a separate build step.
Task 1: Print “Hello World” 🌍
In the project configuration page, scroll down to the Build section.
Click on Add build step and choose Execute shell. This opens a command box.
In the command box, type the following command:
echo "Hello World"This command will print “Hello World” to the job output, helping you confirm that Jenkins can execute simple shell commands.
Task 2: Print the Current Date and Time 📅
Add another build step under Execute shell.
In this new command box, enter the following command:
dateThe
datecommand will display the current date and time. This is useful for logging when each job ran, making it easy to track if Jenkins is executing jobs on schedule.
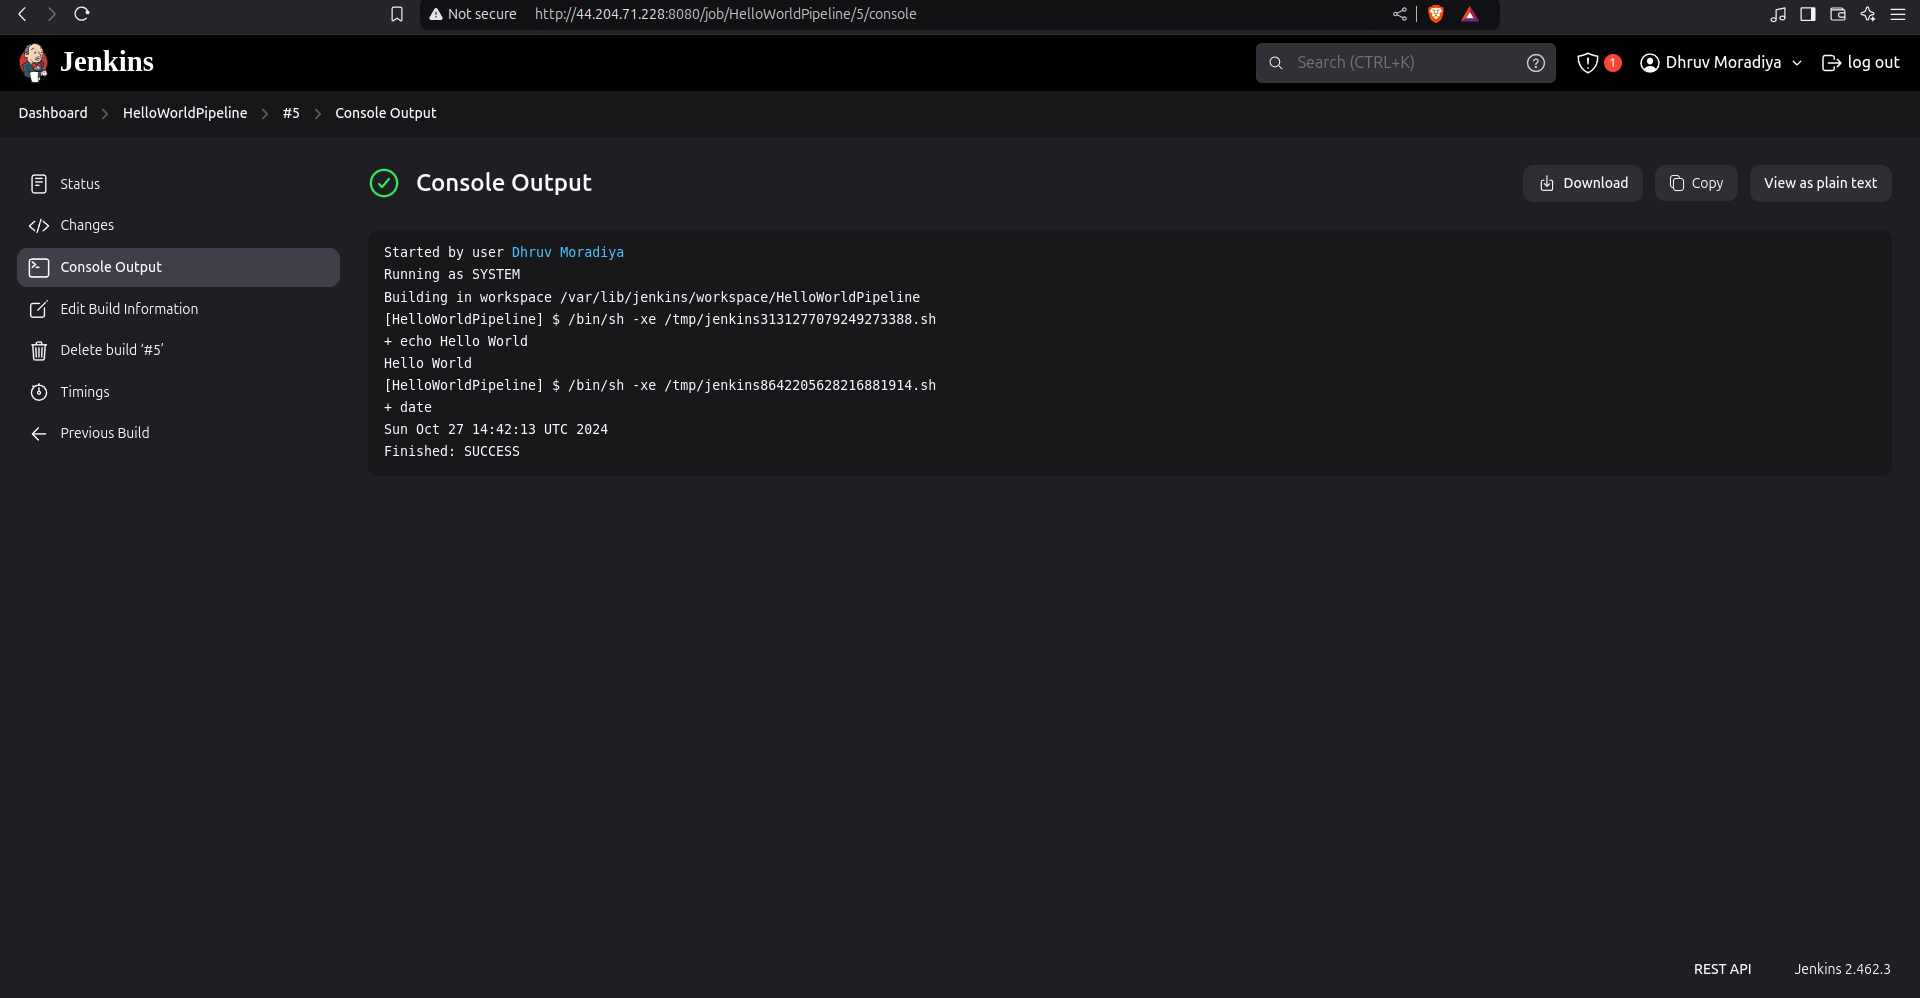
Task 3: Clone a GitHub Repository and List Its Contents 📂
Add another Execute shell build step to clone a GitHub repository.
In the command box, type:
git clone https://github.com/YOUR_USERNAME/YOUR_REPOSITORY.gitReplace
YOUR_USERNAMEandYOUR_REPOSITORYwith your actual GitHub username and repository name.- Note: Jenkins needs to have Git installed on the server for this to work. You can check if Git is installed by running
git --versionin your terminal.
- Note: Jenkins needs to have Git installed on the server for this to work. You can check if Git is installed by running
After cloning the repository, let’s list its contents to verify everything was downloaded successfully. Add this command right below the
git cloneline:ls YOUR_REPOSITORYReplace
YOUR_REPOSITORYwith your repository’s actual folder name.The
lscommand lists all files and folders within the repository, helping us confirm that the clone was successful.
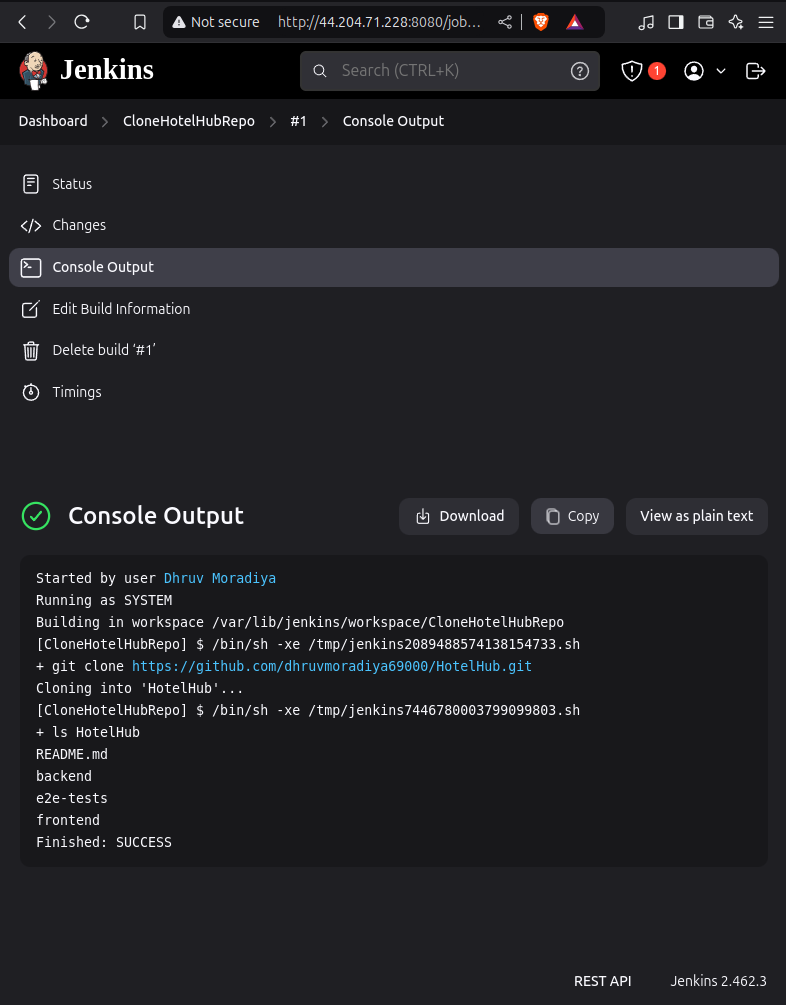
Your Freestyle job now has three basic tasks: printing text, displaying the current time, and cloning a repository. Let’s move on to scheduling! ⏰
Step 3: Set a Build Schedule ⏱️
Let’s automate this pipeline to run periodically. Here’s how you set up a schedule:
Scroll to the Build Triggers section in your project’s configuration page.
Enable Periodic Builds:
- Check the Build periodically option.
Define the Schedule:
In the text box, enter
H * * * *. This setting tells Jenkins to run the job every hour at a random minute (to avoid all jobs starting at the exact same time across servers).The format follows the cron syntax:
Minute Hour Day Month Day-of-week.- Here,
Hrepresents any random minute, and*stands for every hour, day, month, and day of the week.
- Here,
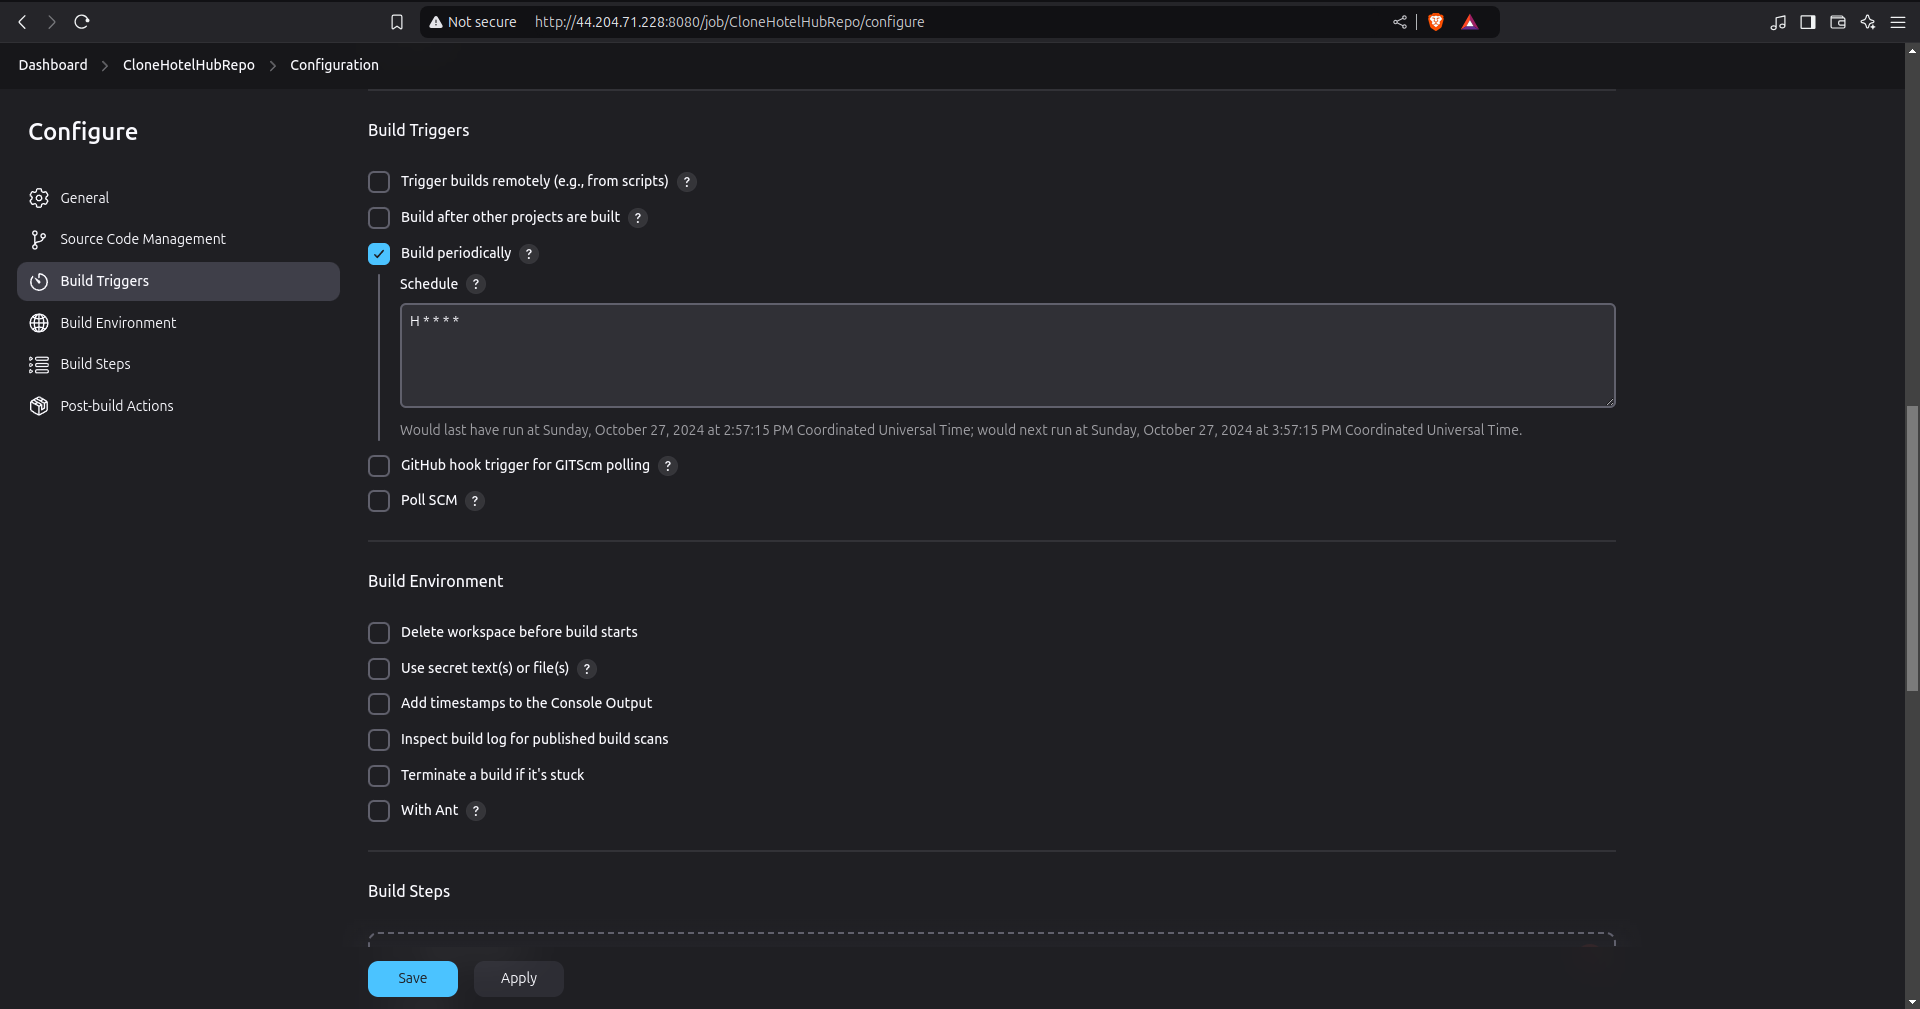
💡 Tip: You can customize this schedule if you prefer, but for this example, an hourly schedule helps to automate regularly.
Step 4: Save and Run the Pipeline 🎬
Now that everything is set up, let’s save the project and do a test run.
Save the Configuration:
- At the bottom of the configuration page, click the Save button. This saves all your settings.
Run the Job:
- On the project’s main page, click Build Now. This will trigger the job to run immediately so we can confirm everything works correctly.
Check the Console Output:
To see the results, click on the latest build under Build History on the left side of the project page.
Click Console Output to view the step-by-step output from the build.
You should see:
“Hello World” printed in the console.
The current date and time.
A list of files from your GitHub repository.
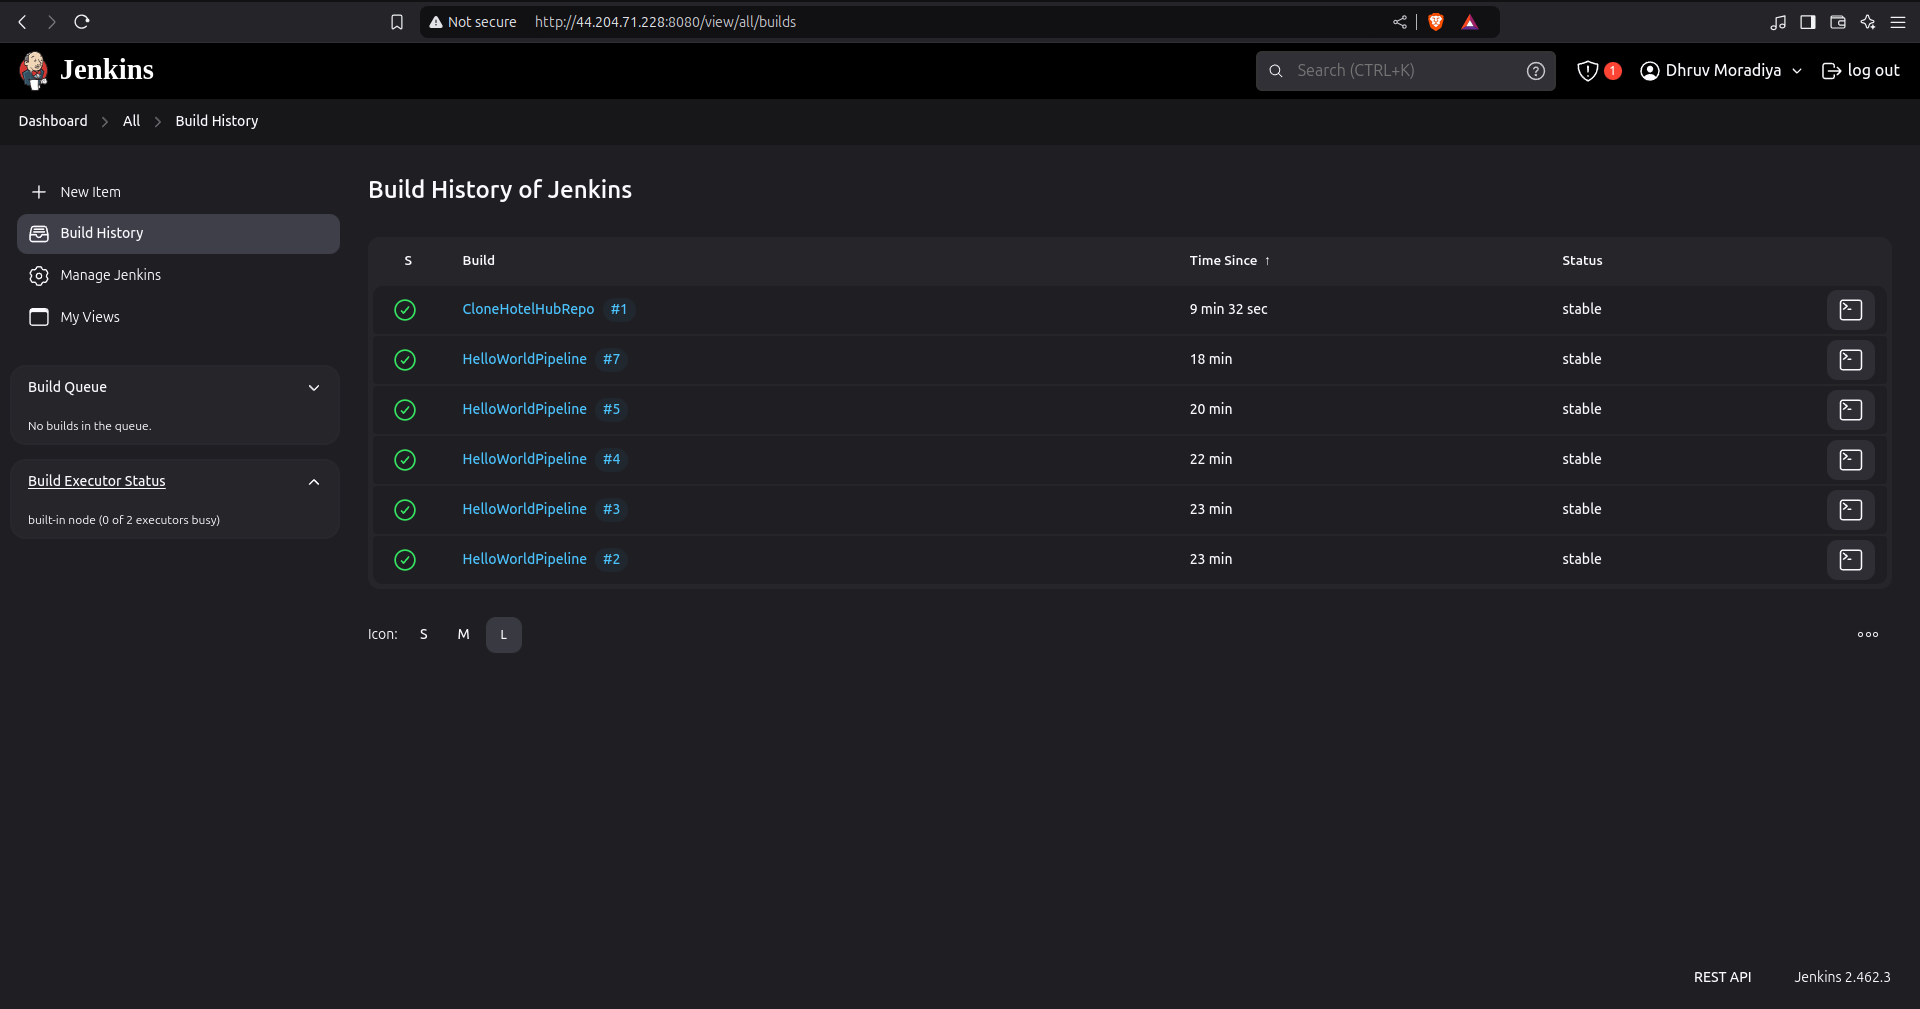
If everything is in order, congratulations! 🎉 You’ve just built your first Jenkins job.
🔄 Bonus: Customizing and Expanding the Pipeline
Now that you’re comfortable with creating simple tasks in Jenkins, you can expand your job to add more complex workflows:
Additional Commands: Try adding commands that perform more actions, like file manipulation or email notifications.
Integrate with Docker: Jenkins has a plugin to work directly with Docker, making it easy to deploy containers.
Slack or Email Notifications: Add notifications to alert you when the job finishes or fails.
With each improvement, Jenkins can become more powerful, managing complex tasks that save you time and help your team release code confidently.
Wrapping Up 🎉
In this guide, you learned how to set up a basic Jenkins Freestyle Pipeline that automates a series of tasks. Jenkins is a great tool for simplifying repetitive tasks in development and deployment, and with this foundation, you’re ready to start exploring more advanced features.
Happy Jenkins-ing! 😄
Subscribe to my newsletter
Read articles from Dhruv Moradiya directly inside your inbox. Subscribe to the newsletter, and don't miss out.
Written by
