Coordinators & SwiftUI
 Vitaly Batrakov
If you prefer to watch video you can find it here.
Hey iOS folks,
With the release of iOS 18, many teams are likely moving towards adopting iOS 16 as the new minimum, bringing newer SwiftUI features, such as NavigationStack, into focus. Opinions on SwiftUI navigation in general are quite mixed. Some developers have embraced it and advocate for it, while others argue that even with NavigationStack, SwiftUI’s navigation system isn't fully ready for large-scale apps.
Many teams, including mine, use SwiftUI for building UI but still rely on UIKit’s navigation by wrapping SwiftUI views into UIHostingController .
In this article, I aim to explore whether SwiftUI, particularly NavigationStack, can be used with the Coordinator approach, how it can be adapted to SwiftUI, and how to build a SwiftUI-based Coordinator with minimal code - without relying on complex third-party libraries.
We will revisit what the Coordinator pattern is, explore how it can be implemented with both UIKit and SwiftUI, and compare the two implementations while discussing their limitations.
What is coordinator?
Like many great concepts in software design, the Coordinator pattern is quite straightforward.
Simply put, a Coordinator is an object that manages the navigation flow.
What is the navigation flow?
In simple terms, it's the sequence of screens in an app, connected by transitions.
These transitions can vary - it can be pushing, presenting, or even custom transitions, depending on your needs.

What does it mean to manage the navigation flow?
It means having full control over navigation flow through the app. Not only can we push new screens when buttons are tapped by user, but we can also change the flow state programmatically based on events happening outside the current screen.
What are the benefits of using a Coordinator?
Instead of letting views (and view controllers) handle navigation directly, the Coordinator takes over.

By decoupling navigation logic from views, we reduce dependencies between views, making it easier to maintain, control, test and reuse. Since we control the state of the navigation flow, handling complex scenarios - even programmatically - becomes straightforward.
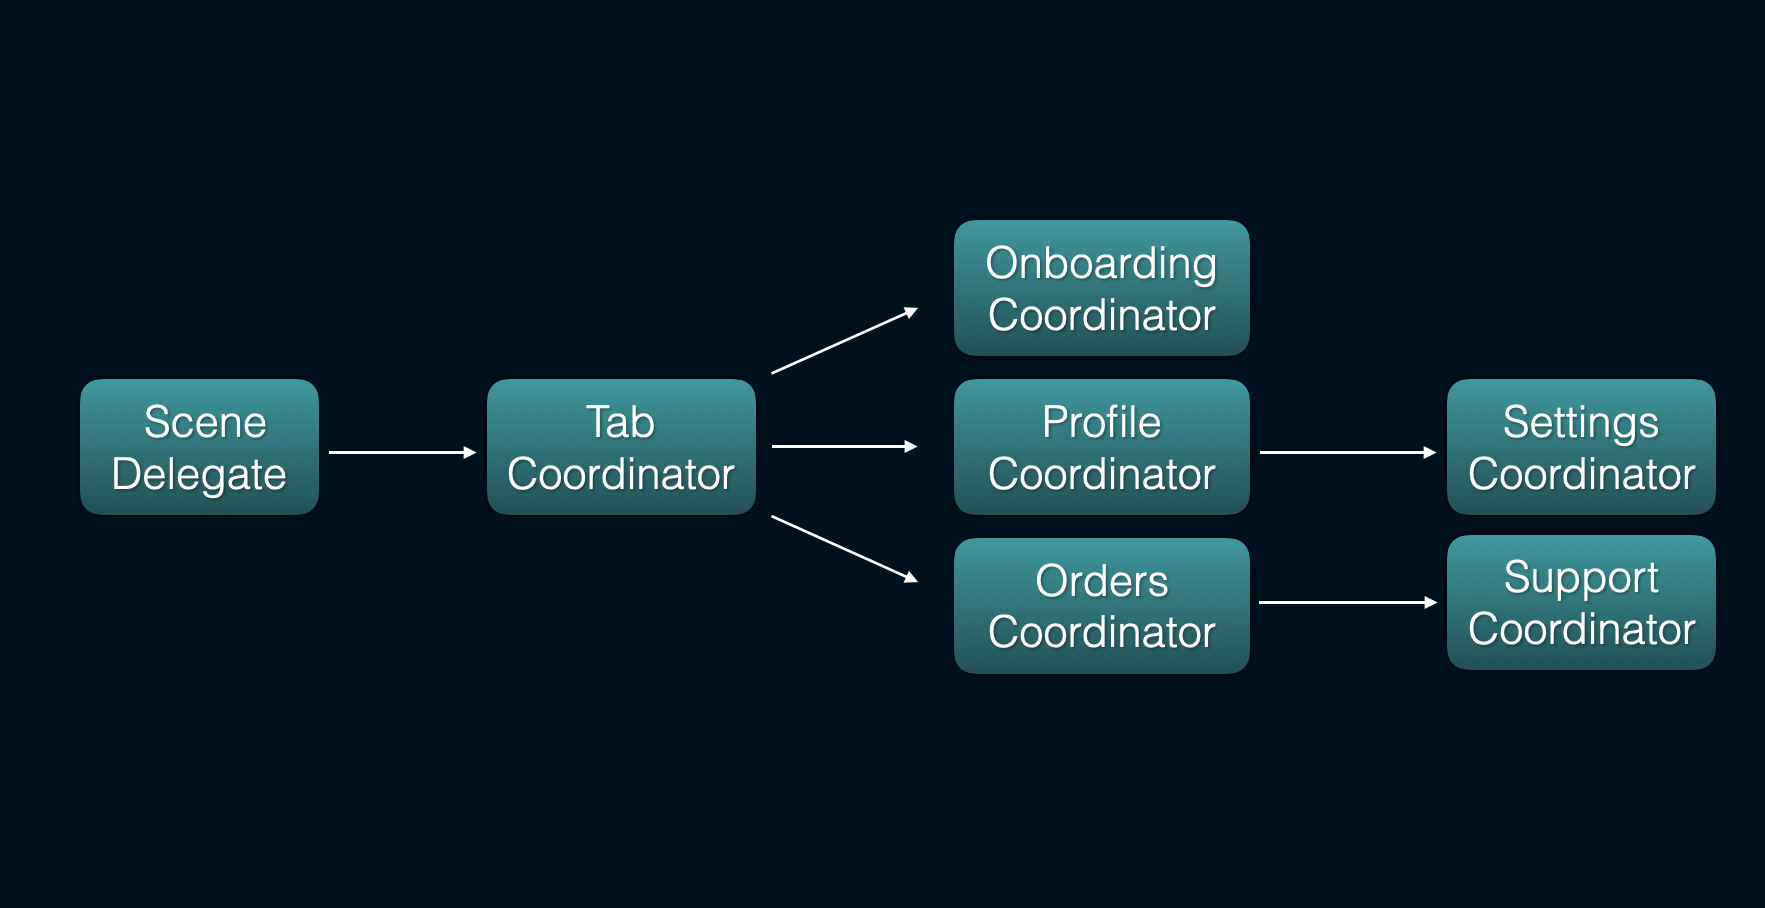
Coordinators scale exceptionally well. You can nest them, allowing sub-coordinators to create hierarchies within the navigation flow, organizing it into a tree structure that simplifies scaling. This approach fits neatly into modular design. If you're following a modular architecture with feature modules, you can easily integrate a feature-specific Coordinator from the composition root.
Router vs. Coordinator
You might be wondering: "We already use the Router pattern in our project - so what's the difference?"
Both the Router and Coordinator handle navigation, obviously.
A Router’s scope can vary depending on how a team defines it. In my experience, a Router typically manages the navigation routes for a single screen, as seen in patterns like MVVM-R (Model-View-ViewModel-Router) or VIPER. In some cases, a Router might handle the flow of multiple screens or even manage the entire app’s navigation - though this is more common in smaller projects and not a widely adopted approach.
A Coordinator, on the other hand, typically controls the flow of the screens, not just individual screen routes. While it’s possible for a Coordinator to manage just one screen in certain cases, its main strength lies in controlling the navigation for a set of related screens like an some feature flow.

Another difference is that coordinators usually have a hierarchical structure: Coordinators can be nested, with parent Coordinators managing child Coordinators, allowing for complex tree-like flows across the app.
Hopefully, this gives you a clearer understanding of Coordinators. Next, we can explore examples of how to implement them in UIKit and SwiftUI.
Plain Old UIKit Coordinator
First, let’s define the coordinator type:
protocol Coordinator: CoordinatorFinishDelegate {
    func start() // 1
    func finish() // 2
    var finishDelegate: CoordinatorFinishDelegate? { get set } // 3
}
start(): This method starts the coordinator flow. It provides the flexibility to create a coordinator and activate it only when we’re ready if we need so.finish(): This method is called to end the flow, such as dismissing the screen flow.When a coordinator finishes, there needs to be a mechanism to notify the parent coordinator so that it can remove the child coordinator from its list or perform additional tasks. Typically, the
finishDelegateis the parent coordinator. To follow the principle of least privilege, we avoid giving the child direct access to control the parent. Instead, we hide the parent behind aCoordinatorFinishDelegateprotocol.
protocol CoordinatorFinishDelegate: AnyObject {
    func didFinish(childCoordinator: Coordinator)
}
NOTE: By using a
start()method, we separate coordinator initialization from activation. There are several reasons for this:
Separation of Concerns: Instantiation and execution are conceptually different -initialization creates the object, while
start()triggers the flow. This separation makes the code easier to understand and maintain, as the responsibilities of creation and execution are clearly decoupled.Deferred Execution: This approach allows for deferred execution of the navigation flow, which can be useful in certain scenarios where immediate navigation isn't desired.
Dependency Injection: Coordinators often need dependencies like services, data, or other coordinator before starting their flow. An explicit
start()method provides the flexibility to inject these dependencies before navigation begins.Multiple Entry Points: In some cases, a coordinator might have multiple entry points depending on the context. Instead of complicating the initialization logic, having different
start()methods allows for more straightforward handling of different use cases.
Next we need to define how coordinators will work with child coordinators:
protocol FlowCoordinator: Coordinator {
    var childCoordinator: Coordinator? { get set }
}

protocol CompositionCoordinator: Coordinator {
    var childCoordinators: [Coordinator] { get set }
}
FlowCoordinator is designed for typical navigation processes involving push and present actions. It follows a linear flow and therefore has only one childCoordinator.
CompositionCoordinator, on the other hand, manages multiple child coordinators. An example would be a TabBarCoordinator, which acts as a CompositionCoordinator for each tab's coordinator.
But why don’t we include a childCoordinators array in the base coordinator protocol? It's a reasonable question. While we could add a childCoordinators array to the base Coordinator protocol - something many implementations do - it's better to adhere to the YAGNI (You Aren't Gonna Need It) and Interface Segregation principles here. As you'll see shortly, this approach simplifies the implementation.
NOTE: In some Coordinator implementations, you may find a
UINavigationControllerdefined in the coordinator protocol. Adding it allows you to create default methods in a protocol extension for common navigation tasks, such aspush,present,popToRoot, ordismissToRoot, which can then be reused throughout your project. While this approach adds some complexity, it also makes the solution more ready for universal flows. However, includingUINavigationControllerin the protocol is optional, and there are several reasons why avoiding it can be beneficial:
Framework Independence: The Coordinator concept is independent of UIKit, so keeping the coordinator protocol free from framework-specific details helps maintain a cleaner architecture.
Flexibility: Without restricting the coordinator to
UINavigationController, you have the freedom to use other containers for views, such asUIViewController,UITabBarController, or evenUIWindow, depending on the specific requirements of the flow.NOTE: We can also add default implementations to protocol extensions for finish, child coordinators manipulation and etc.
extension Coordinator {
    func finish() {
        finishDelegate?.didFinish(childCoordinator: self)
    }
}

extension FlowCoordinator {

    func addChild(_ coordinator: Coordinator) {
        childCoordinator = coordinator
        coordinator.finishDelegate = self
    }

    func removeChild() {
        childCoordinator = nil
    }

    func didFinish(childCoordinator: Coordinator) {
        removeChild()
    }
}
For specific screen flow like a feature flow, coordinator will look like this:
final class FeatureCoordinator: FlowCoordinator {

    weak var finishDelegate: (any CoordinatorFinishDelegate)?

    var childCoordinator: Coordinator?

    private let navigationController: UINavigationController

    init(navigationController: UINavigationController) {
        navigationController = navigationController
    }

    func start() {
        let rootScreen = FirstTabScreen(coordinator: self)
        let vc = UIHostingController(rootView: rootScreen)
        navigationController.setViewControllers([vc], animated: false)
    }

    func pushNextScreen(animated: Bool = true) {
        let nextScreen = NextScreen(coordinator: self)
        let vc = UIHostingController(rootView: nextScreen)
        navigationController.pushViewController(vc, animated: animated)
    }

    func presentAnotherScreen(animated: Bool = true) {
        let anotherScreen = AnotherScreen(coordinator: self)
        let vc = UIHostingController(rootView: anotherScreen)
        navigationController.present(vc, animated: animated)
    }

    func startChildFeature() {
        let child = ChildFeatureCoordinator(
            navigationController: navigationController
        )
        addChild(child)
        child.start()
    }
}
We have a lot of freedom with this approach:
We can decide and customize how the coordinator starts itself using the injected navigation controller.
We can use both UIKit and SwiftUI views (wrapped with UIHostingController) if needed.
struct SomeFeatureScreen: View { weak var coordinator: FeatureCoordinator? var body: some View { // some body that calls 'pushNext' and 'presentAnother' } private func pushNext() { coordinator?.pushNextScreen() } private func presentAnother() { coordinator?.presentAnotherScreen() } }NOTE: In this example, each view is tied to a specific coordinator type. While this is a limitation, it's generally not a significant issue. If needed, you can use closures and wrapper views to handle multiple screens with different coordinators.
We have complete control over the navigation flow, allowing us to modify it programmatically - for example, when handling a deep link.
 final class FeatureDeeplinkHandler: DeeplinkHandlerProtocol {

     // ...

     func canOpenURL(_ url: URL) -> Bool {
         url.absoluteString.hasPrefix("deeplink://feature")
     }

     func openURL(_ url: URL) {
         guard canOpenURL(url) else {
             return
         }
         featureCoordinator?.dismissAll { [weak self] in
             self?.featureCoordinator?.startChildFeature()
         }
     }
 }
This approach is simple, scalable, and powerful - proven effective in large, mature modular apps. That's great, but what does SwiftUI offer for navigation?
What does SwiftUI offer?
NavigationStack vs. NavigationView
Before the introduction of NavigationStack, SwiftUI's NavigationView had many limitations. Many common navigation tasks were either difficult or impossible to achieve, such as pushing multiple screens or popping back to the root through several views or recreating navigation flows to open a specific screen sequence.
NavigationView struggled with managing state and handling programmatic navigation. Developers often resorted to workarounds or even reinvent the navigation stack, which was far from ideal.
NOTE: Since iOS 18, NavigationView is officially deprecated due to these limitations. Apple has made it clear that NavigationStack is the path forward for managing navigation in SwiftUI.
With iOS 16, Apple addressed these issues by introducing state-based navigation via NavigationStack, allowing developers to control navigation state programmatically in a convenient way. This resolved many challenges related to managing navigation state.
Let’s consider a simple example of NavigationStack:
struct ContentView: View {
    @State private var path = NavigationPath()

    var body: some View {
        NavigationStack(path: $path) {
            RootView()
                .navigationDestination(for: HashableRoute.self) { route in
                    switch route {
                    case .firstScreen:
                        FirstScreen()
                    case .secondScreen:
                        SecondScreen()
                    }
                }
        }
    }
}

enum HashableRoute: Hashable {
    case firstScreen
    case secondScreen
}
In essence, we can now control the navigation stack by modifying the navigation path, which can contain any Hashable elements. All it takes is wrapping the view in a NavigationStack and providing a path along with all the navigation destinations.
Now let’s explore how we can implement the Coordinator pattern in SwiftUI using NavigationStack. We'll aim to keep the implementation simple, but this will introduce some limitations as a result.
SwiftUI Coordinator
Let’s start by defining the coordinator protocols again:
protocol Coordinator: ObservableObject, CoordinatorFinishDelegate {

    associatedtype Content: View

    @MainActor @ViewBuilder var rootView: Content { get }

    var finishDelegate: CoordinatorFinishDelegate? { get set }

    func finish()
}

protocol CompositionCoordinator: Coordinator {
    var childCoordinators: [any Coordinator] { get set }
}

protocol FlowCoordinator: Coordinator {

    associatedtype Route: Routable
    associatedtype Destination: View

    @MainActor @ViewBuilder func destination(for route: Route) -> Destination

    var childCoordinator: (any Coordinator)? { get set }

    var navigationControllers: [NavigationController<Route>] { get set }
}
It looks quite similar to the UIKit version, but there are a few new elements:
The Coordinator is now an
ObservableObject, allowing us to observe navigation state changes.We have a
rootViewnow. But why? In the UIKit example, we wanted to decouple navigation logic from views, avoiding UI framework details in the coordinator protocol. This remains a good goal, but in SwiftUI, therootViewis necessary for the setup to work. We’ll revisit this point later when discussing limitations.The
startmethod is gone. As you’ll see, it’s no longer needed due to limitations in presenting child coordinators.
We also have some changes in FlowCoordinator:
RouteandDestinationare new types defining the routes and screens handled by the coordinator. These will be used to provide destination views for theNavigationStack.NavigationControlleris our custom analog ofUINavigationController, storing thenavigationPathandpresentedRoutestate. We need it to build the state of our coordinator navigation flow.final class NavigationController<Route: Routable>: ObservableObject { @Published var navigationPath = NavigationPath() @Published var presentedRoute: Route? //... }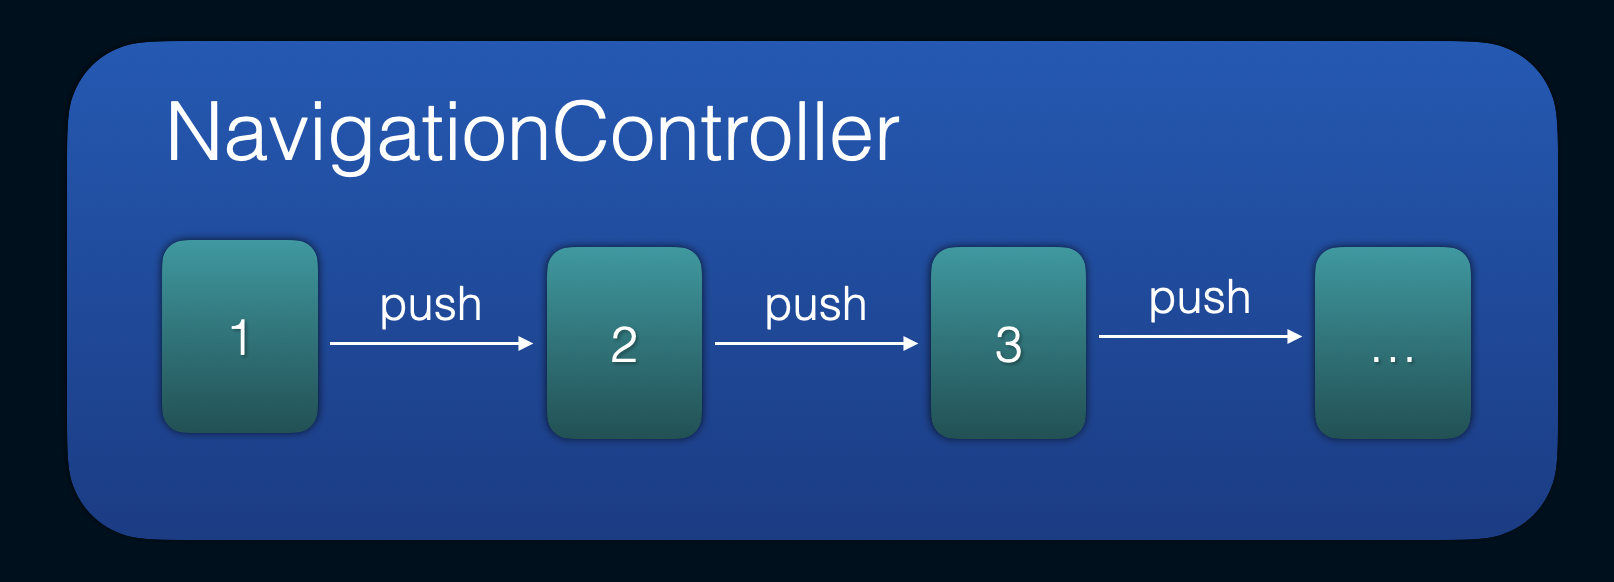
We can think of our coordinator navigation flow as a chain of navigation controllers, each managing its navigation path and presenting the next one in the chain.
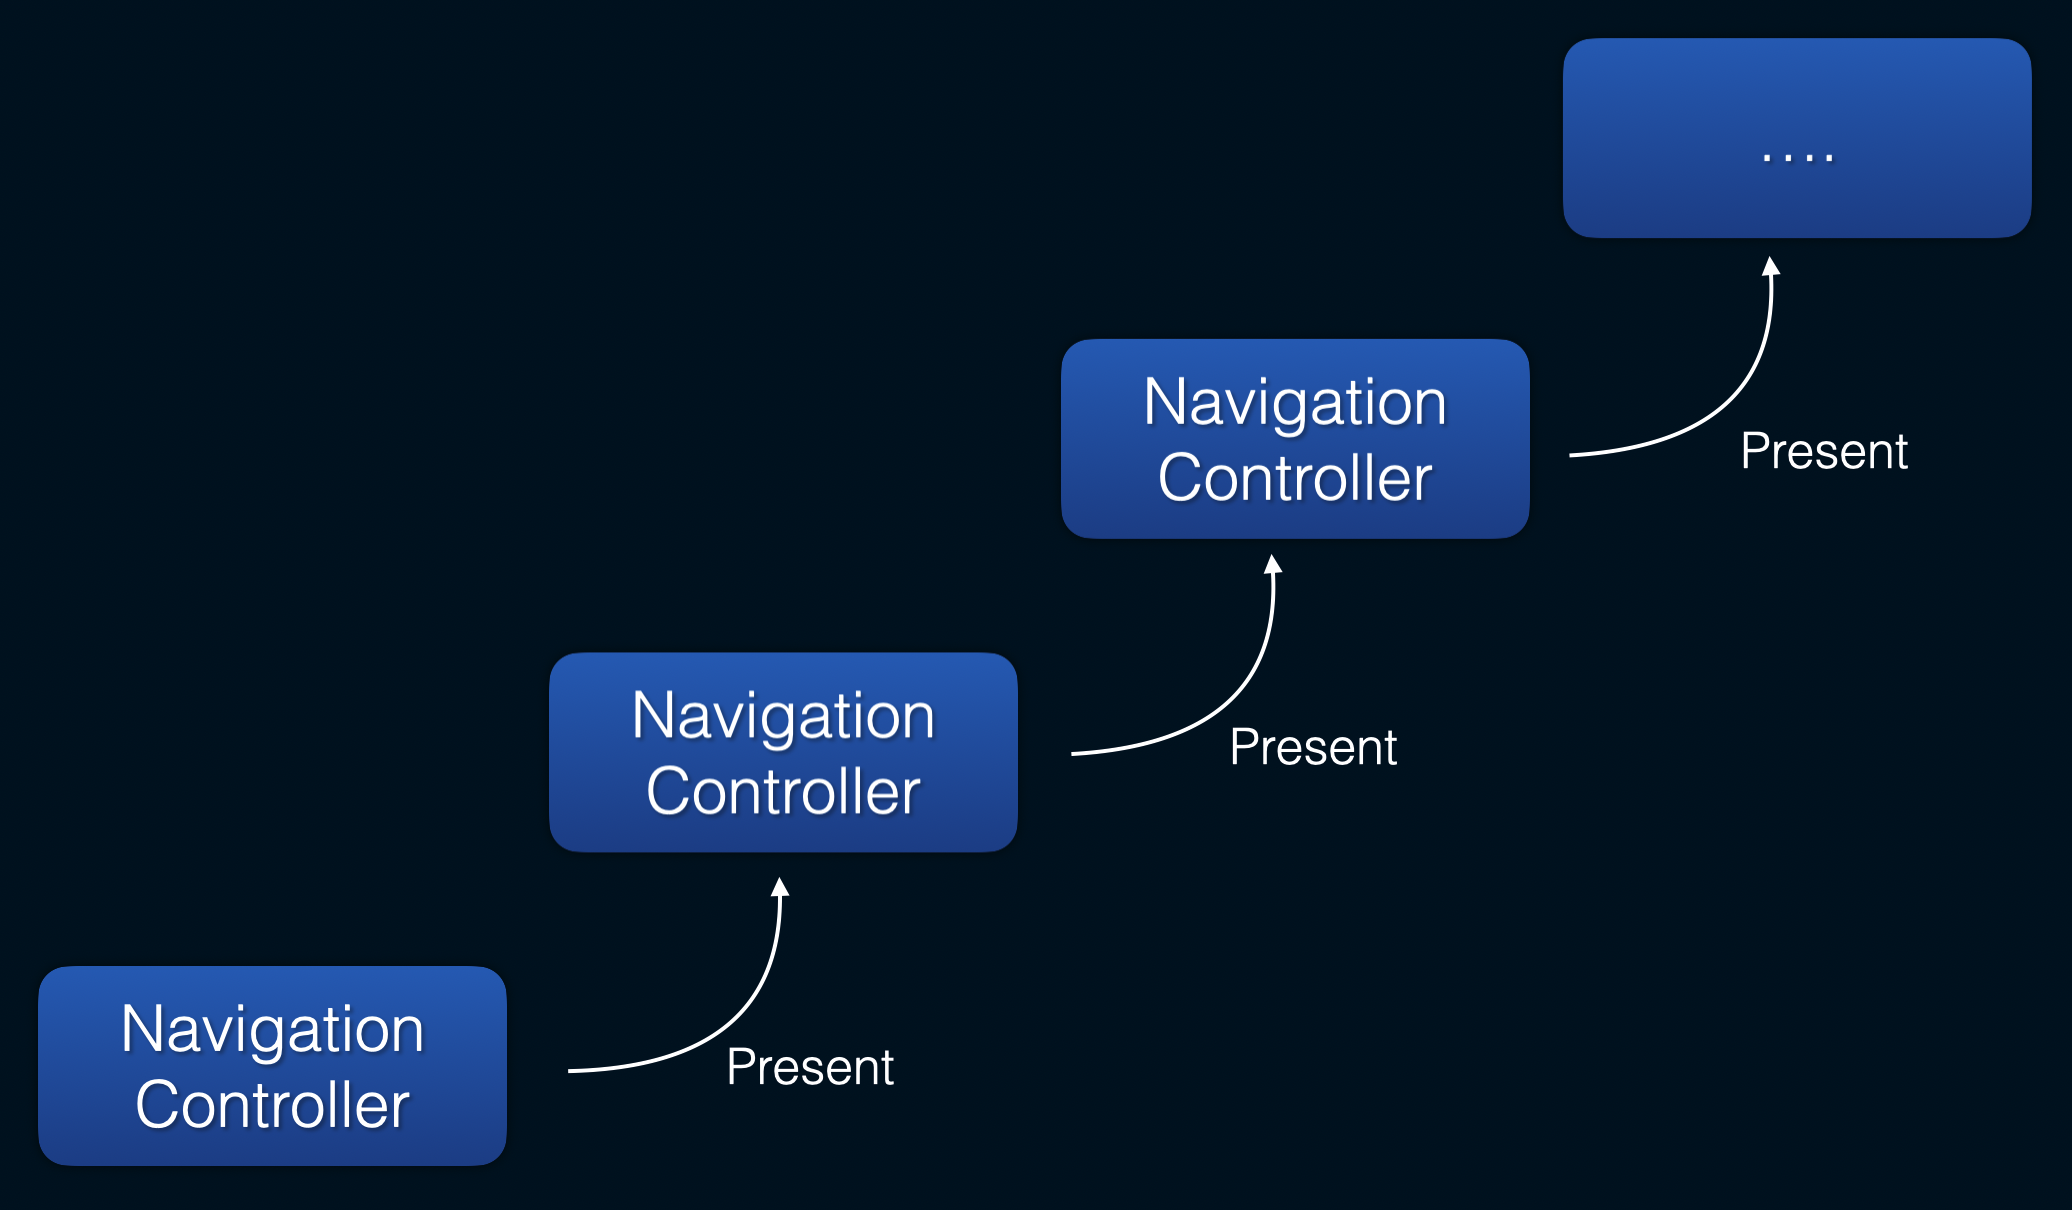
They are all combined together and stored in the
navigationControllersarray, which we can see in theFlowCoordinatorprotocol.
For specific screen flow like a feature flow, SwiftUI coordinator will look like this:
final class FeatureCoordinator: FlowCoordinator {

    weak var finishDelegate: CoordinatorFinishDelegate?

    @Published var childCoordinator: (any Coordinator)?

    @Published var navigationControllers = [NavigationController<FeatureRoute>]()

    func destination(for route: FeatureRoute) -> some View {
        switch route {
            case .next:
                NextScreen()
            case .another:
                AnotherScreen()
        }
    }

    var rootView: some View {
        NavigatingView(
            nc: self.rootNavigationController,
            coordinator: self
        ) {
            FeatureScreen()
        }
        .environmentObject(self)
    }

    func pushNextScreen() {
        push(route: .next)
    }

    func presentAnotherScreen() {
        present(route: .another)
    }

    func presentChild() {
        present(child: ChildCoordinator())
    }
}

enum FeatureRoute: Routable {
    case next
    case another

    var navigationType: NavigationType {
        switch self {
            case .next:
                return .push
            case .another:
                return .present(.sheet([.medium, .large]))
        }
    }
}
As shown, FeatureRoute is an enum that contains all routes managed by FeatureCoordinator.
You probably noticed that rootView is a NavigatingView. NavigatingView is central to our SwiftUI navigation. In SwiftUI, everything is a View, and this wrapper view serves as the link between the Coordinator and SwiftUI views.
struct NavigatingView<SomeCoordinator: FlowCoordinator>: View {

    @StateObject var nc: NavigationController<SomeCoordinator.Route>
    @StateObject var coordinator: SomeCoordinator

    var content: () -> any View

    var body: some View {
        NavigationStack(path: $nc.navigationPath) {
            AnyView(content())
                .navigationDestination(for: SomeCoordinator.Route.self) {
                    coordinator.destination(for: $0)
                }
        }
        .sheet(isPresented: nc.isPresenting(with: .sheet())) {
            let detents = nc.presentedRoute?.navigationType.presentationType?.detents
            viewToPresent
                .presentationDetents(detents ?? .init())
        }
        .fullScreenCover(isPresented: nc.isPresenting(with: .fullScreenCover)) {
            viewToPresent
        }
        .sheet(isPresented: coordinator.shouldPresentChild(from: nc)) {
            if let childCoordinator = coordinator.childCoordinator {
                AnyView(childCoordinator.rootView)
            }
        }
    }

    @ViewBuilder
    private var viewToPresent: some View {
        if let route = nc.presentedRoute {
            NavigatingView(
                nc: coordinator.topNavigationController,
                coordinator: coordinator
            ) {
                coordinator.destination(for: route)
            }
        }
    }
}
As you can see, our NavigationStack is located inside NavigatingView. We also have our routes presentation implementation here with .sheet and .fullScreenCover modifiers.
If we need a new navigation type, we should add it to NavigationType - even custom navigation types if we want. Then it should be implemented in NavigatingView .
enum NavigationType {
    /// A push transition style, commonly used in navigation controllers.
    case push
    /// A presentation style, often used for modal or overlay views.
    case present(PresentationType)
}

enum PresentationType {
    /// A sheet presentation style
    case sheet(Set<PresentationDetent>? = nil)
    /// A full-screen cover presentation style.
    case fullScreenCover
}
The last thing to highlight in NavigatingView is how we present the child coordinator. To simplify the implementation, we intentionally limited the presentation options to the .sheet modifier. This is why the start method doesn’t add much value in this case - there’s no customization available for the child coordinator to initiate itself.
Finally, we can take a look on FeatureScreen:
struct FeatureScreen: View {

    @EnvironmentObject var coordinator: FeatureCoordinator

    var body: some View {
        // some body that calls 'pushNext' and 'presentAnother'
    }

    private func pushNext() {
        coordinator.pushNextScreen()
    }

    private func presentAnother() {
        coordinator.presentAnotherScreen()
    }

    //...
}
The FeatureScreen is quite similar to the one we used in the UIKit navigation example, with the main difference being the use of the EnvironmentObject property wrapper here. EnvironmentObject is used to demonstrate the options available, but it could also be an ObservedObject if you prefer using plain old constructor dependency injection.
For deeplink handling, we can use the same approach as we did with UIKit with FeatureDeeplinkHandler.
In the end, we had to write more code in comparison to UIKit, but now we can apply the Coordinator pattern using SwiftUI navigation. However, is this solution truly smooth and effective, or are there still limitations?
Limitations
Let's explore the limitations of our SwiftUI Coordinator implementation, especially when compared to UIKit approach. Many of them are simply differences between SwiftUI and UIKit navigation systems, but some comes from the attempt to not overcomplicate the SwiftUI solution.
View-Bound Nature
In SwiftUI approach, you might have noticed we needed to add more view-related properties to our Coordinator protocols, such as rootView and destination. This makes SwiftUI's NavigationStack based approach more tightly coupled to the views, which contrasts with UIKit’s approach where coordinator protocol was abstracted away from the views. This "view-bound" characteristic comes from SwiftUI's view-centric nature, where everything is a wrapper around a view. This makes it difficult to keep Coordinator protocol agnostic to the framework details. But this is not a significant limitation unless you intend to reuse your Coordinator solution across different platforms or frameworks.
Complexity
Navigating in SwiftUI tends to feel more complex when it goes a bit from simple examples. You might have noticed the increased amount of code required for the SwiftUI coordinator compared to UIKit one. In UIKit, injecting a UINavigationController into specific coordinator implementation was usually enough for most navigation tasks, since navigation controller also acts as a UIViewController that can present other view controllers.
In contrast, NavigationStack in SwiftUI is limited. It only handles pushing and popping views. Presentation is out of it’s control. For more advanced scenarios, you need to create custom solutions. We had to create a custom NavigationController and wrap views within NavigatingView to achieve similar capabilities, adding to the overall complexity.
Starting Child Coordinators
UIKit Coordinator approach offers a great deal of freedom in how you navigate to child coordinators - be it pushing, presenting, or using custom transitions. It also allows child coordinators to handle their own starting process through a start method.
In our SwiftUI implementation, starting child coordinators is restricted to using the sheet modifier. While other modifiers like fullScreenCover could theoretically be supported, this would further complicate the solution. This limitation is the reason why the start method doesn’t make sense in SwiftUI approach - it makes sense only when a child can determine and initiate its own presentation, which isn’t possible under this approach where presentation is fully controlled by parent.
Another limitation is that attempting to push a new coordinator onto an existing NavigationStack is particularly challenging there because each FlowCoordinator is bound to a specific Route type and making two coordinators to share the same Route type doesn’t make much sense.
Changing the Navigation Path
SwiftUI's NavigationStack also has limitations regarding modifying navigation path. The NavigationPath can only pop elements from the end of the stack with removeLast(_ k: Int = 1) method. Unlike UIKit, it can't remove elements from the middle of the stack, which limits its flexibility.
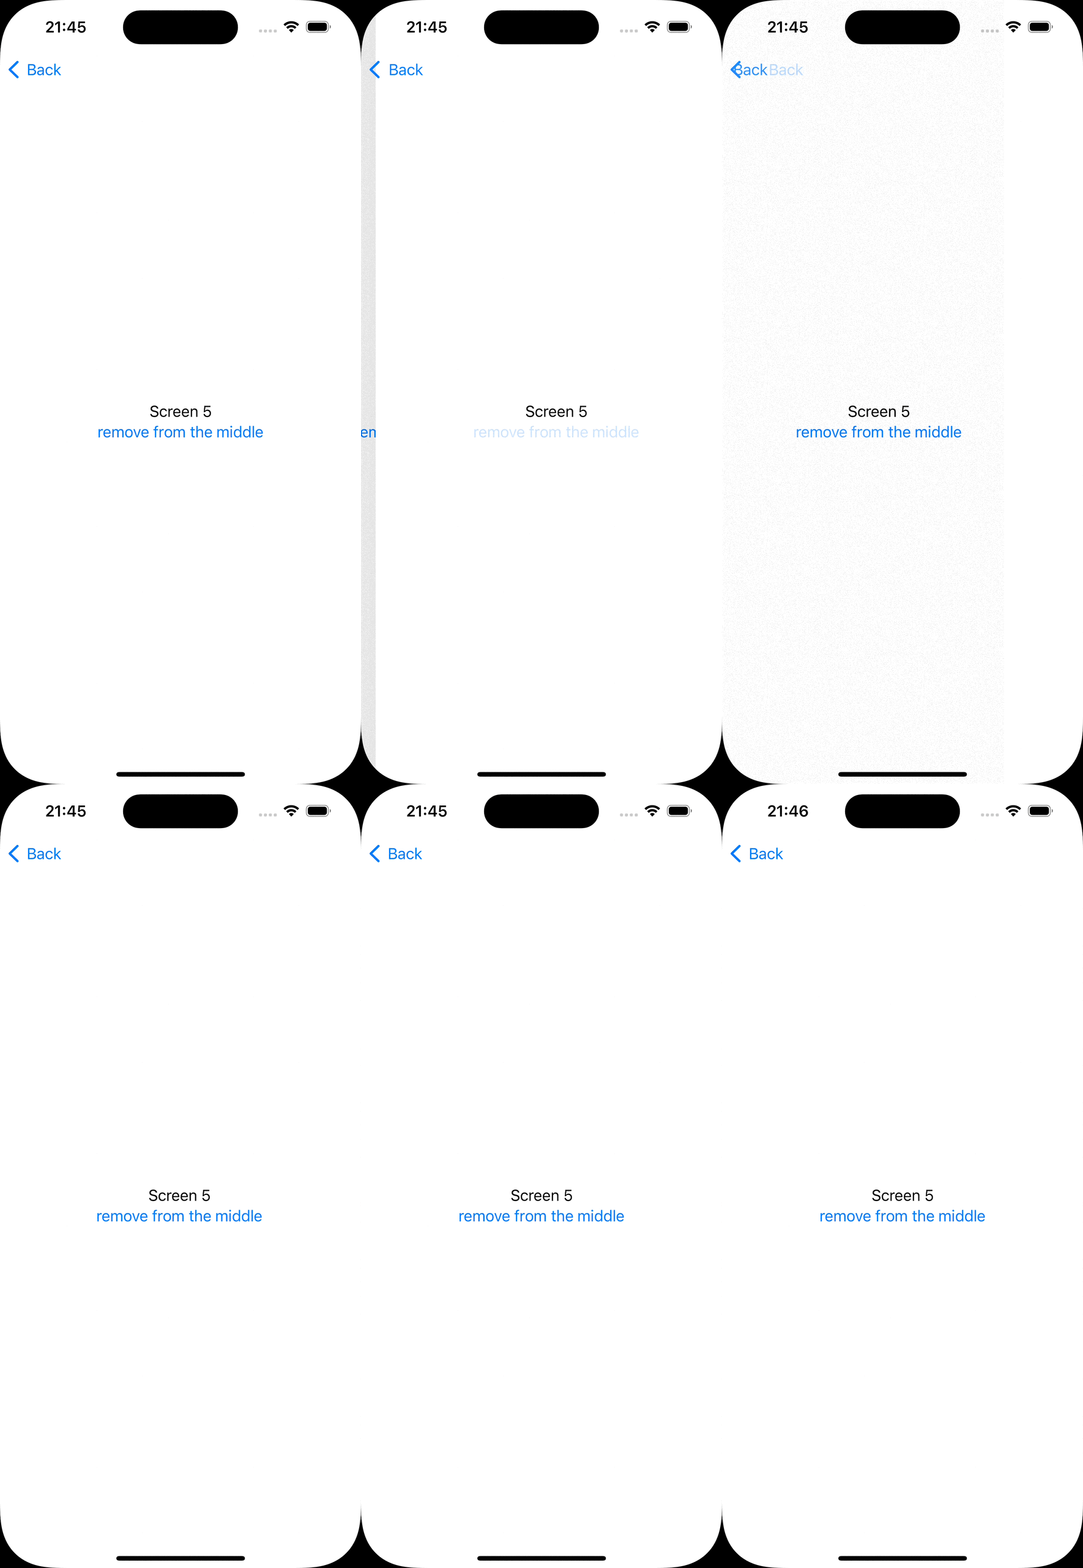
Even if you use an array of routes instead of NavigationPath, removing elements from the middle causes strange behavior with unexpected pop animations. You can see it on example above.
Moreover, the initial root view in NavigationStack isn’t included in the navigationPath array, making any modification of the root view impossible.
Custom Navigation Transitions
SwiftUI lacks support for custom navigation transitions when using NavigationStack. A third-party package called NavigationTransitions supports custom transitions for iOS 16, but depending on external SDKs has its own downsides. iOS 18 introduces a new API, NavigationTransition, that allows custom transitions like zoom. However, this isn’t helpful if you need to support iOS 16 or earlier versions.
UIKit remains more robust and reliable for custom navigation transitions. If you’re okay with using only standard transitions, SwiftUI will suffice, but for more sophisticated effects, UIKit still stands out.
Navigation Bar Customization
SwiftUI allows navigation bar customization with modifiers like navigationTitle, and toolbar. However, deeper customizations - like adjusting the height, adding a background image, or modifying the back button - are more limited compared to UIKit. You can access global UINavigationBarAppearance to achieve some customizations in SwiftUI, but UIKit remains far superior in this regard.
Working with Environment
Finally, an advantage for SwiftUI approach. If you rely on the @EnvironmentObject property wrapper, SwiftUI offers direct integration, which doesn't work properly in UIKit's hosting controller approach. While @Environment still works in UIHostingController approach, @EnvironmentObject does not.
Personally, I am not a big fan of environment objects. I prefer constructor injection, much like how I prefer using Factory over Swinject, or why I avoid force-unwrapped optionals. I respect Murphy's law and believe that if it can crash, it will crash. (Depending on environment objects can lead to unpredictable crashes—check out my DI in SwiftUI article for more details.)
Final Thoughts
Given these limitations, I find myself leaning towards continuing using UIKit Coordinator approach for navigation, at least for now.
UIKit's navigation model is powerful, predictable, and well-proven. When needed, I can combine UIKit with SwiftUI to leverage the best of both worlds and avoid potential headaches related to navigation.

Migrating to SwiftUI for navigation currently brings limited benefits, particularly given the edge cases I could miss and added complexity.
NOTE: It’s worth mentioning that everything discussed in this article reflects the current state of SwiftUI Navigation. SwiftUI continues to improve each year, and I believe that in the coming years, it will reach a point where it meets our needs. For now, though, it is what it is.
Can we use a Third-Party Library for SwiftUI Navigation? There are several quite popular libraries available that can simplify navigation in SwiftUI, such as Stinsen or PointFree's SwiftUINavigation. However, I prefer avoiding third-party dependencies for something as fundamental as navigation. Third-party libraries may stop receiving updates or break with new versions of iOS, leaving you at the mercy of someone else's timelines or requiring you to maintain your own fork with solutions that are quite complex.
Many large-scale applications has complex navigation engines which uses a path-based approach where everything is a deep link and are unlikely to migrate away from their powerful solutions to a more constrained SwiftUI-based navigation system anytime soon.
If you have insights or experiences with SwiftUI navigation, feel free to share them in the comments. You can also check out the code examples for this discussion.
You can find the example project code here if needed.
Subscribe to my newsletter
Read articles from Vitaly Batrakov directly inside your inbox. Subscribe to the newsletter, and don't miss out.
Written by

Vitaly Batrakov
Vitaly Batrakov
Senior iOS Engineer at Skip