Accelerating Deployment Velocity: Reducing Build Times and Image Sizes in Kubernetes
 Subhanshu Mohan Gupta
Table of contents
- Introduction
- Why Deployment Velocity Matters?
- Real-World Examples
- Actionable Tips for Speeding Up Build Times and Reducing Image Sizes
- End-to-End Implementation: Architecture and Pipeline Diagram
- 1. Set Up Your Git Repository
- 2. Create a Multi-Stage Dockerfile
- 3. Deploy a Container Registry Secret in Kubernetes
- 4. Configure Kaniko to Build and Push Images in Kubernetes
- 5. Configure Your CI/CD Pipeline
- 6. Deploy to Kubernetes Cluster
- 7. Automate Testing and Validation
- 8. Observe and Scale Based on Metrics
- Testing and Validating Deployment Performance
- Conclusion

Introduction
Welcome to the final part of my Kubernetes CI/CD optimization series!
So far, we’ve covered the essentials of Kubernetes deployment, container image optimization, and strategies for speeding up CI/CD cycles. In this article, we’ll put everything together to accelerate your deployment velocity by reducing Docker image sizes, optimizing build times, and streamlining your Kubernetes CI/CD pipeline with tools like Kaniko for in-cluster image building.
In this part, we’ll walk through a practical implementation of this architecture, giving you actionable steps and code snippets to optimize your build processes, and we’ll even dive into future scope ideas to enhance your Kubernetes CI/CD pipelines beyond the basics.
Why Deployment Velocity Matters?
In Kubernetes, each application is packaged into a container image and deployed across clusters. Larger images and inefficient build processes result in longer build times, slower deployments, and increased resource usage. Improving deployment velocity enhances the developer experience, reduces infrastructure costs, and enables more frequent, reliable updates. Let’s look at actionable ways to achieve this.
Real-World Examples
Fintech Company Improving CI/CD for Faster Feature Release
Scenario: A fintech company needs to release frequent updates to its mobile banking application with minimal downtime. Due to regulatory demands, each release must undergo automated security and performance testing.
Solution:
The company adopted multi-stage Docker builds to isolate dependencies and reduce the overall image size by more than 60%.
Kaniko was deployed within Kubernetes to securely build images, ensuring no sensitive data leaves the cluster.
Automated CI/CD pipeline with GitHub Actions was configured to trigger Kaniko jobs and automate image building, testing, and deployment.
Outcome: By reducing image sizes and automating the build-and-deploy process, the company cut down deployment cycles by 70%. This setup allowed for quick releases with built-in compliance checks, letting the development team push critical updates more frequently without compromising on security or speed.
Media Streaming Service Optimizing Video Processing Pipelines
Scenario: A media streaming service processes a high volume of video content and pushes updates frequently to support new devices and streaming protocols. However, lengthy build times were slowing down the process of pushing updates to their Kubernetes clusters.
Solution:
By using multi-stage Docker builds to separate video processing dependencies, the team reduced image sizes significantly, as unnecessary tools were removed from the final production images.
Kaniko jobs were used within Kubernetes clusters to build these optimized images in parallel, saving network transfer times and securing the build process within the cluster.
Advanced Caching strategies were applied for libraries frequently used in video processing, reducing the rebuild time for dependencies by 30%.
Outcome: The team accelerated video processing pipeline updates by 40%, allowing faster deployment of support for new devices and content formats. This enhancement led to a smoother viewing experience, with minimal service interruption during releases.
Actionable Tips for Speeding Up Build Times and Reducing Image Sizes
Optimize Docker Images with Multi-Stage Builds
Why: Multi-stage builds allow you to separate build dependencies from runtime dependencies, reducing image size by discarding unnecessary build tools in the final image.
How: Use separate stages for building, testing, and packaging in Docker. Only include production dependencies in the final image.
  # Stage 1 - Build
  FROM golang:1.16 AS builder
  WORKDIR /app
  COPY . .
  RUN go build -o app

  # Stage 2 - Production
  FROM alpine:3.14
  WORKDIR /app
  COPY --from=builder /app/app .
  CMD ["./app"]
Use Smaller Base Images
Why: Base images contribute significantly to the final size of Docker images. Using lighter images like
alpineinstead ofubuntureduces size dramatically.How: Swap larger OS images with minimal ones (e.g.,
alpine,distroless) wherever feasible.
Leverage Layer Caching in CI/CD Pipelines
Why: Docker caches each layer of an image build, so if a layer hasn't changed, it can be reused. Configuring your pipeline to leverage this caching can drastically reduce build times.
How: Set up your CI/CD pipeline (e.g., GitHub Actions, GitLab CI) to cache Docker layers by maintaining a persistent layer storage. This prevents repeated builds of unchanged layers.
Implement Kaniko for Kubernetes Builds
Why: Kaniko allows you to build Docker images directly in your Kubernetes cluster without requiring privileged permissions, which is both secure and scalable.
How: Configure Kaniko as a Kubernetes Job to build and push images directly from your Kubernetes environment, reducing external dependencies and streamlining the CI/CD pipeline.
Optimize Dependency Management
Why: Repeated dependency downloads increase build times. Efficiently managing dependencies reduces unnecessary overhead in CI/CD.
How: Use tools like Docker’s
COPY --chownto handle dependencies in dedicated layers, leveraging layer caching for modules that don’t change frequently.
Minimize Layers in Dockerfile
Why: Each line in a Dockerfile creates a new image layer. Fewer layers mean less storage overhead and faster transfers.
How: Combine related commands in the Dockerfile to reduce layers. For example, combining
apt-get updateandinstallreduces layers and the risk of outdated caches.RUN apt-get update && apt-get install -y curl && apt-get clean
End-to-End Implementation: Architecture and Pipeline Diagram
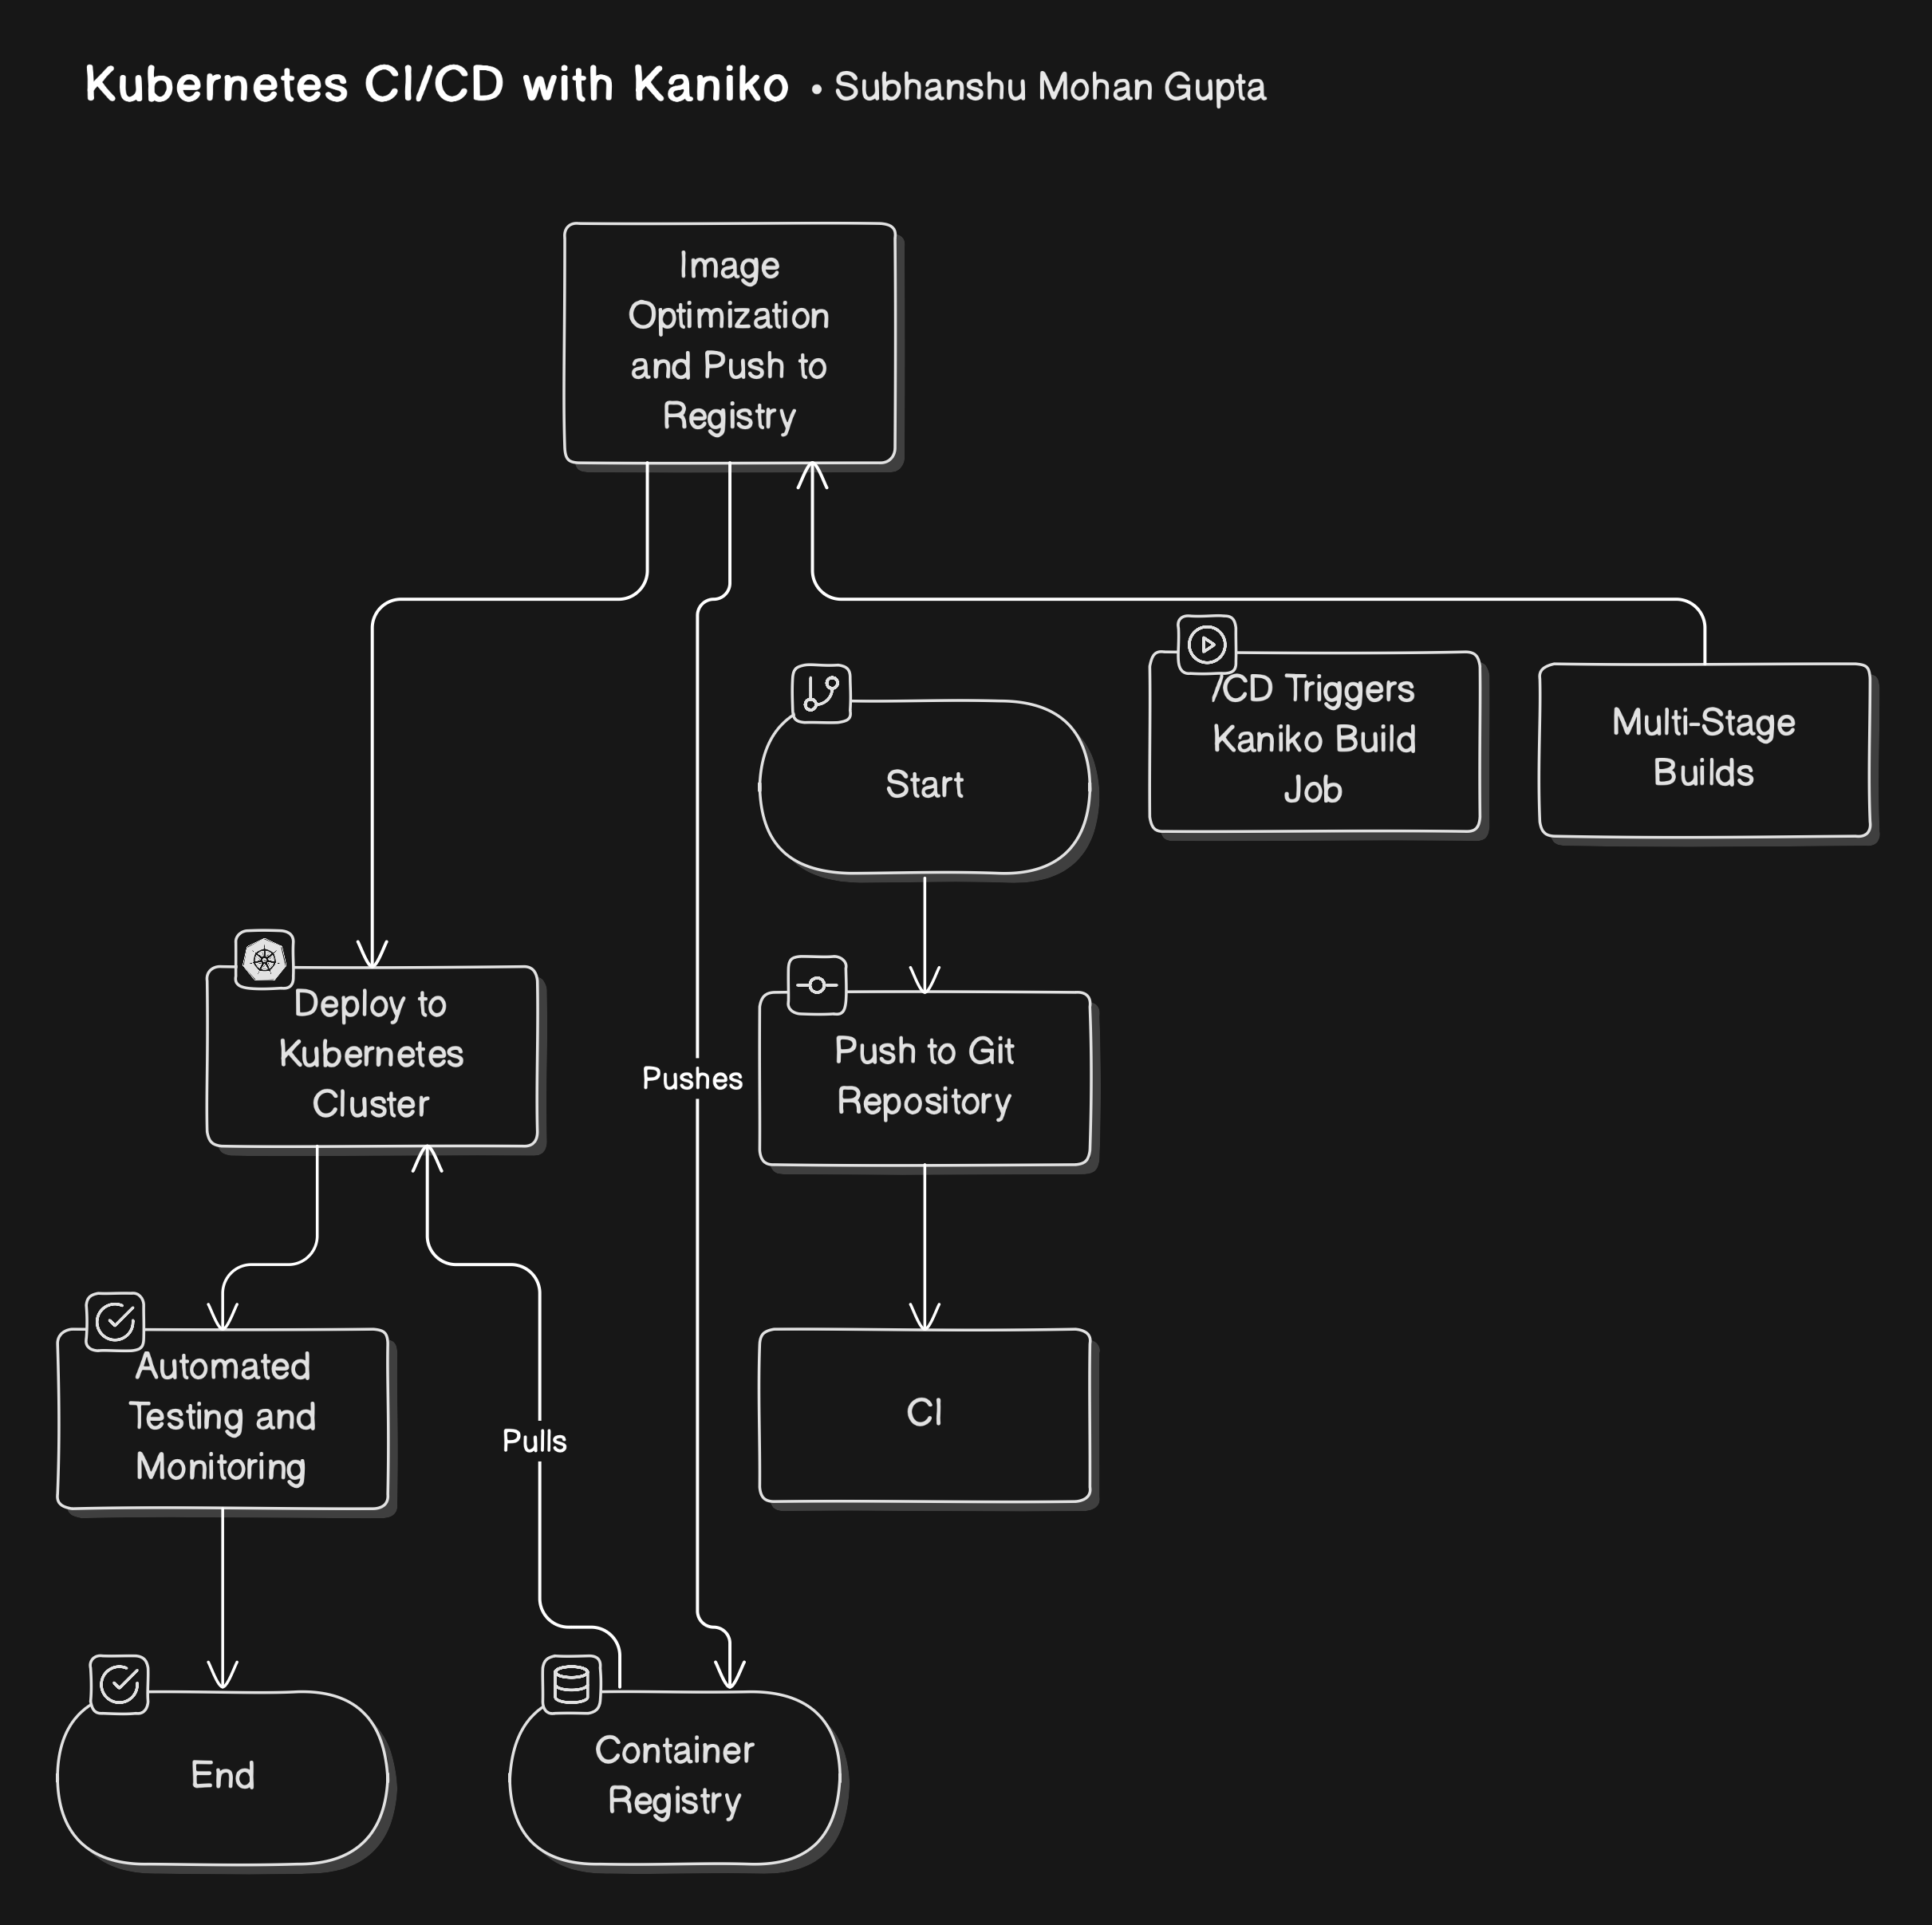
Implementing a streamlined CI/CD architecture in Kubernetes for accelerated deployment involves configuring multi-stage Docker builds, setting up Kaniko for secure image building, and using CI/CD tools like GitHub Actions or GitLab CI for orchestrating the process.

1. Set Up Your Git Repository
Start by creating a repository where your application code and Dockerfiles reside. If you’re using GitHub, follow these steps:
Initialize the Repository:
git initAdd Your Application Code and Dockerfile:
Write a multi-stage Dockerfile (explained below) in the root directory.
Commit all files.
Push to Remote Repository:
 git add .
 git commit -m "Initial commit"
 git push origin main
2. Create a Multi-Stage Dockerfile
Multi-stage builds allow you to keep your image small by including only necessary components in the final image.
Dockerfile:
# Stage 1 - Build
FROM golang:1.16 AS builder
WORKDIR /app
COPY . .
RUN go build -o app

# Stage 2 - Production
FROM alpine:3.14
WORKDIR /app
COPY --from=builder /app/app .
CMD ["./app"]
3. Deploy a Container Registry Secret in Kubernetes
You’ll need a secret in Kubernetes to allow Kaniko to push images to your registry.
Create a Docker Registry Secret (e.g., Google Container Registry):
 kubectl create secret docker-registry gcr-secret \
 --docker-server=gcr.io \
 --docker-username=_json_key \
 --docker-password="$(cat path/to/keyfile.json)" \
 --docker-email=your-email@example.com
Verify the secret was created:
kubectl get secrets
4. Configure Kaniko to Build and Push Images in Kubernetes
Using Kaniko, you can securely build Docker images in your Kubernetes cluster.
Create a Kaniko Job YAML file (
kaniko-job.yaml):apiVersion: batch/v1 kind: Job metadata: name: kaniko-build spec: template: spec: containers: - name: kaniko image: gcr.io/kaniko-project/executor:latest args: - "--context=git://github.com/your-org/your-repo.git" - "--dockerfile=/path/to/Dockerfile" - "--destination=gcr.io/your-project/your-image:latest" volumeMounts: - name: kaniko-secret mountPath: /kaniko/.docker restartPolicy: Never volumes: - name: kaniko-secret secret: secretName: gcr-secretDeploy the Kaniko Job:
kubectl apply -f kaniko-job.yamlMonitor the Job:
kubectl logs job/kaniko-build
5. Configure Your CI/CD Pipeline
Choose a CI/CD platform (GitHub Actions, GitLab CI, Jenkins) to automate builds and deployments.
Example with GitHub Actions:
Create a GitHub Actions Workflow File (
.github/workflows/build-deploy.yaml):name: Build and Deploy with Kaniko on: push: branches: - main jobs: build-deploy: runs-on: ubuntu-latest steps: - name: Checkout Code uses: actions/checkout@v2 - name: Set up Kubeconfig run: | echo "${{ secrets.KUBECONFIG }}" > $HOME/.kube/config - name: Trigger Kaniko Job run: | kubectl apply -f kaniko-job.yaml kubectl wait --for=condition=complete job/kaniko-build kubectl delete job/kaniko-buildReplace
${{ secrets.KUBECONFIG }}with a secret containing your Kubernetes configuration file.Add Secrets:
KUBECONFIG: Add your kubeconfig file as a secret in GitHub.
Push to Trigger Workflow:
 git add .
 git commit -m "Add GitHub Actions workflow"
 git push origin main
6. Deploy to Kubernetes Cluster
Now, configure your Kubernetes deployment to use the newly built and pushed image.
Create a Deployment YAML (
deployment.yaml):apiVersion: apps/v1 kind: Deployment metadata: name: my-app spec: replicas: 3 selector: matchLabels: app: my-app template: metadata: labels: app: my-app spec: containers: - name: my-app image: gcr.io/your-project/your-image:latest ports: - containerPort: 8080Apply the Deployment:
kubectl apply -f deployment.yamlCheck the Status:
 kubectl get pods
 kubectl logs -f deployment/my-app
7. Automate Testing and Validation
Use testing tools (e.g., Argo CD, Helm, or KubeTest) to validate that deployments are running correctly.
Add a Liveness and Readiness Probe to the Deployment (
deployment.yaml):spec: containers: - name: my-app image: gcr.io/your-project/your-image:latest livenessProbe: httpGet: path: /healthz port: 8080 initialDelaySeconds: 5 periodSeconds: 10 readinessProbe: httpGet: path: /readyz port: 8080 initialDelaySeconds: 5 periodSeconds: 10Monitor Deployments:
Use
kubectl get podsandkubectl describe pod <pod_name>for logs and resource monitoring.Integrate logging and monitoring tools like Prometheus and Grafana for real-time insights into application performance.
8. Observe and Scale Based on Metrics
Set up horizontal pod autoscaling (HPA) to dynamically adjust your app’s resources based on real-time performance metrics.
Define the HPA in a YAML File (
hpa.yaml):apiVersion: autoscaling/v2 kind: HorizontalPodAutoscaler metadata: name: my-app-hpa spec: scaleTargetRef: apiVersion: apps/v1 kind: Deployment name: my-app minReplicas: 2 maxReplicas: 10 metrics: - type: Resource resource: name: cpu targetAverageUtilization: 70Apply the HPA:
kubectl apply -f hpa.yaml
This setup reduces build times and image sizes, accelerates deployments, and ensures your applications scale dynamically. As a next step, integrate observability tools for a complete feedback loop, further enhancing deployment velocity and resilience in production.
Testing and Validating Deployment Performance
After implementing optimizations, evaluate improvements by measuring:
Build Time Reduction: Use CI/CD metrics to compare previous and optimized build times.
Image Size Reduction: Check the image sizes in your registry to see the effect of optimizations.
Deployment Speed: Measure the total deployment time from code commit to production deployment.
Future Enhancements
This setup lays a strong foundation, but there’s room for enhancement:
Image Scanning for Security: Integrate tools like Trivy to automatically scan images for vulnerabilities before deployment.
Advanced Caching Strategies: Use tools like BuildKit for better layer caching and Artifactory for dependency caching, further speeding up builds.
Automated Rollbacks: Configure Argo Rollouts or Flagger for safer, progressive rollouts and rollbacks based on health checks.
Dynamic Resource Allocation: Integrate tools like KEDA for event-driven scaling in Kubernetes, especially useful for microservices with varying traffic patterns.
Conclusion
With this setup, you’ve optimized build times, minimized image sizes, and created a streamlined CI/CD pipeline that accelerates Kubernetes deployment velocity. By applying Kaniko, multi-stage builds, and efficient caching, your development teams can focus on delivering features instead of waiting on deployment pipelines. This architecture not only boosts deployment speed but also sets a solid foundation for scalable, resilient deployments.
References:
What’s Next?
Stay tuned for even more insights, tips, and innovative strategies to supercharge your Kubernetes journey. Follow along as we dive deeper into the latest DevSecOps trends, and share hands-on guides to keep you at the forefront of cloud-native development.
Also make sure to check back for future articles that bring you actionable solutions, real-world examples, and cutting-edge tools to elevate your deployment game!
Subscribe to my newsletter
Read articles from Subhanshu Mohan Gupta directly inside your inbox. Subscribe to the newsletter, and don't miss out.
Written by

Subhanshu Mohan Gupta
Subhanshu Mohan Gupta
A passionate AI DevOps Engineer specialized in creating secure, scalable, and efficient systems that bridge development and operations. My expertise lies in automating complex processes, integrating AI-driven solutions, and ensuring seamless, secure delivery pipelines. With a deep understanding of cloud infrastructure, CI/CD, and cybersecurity, I thrive on solving challenges at the intersection of innovation and security, driving continuous improvement in both technology and team dynamics.