Setting Up Amazon EKS with Terraform
 Manoj Shet
Introduction
Amazon Elastic Kubernetes Service (EKS) simplifies the management of Kubernetes clusters, allowing users to deploy and scale containerized applications with ease. As organizations increasingly adopt microservices architectures and containerization, a robust orchestration platform like Kubernetes becomes essential for streamlining application deployment and management.
Incorporating infrastructure as code (IaC) tools such as Terraform into the workflow enhances the setup and management of the EKS environment. Terraform enables the definition of infrastructure in a declarative manner, facilitating version control, automation of deployments, and easy replication of environments. This blog provides a step-by-step process for setting up an EKS cluster using Terraform.
Prerequisites
An active AWS account with the necessary permissions to create EKS clusters, IAM roles, VPCs, and associated resources.
Terraform installed on the local machine.
AWS CLI installed and configured with access keys for the AWS account.
Basic understanding of Kubernetes concepts, including pods, services, and deployments.
Familiarity with Terraform syntax and configuration files for effective implementation.
Infrastructure Setup
Setting Up the AWS Provider
The provider.tf file initializes the AWS provider, which allows Terraform to authenticate with AWS and deploy resources in the specified region.
terraform {
  required_providers {
    aws = {
      source = "hashicorp/aws"
      version = "5.73.0"
    }
  }
}
provider "aws" {
  region = "us-east-1"
}
1. Create VPC
A Virtual Private Cloud (VPC) provides an isolated network for your resources. It allows you to define your own IP address range, create subnets, and configure route tables and network gateways.
resource "aws_vpc" "manoj_vpc" {
  cidr_block = "10.0.0.0/16"
}
Resource Type: aws_vpc
Purpose: This block creates a VPC with the CIDR block of 10.0.0.0/16, allowing for up to 65,536 private IP addresses. This isolation is crucial for securely managing your resources.
2. Create Subnets
Two public subnets are created across two availability zones. Subnets enable you to segment your VPC for better organization and security.
resource "aws_subnet" "manoj_subnet" {
  count = 2
  vpc_id = aws_vpc.manoj_vpc.id
  cidr_block = cidrsubnet(aws_vpc.manoj_vpc.cidr_block, 8, count.index)
  availability_zone = element(["us-east-1a", "us-east-1b"], count.index)
  map_public_ip_on_launch = true
}
Resource Type: aws_subnet
Purpose: This block creates two subnets in different availability zones (us-east-1a and us-east-1b). The cidrsubnet function calculates a subnet CIDR block from the VPC CIDR, and map_public_ip_on_launch ensures instances launched in these subnets receive a public IP address.
3. Set Up the Internet Gateway and Route Table
An internet gateway allows communication between instances in the VPC and the internet, enabling external access to the resources.
resource "aws_internet_gateway" "manoj_internet_gateway" {
  vpc_id = aws_vpc.manoj_vpc.id
}

resource "aws_route_table" "manoj_route_table" {
  vpc_id = aws_vpc.manoj_vpc.id

  route {
    cidr_block = "0.0.0.0/0"
    gateway_id = aws_internet_gateway.manoj_internet_gateway.id
  }
}
Resource Type: aws_internet_gateway and aws_route_table
Purpose: The internet gateway is created to allow resources in the VPC to access the internet. The route table defines a route that sends all outbound traffic through the internet gateway.
4. Associate Subnets with the Route Table
The subnets must be associated with the route table to enable internet access for the instances within those subnets.
resource "aws_route_table_association" "manoj_route_table_association" {
  count = 2
  subnet_id = aws_subnet.manoj_subnet[count.index].id
  route_table_id = aws_route_table.manoj_route_table.id
}
Resource Type: aws_route_table_association
Purpose: This block associates each subnet with the previously created route table. The count allows for multiple associations, ensuring both subnets can reach the internet.
5. Create Security Groups
Security groups control inbound and outbound traffic for the resources. They act as virtual firewalls to control network access.
resource "aws_security_group" "manoj_cluster_secutiry_group" {
  vpc_id = aws_vpc.manoj_vpc.id

  egress {
    from_port = 0
    to_port = 0
    protocol = "-1"
    cidr_blocks = ["0.0.0.0/0"]
  }
}

resource "aws_security_group" "manoj_node_security_group" {
  vpc_id = aws_vpc.manoj_vpc.id

  ingress {
    from_port = 0
    to_port = 0
    protocol = "-1"
    cidr_blocks = ["0.0.0.0/0"]
  }

  egress {
    from_port = 0
    to_port = 0
    protocol = "-1"
    cidr_blocks = ["0.0.0.0/0"]
  }
}
Resource Type: aws_security_group
Purpose:
manoj_cluster_security_group: This security group allows all outbound traffic from the EKS cluster.
manoj_node_security_group: This group allows all inbound and outbound traffic, providing flexibility for communication between nodes and external clients.
6. Create the EKS Cluster
The EKS cluster is created, specifying the associated VPC and security groups.
resource "aws_eks_cluster" "manoj" {
  name = "manoj-cluster"
  role_arn = aws_iam_role.manoj_cluster_role.arn

  vpc_config {
    subnet_ids = aws_subnet.manoj_subnet[*].id
    security_group_ids = [aws_security_group.manoj_cluster_secutiry_group.id]
  }
}
Resource Type: aws_eks_cluster
Purpose: This block defines the EKS cluster with the specified name and IAM role. The vpc_config section links the cluster to the previously created subnets and security groups, enabling it to function within the defined network.
7. Define the EKS Node Group
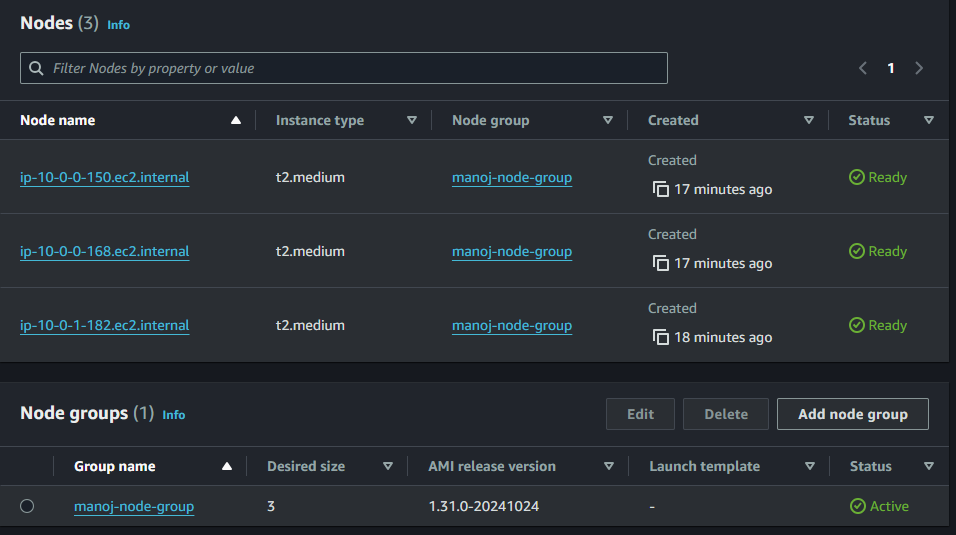
The node group consists of EC2 instances that run your Kubernetes workloads. Node groups allow you to scale and manage the worker nodes.
resource "aws_eks_node_group" "manoj" {
  cluster_name = aws_eks_cluster.manoj.name
  node_group_name = "manoj-node-group"
  node_role_arn = aws_iam_role.manoj_node_group_role.arn
  subnet_ids = aws_subnet.manoj_subnet[*].id

  scaling_config {
    desired_size = 2
    max_size = 5
    min_size = 2
  }

  instance_types = ["t2.medium"]

  remote_access {
    ec2_ssh_key = var.ssh_key_name
    source_security_group_ids = [aws_security_group.manoj_node_security_group.id]
  }
}
Resource Type: aws_eks_node_group
Purpose: This block defines a node group associated with the EKS cluster. It specifies the scaling configuration, desired instance type, and enables SSH access to the nodes using an SSH key. The node group automatically manages the EC2 instances that run your applications.
8. Create IAM Roles for the Cluster and Node Group
IAM roles are essential for granting permissions to the EKS cluster and nodes. They allow AWS services to perform actions on your behalf.
resource "aws_iam_role" "manoj_cluster_role" {
  name = "manoj-cluster-role"

  assume_role_policy = <<EOF
{
  "Version": "2012-10-17",
  "Statement": [
    {
      "Effect": "Allow",
      "Principal": {
        "Service": "eks.amazonaws.com"
      },
      "Action": "sts:AssumeRole"
    }
  ]
}
EOF
}

resource "aws_iam_role_policy_attachment" "manoj_cluster_role_policy" {
  role = aws_iam_role.manoj_cluster_role.name
  policy_arn = "arn:aws:iam::aws:policy/AmazonEKSClusterPolicy"
}

resource "aws_iam_role" "manoj_node_group_role" {
  name = "manoj-node-group-role"

  assume_role_policy = <<EOF
{
  "Version": "2012-10-17",
  "Statement": [
    {
      "Effect": "Allow",
      "Principal": {
        "Service": "ec2.amazonaws.com"
      },
      "Action": "sts:AssumeRole"
    }
  ]
}
EOF
}

resource "aws_iam_role_policy_attachment" "manoj_node_group_role_policy" {
  role = aws_iam_role.manoj_node_group_role.name
  policy_arn = "arn:aws:iam::aws:policy/AmazonEKSWorkerNodePolicy"
}

resource "aws_iam_role_policy_attachment" "manoj_node_group_cni_policy" {
  role = aws_iam_role.manoj_node_group_role.name
  policy_arn = "arn:aws:iam::aws:policy/AmazonEKS_CNI_Policy"
}

resource "aws_iam_role_policy_attachment" "manoj_node_group_registry_policy" {
  role = aws_iam_role.manoj_node_group_role.name
  policy_arn = "arn:aws:iam::aws:policy/AmazonEC2ContainerRegistryReadOnly"
}
Resource Type: aws_iam_role and aws_iam_role_policy_attachment
Purpose:
manoj_cluster_role: Allows the EKS service to manage the cluster.
manoj_node_group_role: Grants permissions to the EC2 instances in the node group. Various policy attachments ensure that nodes can manage network interfaces, communicate with EKS, and access container images.
Deploy the Infrastructure
To apply your Terraform configuration and deploy the infrastructure, run:
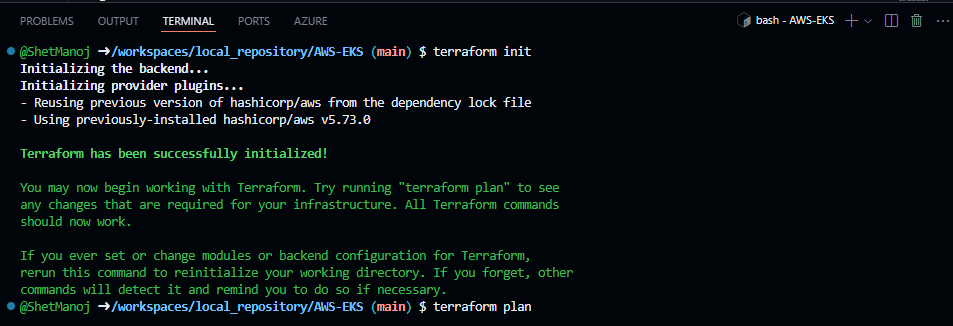
- terraform init
Purpose: Initializes the Terraform working directory.
Explanation: This command downloads any required provider plugins and sets up the backend configuration, which is where Terraform stores its state files (like local files or a remote storage service). Running this command is mandatory when working with a new or modified Terraform configuration, as it ensures Terraform has all necessary resources to run the subsequent commands.

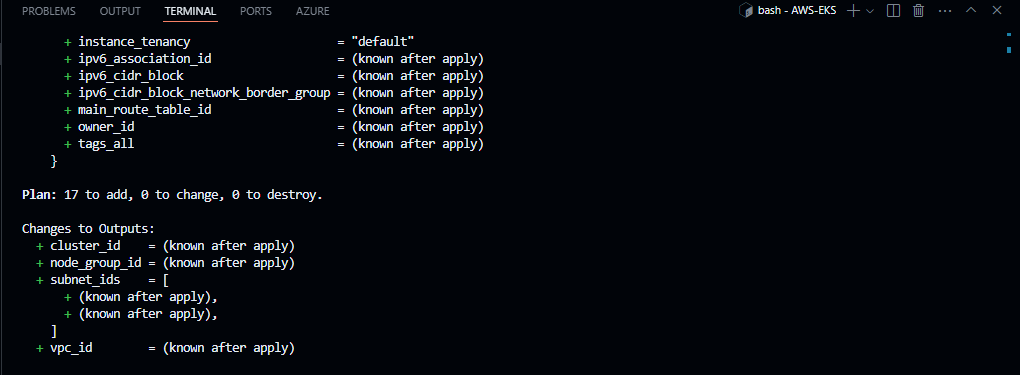
- terraform plan
Purpose: Creates an execution plan, showing what changes will be made to reach the desired infrastructure state.
Explanation: This command allows you to see the proposed changes Terraform will make before actually applying them. It compares the current infrastructure (based on the existing state file) with the configuration specified in your Terraform files. It then provides a detailed list of resources that will be added, modified, or destroyed. The plan step is especially useful for verifying that everything is correct before making changes.

- terraform apply
Purpose: Executes the changes defined by the Terraform configuration to achieve the desired state.
Explanation: This command applies the proposed changes from the terraform plan. Terraform will prompt for confirmation before making any changes. Once confirmed, Terraform provisions the resources in the order necessary to create the infrastructure according to the configuration files. Afterward, it updates the state file with the latest configuration


- terraform destroy
Purpose: Destroys the infrastructure managed by Terraform.
Explanation: This command will remove all resources defined in your Terraform configuration files. When executed, Terraform reads the current state file to identify all existing resources it manages and then deletes them.

Conclusion
This guide successfully provisions an Amazon EKS cluster using Terraform, establishing a strong foundation for scalable and manageable Kubernetes clusters on AWS. The use of Terraform’s infrastructure-as-code approach ensures configurations are version-controlled, repeatable, and adaptable, simplifying the process of managing infrastructure changes across environments.
The resulting cluster setup offers flexibility to support various workloads and can be further customized. Future steps may include enhancing the setup with monitoring and logging, refining network and security policies, or implementing autoscaling for optimized resource usage. This configuration provides a robust starting point, ready to be expanded as infrastructure requirements evolve.
Subscribe to my newsletter
Read articles from Manoj Shet directly inside your inbox. Subscribe to the newsletter, and don't miss out.
Written by
