Python voice AI web phone using WebRTC
 Kevin Naidoo
Recently, I did a walk-through on how you can use SIP and voice AI to answer the phone with Python (read more here). This got me experimenting a bit more. I have a 6-year-old, and as you can imagine, kids at that age love amusing, funny voices.
What if I could build an AI voice phone just for fun? Something that she could interact with. This would be way cooler than those stuffed animal toys that keep repeating the same sentences over and over. Since this “toy” is powered by a full LLM, it could actually have an entire conversation and role-play as if it were an actual cartoon character!
💡 Are you new to Python? Learn Python with LearnPython.com courses. Fun interactive courses that are based on real-life business scenarios, meaning you’ll be writing Python code and seeing the results instantly. No need to install Python or other tools on your device, everything happens through your favorite web browser (Sponsored content).
In this article, I will walk you through step-by-step how I achieved this and all the relevant technologies and services needed.
WebRTC VoiceAI: How will this work?
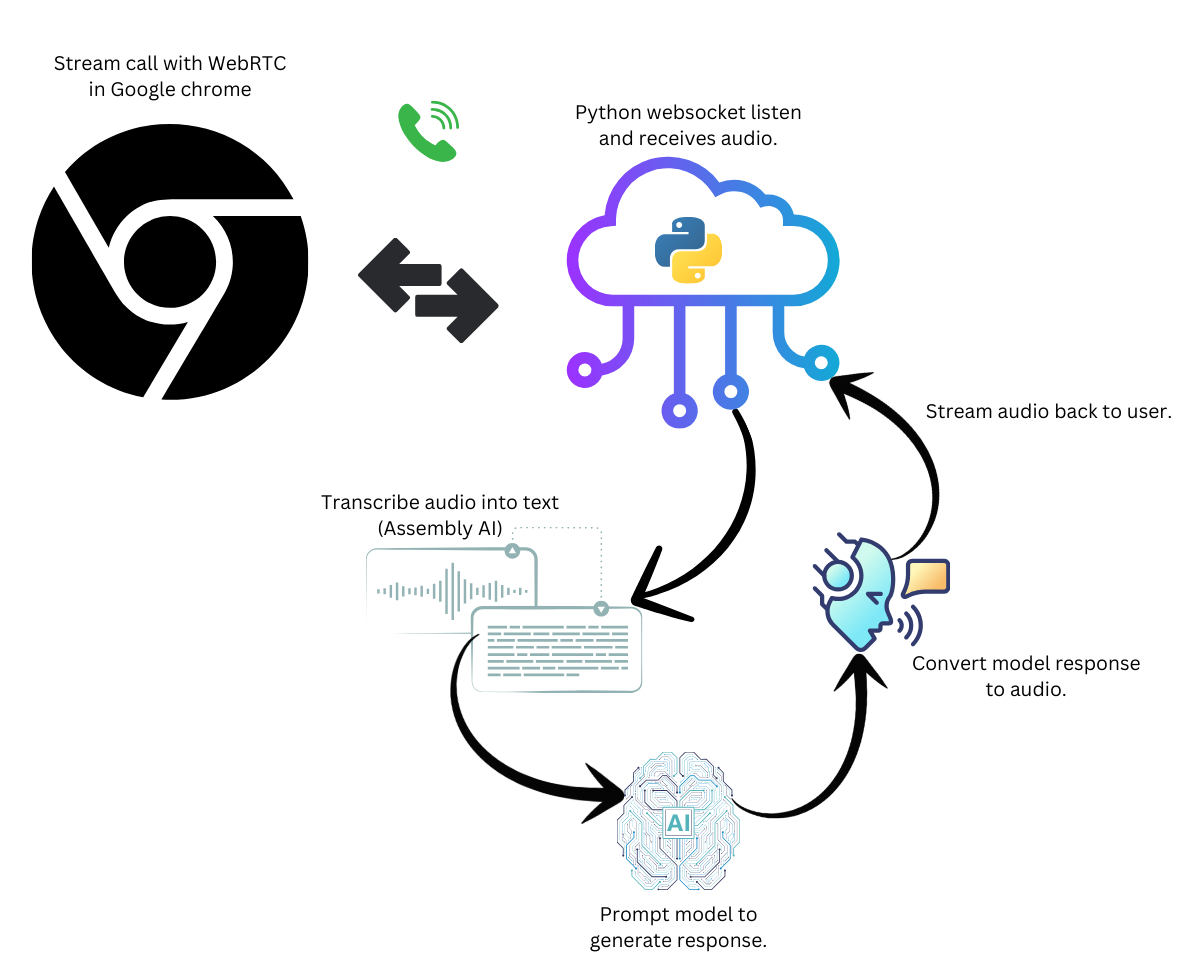
WebRTC is a browser peer-to-peer standard that allows just about any modern browser to stream rich media content such as video or audio in real-time, similar to a voice or video call.
Thus, WebRTC is perfect for our little Voice AI character (Aka ZaZu the Monkey!). For the backend, we will use a WebSocket server built in Python, which orchestrates the AI chain to transcribe the audio, prompt the model, and finally convert the model’s response back to audio and stream it back to the browser using WebRTC.
Now, since this is a fun app, I wasn’t going to spend a lot of time building my own transcription model, or TTS model for that matter. Instead, we’ll just use Assembly AI for transcription and OpenAI for everything else.
I initially tried to build this with VOSK instead of Assembly AI which is a decent open-source speech-to-text library, however, the transcription quality wasn’t that great, and it wasn’t worth the time and effort to train a custom VOSK model. AssemblyAI has really good accuracy and costs just $0.37 per hour, which is insanely cheap!
You can view the full source code here: https://github.com/kevincoder-co-za/zazu-voiceai
⚠️ I omitted “try except” blocks throughout to make the code more readable, however, for a real production app, you should catch and handle errors more efficiently.
Setting up our WebSocket server
For the WebSocket server, we’ll go a bit old-school and use Flask. Flask has very good support for web sockets and is fairly easy to spin up a quick prototype. To get started, let’s install a few pip packages:
pip install -r requirements.txt
flask
flask-sockets
gevent
gevent-websocket
assemblyai
ffmpeg
You will in addition need to install “FFMpeg” for your operating system. FFmpeg is a powerful audio manipulation library used by most modern audio tools on the market, and we’ll use it to alter the audio generated by OpenAI to sound more cartoonish.
Next, you’ll want to create a Python file: “server.py” or whatever you prefer:
from flask import Flask, render_template
from flask_sockets import Sockets
from gevent import pywsgi
from geventwebsocket.handler import WebSocketHandler
from audio_handlers import AudioHandler
from llm_adapters import OpenAILLM
import settings

app = Flask(__name__)
sockets = Sockets(app)

@app.route("/dialer")
def dialer():
    return render_template("dialer.html",
        sample_rate = settings.SAMPLE_RATE,
        socket_url = settings.SOCKET_URL
    )

@sockets.route("/websocket/stream")
def audio_stream(ws):
    audio_handler = None
    llm = None

    while not ws.closed:
        message = ws.receive()

        if message is None:
            continue
        if isinstance(message, str):
            if "start call" in message:
                print("Call started", flush=True)
                llm = OpenAILLM()
                audio_handler = AudioHandler(llm, ws)
            elif "end call" in message and audio_handler:
                audio_handler.stop()
                llm = None

        elif isinstance(message, bytes) or isinstance(message, bytearray):
            audio_handler.stream(bytes(message))

if __name__ == "__main__":
    WEBSOCKET_PORT = 5000
    server = pywsgi.WSGIServer(("", WEBSOCKET_PORT), app, handler_class=WebSocketHandler)
    print(f"Server listening on ws://0.0.0.0:{WEBSOCKET_PORT}")
    server.serve_forever()
Let’s go through this step-by-step, first, we set up our socket server and two routes:
app = Flask(__name__)
sockets = Sockets(app)

@app.route("/dialer")
def dialer():
    return render_template("dialer.html",
        sample_rate = settings.SAMPLE_RATE,
        socket_url = settings.SOCKET_URL
    )

@sockets.route("/websocket/stream")
def audio_stream(ws):
The dialer route just returns an HTML page: “dialer.html”. This contains our JavaScript WebRTC phone implementation. We’ll get to that in a bit.
The “/websocket/stream” is where all the magic happens. When the browser initiates a call, this endpoint is triggered, and a socket is opened. Since the socket will remain open until either party terminates the call, we can therefore constantly stream data back and forth in a consistent manner.
@sockets.route("/websocket/stream")
def audio_stream(ws):
    audio_handler = None
    llm = None

    while not ws.closed:
        message = ws.receive()

        if message is None:
            continue
        if isinstance(message, str):
            if "start call" in message:
                print("Call started", flush=True)
                llm = OpenAILLM()
                audio_handler = AudioHandler(llm, ws)
            elif "end call" in message and audio_handler:
                audio_handler.stop()
                llm = None

        elif isinstance(message, bytes) or isinstance(message, bytearray):
            audio_handler.stream(bytes(message))
In our “audio_stream” method, we scan the incoming data to check if it’s raw bytes or a string. When the data is raw bytes, this means that we are receiving audio data and when the data is a string, this means we are receiving an event such as “start call” or “end call”.
When the call starts, we set up an audio_handler and llm. The “audio_handler” will transcribe audio and send it back to the user.
The “llm” will communicate with GPT4o-mini and generate an appropriate response to the user based on the transcription.
Building the LLM Adapter
The LLM adapter has two tasks it needs to perform:
Prompt the text model with the transcription and get back a generated response (invoke method).
Take the generated response and convert it to audio so that we can stream it back to the browser (text_to_audio method).
from openai import OpenAI
import settings

class OpenAILLM:
    def __init__(self):
        self.llm = OpenAI()
        self.messages = [
            ("system",settings.SYSTEM_AI_PROMPT)
        ]

    def invoke(self, message):
        self.messages.append(("user", message))
        messages = self.messages.copy()

        chat_completion = self.llm.chat.completions.create(
            model= settings.OPENAI_GPT_MODEL,
            messages=[{"role": m[0], "content": m[1]} for m in messages]
        )

        response = chat_completion.choices[0].message.content
        self.messages.append(("assistant", response))

        return response

    def text_to_audio(self, text, audio_file_path):
        response = self.llm.audio.speech.create(
            model=settings.OPENAI_TTS_MODEL,
            voice=settings.OPENAI_TTS_VOICE,
            input=text
        )

        response.stream_to_file(audio_file_path)
Note: We also have some memory built in so that the LLM has context for the entire conversation. To maintain memory, we simply just append all messages to a list of “messages” and then use the conversation API to send a batch of messages.
Building the Audio Manager
The Audio Manager can be found in “audio_handlers.py”:
import os
import uuid
import settings
import assemblyai as aai
import ffmpeg

aai.settings.api_key = settings.ASSEMBLYAI_API_KEY

class AudioHandler(aai.RealtimeTranscriber):
    def __init__(self, llm, ws):
        super().__init__(
            on_data=self.on_data,
            sample_rate=settings.SAMPLE_RATE,
            on_error=lambda x : print(x, flush=True),
            disable_partial_transcripts=True
        )
        self.llm = llm
        self.ws = ws
        self.connect()

    def stop(self):
        self.close()

    def on_data(self, transcript: aai.RealtimeTranscript):
       if isinstance(transcript, aai.RealtimeFinalTranscript) and transcript.text:
            response = self.llm.invoke(transcript.text)
            if response != "":
                self.respond_to_user_prompt(response)

    def respond_to_user_prompt(self, transcript):
        tmp_id = str(uuid.uuid4())
        tmp_file = f"/tmp/_{tmp_id}.mp3"
        cartoonified_version = f"/tmp/modified_{tmp_id}.mp3"

        self.llm.text_to_audio(transcript, tmp_file)

        ffmpeg.input(tmp_file).filter('asetrate', 33050).output(cartoonified_version).run()

        audio_data = None

        with open(cartoonified_version, "rb") as f:
            audio_data = f.read()

        if os.path.exists(tmp_file):
            os.remove(tmp_file)
        if os.path.exists(cartoonified_version):
            os.remove(cartoonified_version)

        if audio_data:
            self.ws.send(audio_data)
The audio manager class extends Assembly AI’s RealtimeTranscriber. We override the “on_data” method to grab the finished transcription and then use both OpenAI Whisper and FFMpeg to generate a cartoonish voice (You probably should use a voice cloning API for better performance).
    def __init__(self, llm, ws):
        super().__init__(
            on_data=self.on_data,
            sample_rate=settings.SAMPLE_RATE,
            on_error=lambda x : print(x, flush=True),
            disable_partial_transcripts=True
        )
        self.llm = llm
        self.ws = ws
        self.connect()
In the constructor, we set up a few configs:
on_data: This method will allow us to receive the full transcription and perform any other post-processing needed.
sample_rate: Measured in hertz and basically the number of audio samples carried per second. Assembly AI supports a wide variety of sample rates, but we want to keep a consistent sample rate between the different services (OpenAI Whisper only supports 16 kHz, hence our sample rate is 16000).
disable_partial_transcripts: for this application, we don’t need phrases or parts of speech; all we care about is the full transcript. Turning this setting on will minimize the network requests between us and Assembly AI, thus improving performance.
Once we get a transcription back from Assembly AI, we then need to:
Prompt the LLM to generate a response.
Send the response to the OpenAI TTS model.
Receive the audio from OpenAI TTS and then use FFMpeg to alter the audio so that it sounds similar to a cartoonish voice. OpenAI does not support custom voices, so we are stuck with human voices and therefore need to alter the pitch to sound similar to a cartoon character.
Silent pauses are a pain!
One of the major pain points is the “silent pause” which occurs for a few milliseconds (or seconds in some instances) after the user stops speaking, this is the time taken for the audio transcriber to detect the end of a sentence and also all the AI queries back and forth to generate the final response back to the caller.
This can be annoying since it’s not a fluid conversation that you would typically have with a real person.
Nonetheless, it works pretty decently if you can stomach the annoying pauses.
A few approaches I will look at to improve the code when I get some more time:
Rebuild in a faster language, I actually already done this partially in Golang. It does make a difference, but it could still do with more optimizations.
Run my own model near the WebSocket server. PHI-3 is fairly good and fast, running this model with Ollama and then fine-tuning could really improve both the speed and accuracy of the AI queries.
Train my own voice model, similar to the above. It might be better to just fine-tune a speech model from scratch. I’ve played around with pocketsphinx and Whisper, both are great options and not complicated to train.
Implement using a speech-to-speech model. These improve response times drastically, but can be quite pricy at this stage.
Conclusion
While this “toy app” is not much at this stage, it’s useful enough to amuse my kid 😀 and a great base for me to build upon a more commercial offering later on. I see Voice AI growing in the next few years and being very useful in environments such as call centers or for building custom business context-aware agents.
The great news is that the technology gets better every few months, and we are spoiled for choice. At the time of writing, I noticed several new speech-to-speech API’s springing up, including OpenAI’s real-time models. The only caveat is that they are just too expensive to run. Elevenlabs is probably the most cost-effective option at this stage at around $99 per 1000 minutes of audio.
I plan to give Elevenlabs a try, and also Deepgram agents will be interesting as well.
Subscribe to my newsletter
Read articles from Kevin Naidoo directly inside your inbox. Subscribe to the newsletter, and don't miss out.
Written by
Kevin Naidoo
Kevin Naidoo
I am a South African-born tech leader with 15+ years of experience in software development including Linux servers and machine learning. My passion is web development and teaching. I often love experimenting with emerging technologies and use this blog as an outlet to share my knowledge and adventures. Learn about Python, Linux servers, SQL, Golang, SaaS, PHP, Machine Learning, and loads more.