VMware Tools Upgrade failed on Linux VMs
 Dave Davis
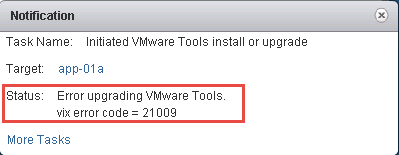
The other day I was working on a project updating vApp components and after successfully upgrading vCenter, ESXi hosts, and NSX Managers it was time to upgrade the VMware Tools for all the VMs. I powered on the VMs and noticed that 8 of the 10 linux machines failed with the same error as shown in Figure-1. I will be the first one to admit that my linux-ninja skills are subpar at best. When I saw this error message I was excited because this gave me a chance to learn some new linux commands and gain some much needed experience points to level up my linux-ninja skills.
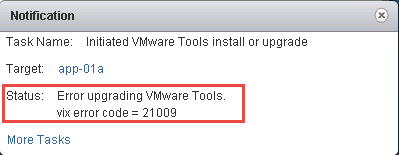
Figure-1 Error upgrading Vmware Tools. Vix error code = 21009
I thought hmm that’s odd let’s take a look at the vmware-tools-upgrader.log file and see what’s going on. Typically when searching through log files I like to leverage egrep. Below is the command with some common verbiage typically found inside log files.
egrep -wi ‘warning|fail|failure|error|cannot’ /var/log/vmware-tools-upgrader.log
Egrep quickly returned results shown in Figure-2 and to confirm the current disk size I ran df-h on the server and noticed only 41M were available on the disk…YIKES, as shown in Figure-3. Then ran pvs to take a look at the physical volume and notice there is 0 space left to expand…OUCH shown in Figure-4. To get around this we need to create another physical volume. A useful command that can provide the current size of the disk is fdisk -l, notice in Figure-5 the disk size is 2GB. Before we proceed let’s take a look at the logical volumes and see how many we have on the disk using lvdisplay. As you can see in Figure-6, we have 2 logical volumes one is our OS/file (lv_root) and the other is our swap (lv_swap). In order to increase the disk size we need to first shutdown the VM. Right click on the VM -> Edit Settings -> Virtual Hardware -> Hard disk 1 and increase the size from 2GB to 3GB as shown in Figure-7. Once the change has been applied power on the VM and verify the disk size using fdisk -l as shown in Figure-8.
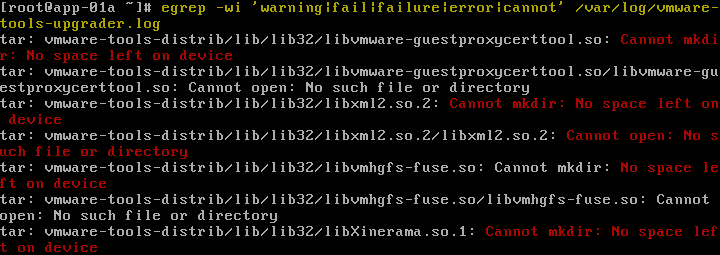
Figure-2 Cannot mkdir: No Space left on device

Figure-3 Checking available space on disk

Figure-4 Confirm physical volume free space

Figure-5 Current disk size
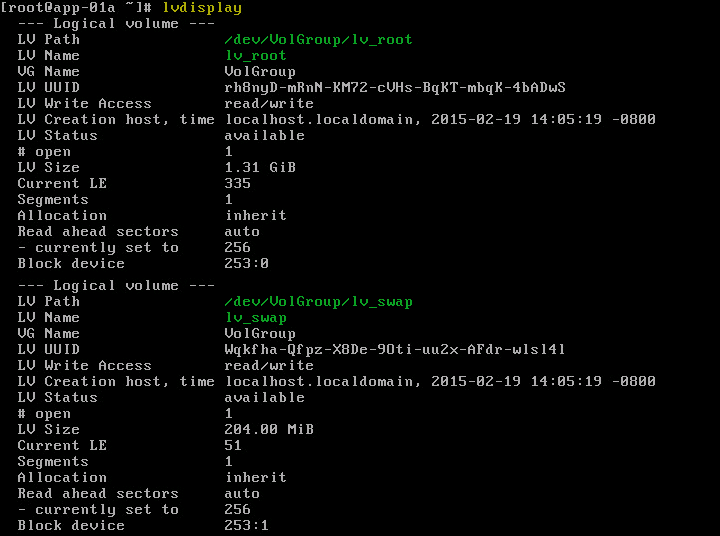
Figure-6 Show all logical volumes

Figure-7 Edit Settings for VM

Figure-8 Confirmation of increase in disk size
To begin the process of extending the disk space of this VM we need to issue the cfdisk /dev/sda command as shown in Figure-9 which launches cfdisk utility. Cfdisk is a partition editor and allows us to create both primary and logical partitions. In our case, we can see the newly added 1GB (1073.75MB) of disk space. Let’s create a new primary partition by highlighting the Free Space at the bottom -> New -> Primary -> accept default values -> press Enter. Once done notice in Figure-10 “sda3” appears. Next, lets write changes to disk by selecting Write -> read the warning -> type ‘yes‘. The VM will need to be rebooted in order for the changes to take affect.
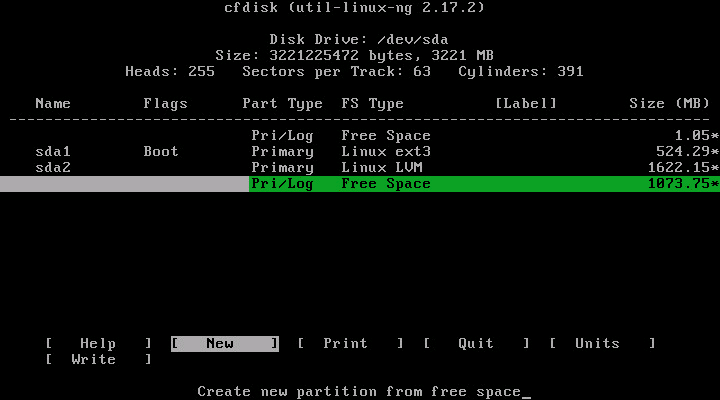
Figure-9 Launch cfdisk utility
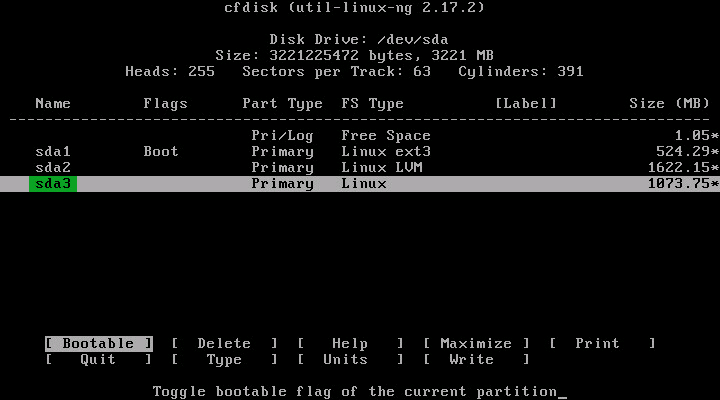
Figure-10 Create primary partition with cfdisk utility
On to creating a physical volume using pvcreate /dev/sda3 shown in Figure-11. If we run the pvs we should see the newly created physical volume shown in Figure-12. Let’s see the current volume group size by using vgdisplay as shown in Figure-13. Now to extend VolGroup using the newly created physical volume by issuing the command vgextend VolGroup /dev/sda3 see Figure-14. To confirm the size we again run the vgdisplay command shown in Figure-15.

Figure-11 Create new physical volume

Figure-12 Confirming physical volume creation
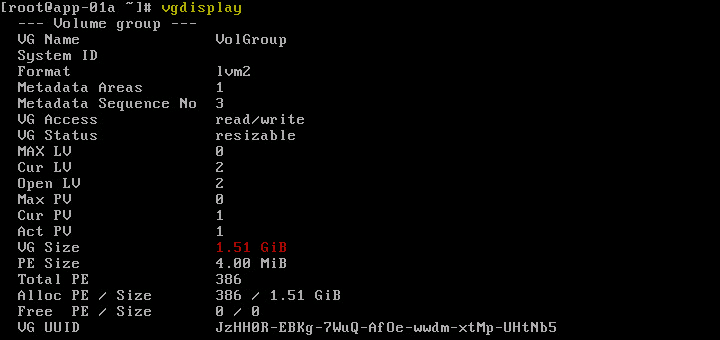
Figure-13 vgdisplay

Figure-14 Extend volume group VolGroup
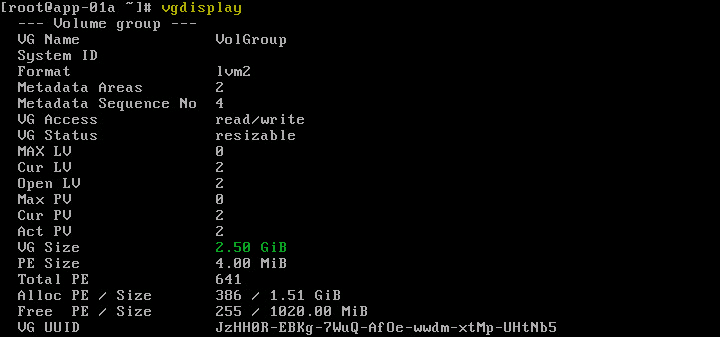
Figure-15 After extending VolGroup
Now that VolGroup has been extended lets proceed with increasing lv_root. Remember when we ran lvdisplay see Figure-6, we saw two logical volumes lv_root followed by lv_swap attempting to extend lv_root in this current state will fail as shown in Figure-16 because lv_swap is for a lack of a better term “in our way”. So we need to disable and remove lv_swap by using the following commands shown in Figure-17:
swapoff /dev/VolGroup/lv_swap
lvm lvremove /dev/VolGroup/lv_swap
With lv_swap gone lets extend lv_root using lvextend -L+1G /dev/VolGroup/lv_root as shown in Figure-18

Figure-16 Insufficient free space

Figure-17 Disable and remove lv_swap

Figure-18 Extending logical volume lv_root
Great! Let’s confirm lv_root has been increased by using lvdisplay shown in Figure-19. Ok, now that we have extended lv_root all should be good, right? Not exactly because the file system isn’t aware of the increase we did in the previous step shown in Figure-20 using the df -h . To increase the file system let’s run resize2fs /dev/VolGroup/lv_root as shown in Figure-21 and again confirm by using df -h shown in Figure-22.
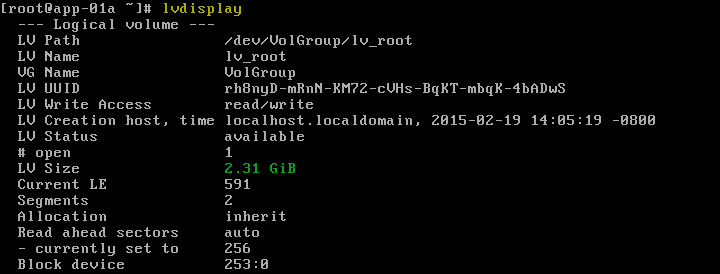
Figure-19 lv_root size increased

Figure-20 Current file system size

Figure-21 Resizing the file system

Figure-22 File system size increased
What has been described to this point might seem like a lot but once you have done this a few time it goes really quick 😉 . We are entering the final stretch just need to recreate the lv_swap we deleted earlier and activate it. As you can see in Figure-23 we issue the lvm lvcreate VolGroup -n lv_swap -L 200M command. Once done like everything else we have done up to this point we confirm lv_swap was created by using our favorite lvdisplay command shown in Figure-24. Awesome, lv_swap is created but we must not forget to activate it otherwise our swap cache won’t work. Let’s issue the following commands to ensure the lv_swap is functioning shown in Figure-25:
mkswap /dev/VolGroup/lv_swapswapon /dev/VolGroup/lv_swapswapon -s
Hurray we successfully extended our disk inside our CentOS VM let’s do a quick cleanup of the temp directory using rm -rf /tmp/* shown in Figure-26 before attempting the VMware Tools upgrade again. Success! We can now successfully upgrade VMware Tools on our CentOS VM as shown in Figure-27.

Figure-23 Recreate lv_swap logical volume
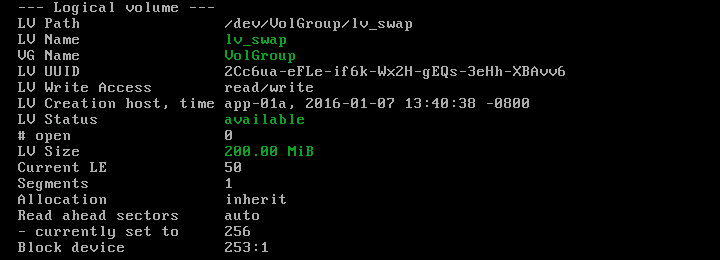
Figure-24 Confirmation lv_swap was created

Figure-25 Activate lv_swap cache

Figure-26 Cleaning up the temp directory
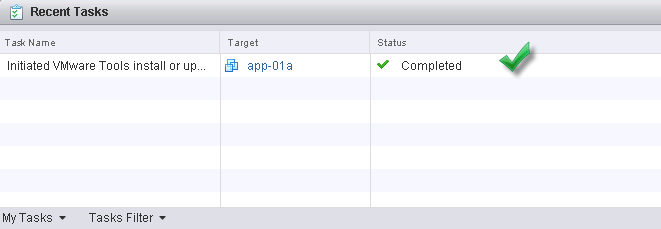
Figure-27 VMware Tools successfully upgraded
Command cheat sheet used to complete task:
CENTOS Command List
egrep -wi 'warning|fail|failure|error|cannot' /var/log/vmware-tools-upgrader.log (search log files)
fdisk -l
df -h
pvs
lvdisplay
cfdisk /dev/sda (create /dev/sda3) **Reboot**
pvcreate /dev/sda3
vgdisplay
vgextend VolGroup /dev/sda3
vgdisplay
swapoff /dev/VolGroup/lv_swap
lvm lvremove /dev/VolGroup/lv_swap
lvextend -L+1G /dev/VolGroup/lv_root
lvdisplay
resize2fs /dev/VolGroup/lv_root
df -h
lvm lvcreate VolGroup -n lv_swap -L 200M
mkswap /dev/VolGroup/lv_swap
swapon /dev/VolGroup/lv_swap
swapon -s
rm -rf /tmp/*
Subscribe to my newsletter
Read articles from Dave Davis directly inside your inbox. Subscribe to the newsletter, and don't miss out.
Written by
