Foundations of Convolutional Neural Networks (CNNs)
 Ezaan Amin
Convolutional Neural Networks (CNNs) have transformed the field of computer vision by allowing machines to detect patterns and features in images automatically. Whether it’s facial recognition, object detection, or autonomous vehicles, CNNs rely on a powerful mathematical operation called convolution to analyse visual data.
But how exactly does convolution work, and why is it essential? In this blog, we’ll break down the process of convolution with an example using grayscale images, so you can better understand how CNNs extract meaningful features from raw data.
What is Convolution?
Convolution is a mathematical operation that blends two sets of information. In the context of CNNs, it involves applying a filter (also known as a kernel) to an image, producing a feature map. This helps detect important features like edges, textures, or shapes in the image.
Put simply, convolution helps identify patterns — such as where an object begins and ends — by highlighting differences in pixel intensity.
How Does Convolution Work on Grayscale Images?
To make the concept clearer, let’s apply convolution to a grayscale image. A grayscale image consists of a matrix of pixel values, where each pixel intensity ranges between 0 (black) and 255 (white). Unlike a colour image, which has three channels (Red, Green, Blue), a grayscale image has just one.
Step 1: The Input Image and Filter
We’ll start with an example grayscale image represented by a 6x6 matrix:
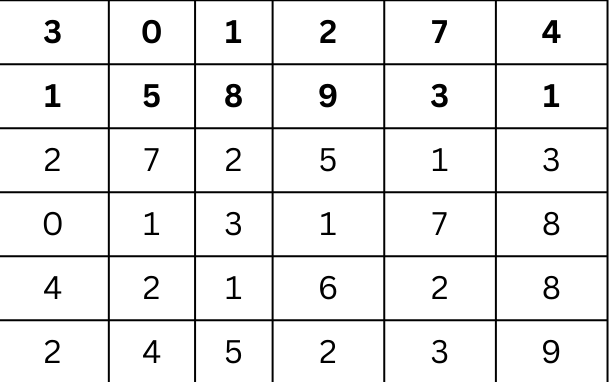
Next, we have a 3x3 kernel (filter) that is designed to detect vertical edges:
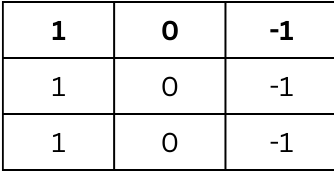
This filter is used to scan the input image to detect patterns. In this case, it’s structured to highlight vertical differences, which help in identifying vertical edges in the image.
Step 2: Applying the Filter (Convolution Operation)
The convolution process begins by placing the kernel on top of a 3x3 section of the input image, starting from the top-left corner. The kernel slides over the image one pixel at a time, performing a dot product between the kernel values and the corresponding image pixels, and then summing them up to produce a single output value.
Let’s walk through an example.
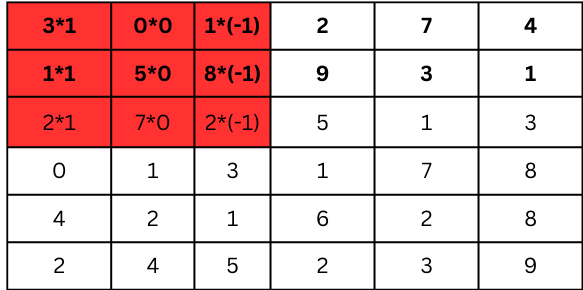
We multiply each element in this 3x3 section by the corresponding element in the kernel, and then sum the results:
Multiply the first row:
3 × 1 = 3
0 × 0 = 0
1 × -1 = -1
Multiply the second row:
1 × 1 = 1
5 × 0 = 0
8 × -1 = -8
Multiply the third row:
2 × 1 = 2
7 × 0 = 0
2 × -1 = -2
Now, sum the results:
3+0+(-1)+1+0+(–8)+2+0+(–2)= -5
This value (-5) is placed in the feature map in the top-left position.

Now let’s move the filter one step to the right and repeat the process with the next 3x3 section of the image:
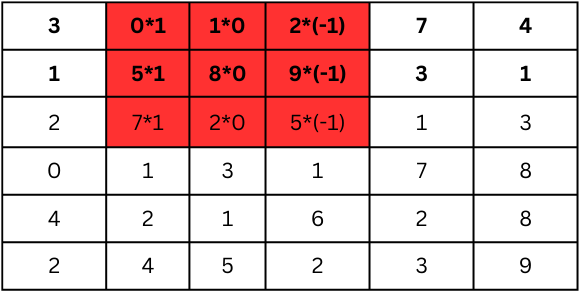
Multiply the first row:
0 × 1 = 0
1 × 0 = 0
2 × -1 = -2
Multiply the second row:
5 × 1 = 5
8 × 0 = 0
9 × -1 = -9
Multiply the third row:
7 × 1 = 7
2 × 0 = 0
5 × -1 = -5
Summing the results:
0+0+(-2)+5+0+(-9)+7+0+(-5)=-4
This value (-4) goes into the feature map in the next position to the right.
By continuing this process for the entire image, the feature map will look like this after applying the filter to every 3x3 section:
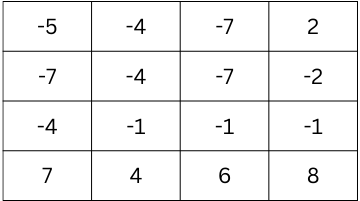
This matrix represents the feature map, which highlights where the vertical edges are detected in the image. The negative values represent areas where an edge is detected in one direction, and positive values may represent the opposite direction.
Stride and Padding: Fine-tuning the Convolution Process
In CNNs, two key parameters control how the filter moves across the image and affects the output size:
Stride: This refers to how many pixels the filter moves over after each calculation. In the above example, we used a stride of 1, meaning the filter moved one pixel at a time. A stride of 2, for example, would move the filter two pixels at a time, reducing the size of the feature map but possibly missing smaller details.
Padding: Padding adds extra pixels around the edges of the image. This allows the filter to process the edges more effectively without shrinking the image too much. In our example, we didn’t use any padding, but zero-padding could be applied to ensure the output size is closer to the input size.
Why Convolution is Crucial for CNNs
Convolution allows a CNN to automatically detect important features in images — such as edges, corners, and textures — by applying filters. Multiple layers of convolutional filters can stack up, enabling the network to recognise more complex patterns, like shapes and even entire objects (e.g., faces, cars).
Conclusion: Simplifying Convolution with an Example
In summary, convolution allows CNNs to “see” features within images, transforming raw pixel data into meaningful patterns. The key steps involve:
Input Image: A matrix of pixel values.
Kernel: A smaller matrix used to detect specific features, such as edges.
Convolution Operation: Sliding the filter over the image, multiplying corresponding values, and summing the results.
Feature Map: A new matrix that highlights where features like edges appear in the image.
By understanding this process, you can better appreciate how CNNs break down visual information and learn to recognise objects from patterns in pixel data.
Subscribe to my newsletter
Read articles from Ezaan Amin directly inside your inbox. Subscribe to the newsletter, and don't miss out.
Written by

Ezaan Amin
Ezaan Amin
Hey there! I'm Ezaan Amin, a dedicated student and MERN Stack Developer with a passion for technology, particularly in web development and machine learning. I'm committed to refining my skills and contributing positively to the tech sector. During my academic journey, I've undertaken various projects, including developing a comprehensive restaurant management system over 6 months (3 months for the admin app and 3 months for the user-facing app) and creating a social media platform focused on mental health awareness within 4 months. These experiences have provided me with valuable insights into software development, data analysis, and machine learning techniques. In addition to these projects, I have completed several smaller projects, such as a real-time chat application and a personal finance tracker, each within a 2-month timeframe. These projects have strengthened my skills in front-end and back-end development, database management, and user experience design.