Streamlining App Traffic: Deploying Azure Internal & External Load Balancers with Terraform IAC
 Ritesh Kumar Nayak
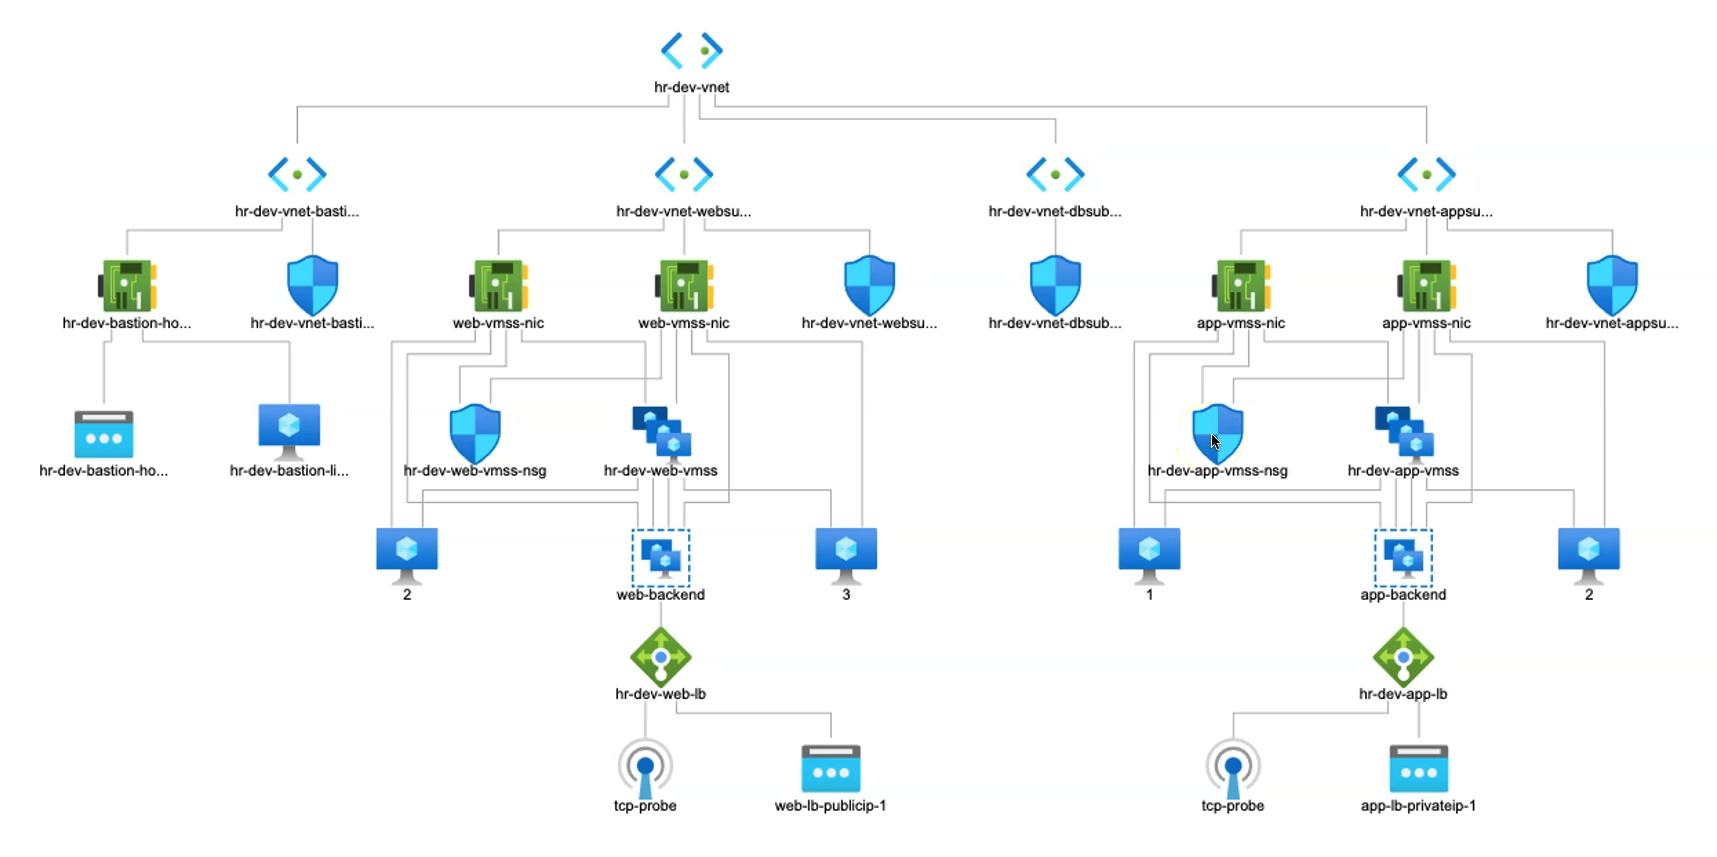
In Azure, Internal and External Load Balancers serve as crucial network components that distribute traffic effectively, help ensure high availability, and play a significant role in securing network traffic. We have earlier deployed an External LB in Web Subnet and in this article, we’ll be deploying an Internal LB in the App Subnet.
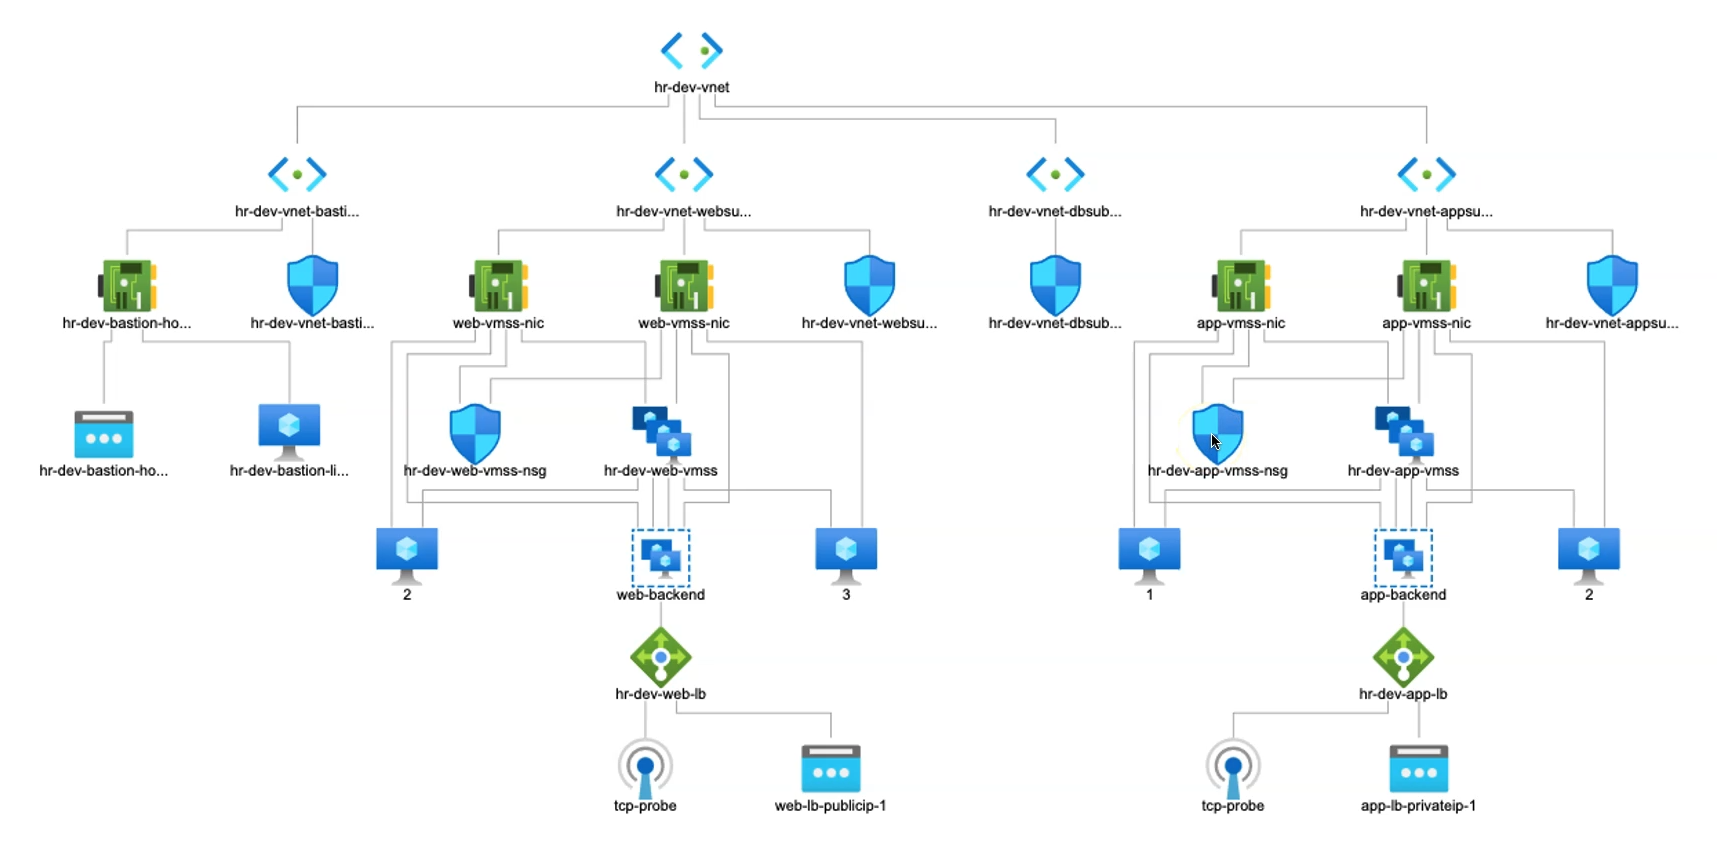
Internal Load Balancer
An Internal Load Balancer (ILB) is restricted to a Virtual Network (VNet) or a subset of subnets within the VNet. It is accessible only within private IP ranges and doesn’t have a public endpoint.
In App Subnets, the ILB handles traffic between internal services, such as between the application layer and the database layer, without exposing the services to the internet. By keeping this traffic internal, ILBs add an extra layer of security, ensuring that sensitive data and application communications stay within the network boundaries.
It limits exposure of critical resources by keeping inter-service traffic within private IP ranges as well as reduces the attack surface since resources do not need to be publicly accessible and helps enforce strict network segmentation, ensuring that only internal resources can interact with each other within controlled boundaries.
External Load Balancer
An External Load Balancer (ELB), or public load balancer, has a public IP address and is accessible over the internet.
In Web Subnets, an ELB distributes incoming internet traffic across the frontend or web servers in the subnet, typically hosted in a DMZ (Demilitarized Zone) within the VNet. It handles user traffic and ensures users have uninterrupted access to web services or applications, even during high-demand periods.
Controls the flow of incoming requests to the web servers, acting as a buffer to prevent direct access to backend or database layers. Integrates with security features such as NSGs (Network Security Groups), DDoS protection, and web application firewalls (WAF) to further protect against common web threats.
ILB & ELB Complement Each Other
Both ILBs and ELBs play essential roles in securing network traffic in a layered architecture:
Internal Isolation: ILBs ensure that backend services are isolated and can only communicate internally, reducing the chance of unauthorized access from external sources.
Traffic Control: ELBs manage all incoming traffic from the internet, filtering it before reaching any critical application layers.
Enhanced Security Posture: Together, they create a layered security approach where only necessary traffic flows between layers, reducing exposure and ensuring tighter security across the entire VNet.
How They Complement Each Other
In a typical web application architecture:
The External Load Balancer manages internet-facing traffic for the web layer in the Web Subnet.
The Internal Load Balancer facilitates secure communication between the web layer and the App Subnet, and similarly from the App Subnet to other layers (e.g., database subnet).
Required Azure Resources for Internal LB
To provision an internal load balancer in the app subnet, several Azure resources are needed to ensure secure and efficient network traffic management without exposing the application to the public internet. The setup includes resources for NAT gateway configuration, internal load balancing, and storage for necessary configuration files. Each resource plays a role in directing internal traffic, enhancing security, and maintaining seamless communication within the application architecture.
This setup leverages key resources such as NAT Gateway with associated public IPs for secure internet access, Load Balancer components (backend pools, health probes, load balancing rules), and Storage Account resources for configuration file management within VMs. Together, these components provide a robust foundation for internal network traffic management within the application subnet.
1) Storage Account Setup
To support file operations required for our deployment, a storage account and blob storage are essential. These will enable secure storage and retrieval of configuration files and scripts needed for the virtual machines managed by the Azure VM Scale Set.
Primary resources include:
azurerm_storage_account: Creates the storage account to store files and configuration data.
azurerm_storage_container: Organizes and contains the blob files within the storage account.
azurerm_storage_blob: Manages individual files to be stored and accessed for configurations.
This setup ensures that necessary files are accessible to VM instances, enhancing automation and configuration management across the scale set.
2) NAT Gateway Resource
Since the Internal Load Balancer (ILB) will reside in the app subnet without a public IP, a NAT gateway is necessary to enable outbound internet connectivity for resources in this subnet. The NAT gateway will route public internet traffic through a designated public IP, ensuring secure and controlled access.
Key resources include:
azurerm_public_ip: Provides the public IP address for the NAT gateway.
azurerm_nat_gateway: Sets up the NAT gateway instance to manage outbound traffic.
azurerm_nat_gateway_public_ip_association: Links the NAT gateway with the public IP.
azurerm_subnet_nat_gateway_association: Associates the NAT gateway with the app subnet.
This configuration ensures that resources behind the ILB can securely access the internet while maintaining the private, internal-only accessibility for incoming traffic.
3) Internal Load Balancer Resource
We've previously utilized resources to configure an external load balancer within the web subnet. Now, we’ll proceed by setting up the internal load balancer (ILB) in the app subnet, enhancing traffic control and security within our network.
Key resources in use include:
azurerm_lb: Defines the load balancer instance.
azurerm_lb_backend_address_pool: Configures backend pools for VM traffic distribution.
azurerm_lb_probe: Sets up health probes to monitor VM health.
azurerm_lb_rule: Manages the load balancing rules for specific traffic handling.
azurerm_network_interface_backend_address_pool_association: Links VM NICs to the backend address pool.
This setup will enable efficient traffic routing and help in isolating internal applications, ensuring enhanced security and optimized performance across the application tier.
Storage Account & Blob Container
Before provisioning the load balancer, it’s essential to set up a storage account to store configuration files that will be utilized by the virtual machines provisioned through Azure Virtual Machine Scale Sets (VMSS). This process involves first creating a storage account and then establishing a storage container to securely store and organize these configuration files for seamless access during VM initialization.
Storage Account Input Variables
variable "storage_account_name" {
    description = "Name of the storage accoun"
    type = string

}
variable "storage_account_tier" {
    description = "Storage account tier"
    type = string

}
variable "storage_account_replication_type" {
    description = "Storage Account Replication Type"
    type = string

}
variable "storage_account_kind" {
    description = "Storage account kind"
    type = string

}
variable "static_websit_index_document" {
    description = "static website index document"
    type = string

}
variable "static_website_error_404_document" {
    description = "static website error 404"
    type = string

}
Storage Account Resource
resource "azurerm_storage_account" "storage_account_lb" {
    name = "${var.storage_account_name}${random_string.random_name.id}"
    account_replication_type = var.storage_account_replication_type
    resource_group_name = azurerm_resource_group.rg.name
    location = azurerm_resource_group.rg.location
    access_tier = var.storage_account_tier
    account_kind = var.storage_account_kind
    account_tier = var.storage_account_tier

    static_website {
      index_document = var.static_websit_index_document
      error_404_document = var.static_website_error_404_document
    }

}

resource "azurerm_storage_container" "storage_container" {
    name = "${local.resource_name_prefix}-httpd-files-container"
    storage_account_name = azurerm_storage_account.storage_account_lb.name
    container_access_type = "private"

}
locals {
  httpd_files = ["app1.conf"]
}

# Resource to upload file to the container
resource "azurerm_storage_blob" "storage_container_blob" {
    for_each = local.httpd_files
    name = "upload_${each.value}_file"
    storage_account_name = azurerm_storage_account.storage_account_lb.name
    storage_container_name = azurerm_storage_container.storage_container.name
    type = "Block"
    source = "${path.module}/app-scripts/${each. Value}"

}
Storage Account (
azurerm_storage_account):Configured with a unique name using
random_string, this storage account supports replication and access tier based on provided variables.The
static_websiteblock enables static website hosting, specifying the index and error documents.
Storage Container (
azurerm_storage_container):- A private container named with a resource prefix is created within the storage account to securely store files required by the application.
Storage Blob (
azurerm_storage_blob):- Files listed in
httpd_filesare uploaded as blobs to the storage container. Each file is sourced from the local module path, allowing application-specific configurations (e.g.,app1.conf) to be accessible within the VMSS environment.
- Files listed in
Storage Account Outputs
output "storage_account_primary_access_key" {
    value = azurerm_storage_account.storage_account_lb.primary_access_key
    sensitive = true

}
output "storage_account_primary_web_endpoint" {
    value = azurerm_storage_account.storage_account_lb.primary_web_endpoint

}
output "storage_account_primary_web_host" {
    value = azurerm_storage_account.storage_account_lb.primary_web_host

}
output "storage_account_name" {
    value = azurerm_storage_account.storage_account_lb.name

}
NAT Gateway & Association with App Subnet
In the next steps, we’ll configure a NAT Gateway to manage secure inbound traffic for the application subnet. This involves:
Creating a Public IP Resource: A public IP will be created specifically for the NAT Gateway, ensuring controlled public access.
Deploying the NAT Gateway: This gateway will route incoming traffic securely through an internal load balancer, keeping the app subnet isolated from direct public access.
Associating NAT Gateway with Resources: Finally, we’ll link the NAT Gateway to the created public IP and associate it with the App subnet, directing traffic through the designated internal load balancer for secure connectivity.
#Create Public IP for Nat Gateway
resource "azurerm_public_ip" "nat_gateway_publicip" {
    name = "${local.resource_name_prefix}-natgtw_publicip"
    allocation_method = "Static"
    location = azurerm_resource_group.rg.location
    resource_group_name = azurerm_resource_group.rg.name
    sku = "Standard"

}
# Create NAT Gateway
resource "azurerm_nat_gateway" "nat_gateway_appsnet" {
    name = "${local.resource_name_prefix}-app-svc-nat-gateway"
    resource_group_name = azurerm_resource_group.rg.name
    location = azurerm_resource_group.rg.location
}

# Associate NAT gateway and public ip
resource "azurerm_nat_gateway_public_ip_association" "associate_natgtw_publicip" {
    nat_gateway_id = azurerm_nat_gateway.nat_gateway_appsnet.id
    public_ip_address_id = azurerm_public_ip.nat_gateway_publicip.id

}
# Associate App Subnet and Azure NAT Gateway
resource "azurerm_subnet_nat_gateway_association" "associate_natgtw_app_snet"{
    subnet_id = azurerm_subnet.app_subnet.id
    nat_gateway_id = azurerm_nat_gateway.nat_gateway_appsnet.id

}
App VMSS & NSG
In this section, we’ll set up the App Virtual Machine Scale Set (VMSS) similarly to the Web VMSS configuration. This App VMSS will be equipped with a dedicated Network Security Group (NSG) to define precise inbound and outbound traffic rules, enhancing network security for application resources.
The App VMSS will then be fronted by an internal load balancer, ensuring that internal traffic is efficiently managed. Additionally, it will be supported by a NAT Gateway to handle secure public connections, while still restricting direct access to the application subnet.
NSG Resource
# Create NSG using Terraform Dynamic Block
resource "azurerm_network_security_group" "app_vmss_nsg" {
  name = "${local.resource_name_prefix}-app-vmss-nsg"
  location = azurerm_resource_group.rg.location
  resource_group_name = azurerm_resource_group.rg.name
  dynamic "security_rule" {
    for_each = var.app_vmss_nsg_inbound_ports
    content {
      name = "inbound-rule-${security_rule.key}"
      description = "Inbound-rule-${security_rule.key}"
      priority = sum([100,security_rule.key])
      direction = "Inbound"
      access = "Allow"
      protocol = "Tcp"
      source_port_range = "*"
      destination_port_range = security_rule.value
      source_address_prefix = "*"
      destination_address_prefix = "*"
    }

  }
}
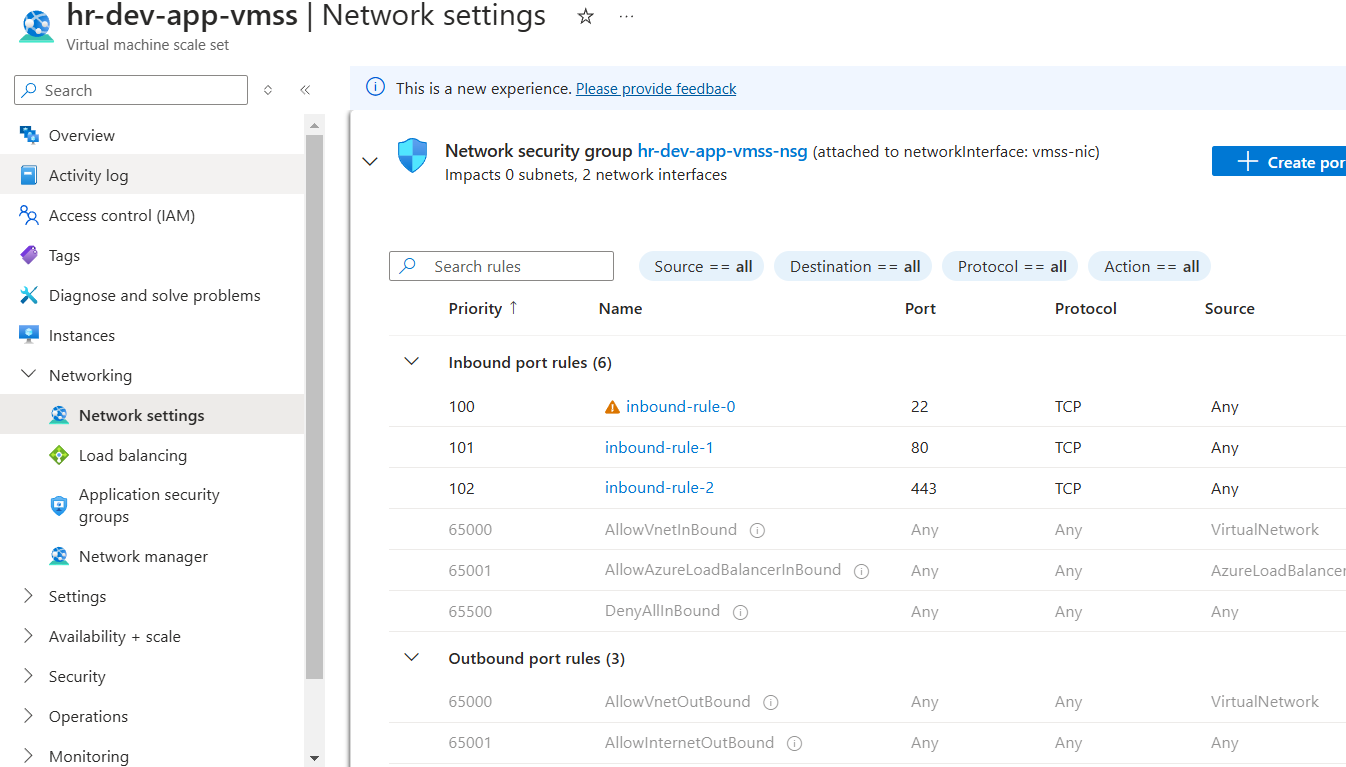
NSG Resource:
- The
azurerm_network_security_groupresource creates the NSG, named based on a specified prefix and applied to the App VMSS. It is located in the same resource group and region as defined in the configuration.
- The
Dynamic Inbound Rules:
The
dynamic "security_rule"block generates multiple inbound rules by iterating overvar.app_vmss_nsg_inbound_ports.Each rule allows TCP traffic on specific ports defined in
app_vmss_nsg_inbound_ports.The rule configuration includes:
Name and Description: Generated dynamically with a unique identifier for each rule.
Priority: Calculated based on the rule's index, ensuring proper order without conflicts.
Access: All rules are set to “Allow.”
Source/Destination Port and Address Ranges: Allows traffic from any source to any destination on the specified ports.
App VMSS Resource
# Resource VMSS(Virtual machine scale sets)

resource "azurerm_linux_virtual_machine_scale_set" "app_vmss" {
  name                 = "${local.resource_name_prefix}-app-vmss"
  admin_username       = var.linux_admin_username
  computer_name_prefix = "vmss-app"
  location             = azurerm_resource_group.rg.location
  sku                  = "Standard_DS1_v2"
  resource_group_name  = azurerm_resource_group.rg.name

  instances = 2 # Manually defining the number of instances. Hence, it is called manual scaling

  upgrade_mode = "Automatic" # VMs will be auto upgraded after associated with LB

  admin_ssh_key {
    username   = var.linux_admin_username
    public_key = file("${path.module}/ssh-keys/terraform-azure.pub")

  }
  os_disk {
    caching              = "ReadWrite"
    storage_account_type = "Standard_LRS"
  }
  source_image_reference {
    publisher = "RedHat"
    offer     = "RHEL"
    sku       = "83-gen2"
    version   = "latest"
  }
  network_interface {
    name                      = "vmss-nic"
    primary                   = true
    network_security_group_id = azurerm_network_security_group.app_vmss_nsg.id

    ip_configuration {
      name      = "internal"
      primary   = true
      subnet_id = azurerm_subnet.app_subnet.id
      # here the VMSS is now associated with Internal LoadBalancer.
      load_balancer_backend_address_pool_ids = [azurerm_lb_backend_address_pool.app_internal_lb_address_pool.id]
    }

  }
  custom_data = filebase64("${path.module}/app-script/appvm-script.sh") # One way of passing custom script


}
VMSS Configuration:
Creates a VM scale set named after a defined prefix for application VMs.
Sets a specific SKU (
Standard_DS1_v2) and deploys 2 VM instances (manual scaling).Configures automatic upgrade mode, allowing VMs to update automatically when changes are applied.
Admin Configuration:
- Sets the administrator username and SSH key for secure access. The public key is read from the specified path for the VMSS.
OS Disk and Image:
Configures the OS disk with
Standard_LRSstorage and sets caching toReadWrite.Uses the Red Hat Enterprise Linux (RHEL) image, specifying the publisher, offer, SKU, and version.
Network Configuration:
Attaches each VM to the App subnet and associates it with an Internal Load Balancer for internal traffic handling.
Associates the NSG (Network Security Group) for controlled inbound and outbound traffic to the application layer.
Custom Data:
- Uses the
custom_datafield to pass initialization scripts to each VM instance, which can be used to configure applications or services during the VM setup.
- Uses the
Auto-Scaling Profile
Configuring an autoscaling profile is essential for managing load and ensuring optimal performance in Virtual Machine Scale Sets (VMSS). The following Terraform code creates an autoscaling profile for VMSS, targeting both CPU and memory usage as scaling triggers
resource "azurerm_monitor_autoscale_setting" "app_vmss_autoscale" {
  name                = "${local.resource_name_prefix}-app-vmss-autoscale-profiles"
  resource_group_name = azurerm_resource_group.rg.name
  location            = azurerm_resource_group.rg.location
  target_resource_id  = azurerm_linux_virtual_machine_scale_set.app_vmss.id

  profile {
    name = "default"
    # Capacity Block
    capacity {
      default = 2
      minimum = 2
      maximum = 6
    }
    ###########  START: Percentage CPU Metric Rules  ###########
    ## Scale-Out
    rule {
      scale_action {
        direction = "Increase"
        type      = "ChangeCount"
        value     = 1
        cooldown  = "PT5M"
      }
      metric_trigger {
        metric_name        = "Percentage CPU"
        metric_resource_id = azurerm_linux_virtual_machine_scale_set.app_vmss.id
        metric_namespace   = "microsoft.compute/virtualmachinescalesets"
        time_grain         = "PT1M"
        statistic          = "Average"
        time_window        = "PT5M"
        time_aggregation   = "Average"
        operator           = "GreaterThan"
        threshold          = 75
      }
    }

    ## Scale-In
    rule {
      scale_action {
        direction = "Decrease"
        type      = "ChangeCount"
        value     = 1
        cooldown  = "PT5M"
      }
      metric_trigger {
        metric_name        = "Percentage CPU"
        metric_resource_id = azurerm_linux_virtual_machine_scale_set.app_vmss.id
        metric_namespace   = "microsoft.compute/virtualmachinescalesets"
        time_grain         = "PT1M"
        statistic          = "Average"
        time_window        = "PT5M"
        time_aggregation   = "Average"
        operator           = "LessThan"
        threshold          = 25
      }
    }
    ###########  END: Percentage CPU Metric Rules   ###########

    ###########  START: Available Memory Bytes Metric Rules  ###########
    ## Scale-Out
    rule {
      scale_action {
        direction = "Increase"
        type      = "ChangeCount"
        value     = 1
        cooldown  = "PT5M"
      }
      metric_trigger {
        metric_name        = "Available Memory Bytes"
        metric_resource_id = azurerm_linux_virtual_machine_scale_set.app_vmss.id
        metric_namespace   = "microsoft.compute/virtualmachinescalesets"
        time_grain         = "PT1M"
        statistic          = "Average"
        time_window        = "PT5M"
        time_aggregation   = "Average"
        operator           = "LessThan"
        threshold          = 1073741824 # Increase 1 VM when Memory In Bytes is less than 1GB
      }
    }

    ## Scale-In
    rule {
      scale_action {
        direction = "Decrease"
        type      = "ChangeCount"
        value     = 1
        cooldown  = "PT5M"
      }
      metric_trigger {
        metric_name        = "Available Memory Bytes"
        metric_resource_id = azurerm_linux_virtual_machine_scale_set.app_vmss.id
        metric_namespace   = "microsoft.compute/virtualmachinescalesets"
        time_grain         = "PT1M"
        statistic          = "Average"
        time_window        = "PT5M"
        time_aggregation   = "Average"
        operator           = "GreaterThan"
        threshold          = 2147483648 # Decrease 1 VM when Memory In Bytes is Greater than 2GB
      }
    }
    ###########  END: Available Memory Bytes Metric Rules  ###########
  } # End of Profile-1
}
Resource Definition:
Resource:
azurerm_monitor_autoscale_settingName: Configured with a prefix for easy identification as
app-vmss-autoscale-profilesTarget Resource: Associates with the VMSS for the application layer using
target_resource_id
Profile Specifications:
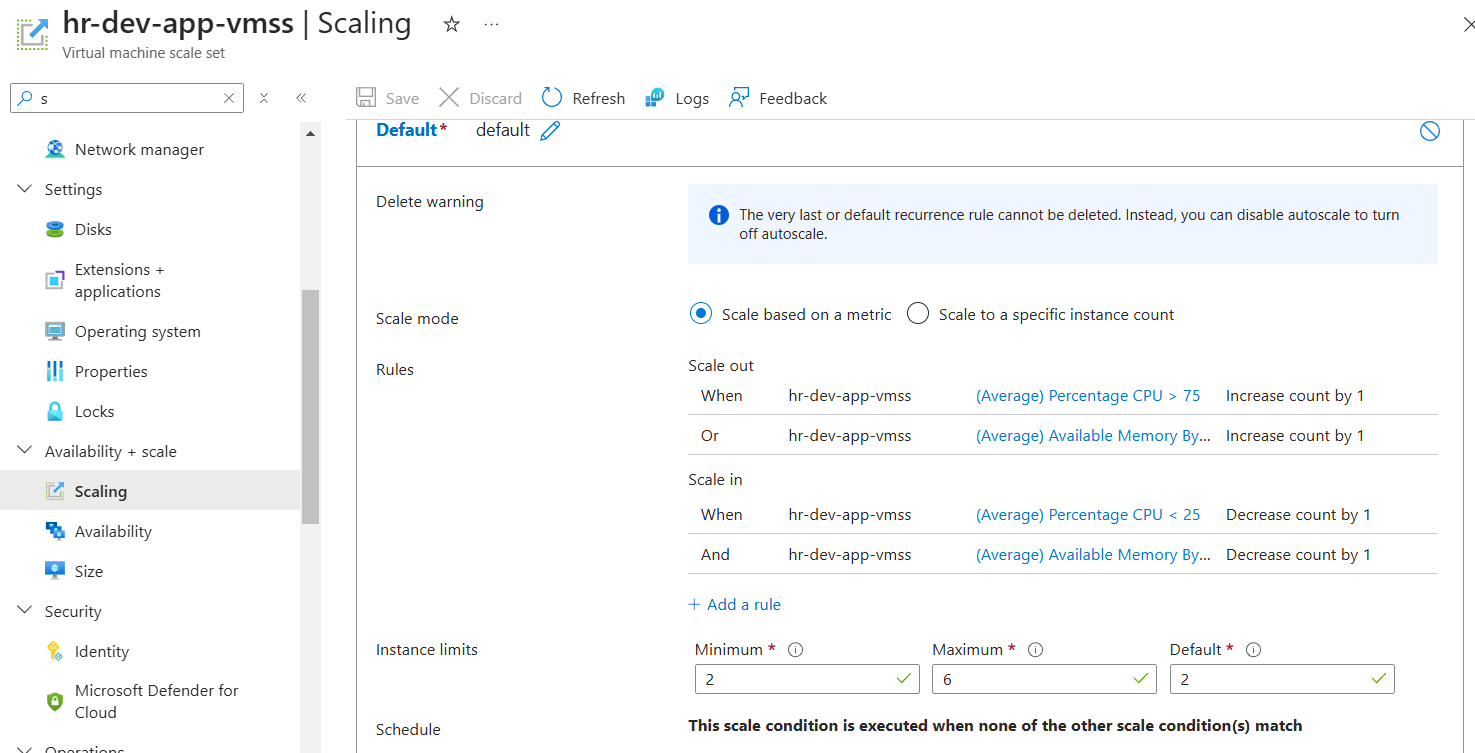
Capacity Block:
Default: 2 instances
Minimum: 2 instances
Maximum: 6 instances (allowing the VMSS to scale between these limits)
Metric-Based Scaling Rules:
CPU Usage (Percentage CPU):
Scale-Out: Adds one instance when the average CPU exceeds 75% over a 5-minute window.
Scale-In: Removes one instance when the average CPU falls below 25% over a 5-minute window.
Memory Usage (Available Memory Bytes):
Scale-Out: Adds one instance when available memory is below 1GB.
Scale-In: Removes one instance when available memory exceeds 2GB.
Provision of Internal Load Balancer
This section covers the setup of an internal load balancer for the Application Virtual Machine Scale Set (App VMSS). By routing traffic through the App Subnet and fronting it with a NAT gateway, this configuration enhances the security and management of internal network traffic.
resource "azurerm_lb" "app_internal_lb" {
  name                = "${local.resource_name_prefix}-app-internal-lb"
  location            = azurerm_resource_group.rg.location
  sku                 = "Standard"
  resource_group_name = azurerm_resource_group.rg.name
  frontend_ip_configuration {
    name                          = "app-lb-privateip-1"
    subnet_id                     = azurerm_subnet.app_subnet.id
    private_ip_address_allocation = "Static"
    private_ip_address            = "10.1.11.241"
    private_ip_address_version    = "IPv4"

  }

}
# Create backen pool
resource "azurerm_lb_backend_address_pool" "app_internal_lb_address_pool" {
  name            = "app-backend"
  loadbalancer_id = azurerm_lb.app_internal_lb.id

}
# Create LB Probe
resource "azurerm_lb_probe" "app_internal_lb_probe" {
  name            = "tcp-probe"
  protocol        = "Tcp"
  port            = 80
  loadbalancer_id = azurerm_lb.app_internal_lb.id

}
# Create LB Rule
resource "azurerm_lb_rule" "app_internal_lb_rule" {
  name                           = "app-app1-rule"
  protocol                       = "Tcp"
  backend_port                   = 80
  frontend_port                  = 80
  frontend_ip_configuration_name = azurerm_lb.app_internal_lb.frontend_ip_configuration[0].name
  backend_address_pool_ids       = azurerm_lb_backend_address_pool.app_internal_lb_address_pool.id
  probe_id                       = azurerm_lb_probe.app_internal_lb_probe.id
  loadbalancer_id                = azurerm_lb.app_internal_lb.id

}
Resource Breakdown:
Internal Load Balancer:
Resource:
azurerm_lbConfiguration:
Name: Specifies a unique identifier with a custom prefix.
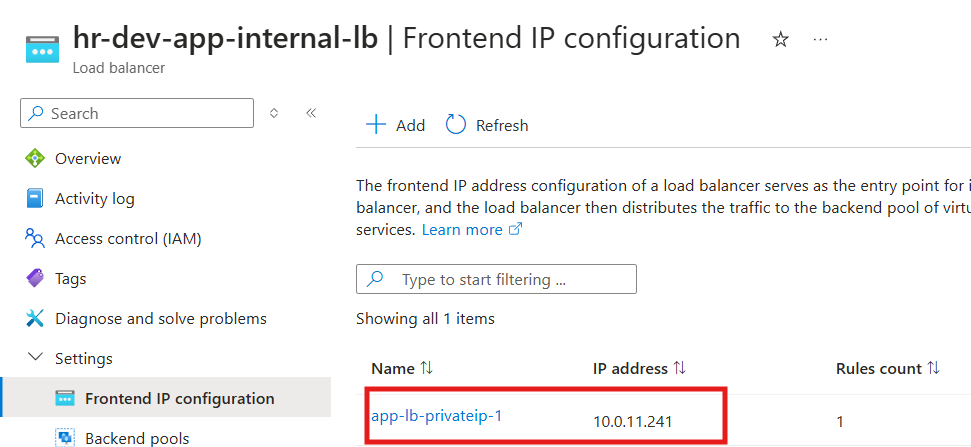
Frontend IP: Sets up a private static IP within the App Subnet for internal-only access.
Backend Pool:
Resource:
azurerm_lb_backend_address_poolConfiguration:
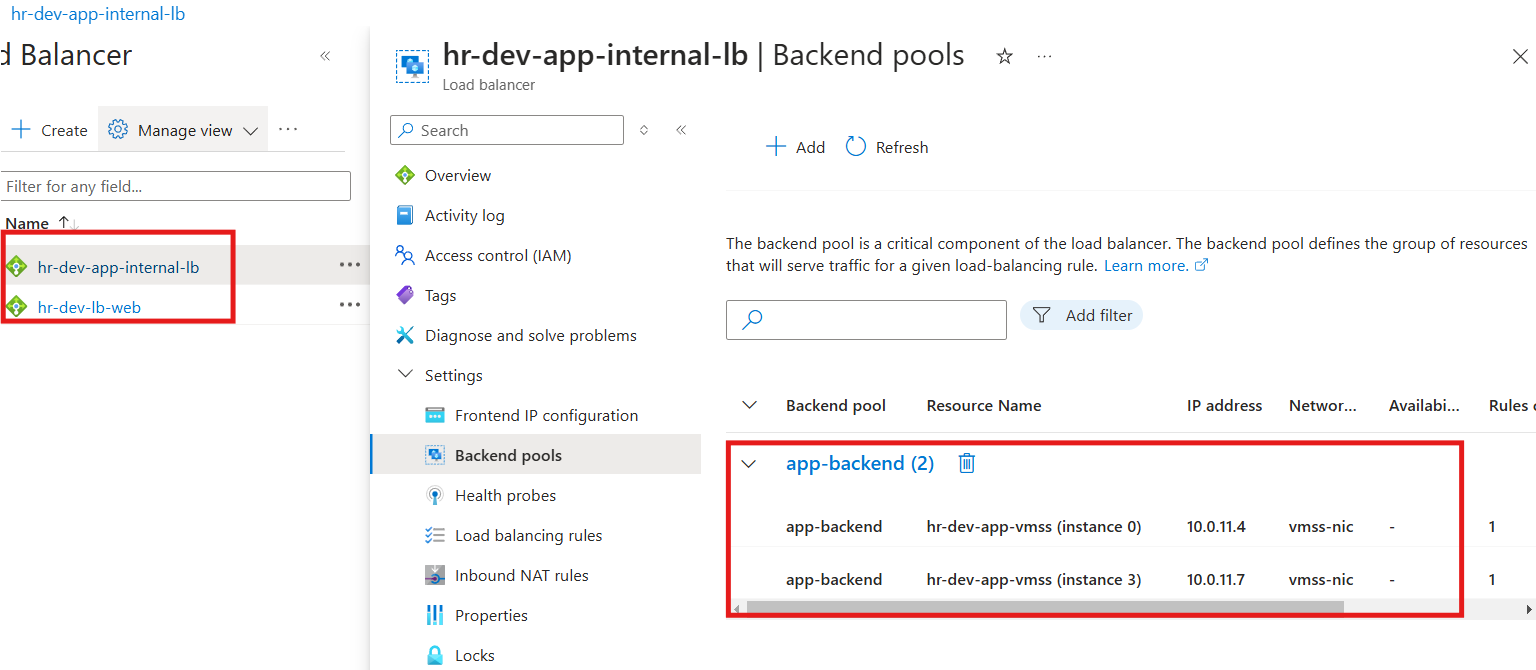
- Connects the App VMSS instances to the load balancer.
Health Probe:
Resource:
azurerm_lb_probeConfiguration:
Protocol: TCP
Port: 80, enabling traffic health checks for connected instances.
Load Balancer Rule:
Resource:
azurerm_lb_ruleConfiguration:
- Routes traffic on TCP port 80, forwarding it from the frontend IP to the backend pool with health checks provided by the probe.
Resource Verification on Azure Portal
Storage Account
The designated storage account has been successfully provisioned with a blob container that includes the app.conf file, which has been correctly uploaded as expected.

NAT Gateway
The NAT Gateway has been deployed and is now associated with the application subnet.
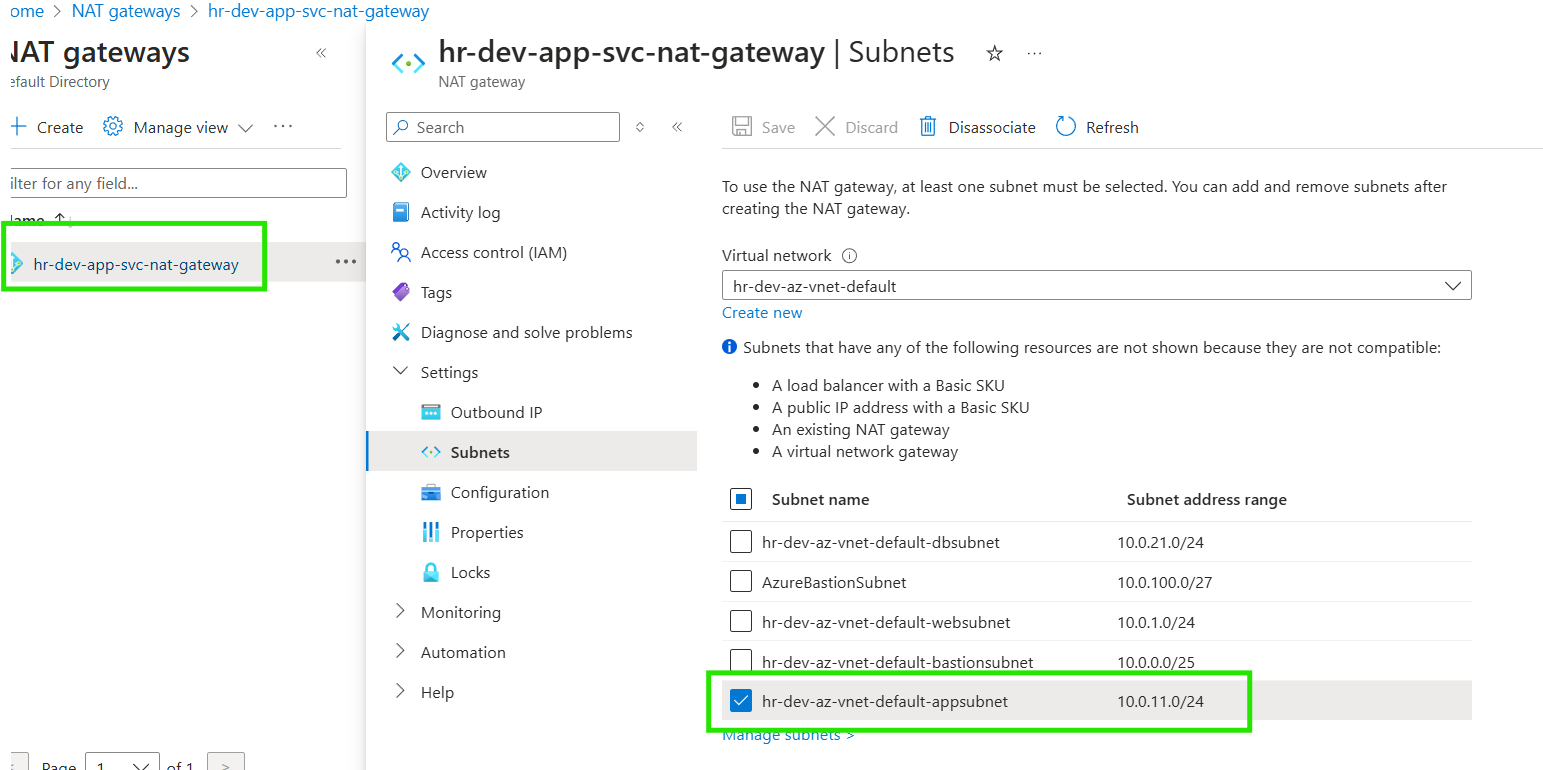
Additionally, the outbound IP configuration has been set up with the specified public IP, enabling external communication for resources within the App subnet.

APP VMSS
The App VMSS has been successfully deployed within the application subnet, as highlighted in the configuration.
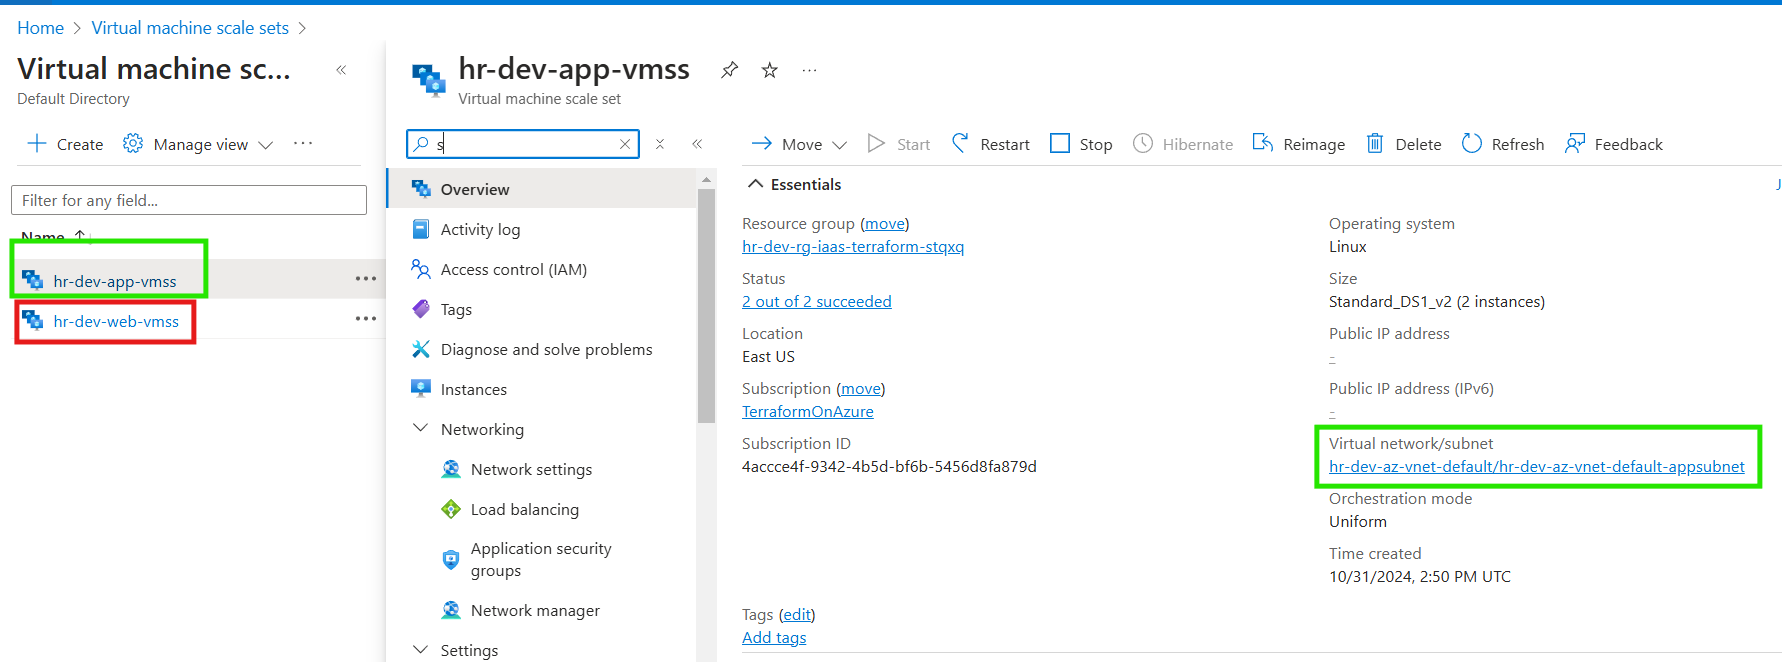
A scaling policy has been applied to manage resources efficiently based on demand.
Custom networking for the App VMSS has also been configured to support secure inbound and outbound traffic, layered on top of the default Network Security Group (NSG) settings for the App subnet.
Load Balancers
An internal load balancer has been provisioned, with backend pools configured and associated for optimal load distribution.
The frontend IP has been sourced directly from the App subnet, ensuring seamless connectivity and traffic routing within the internal network.
Subscribe to my newsletter
Read articles from Ritesh Kumar Nayak directly inside your inbox. Subscribe to the newsletter, and don't miss out.
Written by

Ritesh Kumar Nayak
Ritesh Kumar Nayak
Passionate about helping organizations build scalable infrastructure and DevOps solutions with cloud technologies. Experienced in designing robust systems, automating processes, and driving efficiency through innovative cloud solutions. Advocate for best practices in DevOps and cloud computing, committed to enabling teams to achieve their full potential.