Create and Test an ASP.NET Core App in Azure DevOps Pipelines
 Rabiatu Mohammed
Table of contents
- What is Azure DevOps?
- Step 1: Access Your Azure DevOps Organization
- Step 2: Create Your Azure DevOps Organization
- Step 3: Create a New Project
- Step 4: Add Code to Your Repository
- Step 5: Review VM Details in Azure Portal
- Step 6: Connect to Your VM via SSH
- Step 7: Clone the Repository to Your VM
- Step 8: Verify and Remove the Remote Origin
- Step 9: Access Personal Access Tokens (PAT)
- Step 10: Create a Personal Access Token (PAT)
- Step 11: Set Up the Build Pipeline in Azure DevOps
- Step 12: Select an Agent Pool for Your Pipeline
- Step 13: Set Up a Self-Hosted Agent on Linux
- Step 14: Add Remote and Push Code to Azure DevOps
- Step 15: Download the Azure DevOps Agent
- Step 16: Extract the Azure DevOps Agent
- Step 17: Configure the Azure DevOps Agent
- Step 18: Set Up the Pipeline Using a Template
- Step 19: Configure the ASP.NET Core Pipeline
- tep 20: Configure and Save the Pipeline
- Step 22: Verify Specific Files in the Repository
- Step 23: Update and Commit Changes to Index.cshtml
- Step 24: View Pipeline Run and Job Status
- Step 25: Start the Azure DevOps Agent
- Conclusion
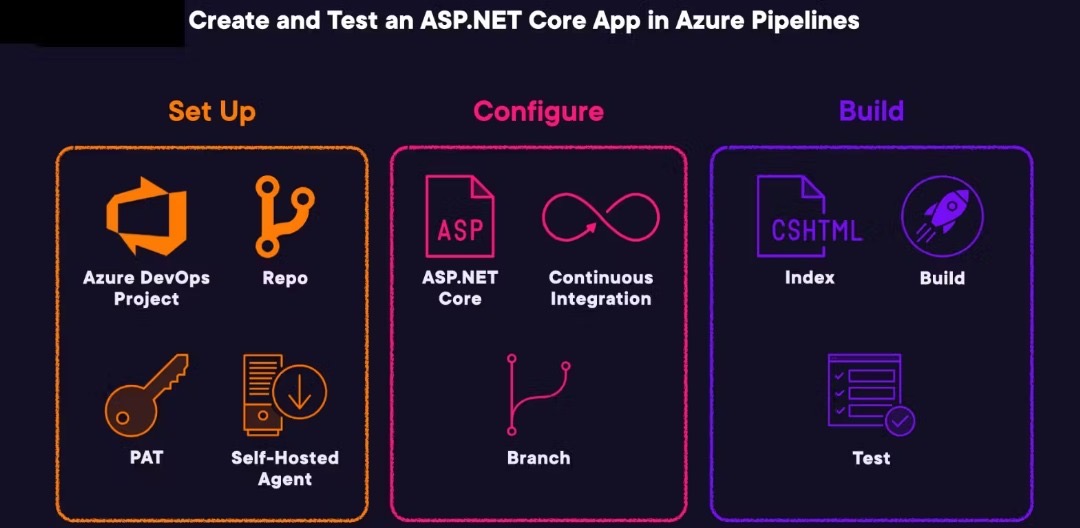
What is Azure DevOps?
Azure DevOps is Microsoft’s all-in-one platform for planning, developing, testing, and deploying software. It offers tools like Azure Repos for source control, Azure Pipelines for automating CI/CD, Azure Boards for project management, and more—all to help teams deliver better software faster.
In this guide, we’ll focus on Azure Pipelines to automate the build, test, and deployment of an ASP.NET Core application. Azure DevOps makes software delivery smoother and more efficient, whether you're working solo or in a team.
Step 1: Access Your Azure DevOps Organization
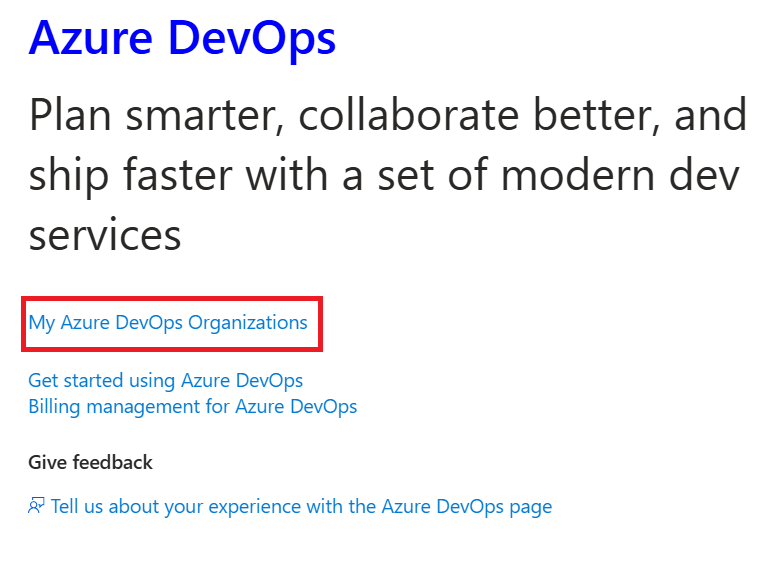
Go to the Azure DevOps homepage.
Click "My Azure DevOps Organizations" to view or manage your organization.
Step 2: Create Your Azure DevOps Organization
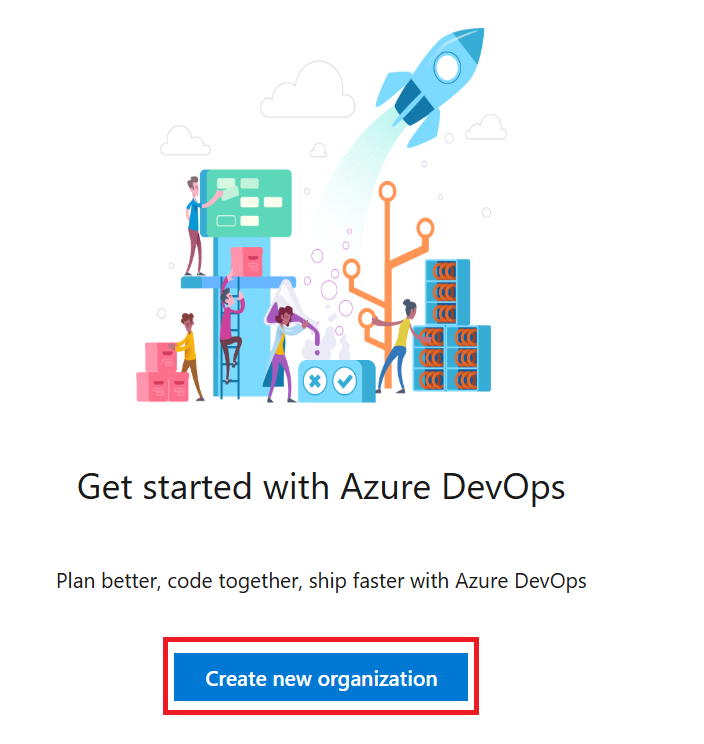
On the Azure DevOps homepage, click Create new organization.
Sign in with your Microsoft account if prompted.
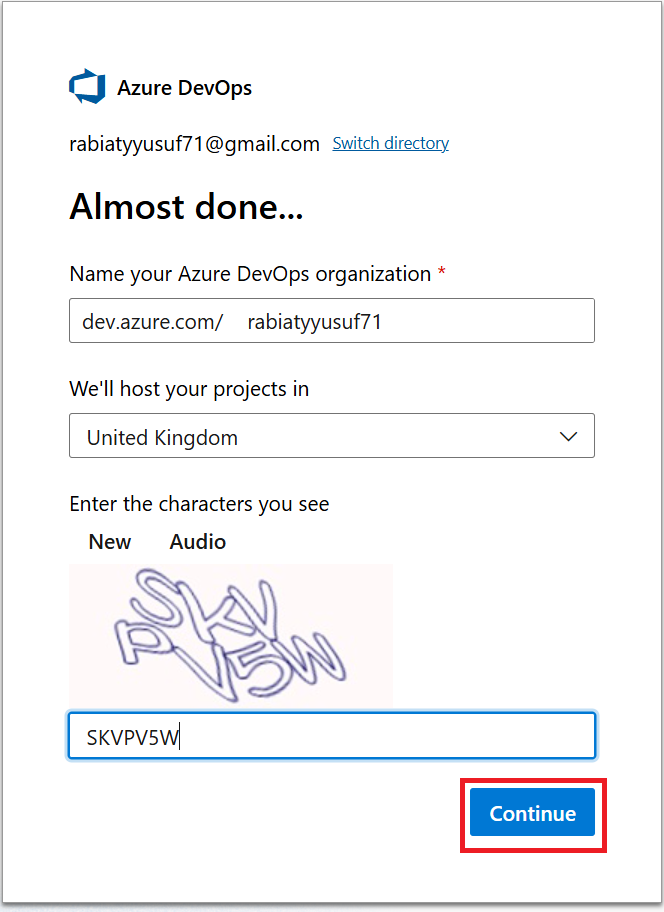
Enter a unique name for your organization (e.g.,
dev.azure.com/rabiatyusuf71).Choose your region (e.g., United Kingdom).
Complete the CAPTCHA, then click Continue.
Step 3: Create a New Project
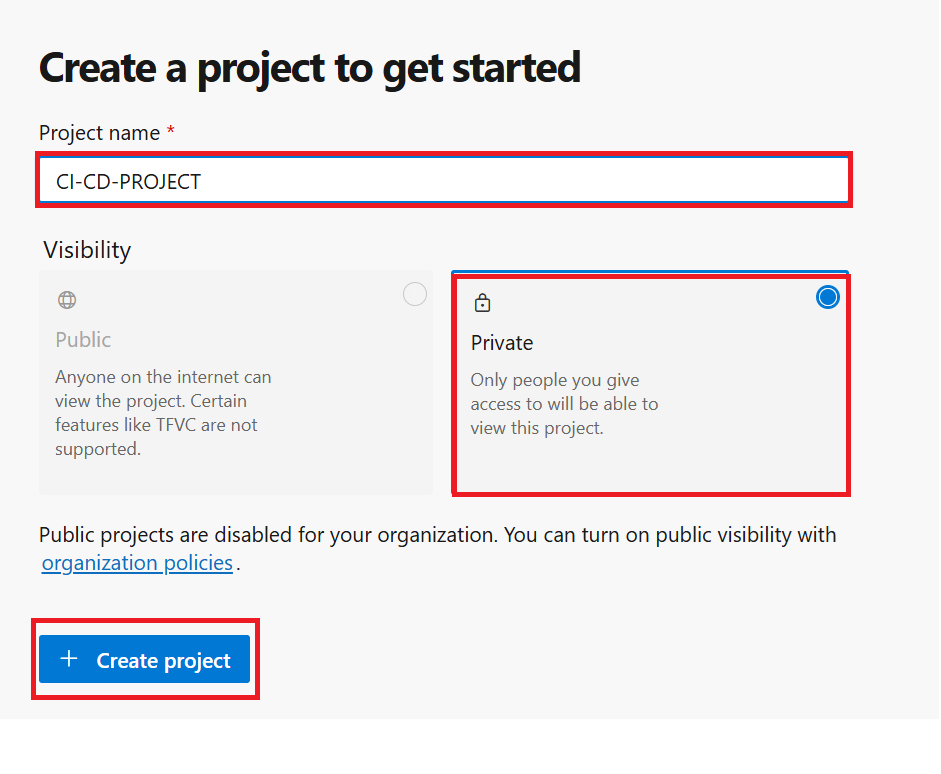
Once your organization is set up, you’ll be prompted to create a new project.
Enter a Project name (e.g.,
CI-CD-PROJECT).Select the Visibility:
Private: Only people you give access to can view this project.
Public: Available for anyone to view on the internet (may have limitations).
Click Create project to complete the setup.
Step 4: Add Code to Your Repository
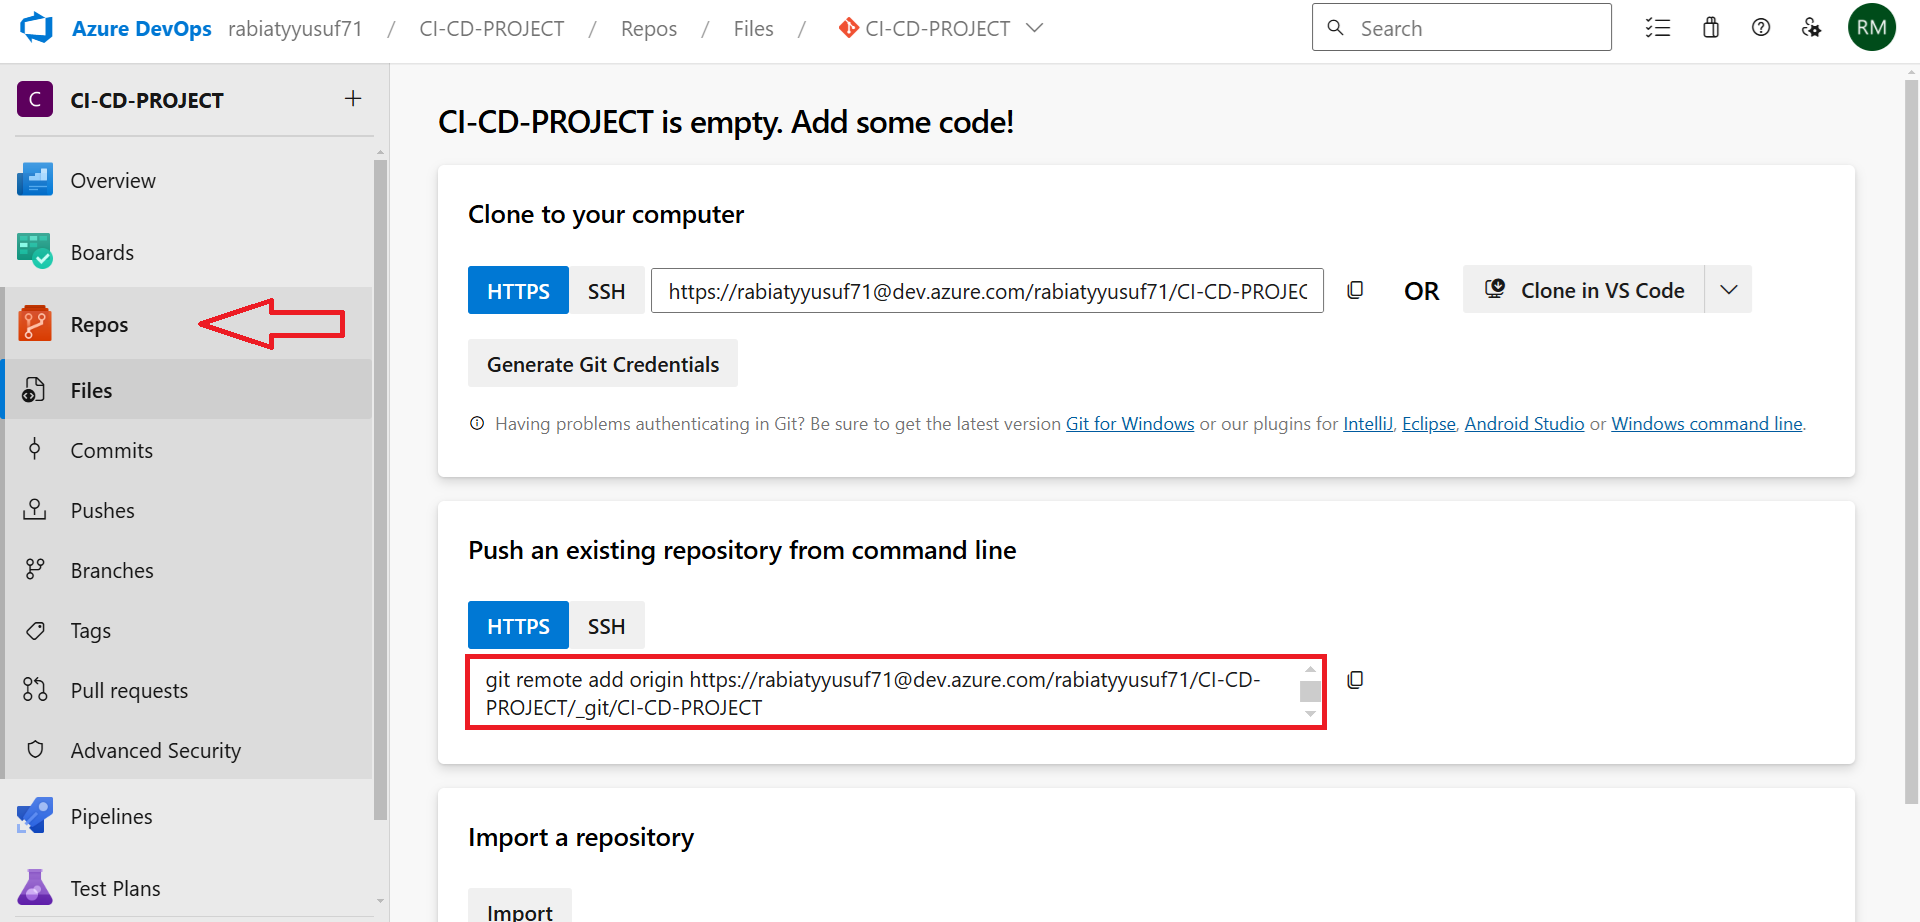
In your Azure DevOps project, go to Repos in the left sidebar.
To connect your local repository, copy the HTTPS or SSH URL.
If you’re pushing an existing repository, run this command in your terminal.
Push your code.
Step 5: Review VM Details in Azure Portal
To access and interact with Azure DevOps securely, we created a Linux virtual machine (VM) in Azure. This VM serves as a controlled environment from which we can manage Azure DevOps resources and workflows.
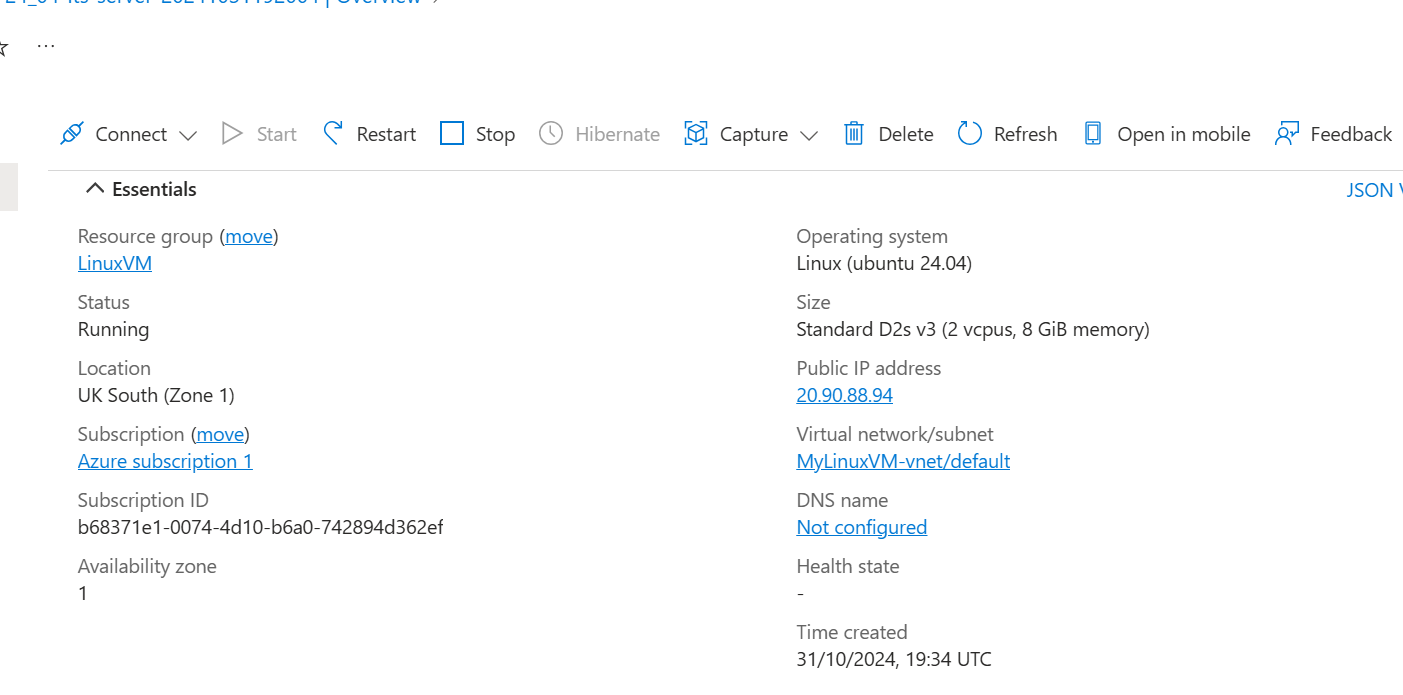
In the Azure Portal, navigate to your VM's Overview tab to review essential details, including:
Resource Group: The group the VM is part of (e.g.,
LinuxVM).Status: Current status (e.g., Running).
Location: Azure region hosting the VM (e.g., UK South (Zone 1)).
Operating System: Type and version (e.g., Linux Ubuntu 24.04).
Public IP Address: Use this IP address to connect to the VM and access Azure DevOps securely.
Ensure your VM is running and accessible, as it will act as the primary interface for managing Azure DevOps.
Step 6: Connect to Your VM via SSH
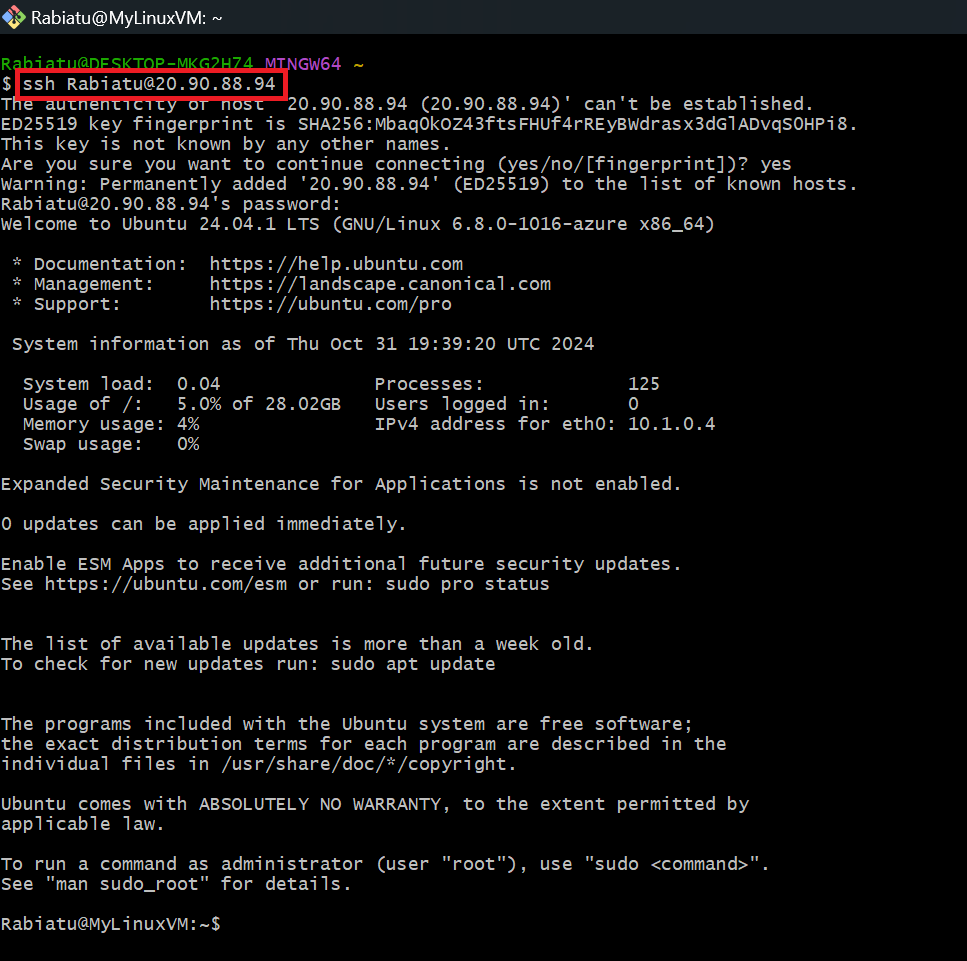
To access and manage Azure DevOps securely from your VM, connect to it using SSH.
Open a terminal on your local machine.
Run the following command, replacing the IP address with your VM's public IP.
If prompted, confirm the connection by typing yes.
Enter your VM password when prompted.
You’re now connected to your VM and can use it to interact with Azure DevOps resources.
Step 7: Clone the Repository to Your VM
To work with code and resources needed for your Azure DevOps setup, clone the required repository onto your VM.
In the SSH session on your VM, run the following command to clone the repository (replace with your repository URL if different).
-b unit-testspecifies the branch to clone (in this case,unit-test).
Once the cloning is complete, you’ll have the repository files available on your VM for further configuration or testing.

Step 8: Verify and Remove the Remote Origin
After cloning the repository, you may want to remove the default remote origin if you plan to link it to a different repository.
List Current Remotes: Check the current remote repositories by running: git remote -v
- This should display the current remote URL for both
fetchandpush.
- This should display the current remote URL for both
Remove the Remote Origin: Use the following command to remove the existing remote origin: git remote remove origin
Verify Removal: Confirm that the remote has been removed by listing remotes again: git remote -v
You should see no output, indicating the origin has been removed successfully.

Step 9: Access Personal Access Tokens (PAT)
To authenticate with Azure DevOps from your VM or other tools, you’ll need a Personal Access Token (PAT).
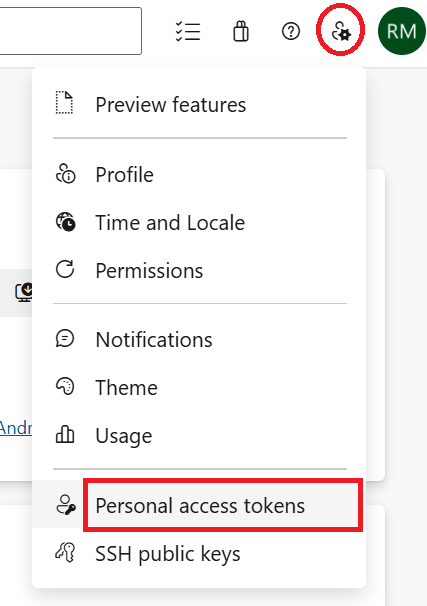
In Azure DevOps, go to the top-right corner and click on the User Settings icon (gear icon).
From the dropdown menu, select Personal access tokens.
This will take you to the page where you can create and manage your tokens for secure access.
Step 10: Create a Personal Access Token (PAT)
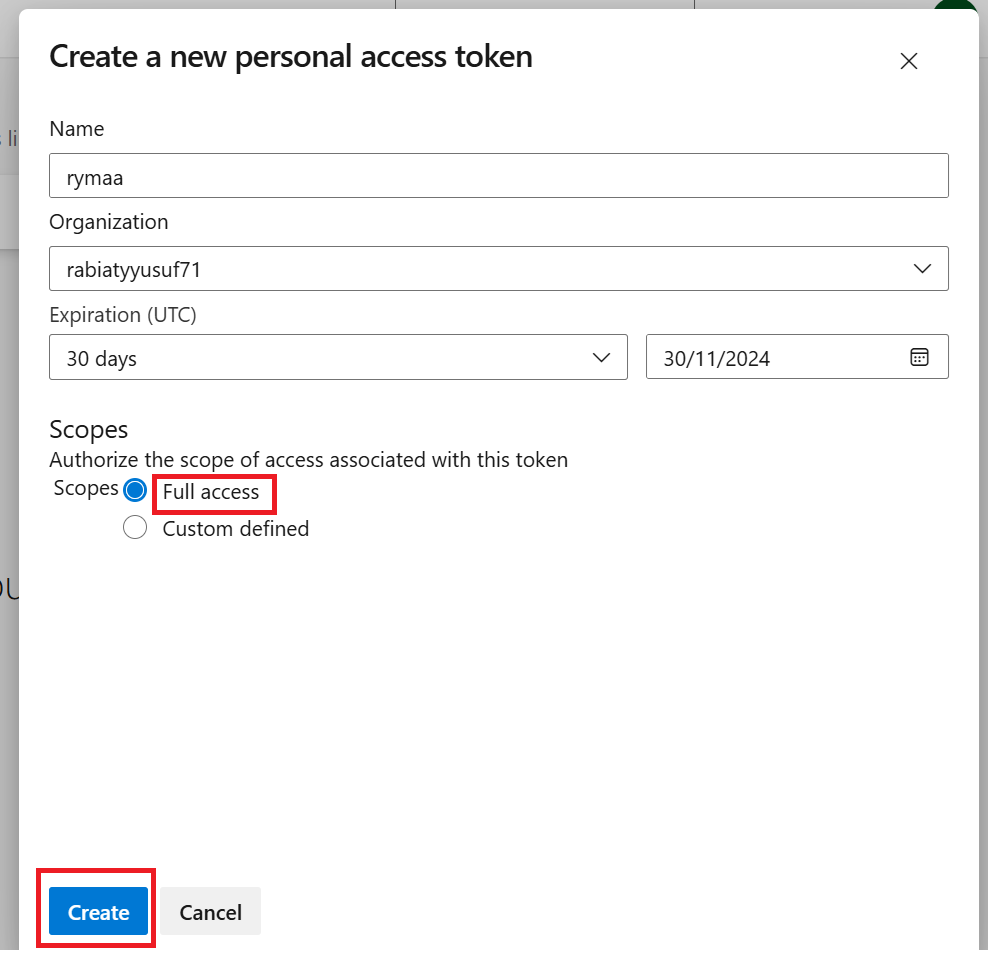
In the Personal Access Tokens section, click Create new token.
Fill in the details:
Name: Enter a name for the token (e.g.,
rymaa).Organization: Verify your organization (e.g.,
rabiatyusuf71).Expiration: Set the expiration duration (e.g., 30 days).
Scopes: Select Full access to allow comprehensive access to Azure DevOps resources.
Click Create to generate the token.
Once created, copy and securely store the token, as it will be required for authenticating with Azure DevOps.
Step 11: Set Up the Build Pipeline in Azure DevOps
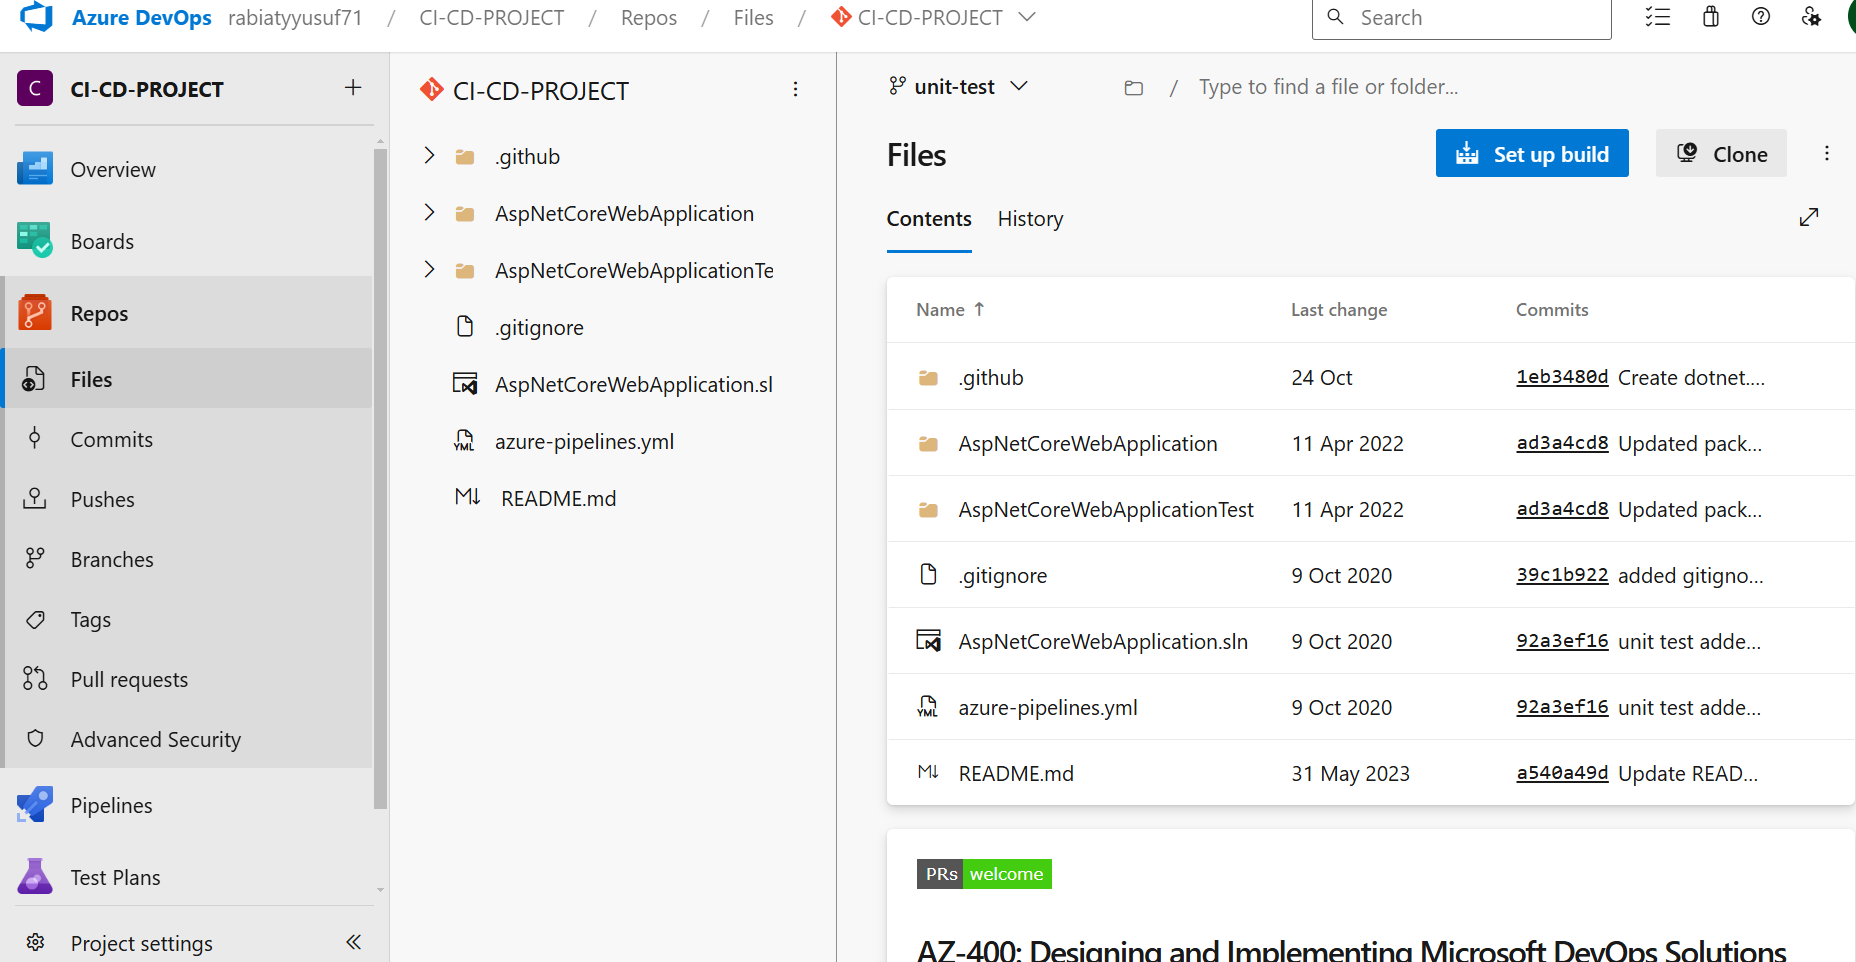
In your Azure DevOps project, go to Repos > Files to view the repository contents.
Ensure the repository contains the necessary files, including the
azure-pipelines.ymlfile, which defines your pipeline steps.Click on Set up build at the top right to initiate the pipeline setup process.
This setup will allow Azure DevOps to automatically follow the instructions in azure-pipelines.yml to build, test, and deploy your application.
Step 12: Select an Agent Pool for Your Pipeline
An agent pool is necessary to run your pipeline tasks. Azure DevOps provides a default agent pool for you to use.
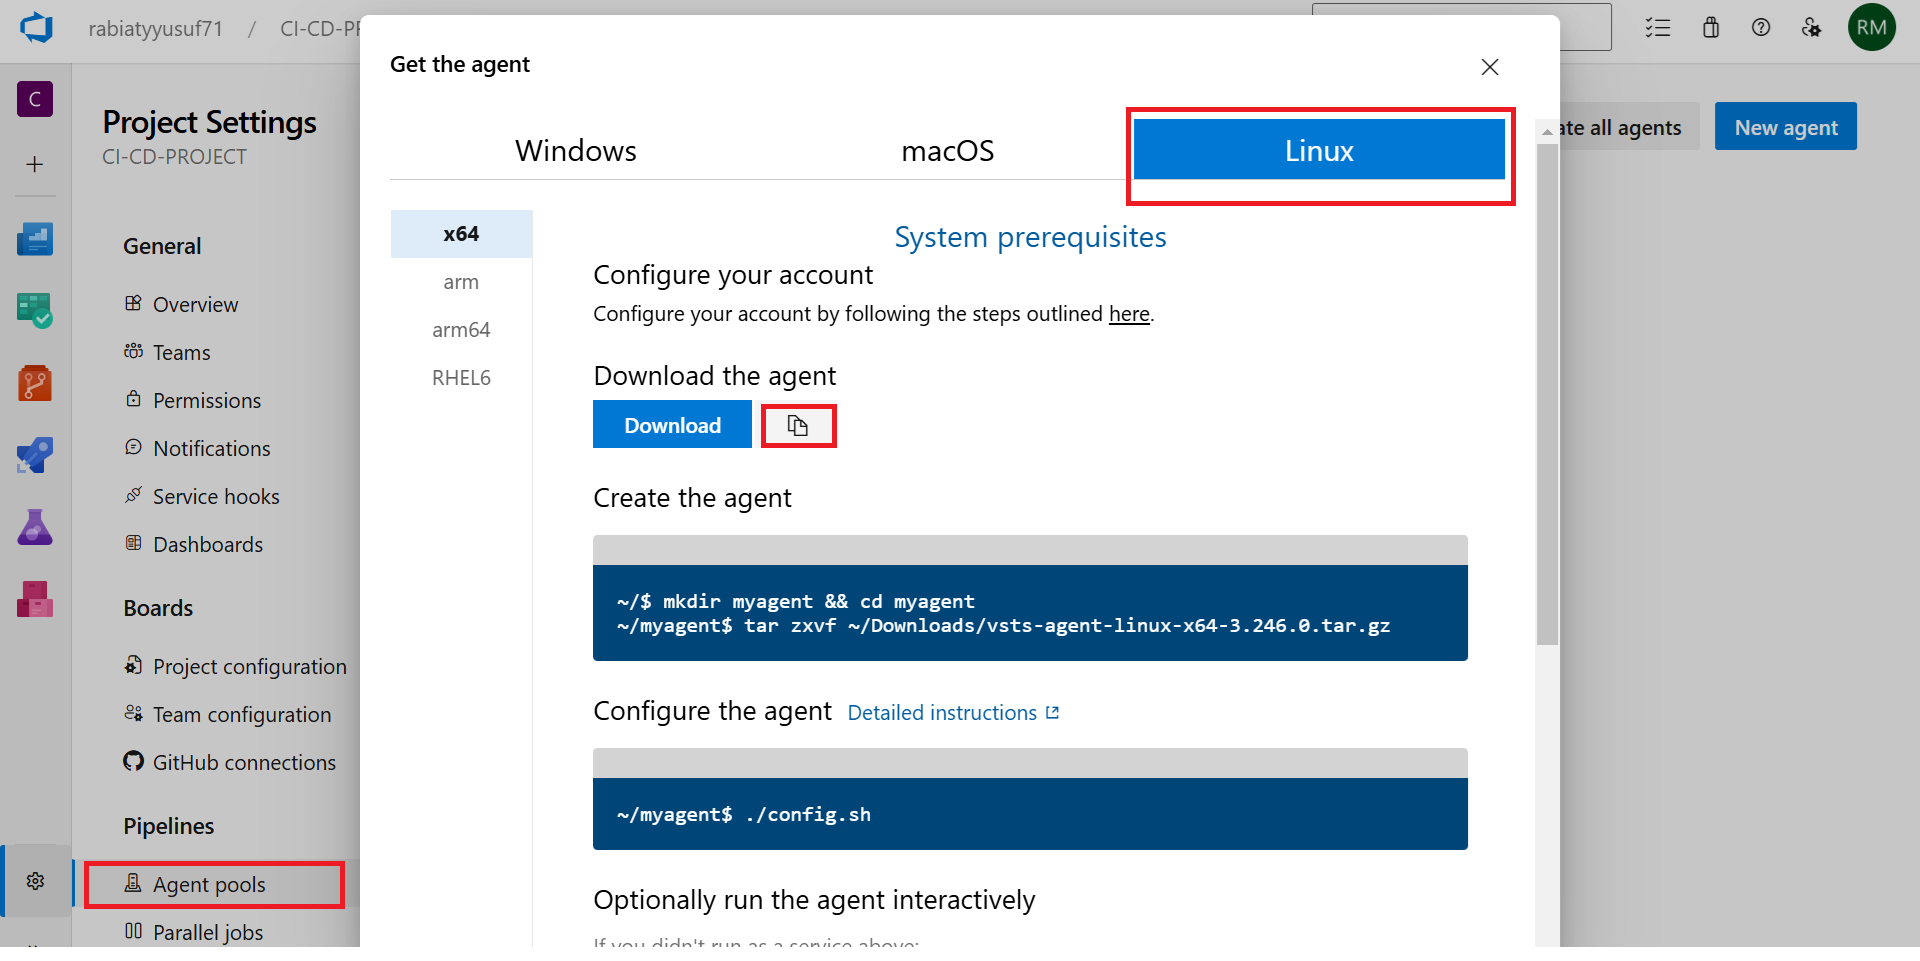
In your Azure DevOps project, go to Project Settings > Agent pools.
Under Agent pools, confirm that the Default pool is available. This pool allows Azure-hosted agents to run your builds and deployments.
By using the default pool, your pipeline will have access to a range of agents suitable for building and testing applications.

Step 13: Set Up a Self-Hosted Agent on Linux
If you prefer to use a self-hosted agent instead of the default Azure-hosted agents, follow these steps to set up one on Linux.
In Azure DevOps, go to Project Settings > Agent pools and click New agent.
Select the Linux tab to get instructions for setting up the agent on a Linux machine.
Download the agent by clicking the Download button.
Open a terminal on your Linux machine and navigate to the download location.
Run the following commands to install and configure the agent.
Follow the prompts to complete the configuration.
Once configured, your self-hosted agent will be ready to execute pipeline jobs.
Step 14: Add Remote and Push Code to Azure DevOps
To link your local repository with Azure DevOps and push all branches, follow these steps:
Add Remote: Run the following command to add Azure DevOps as a remote origin.
Push All Branches: Use this command to push all branches to the remote origin.
After pushing, all branches, including unit-test, will be available in Azure DevOps for further integration and deployment.

Step 15: Download the Azure DevOps Agent
To set up a self-hosted agent for Azure DevOps, download the agent package on your Linux VM.
Create a Downloads directory (if it doesn’t already exist) and navigate to it.
Use
wgetto download the Azure DevOps agent package.
Once downloaded, you’ll be ready to extract and configure the agent.

Step 16: Extract the Azure DevOps Agent
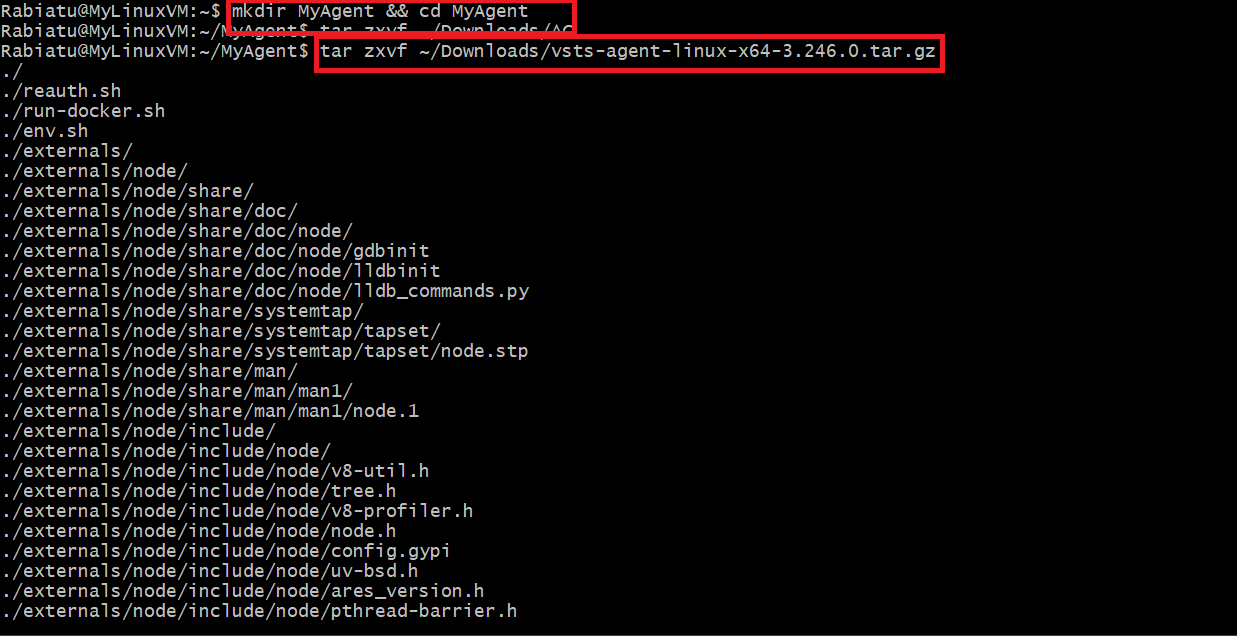
After downloading the agent package, extract it to set up the agent files.
Create a new directory for the agent and navigate to it.
Extract the downloaded agent package.
This will unpack the necessary files into the MyAgent directory, preparing it for configuration.
Step 17: Configure the Azure DevOps Agent
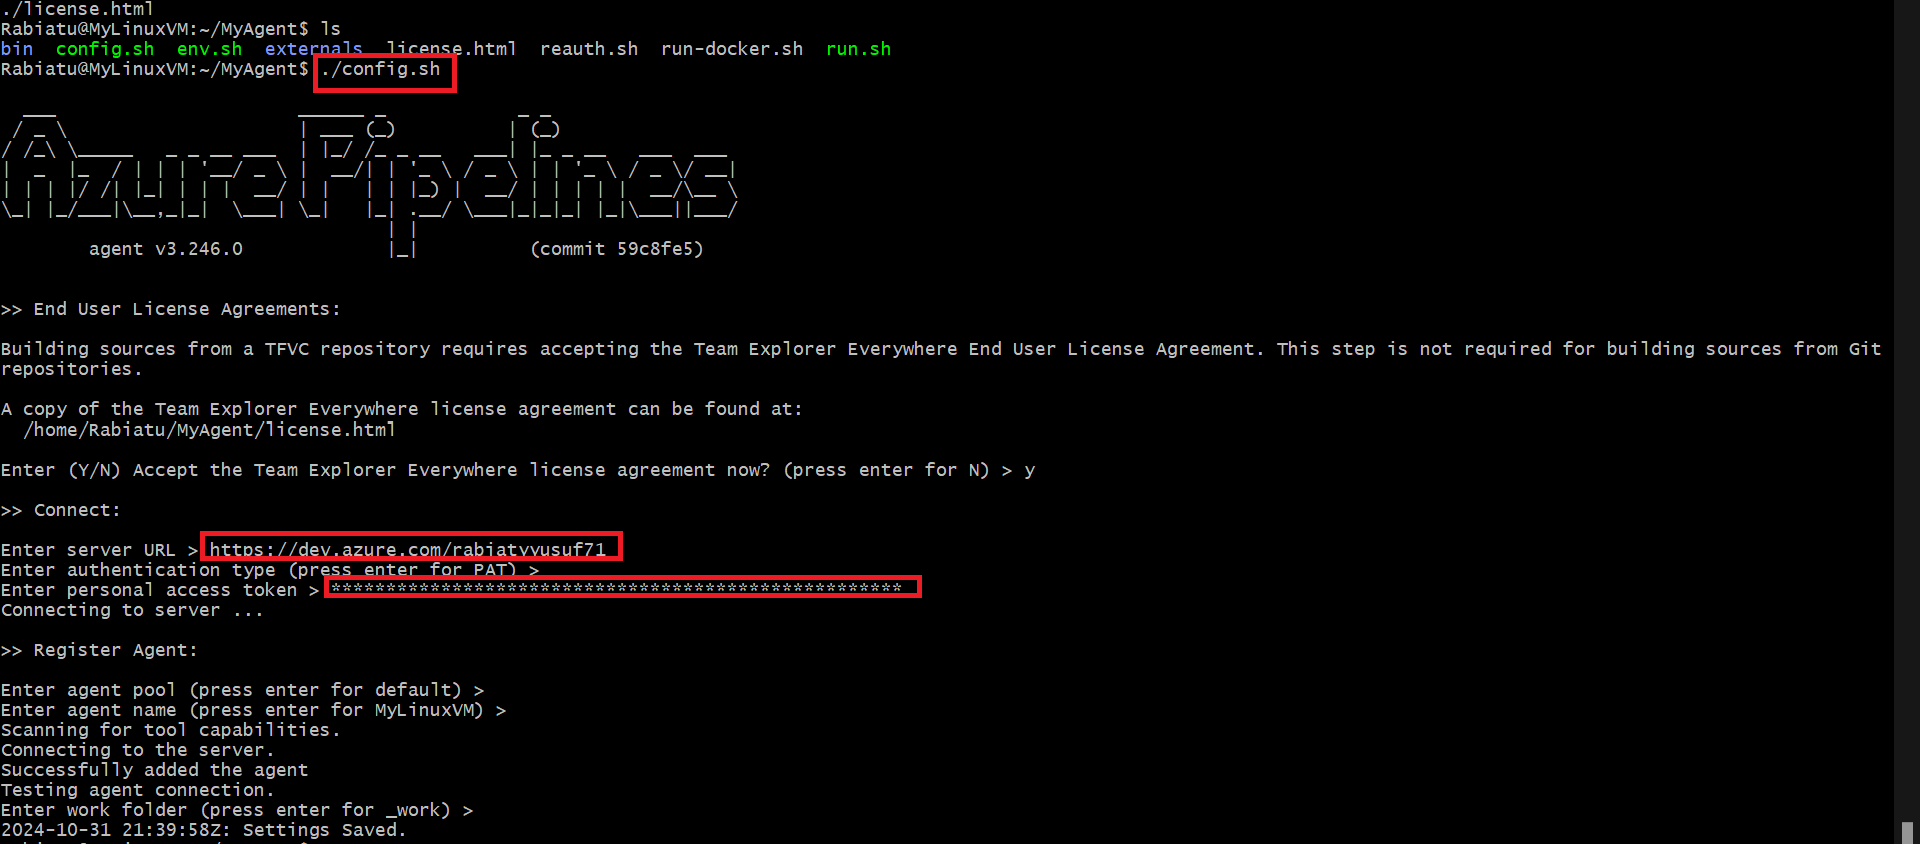
After extracting the agent files, configure the agent to connect to your Azure DevOps organization.
Run the configuration script.
When prompted, accept the Team Explorer Everywhere license by entering y.
Enter the following details as prompted:
Server URL: Enter your Azure DevOps organization URL (e.g.,
https://dev.azure.com/rabiatyusuf71).Authentication Type: Press Enter to use PAT (Personal Access Token).
Personal Access Token: Enter your PAT and press Enter.
For additional prompts:
Agent Pool: Press Enter to use the default pool.
Agent Name: Press Enter to use the default name or provide a custom name.
Work Folder: Press Enter to use the default
_workfolder.
Once configured, the agent is registered and ready to run pipeline jobs.
Step 18: Set Up the Pipeline Using a Template
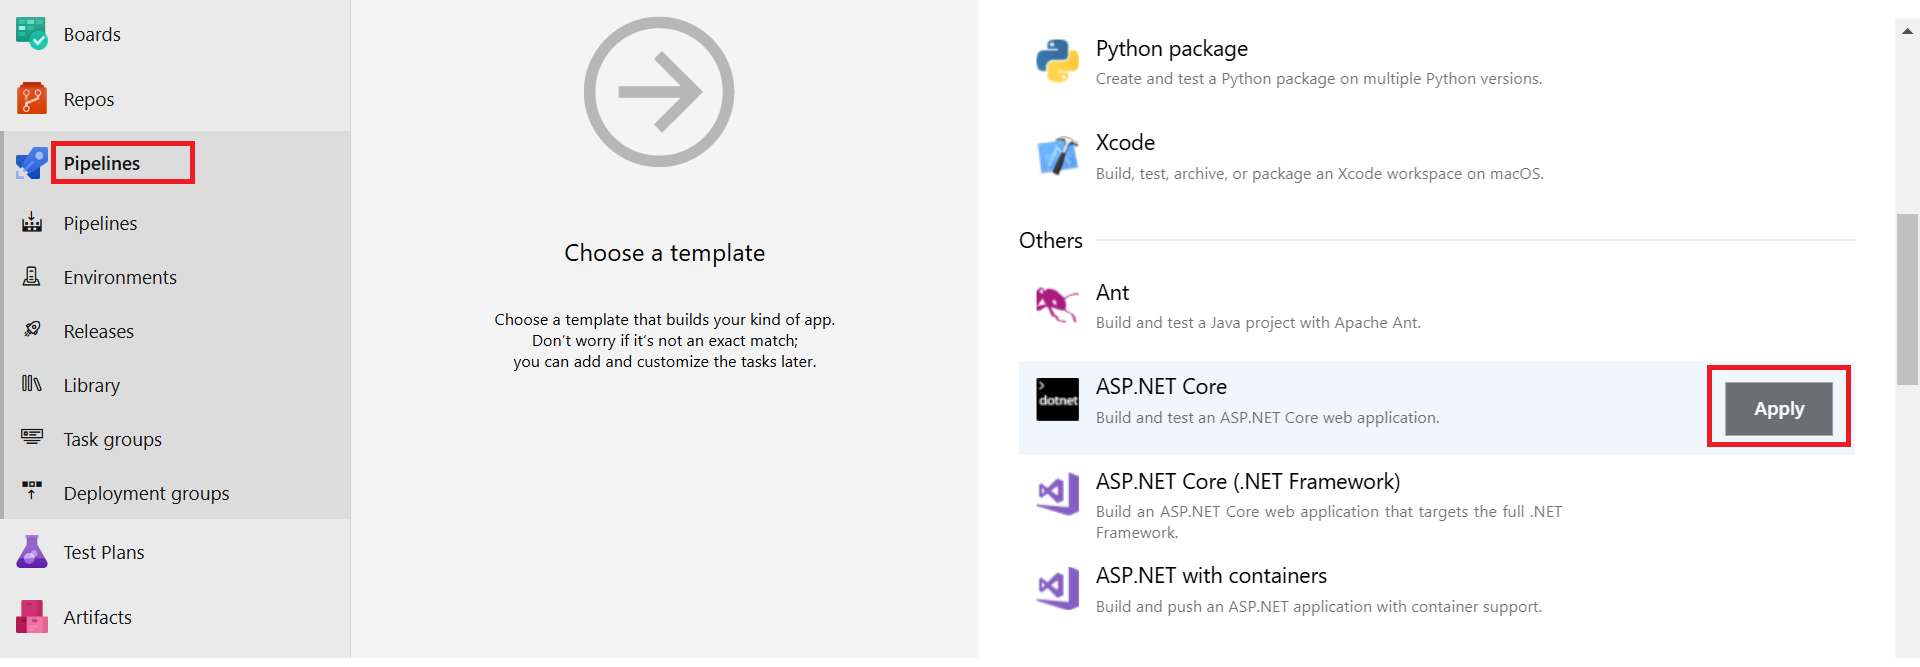
In Azure DevOps, navigate to Pipelines on the left sidebar.
Click on Pipelines and then select New pipeline if you're creating a new one.
Under the Choose a template section, find and select ASP.NET Core.
Click Apply to use the ASP.NET Core template.
This template provides a preconfigured pipeline setup for building and testing an ASP.NET Core web application, making it easier to get started.
Step 19: Configure the ASP.NET Core Pipeline
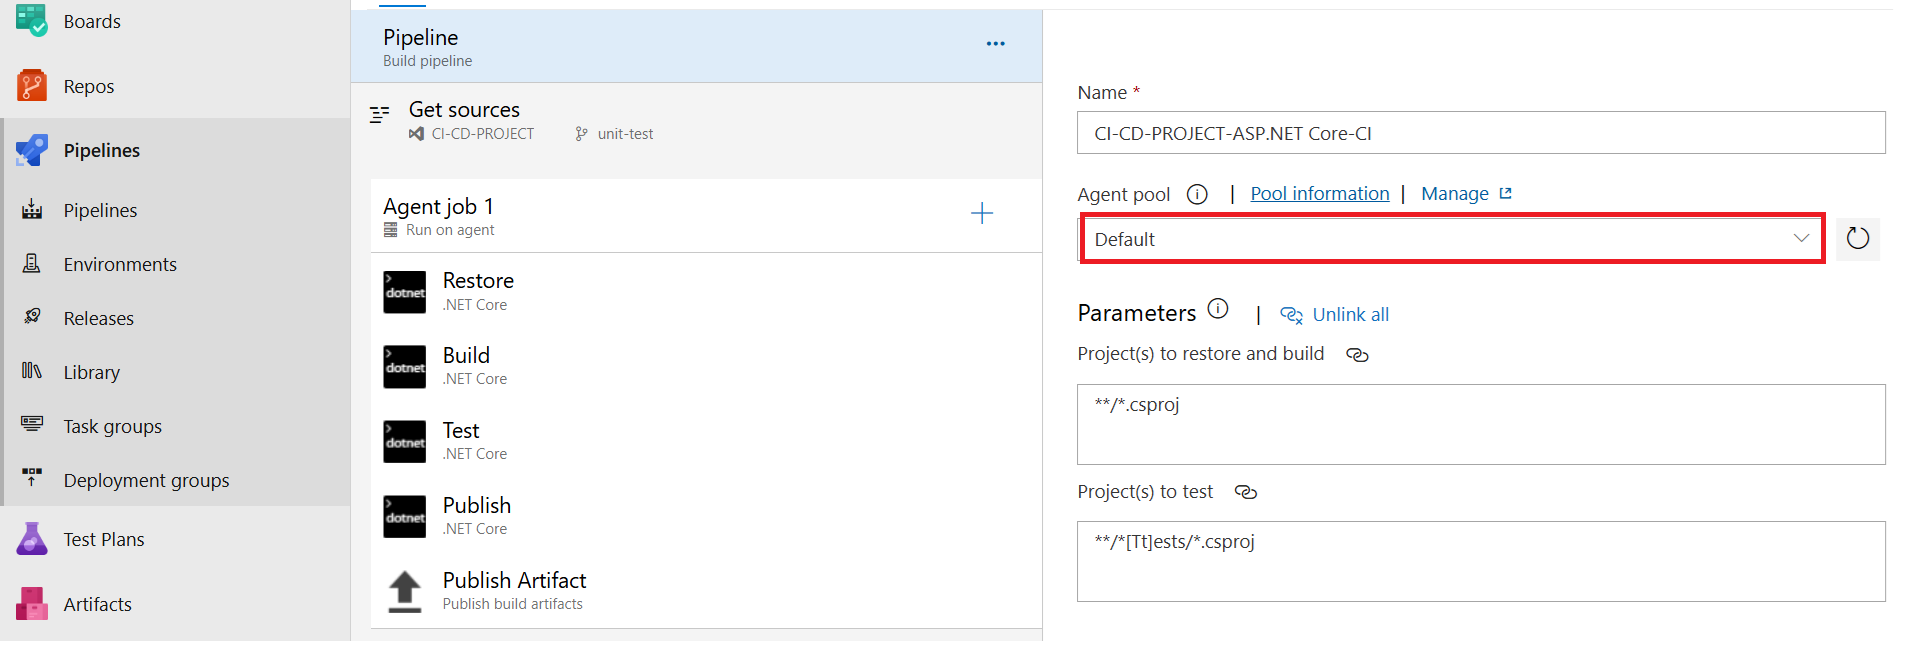
After applying the ASP.NET Core template, you’ll see the pipeline configuration screen.
In the Agent pool dropdown, select Default to use the default Azure-hosted agent pool.
Review the pipeline tasks included in the template:
Restore: Restores dependencies specified in the
.csprojfiles.Build: Compiles the project.
Test: Runs any tests specified in the test project(s).
Publish: Prepares the build output for deployment.
Publish Artifact: Stores the build output for further use in release pipelines.
Check the Parameters section to ensure the correct project(s) are specified for building, testing, and publishing (e.g.,
**/*.csproj).
Once configured, save and run the pipeline to initiate the build and testing process for your ASP.NET Core project.
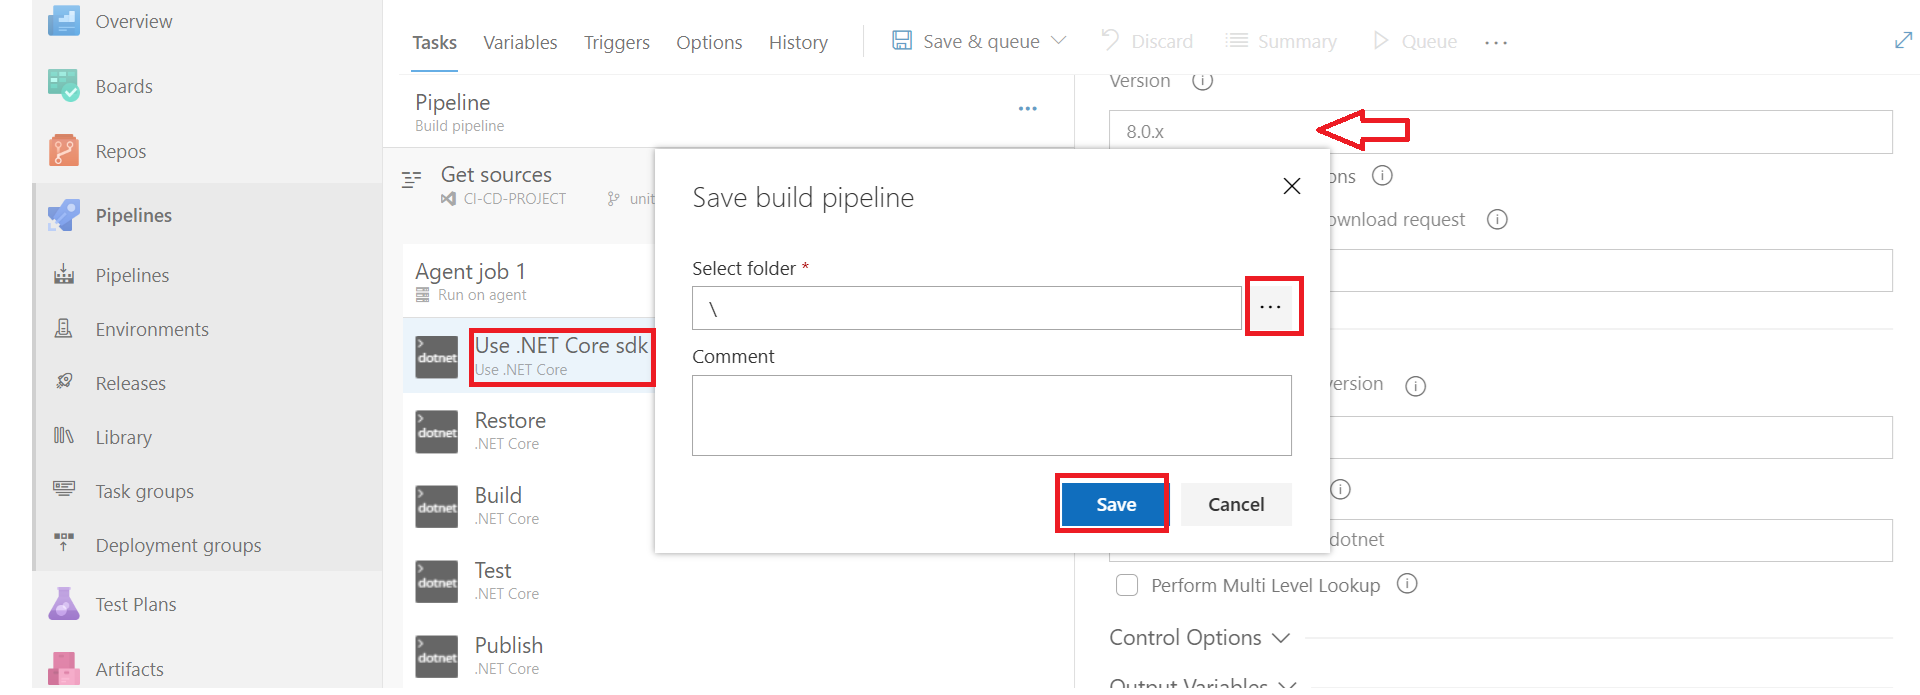
tep 20: Configure and Save the Pipeline
In the pipeline configuration, locate the Use .NET Core sdk task.
Specify the Version of the .NET Core SDK you want to use (e.g.,
8.0.x).Click Save & queue or Save to save your pipeline.
In the Save build pipeline dialog:
Choose a folder by clicking the ellipsis (...) and selecting the desired folder.
Add any comments if needed.
Click Save to finalize and store the pipeline configuration.
This completes the setup of your ASP.NET Core pipeline, ready to build, test, and deploy your application.
Step 22: Verify Specific Files in the Repository
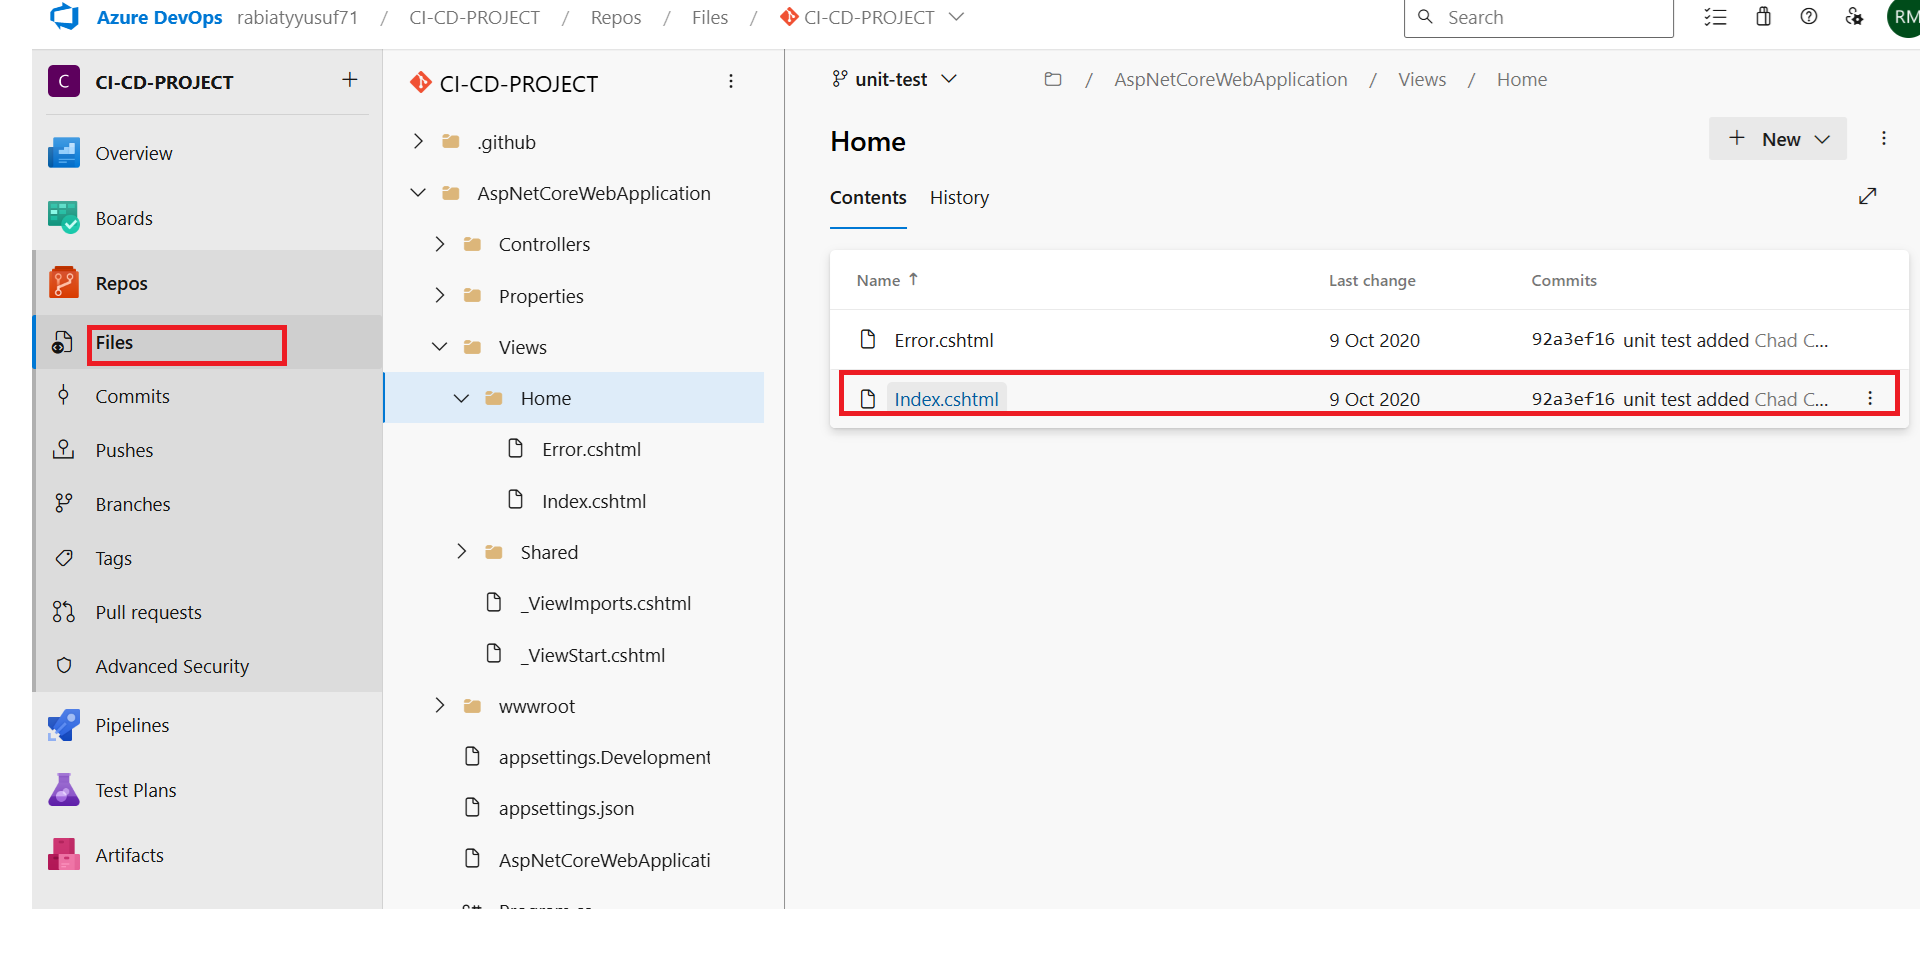
To ensure that your application files are correctly stored and accessible in Azure DevOps:
Navigate to Repos > Files in your project.
Browse to the AspNetCoreWebApplication > Views > Home directory.
Confirm that essential files like
Index.cshtmlandError.cshtmlare present in this directory. These files are typically used for rendering the main view and error handling in an ASP.NET Core application.
Having these files in place verifies that your project structure is ready for building and deploying the application.
Step 23: Update and Commit Changes to Index.cshtml
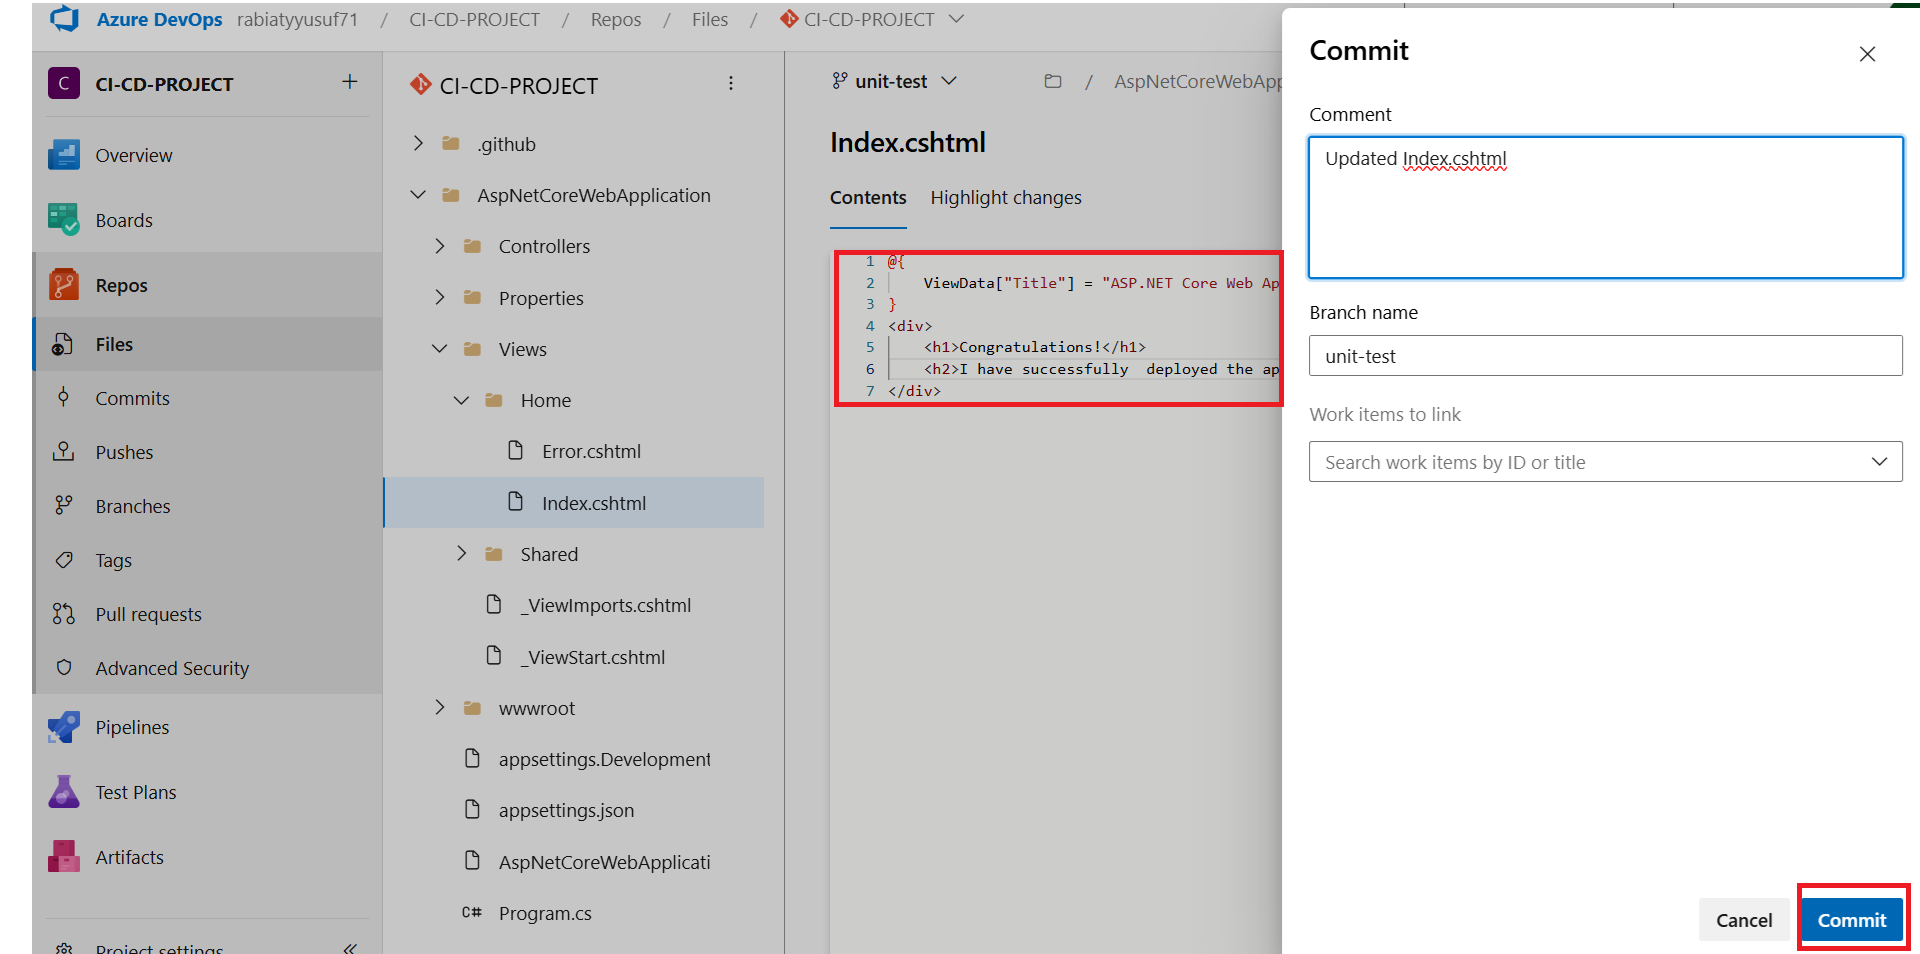
In Repos > Files, navigate to AspNetCoreWebApplication > Views > Home and select
Index.cshtml.Edit the file to make the necessary changes.
After making your changes, click Commit.
In the Commit dialog:
Enter a commit message, such as "Updated Index.cshtml".
Ensure the correct branch is selected (e.g.,
unit-test).
Click Commit to save your changes to the repository.
This process confirms that the Index.cshtml file is updated and committed, ready for the pipeline to deploy the latest changes.
Step 24: View Pipeline Run and Job Status
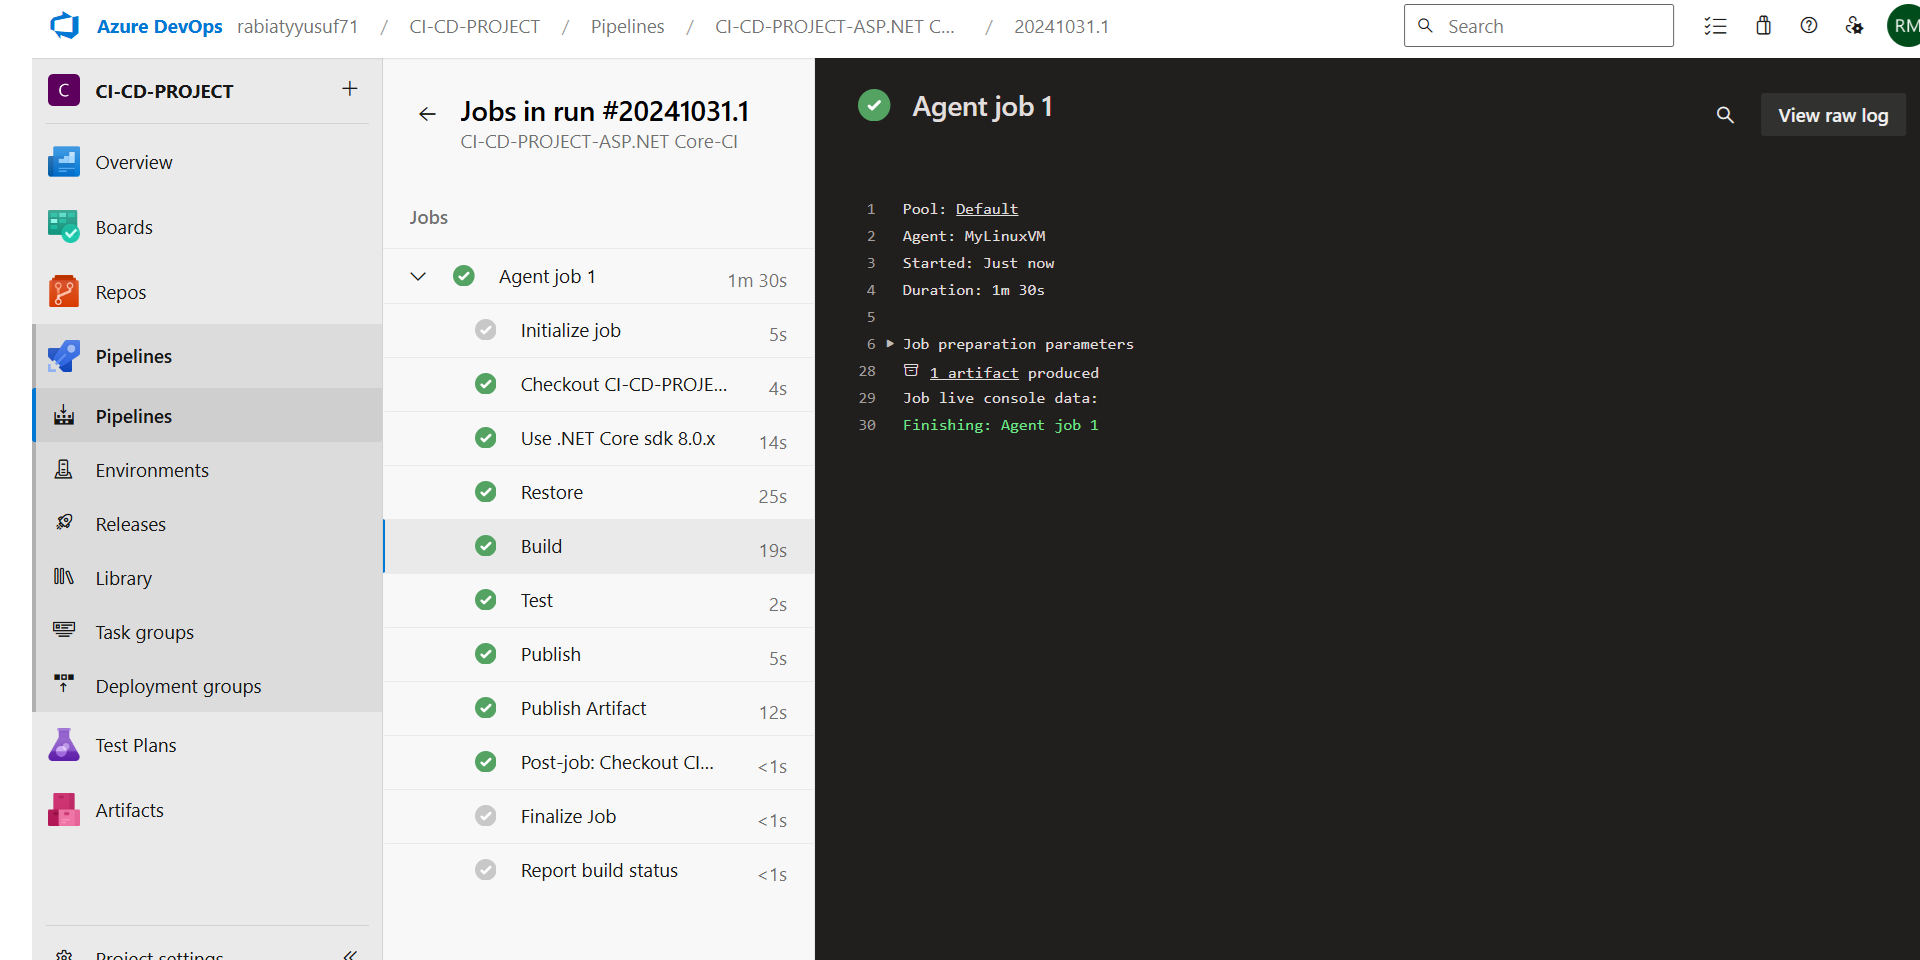
After committing your changes, the CI/CD pipeline automatically runs to build, test, and publish your ASP.NET Core application.
Go to Pipelines > Pipelines and select the latest pipeline run.
You’ll see a list of Jobs in the pipeline, showing each step with its status:
Initialize job: Sets up the agent environment.
Checkout: Checks out the code from the repository.
Use .NET Core sdk: Specifies the .NET Core SDK version.
Restore: Restores project dependencies.
Build: Builds the application.
Test: Runs any configured tests.
Publish: Prepares the application for deployment.
Publish Artifact: Stores build artifacts for release.
Each job is marked with a green check mark if successful. To view detailed logs, click on each job step or click View raw log on the right.
This overview confirms the successful execution of each stage in your CI/CD pipeline.
Step 25: Start the Azure DevOps Agent
To manually start the Azure DevOps agent and allow it to listen for jobs.
In your MyAgent directory, run the following command.
The agent will connect to the server and begin listening for jobs.
As jobs are received, the agent will execute them. You will see updates such as:
Running job: Indicates a job has started.
Job completed with result: Succeeded: Confirms successful completion of the job.
Running the agent manually provides control over job execution and allows you to monitor job status in real-time.

Conclusion
Setting up a CI/CD pipeline in Azure DevOps has automated the build, test, and deployment for our ASP.NET Core app, enabling continuous integration and reliable deployment with every commit.
In this guide, we:
Created a secure Azure DevOps organization.
Configured a pipeline to automate builds and tests.
Used a Linux VM as a self-hosted agent for better control.
Seamlessly committed and deployed changes.
With this setup, we can now focus on feature development, trusting our pipeline to maintain quality and speed up releases. Azure DevOps truly streamlines software delivery, making deployments more efficient and reliable.
Subscribe to my newsletter
Read articles from Rabiatu Mohammed directly inside your inbox. Subscribe to the newsletter, and don't miss out.
Written by

Rabiatu Mohammed
Rabiatu Mohammed
I work on securing, automating, and improving cloud environments. Always exploring better ways to build reliable, secure infrastructure.