Step-by-Step Guide to Launching an EC2 Instance on AWS
 Aditya Gadhave
What is Elastic Compute Cloud (EC2)?
EC2 stands for Elastic Compute Cloud.
EC2 is an on-demand computing service on the AWS cloud platform.
It also allows the user to configure their instances as per their requirements
i.e. allocate the RAM, ROM, and storage according to the need of the current task
EC2 is secure, resizable, and scalable.
These virtual machines are pre-configured with the operating systems and some of the required software.
Instead of managing the infrastructure AWS will do that so you can just launch and terminate the EC2 instance whenever you want.
You can scale up and down the EC2 instance depending on the incoming traffic.
The other advantage of AWS EC2 is that you need to pay only for how much you use it is like the pay-as-you-go model.
Why do we need an EC2 instance?
One of the main reasons we need EC2 instances is because they offer scalability and flexibility.
We can launch EC2 instances on demand and scale up or down as needed to match our workload requirements.
This means we can easily provision resources when we need them and only pay for what we use.
Use Cases of Amazon EC2 (Elastic Compute Cloud)
The following are the use cases of Amazon EC2:
Deploying Application: In the AWS EC2 instance, you can deploy your application like .jar,.war, or .ear application without maintaining the underlying infrastructure.
Scaling Application: Once you deployed your web application in the EC2 instance know you can scale your application based upon the demand you are having by scaling the AWS EC2-Instance.
Deploying The ML Models: You can train and deploy your ML models in the EC2-instance because it offers up to 400 Gbps), and storage services purpose-built to optimize the price performance for ML projects.
Hybrid Cloud Environment: You can deploy your web application in EC2-Instance and you can connect to the database which is deployed in the on-premises servers.
Cost-Effective: Amazon EC2-instance is cost-effective so you can deploy your gaming application in the Amazon EC2-Instances
Pricing of AWS EC2 (Elastic Compute Cloud) Instance
The pricing of AWS EC2-instance is mainly going to depend upon the type of instance you are going to choose. The following are the pricing charges on some of the EC2-Instances.
On Demand
It allows you to pay a fixed rate by the hour or even by the second with no commitment.
Linux instance is by the second and windows instance is by the hour.
On Demand is perfect for the users who want low cost and flexibility of Amazon EC2 without any up-front investment or long-term commitment.
It is suitable for the applications with short term, spiky or unpredictable workloads that cannot be interrupted.
It is useful for the applications that have been developed or tested on Amazon EC2 for the first time.
On Demand instance is recommended when you are not sure which instance type is required for your performance needs.
Reserved
It is a way of making a reservation with Amazon or we can say that we make a contract with Amazon. The contract can be for 1 or 3 years in length.
In a Reserved instance, you are making a contract means you are paying some upfront, so it gives you a significant discount on the hourly charge for an instance.
It is useful for applications with steady state or predictable usage.
It is used for those applications that require reserved capacity.
Users can make up-front payments to reduce their total computing costs. For example, if you pay all your upfronts and you do 3 years contract, then only you can get a maximum discount, and if you do not pay all upfronts and do one year contract then you will not be able to get as much discount as you can get If you do 3 year contract and pay all the upfronts.
Spot Instances
It allows you to bid for a price whatever price that you want for instance capacity, and providing better savings if your applications have flexible start and end times.
Spot Instances are useful for those applications that have flexible start and end times.
It is useful for those applications that are feasible at very low compute prices.
It is useful for those users who have an urgent need for large amounts of additional computing capacity.
EC2 Spot Instances provide less discounts as compared to On Demand prices.
Spot Instances are used to optimize your costs on the AWS cloud and scale your application's throughput up to 10X.
EC2 Spot Instances will continue to exist until you terminate these instances.
Dedicated Hosts
A dedicated host is a physical server with EC2 instance capacity which is fully dedicated to your use.
The physical EC2 server is the dedicated host that can help you to reduce costs by allowing you to use your existing server-bound software licenses. For example, Vmware, Oracle, SQL Server depending on the licenses that you can bring over to AWS and then they can use the Dedicated host.
Dedicated hosts are used to address compliance requirements and reduces host by allowing to use your existing server-bound server licenses.
It can be purchased as a Reservation for up to 70% off On-Demand price.
Benefits of Amazon EC2
The following are the benefits of Amazon EC2:
Scalability: It helps to easily scale the instances up or down based on the demand with ensuring the optimal performance and cost-efficiency.
Flexibility: It provides wide variety of instance types and configurations for matching different workload requirements and operating systems.
Cost-Effectiveness: It comes with providing Pay-as-you-go model with options like On-Demand, Reserved, and Spot Instances for managing cost efficiently.
High Availability and Reliability: It offers multiple geographic regions and availability zones for strong fault tolerance and disaster recovery.
What is EBS?
EBS stands for Elastic Block Store.
EC2 is a virtual server in a cloud while EBS is a virtual disk in a cloud.
Amazon EBS allows you to create storage volumes and attach them to the EC2 instances.
Once the storage volume is created, you can create a file system on the top of these volumes, and then you can run a database, store the files, applications or you can even use them as a block device in some other way.
Amazon EBS volumes are placed in a specific availability zone, and they are automatically replicated to protect you from the failure of a single component.
EBS volume does not exist on one disk, it spreads across the Availability Zone. EBS volume is a disk which is attached to an EC2 instance.
EBS volume attached to the EC2 instance where windows or Linux is installed known as Root device of volume.
EBS Volume Types

Amazon EBS provides two types of volume that differ in performance characteristics and price. EBS Volume types fall into two parts:
SSD-backed volumes
HDD-backed volumes
Security Group
A security group is a virtual firewall which is controlling the traffic to your EC2 instances.
When you first launch an EC2 instance, you can associate it with one or more security groups.
A Security group is the first defence against hackers.
we will explore the process of launching an EC2 instance on AWS, step by step.

Step 1: Sign in to the AWS Management Console
To get started, sign in to the AWS Management Console using your AWS account credentials. If you don’t have an AWS account, you can create one easily by following the instructions on the AWS website.
Step 2: Open the EC2 Console Once you are signed in to the AWS Management Console, search for “EC2” in the services search bar and click on “EC2” from the search results. This will open the EC2 console, where you can manage your instances.
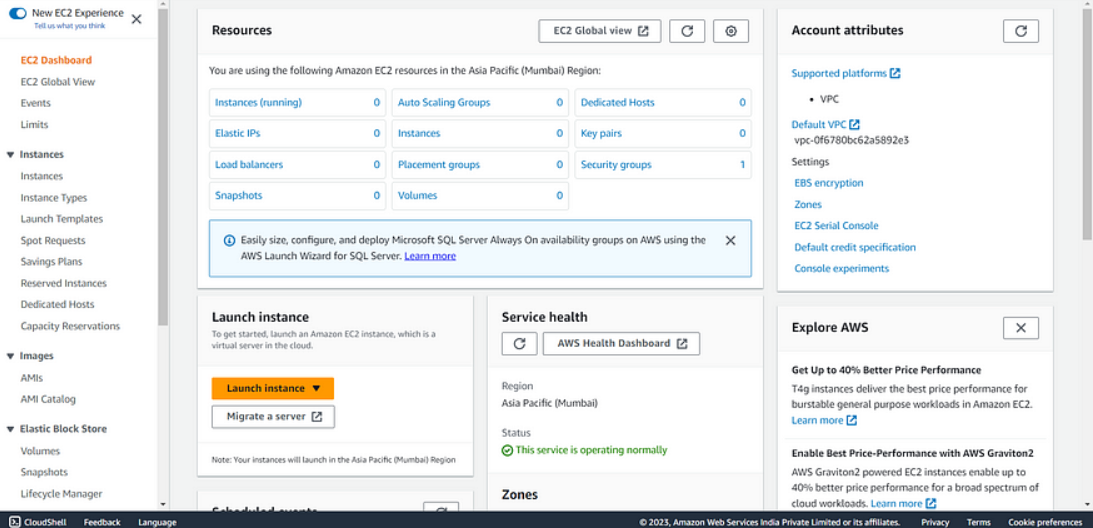
EC2 Console
Step 3: Launch Instance
In the EC2 console, click on the “Launch Instance” button to start the instance creation process. This will take you through a series of steps to configure your instance.After clicking on the “Launch Instance” button, you will be redirected to a page as shown below.
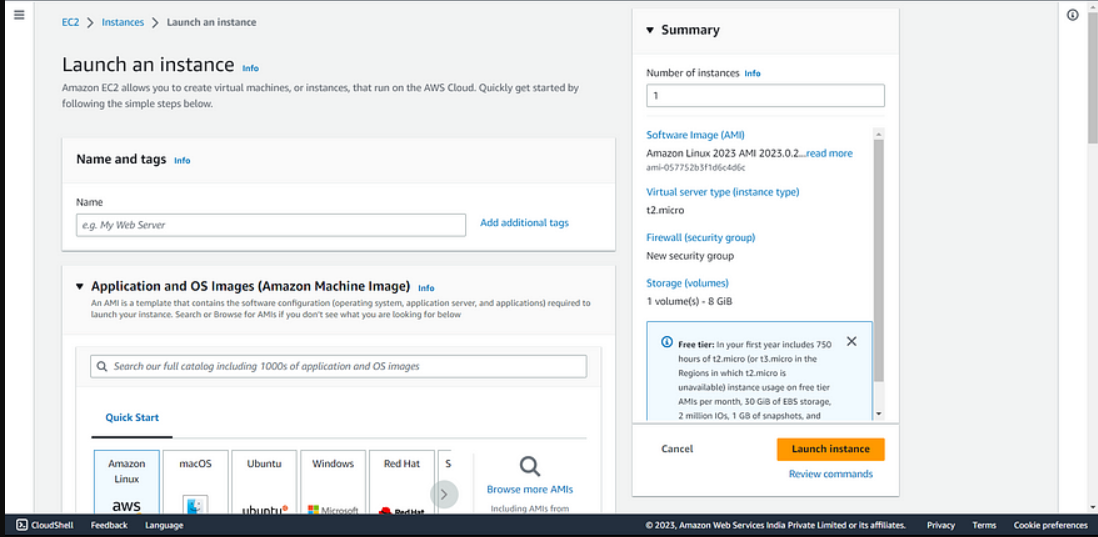
Step 4: Provide a Name for the EC2 Instance
You need to provide a name for your EC2 instance. Giving your instance a meaningful name can help with easy identification and management of your resources in the future.In this case, you can enter “aws_linux” as the name for your EC2 server.

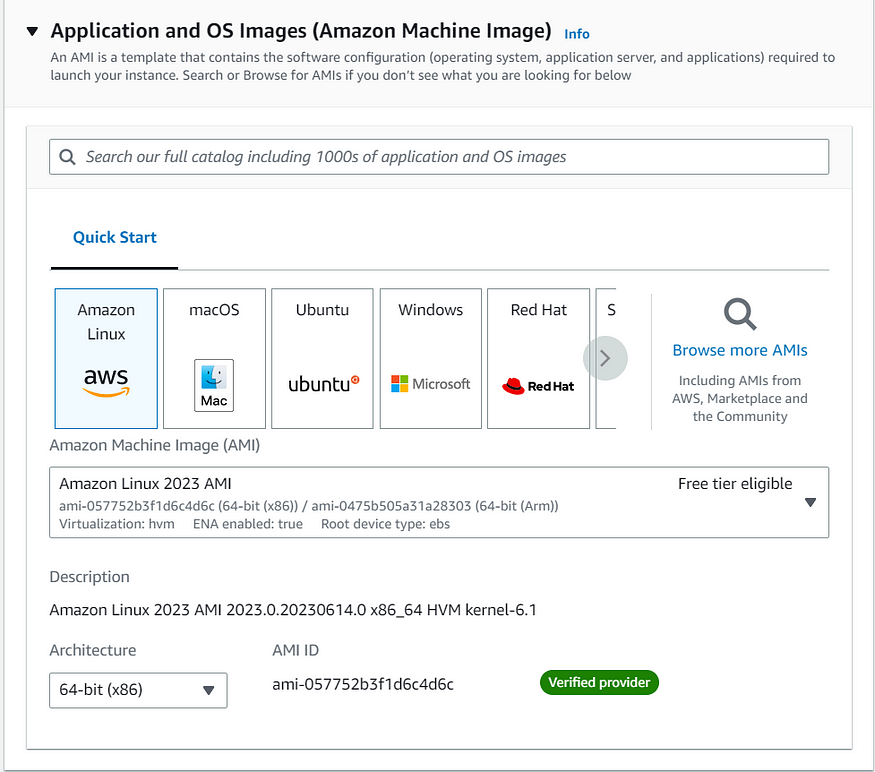
Step 5: Choose an Amazon Machine Image (AMI)
An Amazon Machine Image (AMI) is a pre-configured template that contains the operating system and other software necessary for your instance. In this step, you can choose from a wide variety of AMIs provided by AWS or the AWS Marketplace. Select an AMI that best suits your requirements.
In this case, you can choose “Amazon Linux” as the operating system for your instance.
Step 6: Choose an Instance Type
The instance type determines the hardware of the host computer used for your instance. AWS offers a range of instance types with varying compute, memory, and storage capabilities. Consider your workload requirements and select the instance type that meets your needs.
In this case, you can select “t2.micro” as the instance type. The “t2.micro” instance type is eligible for the AWS Free Tier, which provides limited free usage of certain AWS services.

Step 7: Create a Key Pair
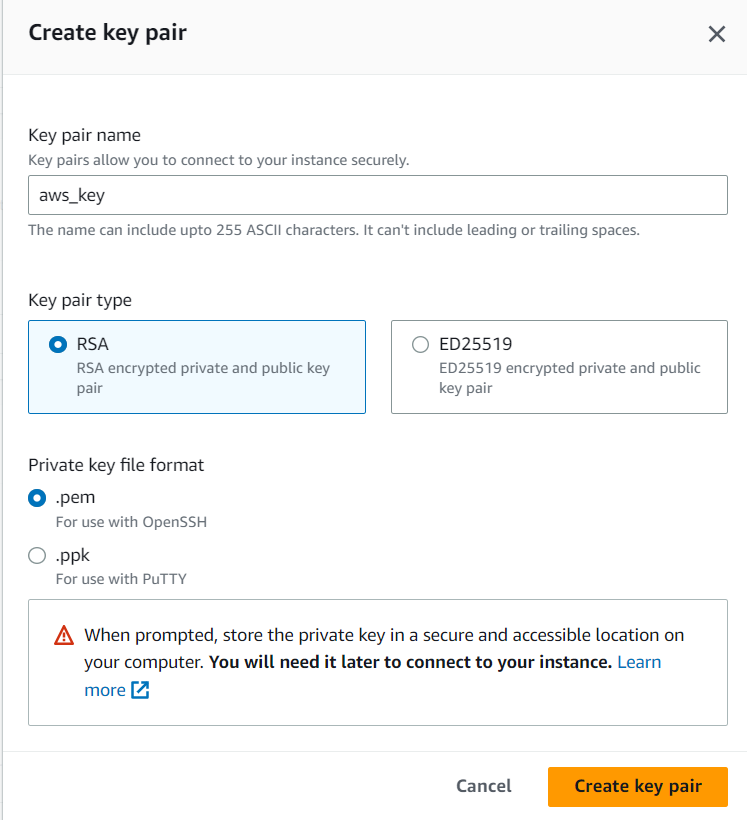
To securely access your EC2 instance from your system, you need to create a key pair. A key pair consists of a public key that AWS stores and a private key that you download to your local machine. The private key is used to authenticate and establish a secure connection with your EC2 instance.
You have the option to select an existing key pair if you already have one, or you can create a new key pair by clicking on the “Create new key pair” button.

Upon clicking this button, a dialogue box will appear where you can provide a unique name for your key pair. Select the key pair type as “RSA” and choose the private key file format as “.pem”.
Finally, click on the “Create Key Pair” button to generate your new key pair.
Step 8: Configure Instance Details, Add Storage, and Configure Security Groups
In this step, you can configure various settings for your EC2 instance. Adjust these settings based on your specific requirements. You have the flexibility to update these details even after launching the instance.
Instance Details: Configure settings such as the number of instances to launch and network settings. You can specify the desired number of instances, choose the VPC (Virtual Private Cloud) network, and assign an IAM (Identity and Access Management) role if needed. You can also enable detailed monitoring for enhanced metrics on your instance’s performance.
Storage: Specify the amount and type of storage to attach to your instance. AWS provides Elastic Block Store (EBS) volumes for persistent storage. Consider factors such as storage size, performance requirements, and encryption options. You can configure storage options according to your needs.
Storage: Specify the amount and type of storage to attach to your instance. AWS provides Elastic Block Store (EBS) volumes for persistent storage. Consider factors such as storage size, performance requirements, and encryption options. You can configure storage options according to your needs.
Remember, these configuration details can be updated later after launching the instance. You can leave them as they are for now and make changes as necessary in the future.
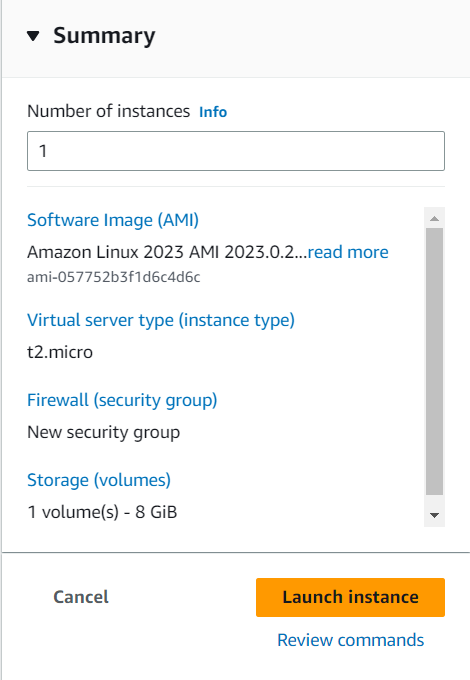
On the right side of the EC2 instance launch page, you will find the summary details section. This section provides a consolidated view of the configuration settings you have chosen for your instance. It allows you to review and verify the settings before launching the instance.
Step 9: Review and Launch
Before launching the instance, review the configuration details to ensure everything is set up correctly. Double-check the instance type, storage options, security groups, and any additional settings you have configured. If everything looks good, click on the “Launch Instance” button.
After launching the instance, you will be redirected to a page displaying a success dialogue box. To view the list of instances, click on the instance ID. In mycase, the instance ID is “i-0ee41ca38b75e7a7b” as shown below.

Step 10: Connect to Your Instance
After launching your instance, you can connect to it using various methods, such as SSH or Remote Desktop Protocol (RDP). You can also use the AWS Systems Manager Session Manager to connect to your instance securely without the need for a public IP address.
Step 11 :Installing Web Server Software:
Update Packages: Run sudo apt-get update (for Ubuntu).
Install Web Server: Install a web server like Apache or Nginx.
Run sudo apt-get install nginx

Step 11c: We Can Create index.html Page:
We can Type Following Command To Create File :
$ cd /var/www/html
ls
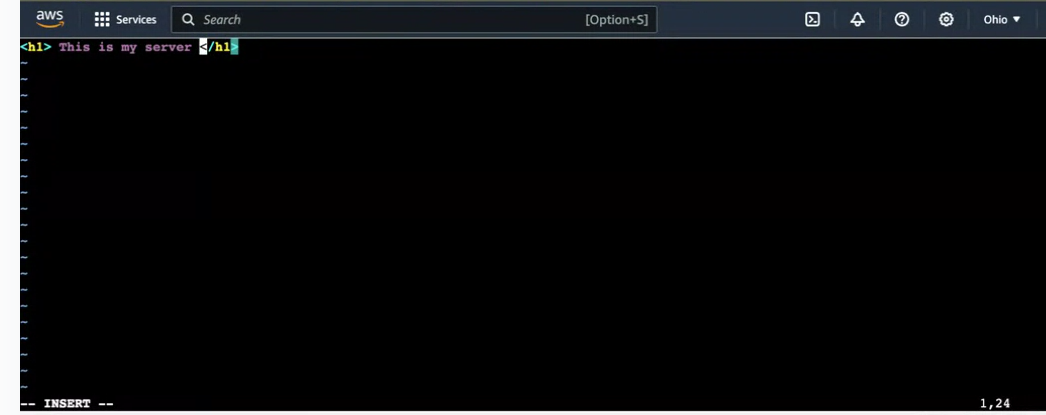
vim index.html
Then We Can Add Html Code in this File:
Step 12: Access Your Web Application:
Get Public IP: In the EC2 console, note the public IP of your instance.
Access the Web App: Open a web browser and enter the public IP in the address bar. You should see your sample web application if everything is set up correctly.
Conclusion
Day 4: Launching an EC2 instance on AWS provides you with the flexibility and scalability to run your applications in the cloud. By following the step-by-step guide in this article, you have learned how to navigate the AWS Management Console, select an AMI, choose an instance type, configure instance details, add storage, configure security groups, and launch your instance.
Remember to regularly monitor and manage your EC2 instances to optimize performance, security, and cost. AWS offers a wealth of additional features and services that you can explore to enhance your EC2 instances further. Happy cloud computing with AWS EC2!
If you have any questions, need clarifications, or want to discuss anything related to AWS technologies, feel free to reach out to me on LinkedIn. Connect with me at Aditya Gadhave, and I'll be more than happy to assist you. 😊
Subscribe to my newsletter
Read articles from Aditya Gadhave directly inside your inbox. Subscribe to the newsletter, and don't miss out.
Written by

Aditya Gadhave
Aditya Gadhave
👋 Hello! I'm Aditya Gadhave, an enthusiastic Computer Engineering Undergraduate Student. My passion for technology has led me on an exciting journey where I'm honing my skills and making meaningful contributions.