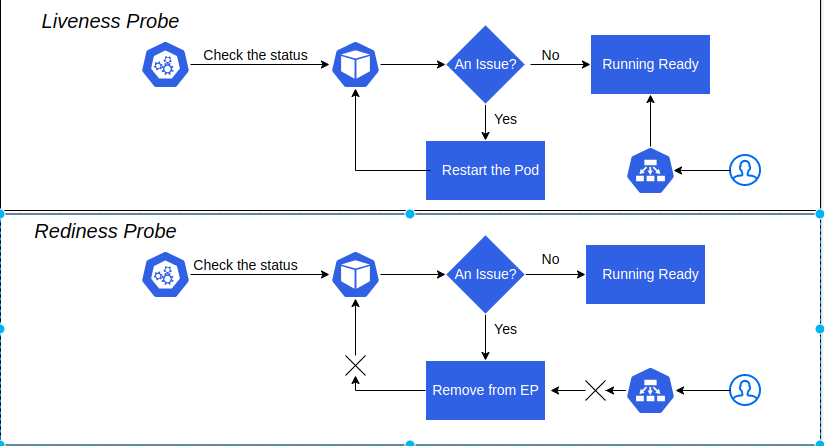
Difference of Liveness and Readiness Probes
 StackOps - Diary
Liveness and Readiness probes are used to check the health of an application running inside a pod’s container. Both of them are very similar in functionality and usage.
Liveness Probe
Our applications are running inside the pod as a container; sometimes these applications have an issue due to some reason out of memory, cpu usage, applications deadlock, etc. In this time, our applications are not responding to our request and stack in an error state.
The liveness probe is to check the container's health status, and if there is some reason the liveness probe fails, it restarts the container. We can define it in three ways. There are the following:
Liveness command
Liveness http
Liveness tcp
Liveness Command
apiVersion: v1
kind: Pod
metadata:
  labels:
    test: liveness
  name: liveness-exec
spec:
  containers:
  - name: liveness
    image: k8s.gcr.io/busybox
    args:
    - /bin/sh
    - -c
    - touch /tmp/healthy; sleep 30; rm -rf /tmp/healthy; sleep 600
    livenessProbe:
      exec:
        command:
        - cat
        - /tmp/healthy
      initialDelaySeconds: 3
      periodSeconds: 5
Currently, we are creating a container with name liveness, and as the container initializes, we use following command:
- touch /tmp/healthy; sleep 30; rm -rf /tmp/healthy; sleep 600
This command is to create a file healthy at path /tmp/healthy, and delete it after 30 seconds. The first 30 seconds our pod restart count is zero and the pod is healthy.
➜  blog kubectl get po
NAME            READY   STATUS    RESTARTS   AGE
liveness-exec   1/1     Running   0          31s
Our pod’s age is over 30 seconds; we removed the /tmp/healthy file. So, when livenessprobe is checked with command, this path is not exist. In the mean time, liveness is restarting our application.
When we check kubectl describe pod command, we can see following output and check the pod status, the restart count is one.
Events:
  Type     Reason     Age                 From               Message
  ----     ------     ----                ----               -------
  Normal   Scheduled  116s                default-scheduler  Successfully assigned default/liveness-exec to home-cluster-worker3
  Normal   Pulled     109s                kubelet            Successfully pulled image "busybox:latest" in 7.751s (7.751s including waiting)
  Normal   Killing    66s                 kubelet            Container liveness failed liveness probe, will be restarted
  Normal   Pulling    36s (x2 over 116s)  kubelet            Pulling image "busybox:latest"
  Normal   Created    34s (x2 over 109s)  kubelet            Created container liveness
  Normal   Started    34s (x2 over 109s)  kubelet            Started container liveness
  Normal   Pulled     34s                 kubelet            Successfully pulled image "busybox:latest" in 2.324s (2.324s including waiting)
  Warning  Unhealthy  1s (x4 over 76s)    kubelet            Liveness probe failed: cat: can't open '/tmp/healthy': No such file or directory
➜  blog kubectl get po
NAME            READY   STATUS    RESTARTS      AGE
liveness-exec   1/1     Running   1 (28s ago)   109s
livenessProbe:
      exec:
        command:
        - cat
        - /tmp/healthy
      initialDelaySeconds: 3
      periodSeconds: 5
This block tells the liveness probe to open a file at path /tmp/healthy, and if it can't, the liveness probe will fail and the container will restart. The initialDelaySeconds is wait for 3 seconds before performing the first probe. And the periodSeconds means the probe commands are checked every 5 seconds.
As we checked the above example, our container is working normally for the first 30 seconds. And then the liveness probe will fail and restart the container.
Liveness HTTP
livenessProbe:
  httpGet:
    path: /healthz
    port: 8080
  initialDelaySeconds: 3
  periodSeconds: 3
In this case the kubelet will send HTTP GET request to /healthz endpoint at port 8080 of the application running inside the container. If the response is an error, the liveness is assumes the application is not healthy and restarts the container.
TCP Liveness
livenessProbe:
  tcpSocket:
    port: 8080
  initialDelaySeconds: 15
  periodSeconds: 20
In this case the kubelet will try to open a tcp socket at port 8080 in the container running the application. If it succeeds, the application will be considered healthy; if not, the probe assumes the application is not healthy, and the container will restart.
Readiness Probe
In some cases, we would like our application to be alive but not serve traffic unless some conditions are met, e.g, database connection an issue, waiting for some other related service to be alive, etc. In such cases, we use readiness probe. If the condition inside readiness probe passes, only then can our application serve traffic. If the related services are not alive, rediness is assumed our application is not ready to serve the traffic and remove it from service endpoints.
Readiness probe is defined in 3 ways exactly like the Liveness probe above. We just need to replace livenessProbe with readinessProbe like this:
redinessProbe:
  httpGet:
    path: /healthz
    port: 8080
  initialDelaySeconds: 3
  periodSeconds: 3
If you want to test this example, you can use your local cluster with kind. I already published how to setup home-lab for a kind cluster. You can read here
If you want to test in playground, you can use Killercoda
Thanks For Reading, Follow Me For More
Have a great day!..
Subscribe to my newsletter
Read articles from StackOps - Diary directly inside your inbox. Subscribe to the newsletter, and don't miss out.
Written by

StackOps - Diary
StackOps - Diary
I'm a cloud-native enthusiast and tech blogger, sharing insights on Kubernetes, AWS, CI/CD, and Linux across my blog and Facebook page. Passionate about modern infrastructure and microservices, I aim to help others understand and leverage cloud-native technologies for scalable, efficient solutions.