Mastering Git and GitHub: A Comprehensive Guide
 Pranjal Chaubey
Continuous Integration and Continuous Delivery (CI/CD) are essential components of any software development lifecycle, particularly in the context of Machine Learning Operations (MLOps). Welcome to the first chapter of our CI/CD Series for MLOps where we will explore git and github- the ultimate version control tools.
Git and GitHub are essential tools in modern software development, enabling version control and collaboration among developers. This article explores their functionalities, key commands, and how to get started with them effectively.
What is Git?
Git is a distributed version control system created by Linus Torvalds in 2005. It allows developers to track changes in their code, manage different versions of their projects, and collaborate efficiently. Key features of Git include:
Version Tracking: Maintains a history of changes, enabling users to revert to previous states of their code.
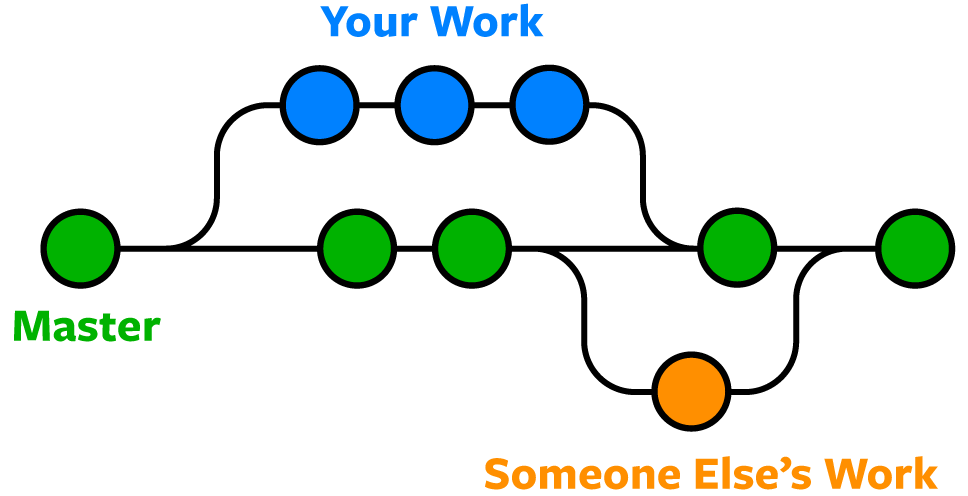
Branching: Allows developers to create branches to work on features independently without affecting the main codebase.
Merging: Seamlessly merges branches back into the main project once changes are finalized.
Git operates locally on a developer's machine, allowing for offline work while still keeping a comprehensive history of changes made during the development process.
What is GitHub?
GitHub is a cloud-based platform that hosts Git repositories. It provides a collaborative environment where developers can share their code and work together on projects. Key functionalities of GitHub include:
Repository Hosting: Stores your code online, making it accessible from anywhere.
Collaboration Tools: Features like pull requests, issues, and code reviews facilitate teamwork and project management.
Community Engagement: Serves as a hub for open-source projects and developer collaboration with millions of users worldwide.
Differences Between Git and GitHub
While often used interchangeably, Git and GitHub serve different purposes:
| Feature | Git | GitHub |
| Type | Version control system | Hosting service for Git repositories |
| Functionality | Tracks changes in files locally | Provides a platform for collaboration and sharing |
| Usage | Command-line interface | Web interface with additional tools |
| Accessibility | Local only | Cloud-based, accessible anywhere |
Git is the tool that manages versions of your code, while GitHub is the platform that allows you to host and share those versions with others.
Getting Started with Git and GitHub
Installing Git
Before using Git, ensure it is installed on your system. You can check the installation by running:
git --version
Configuring Git
Once installed, configure your Git environment with your username and email. This information will be associated with your commits.
git config --global user.name "Your Name"
git config --global user.email "your.email@example.com"
Git Stages
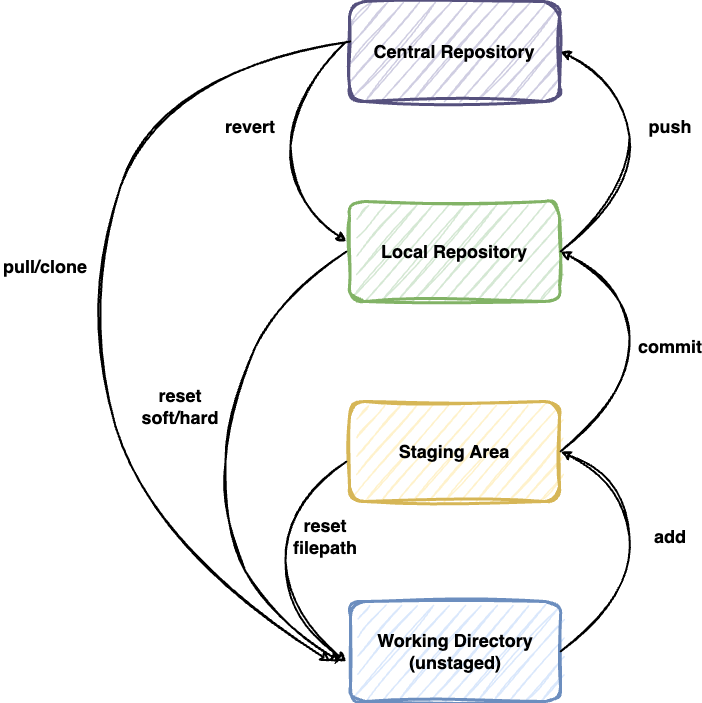
The below diagram summarizes everything you need to know about various stages while committing code and commands required to move between them.

Working Directory (Unstaged):
This is where you make changes to your files. When you modify a file, it’s only saved locally and remains unstaged. At this stage, Git is aware of the changes but hasn’t recorded them yet.
Staging Area:
The staging area is like a preparation zone for changes that you want to commit. Using the
git addcommand, you can mark specific changes to be included in the next commit. This step lets you select exactly what you want to commit.Local Repository:
The local repository contains your project’s history and all committed changes. When you use the
git commitcommand, changes in the staging area are saved here as a new snapshot of the project. This repository is still on your local machine.Central Repository:
The central repository (or remote repository) is where you share your work with others. Using the
git pushcommand, you can upload your local commits here, allowing others to access them. Conversely,git pullorgit clonebrings changes from the central repository to your local environment.
Creating a New Repository
To start tracking a project, navigate to your project directory and initialize a new Git repository. For this we will use github.
git clone https://github.com/ddcrpf/git-github-demo.git
Basic Workflow Commands
Check Status: See the current status of your repository.
git statusAdd Files: Stage files for commit.
 git add .           # Add all files in the current directory
 git add <file>     # Add specific file(s)
Commit Changes: Save staged changes to the repository.
git commit -m "Your commit message"View Commit History: Check the log of commits.
git log
Advanced File Management
View Differences: Check what has changed.
  git diff            # Show unstaged changes
  git diff --staged   # Show staged changes ready for commit
Unstage Changes: Remove files from staging area.
git reset HEAD <file>Revert Changes: Discard changes in a file since the last commit.
git checkout -- <file>
Branching and Merging

Create a Branch:
git branch <branch-name>Switch Branches:
git checkout <branch-name>Create and Switch to a New Branch:
git checkout -b <new-branch-name>Merge Branches:
First, switch back to the main branch (usually
masterormain):git checkout main # or master depending on your setupThen merge:
git merge <branch-name>
Delete a Branch:
 git branch -d <branch-name>           # Delete merged branch
 git branch -D <branch-name>           # Force delete unmerged branch
Remote Repositories
Add a Remote Repository:
git remote add origin <remote-repo-url>Push Changes to Remote:
git push -u origin master # Push to master branch and set upstream trackingFetch and Pull Updates:
 git fetch origin              # Fetch changes from remote without merging
 git pull origin master        # Pull changes from remote and merge into local branch
Remove a Remote Repository:
git remote rm <remote-name>
Undoing Changes
Reset Last Commit but Keep Changes Staged:
git reset --soft HEAD^ # Undo last commit but keep changes staged for next commit.Hard Reset to Undo Last Commit and Discard Changes:
git reset --hard HEAD^ # Completely remove last commit and its changes.Revert a Commit by ID:
git revert <commit-id> # Create a new commit that undoes the changes of the specified commit.
Conclusion
Mastering Git and GitHub is essential for any developer today. These tools not only facilitate effective version control but also enhance collaboration across teams and projects. By understanding how to utilize both effectively, developers can improve their workflow, manage projects efficiently, and contribute to the vast community of open-source software development.
With this guide, you now have a comprehensive understanding of key concepts and commands in Git and GitHub that will help you navigate your development journey with confidence!
In the next chapter, we will look into AWS CodeBuild for fully managed continuous integration.
Subscribe to my newsletter
Read articles from Pranjal Chaubey directly inside your inbox. Subscribe to the newsletter, and don't miss out.
Written by

Pranjal Chaubey
Pranjal Chaubey
Hey! I'm Pranjal and I am currently doing my bachelors in CSE with Artificial Intelligence and Machine Learning. The purpose of these blogs is to help me share my machine-learning journey. I write articles about new things I learn and the projects I do.