eSewa and Node.js: The Dynamic Duo of Payment Integration – No Capes Required!
 Kumar Chaudhary
Alright, folks, it’s time to roll up our sleeves and dive into the exciting world of payment integration! To kick things off, we’ll create a payment initiation form in a file named form.html. This form will be the friendly face of our application, allowing users to input the amount they want to pay and any applicable taxes.
Step-1: Create Payment Initiation Form
<!DOCTYPE html>
<html lang="en">
  <head>
    <meta charset="UTF-8" />
    <meta name="viewport" content="width=device-width, initial-scale=1.0" />
    <script src="https://cdnjs.cloudflare.com/ajax/libs/crypto-js/4.1.1/crypto-js.min.js"></script>
    <title>eSewa Payment Integration</title>
    <style>
      .container {
        max-width: 500px;
        margin: 50px auto;
        padding: 20px;
        border: 1px solid #ddd;
        border-radius: 8px;
        box-shadow: 0 2px 4px rgba(0, 0, 0, 0.1);
      }
      .form-group {
        margin-bottom: 20px;
      }
      label {
        display: block;
        margin-bottom: 8px;
        font-weight: 600;
      }
      input {
        width: 100%;
        padding: 10px;
        border: 1px solid #ddd;
        border-radius: 4px;
        font-size: 16px;
      }
      button {
        background-color: #60bb46;
        color: white;
        padding: 12px 24px;
        border: none;
        border-radius: 4px;
        cursor: pointer;
        font-size: 16px;
        width: 100%;
      }
      button:hover {
        background-color: #4fa83d;
      }
      .error {
        color: #dc3545;
        margin-top: 10px;
        padding: 10px;
        border-radius: 4px;
        background-color: #fff3f3;
        display: none;
      }
    </style>
  </head>
  <body>
    <div class="container">
      <h2>eSewa Payment Test</h2>
      <div id="payment-form">
        <div class="form-group">
          <label for="amount">Amount (NPR):</label>
          <input type="number" id="amount" step="0.01" value="100" min="1" />
        </div>
        <div class="form-group">
          <label for="tax_amount">Tax Amount (NPR):</label>
          <input type="number" id="tax_amount" step="0.01" value="10" min="0" />
        </div>
        <button onclick="initializePayment()">Pay with eSewa</button>
        <div id="error-message" class="error"></div>
      </div>
    </div>
  </body>
</html>
Step-2: Setup Basic server
Now lets move on to Backend
Enter the following command on your terminal which will create package.json file where we can manage list of dependecies which are required for the project.
npm init -y
Install the follwing dependecises
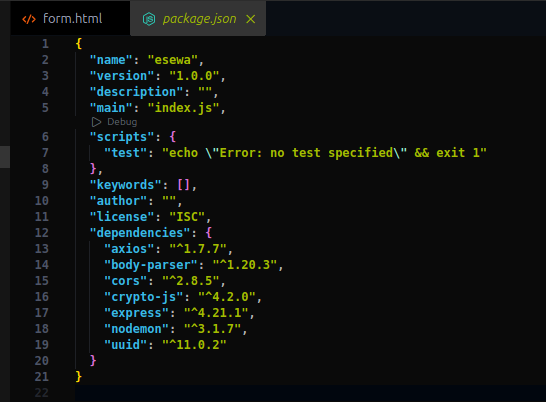
npm i axios body-parser cors crypto-js express nodemon uuid
After entering that command we will be having this on your package.json file

Importing Packages: CommonJS vs. ES Modules
Node.js supports two module systems: CommonJS (require) and ES Modules (import). Let’s look at each in detail.
CommonJS (require)
The CommonJS module system is the traditional way to handle modules in Node.js. Here’s how you would import a package using CommonJS:
const packageName = require('package-name');
This syntax is synchronous and works seamlessly with many older Node.js projects. CommonJS has been the default in Node.js for a long time, so it’s widely supported by packages.
ES Modules (import)
ES Modules use the import syntax, introduced as part of ECMAScript standards, and are generally the preferred approach for newer projects. Here’s how you would import a package using ES Modules:
import packageName from 'package-name';
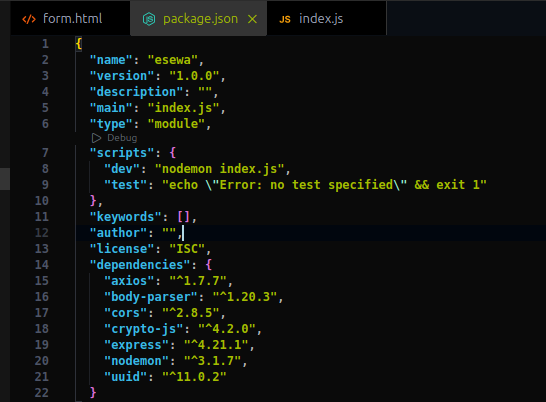
To use this syntax in Node.js, make sure your package.json includes the following:
"type": "module"
Also add the script to start the server
"dev": "nodemon index.js"
This tells Node.js to interpret .js files as ES Modules by default.

If you encounter issues with your setup, you can replace your package.json with the code below and reinstall the dependencies. However, be cautious: do not overwrite your package.json if you’re working on an existing project—the listed packages are specific to this setup and may differ from the libraries your project depends on.
{
  "name": "payment-integration",
  "version": "1.0.0",
  "description": "",
  "main": "index.js",
  "type": "module",
  "scripts": {
    "test": "echo \"Error: no test specified\" && exit 1",
    "dev": "nodemon index.js"
  },
  "keywords": [],
  "author": "",
  "license": "ISC",
  "dependencies": {
    "axios": "^1.7.7",
    "body-parser": "^1.20.3",
    "cors": "^2.8.5",
    "crypto": "^1.0.1",
    "crypto-js": "^4.2.0",
    "express": "^4.21.1",
    "nodemon": "^3.1.7",
    "uuid": "^10.0.0"
  }
}
When to Use CommonJS vs. ES Modules
CommonJS: Useful for compatibility with older libraries or projects that rely on synchronous imports.
ES Modules: Ideal for modern, asynchronous code and works well with the latest JavaScript features. It’s also becoming the standard, so consider using it for new projects.
For now create the index.js file in backend root directory where we will be handling our esewa payment integration code for you project you need write it down on your preferred project methods /files.
// server.js
import express from "express";
import bodyParser from "body-parser";
import cors from "cors";

const app = express();

app.use(bodyParser.json());
app.use(bodyParser.urlencoded({ extended: true }));
app.use(cors({ origin: "*" }));

app.listen(3000, () => {
  console.log("Server running on port 3000");
});
Firing Up Your Server: Let’s Get This Party Started!
So, you’ve set up your server script in package.json, and now it’s time for the moment of truth. To get things rolling, just type:
npm run dev
Hit enter, and... drumroll... hurray! 🎉 Your server is up and running! Give yourself a high-five (or a fist bump to your screen—just not too hard). Now you’re officially in business!
If you see the magic words “Server is running,” you’re all set. Go forth and conquer that code!
Step-3: Creating a Payment Signature and Kicking Off the Payment Process! 🎉
Let’s dive back into our payment form, shall we?
Here’s a breakdown of this code , explaining each part of the payment initialization and signature generation process:
Creating a Payment Signature and Initializing the Payment
This code snippet shows how to generate a secure payment signature and initialize the payment process in JavaScript. Let’s walk through it step by step.
i. generateSignature Function
The generateSignature function creates a secure, HMAC SHA-256 signature for the payment using the provided details. This is crucial for verifying and securing the transaction data.
Here’s what each part of this function does:
Inputs:
total_amount,transaction_uuid,product_code, andsecretKeyare passed in as arguments.Creating the Signed String: The code combines these values into a single string (
signedFields), formatted astotal_amount=<value>,transaction_uuid=<value>,product_code=<value>.Generating the HMAC SHA-256 Hash: It uses the
CryptoJS.HmacSHA256method to create a cryptographic hash based on thesignedFieldsstring and thesecretKey.Encoding to Base64: The resulting hash is converted to a base64 string using
CryptoJS.enc.Base64.stringify, making it compatible with many API formats.function generateSignature(total_amount, transaction_uuid, product_code, secretKey) { const signedFields = `total_amount=${total_amount},transaction_uuid=${transaction_uuid},product_code=${product_code}`; const hash = CryptoJS.HmacSHA256(signedFields, secretKey); const base64Signature = CryptoJS.enc.Base64.stringify(hash); return base64Signature; }
Purpose: This signature, unique to each transaction, protects sensitive transaction details from tampering.
ii. initializePayment Function
The initializePayment function handles the start of the payment process. It validates the payment information and calculates the total_amount to ensure everything checks out before the payment proceeds.
Here’s what happens in initializePayment:
Hiding Error Messages: It first hides any error message that might be displayed from a previous attempt.
Fetching and Calculating Total Amount: It retrieves the
amountandtaxAmountfrom input fields, converts them to numbers, and calculates the total by adding the two values.Generating a Transaction UUID: This function then creates a unique transaction ID,
transaction_uuid, using a random string, making each transaction uniquely identifiable.Setting the Product Code: The
product_codeis defined as a constant,EPAYTESTin this case, which could represent a demo or test product.async function initializePayment() { const errorElement = document.getElementById("error-message"); errorElement.style.display = "none"; try { const amount = document.getElementById("amount").value; const taxAmount = document.getElementById("tax_amount").value; const total_amount = (parseFloat(amount) + parseFloat(taxAmount)).toFixed(2); const transaction_uuid = Math.random().toString(36).substring(2, 14); const product_code = "EPAYTEST"; console.log("Initiating payment with:", { total_amount, transaction_uuid, product_code });Validating Total Amount: If the calculated
total_amountis less than or equal to zero, it throws an error to alert the user that the entered amount is invalid.Error Handling: If any error occurs during initialization, it logs the error and displays an error message on the page.
      if (parseFloat(total_amount) <= 0) {
        throw new Error("Please enter a valid amount greater than 0");
      }
    } catch (error) {
      console.error("Payment initialization error:", error);
      errorElement.style.display = "block";
      errorElement.innerText = error.message;
      errorElement.textContent = error.message;
    }
  }
Putting It All Together
With these two elements, you’ll have a fully functioning setup:
The payment button triggers the
initializePaymentfunction.The CryptoJS library, added via CDN, powers the secure hashing process in
generateSignature.
Below code the combination above two blockl code which generate a secure payment signature and initialize the payment process in JavaScript.First set
  <script>
    function generateSignature(
      total_amount,
      transaction_uuid,
      product_code,
      secretKey
    ) {
      // Create the string in the correct order
      const signedFields = `total_amount=${total_amount},transaction_uuid=${transaction_uuid},product_code=${product_code}`;

      // Generate the HMAC SHA-256 signature
      const hash = CryptoJS.HmacSHA256(signedFields, secretKey);

      // Convert the result to base64
      const base64Signature = CryptoJS.enc.Base64.stringify(hash);

      return base64Signature;
    }
    async function initializePayment() {
      const errorElement = document.getElementById("error-message");
      errorElement.style.display = "none";
      try {
        const amount = document.getElementById("amount").value;
        const taxAmount = document.getElementById("tax_amount").value;
        const total_amount = (
          parseFloat(amount) + parseFloat(taxAmount)
        ).toFixed(2);
        const transaction_uuid = Math.random().toString(36).substring(2, 14); // Example transaction UUID
        const product_code = "EPAYTEST";
        console.log("Initiating payment with:", {
          total_amount,
          transaction_uuid,
          product_code,
        });
        if (parseFloat(total_amount) <= 0) {
          throw new Error("Please enter a valid amount greater than 0");
        }
      } catch (error) {
        console.error("Payment initialization error:", error);
        errorElement.style.display = "block";
        errorElement.innerText = error.message;
        errorElement.textContent = error.message;
      }
    }
  </script>
Step 3
Almost There: Bringing Up the eSewa Payment UI!
Alright, we’ve got the foundation laid out, but we’re only halfway to the finish line! We still need to make that magical eSewa payment UI pop up—the one that handles login and payment details on a third-party site. Ever wonder how sites open that fancy payment screen? Don’t worry if you’re not sure yet. I’m here to help, and I promise it’s simple!
Now, I could tell you to just copy-paste my code and call it a day… but hold on! Don’t do that until you understand what’s happening here. Let’s walk through it so you’re not just clicking buttons but actually mastering this process. Ready to dive in?
The Final Countdown: Making the eSewa Payment UI Appear!
Alright, we’ve set up our transaction data and secured it with a signature. Now it’s time to bring that eSewa payment screen to life! Let’s break down how this code sends everything over to eSewa so users can complete their payment with style.
Step i: Generating the Signature 🎩🔐
This bit of code is like our VIP pass. To make sure eSewa knows we’re legit, we use generateSignature() to create a secure signature with our secret key, "8gBm/:&EnhH.1/q". The secret key is provided by esewa fell free to check the documentation. OfCourse you will need a live secret to work in real world.As for now let’s procces with test secret key, this keeps our transaction data safe and sound. Add this below code after if statement in try catch block that we did on our previous step.
const signature = generateSignature(
  total_amount,
  transaction_uuid,
  product_code,
  "8gBm/:&EnhH.1/q"
);
console.log("Generated Signature:", signature);
Here we’ve got our signature in hand. You could even print it out as proof of your fancy crypto skills!
Step ii: Building the Payment Data 🛠️📦
Next up, we need a nicely packed box of paymentData. Think of this as the gift basket we’re sending to eSewa, packed with all the transaction details:
amount, total_amount, tax_amount: These tell eSewa how much we’re paying.
transaction_uuid: Like a fingerprint for our transaction.
product_code: The unique code for our product.
signature: Our security stamp from Step 1.
URLs for success and failure: These URLs let eSewa know where to send the user after they’ve paid or backed out.
Charges: Here we assume no delivery or service charge and set these to
0.
const paymentData = {
  amount: amount,
  total_amount: total_amount,
  tax_amount: taxAmount,
  transaction_uuid: transaction_uuid,
  product_code: product_code,
  signature: signature,
  success_url: "http://localhost:3000/payment-success",
  failure_url: "http://localhost:3000/payment-failure",
  product_delivery_charge: "0",
  product_service_charge: "0",
  signed_field_names: "total_amount,transaction_uuid,product_code",
};
Step iii: Creating the Form 📝📬
Now, we need to send this info over to eSewa. To do that, we create a form element, just like if we were filling out a web form manually:
Create the Form: Set it up to send a POST request directly to the eSewa payment API.
Put Everything in Order: eSewa expects specific fields, so we create a list to ensure everything is lined up just right.
Hidden Inputs: Add each field as a hidden input, so users don’t see them but the data goes along for the ride.
Send the Form: Finally, we add the form to the page and let
form.submit()work its magic!
const form = document.createElement("form");
form.method = "POST";
form.action = "https://rc-epay.esewa.com.np/api/epay/main/v2/form";

const fields = [
  "amount",
  "failure_url",
  "product_delivery_charge",
  "product_service_charge",
  "product_code",
  "signature",
  "signed_field_names",
  "success_url",
  "tax_amount",
  "total_amount",
  "transaction_uuid",
];

fields.forEach((field) => {
  const input = document.createElement("input");
  input.type = "hidden";
  input.name = field;
  input.value = paymentData[field];
  form.appendChild(input);
});

document.body.appendChild(form);
form.submit();
And voilà! The form.submit() sends our package over to eSewa, popping up that familiar payment UI so users can complete their transaction. Just a click, and they’re off to the eSewa checkout page, ready to seal the deal!
Final Script
  <script>
    function generateSignature(
      total_amount,
      transaction_uuid,
      product_code,
      secretKey
    ) {
      // Create the string in the correct order
      const signedFields = `total_amount=${total_amount},transaction_uuid=${transaction_uuid},product_code=${product_code}`;

      // Generate the HMAC SHA-256 signature
      const hash = CryptoJS.HmacSHA256(signedFields, secretKey);

      // Convert the result to base64
      const base64Signature = CryptoJS.enc.Base64.stringify(hash);

      return base64Signature;
    }
    async function initializePayment() {
      const errorElement = document.getElementById("error-message");
      errorElement.style.display = "none";
      try {
        const amount = document.getElementById("amount").value;
        const taxAmount = document.getElementById("tax_amount").value;
        const total_amount = (
          parseFloat(amount) + parseFloat(taxAmount)
        ).toFixed(2);
        const transaction_uuid = Math.random().toString(36).substring(2, 14); // Example transaction UUID
        const product_code = "EPAYTEST";
        console.log("Initiating payment with:", {
          total_amount,
          transaction_uuid,
          product_code,
        });
        if (parseFloat(total_amount) <= 0) {
          throw new Error("Please enter a valid amount greater than 0");
        }

        // Generate the signature
        const signature = generateSignature(
          total_amount,
          transaction_uuid,
          product_code,
          "8gBm/:&EnhH.1/q"
        );
        console.log("Generated Signature:", signature);

        const paymentData = {
          amount: amount,
          total_amount: total_amount,
          tax_amount: taxAmount,
          transaction_uuid: transaction_uuid,
          product_code: product_code,
          signature: signature,
          success_url: "http://localhost:3000/payment-success", // Placeholder URL
          failure_url: "http://localhost:3000/payment-failure", // Placeholder URL
          product_delivery_charge: "0", // Assuming no delivery charge
          product_service_charge: "0", // Assuming no service charge
          signed_field_names: "total_amount,transaction_uuid,product_code",
        };

        // Create and submit form
        const form = document.createElement("form");
        form.method = "POST";
        form.action = "https://rc-epay.esewa.com.np/api/epay/main/v2/form";

        // Ensure fields are in the correct order
        const fields = [
          "amount",
          "failure_url",
          "product_delivery_charge",
          "product_service_charge",
          "product_code",
          "signature",
          "signed_field_names",
          "success_url",
          "tax_amount",
          "total_amount",
          "transaction_uuid",
        ];

        fields.forEach((field) => {
          const input = document.createElement("input");
          input.type = "hidden";
          input.name = field;
          input.value = paymentData[field];
          form.appendChild(input);
        });

        document.body.appendChild(form);
        form.submit();
      } catch (error) {
        console.error("Payment initialization error:", error);
        errorElement.style.display = "block";
        errorElement.innerText = error.message;
        errorElement.textContent = error.message;
      }
    }
  </script>
Time to Get Down to Business: Validating Payments on the Server
Alright, payment enthusiasts, it’s time to bring some server-side magic into our eSewa integration! We’ll validate our payment right after initiating it. This means we need to add a bit of code to our server that checks if everything is in order after the user tries to pay.
Step 1: Import the Crypto Library
First things first, we need to import our trusty sidekick, the CryptoJS library, which will help us decode those sneaky Base64 strings that eSewa sends back to us. Let’s get this party started!
import CryptoJS from "crypto-js";
Step 2: Decode the Base64 String
Next, we’ll write a function that decodes Base64 strings and converts them into a fancy JSON object that we can actually work with. This is how we do it:
function decodeBase64ToJson(base64String) {
  const decoded = CryptoJS.enc.Base64.parse(base64String);
  const decodedString = CryptoJS.enc.Utf8.stringify(decoded);
  try {
    const jsonObject = JSON.parse(decodedString);
    return jsonObject;
  } catch (error) {
    console.error("Error parsing JSON:", error);
    return null;
  }
}
What’s happening here?
We’re taking that mysterious Base64 string from eSewa, decoding it like a pro, and then trying to convert it into a JSON object. If it fails, we’ll just log an error and return null—because we’re all about keeping our code clean and informative!
Step 3: Setting Up Success and Failure Routes
Now, let’s set up the routes for when our payment succeeds or fails. This is where we check if everything went smoothly and respond accordingly:
app.get("/payment-success", (req, res) => {
  const data = decodeBase64ToJson(req.query.data);
  console.log(data);
  res.send("Success! Please check the console of index.js.");
});

app.get("/payment-failure", (req, res) => {
  const data = decodeBase64ToJson(req.query.data);
  console.log(data);
  res.send("Oops! There was an error. Please check the console of index.js.");
});
What do these routes do?
/payment-success: If everything goes according to plan and the user successfully makes a payment, this route is hit. We decode the data, log it for our records (and for your eyes), and send a happy message back to the user. 🎉
/payment-failure: If, heaven forbid, something goes wrong, this route kicks in. We decode the data, log the error, and send a friendly message letting the user know that something went wrong. 💔
Conclusion
And there you have it! We’ve successfully set up our server to validate payments with eSewa. Now we can handle success and failure cases like pros.
Subscribe to my newsletter
Read articles from Kumar Chaudhary directly inside your inbox. Subscribe to the newsletter, and don't miss out.
Written by
