How to Integrate Tailwind with Django – With Code Examples
 Abhijeet Dave
Table of contents
- Table of Contents
- A Quick Overview of Django
- What is Tailwind CSS?
- Why Django and Tailwind Work So Well Together?
- How to Initialize a Django Project?
- How to Integrate Tailwind CSS with Django?
- Let’s Create a Chat Bubble app.
- How to Use Prettier for Class Formatting?
- How to Create a Chat Bubble Using FlyonUI Tailwind Components and Django
- Conclusion
In modern web development, choosing the right technology is crucial because it impacts both the process and outcome of your projects. Using Django as a backend framework and Tailwind CSS as a utility-first CSS framework offers an efficient way to create responsive and visually appealing web applications.
This article will explain why Django and Tailwind CSS work well together, how to start a Django project, how to easily add Tailwind CSS, and how to speed up your development with Prettier for better class formatting.
Table of Contents
A Quick Overview of Django
Django is an open-source, full-featured Python web framework that follows the batteries-included approach. Django aims at making the development of complex, database-driven websites as fast and easy as possible by providing a lot of built-in functionalities like ORM, authentication system, admin panel, and many more. Django enables rapid development by focusing on writing the app's unique parts rather than wasting time writing a lot of boilerplate code.
The reason for its popularity is that it follows the MVT design pattern which keeps data models, views, and templates well separated. In Django, security is paramount: it guards against SQL injection, cross-site scripting, and cross-site request forgery out of the box. Django scales well and is flexible – it is fit for both small projects and large, complex web applications, and that is why it is used by major sites such as Instagram and Pinterest.
What is Tailwind CSS?
It is a well-known fact that Tailwind CSS is a utility-first CSS framework. It lets you style elements directly within your HTML, thanks to pre-defined classes. Unlike other CSS frameworks that offer pre-built components, Tailwind offers these low-level utility classes that let you create your own design system. Thus, this makes crafting unique responsive designs effortless as there is not much to do with custom CSS.
Why Django and Tailwind Work So Well Together?
The combination of Django and Tailwind CSS offers a seamless way to build robust, full-featured applications. Here’s why:
Rapid Development: Django’s backend capabilities allow developers to create powerful applications quickly, while Tailwind CSS helps streamline the styling process with its utility-first approach.
Customizable Design: With Tailwind, you’re not confined to predefined styles. You can craft a unique, consistent design that scales easily as your project grows.
Separation of Concerns: Django’s templating system works hand-in-hand with Tailwind CSS, ensuring a clear separation between the backend logic and frontend styling.
How to Initialize a Django Project?
Install Django: Install Django using pip:
pip install djangoCreate a Django Project: Use the Django admin command to create a new project:
django-admin startproject myprojectNavigate to Your Project Directory:
cd myprojectModify
settings.py:In the
TEMPLATESsetting, add atemplatesdirectory:"DIRS": [BASE_DIR / "templates"],Add a
staticdirectory for your static files:STATICFILES_DIRS = [BASE_DIR / "static"]
How to Integrate Tailwind CSS with Django?
Install Tailwind CSS: Make sure Node.js is installed, then run:
 npm install -D tailwindcss
 npx tailwindcss init
Set Up Tailwind CSS: In your
static/cssdirectory, create amain.cssfile with the following content:@tailwind base; @tailwind components; @tailwind utilities;Modify tailwind.config.js: Adjust the content section to include
templates/*.htmlfiles, ensuring Tailwind CSS generates the necessary styles./** @type {import('tailwindcss').Config} */ module.exports = { content: ["./templates/**/*.html", "./**/templates/**/*.html"], darkMode: "media", theme: { extend: {}, }, plugins: [], };Add a Build Script: Update your
package.jsonto include a build script:"scripts": { "watch:css": "tailwindcss build static/css/main.css -o static/output.css -w"}Compile Tailwind CSS:
npm run watch:css
Let’s Create a Chat Bubble app.
Create a Django App:
django-admin startapp chatSet Up the Views:
In
chat/views.py, create a simple view:from django.shortcuts import render def chat(request): return render(request, "chat.html")
Configure URLs:
In
chat/urls.py, define the URL pattern for your view:from django.urls import path from . import views urlpatterns = [ path("", views.chat, name="chat"), ]In the project’s
urls.py, include the app URLs:from django.urls import include, path urlpatterns = [ path("", include("chat.urls")), ]
Set Up the Base HTML Template:
Create a
templates/base.htmlfile to serve as the foundation of your application:{% load static %} <!doctype html> <html lang="en"> <head> <meta charset="UTF-8" /> <meta name="viewport" content="width=device-width, initial-scale=1.0" /> <title>My Django App with Tailwind</title> <link rel="stylesheet" href="{% static 'css/output.css' %}" /> </head> <body class="h-screen bg-slate-300 dark:bg-slate-400"> <section class="container mx-auto flex flex-col items-center"> <h1 class="mb-4 mt-10 text-6xl font-bold text-blue-500 dark:text-blue-200" > Chat Bubble </h1> {% block content %} {% endblock %} </section> </body> </html>
Create the Chat Template:
- In
templates/chat.html, extend the base template:
- In
{% extends "base.html" %}
{% block content %}
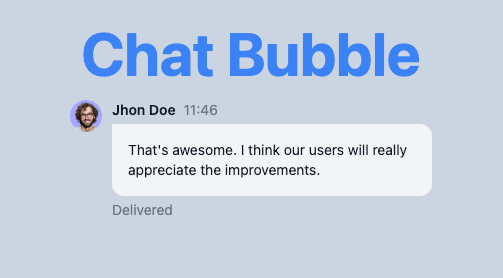
<div class="flex items-start gap-2.5">
<img class="w-8 h-8 rounded-full" src="<https://cdn.flyonui.com/fy-assets/avatar/avatar-1.png>" alt="Jhon image">
<div class="flex flex-col gap-1 w-full max-w-[320px]">
<div class="flex items-center space-x-2 rtl:space-x-reverse">
<span class="text-sm font-semibold text-gray-900 dark:text-white">Jhon Doe</span>
<span class="text-sm font-normal text-gray-500 dark:text-gray-400">11:46</span>
</div>
<div
class="flex flex-col leading-1.5 p-4 border-gray-200 bg-gray-100 rounded-e-xl rounded-es-xl dark:bg-gray-700">
<p class="text-sm font-normal text-gray-900 dark:text-white"> That's awesome. I think our users will really
appreciate the improvements.</p>
</div>
<span class="text-sm font-normal text-gray-500 dark:text-gray-400">Delivered</span>
</div>
</div>
{% endblock %}
- Run the Development Server:
bash python manage.py runserver
How to Use Prettier for Class Formatting?
To keep your Tailwind CSS classes clean and organized, you can integrate Prettier into your workflow.
Install Prettier and the Tailwind Plugin:
npm install --save-dev prettier prettier-plugin-tailwindcssConfigure Prettier: Create a
.prettierrcfile in your project root:{ "plugins": ["prettier-plugin-tailwindcss"]}Format on Save: Set up your code editor to format files automatically with Prettier on save.
Result:
GitHub Repo: ts-django-tailwindcss
How to Create a Chat Bubble Using FlyonUI Tailwind Components and Django
Here, we’ll use FlyonUI, an open-source Tailwind CSS Components Library. It offers a wide range of customizable, accessible, and ready-to-use components.
Let’s integrate Django with FlyonUI components and create a chat bubble.
Step 1: Install flyonui
Install flyonui via npm.
npm install -D flyonui@latest
Step 2: Configure Tailwind
Add the path to FlyonUI JavaScript files in your tailwind.config.js file.
module.exports = {
  content: ["./node_modules/flyonui/dist/js/*.js"], // Require only if you want to use FlyonUI JS component

  plugins: [
    require("flyonui"),
    require("flyonui/plugin") // Require only if you want to use FlyonUI JS component
  ]
}
Step 3: Copy the FlyonUI JavaScript
Copy FlyonUI's JavaScript (node_modules/flyonui/flyonui.js) files to the static/ folder.
Step 4: Add Js to your base.html
Once you copied the js file to your static folder include it in base.html.
<html lang="en">
 ...
 <body>
  ...
  <script src="{% static 'js/flyonui.js' %}"></script>
 </body>
</html>
Let's Update the Chat bubble code block:
{% extends "base.html" %}
{% block content %}
<div>
  <div class="chat chat-receiver">
    <div class="avatar chat-avatar">
      <div class="size-10 rounded-full">
        <img
          src="<https://cdn.flyonui.com/fy-assets/avatar/avatar-1.png>"
          alt="avatar"
        />
      </div>
    </div>
    <div class="chat-header text-base-content/90">
      Obi-Wan Kenobi
      <time class="text-base-content/50">12:45</time>
    </div>
    <div class="chat-bubble">I started learning guitar today!</div>
    <div class="chat-footer text-base-content/50">
      <div>Delivered</div>
    </div>
  </div>
  <div class="chat chat-sender">
    <div class="avatar chat-avatar">
      <div class="size-10 rounded-full">
        <img
          src="<https://cdn.flyonui.com/fy-assets/avatar/avatar-2.png>"
          alt="avatar"
        />
      </div>
    </div>
    <div class="chat-header text-base-content/90">
      Anakin
      <time class="text-base-content/50">12:46</time>
    </div>
    <div class="chat-bubble">
      That's awesome! You're going to be great at it!
    </div>
    <div class="chat-footer text-base-content/50">
      Seen
      <span class="icon-[tabler--checks] align-bottom text-success"></span>
    </div>
  </div>
</div>
{% endblock %}
Result:

Conclusion
Using Tailwind CSS with Django is a great way to make your web applications look good and work well on different devices, while you take advantage of Django's many features. This setup not only boosts productivity but also helps you follow good styling and design practices.
Here's the repository where you can find more details or see the complete code: ts-django-tailwindcss. I hope this tutorial helps you with the Django integration with Tailwind CSS. I have prepared this article with the help of Pruthvi Prajapati, a front-end developer with 2 years of experience.
Happy coding!
Subscribe to my newsletter
Read articles from Abhijeet Dave directly inside your inbox. Subscribe to the newsletter, and don't miss out.
Written by
Abhijeet Dave
Abhijeet Dave
A seasoned technical writer with experience in creating high-quality content. Specialized in frontend tech & simplifying complex concepts into clear articles. In my free time, I like to play chess.