How to create a Linux (Ubuntu) Virtual Machine in Azure using a Public Key.
 Uzomah Chiemerie

INTRODUCTION
Creating and connecting to a Linux VM on the Azure portal might seem challenging at first, but rest assured, it’s quite straightforward and only slightly different from setting up a Windows VM. In this comprehensive guide, I'll walk you through each step of the process, making it simple and approachable. By the end of this article, you'll be confidently spinning up your very own Linux VM on Azure.
Benefits of using a Linux VM on Azure:
Using a Linux Virtual Machine (VM) on Azure comes with a plethora of benefits. Here are some key advantages:
Cost Efficiency: Linux VMs often come at a lower cost compared to other operating systems, which can help manage your budget effectively.
Flexibility: Azure supports a wide range of Linux distributions (like Ubuntu, CentOS, Debian, and more), allowing you to choose the best fit for your needs.
Scalability: Easily scale your infrastructure up or down based on demand, ensuring you only pay for what you use.
Integration: Seamlessly integrate with other Azure services, such as Azure Kubernetes Service (AKS), Azure DevOps, and Azure Storage.
Performance: High-performance computing capabilities for running complex and resource-intensive applications.
Security: Robust security features, including Azure Security Center, which helps you monitor and protect your Linux VMs.
Support: Access to extensive community support and Microsoft’s enterprise-grade support services.
Automation: Utilize Azure’s automation tools for deployment, management, and scaling, such as Azure Resource Manager templates and Azure CLI.
Open Source: Leverage the open-source nature of Linux to customize and optimize your VM environment.
Development: Ideal for development environments, particularly for developers working with open-source tools and languages.
These benefits make using a Linux VM on Azure a powerful and flexible choice for a wide range of applications and workloads.
Before we dive in, make sure you have an active Azure account and subscription. This could be a standard paid subscription, free credits for new users, or even a student account. Ready to get started? Let’s make the complex simple together!
GUIDED STEPS:
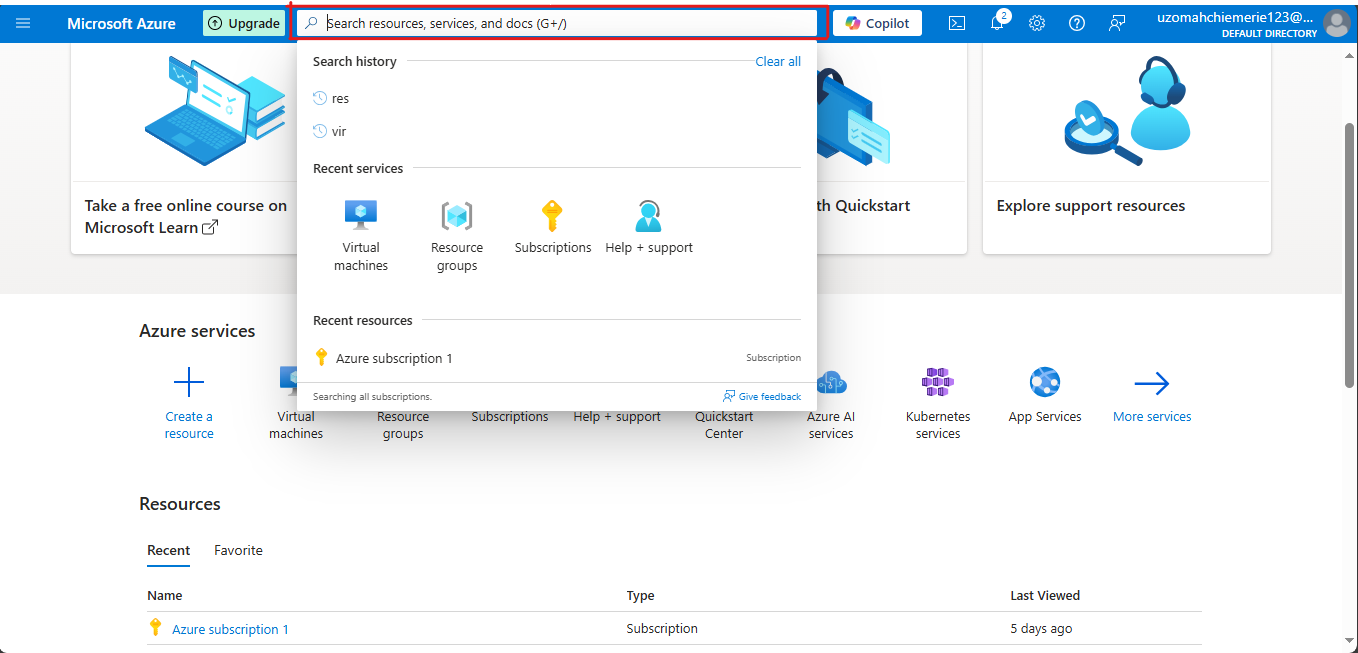
Step one is to log in to your account on the Azure portal. Once you're in, navigate to the Virtual Machine tab. If you prefer, you can quickly locate it by using the search bar at the top. This straightforward step sets the stage for creating and managing your virtual machines effortlessly.
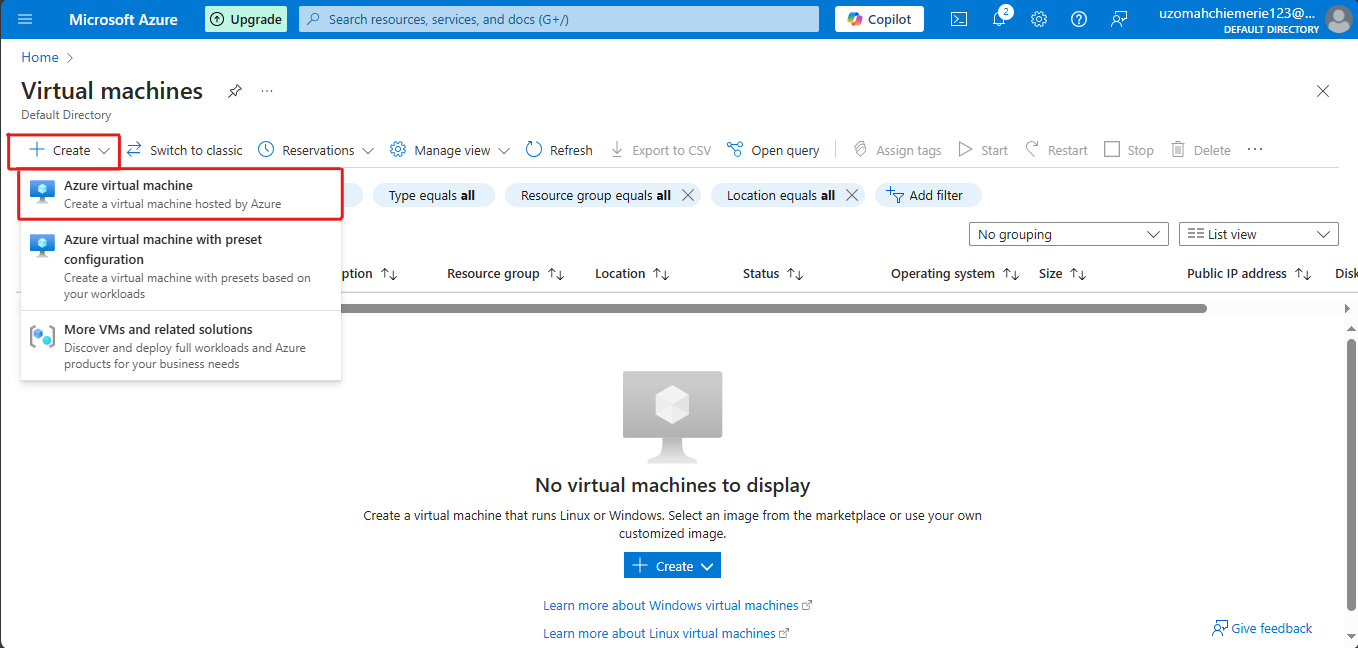
Once you're on the Virtual Machine page, look for the Create tab located at the top left corner. Go ahead and give it a click. From the dropdown menu, select Azure Virtual Machine. This action initiates the process of creating your new virtual machine.
SUBSCRIPTION AND INSTANCE DETAILS:
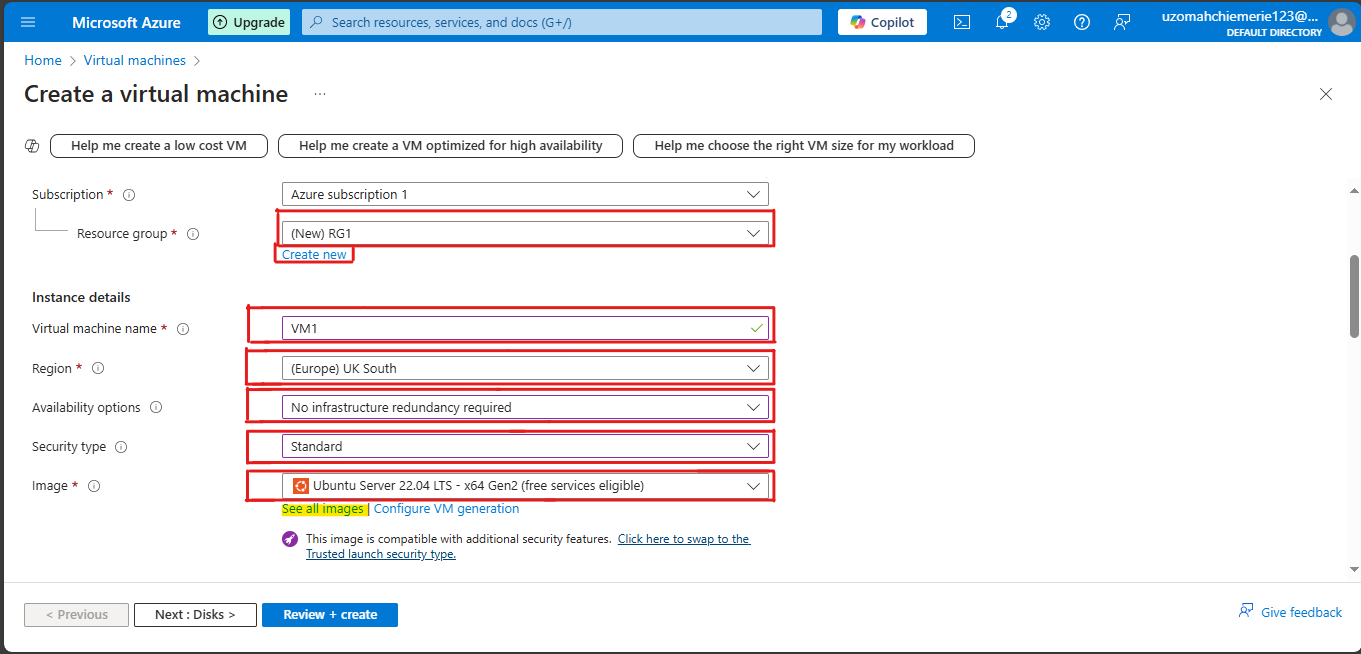
Start by creating a new resource group or selecting an existing one. Next, fill in and select the remaining parameters. Enter your Virtual Machine name and choose a region that is close to your location. For this tutorial, you can skip the “Availability” options by selecting "No infrastructure redundancy required." Then, choose your preferred image, which in this case is Ubuntu. In the context of Azure and virtual machines, an “image” refers to a pre-configured template or snapshot of an operating system (OS) that includes the necessary files, settings, and software installations to deploy a virtual machine (VM) with specific characteristics. For more images, select “see all images” as highlighted in the image below.
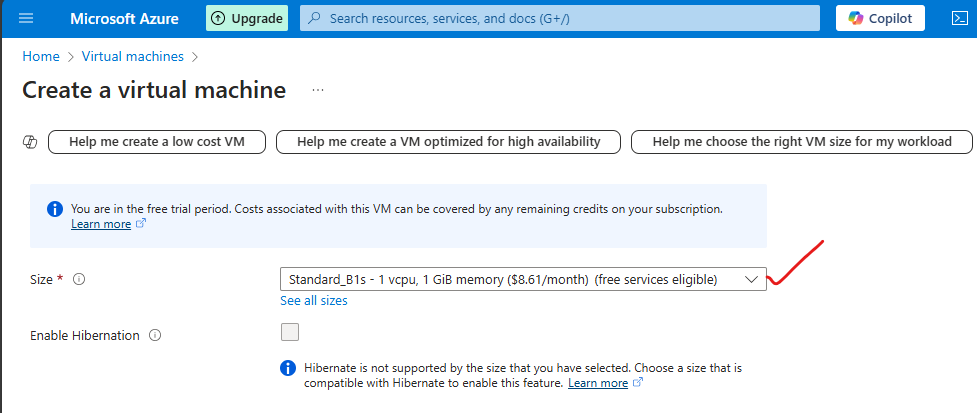
Finally, select your VM size to complete the setup.
ADMINISTRATOR:
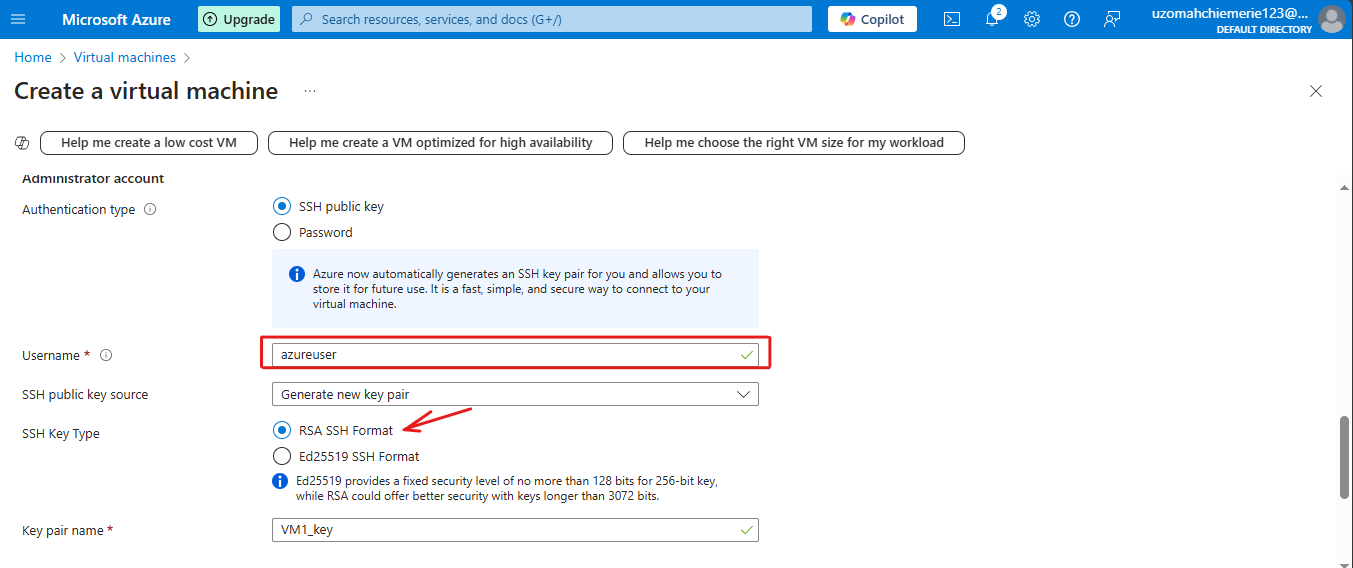
Select your preferred mode of authentication. If you opt for a password, make sure to remember both your username and password. Your password should include uppercase letters, lowercase letters, numbers, and must be at least 12 characters long. Alternatively, you can use an SSH key for authentication. It's crucial to remember the username and keypair name or write them down and store them in a safe place. For the purpose of this tutorial, we'll use an SSH key with "azureuser" as the username. We will be using “RSA SSH Format”.
NOTE: SSH is the default connection protocol for Linux VMs hosted in Azure
INBOUND PORTS AND CREATE:
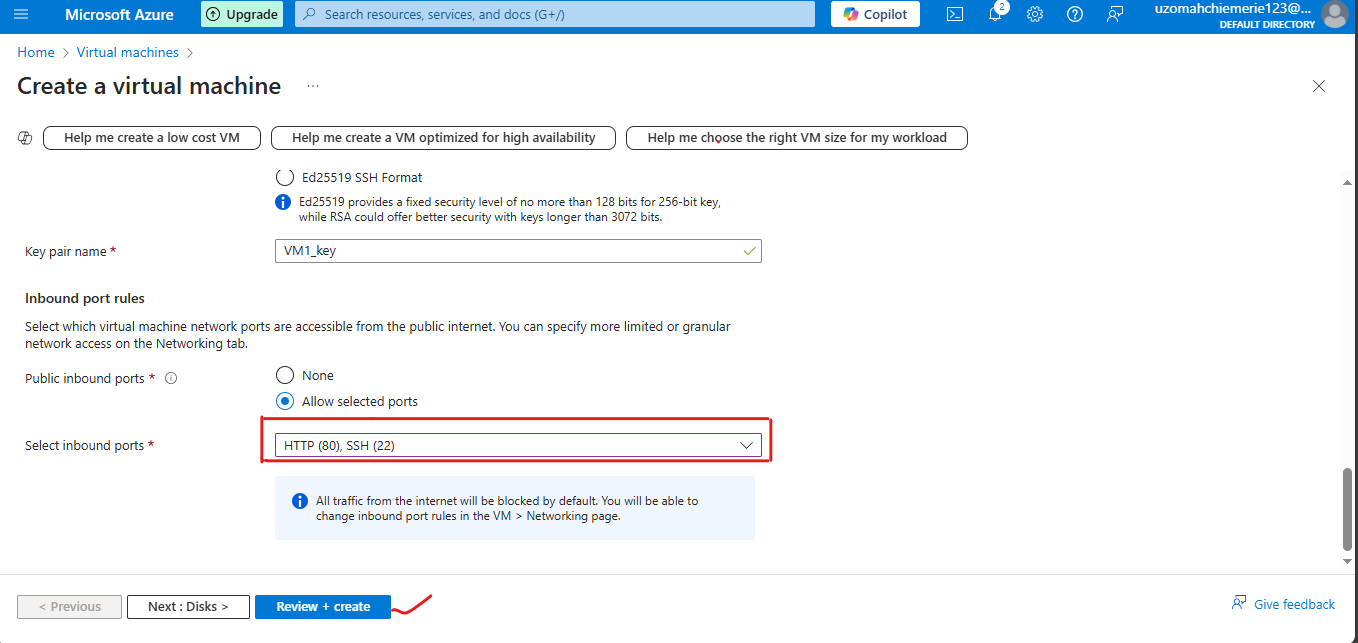
For inbound rules, you can specify the network ports using which you can connect and access the VM from public internet. For testing purposes, I am going to select Allow Selected ports and select inbound ports to HTTP (80) and SSH (22). Once you've reviewed your configuration, you have two choices. If you're happy with the setup, click Review + Create to proceed. Alternatively, if you need to tweak other settings—like changing the disk type or enabling auto-shutdown—you can click Next to make those adjustments. This flexibility ensures that your virtual machine is perfectly tailored to your needs before finalizing the creation process.
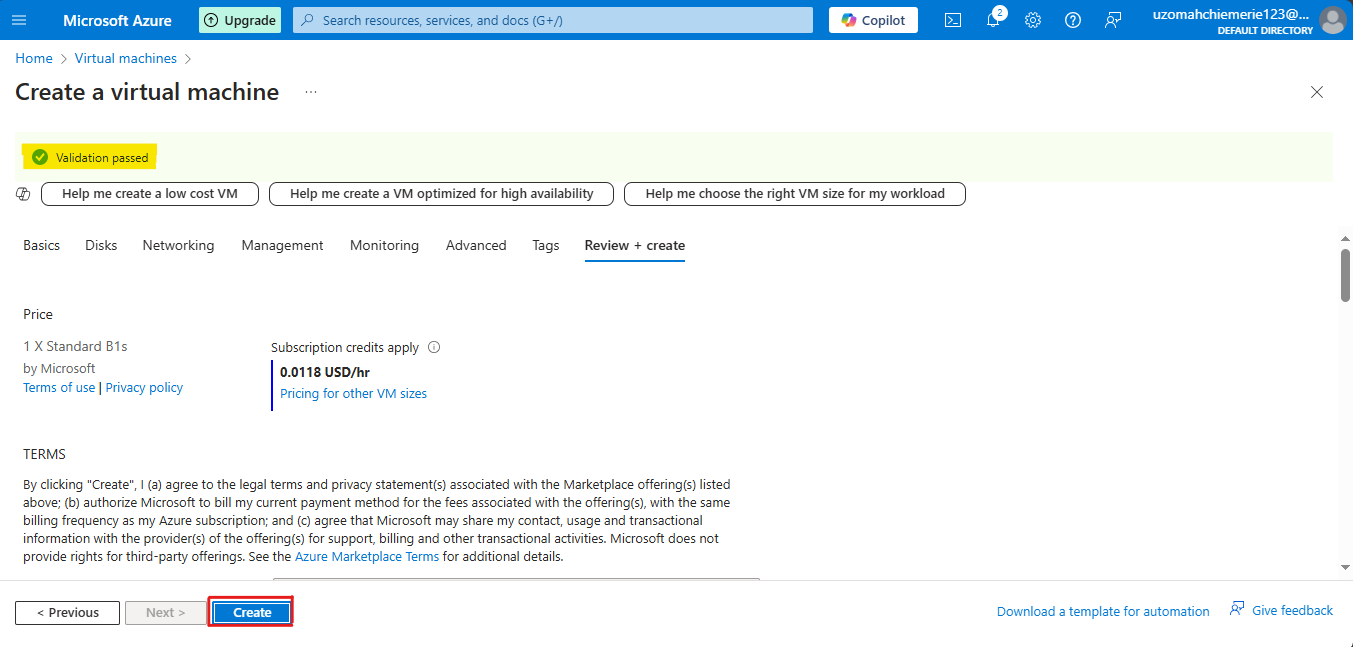
“Validation passed”. After you've carefully reviewed all your parameters, simply click Create at the bottom left corner. Once you're satisfied with your settings, your VM will start deploying. Watching your VM come to life is like seeing your plans take shape—exciting stuff!
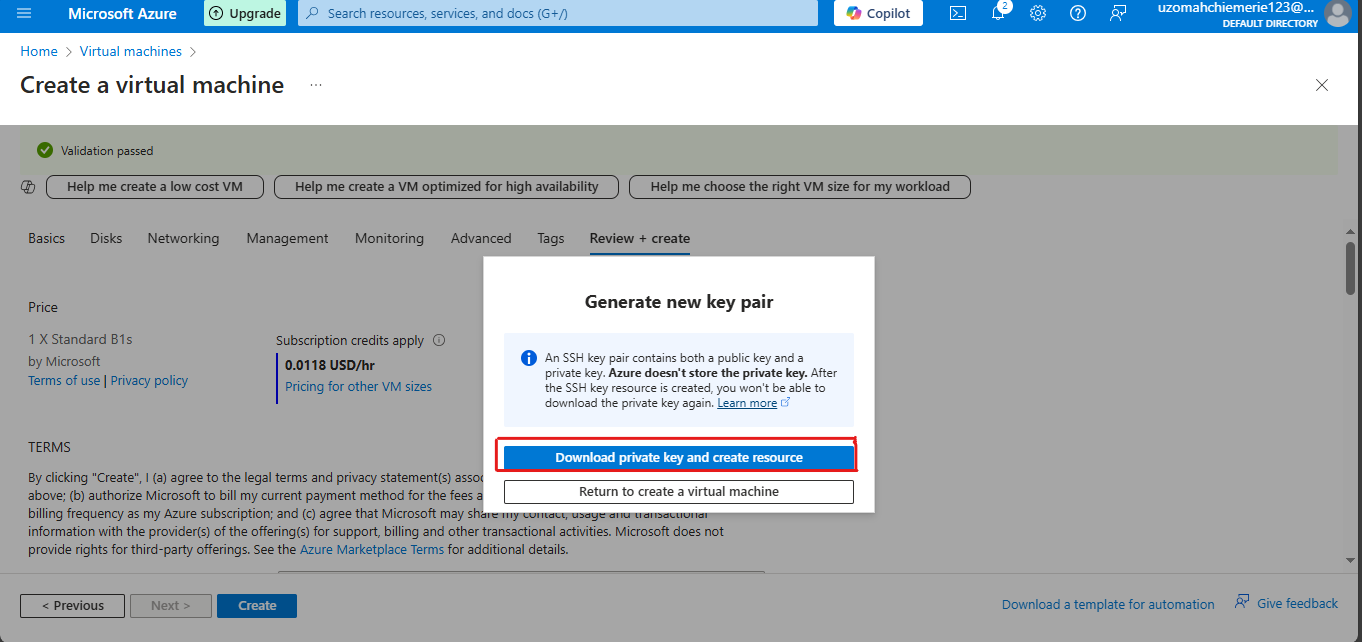
If you opted for an SSH key for authentication, you'll be prompted to download your private key. Make sure to click the download button and note where you save it on your computer. This key is crucial for accessing your virtual machine, so keeping it safe and accessible is essential.
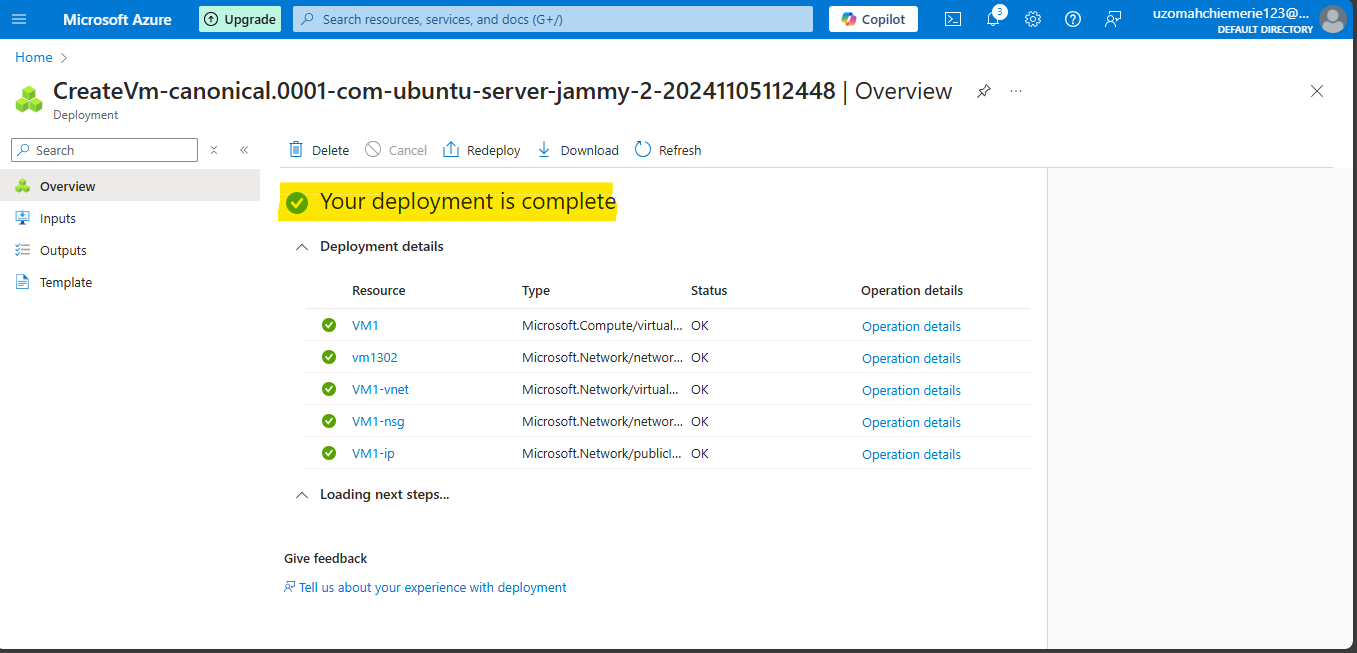
Once the deployment is complete, simply click on Go to resource to access your newly created virtual machine. This will take you directly to the resource management page where you can start configuring and using your VM. It's the final step to bring your setup to life!
CONNECTION
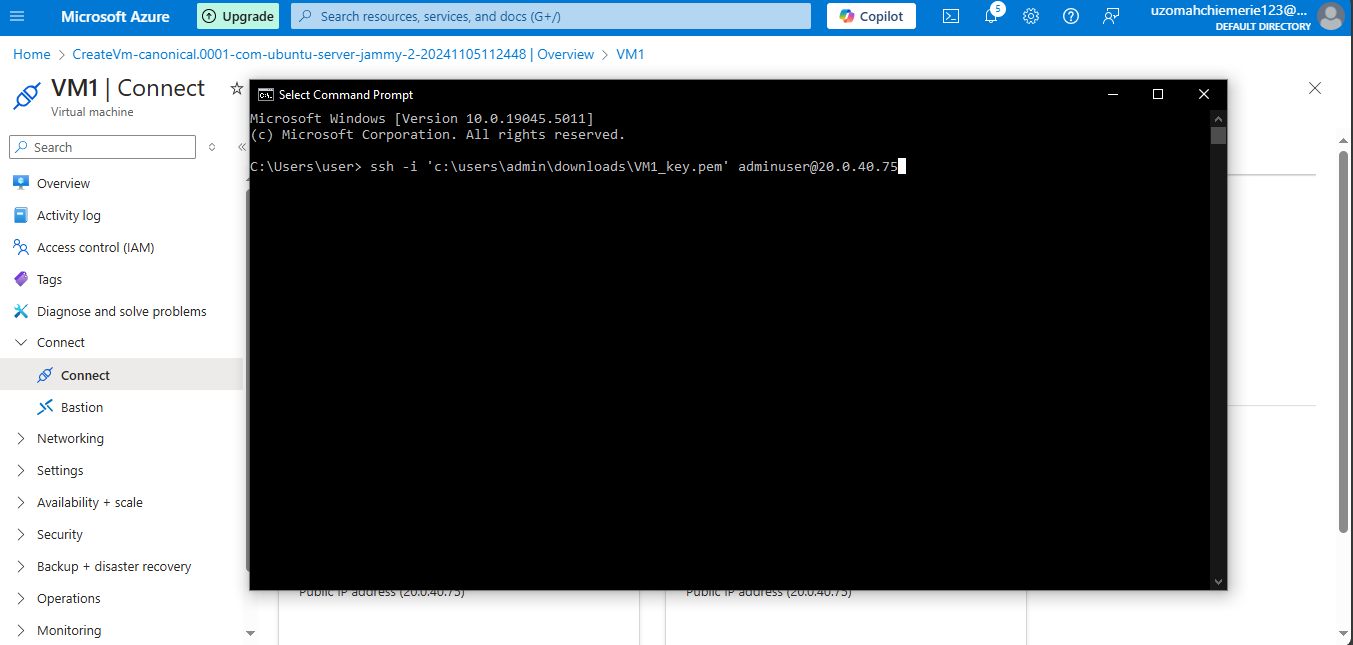
Open a CMD (Command prompt) window so you can run the SSH connection string. At the prompt, connect to the virtual machine using SSH. Be sure to include the correct path to the key and the virtual machine’s public_ip_address. Example of key location: c:\users\admin\downloads\VM1_key.pem. When prompted, type yes to connect. “adminuser” is the username of the VM.
ssh -i C:\Users\user\Downloads\VM1_key.pem adminuser@public_ip_address
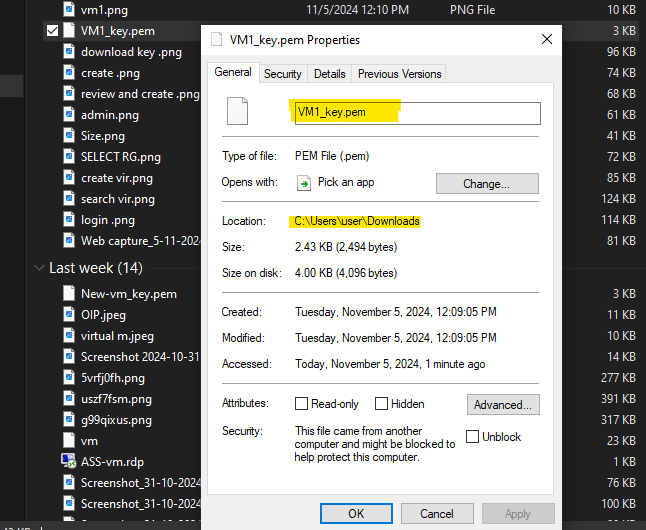
Which can be gotten from the previously downloaded key by checking its properties.
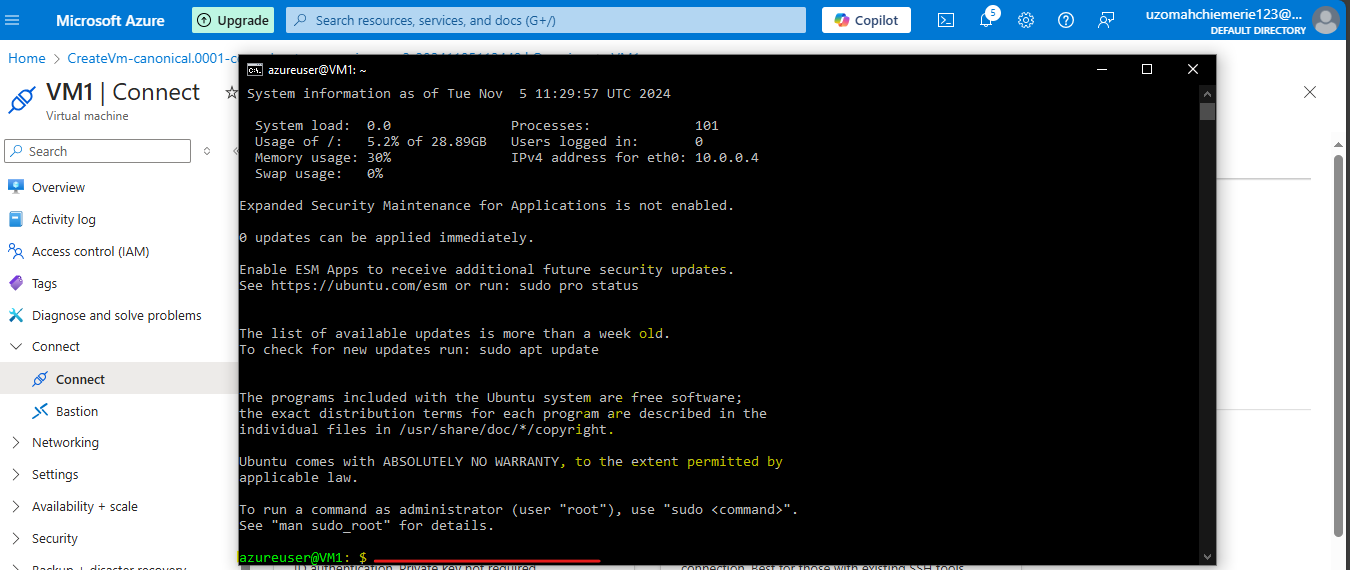
Ensure the command is successful and the prompt changes to adminuser@VM1. Fetch the list of available OS updates and install updates. When prompted, type yes to continue. Each command must be completed successfully.
This “adminuser@VM1” would then come up again, insert the code below
sudo apt-get -y update
INSTALL NGINX WEB SERVICE
Continue working at the CMD prompt (Command prompt). Run these commands one at a time. Ensure each command is completed successfully.
Once the previous runs successfully insert the code below
sudo apt-get -y install nginx
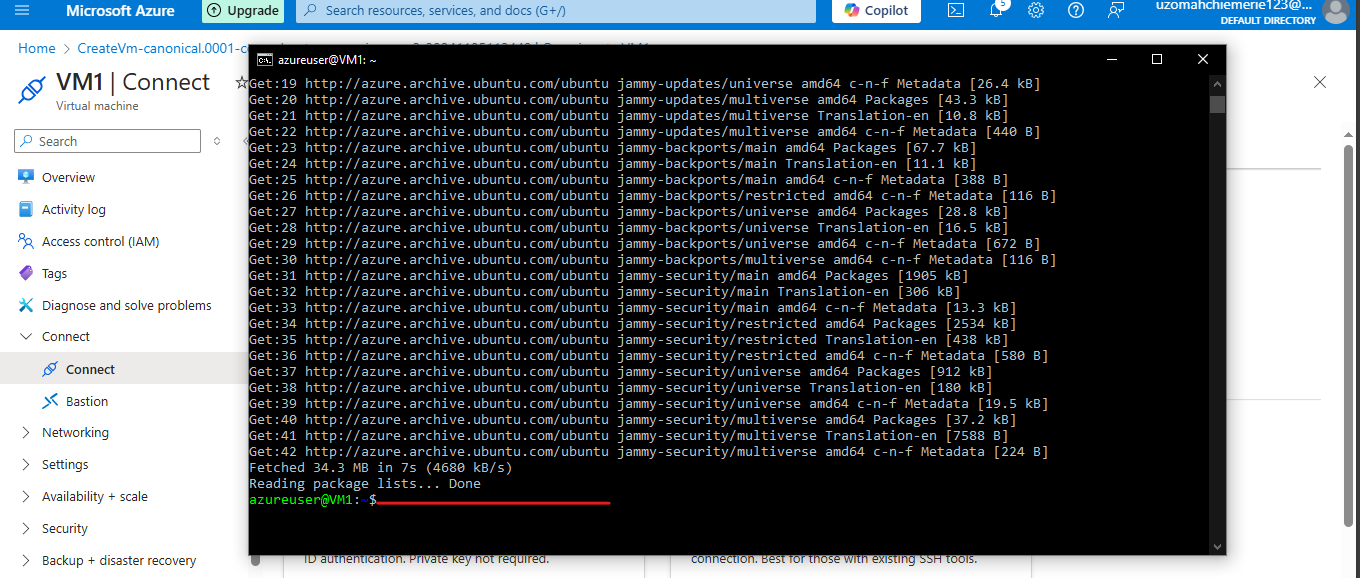
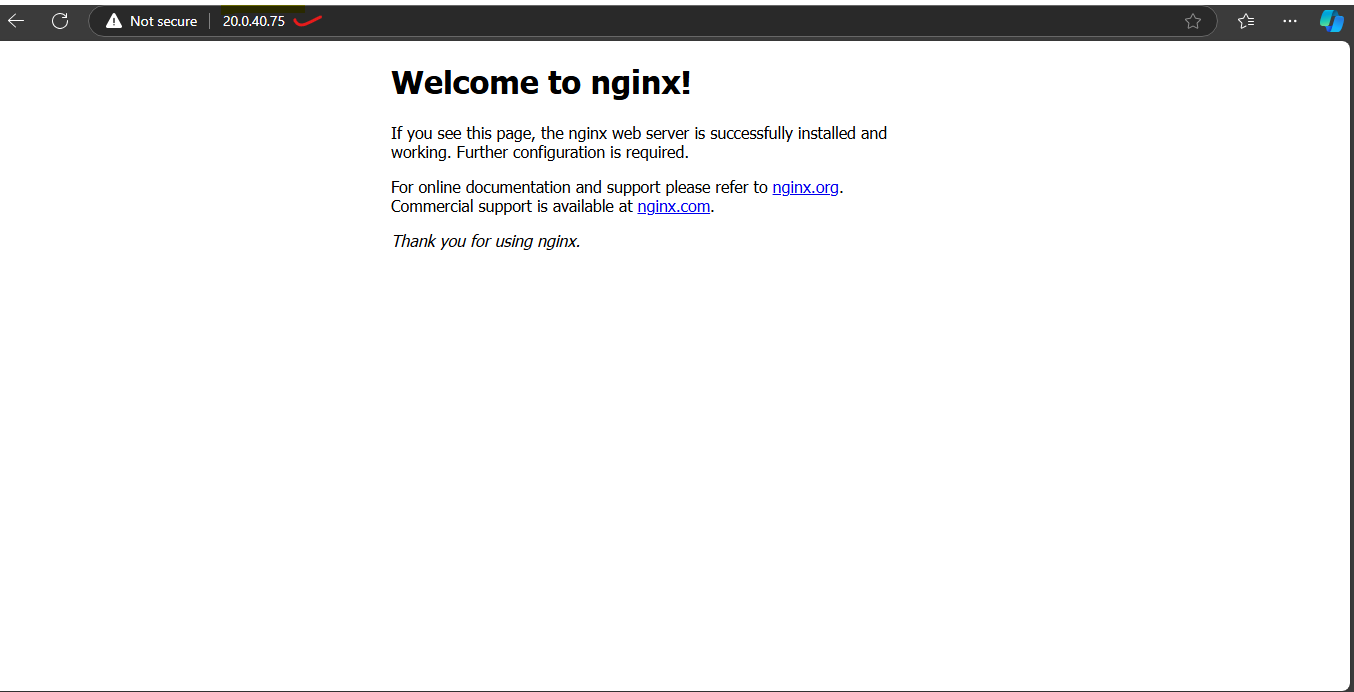
Let it load. Once that is done, launch the Nginx welcome page. You can open the Nginx default page in a browser, http://public_ip_address.
DELETING RESOURCES
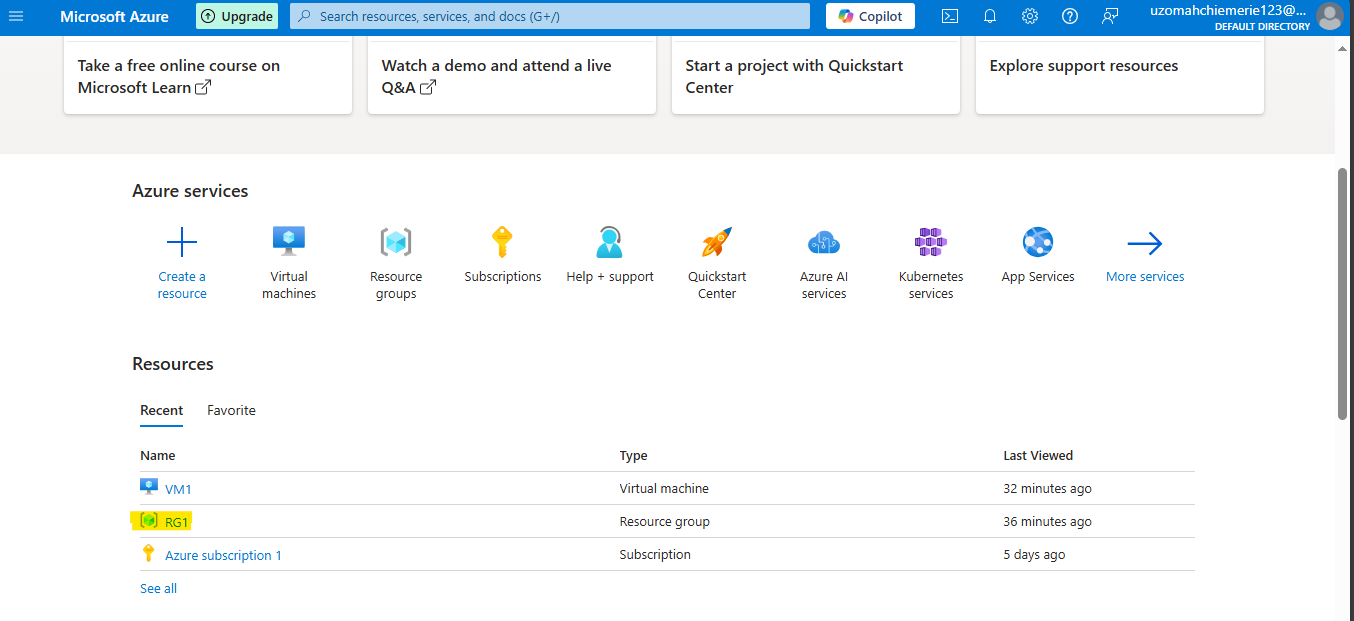
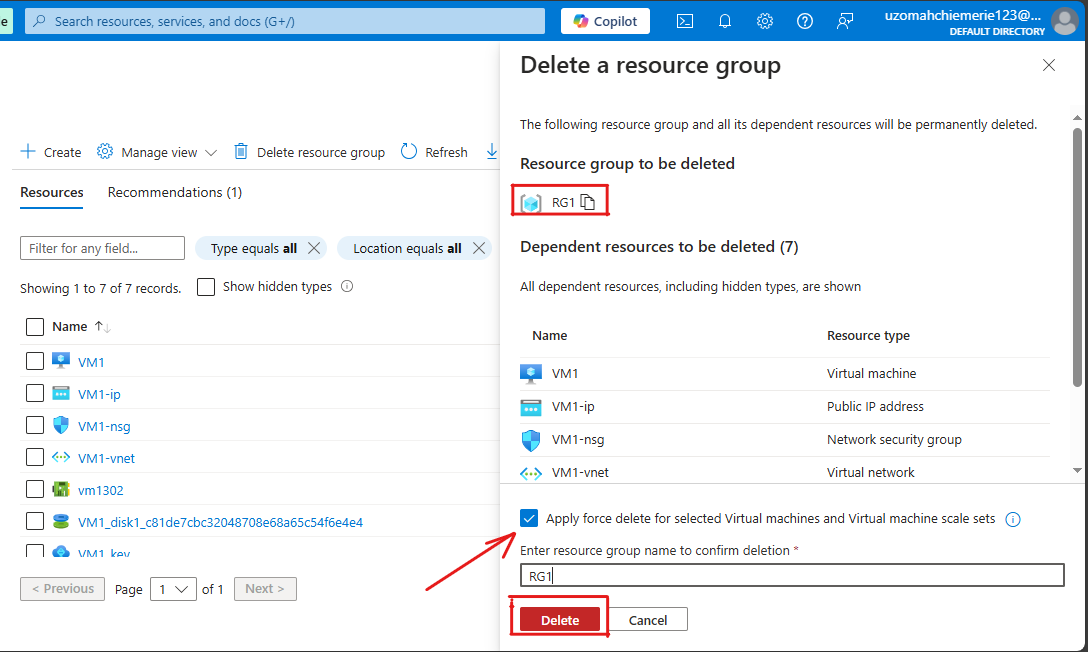
When you no longer need your virtual machine and related resources, you can easily clean them up. First, navigate to the Home page on the Azure portal. From there, select the resource group you want to delete, in this case, "RG1."
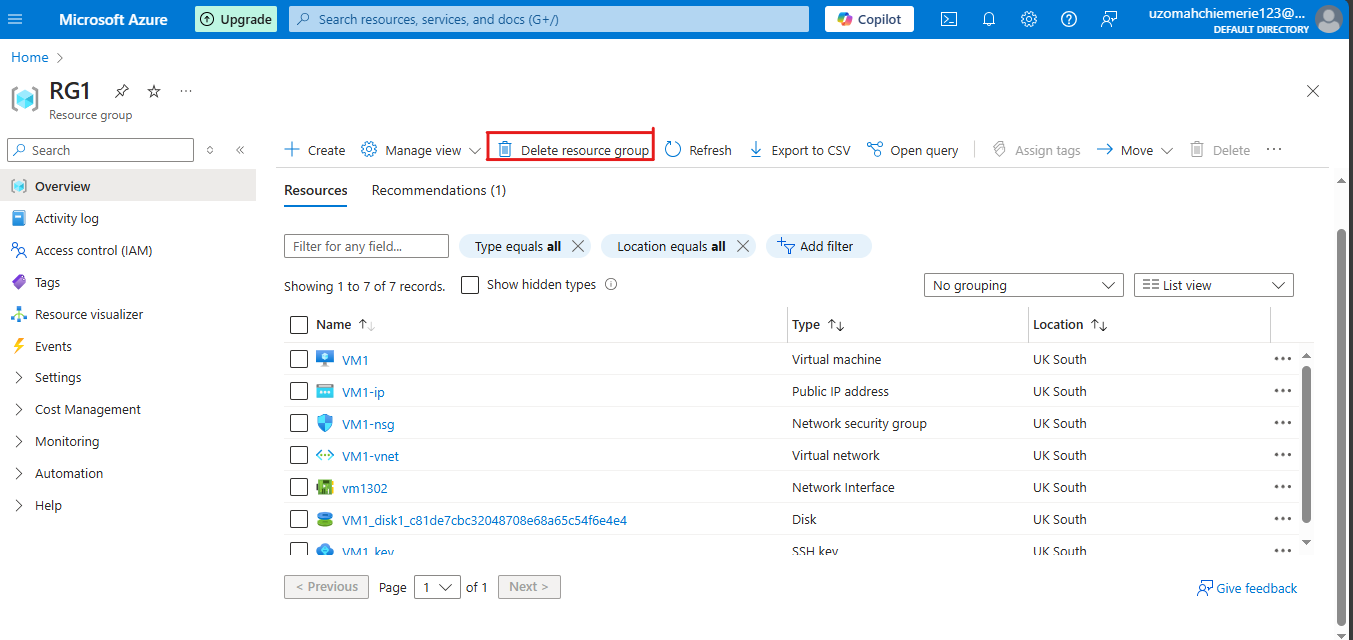
Once you're on the resource group page, simply click on Delete resource group at the top of the page. This will remove the resource group along with all its associated resources, ensuring your Azure environment stays tidy and organized (also to incur fewer costs).
To finalize the deletion, type or copy and paste the name of the resource group. This step confirms your intention to delete the resource group and all associated resources, ensuring everything is removed safely and correctly.
CONCLUSION
In conclusion, creating a Linux (Ubuntu) Virtual Machine in Azure using a public key is a straightforward process that can be accomplished with a few guided steps. By following this comprehensive guide, you can easily set up and manage your virtual machine, ensuring it meets your specific needs. From selecting the appropriate subscription and instance details to configuring authentication and inbound ports, each step is designed to simplify the process. Once your VM is up and running, you can connect to it using SSH and even install additional services like Nginx. Finally, when your virtual machine is no longer needed, Azure provides an easy way to clean up resources, helping you maintain an organized and cost-effective cloud environment. With this knowledge, you are now equipped to confidently create and manage Linux VMs on Azure.
Subscribe to my newsletter
Read articles from Uzomah Chiemerie directly inside your inbox. Subscribe to the newsletter, and don't miss out.
Written by
