Editing Data of a Baserow Table using Nuxt: A step-by-step tutorial
 Costanza Casullo
In the previous article, I walked you through the process of posting data to a Baserow table using Nuxt. We utilized Nuxt composables to handle the API call and displayed the data on a page.
Please go back to the previous article if it’s your first time using BaseRow or you are a beginner. Otherwise, this second post about EDITING data will not make sense.
Compared to the folder structure outlined in the previous article, I have added one more composable called useUpdateData.ts . Here is the updated folder structure.
/my-nuxt-app
│
├── /composables
│   ├── useFetchData.ts            # For fetching data from Baserow
│   ├── usePostData.ts             # For posting data to Baserow
│   └── useUpdateData.ts           # For updating data in Baserow
│
├── /types
│   └── tableFields.ts             # Type definitions for Baserow data
│
├── /pages
│   └── index.vue                  # Main page to display the component
│
├── /public                        # Static files
├── /assets                        # Styles, images, and other assets
│
├── /components
│   └── TableFields.vue            # Component showing the table data
│
├── nuxt.config.ts                 # Nuxt configuration file
├── package.json                   # Dependencies and scripts
└── tsconfig.json                  # TypeScript configuration
Let’s recap what we have so far
Composables
Fetch data
import type { ApiResponse } from "~/types/tableFields";

export const useFetchData = async () => {
  const config = useRuntimeConfig();
  const token = config.public.apiToken;
  const apiUrl = config.public.apiUrl;

  // Fetch data from the Baserow API
  const { data, error } = await useFetch<ApiResponse>(
    `${apiUrl}/api/database/rows/table/373117/?user_field_names=true`,
    {
      headers: {
        Authorization: `Token ${token}`,
      },
    }
  );

  return { data, error };
};
Post Data
import type { TableRow } from "~/types/tableFields"; // Import your TableRow type
import { TABLE_IDS } from "~/utils/constants"; // Import your constants
import { constructBaserowApiUrl } from "~/utils/baserowUtils"; // Import the URL construction utility

// Generic function to post data to Baserow API
const postToBaserowApi = async (tableId: number, newRow: TableRow) => {
  const config = useRuntimeConfig();
  const token = config.public.apiToken;

  // Construct the API URL using the utility function
  const url = constructBaserowApiUrl(tableId);

  // Post data to the Baserow API
  const { data, error } = await useFetch<TableRow>(url, {
    method: "POST",
    headers: {
      Authorization: `Token ${token}`,
      "Content-Type": "application/json",
    },
    body: JSON.stringify(newRow),
  });

  return { data, error };
};

// Main function to post data to a specified table
export const usePostData = async (
  newRow: TableRow,
  tableKey: keyof typeof TABLE_IDS
) => {
  const tableId = TABLE_IDS[tableKey]; // Get the table ID from the constants
  if (tableId === undefined) {
    throw new Error(`Table ID not found for key: ${tableKey}`); // Error handling for undefined table ID
  }
  return await postToBaserowApi(tableId, newRow); // Call the generic POST function
};
Poll data
import { ref, onMounted, onUnmounted } from "vue";

export const usePolling = (
  fetchData: () => Promise<void>,
  interval: number
) => {
  const isPolling = ref(false);
  let pollingInterval: ReturnType<typeof setInterval> | null = null;

  const startPolling = () => {
    isPolling.value = true;
    pollingInterval = setInterval(fetchData, interval);
  };

  const stopPolling = () => {
    isPolling.value = false;
    if (pollingInterval) {
      clearInterval(pollingInterval);
      pollingInterval = null;
    }
  };

  onMounted(startPolling);
  onUnmounted(stopPolling);

  return { isPolling };
};
Types
export interface TableRow {
  id: number;
  Name: string;
  Notes: string;
}

export interface ApiResponse {
  count: number;
  next: string | null;
  previous: string | null;
  results?: TableRow[];
}
Utils
// baserowUtils.ts
import { useRuntimeConfig } from "#app";

// Function to construct the Baserow API URL
export const constructBaserowApiUrl = (tableId: number, rowId?: number) => {
  const config = useRuntimeConfig();
  const apiUrl = config.public.apiUrl;

  // If a rowId is provided, construct the URL for a specific row (used for DELETE and GET specific row)
  if (rowId) {
    return `${apiUrl}/api/database/rows/table/${tableId}/${rowId}/?user_field_names=true`;
  }

  // If no rowId, construct the URL for general table operations (POST, GET all rows)
  return `${apiUrl}/api/database/rows/table/${tableId}/?user_field_names=true`;
};
// constants.ts
export const TABLE_IDS = {
  EXAMPLE_TABLE: 373117,
};
Creating the composable to edit data
1. Import Necessary Types and Utilities
import { type TableRow } from "~/types/tableFields";
import { TABLE_IDS } from "~/utils/constants";
import { constructBaserowApiUrl } from "~/utils/baserowUtils";
TableRow Type: This type defines the shape of the data (like fields for "Name" and "Notes") used when interacting with the API.
TABLE_IDS: A set of constants mapping table names to their IDs, which is crucial for constructing the correct API request URL.
constructBaserowApiUrl: A utility function that constructs the URL for accessing a specific Baserow table row. This takes in both the table ID and the row ID.
2. Define updateBaserowApi - Generic Function to Send PATCH Request to Baserow API
const updateBaserowApi = async (
  tableId: number,
  rowId: number,
  updatedRow: Partial<TableRow>
) => {
  const config = useRuntimeConfig();
  const token = config.public.apiToken;
Function Parameters:
tableId: ID of the specific table where the data resides.rowId: ID of the row in the table to update.updatedRow: Contains the specific fields and values to update, allowing partial updates.
Configuration and Token:
useRuntimeConfig(): Fetches runtime configuration (e.g., fromnuxt.config.ts), containing environment-specific settings.token: Uses a public API token for authorization when making API requests.
Construct the API URL
const url = constructBaserowApiUrl(tableId, rowId);
- This line calls
constructBaserowApiUrl, passing in the table and row IDs to build the correct URL endpoint for updating a specific row in Baserow.
Send the PATCH Request
  const { data, error } = await useFetch(url, {
    method: "PATCH", // PATCH is used to update specific fields
    headers: {
      Authorization: `Token ${token}`,
      "Content-Type": "application/json",
    },
    body: JSON.stringify(updatedRow),
  });
useFetch: A Nuxt composable used to perform HTTP requests.
method: Specifies "PATCH" to update only specific fields in the row, rather than overwriting the entire row (which would require "PUT").
headers:
Authorization: Sets the token for authorization."Content-Type": "application/json": Specifies that the request body will be JSON.
body: Serializes
updatedRowinto JSON format. This object only contains fields that need updating.The
useFetchcall returns an object with two properties:data: Holds the updated data if the request is successful.error: Contains error details if the request fails.
3. Define useUpdateData - Main Function to Update Data in a Specified Table
export const useUpdateData = async (
  rowId: number,
  updatedRow: Partial<TableRow>,
  tableKey: keyof typeof TABLE_IDS
) => {
Function Parameters:
rowId: ID of the row to be updated.updatedRow: Partial object ofTableRowtype, allowing only certain fields to be updated (e.g., updating just the "Name" field).tableKey: Key that references a specific table inTABLE_IDS.
Retrieve Table ID and Error Handling
  const tableId = TABLE_IDS[tableKey];
  if (tableId === undefined) {
    throw new Error(`Table ID not found for key: ${tableKey}`);
  }
Retrieve Table ID: Looks up the ID from
TABLE_IDSusingtableKey.Error Handling: Throws an error if the table ID is undefined, which would indicate a misconfiguration or typo in the key.
Call updateBaserowApi to Send the Update Request
  return await updateBaserowApi(tableId, rowId, updatedRow);
};
Return the Result: Invokes
updateBaserowApiwith the retrieved table ID,rowId, andupdatedRowobject, and returns thedataanderrorfrom this call.Updating the component
The component has evolved from only supporting data posting to also allowing inline editing of existing data. Here’s how each part has changed or been added to support editing:
1. New Import for
useUpdateDataimport { useUpdateData } from "~/composables/useUpdateData"; // Import update composable- Purpose: This composable provides the functionality to send PATCH requests, enabling specific fields in a row to be updated without replacing the entire row.
2. States for Editing
    const editingRow = ref<number | null>(null); // Track which row is being edited
    const editedRow = ref<Partial<TableRow>>({}); // Store edits temporarily
editingRow: Holds the ID of the row currently being edited. It’s set tonullwhen no row is being edited.editedRow: Temporarily stores the edited values, allowing users to make changes before saving.
3. New Editing Functions
Three new functions (handleEdit, handleSave, and handleCancel) manage the editing process:
handleEdit
    const handleEdit = (row: TableRow) => {
      editingRow.value = row.id;
      editedRow.value = { ...row };
    };
- Purpose: Called when the "Edit" button is clicked, this function sets the
editingRowID and copies the existing row data intoeditedRow, allowing users to edit the fields.
handleSave
    const handleSave = async (rowId: number) => {
      const { error: updateError } = await useUpdateData(rowId, editedRow.value, tableKey);
      if (updateError.value) {
        error.value = updateError.value.message;
      } else {
        editingRow.value = null;
        await fetchData(); // Refreshes the data to show updates
      }
    };
- Purpose: Called when the "Save" button is clicked, this function sends the updated data in
editedRowto the API. If successful, it resetseditingRowand fetches the latest data to update the view.
handleCancel
    const handleCancel = () => {
      editingRow.value = null;
      editedRow.value = {};
    };
- Purpose: Cancels editing without saving changes, resetting
editingRowandeditedRow.
4. Updated Template for Inline Editing
The template now includes conditional rendering within each row:
    <li v-for="row in data?.results ?? []" :key="row.id">
      <div v-if="editingRow === row.id">
        <input v-model="editedRow.Name" placeholder="Edit name" />
        <input v-model="editedRow.Notes" placeholder="Edit notes" />
        <button @click="handleSave(row.id)">Save</button>
        <button @click="handleCancel">Cancel</button>
      </div>
      <div v-else>
        Name: {{ row.Name }} <br />
        Notes: {{ row.Notes }}
        <button @click="handleEdit(row)">Edit</button>
      </div>
    </li>
Editing Mode: When
editingRowmatches the currentrow.id, the inputs for "Name" and "Notes" appear, allowing users to update these fields.Non-Editing Mode: Shows static "Name" and "Notes" values with an "Edit" button.
5. Form for Adding New Data
This part remains similar but now coexists with the editing functionality:
    <form @submit.prevent="handleSubmit">
      <input v-model="newRow.Name" placeholder="Enter name" required />
      <input v-model="newRow.Notes" placeholder="Enter notes" required />
      <button type="submit">Submit</button>
    </form>
This section enables users to submit new entries as before, with handleSubmit handling the post request.
The component now supports inline editing, adding flexibility for users to modify individual fields and update data without needing to delete and re-add entries. It conditionally renders based on editingRow and provides a seamless way to switch between view and edit modes.
Wrapping up
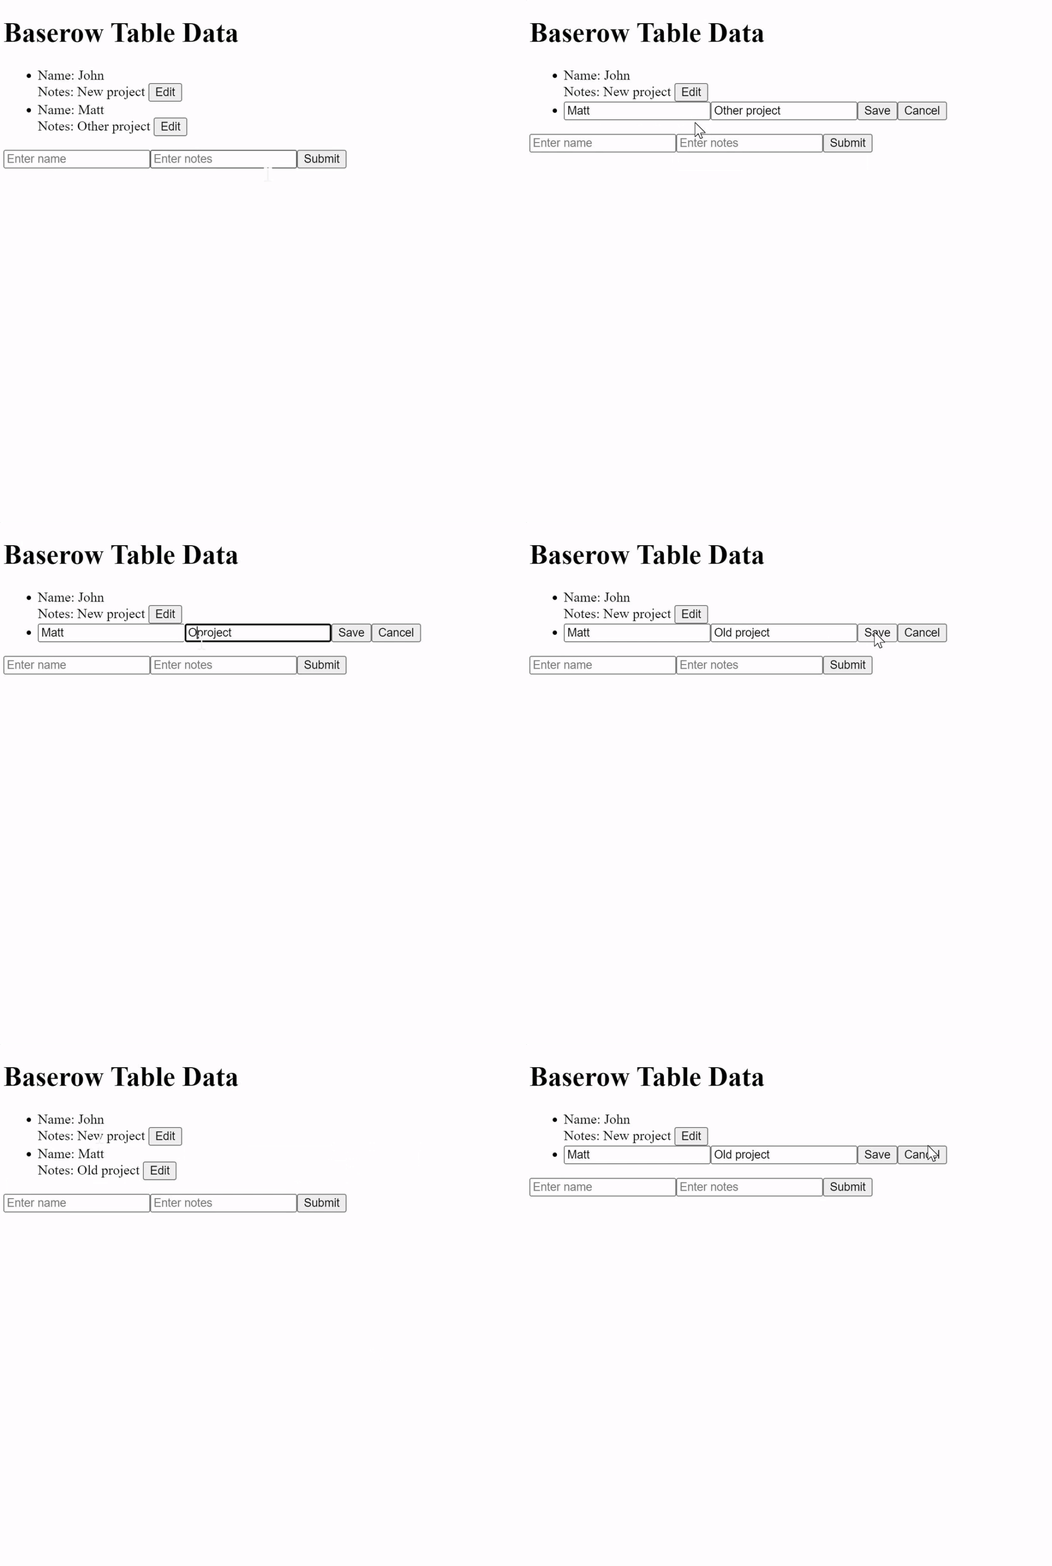
Let’s see how it all works together
Can you guess what the next tutorial will be about?
Subscribe to my newsletter
Read articles from Costanza Casullo directly inside your inbox. Subscribe to the newsletter, and don't miss out.
Written by

Costanza Casullo
Costanza Casullo
🔧 I make websites for small businesses (though I don't think my clients would be interested in tech blog, but never underestimate anyone!) 🌱 As a curious person, I’m always eager to learn more about different technologies. To the point that sometimes I get lost and forget to stick to one thing. 💬 Does the internet really need another developer sharing her learnings on a blog? Probably not. But if you are reading this, maybe it does.
