Building and Deploying a Java Web Application Using Maven on AWS EC2: A GitHub-Integrated Approach
 Keerthi Ravilla Subramanyam
Table of contents
- Key components
- Pre-requisites
- Step by step instructions to build this project
- Step 1: Creating an IAM user
- Step 2: Login with IAM user credentials
- Step 3: Set Up an EC2 Instance
- Step 4: Connect to the EC2 Instance Using SSH
- Step 5: Install Apache Maven and Amazon Corretto 8 (Java 8) on EC2
- Step 6: Create a Maven Project
- Step 7: Connect VS code to EC2 instance
- Step 8: Install Git on EC2
- Step 9: Set Github token and repository
- Step 10: Pushing project to the GitHub repo
In this article, we’ll explore how to set up a cloud-based web application on AWS using an EC2 instance. We’ll provide a step-by-step guide to creating a simple Maven-based Java web application, deploying it on an EC2 instance, and linking it to a GitHub repository. Each concept and service will be clearly explained, making this an ideal guide for beginners. Let’s start by understanding the key concepts used in this project.
Key components
AWS IAM: Identity and access management(IAM) is a service that helps us securely access AWS resources. It allows us to manage users, roles, and permissions, so we can give the right level of access to different users (like root users and IAM users) and services within your AWS environment.
AWS EC2: Elastic Compute Cloud (EC2) is an AWS service that offers secure, resizable computing capacity in the cloud. It allows you to run virtual servers for various applications and scale them as needed.
GitHub is a platform for version control and collaboration that allows developers to host, manage, and track changes in code repositories. It uses Git for version control, which lets multiple users work on projects simultaneously.
Apache Maven is an automatic build and project management tool, primarily for Java projects. It uses a pom.xml file to handle project dependencies, compile code, run tests, and package applications. This makes the build process easier and ensures consistency across various environments.
Java 8 (Amazon corecto 8) is an open-source, production-ready distribution of OpenJDK 8 provided by Amazon. It includes long-term support, security updates, and performance enhancements, making it a reliable choice for running Java applications in production environments.
Pre-requisites
AWS account: If you don't have an account you can create one for free here.
GitHub account: If you don't have an account you can create one for free here.
Visual studio code: Install VS Code on your computer by downloading it here.
Step by step instructions to build this project
Now that, we have a basic understanding of these services and have fulfilled the prerequisites. let's dive straight into building the project.
Step 1: Creating an IAM user
In AWS IAM, there are root users and IAM users. Root users have full, unrestricted access to all resources and should only be used for essential tasks. IAM users are created with specific permissions for different roles, providing more controlled access to resources and enhancing security. It’s always recommended to use IAM users, as this is considered a best practice. So, let's create an IAM user.
Log in to your AWS account and navigate to
AWS IAMin console.Click on
Users, then click on theCreate New Userbutton, and give the user a relevant name likeusername-IAM-admin(change username to your name).select the checkbox
Provide user access to the AWS Management Console - optional
Select “
I want to create an IAM user” option in the pop-up box.Under
console password, choosecustom passwordand type the password you want to set for your IAM user in the text box.
Choose
Next.On the permission setup page, click on
Attach policies directlyUnder the list of permission policies, select
AdministratorAccess.Click the
Nextand then chooseCreate Userbuttons.A new IAM user has been created. Make sure to save the credentials by clicking on the
download .csv fileoption.
Step 2: Login with IAM user credentials
Sign out from the AWS root user account.
Open the .csv file that you downloaded in the previous step.
Copy the Console sign-in URL from the file and open it on the browser.
Login using the IAM user credentials in the .csv file.
woo!! Now you logged into aws account as an IAM user.
Step 3: Set Up an EC2 Instance
We will create an EC2 instance that will serve as our server for deploying the project.
In your AWS console, go to EC2.
In the top-right corner, change to the region closest to you.
Click on
Launch Instance.In Name, give the instance a relevant name like
keerthi-devops-project.Under Amazon Machine Image (AMI), choose
Amazon Linux 2023 AMI.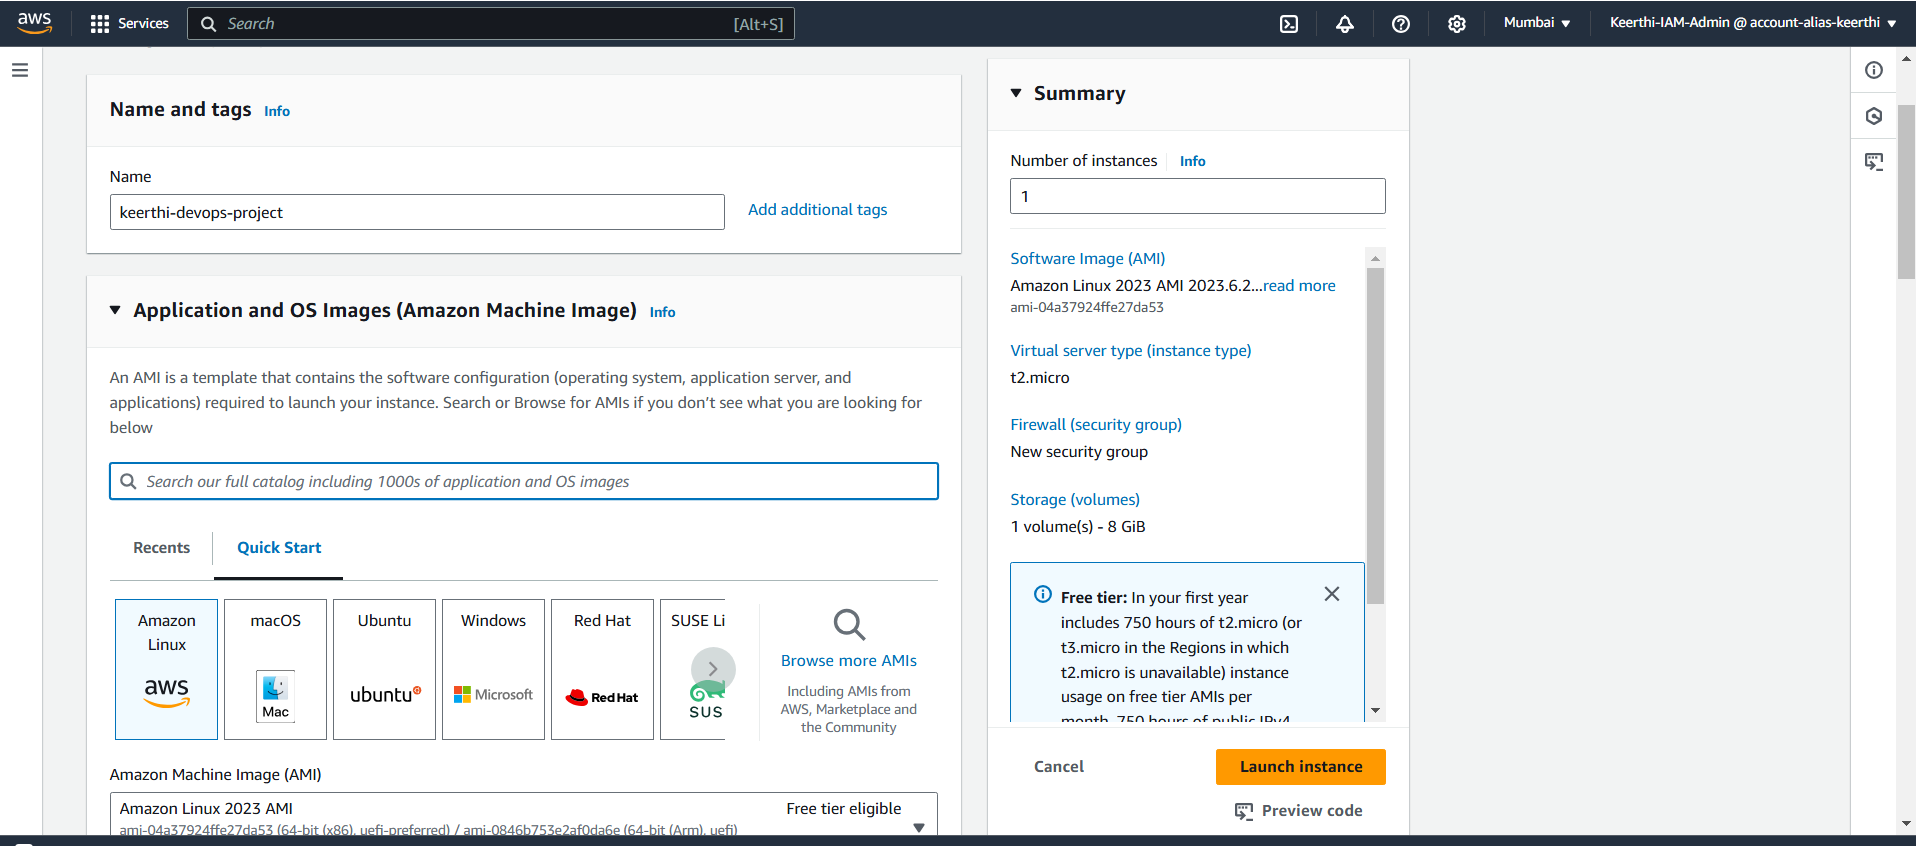
Select the
t2.microinstance type (eligible for the free tier).Under the key pair section, choose
create key pair. Give the key pair a relevant name, likedevops-project-yourname. SelectRSAas the key pair type and choose.pemas the private key file format, then click create key pair. The key pair will now be downloaded to your local system!!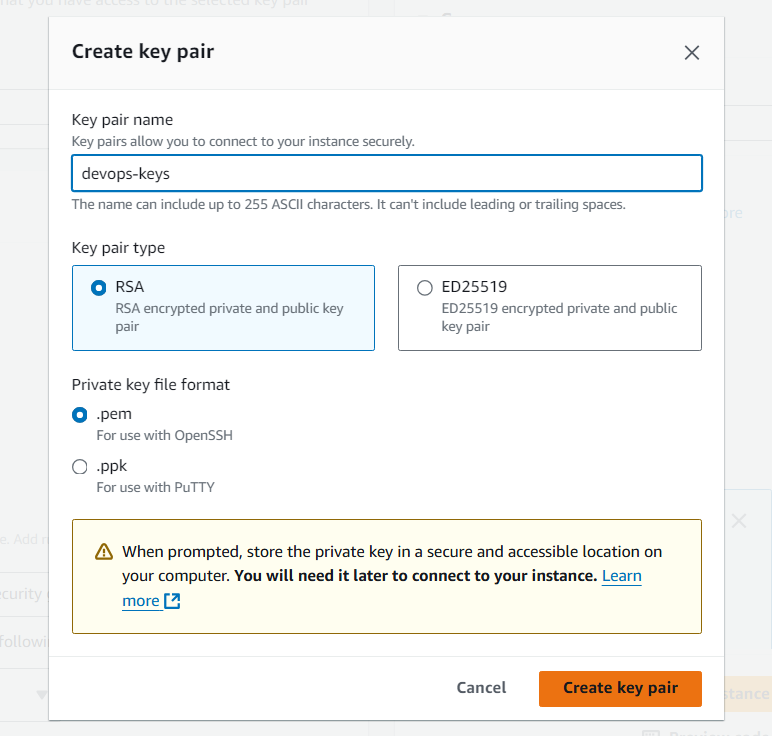
In the "
Allow SSH traffic from" section, select "My IP" from the drop-down list. Double-check the IP address shown. If it is incorrect, change it to your IP address and be sure to add/32at the end.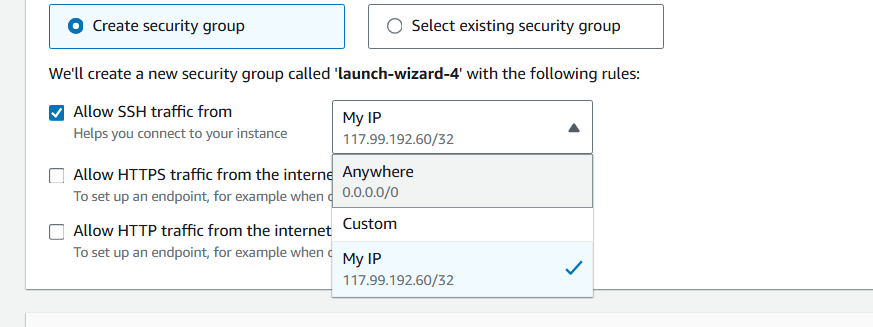
Click on the
Launch instancebutton.
We have successfully launched our instance, and all the instance information can be viewed by clicking on the created instance.
Create a folder on your computer and move the downloaded .pem file into it for easy access later.
Step 4: Connect to the EC2 Instance Using SSH
To work with files and run commands on your EC2 instance, you'll need to connect to it using SSH. Let’s see how it is done!
Open the VS code
Select
Terminalfrom the top menu bar.Select
New Terminalfrom the dropdown.
Change the terminal from power shell to git bash (I will be using bash commands in this guide). And navigate your terminal to the folder, where your .pem file is saved.
 #change the path to your folder path
 cd ~/path
Now, let’s change the permissions to our .pem file by using
chmodcommandchmod 400 pemfilename.pemGo back to your AWS account, click on your instance.
Under the instance details look for Public Ipv4 DNS address.
Copy that address

In your VS Code terminal, run this command to connect to your instance.
 # Replace path-to-pem-file with your actual pem file path
 # and replace the your-Public-ipv4-DNS-address with your instance's one
 ssh -i ~/path-to-pem-file ec2-user@your-Public-ipv4-DNS-address
When your terminal asks if you want to continue connecting to this EC2 instance, type "yes" to proceed.

We have successfully connected to our EC2 instance 🎉! This means our terminal is now running directly on the EC2 instance, allowing us to treat it like a local computer. In the upcoming steps, we'll dive into creating a basic application using Maven.
Step 5: Install Apache Maven and Amazon Corretto 8 (Java 8) on EC2
Apache Maven is a build tool for Java projects. We'll install it on the EC2 instance
Install Apache Maven, by running these commands on your terminal
This command downloads the Apache Maven 3.5.2 binary tarball from the official Apache archives.
wget https://archive.apache.org/dist/maven/maven-3/3.5.2/binaries/apache-maven-3.5.2-bin.tar.gzThe command below extracts the downloaded tarball (
apache-maven-3.5.2-bin.tar.gz) into the/optdirectory, which is a common place for installing software on Linux systems.sudo tar -xzf apache-maven-3.5.2-bin.tar.gz -C /optThe following command adds the Maven binary directory (
/opt/apache-maven-3.5.2/bin) to the system'sPATHenvironment variable in the~/.bashrcfile, allowing Maven to be accessed from anywhere in the terminal.echo "export PATH=/opt/apache-maven-3.5.2/bin:$PATH" >> ~/.bashrcThis command reloads the
~/.bashrcfile, applying the updatedPATHwithout needing to restart the terminal:source ~/.bashrc
After running these commands, Maven will be installed and ready to use on your EC2 instance! You can check the installation by running mvn -version to verify the version and configuration.

Install Amazon Corretto 8 (Java 8), by running the following commands on your terminal.
This following command installs the Amazon Corretto 8 development package, which includes Java 8 (Amazon's build of OpenJDK 8) along with development tools like compilers and debuggers.
sudo dnf install -y java-1.8.0-amazon-corretto-develThis sets the
JAVA_HOMEenvironment variable to point to the directory where Amazon Corretto 8 is installed, which is necessary for various Java-based tools to function properly.export JAVA_HOME=/usr/lib/jvm/java-1.8.0-amazon-corretto.x86_64This appends the Java executable directory (
/usr/lib/jvm/java-1.8.0-amazon-corretto.x86_64/jre/bin/) to the systemPATH, allowing you to run Java commands (likejavaandjavac) directly from the terminal.export PATH=/usr/lib/jvm/java-1.8.0-amazon-corretto.x86_64/jre/bin/:$PATH
After these steps, Amazon Corretto 8 should be installed, and you can verify it by running java -version
Step 6: Create a Maven Project
Now, let’s create a new Maven project using a template. Maven will automatically set up the structure for your web application.
Generate a maven project, by running the following commands
 mvn archetype:generate \
   -DgroupId=com.devops.app \
   -DartifactId=keerthidevops-project \
   -DarchetypeArtifactId=maven-archetype-webapp \
   -DinteractiveMode=false
This command uses Maven’s
archetype:generatea feature to create a new project based on a specific template (archetype). Here’s a breakdown of each parameter:DgroupId=com.devops.app: This sets the group ID for your project, typically a reverse domain name. It groups related projects and helps uniquely identify your project. You can change "devops" to something relevant to your project.DartifactId=keerthidevops-project: This sets the artifact ID, which is the name of your project. Maven will use this to name the project directory and the final build artifact (like a.warfile). You can change this name to anything relevant to your preferences.DarchetypeArtifactId=maven-archetype-webapp: This specifies the archetype (template) to use for the project. Here,maven-archetype-webappsets up a basic web application structure, including directories and configurations for a Java-based web app.DinteractiveMode=false: This disables interactive mode, letting the command run without asking for extra input. It's useful for automation or scripts.
After running this command, a new Maven web application project will be created with the specified configurations in a directory named keerthi-devops-project with a default index.jsp file.You can then navigate to this directory and start building your web application!
Look out for the
Build successmessage, after executing the above command.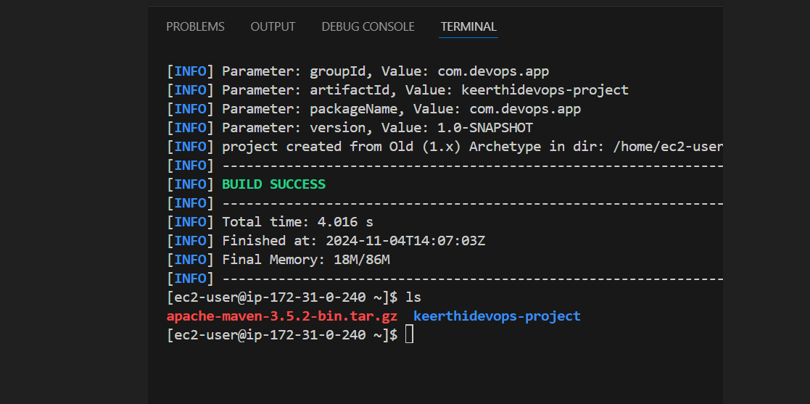
Step 7: Connect VS code to EC2 instance
Yes, till now we’re only connected to EC2 through the VSCode terminal, it means you're just using the terminal's SSH access, and VSCode itself isn't fully connected to our EC2.
By connecting via VSCode’s Remote - SSH extension, you attach your entire VSCode environment to the instance. This setup allows you to browse, edit, and debug files directly in VSCode as if they were local, unlike the basic command-line access you currently have. Let’s see how it is done.
In your VS code, click on the
extensions iconor pressCtrl+Shift+X.Search for
Remote-sshand click on install.
In the bottom left corner of VS Code, you'll find a double arrow icon. This icon serves as a shortcut to use Remote-SSH.
Click on the double arrow icon, and type
Remote-SSH: Add New SSH Host.Enter the following ssh command to connect to the host.
 #Replace /path/to/your-key.pem with the path to your private key file
 #and <your-ec2-public-ip> with the public IP address of your EC2 instance.
 ssh -i /path/to/your-key.pem ec2-user@<your-ec2-public-ip>
Choose the
~/.ssh/configas configuartion file.(optional) If you would like to give an alias name for your EC2 connection, follow the following steps.
This command will open the configuration file, typically located at
~/.ssh/config.nano ~/.ssh/configLook for your host address(instance public ipv4 DNS address) in this file. The entry will be something like this.
Host my-ec2-server HostName <your-ec2-public-ip> User ec2-user IdentityFile /path/to/your-key.pemHostis the alias name you choose in this example, it’smy-ec2-server. You can name it anything you like.Save and close the file.
we have successfully added the host to the remote ssh, now lets connect to it.
Open the Command Palette again and select
Remote-SSH: Connect to Host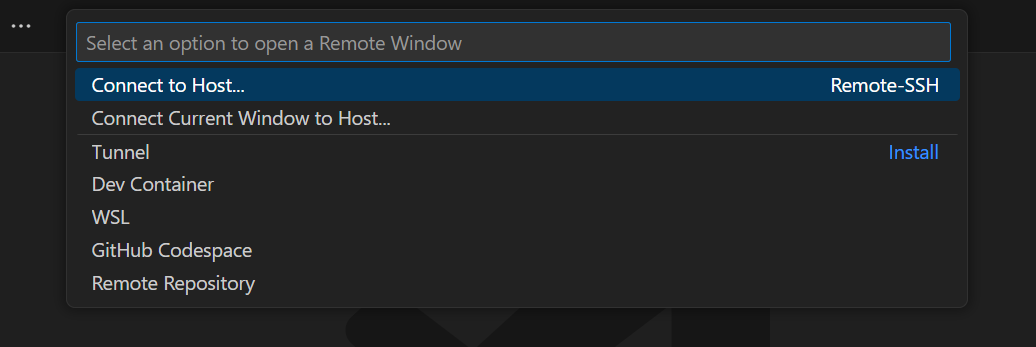
Click on your EC2 instance from the list, or find the alias name you provided, this will open a new VS code window connected to the EC2 instance.
Head to this new window, here lets open the web application we have created using maven.
Navigate to the explorer icon or simply press
click on the
open folderbutton.From the drop-down select your project.
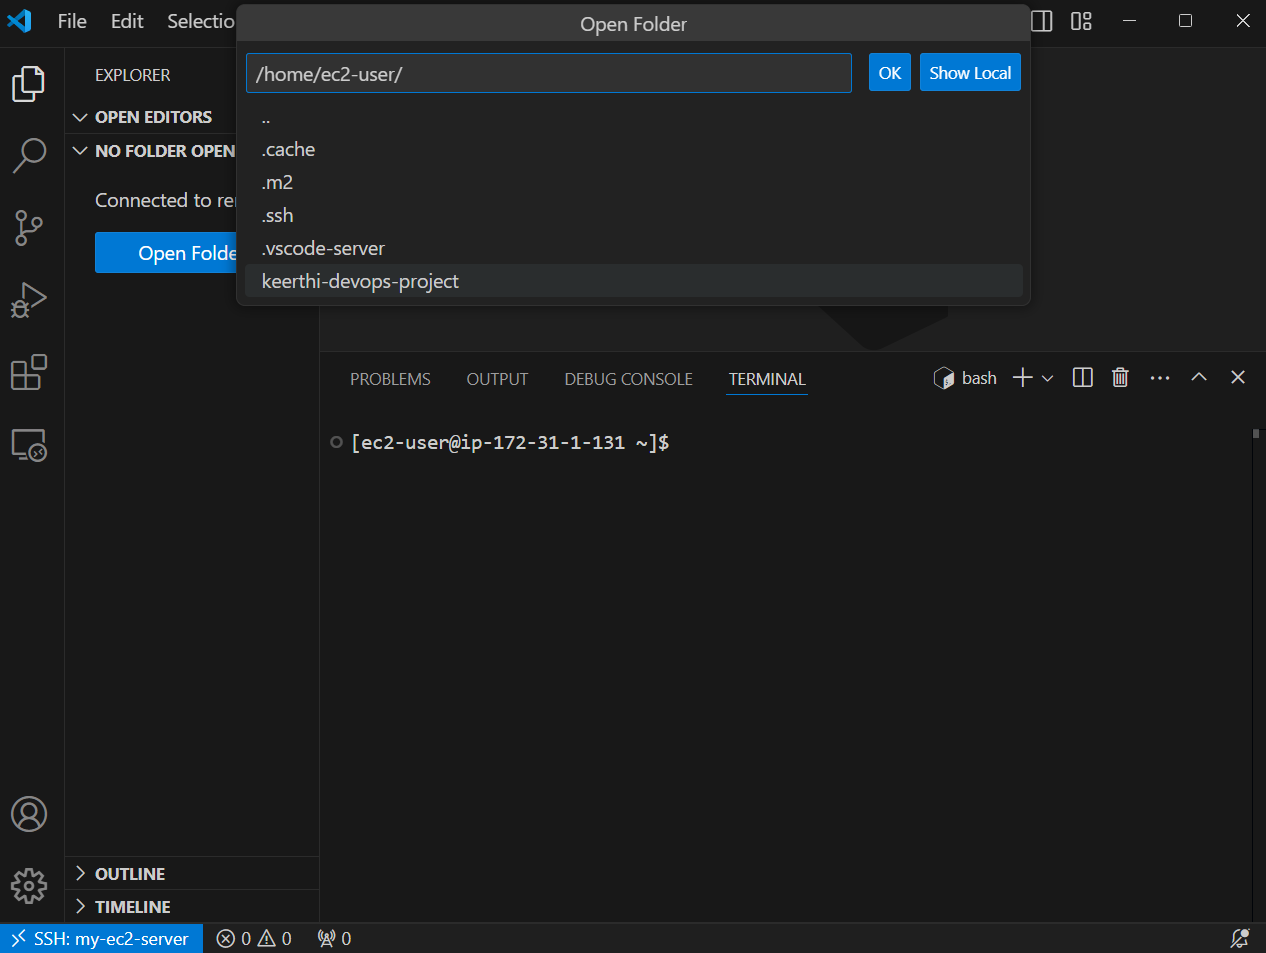
Your project files will now appear in the Explorer view, ready for you to edit and manage directly from VSCode!
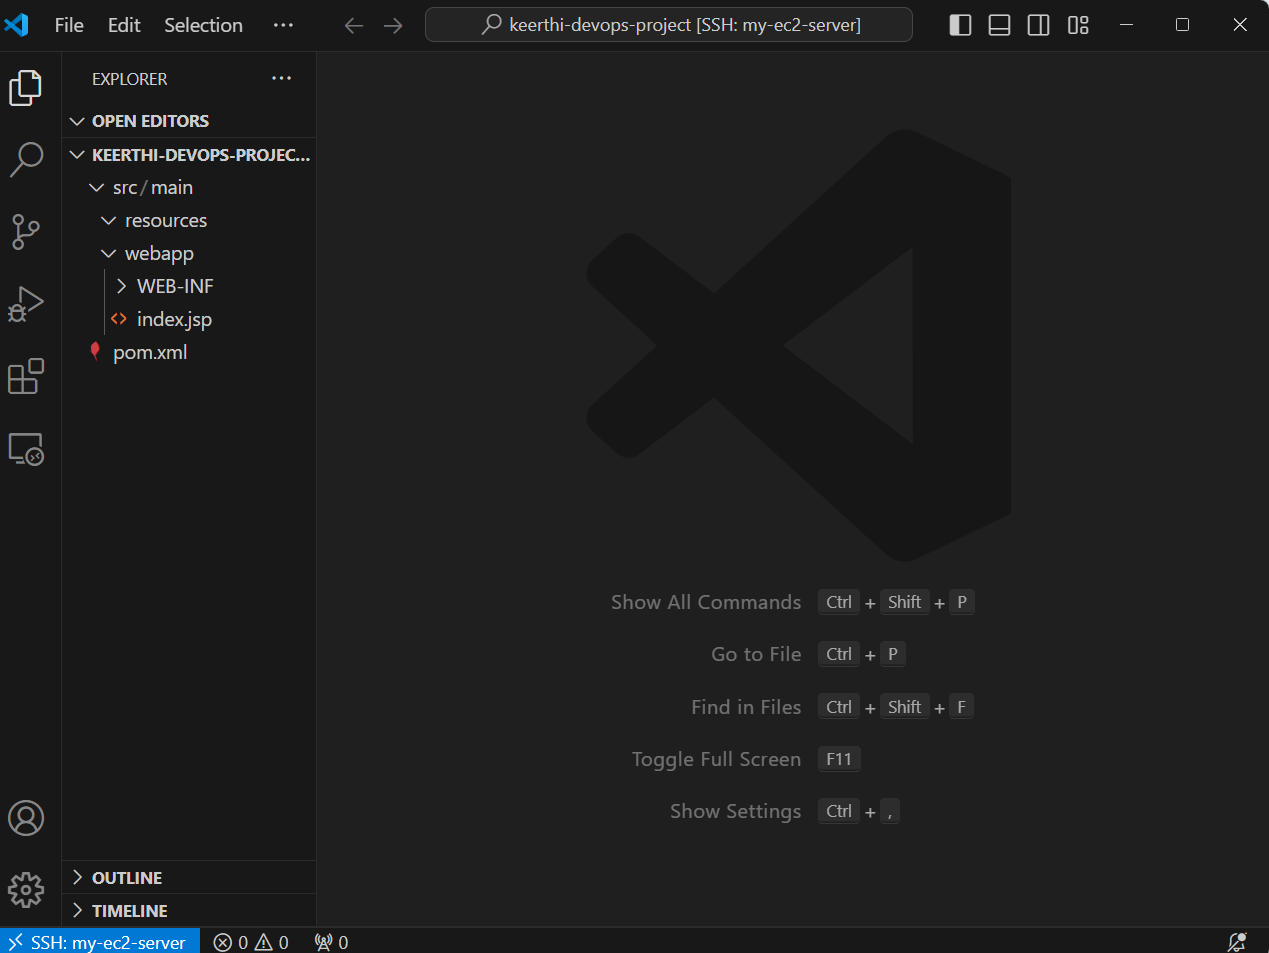
you can customize the
index.jspfile and make it more specific to your project, you can modify the placeholder code. something like this.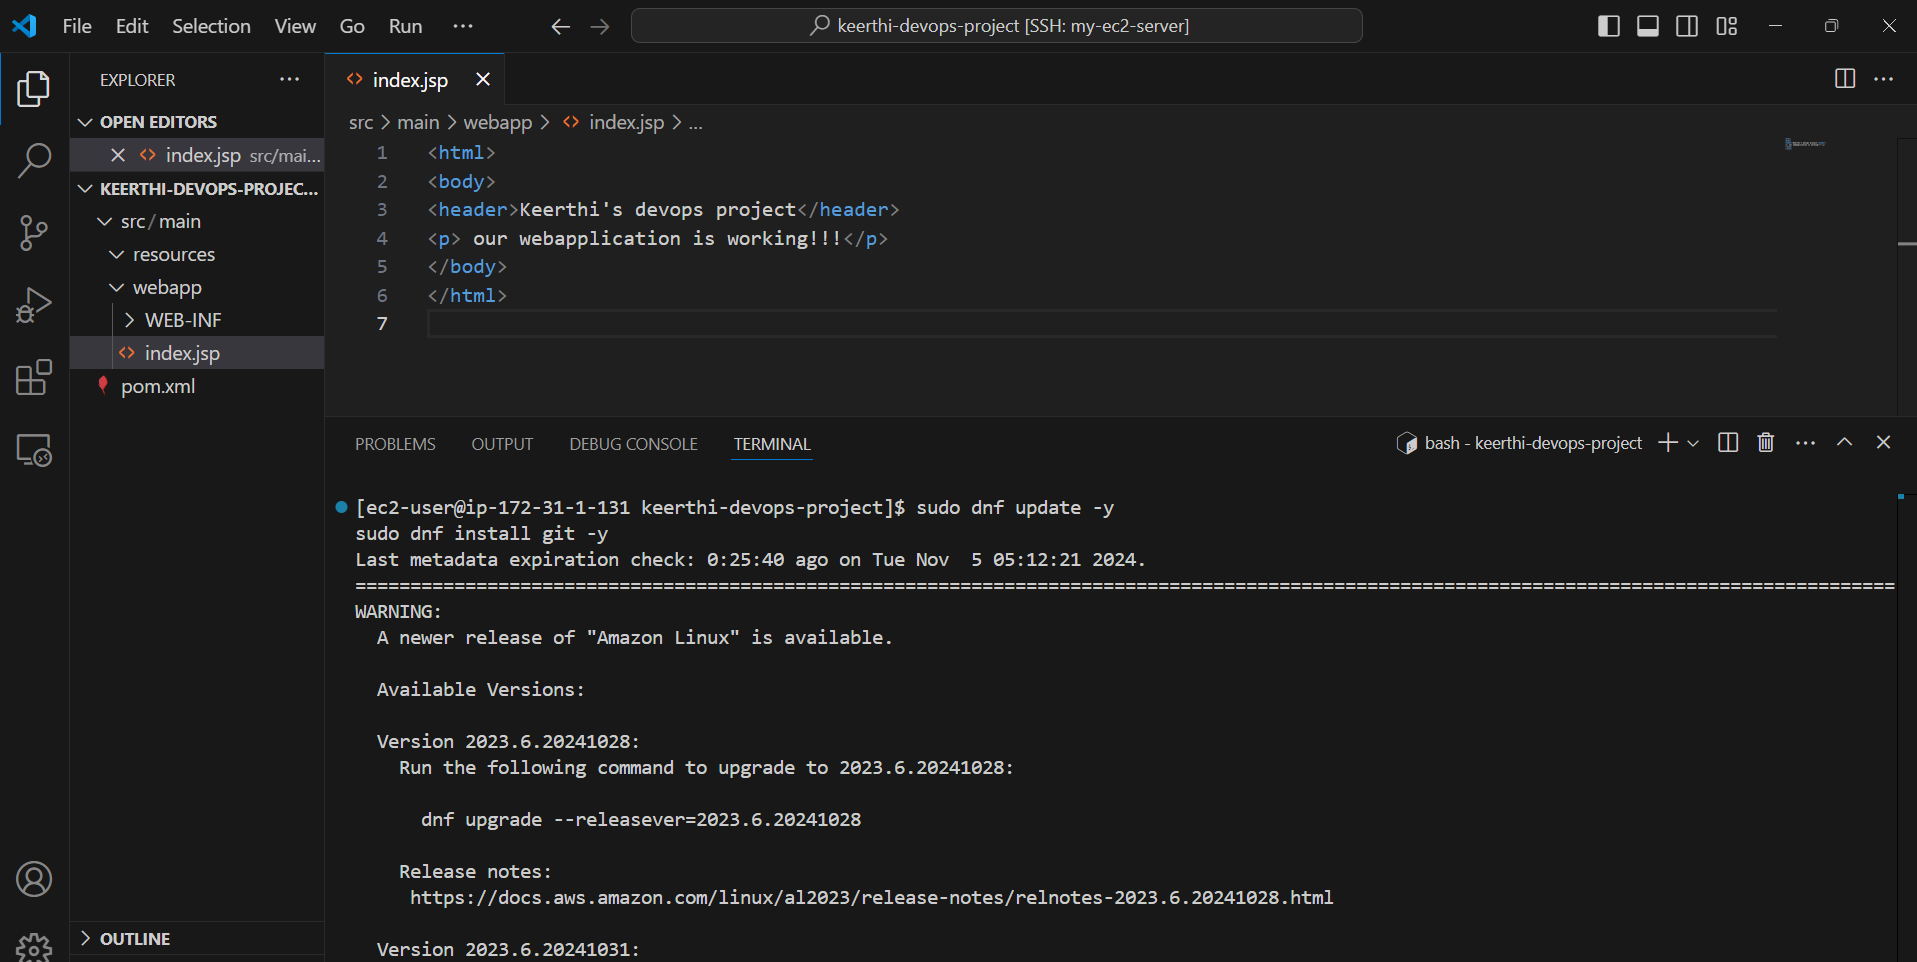
Remember to save after editing.
We have successfully connected VS Code to the EC2 instance 🎉, opened our web application, and made changes to our code. Now, let's move on to the main task: installing Git and pushing our project to GitHub.
Step 8: Install Git on EC2
We need Git to push our project to GitHub. so, lets install it.
Open a new terminal in the window (VC code with ec2 instance connected one).
Use the below commands to install git on your ec2 instance.
This command updates all installed packages to their latest versions, ensuring your instance has the most recent security patches and software.
sudo dnf update -yThis command installs Git. Here the
-yoption automatically confirms any prompts, so the commands run without needing further input.sudo dnf install git -yYou can check whether the git is installed or not by checking the version
git --version
Step 9: Set Github token and repository
To set up your GitHub token and repository, follow these simple steps to ensure everything is configured correctly.\
Creating GitHub token
Login to your GitHub account
In the top-right corner, click your profile picture and choose
Settingsfrom the dropdown menu.Scroll down to
Developer settingsand click on it.Under
Developer settings, selectPersonal access tokens.Click on the
Generate new tokenbutton.Set permission:
Give the token a descriptive name (e.g., “EC2 Deployment Token”).
Select the appropriate scopes (permissions). For general use, you can choose the following:
repo(Full control of private repositories)workflow(Update GitHub Action workflows)read:org(Read your organization's data, if needed)
It is reccomended to choose the repo for this project.
Click
Generate tokenat the bottom.Remember to copy it and save it for future use(you won’t be able to see it again once you navigate away).
Creating a repository in GitHub
Navigate to the dashboard.
Create a new repository by clicking on the
new repositorybutton, usually located on the top right of the page.Enter a repository name that is unique and describes your project well. You can also add a brief description to give a clear insight into the project.

Decide whether you want your repository to be public or private, depending on who you want to have access to your code. I choose public for this project.
Select the
Add a README filecheck box.Click on the
create repositorybutton.Copy the https url of repo that you will find under Quick setup.
We have successfully created a repository of our project now lets push our web application to this repo in the next steps.
Step 10: Pushing project to the GitHub repo
The final step, let’s move our web application to our github repository
In the VS code terminal run these command to initialize the Git in our project.
git initNow lets link the our project to the GitHub repository by running the following command. Replace the
<YOUR_GITHUB_REPO_LINK>with the https url of repo we copied eariler.git remote add origin <YOUR_GITHUB_REPO_LINK>
The command
git add .stages all the changes in the current directory and its subdirectories, getting them ready to be committed to the local Git repository. This includes new, modified, and deleted files. Meanwhile, thegit commit -mcommand is used to save your changes to the local repository.git add . git commit -m "Updated index.jsp with new content"The following command pushs the project from local repo to remote one’s.
git push -u origin masterIt will ask for the github username and password. Under github username enter your username, but instead of entering your github password, enter your token.
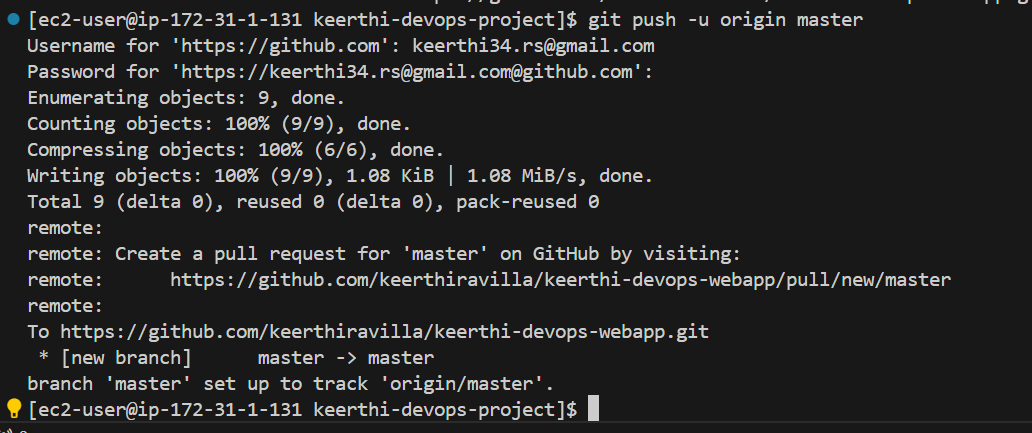
After successfull exceution of the command, head back to your github repo in browser and refresh it.
You will find the web files along with commit messages in there!!.
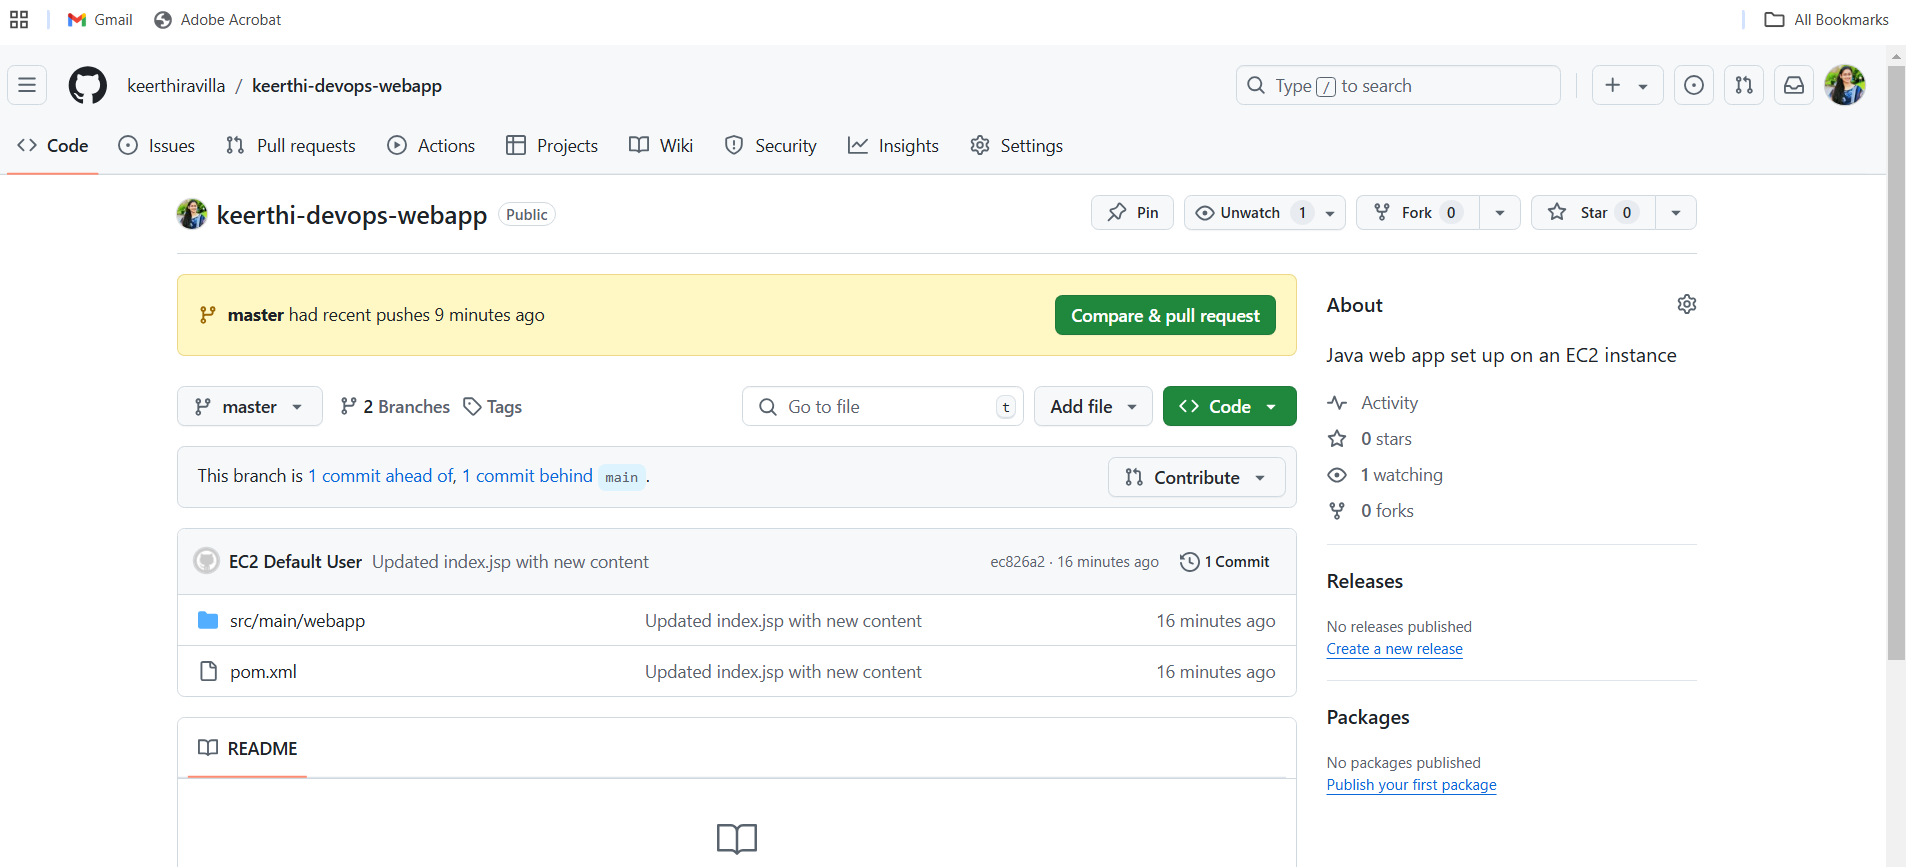
You can keep working on your web application by personalizing it and pushing your changes to the Git repository this way.
Congratulations! 🎉 You've successfully created, deployed, and managed a Maven-based Java web application on AWS EC2, while also integrating it with GitHub for version control. For more exciting projects and resources, visit network.org. Stay tuned for more AWS articles and keep learning with us. Happy coding! 💻🎉.
Subscribe to my newsletter
Read articles from Keerthi Ravilla Subramanyam directly inside your inbox. Subscribe to the newsletter, and don't miss out.
Written by

Keerthi Ravilla Subramanyam
Keerthi Ravilla Subramanyam
Hi, I'm Keerthi Ravilla Subramanyam, a passionate tech enthusiast with a Master's in Computer Science. I love diving deep into topics like Data Structures, Algorithms, and Machine Learning. With a background in cloud engineering and experience working with AWS and Python, I enjoy solving complex problems and sharing what I learn along the way. On this blog, you’ll find articles focused on breaking down DSA concepts, exploring AI, and practical coding tips for aspiring developers. I’m also on a journey to apply my skills in real-world projects like predictive maintenance and data analysis. Follow along for insightful discussions, tutorials, and code snippets to sharpen your technical skills.