New possibilities provided by NestJS Boilerplate
 Rodion Salnik
In our previous post about bc boilerplates, we discussed the integration of a CLI for generating resources like controllers, services, and entities. This feature significantly speeds up setup time, especially considering the use of hexagonal architecture, which provides the boilerplate with the flexibility to choose between document-oriented and relational databases (e.g., PostgreSQL with TypeORM) or even both simultaneously.
The introduction of CLI commands has greatly simplified the generation of resources such as controllers, services, and entities. However, since the types available for new properties were limited to strings, numbers, and booleans, we received many requests for establishing relationships One-To-One, One-To-Many, Many-To-One, or Many-To-Many within the hexagonal architecture. Recognizing that modeling relationships between entities is essential in many backend projects, we understood the importance of enhancing the boilerplate CLI to support these features automatically. This not only addresses a widespread need but also aligns with our goal of further reducing setup time, enabling developers to focus on the more complex aspects of their applications.
In a previous article, we demonstrated the use of the CLI to create endpoints through examples and wrote about future work on expanding property types. Now weʼre pleased to announce that this idea has been implemented, and the CLI in the latest version of the NestJS Boilerplate offers significantly more capabilities for creating resources and handling relationships between objects — all without writing a single line of code.
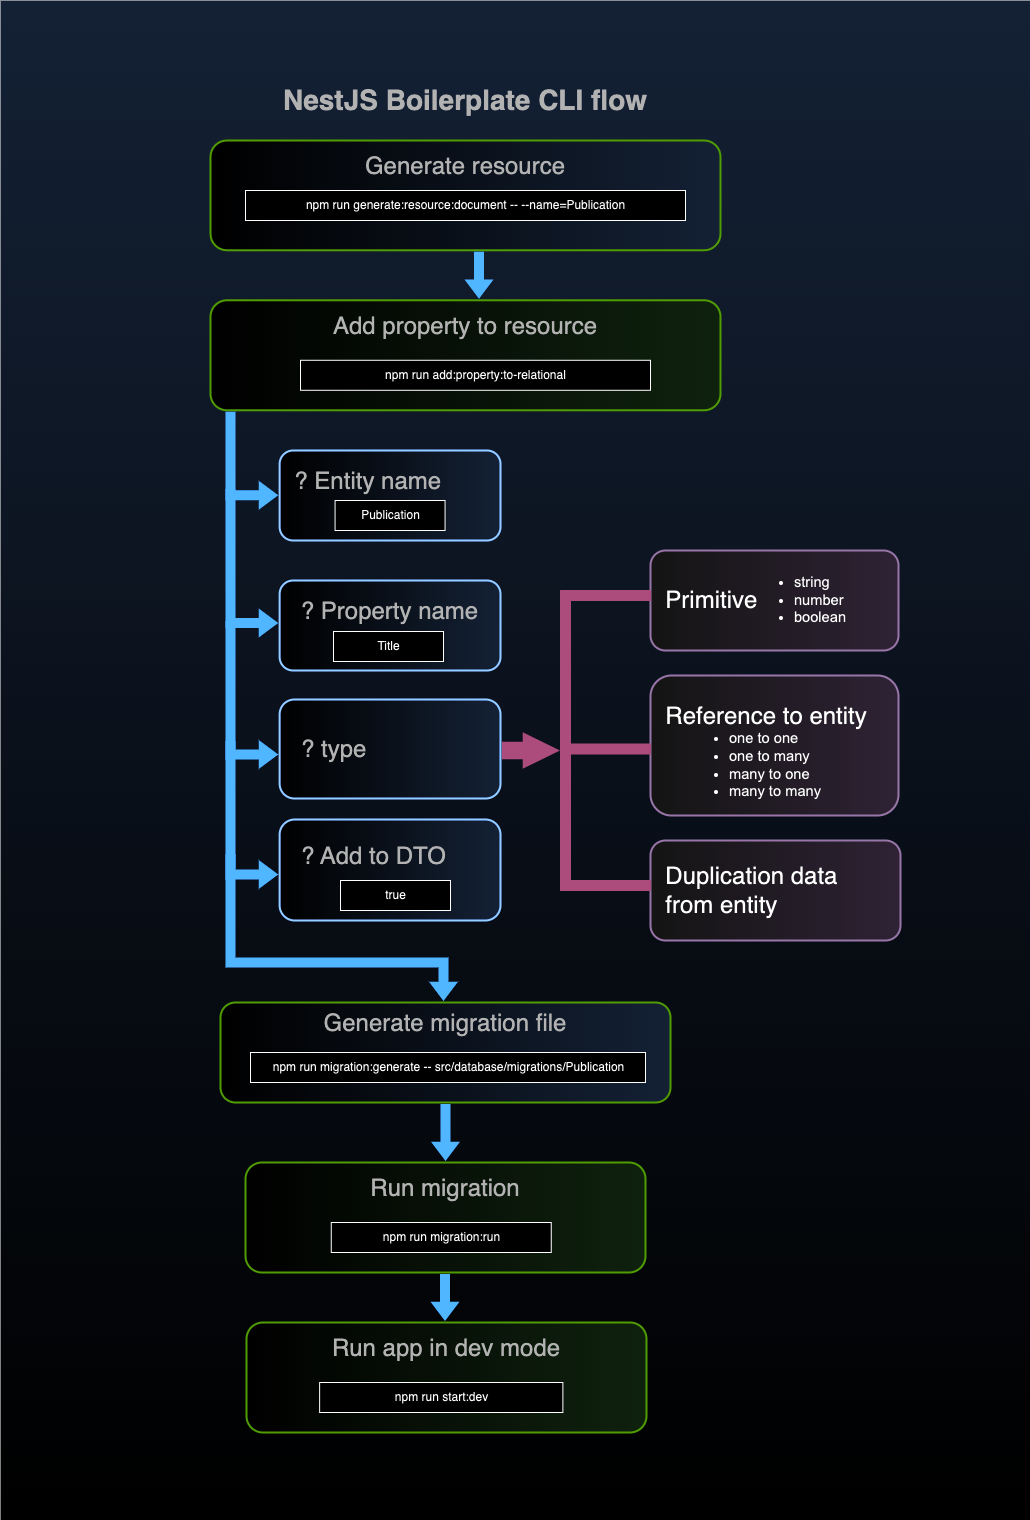
To create a new resource, use the following command, replacing <name> with the desirable entity name (e.g., Publication):
npm run generate:resource:relational -- --name=<name>
This will generate all necessary files (controller, module, service) in a new directory at src/publication.
To add a new field to this entity, use the command:
npm run add:property:to-relational
The interactive mode will now prompt you to specify the entity to which the new field should be added and enter the name of the new property. After that, you will be prompted to select the field type. You can choose from:
Primitive types (string, number, boolean);
Reference to another entity (e.g., relationships like One-To-One, One-To-Many);
Duplication of data from another entity (if you want to store a snapshot of data).
If you select a reference to another entity, you’ll then choose from specific relationship types: One-To-One, One-To-Many, Many-To-One, or Many-To-Many. Following these steps in interactive mode means you don’t have to worry about manual configuration, as it’s handled automatically. For more information on adding properties, you can check the documentation on GitHub.
Let’s go through the step-by-step commands useful for creating a database. Assume we're setting up a blog. We'll go through the CLI commands to show how, in just a few steps, you can build the database structure for a blog without writing any code.

By combining object generation and relationships directly in the CLI, we’ve eliminated the need to manually create template code. The boilerplate now allows you to create a fully functional backend with a basic design and CRUD operations in just minutes, without touching the code. This allows developers to focus on business logic and complex use cases instead of tedious setups.
If you’re already using a previous version of the NestJS Boilerplate, update to the latest version to take advantage of these new features. And if you’re a newcomer, you can also use this boilerplate to create your backend, as it will significantly simplify the development process.
Subscribe to my newsletter
Read articles from Rodion Salnik directly inside your inbox. Subscribe to the newsletter, and don't miss out.
Written by

Rodion Salnik
Rodion Salnik
I'm a CTO at Brocoders and a founder of a few other companies. I used to code a lot, main tech stack is JS and Ruby.