Simplifying Container Setups with the docker init Command
 Prachi Jamdade
Docker is a tool that makes creating, deploying, and running applications very easy. Many development teams are now adopting Docker due to its simplicity, flexibility, and ease of deployment across multiple platforms.
The docker init command is already making its way among developers who want a hassle-free way to containerize applications.

What is the Need for docker init ?
Docker is the most powerful tool for building and running containers on any system/infrastructure. But many still struggle to correctly configure Docker for their project especially you’re new to Docker.
Setting up a container often requires a Dockerfile with specific configurations for your application, which can be time-consuming and prone to errors.
Setting up Docker manually can be hard, especially for beginners. With docker init, Docker does the initial heavy lifting:
It analyzes your project structure and programming language.
Generates an optimized
Dockerfilebased on its findings.Helps you quickly dockerize an application using the best practices.
What is docker init ?
The docker init command (a new feature introduced in the latest Docker releases), introduced to simplify container setup, and automate the creation of essential Docker configuration files.
It’s like a starting template for containerizing your application, detecting common settings, and generating a Dockerfile suited to your project. This means you can get a basic Docker environment up and running without manually creating configurations from scratch.
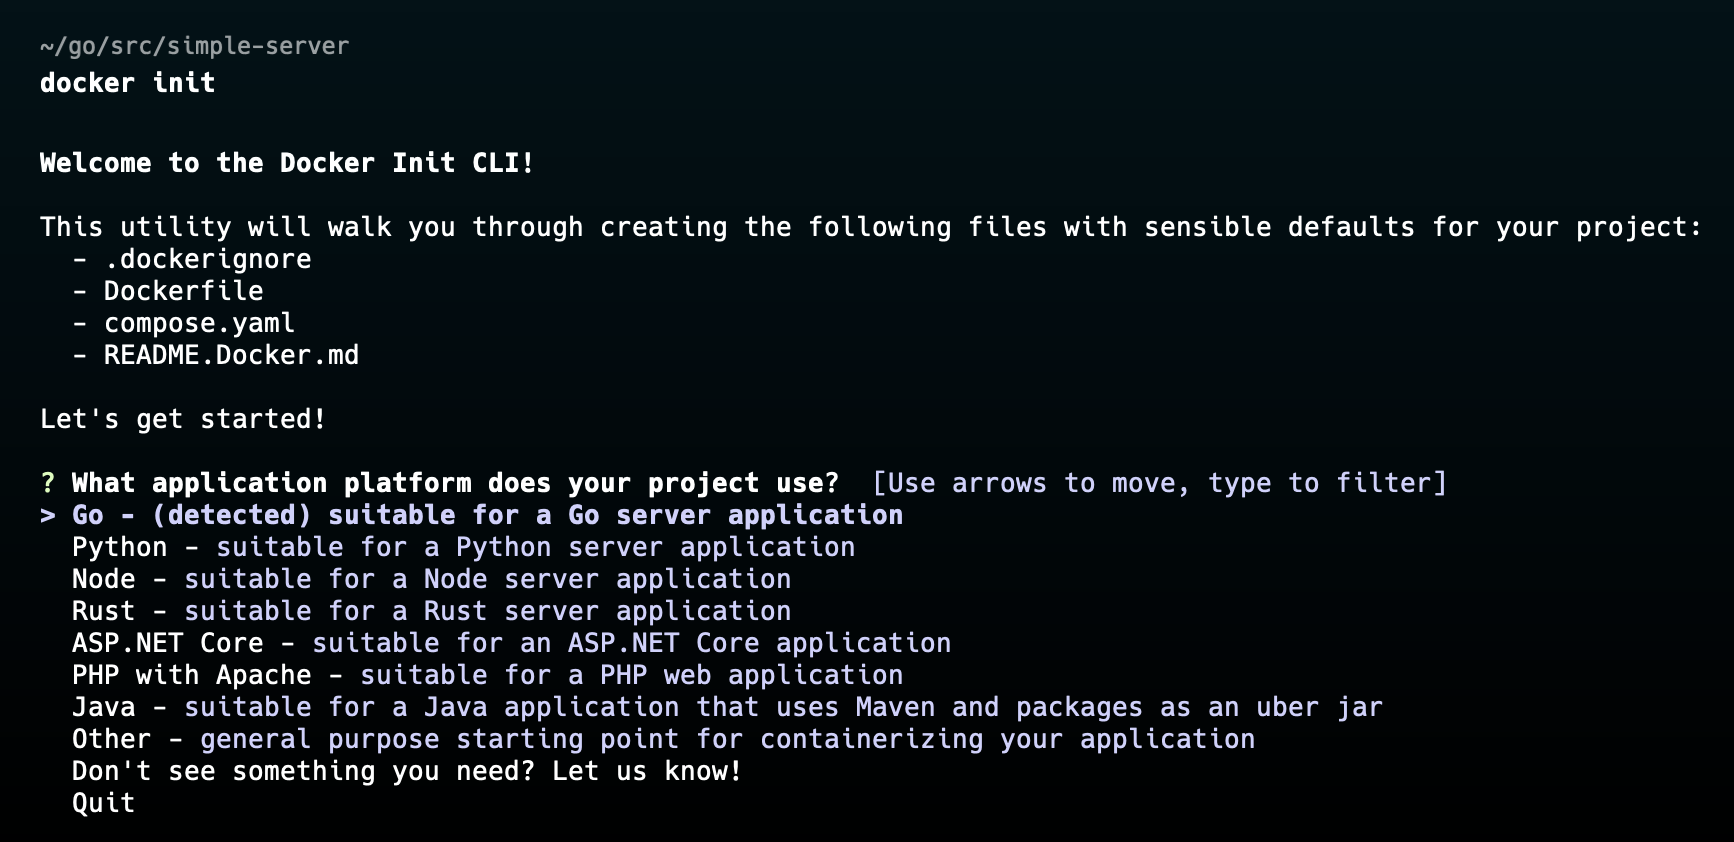
Docker init provides support for Go, Rust, Java, Python, Node, ASP.NET, and PHP apps. There’s also an “Other” option that provides a generic starting point for other types of apps.
What files does it include ?
Running docker init in your project directory results in the creation of four files as mentioned below.
.dockerignore- to exclude files and directories that you don’t want to be invoked during image build.Dockerfile- a set of instructions/commands to create images.compose.yaml- a Docker Compose configuration (written in YAML) that helps you manage multi-container applications and lets you start and run your app and its dependencies such as database connections and API endpoints.README.Docker.md- a markdown document provides guidance on building, running, and deploying your Dockerized application.
When to use docker init ?
Dockerize Existing Projects:
Easily add Docker to older projects.
Supports multiple languages, so it adapts settings based on the project’s tech stack.
Learn Docker with New Languages:
Quickly learn how to Dockerize apps in different languages.
A great tool if you know Docker for one language but need a starting point for another.
Automate Setup:
Saves you time on manual setup work.
Ideal for reducing repetitive project setup tasks in case of bigger projects.
Before using docker init
Docker init is a Docker CLI plugin that is only available in Docker Desktop versions 4.18 and later. And is not yet supported by Docker Engine. Hence, there is no supported manual installation method for Docker init.
Let’s see docker init in Action
Let's walk through how to use docker init by containerizing a basic Go server. This example is beginner-friendly and illustrates how easily Docker can help deploy a Go application in a container.
- Create a Simple Go Server: First, let's write a small Go server that responds with "Hello, Docker!"
// main.go
package main

import (
    "fmt"
    "net/http"
)

func handler(w http.ResponseWriter, r *http.Request) {
    fmt.Fprintln(w, "Hello, Docker!")
}

func main() {
    http.HandleFunc("/", handler)
    fmt.Println("Server is running on port 8080")
    http.ListenAndServe(":8080", nil)
}
- Run
docker initin the project directory: Navigate to the directory where you have written your go server and run:
$ docker init

You can see that Docker has detected the Go environment for our project. Hit the enter key to go further.
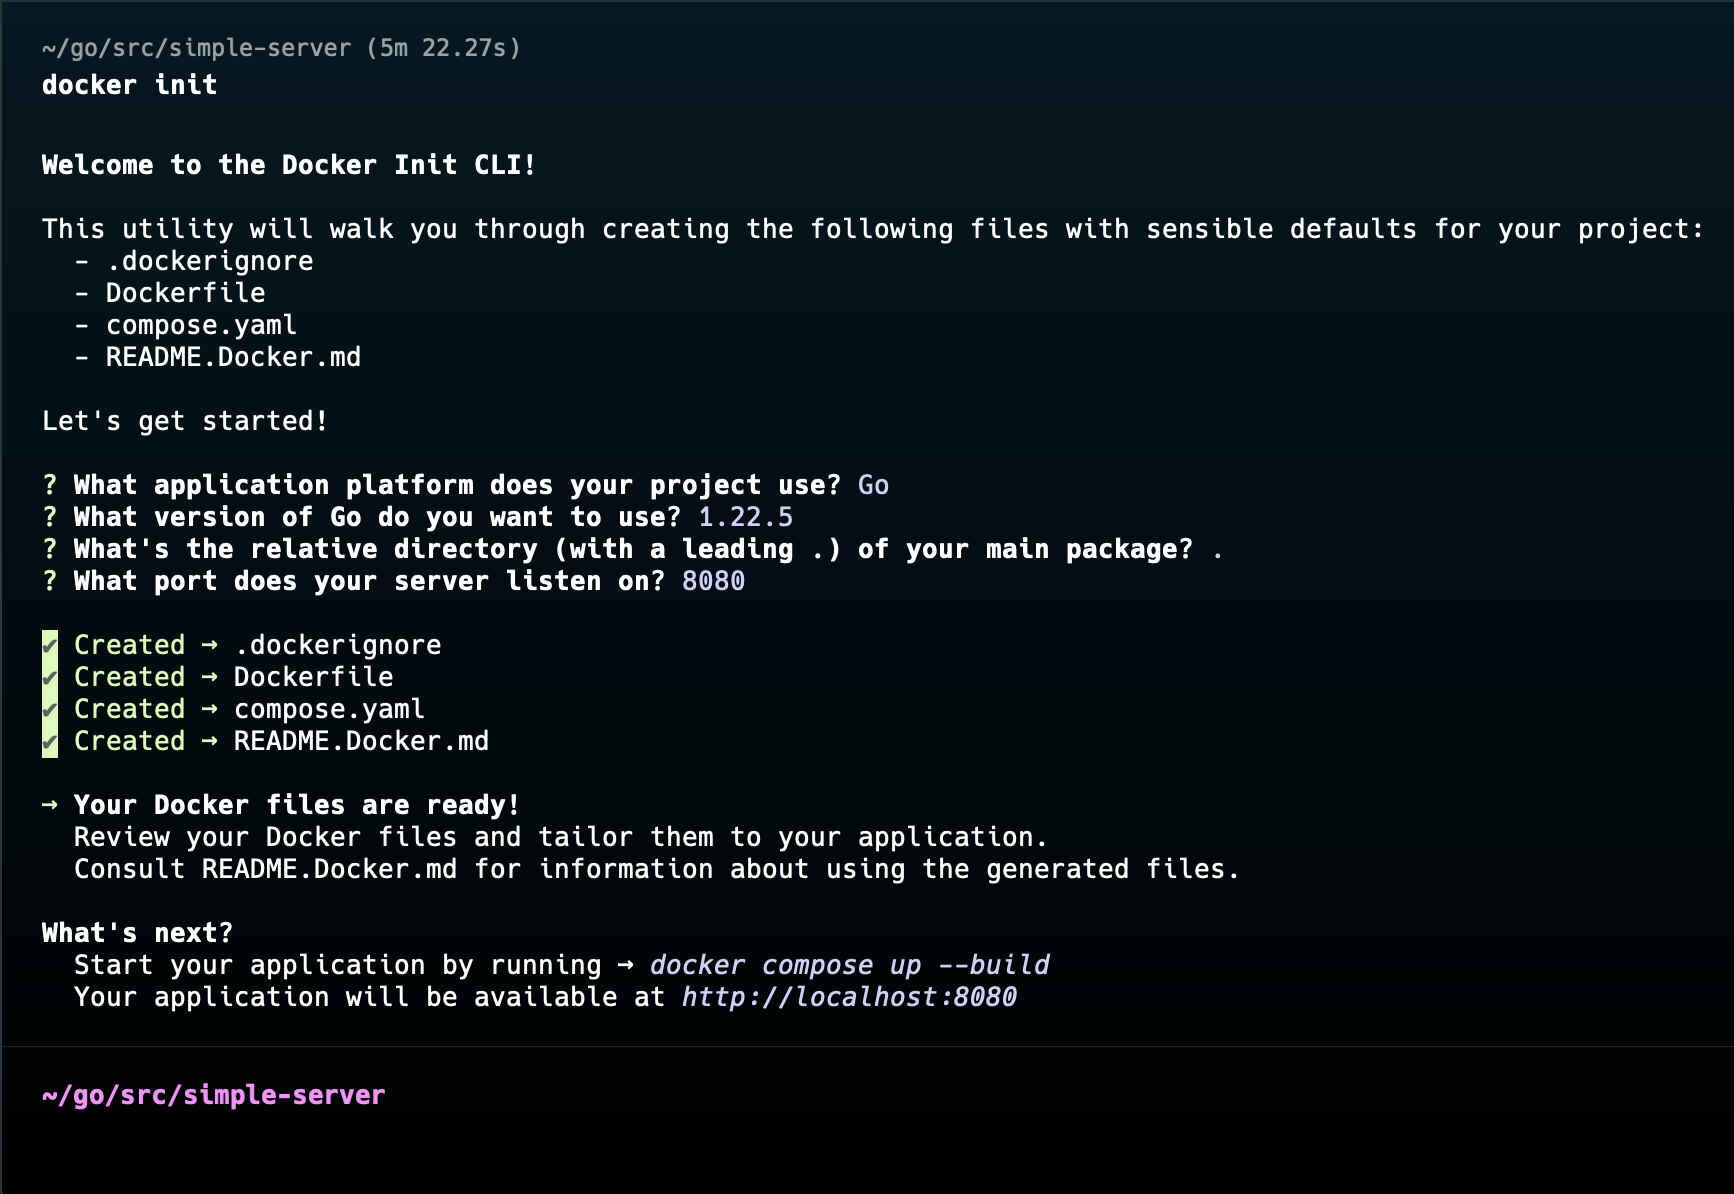
Next, you’ll be asked which version of Go you want to use:

Just go ahead with the detected version or else you can specify it manually.
Help Docker with the prompt you’ll be asked.
You should then see a confirmation that your Docker config files have been created:

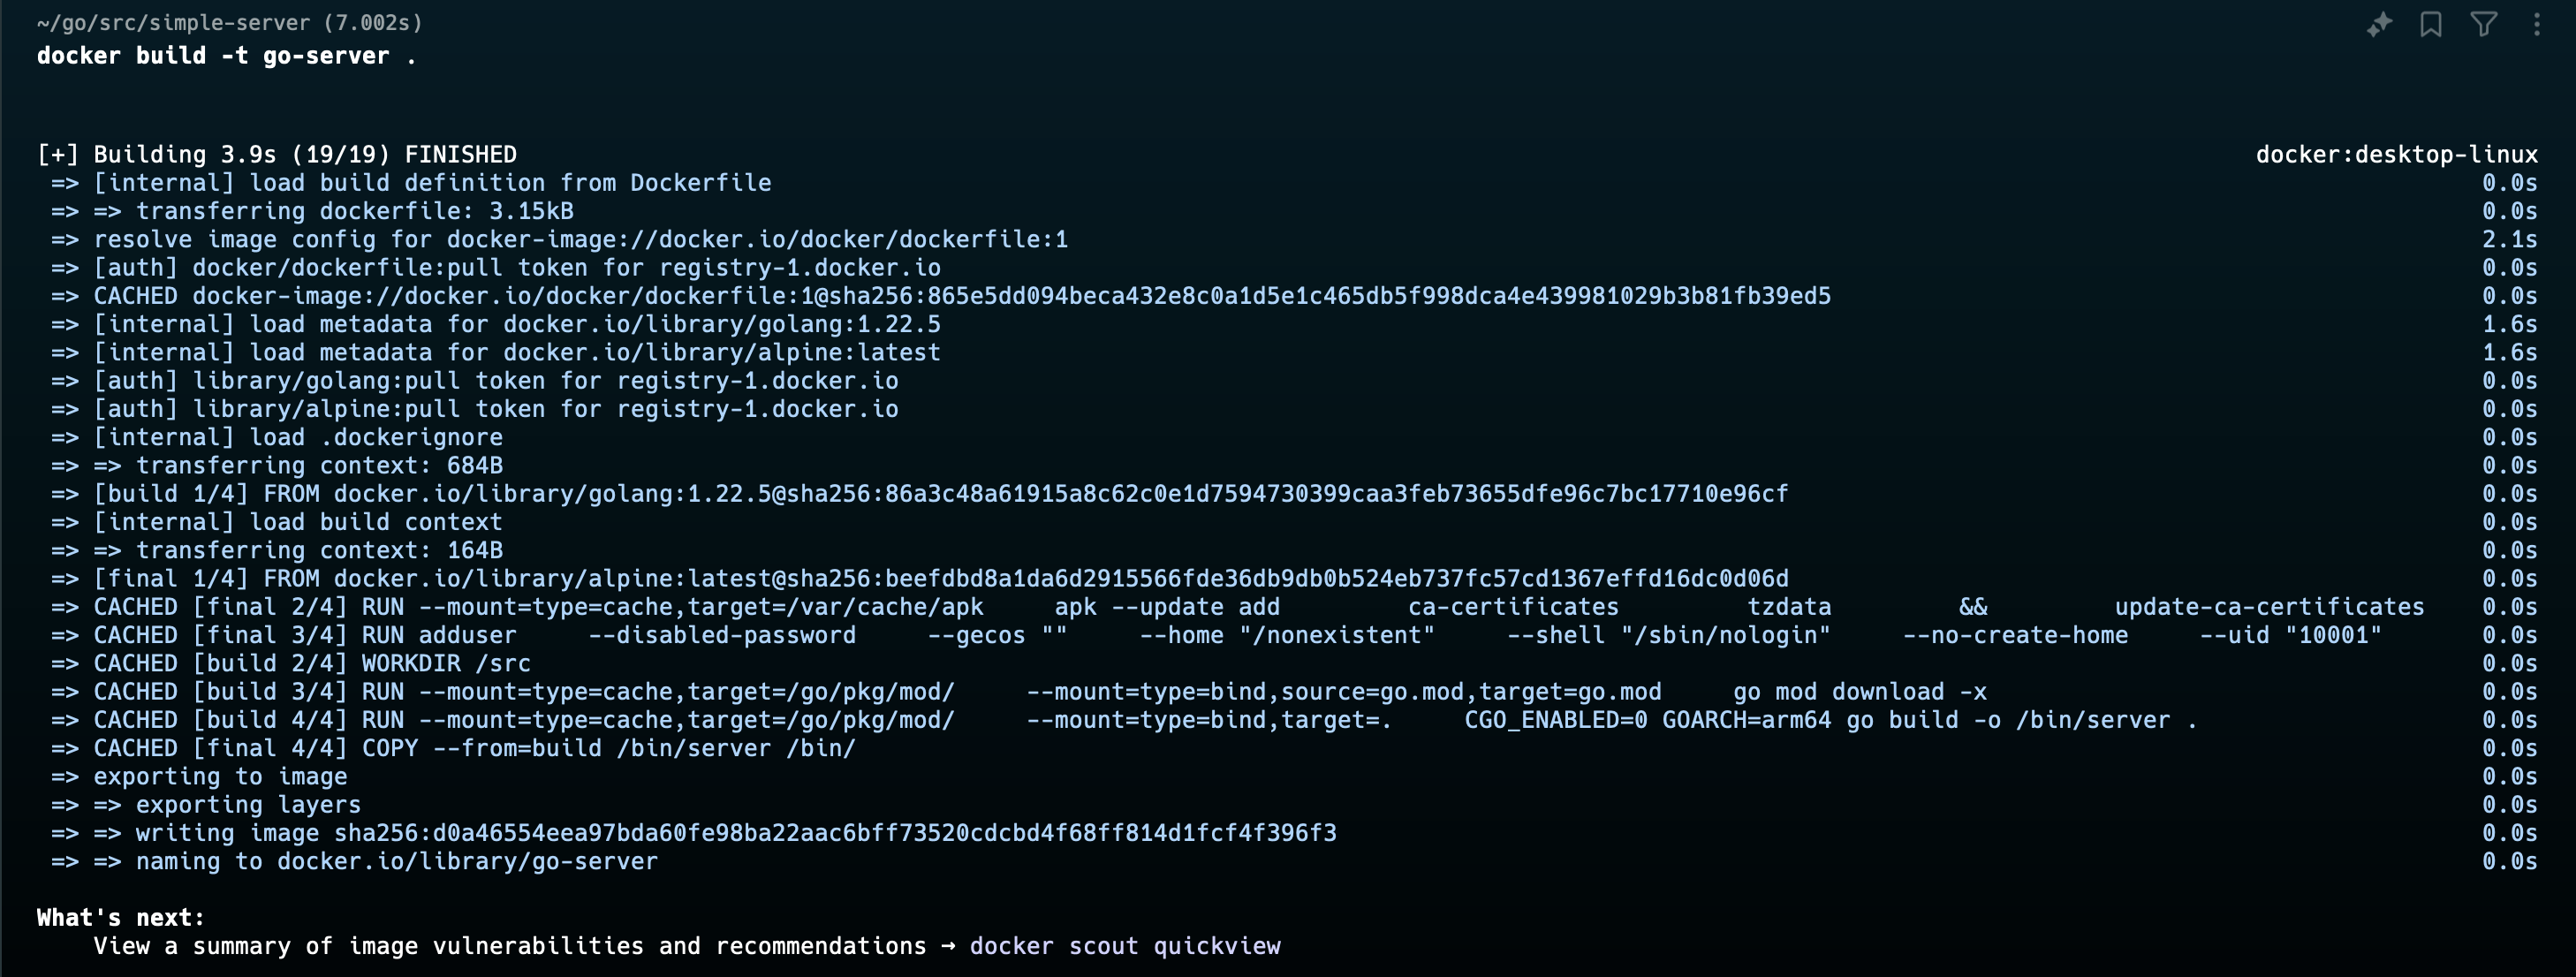
- Run your App:
- Build the container -
$ docker build -t <app_name> .

- Run the container -
$ docker run -p 8080:8080 <app_name>

- Access the App: Open a browser or use
curlto check if the server is running by visitinghttp://localhost:8080. You should see "Hello, Docker!" displayed.

Tips for using docker init efficiently
Optimize for Image Size: Docker’s initial
Dockerfilemight use a larger base image for compatibility. If you need a smaller image, consider using Alpine-based images (likegolang:1.19-alpine).Adjust Files to Suit Your App’s Requirements: The files generated by
docker initprovide a solid starting point, but additional customization may be needed. For example, if your app has specific dependencies like Redis database connections then you might need to adjust the Compose configuration to include it.Caution with Existing Projects: If Docker support has been added to your project then take care not to overwrite any important files. Docker will ask you if any of the config files are present. Overwritten files then can’t be recovered so make sure you rename it or save them into another directory before selecting to overwrite it.
Provide Accurate Responses to Prompts: Carefully answer all prompts to avoid compatibility issues. Incorrect answers can lead to errors during the build or runtime.
Conclusion
Docker init is easy to use and convenient but you still require to make customization to your Dockerfile in order to add or alter dependencies or changes to the base images.
Head out to official documentation for docker init for more information.
Happy Coding!
Subscribe to my newsletter
Read articles from Prachi Jamdade directly inside your inbox. Subscribe to the newsletter, and don't miss out.
Written by

Prachi Jamdade
Prachi Jamdade
Code 👩💻, Content ✍️ and Community 🤝