CloudDevops - Automate with CloudFormation
 yyounos shaik
Table of contents
DIFFICULTY : MID-LEVEL TIME : 150 mins COST : 0$
WHAT YOU’LL NEED:
An AWS account - Create one here!
part-1 : Building an WebApp and IDE in AWS.
Part-4 : Pakcage an App with AWS CodeBuild.
part-5 : Deploy an app with CodeDeploy.
AWS SERVICES :
- CloudFormation
Summary
You've set up your web app's infrastructure, now CloudFormation will help you capture it all in one handy template!
Let’s Get Started…
Step 1 : Set up your CloudFormation template
Search for CloudFormation in your AWS Console.

What is AWS CloudFormation? Why are we using it?
AWS CloudFormation is a handy service that helps you create or update resources in your account using templates. Instead of going through the AWS Management Console and setting up each resource one by one, CloudFormation allows you to list everything you need for your application, like CodeArtifact domains, S3 buckets, and more, in an easy-to-read text file. Once you give this file to CloudFormation, it quickly sets up all the resources you've listed in just a few seconds.
In this project, you'll use CloudFormation to set up a stack for deploying your web application's resources and CI/CD pipeline. CloudFormation templates ensure that everything is set up correctly and consistently, reducing the risk of human errors. Plus, it saves you time!
In the CloudFormation Console, click IaC generator from your left hand navigation bar.
In the Scans panel, select Start a new scan.
CloudFormation is now sweeping through your account's resources and collecting everything that you can save in a CloudFormation template. It'll take a few minutes for the scan to be complete!
Once the scan status shows 100%, select Create template.
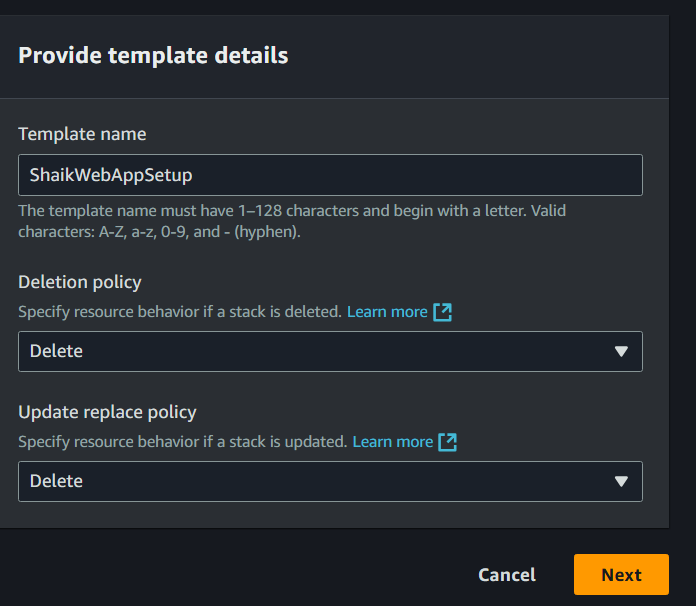
Under the Provide template details panel, enter YournameWebAppSetup as your template's name.
Choose Delete as Deletion Policy.
Choose Delete as Update replace policy.
Why did we choose delete for these two policies?
- The Deletion Policy is there to ask what you want to happen to the AWS resources in this template when the stack is deleted. And the Update Replace Policy is all about deciding what should happen to the AWS resources in this template if they need to be replaced during a stack update! How exciting is that? You're in control of your resources, making sure everything is just the way you want it!.
In the Add scanned resources panel, use the search bar to look for resources you've created to set up your web app.
Here's a quick demo:
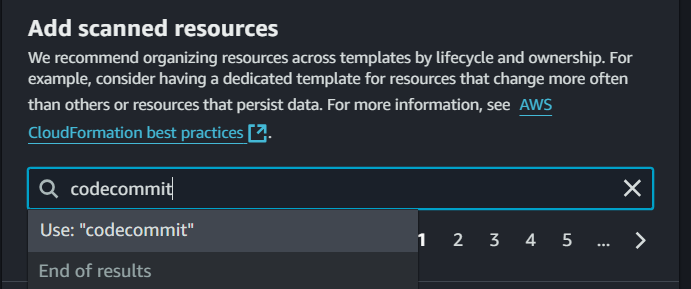
Typing in codecommit doen’t return any search results - this means codecommit cannot be used in cloudformation template with the IaC generator.
But typing CodeArtifact suggest a resource type CodeArtifacts domains!
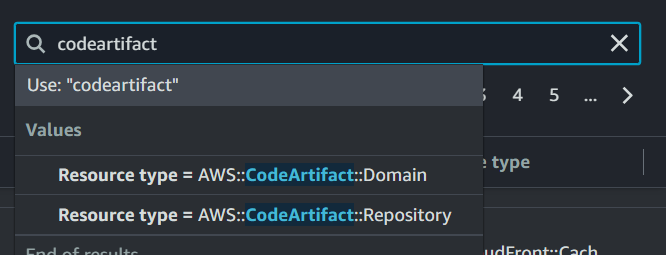
Once that gets selected in search bar, your domain pops up as an option to go to into your CloudFormation template.
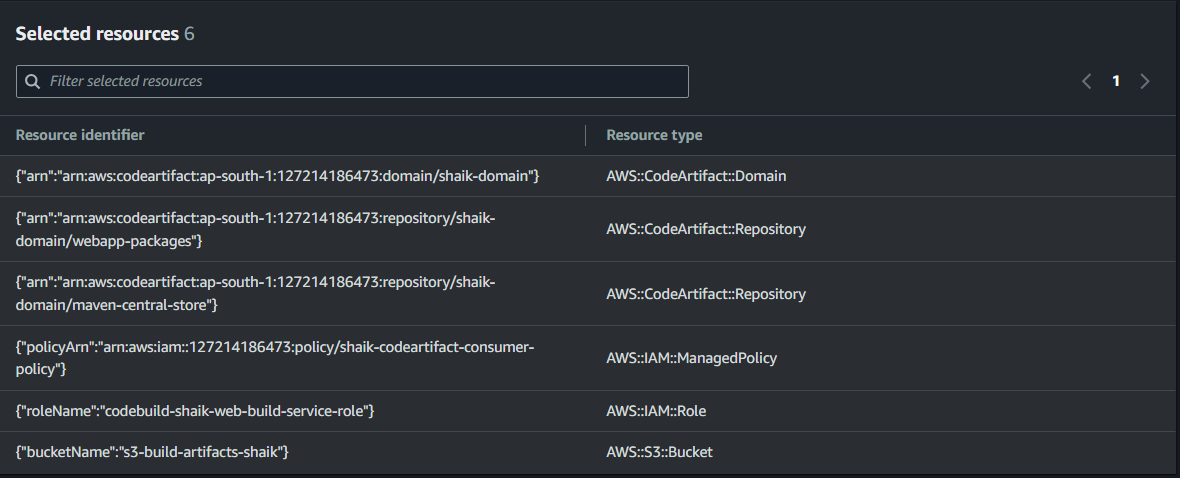
Here are 6 resources that should be on your list!
Your CodeArtifact domain called yourname-domain.
Your local CodeArtifact repository i.e. webapp-packages.
Your upstream CodeArtifact repository i.e. maven-central-store.
Your IAM Policy for CodeArtifact i.e. codeartifact-yourname-consumer-policy.
Your IAM Service Role for CodeBuild i.e. codebuild-yourname-web-build-service-role.
Your S3 bucket i.e. S3-build-artifacts-yourname.
Why can’t we get all the resources in the template?
Well, you might notice that some resources, like codecommit and the CodeBuild project, don't show up as scanned resources. That's because the IaC generator can't include them; they need specific configuration details and security permissions that our generator might not handle automatically.
Let's imagine a CodeCommit repository that often needs specific Git setups and user permissions, while CodeBuild projects come with complex settings like build environments. This doesn't mean you can't add them to a template! Although our IaC generator can't automatically include them in the template file, we can always add them manually afterward.
Select Next.
It seems there are some related resources that CloudFormation thought would be useful in this stack, and here they are. There are policies that our CodeBuild service role uses. Let's go ahead and add them.

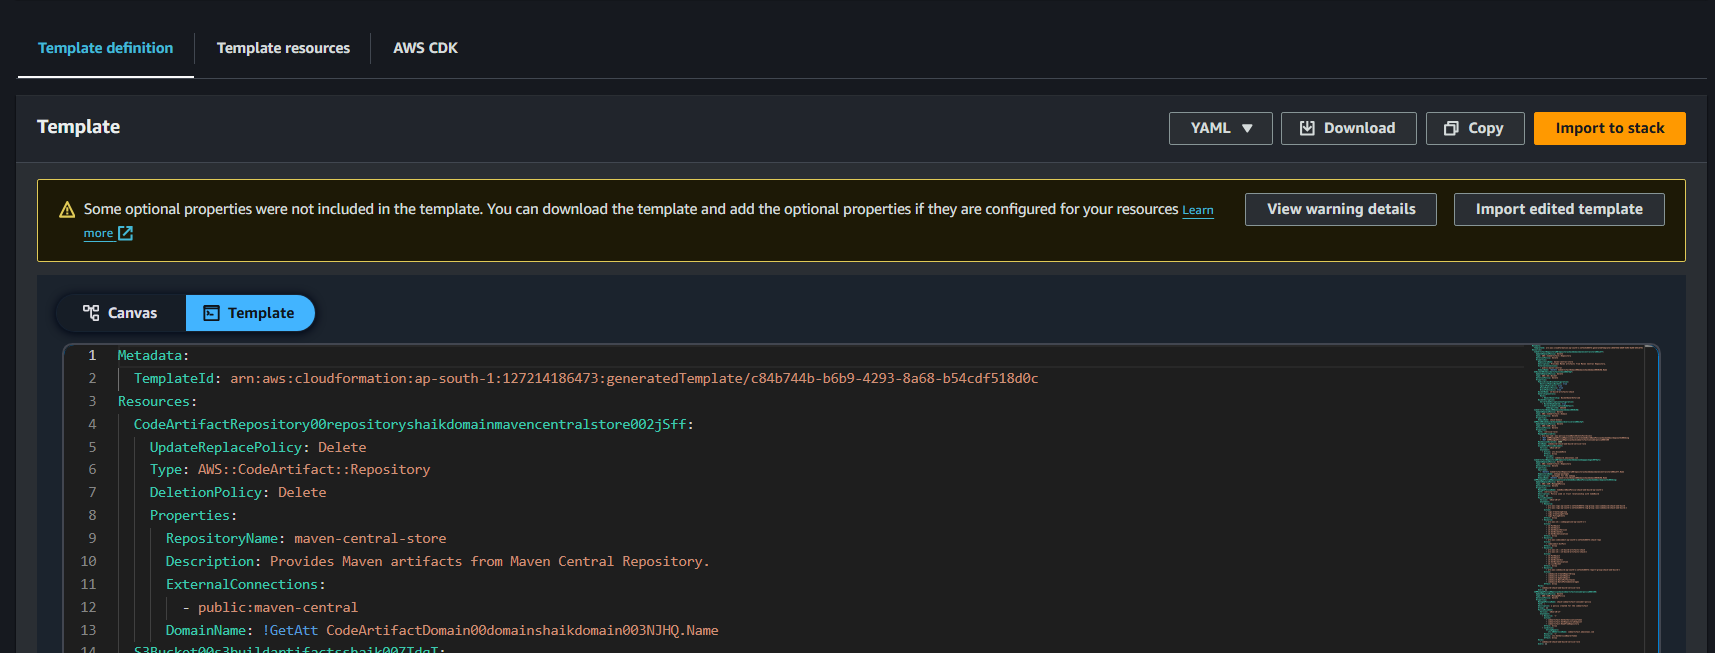
Once the template is 100% ready, select download to save the copy of the template file.
Step 2 : Edit your CloudFormation template
On your local computer, open your Downloads folder.
Find and open the CloudFormation template you've saved using a text editor, like NotePad++ or TextEditor. You could also use an IDE if you have one locally!
what is an IDE again?
An IDE is software that helps developers write and manage their code. Just like Google Docs or Word are text editors, IDEs are used as code editors. IDEs often come with extra tools for running and testing your code too!
These are the settings the cloudFormation has saved about your resources.
Each Section of your code defines one of the resources in our template!
Add comments in this file to understand our template better!
Let’s add by starting with IAMManagedPolicy00policyserviceroleCodeBuildBasePolicy in your template.
Add a new line above the line starting with
IAMManagedPolicy00policyserviceroleCodeBuildBasePolicyand type in the comments #IAM Base Policy for CodeBuild.
Now look for the next resources in your template and add comments at the top to explain what it does. Here are comments names you can use:
IAM Role for CodeBuild.
# CodeArtifact Domain.
# IAM Policy for CodeBuild CloudWatch Logs.
# IAM Policy for CodeArtifact.
# CodeArtifact Upstream Repository.
# CodeCommit Repository.
# S3 Build Artifacts Bucket.
Next, lets add some more resources manually! Copy the following code and paste it at the botton of your template
# CodeBuild Project
  CodeBuildProject:
    DependsOn: "IAMRole00codebuildshaikwebbuildservicerole00QhQSp" //change with your IAM role name.
    Type: "AWS::CodeBuild::Project"
    Properties:
      Name: "yourname-web-build" // change with your build name
      Description: "Build project for web application"
      Source:
        Type: "CODECOMMIT"
        Location: "<add your codeommit repository HTTPS URL>"
        BuildSpec: "buildspec.yml"
      Artifacts:
        Type: "S3"
        Name: "yourname-web-build.zip" //change with .zip file name from S3 bucket
        Packaging: "ZIP"
        Location: !Ref "S3Bucket00nextworkbuildartifactsshaik00f3hQ4" // change with your S3 bucket in the template.
      Environment:
        Type: "LINUX_CONTAINER"
        ComputeType: "BUILD_GENERAL1_SMALL"
        Image: "aws/codebuild/amazonlinux2-x86_64-standard:corretto8"
      ServiceRole: !GetAtt IAMRole00codebuildshaikwebbuildservicerole00QhQSp.Arn // change with your IAM role name from the template.
      LogsConfig:
        CloudWatchLogs:
          GroupName: "yoruname-build-logs" // change with the name of your logs
          Status: "ENABLED"
          StreamName: "webapp"
Please make the changes in the code by following the "// comments." Make sure everything is updated correctly.
Explaining the code :
The snippet above adds codebuild resource to your CloudFormation template. This could ot be automatically added to the template with the IaC generator as they still require manual steps once you,ve deployed them.
In your CloudFormation template, search for the name of your codebuild service role configuration.
What do you mean by doeBuild Service role configuration?
You're going to see the word "configuration" come up a lot when we talk about a CloudFormation template! In a CloudFormation template, a configuration is a part of the code that shows how you want to set up a specific resource.
Each configuration has its own name. In this example, even if your CodeBuild service role has its own name, like codebuild-yourname-web-build-service-role, think of the configuration name as a title for that part of the code.
Your code build servcie role configuration name should look similar to this : IAMRole00codebuildyourname-web-buildservicerole006vOvu.

Copy the service role name.
Still in your template, find the line ServiceRole: ! GetAtt CodeBuildServiceRole.arn.

What does this line say?
The
!GetAttin this line is a shorthand in CloudFormation that stands for "Get Attribute." It's used to fetch specific details about a resource defined in your template, in this case, the CodeBuildServiceRole.The
.Arnpart specifies that you want the Amazon Resource Name, which is like an ID for the role that AWS uses to identify and manage it. So, this line is just trying to say, "Grab the ID of the CodeBuild service role we've set up and use it here."
On that line, replace CodeBuildServiceRole with the service role you’ve just copied!
Double check that you’ve replaced the text .CodeBuildServiceRole in that line. Make sure the .Arn at the end is still there.

So you might wonder why are we doing this?
- The line
ServiceRole: !GetAtt CodeBuildServiceRole.Arnunder your CodeBuild Project configuration is actually using a reference! It's saying "get the AWS ARN of the IAM service role I've defined for this project". Your template calls the service role a specific name, so we need to replace the CodeBuildServiceRole placeholder with the right reference.
- The line
We're going to do this again for another reference in your CloudFormation template!
In your template file, look for the Artifacts section under your CodeBuild project configuration.
In the Artifacts section, search for the line that uses a ArtifactsBucket reference. It should look like this: Location: !Ref ArtifactsBucket.
Replace the reference with the configuration name of your S3 bucket! Search for S3Bucket00yournamebuildartifacts to find the configuration name.
What is the line saying?
- This line
Location: !Ref ArtifactsBucketis trying to say, "Once the build artifacts are created, store the build artifacts inside another resource defined in this CloudFormation template. The other resource that will store the build artifacts has a configuration titled ArtifactsBucket in this CloudFormation template."
- This line
The ArtifactsBucket reference should be consistent with the name of our S3 bucket's configuration in the CloudFormation template! Can you figure out what this name is in the CloudFormation template?.
Hint: search S3Bucket00 to jump to the start of your S3 bucket configuration's name.
The name should look similar to S3Bucket00yournamebuildartifactsshaik0072sC1.
Save your changes by pressing Command + S (Mac), or Ctrl + S (Windows) on your keyboard.
Step 3 : Test your CloudFormation template
Shall we test your CloudFormation template?
Delete the resources that overlap with the resources described in your template, which are your:.
CodeCommit repository.
2x CodeArtifact repositories.
CodeArtifact domain.
CodeBuild project.
S3 artifacts bucket.
IAM role for CodeBuild codebuild-yourname-web-build-service-role.
3x IAM policies for CodeBuild i.e. policies starting with CodeBuildBasePolicy-yourname-web-build, CodeBuildCloudWatchLogsPolicy-yourname-web-build and codeartifact-yoruname-consumer-policy.
Wait hold on!!! why are we doing this?
We're about to test your template, which means passing your template to CloudFormation and asking CloudFormation to deploy all the resources you've defined inside.
CloudFormation's deployment will fail if a resource with the same name already exists! The resources in the template and the existing resources in your account share the same name, so let's prevent any errors by deleting the existing resources.
Why did we create them in the first place if we have to delete them now?
- Creating these resources first was essential to make sure CloudFormation could include them in the account scan when using our IaC generator. If we didn't do the manual work of setting up our infrastructure in Step 1, CloudFormation wouldn't have scanned the resources we need to put together our template!
Now, let's create a new stack and upload the updated file.
In your CloudFormation console, choose Create Stack.
Choose With new resources (standard).
Under the Specify template panel, choose Upload a template file.
Upload your updated CloudFormation template!
Let's configure this stack:
Name: yournameDevOpsProject.
Stack failure options:
Behaviour on provisioning failure: Roll back all stack resources.
Delete newly created resources during a rollback: Delete all newly created resources.
Acknowledge the blue pop up banner that says IAM resources wil be created when you deploy this stack.
Choose Submit!
Roll back all stack resources: means if something goes wrong during the creation of your resources, cloudformation will revert everything back to how it was before you started the deployment. It’s like having a safety net to make sure that unsuccessful deployments don’t leave unwanted ro partially configured resources in your AWS account!!
Delete all newly created resources: during a rollback ensures thta any resources that were created during the attempted deployment are completely removed if any error occurs.
Error! No stress, let's scroll down and have a look at the rows of events that CloudFormation has recorded.
At the top of your Events page you'll see a few rows of DELETE_COMPLETE statuses, so CloudFormation has already deleted all the resources in this stack.
Continue scrolling down, and you'll notice this CREATE_FAILED error message next to your IAM policies.
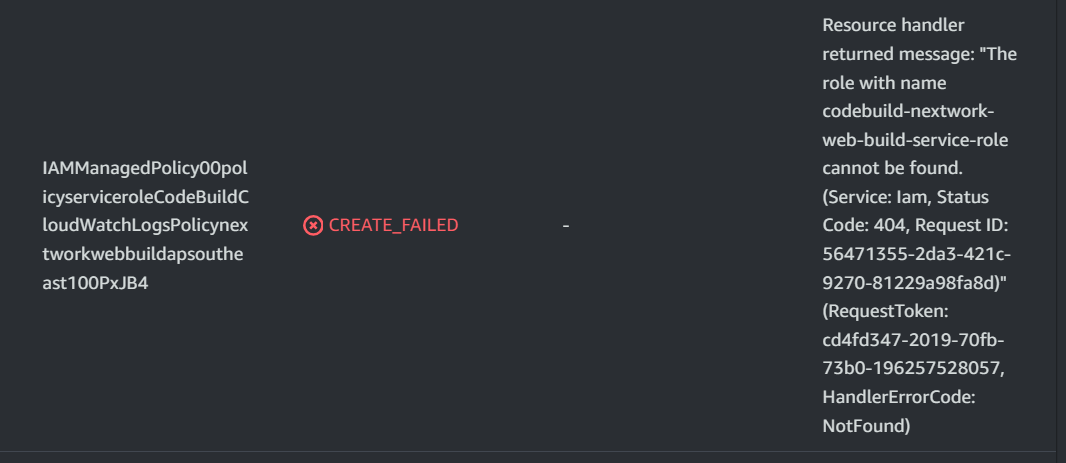
What is this error message saying?
AWS Couldn’t find the role name codebuild-yourname-web-build -service-role that cloudformation was trying to use.
What’s happenign here si that while CloudFormaion is in the process of creating your IAM role, its also trying to attach your policies to this role at the same time.
Step 4 : Fix your CloudFormation Template
Let's fix this error by telling CloudFormation "create the IAM role first before we start with creating the policies."
Open your CloudFormation template again in your text editor.
Find your three IAM policies in the template. Their names should start with IAMManagedPolicy00policyservicerole....
Let's add this magical line that will tell CloudFormation to wait for your IAM role to finish creating first before we try attach it: DependsOn: "YOUR IAM ROLE's NAME IN THE CLOUDFORMATION TEMPLATE".
This should look similar to: DependsOn: "IAMRole00codebuildyournamebuildservicerole006vOvu"

Make sure this line is added to all THREE of your IAM Policies!
Make sure to add exact same DependsOn line to the start of your codebuild project’s configuration.
Save your changes.
Step 5 : Test your CloudFormation template (again)
Let's test your CloudFormation template again!
In your CloudFormation console, choose Create stack.
Choose With new resources (standard).
Under the Specify template panel, choose Upload a template file.
Upload your updated CloudFormation template!
Let's configure this stack:
Name: yournameDevOpsProject2.
Stack failure options:
Behavior on provisioning failure: Roll back all stack resources.
Delete newly created resources during a rollback: Delete all newly created resources.
Acknowledge the blue pop up banner that says IAM resources wil be created when you deploy this stack..
Choose Submit!
Wait another error?!
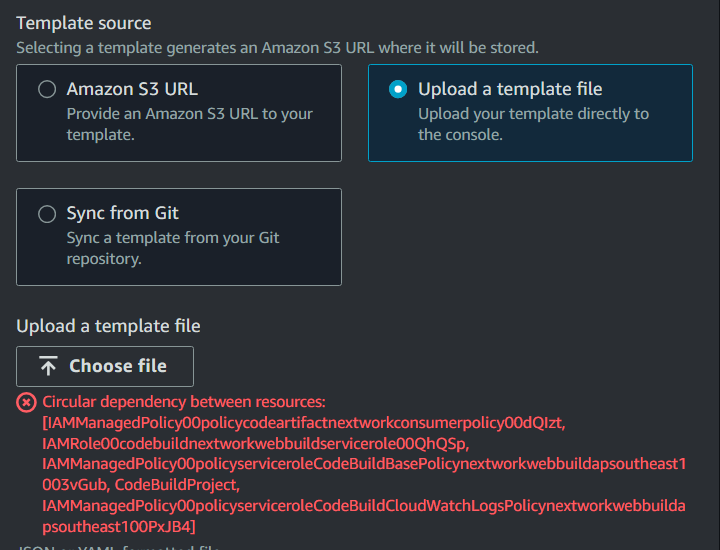
Now what is it this time?
This error, known as a “circular dependency,” is like a classic chicken and egg situation! Your CloudFormation template is totally baffled because parts of it are caught in a loop—your policies insist the IAM role must be created first, but your IAM role is saying it needs those policies ready before it can be made. It's like each part is eagerly waiting for the other to show up first, and CloudFormation is just as confused as we are!
Let's fix this error by removing these circular references in your CloudFormation template.
Open your CloudFormation template again in your text editor (yes, you get to do this again!).
Search for your template's configuration of your IAM role. Press Command + F (Macbook) or Ctrl + F (Windows) on your keyboard to search for IAMRole00codebuild.
You'll notice a section called ManagedPolicyArns in the configuration! Notice how these lines are referencing your IAM policy - we don't need these references, and they're causing the circular dependency error!
Let's delete all four of those lines.

Why did these circular references exist in the first place, and why didn’t CloudFormation delete them for me in the IaC generator? It's like a mystery waiting to be solved! Let's dive in and uncover the secrets behind this puzzling situation!
- CloudFormation doesn't fix circular dependencies on its own because it just follows the blueprint you give it through the template. The IaC generator helps by grabbing the current setup of your resources but doesn't rearrange them to dodge issues like circular dependencies! So, it's up to you to tweak the template a bit and make sure everything works correctly.
Step 6 : Test your template one last time…
In your CloudFormation console, choose Create stack.
Choose With new resources (standard).
Upload your updated template file.
Let's configure this stack:
Name: yournameDevOpsProject2.
Stack failure options:
Behaviour on provisioning failure: Roll back all stack resources.
Delete newly created resources during a rollback: Delete all newly created resources.
Acknowledge the blue pop up banner that says IAM resources wil be created when you deploy this stack.
Choose Submit!
Great success!
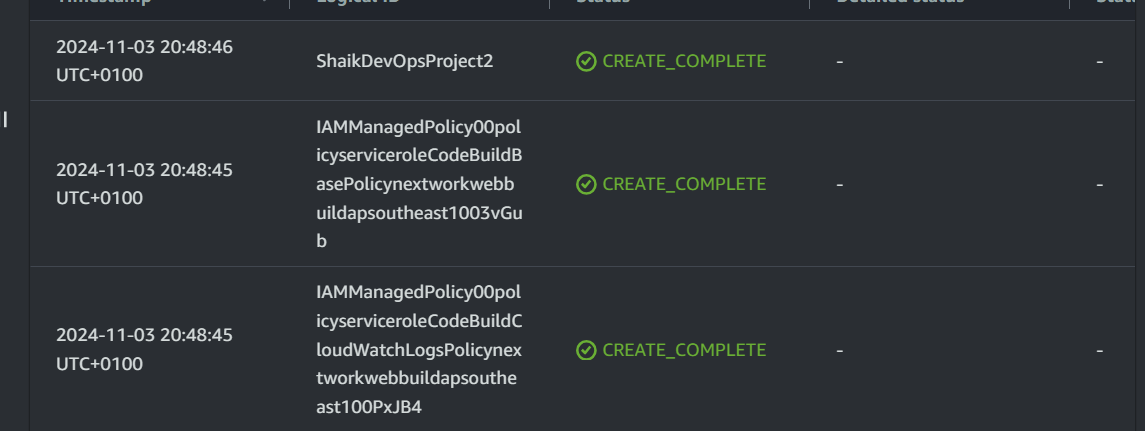
Let’s verify that everything is working by checking your resources.
Switch to the reosource tab, and select on the hyperlinks for all the resources that have a shortcut to the created resource.
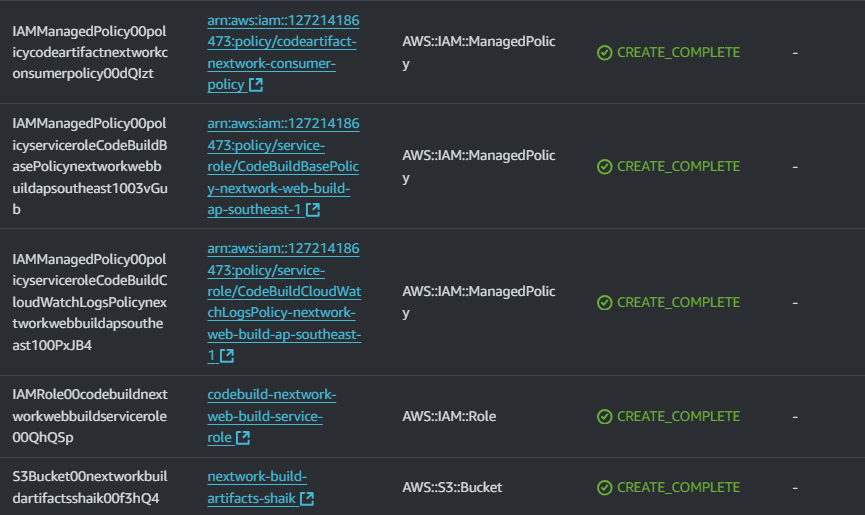
Now it's time for a treasure hunt! Because the other resources (e.g. your S3 artifacts bucket) have been deployed at a specific region, CloudFormation can't produce the same shortcut link to take you there.
Can you find the other resources that CloudFormation has created for you?
Your CodeArtifact domain.
Your CodeArtifact repostiory. Your S3 Artifacts bucket.
Your CodeCommit repository.
Your CodeBuild project. For example, you should be able to find your CodeBuild project in the CodeBuild console!
Nice Work!!!
Awesome job on creating some amazing resources at lightning speed with AWS CloudFormation! There's still a bit of setup left to get your web app up and running, but you've just saved yourself tons of time for the final part of this DevOps series. You're on fire!
High Five!!! Stay tuned for the final project. Until then, tschüss...
Subscribe to my newsletter
Read articles from yyounos shaik directly inside your inbox. Subscribe to the newsletter, and don't miss out.
Written by

yyounos shaik
yyounos shaik
An Aspring Cloud Engineer