How I Implemented Intersite Connectivity in Azure
 Siyabonga Shabangu
Recently, I undertook a project to implement intersite connectivity on Azure, focusing on connecting two distinct Azure VNets. Here’s a step-by-step guide on how I achieved this, along with the tools and best practices used to ensure smooth communication and monitoring between sites.
Step 1: Setting Up Virtual Machines and Virtual Networks
The first step was creating a foundational setup:
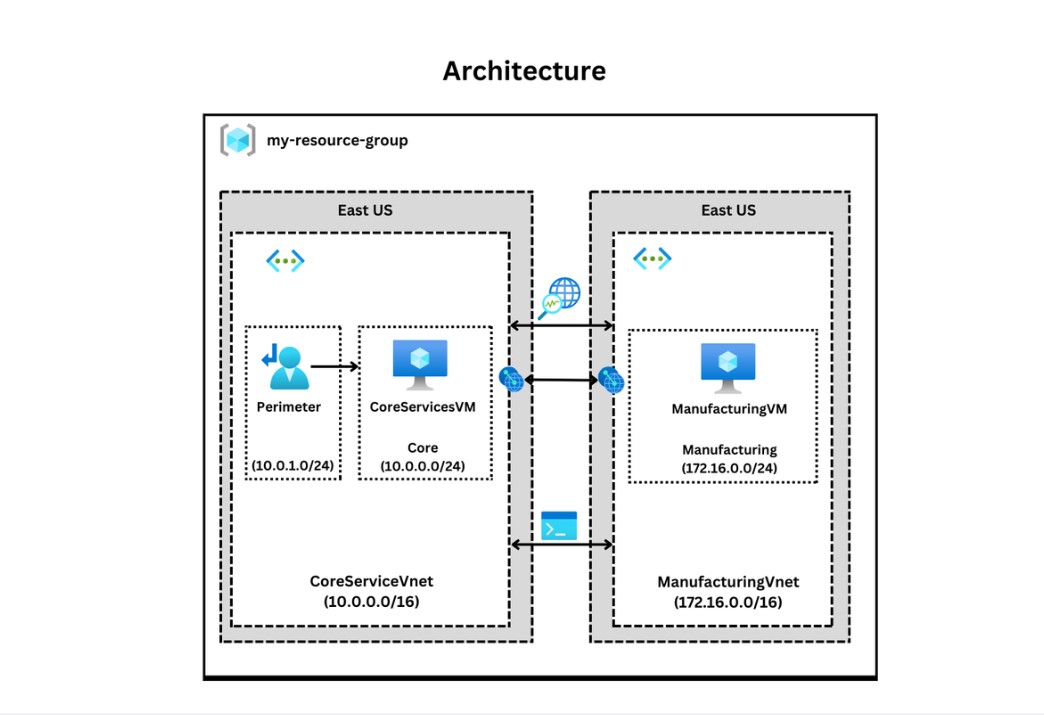
Core Services Virtual Machine and VNet: I started by setting up a core virtual machine (VM) in a virtual network, which would act as the primary node for connectivity testing.
Additional VM in a Separate VNet: To validate intersite connectivity, I created a second VM in a different VNet. This separation is critical as it simulates a real-world scenario where applications in different VNets need to communicate.
Step 2: Establishing Virtual Network Peering
With the VNets and VMs in place, the next step was to set up virtual network peering. Azure’s global VNet peering allows traffic between VNets, even across regions, providing low latency and high-speed connectivity. I configured VNet peering between the two VNets, enabling them to communicate without requiring any additional VPNs or gateways.
Testing the Peering Connection: Once the peering was configured, I tested the connection between the two VMs using Azure Network Watcher, ensuring they could communicate directly across the VNets.
Step 3: Configuring Monitoring Tools
To maintain a clear view of the network's health and troubleshoot connectivity issues, I leveraged several Azure monitoring tools:
Azure Network Watcher Connection Monitor: This tool helped me track connectivity status and latency between the VMs, ensuring there were no issues post-peering.
Flow Logs and NSG Diagnostics: These logs provided insight into traffic patterns and helped identify any potential security or connectivity issues.
Packet Capture: This feature is useful for in-depth network traffic analysis, allowing me to capture data packets for further inspection if needed.
Step 4: Testing with Azure PowerShell
After setting up monitoring, I used Azure PowerShell commands to conduct another round of connection testing between the VMs. PowerShell is especially useful for automating these tests, making it easy to verify the connection status at different intervals.
Step 5: Creating a Custom Route
Finally, I created a custom route to further refine and control the traffic flow between the VNets. Custom routing can be useful for directing traffic through specific security appliances or managing complex network architectures where traffic needs to be routed through a specific path.
Key Takeaways
Implementing intersite connectivity in Azure can seem challenging, but with the right approach, it becomes manageable. Here are my main takeaways:
VNet Peering is Powerful: Azure's VNet peering offers seamless, secure connectivity across regions, making it ideal for distributed cloud architectures.
Monitoring is Essential: Using tools like Network Watcher and Flow Logs ensures proactive network health monitoring and troubleshooting.
Automation with PowerShell: Testing connections with PowerShell can streamline verification processes, especially in complex networks.
Custom Routes for Traffic Control: When handling more advanced traffic scenarios, custom routes are valuable for directing and securing data flows.
Intersite connectivity enhances the performance and security of your Azure infrastructure, ensuring that resources in different VNets can work together effectively. Implementing these steps has not only improved connectivity in my setup but has also provided valuable insights into managing multi-network environments on Azure.
Subscribe to my newsletter
Read articles from Siyabonga Shabangu directly inside your inbox. Subscribe to the newsletter, and don't miss out.
Written by
