Everything You Need to Know About Redux: A Comprehensive Guide
 Ndungu James K
A predictable state container for Javascript apps, It centralizes your application’s state and logic, making it easier to debug and test.
Principles of Redux
Single Source of Truth: The state of your whole application is stored in an object tree within a single store. As the whole application state is stored in a single tree, it makes debugging easy, and development faster.
The state is Read-only: The only way to change the state is to emit an action, an object describing what happened. This means nobody can directly change the state of your application.
Changes are made with pure functions: To specify how the state tree is transformed by actions, you write pure reducers. A reducer is a central place where state modification takes place. Reducer is a function that takes state and action as arguments and returns a newly
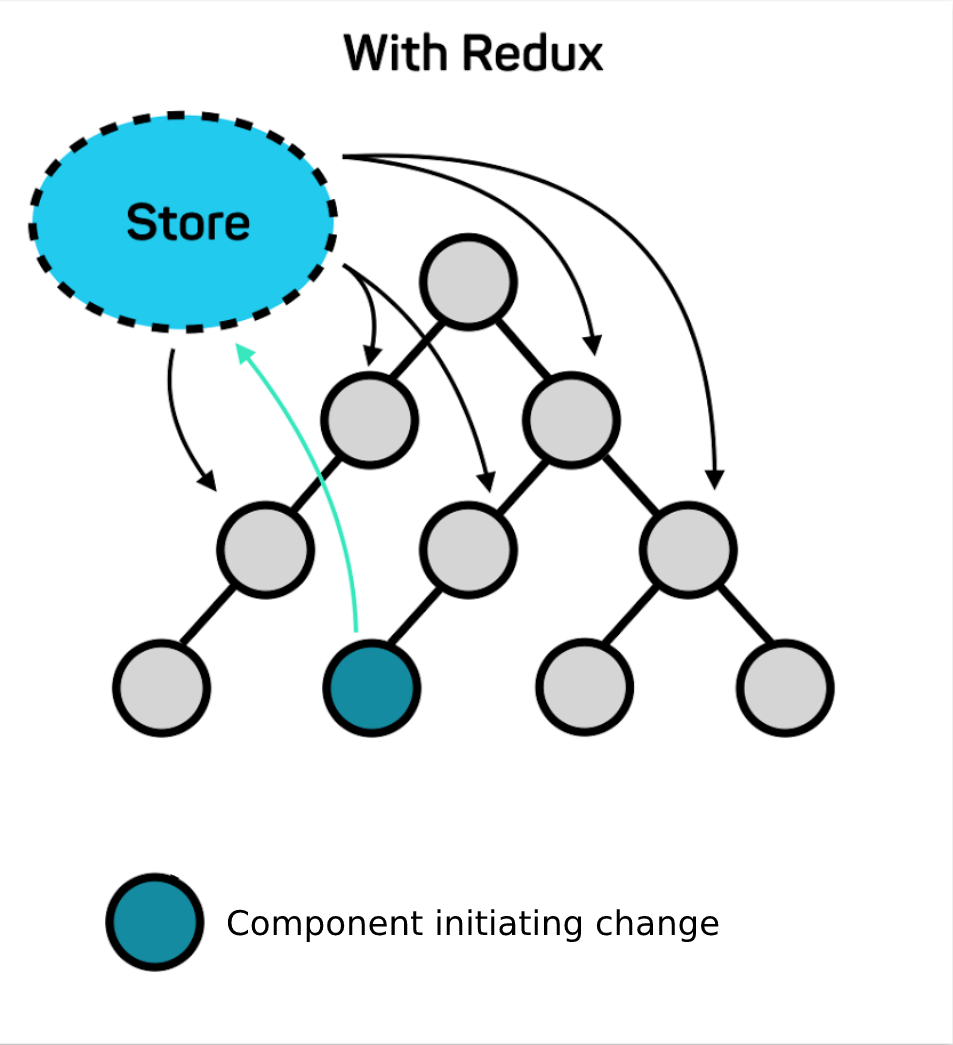
How Redux works?
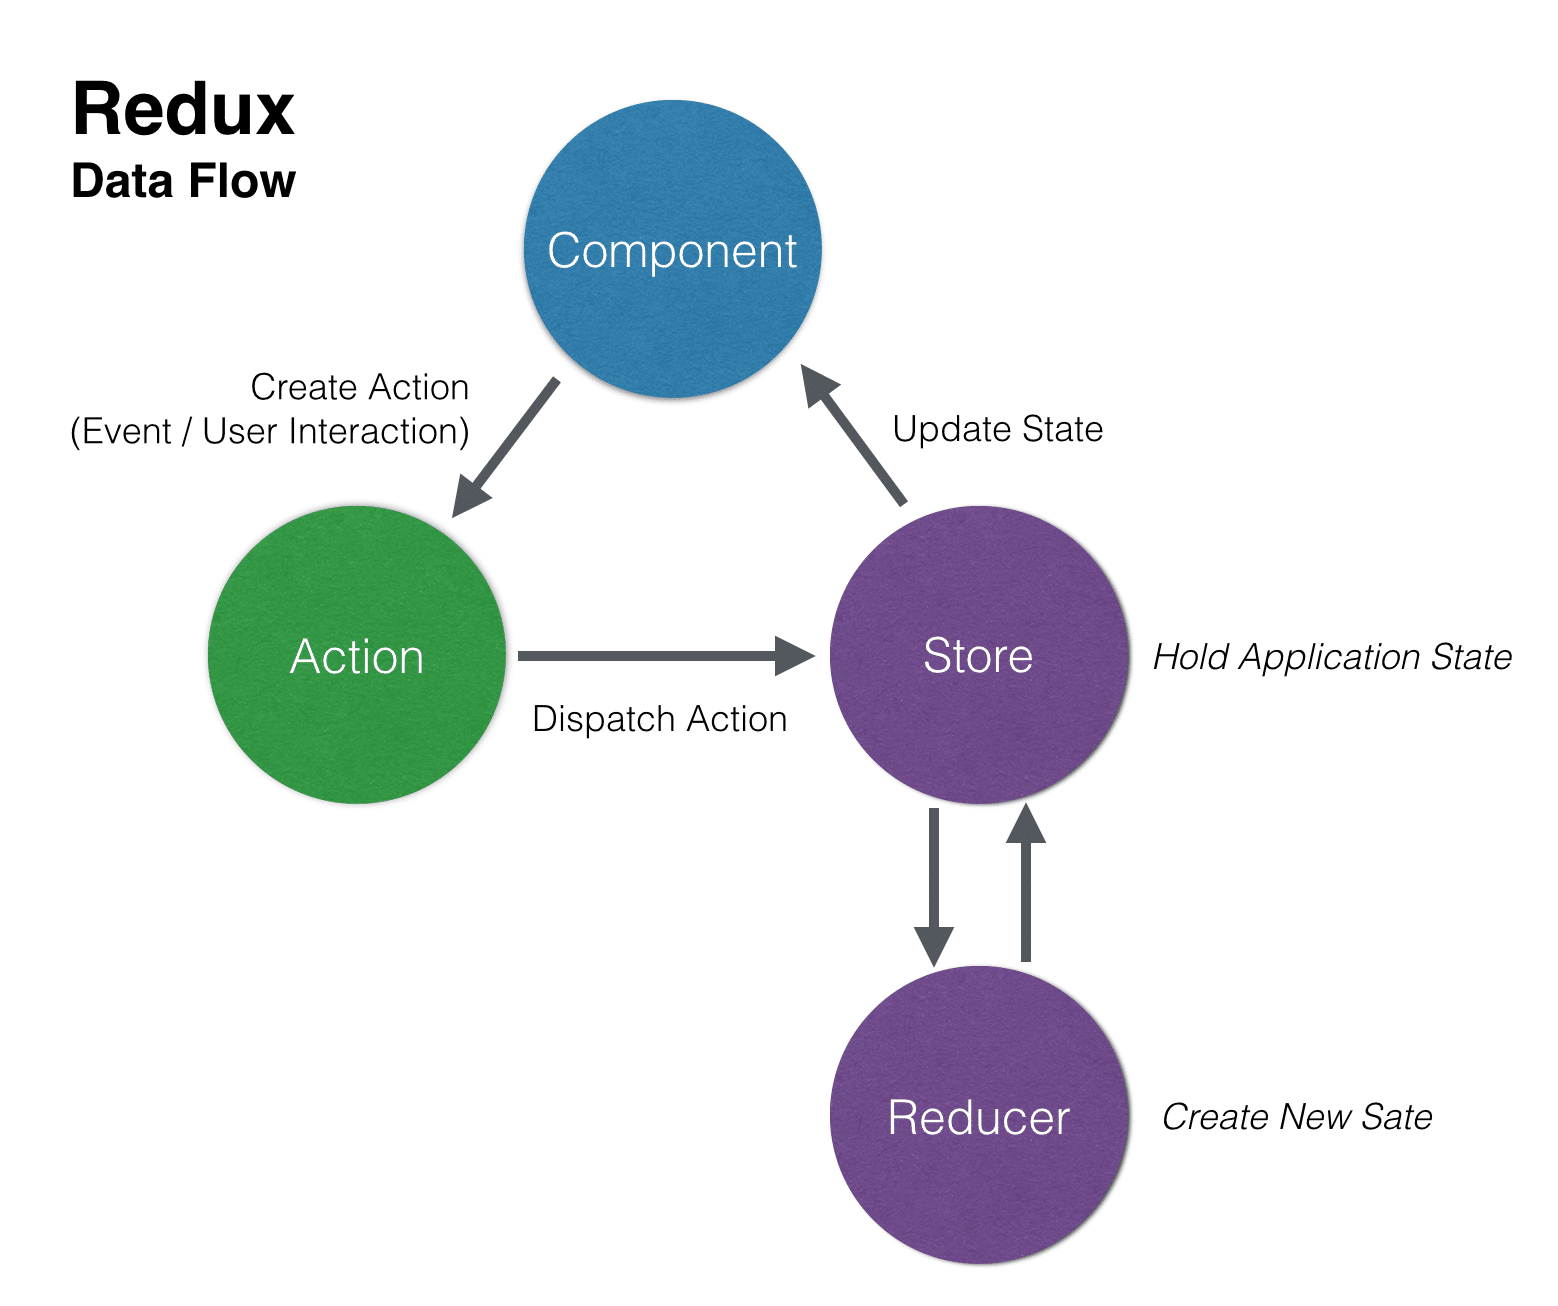
To fully understand the Redux concept we first need to take a look at the man building block. Redux has three main parts: Actions, Reducers, and Store. Let’s explore what each one does:
Actions: are used to send information from the application to the store. Sending data to the store is needed to change the application state after user interaction, internal events, or API calls.
Reducers: are the most important building block and it’s important to understand the concept.
Store: The store is the central objects that holds the state of the application.
To make it easy to understand, let's imagine this scenario, the component triggers an action to change the value of the global state, The action gets dispatched to the store. The store calls the reducer to create a new state based on the dispatched action. When the new state is created the component updates its view.
What is an action?
Let’s dive deeper into the building blocks of Redux.
Actions are JavaScript objects as you can see in the following example:
{

   type: LOGIN_USER,

   payload: {

     username: 'sebastian',

      password: '123456'

      }

}
Here the action object has two properties:
type: a constant to identify the type of action.
payload: the object which is assigned to this property contains the data which are sent to the store.
Action objects are created by using functions. These functions are called action creators
  function authUser(data) {

 return {

   type: LOGIN_USER,

   payload: data,

 };

}
Here you can see that the only purpose of an action creator function is to return the action object as described.
Calling actions in the application is easy by using the dispatch method:dispatch(authUser(data));
What is a Reducer?
Reducers are the most important building block and it’s important to understand the concept. Reducers are pure JavaScript functions that take the current application state and an action object and return a new application state:
A reducer in Redux is a pure function that takes two arguments—the current state and an action—and returns a new state based on that action. Reducers specify how the application's state should change in response to an action but don't actually perform any direct operations to change the state.
Here's a breakdown:
Pure Function: A reducer is called a "pure function" because it doesn't modify its inputs or produce side effects. Given the same inputs, it will always return the same output.
Parameters:
State: The current state of the application or a slice of the state if you're dealing with a specific reducer.
Action: An object with a
typeproperty that describes what kind of update should happen (e.g.,"INCREMENT","DECREMENT").
Return Value: A new state, based on the action received. Redux relies on immutability, so reducers return a new state object instead of modifying the existing state.
const reducer = (state, action) => {

switch (action.type) {

 case type1:

   return; // the new state

case type2:

   return; // the new state

 default:

   return state;

}
}
The important thing to notice here is that the state is not changed directly. Instead a new state object (based on the old state) is created and the update is done to the new state
What is the Redux Store?
The store is the central objects that holds the state of the application. The store is created by using the createStore method from the Redux library:
import { createStore } from ‘redux’;

let store = createStore(myReducer);
You need to pass in the reducer function as a parameter. Now you’re ready to dispatch a action to the store which is handled by the reducer:
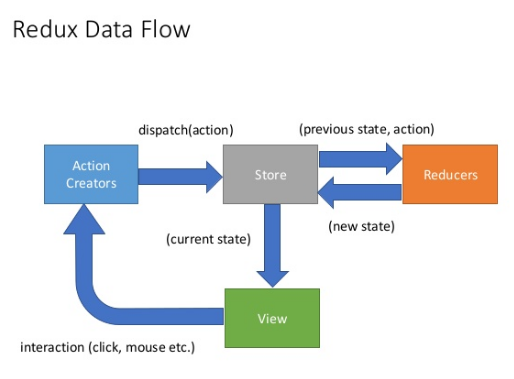
Redux data flow
The image below describes the Redux data flow and how every part gets triggered:
What is React-redux
React Redux is the official Redux UI binding library for React. If you're using Redux and React together, you should also use React-Redux to bind these two libraries.
As the official Redux binding for React, React-Redux is kept up-to-date with any API changes from either library to ensure that your React components behave as expected. Its intended usage adopts the design principles of React - writing declarative components. The followings are some benefits of using React-Redux library
Redux vs react-redux
Redux gives you a store, and lets you keep states in it and extract them out. It responds when the state changes. but that’s all it does.
It’s actually react-redux that lets you connect pieces of the state to React components.
That’s right: redux knows nothing about React at all.
These libraries are like two peas in a pod, though. 99.999% of the time, when anyone mentions “Redux” in the context of React, they are referring to both of these libraries in tandem. So that's what you should keep in mind when you see Redux mentioned on StackOverflow, Reddit or any place else.
The redux library can be used outside of a React app too. It’ll work with Vue, Angular, and even backend Node/Express apps.
Installing React-Redux
To start using Redux along with React, only you need to do is following these steps:
Create a new react application
$ npx create-react-app react-redux-counterInstall redux
$ npm i reduxinstall react-redux
$ npm i react-redux
Redux folder architecture
Redux can make your life as a developer much easier or much harder depending on the architecture that you follow.
Searching the web you can find a lot of architecture or different methods to implement redux into your react application. The following is the one that we recommend using it.
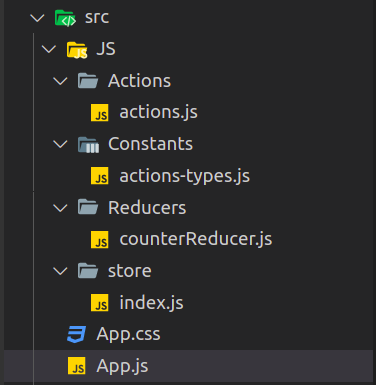
The Architecture is simple and organized. You have to create a folder called JS ( or any name that you prefer )
Under the JS folder, there will be four subfolders:
-> Actions: This folder will contain all the actions
-> Constants: This folder will include all the actions-creator
-> Reducers: it will hold the reducers
-> Store: it will contain the store creation.
Create the store
The store is the one responsible for orchestrating the cogs. The store in Redux is kind of magic and holds all the application's state.
Let's create a store to start playing with Redux. Under the store folder, create a new file index.js,path to the file src/js/store/index.js, and initialize the store.
import { createStore } from "redux";
import rootReducer from "../reducers/rootReducer";
const store = createStore(rootReducer);

export default store;
This code is importing the createStore function from the "redux" library and the rootReducer from the "../reducers/rootReducer" file. It then creates a store using the createStore function and the rootReducer. Finally, it exports the created store as the default export. This code is setting up the Redux store for a React application, where the store will hold the state of the application and allow components to interact with it.
As you can see, store is the result of calling createStore, a function from the Redux library. createStore takes a reducer as the first argument and in our case we passed in rootReducer (not yet present).
The most important concept to understand here is that the state in Redux comes from reducers.
createStore function
createStore(reducer, [preloadedState], [enhancer])
Creates a Redux store that holds the complete state tree of your app. There should only be a single store in your app.
Arguments:
Reducer: (Function): A reducing function that returns the next state tree, given the current state tree and an action to handle.
[preloadedState]: The initial state. You may optionally specify it to hydrate the state from the server in universal apps.
[enhancer]: The store enhancer. You may optionally specify it to enhance the store with third-party capabilities such as middleware, time travel, persistence, etc.
Create a reducer
In our example we'll be creating a simple reducer which takes initial state and action as parameters.
Create a new file under the folder Reducers named rootReducer.js.
src/JS/Reducers/rootReducer.js this is the path for the create file
const initialState = {
 counter: 0
};
function rootReducer(state = initialState, action) { // two parameters are passed in state and action
 return state;
};
export default rootReducer;
The code defines a Redux reducer function called rootReducer. The initial state of the reducer is set to an object with a counter property initialized to 0. The rootReducer function takes two parameters: state and action. If the state parameter is not provided, it defaults to the initialState object. The function simply returns the current state without making any changes. Finally, the rootReducer function is exported as the default export of the module.
The need of actions
Redux reducers are without doubt the most important concept in Redux. Reducers produce the state of an application.
But how does a reducer know when to generate the next state?
The second principle of Redux says the only way to change the state is by sending a signal to the store. This signal is an action. So "dispatching an action" means sending out a signal to the store.
The reassuring thing is that Redux actions are nothing more than JavaScript objects. This is how an action looks like:
type: "INCREMENT_COUNTER",

 payload: {

   value: 1

 }
The type property drives how the state should change and it's always required by Redux. The payload property instead describes what should change, and might be omitted if you don't have new data to save in the store.
Create actions
You can notice that the type property is a string. Strings are prone to typos and duplicates and for this reason it's better to declare actions as constants. Here come the role of the directory constants. Under this folder create a new file actions-types.js
// src/js/constants/action-types.js

export const INCREMENT_COUNTER = "INCREMENT_COUNTER";
Now open up again src/js/Actions/actions.js and update the action to use action types:
// src/Actions/actions.js

impor { INCREMENT_COUNTER } from "../constants/actions-types";
export const incrementCounter = (payload) => ({
 type: INCREMENT_COUNTER,
 payload

}
Refactoring the reducer
When an action is dispatched, the store forwards a message (the action object) to the reducer. At this point, the reducer checks the type of this action. Then depending on the action type, the reducer produces the next state eventually merging the action payload into the new state.
Let's fix our rootReducer.js
import { INCREMENT_COUNTER } from "../constants/actions-types";
const initialState = {
  counter: 0
};
function rootReducer(state = initialState, action) {
switch (action.type) {
  case INCREMENT_COUNTER:
  return {
    counter : state.counter + 1
  }
  return state;
};

export default rootReducer;
What is Redux-toolkit?
React and Redux believed to be the best combo for managing state in large-scale React applications. However, the configuration and the enormously required boilerplate made it a little bit hard to understand and manipulate.
Here came the role of the redux toolkit.
Redux-toolkit is a new way to implement Redux, a more functional way. It's cleaner, you write fewer lines of code and we get the same Redux state management, we have come to love and trust. The best part is it comes with redux-thunk already built into it. Plus they use immerJs to handle all the immutability, so all we need to think about is what needs to get done.
Main features of Redux Tool Kit
The following function is used by Redux Took Kit, which is an abstract of the existing Redux function. These function does not change the flow of Redux but only streamline them in a more readable and manageable manner.
configureStore: Creates a Redux store instance like the original createStore from Redux, but accepts a named options object and sets up the Redux DevTools Extension automatically.
createAction: Accepts an action type string and returns an action creator function that uses that type.
createReducer: Accepts an initial state value and a lookup table of action types to reducer functions and creates a reducer that handles all action types.
createSlice: Accepts an initial state and a lookup table with reducer names and functions and automatically generates action creator functions, action type strings, and a reducer function.
You can use the above function to simplify the boilerplate code in Redux, especially using the createAction and createReducer methods. However, this can be further simplified using createSlice, which automatically generates action creator and reducer functions.
Key Features of Redux Toolkit
configureStore:Simplifies store creation.
Automatically includes middleware like
redux-thunkfor async logic.Enables Redux DevTools by default.
Example:
    javascriptCopy codeimport { configureStore } from '@reduxjs/toolkit';
    import counterReducer from './features/counter/counterSlice';

    const store = configureStore({
      reducer: {
        counter: counterReducer,
      },
    });

    export default store;
createSlice:Combines reducers, actions, and initial state in a single API.
Automatically generates action creators.
Example:
    javascriptCopy codeimport { createSlice } from '@reduxjs/toolkit';

    const counterSlice = createSlice({
      name: 'counter',
      initialState: { value: 0 },
      reducers: {
        increment: (state) => {
          state.value += 1; // Immer allows this mutable-looking syntax
        },
        decrement: (state) => {
          state.value -= 1;
        },
        reset: (state) => {
          state.value = 0;
        },
      },
    });

    export const { increment, decrement, reset } = counterSlice.actions;
    export default counterSlice.reducer;
createAsyncThunk:Handles asynchronous logic like API calls.
Generates pending, fulfilled, and rejected action types automatically.
Example:
    javascriptCopy codeimport { createAsyncThunk, createSlice } from '@reduxjs/toolkit';
    import axios from 'axios';

    export const fetchUsers = createAsyncThunk(
      'users/fetchUsers',
      async () => {
        const response = await axios.get('/api/users');
        return response.data;
      }
    );

    const usersSlice = createSlice({
      name: 'users',
      initialState: { users: [], status: 'idle' },
      reducers: {},
      extraReducers: (builder) => {
        builder
          .addCase(fetchUsers.pending, (state) => {
            state.status = 'loading';
          })
          .addCase(fetchUsers.fulfilled, (state, action) => {
            state.status = 'succeeded';
            state.users = action.payload;
          })
          .addCase(fetchUsers.rejected, (state) => {
            state.status = 'failed';
          });
      },
    });

    export default usersSlice.reducer;
Selectors:
Functions to extract specific pieces of state.
Improves code readability and reusability.
Example:
    javascriptCopy codeexport const selectUsers = (state) => state.users.users;
    export const selectUserStatus = (state) => state.users.status;
DevTools Support:
- Redux Toolkit automatically integrates Redux DevTools for debugging.
Create a Slice:
 javascriptCopy code// src/features/counter/counterSlice.js
 import { createSlice } from '@reduxjs/toolkit';

 const counterSlice = createSlice({
   name: 'counter',
   initialState: { value: 0 },
   reducers: {
     increment: (state) => {
       state.value += 1;
     },
     decrement: (state) => {
       state.value -= 1;
     },
   },
 });

 export const { increment, decrement } = counterSlice.actions;
 export default counterSlice.reducer;
Configure the Store:
 javascriptCopy code// src/app/store.js
 import { configureStore } from '@reduxjs/toolkit';
 import counterReducer from '../features/counter/counterSlice';

 export const store = configureStore({
   reducer: {
     counter: counterReducer,
   },
 });
Provide the Store:
 javascriptCopy code// src/index.js
 import React from 'react';
 import ReactDOM from 'react-dom';
 import { Provider } from 'react-redux';
 import { store } from './app/store';
 import App from './App';

 ReactDOM.render(
   <Provider store={store}>
     <App />
   </Provider>,
   document.getElementById('root')
 );
Access State and Dispatch Actions: Use
useSelectorto access state anduseDispatchto dispatch actions.javascriptCopy code// src/components/Counter.js import React from 'react'; import { useSelector, useDispatch } from 'react-redux'; import { increment, decrement } from '../features/counter/counterSlice'; const Counter = () => { const count = useSelector((state) => state.counter.value); const dispatch = useDispatch(); return ( <div> <h1>Count: {count}</h1> <button onClick={() => dispatch(increment())}>Increment</button> <button onClick={() => dispatch(decrement())}>Decrement</button> </div> ); }; export default Counter;
Advantages of Redux Toolkit
Less Boilerplate: Handles most of the repetitive tasks like creating actions and reducers.
Structured Code: Promotes feature-based slices and modular architecture.
Improved Async Handling: Simplifies handling asynchronous operations with
createAsyncThunk.Developer Experience: Easy debugging with Redux DevTools and clear action-state flow.#
Middleware

Redux middleware intermediates Action Creators and Reducers. The Middleware intercepts the action object before a Reducer receives it and gives it the functionality to perform additional actions or enhancements with respect to the action dispatched.
Why use it?
The action/reducer pattern is very clean for updating the state within an application. But what if we need to communicate with an external API? Or what if we want to log all of the actions that are dispatched? We need a way to run side effects without disrupting our action/reducer flow.
Middleware allows for side effects to be run without blocking state updates.
We can run side effects (like API requests) in response to a specific action or in response to every action that is dispatched (like logging). There can be numerous Middlewares that an action passes through before ending in a reducer.
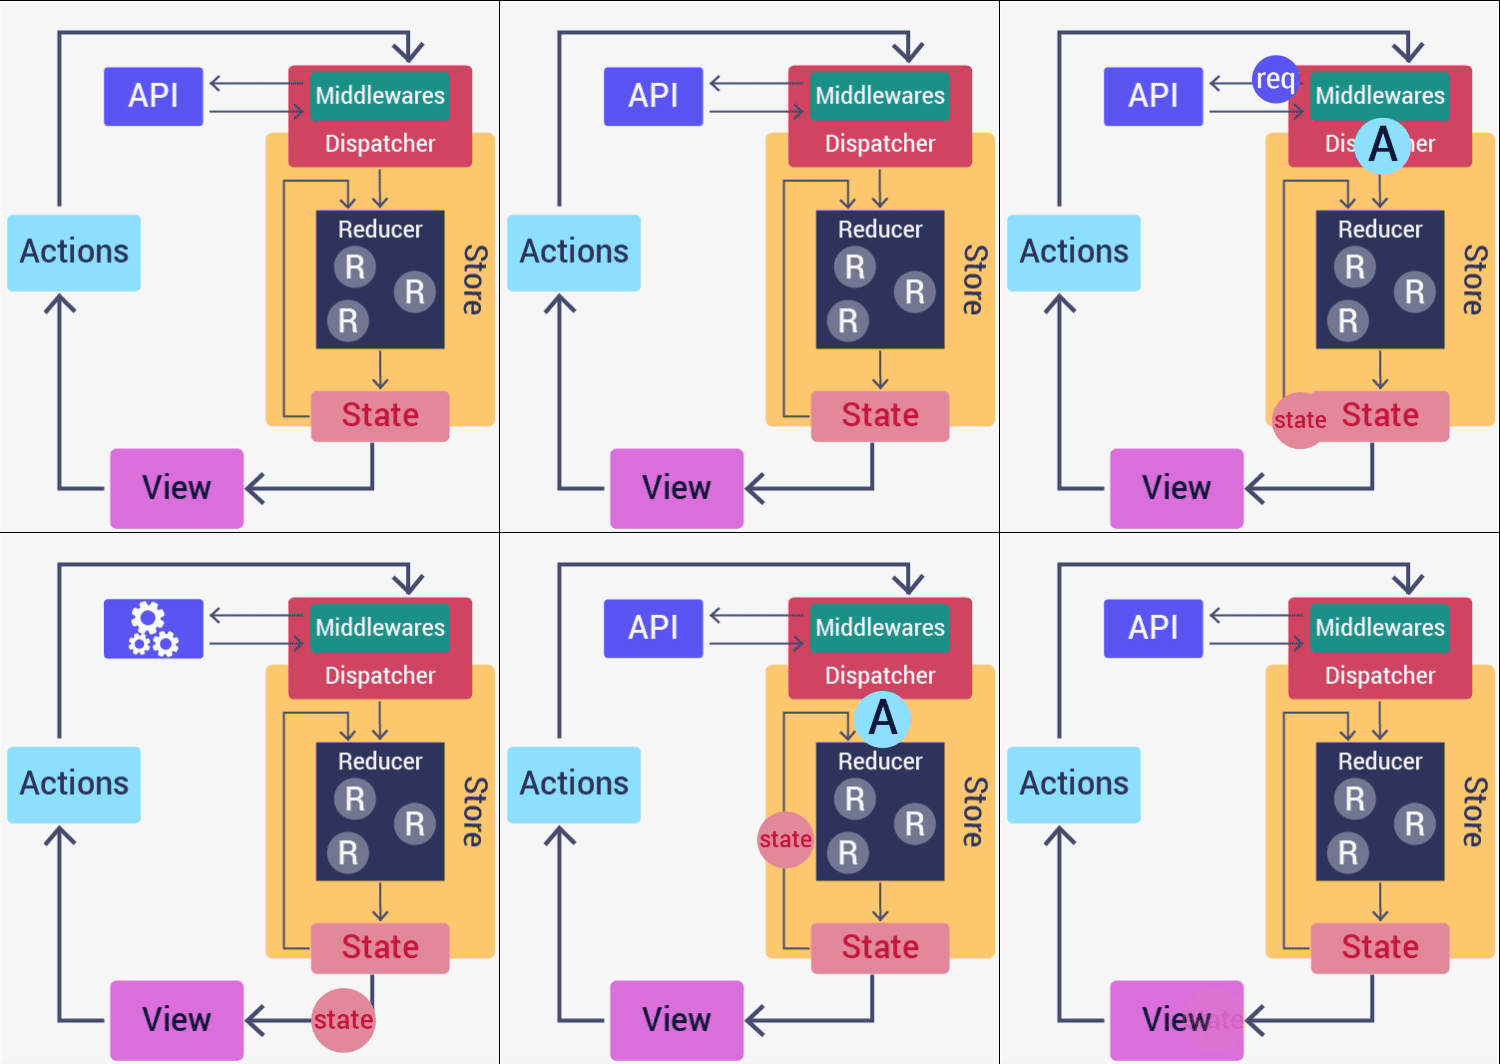
The logger function
Middleware is applied in the state initialization stage with the enhancer applyMiddlware()
import { createStore, applyMiddleware } from "redux";
Logger is the middleware function that will log action and state.
const logger = store => next => action => {
 console.log('dispatching', action)
 let result = next(action)
 console.log('next state', store.getState())
 return result
}
Now only modify the store.
const store = createStore(reducer, applyMiddleware(logger));
Redux Thunk
This is a middleware that allows you to write action creators that return a function instead of an action. This is particularly useful for handling asynchronous logic, like fetching data from an API, while still working within the Redux architecture.
function wrapper_function() {
 // this one is a "thunk" because it defers work for later:
 return function thunk() {
   // it can be named, or anonymous
   console.log("do stuff now");
 };
}
This code defines a function called wrapper_function, which returns another function called thunk. The thunk function is a "thunk" because it defers work for later execution. Inside the thunk function, there is a console.log statement that prints "do stuff now". This means that when the thunk function is called, it will execute the console.log statement
Key Features of Redux Thunk:
Asynchronous Actions:
- Dispatch actions based on the outcome of asynchronous operations (e.g., API requests).
Access to Store Methods:
- The returned function has access to
dispatchto send actions andgetStateto read the current state.
- The returned function has access to
Simple and Lightweight:
- It's a straightforward middleware with no complex setup.
Basic Usage:
Install Redux Thunk:
bashCopy codenpm install redux-thunkConfigure Redux Store:
 javascriptCopy codeimport { configureStore } from '@reduxjs/toolkit';
 import thunk from 'redux-thunk';
 import rootReducer from './reducers';

 const store = configureStore({
   reducer: rootReducer,
   middleware: (getDefaultMiddleware) => getDefaultMiddleware().concat(thunk),
 });
 export default store;
Define an Async Action:
 javascriptCopy codeconst fetchData = () => async (dispatch) => {
   dispatch({ type: 'FETCH_REQUEST' });
   try {
     const response = await fetch('https://api.example.com/data');
     const data = await response.json();
     dispatch({ type: 'FETCH_SUCCESS', payload: data });
   } catch (error) {
     dispatch({ type: 'FETCH_FAILURE', payload: error.message });
   }
 };
Dispatch the Action:
 javascriptCopy codeimport { useDispatch } from 'react-redux';
 import { fetchData } from './actions';

 const MyComponent = () => {
   const dispatch = useDispatch();

   useEffect(() => {
     dispatch(fetchData());
   }, [dispatch]);
 };
Benefits of Redux Thunk:
Makes it easy to manage side effects like API calls.
Allows conditional or delayed dispatching of actions.
Integrates seamlessly with Redux Toolkit for modern Redux development.
In Short: Redux Thunk enables handling async tasks in Redux by allowing action creators to return functions instead of plain objects.
Redux with Hooks
React Redux provides hooks to seamlessly integrate Redux into functional components, making state management simpler and more intuitive.

Provider and create createStore
Provider” and “createStore()”: As with connect(), we should start by wrapping our entire application in a component to make the store available throughout the component.
const store = createStore(rootReducer)

ReactDOM.render(

 <Provider store={store}>

   <App />

 </Provider>,

 document.getElementById('root')
Subscribe to my newsletter
Read articles from Ndungu James K directly inside your inbox. Subscribe to the newsletter, and don't miss out.
Written by

Ndungu James K
Ndungu James K
👋 Hi there! I'm Ndung'u James Kinungi, a passionate Full-Stack Software Developer with expertise in modern web technologies. Currently, I’m enrolled in the Full-Stack Development Bootcamp at GomyCode Kenya (May 2024 - December 2024), where I’m refining my skills in building dynamic, user-centric applications from end to end.