Integrating Syncfusion Vue Form Components and Vuelidate
 syncfusion
TL;DR: Let’s learn how to build a registration form using Syncfusion Vue components and Vuelidate for validation. This guide covers setting up form fields, applying validation rules, and showing real-time error messages—ideal for creating intuitive, user-friendly forms!
Building robust and elegant forms is a crucial aspect of web development. Whether you’re creating registration forms, booking systems, or surveys, the key to great user experience lies in how well you handle input validation.
Vuelidate is a Vue.js library that streamlines form validation by adding rules directly to components. It supports custom rules, making it ideal for simple and complex forms alike.
In this blog, we’ll walk through a real-world example of using Syncfusion Vue Form components and Vuelidate for event form validation.
Let’s get started!
Why use Syncfusion Vue components?
Syncfusion’s Vue UI library offers a comprehensive suite of highly customizable and responsive components. These components are built to work seamlessly across various platforms and devices, ensuring a consistent user experience. The Form components, in particular, the TextBox, DatePicker, and DropDown List, allow developers to create intuitive forms with built-in features like accessibility, localization, and data binding.
Getting started with Syncfusion Vue components and Vuelidate
Step 1: Install dependencies
In your Vue project, install the Syncfusion Vue components and Vuelidate packages by running the following commands:
npm install @syncfusion/ej2-vue-inputs @syncfusion/ej2-vue-calendars @syncfusion/ej2-vue-dropdowns
npm install @vuelidate/core @vuelidate/validators
Step 2: Register Syncfusion Vue components
Once installed, register the required Syncfusion components. Here, we’ll use TextBox, DatePicker, and DropDown List components.
Refer to the following code example.
<script>
  import { TextBoxComponent } from '@syncfusion/ej2-vue-inputs';
  import { DatePickerComponent } from '@syncfusion/ej2-vue-calendars';
  import { DropDownListComponent } from '@syncfusion/ej2-vue-dropdowns';

  export default {
    components: {
      'ejs-textbox': TextBoxComponent,
      'ejs-datepicker': DatePickerComponent,
      'ejs-dropdownlist': DropDownListComponent,
    },
  };
</script>
Step 3: Importing Syncfusion styles
After registering the Syncfusion Vue components, import the style dependencies for the components.
<style>
  @import "../node_modules/@syncfusion/ej2-base/styles/material.css";
  @import '../node_modules/@syncfusion/ej2-buttons/styles/material.css';
  @import "../node_modules/@syncfusion/ej2-inputs/styles/material.css";
  @import '../node_modules/@syncfusion/ej2-popups/styles/material.css';
  @import "../node_modules/@syncfusion/ej2-vue-inputs/styles/material.css";
  @import "../node_modules/@syncfusion/ej2-vue-calendars/styles/material.css";
  @import "../node_modules/@syncfusion/ej2-vue-dropdowns/styles/material.css";
</style>
Step 4: Setting up Vuelidate for validation
Next, we’ll set up Vuelidate. Start by importing the necessary validation rules from @vuelidate/validators. We’ll use simple validations such as required for all fields and email for the email field.
Refer to the following code example.
<script>
  import { required, email } from '@vuelidate/validators';
  import { useVuelidate } from '@vuelidate/core';
  import { ref } from 'vue';

  export default {
   setup() {
     const formData = ref({
       name: '',
       email: '',
       dob: null,
       timeSlot: null,
     });

     const rules = {
       formData: {
         name: { required },
         email: { required, email },
         dob: { required },
         timeSlot: { required },
       },
     };

     const v$ = useVuelidate(rules, { formData });

      return {
        formData,
        v$,
      };
   },
 };
</script>
Real-world example: Event registration form
Let’s build an event registration form to demonstrate how Syncfusion and Vuelidate work together. This form will collect user details like name, email, date of birth, and preferred time slot.
The key features of this form are:
Real-time validation for required fields.
Email validation to ensure correct format.
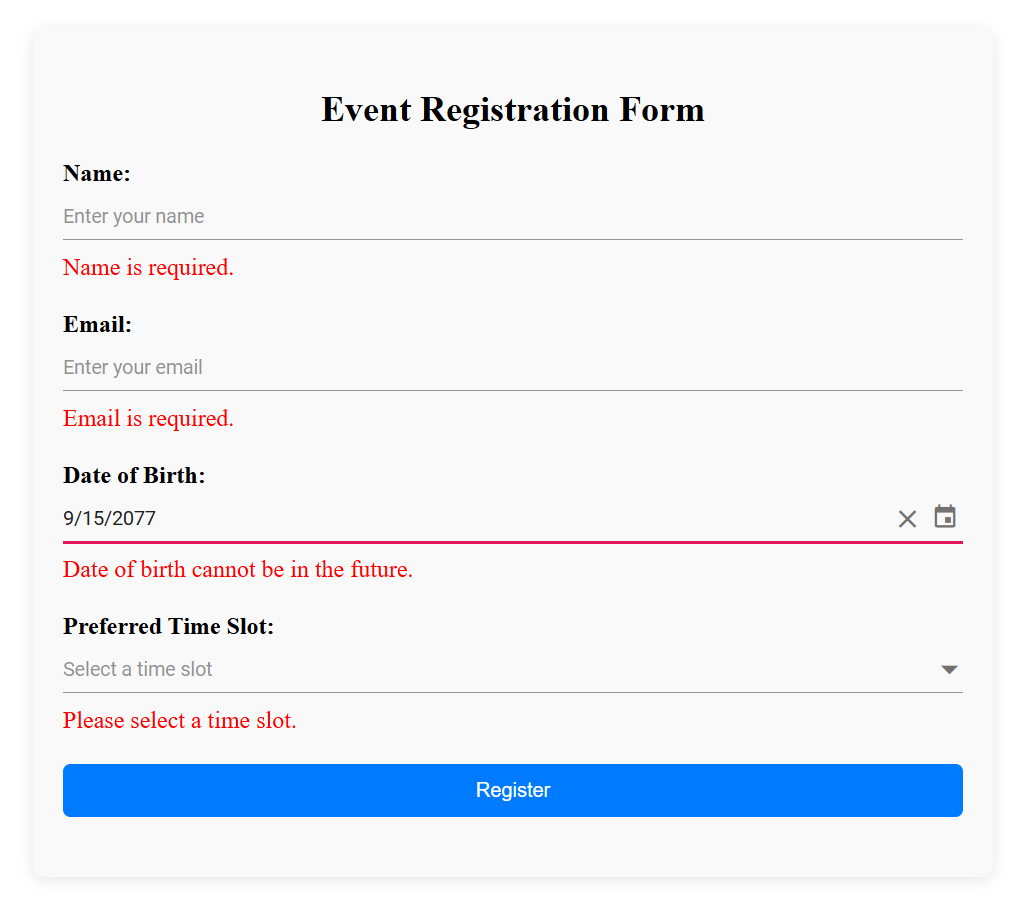
User-friendly error messages are displayed in red color for missing or incorrect input.
Elegant UI using Syncfusion Vue Form components.
Refer to the following code example.
<template>
  <div class="form-container">
    <h2>Event Registration Form</h2>
    <form @submit.prevent="submitForm">
      <!-- Name Field -->
      <div class="form-group">
        <label for="name">Name:</label>
        <ejs-textbox
          id="name"
          v-model="formData.name"
          placeholder="Enter your name"
        ></ejs-textbox>
        <span v-if="v$.formData.name.$invalid && v$.formData.name.$dirty" class="error-message">Name is required.</span>
      </div>

      <!-- Email Field -->
      <div class="form-group">
        <label for="email">Email:</label>
        <ejs-textbox
          id="email"
          v-model="formData.email"
          placeholder="Enter your email"
        ></ejs-textbox>
        <span v-if="v$.formData.email.$invalid && v$.formData.email.$dirty" class="error-message">
          <span v-if="v$.formData.email.required.$invalid">Email is required.</span>
          <span v-else>Email must be valid.</span>
        </span>
      </div>

      <!-- Date of Birth Field -->
      <div class="form-group">
        <label for="dob">Date of Birth:</label>
        <ejs-datepicker
          id="dob"
          v-model="formData.dob"
          placeholder="Select your date of birth"
        ></ejs-datepicker>
        <span v-if="v$.formData.dob.$invalid && v$.formData.dob.$dirty" class="error-message">
          <span v-if="v$.formData.dob.required.$invalid">Date of birth is required.</span>
          <span v-if="v$.formData.dob.isPastDate.$invalid">Date of birth cannot be in the future.</span>
        </span>
      </div>

      <!-- Preferred Time Slot Field -->
      <div class="form-group">
        <label for="timeSlot">Preferred Time Slot:</label>
        <ejs-dropdownlist
          id="timeSlot"
          :dataSource="timeSlots"
          v-model="formData.timeSlot"
          placeholder="Select a time slot"
        ></ejs-dropdownlist>
        <span v-if="v$.formData.timeSlot.$invalid && v$.formData.timeSlot.$dirty" class="error-message">Please select a time slot.</span>
      </div>

      <!-- Submit Button -->
      <div class="form-group">
        <button type="submit" class="submit-btn">Register</button>
      </div>
    </form>
  </div>
</template>

<script>
  import { required, email } from '@vuelidate/validators';
  import { useVuelidate } from '@vuelidate/core';
  import { ref } from 'vue';
  import { TextBoxComponent } from '@syncfusion/ej2-vue-inputs';
  import { DatePickerComponent } from '@syncfusion/ej2-vue-calendars';
  import { DropDownListComponent } from '@syncfusion/ej2-vue-dropdowns';

  // Custom validator to check if the selected date is in the past.
  const isPastDate = (value) => {
    if (!value) return true; // Do not validate if no date is selected.
    const selectedDate = new Date(value);
    const today = new Date();
    return selectedDate <= today;
  };

  export default {
    components: {
      'ejs-textbox': TextBoxComponent,
      'ejs-datepicker': DatePickerComponent,
      'ejs-dropdownlist': DropDownListComponent,
    },
    setup() {
     const formData = ref({
       name: '',
       email: '',
       dob: null,
       timeSlot: null,
     });

     const timeSlots = ref(['Morning (9 AM - 12 PM)', 'Afternoon (1 PM - 4 PM)', 'Evening (5 PM - 8 PM)']);

     const rules = {
       formData: {
         name: { required },
         email: { required, email },
         dob: { required, isPastDate  },
         timeSlot: { required },
       },
     };

     const v$ = useVuelidate(rules, { formData });

     const submitForm = () => {
       v$.value.$touch();
       if (v$.$invalid) {
         console.log('Form validation failed.');
       } else {
         console.log('Form submitted:', formData.value);
       }
     };

     return {
       formData,
       timeSlots,
       v$,
       submitForm,
     };
   },
 };
</script>


<style>
  @import "../node_modules/@syncfusion/ej2-base/styles/material.css";
  @import '../node_modules/@syncfusion/ej2-buttons/styles/material.css';
  @import "../node_modules/@syncfusion/ej2-inputs/styles/material.css";
  @import '../node_modules/@syncfusion/ej2-popups/styles/material.css';
  @import "../node_modules/@syncfusion/ej2-vue-inputs/styles/material.css";
  @import "../node_modules/@syncfusion/ej2-vue-calendars/styles/material.css";
  @import "../node_modules/@syncfusion/ej2-vue-dropdowns/styles/material.css";

  .form-container {
    max-width: 600px;
    margin: 20px auto;
    padding: 20px;
    border-radius: 8px;
    background-color: #f9f9f9;
    box-shadow: 0 2px 10px rgba(0, 0, 0, 0.1);
  }

  h2 {
    text-align: center;
    margin-bottom: 20px;
  }

  .form-group {
    margin-bottom: 20px;
  }

  label {
    display: block;
    margin-bottom: 5px;
    font-weight: bold;
  }

  .error-message {
    color: red;
    margin-top: 5px;
    display: block;
  }

  .submit-btn {
    width: 100%;
    padding: 10px;
    background-color: #007bff;
    color: white;
    border: none;
    border-radius: 5px;
    cursor: pointer;
  }

  .submit-btn:hover {
    background-color: #0056b3;
  }
</style>
Refer to the following output image.

Creating an event registration form with Vuelidate and Syncfusion Vue Form components
Conclusion
Thanks for reading! In this guide, we demonstrated how to build a real-world form using Syncfusion Vue components and Vuelidate. With this, you can easily create forms that are not only visually appealing but also functionally solid. Whether you’re working on simple forms or complex input scenarios, this setup will ensure your users have a smooth, error-free experience. Follow the steps in this blog and share your feedback in the comments section below.
If you’re an existing Syncfusion user, the newest version of Essential Studio is available from the License and Downloads page. If you’re new to Syncfusion, you can take advantage of our 30-day free trial to explore the features and capabilities of our components.
You can also contact us through our support forums, support portal, or feedback portal. We are always happy to assist you!
Related Blogs
Easily Create Interactive Floor Planner Diagrams in Vue
Subscribe to my newsletter
Read articles from syncfusion directly inside your inbox. Subscribe to the newsletter, and don't miss out.
Written by

syncfusion
syncfusion
Syncfusion provides third-party UI components for React, Vue, Angular, JavaScript, Blazor, .NET MAUI, ASP.NET MVC, Core, WinForms, WPF, UWP and Xamarin.