Building a Web App on Azure & Setting Up Alerts
 Stanley Udebuani
Your Fun, Easy Guide to Deploying, Monitoring, and Managing Web Apps in the Cloud
In this guide, you’ll learn how to:
Create a Web App on Azure in just a few easy steps.
Set up Deployment Slots to test updates without breaking your live app.
Set up Monitoring & Alerts to keep your app in top shape.
Use Advanced Tools for proactive issue resolution.
Table of Contents:
Introduction
Getting Started: Azure Setup & Tools
Creating Your Web App on Azure
Using Deployment Slots for Safe Deployments
Setting Up Monitoring & Alerts
Advanced Monitoring and Alert Strategies
Diagnosing Issues & Best Practices
Conclusion: You’re a Cloud Pro Now!
Ready to create your web app and monitor it like a pro? Let’s get started!
Sure thing! Here’s an updated version of the guide with deployment slots included:
Build a Web App on Azure & Set Up Alerts: Your Fun, Easy Guide!
Ready to create a web app, deploy it to the cloud, and keep it in check with alerts? You’re in the right place! We’ll walk you through:
Creating a Web App on Azure (it’s easier than you think!).
Setting up Alerts so you know when things go haywire (because apps can be tricky).
Using Deployment Slots to deploy and test without breaking your production app.
Monitoring performance using Azure’s supercool tools.
Let’s dive in and make this fun! 🚀
1. Before We Start: Gather Your Tools!
Make sure you have these basics:
Azure Account: If you don’t have one, get a free account here. You even get free credits to play with.
A Web App: Have one ready? Perfect! If not, we’ll build one (Node.js, .NET, Python—whatever you prefer).
Azure Portal Access: You can use either the Azure Portal or Azure CLI, but we’ll stick with the portal for simplicity.
2. Creating Your Web App on Azure
Now the fun begins! Let’s set up your web app.
Step 1: Log into the Azure Portal
Head over to the Azure Portal and sign in. Think of this as your cloud command center.
Step 2: Create a Resource Group
A resource group is like a container that holds everything related to your app. It’s where your Azure resources live. Let’s create it:
Search for Resource Groups in the portal.
Click Create and enter the details:
Resource Group Name: Something like
awesome-webapp-group.Region: Pick one close to your target audience.
Click Create, and you’re all set!
Step 3: Create the Web App
Now, let’s get that web app up and running:
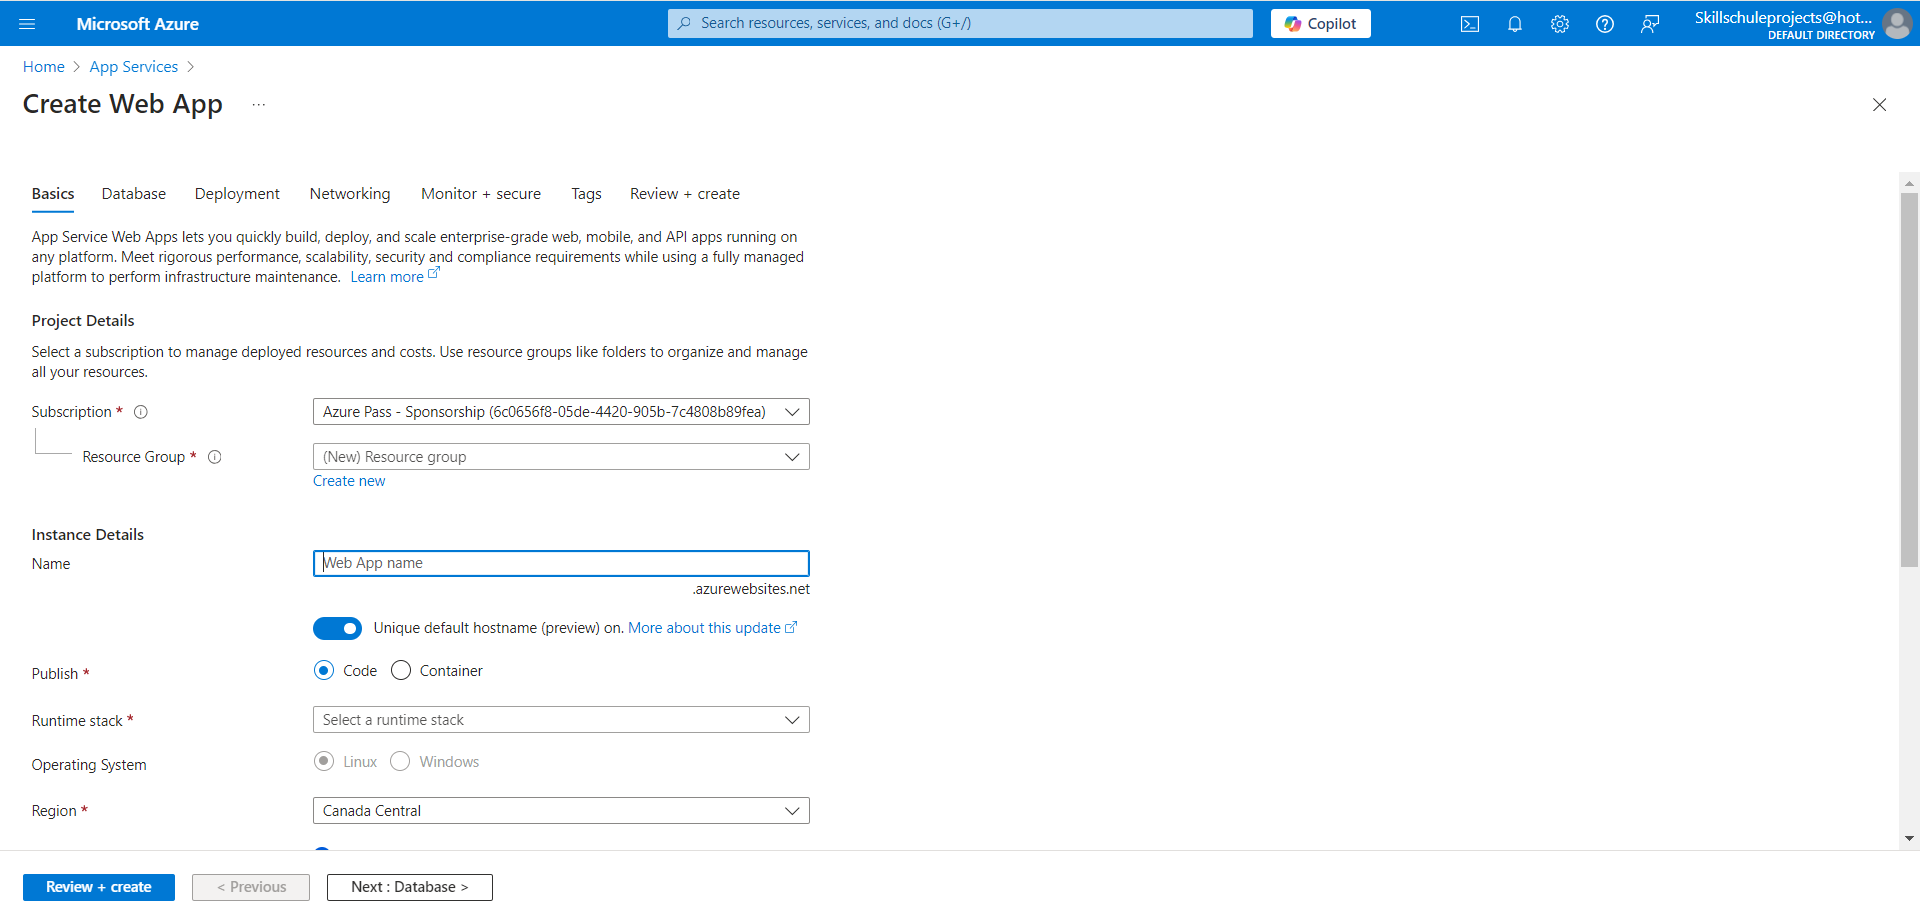
In the portal, search for App Services and click Create.
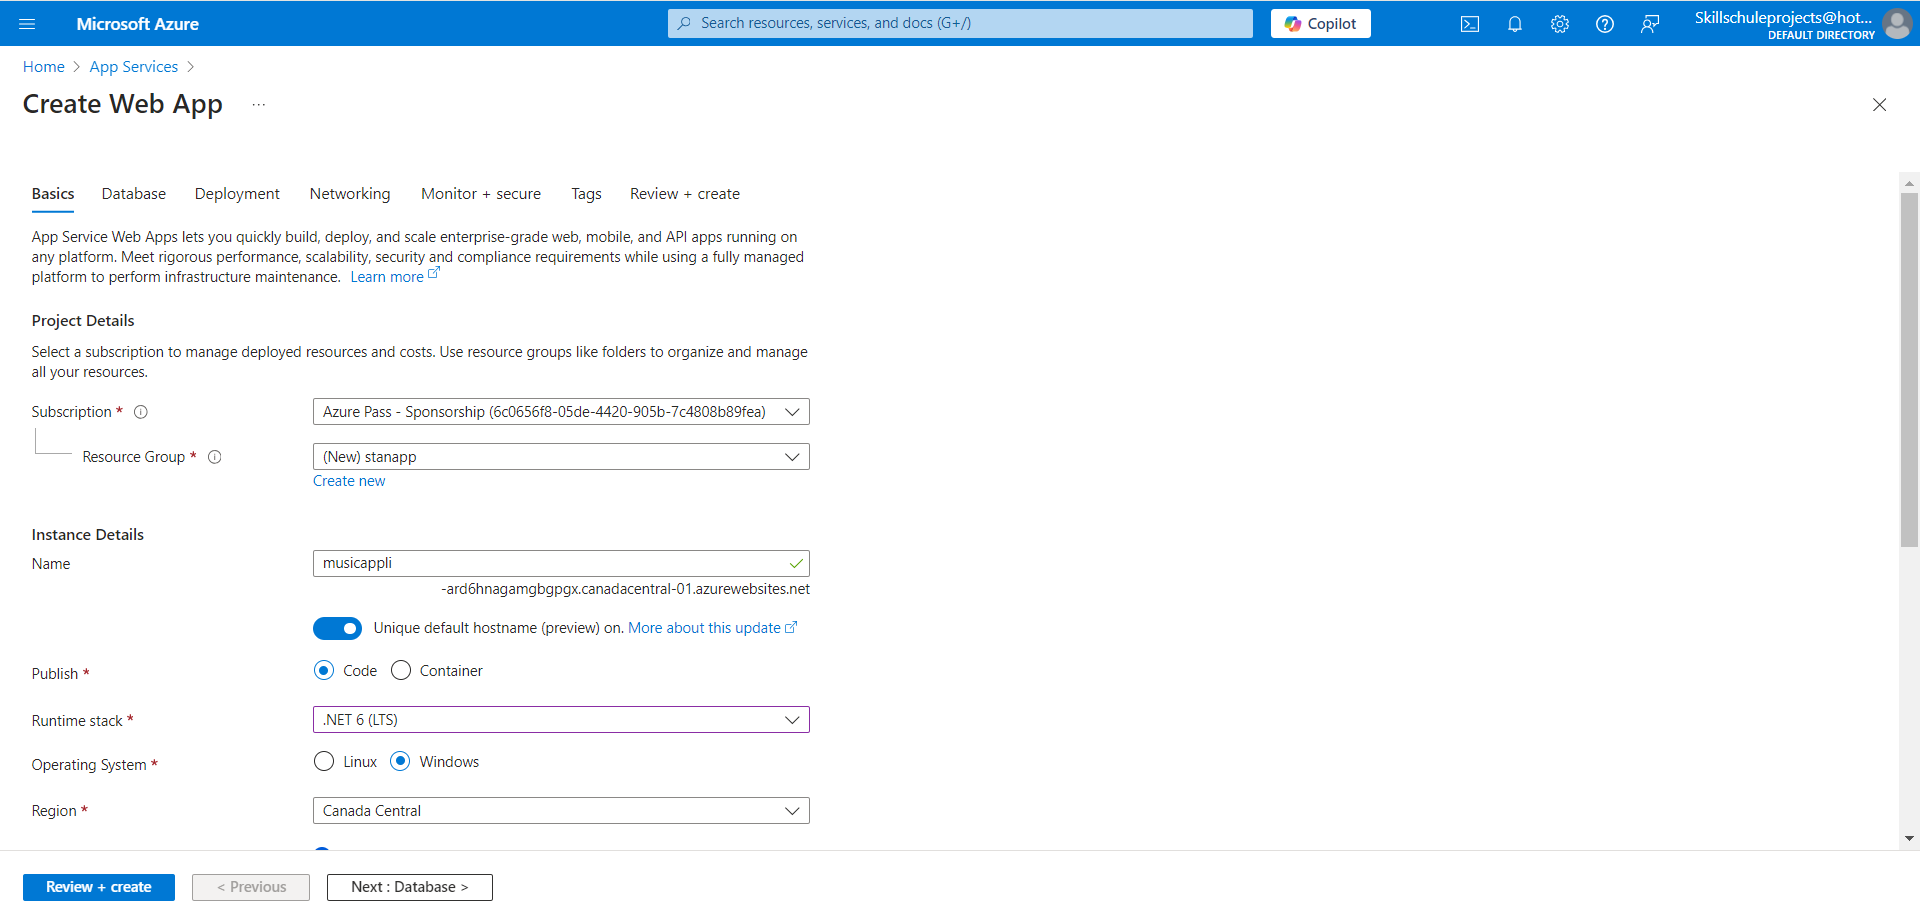
Fill in the necessary details:
Subscription: Pick the subscription you’re using.
Resource Group: Choose the one you just created.
App Name: Pick a unique name (e.g.,
cool-webapp).Runtime Stack: Choose the technology you’re using (Node.js, .NET, Python, etc.).
Region: Select a region that’s near your users.
Once you’ve filled that out, click Review + Create, and then hit Create to launch your app.
Step 4: Deploy Your Web App
Now, let’s deploy your web app. You can do this in multiple ways:
GitHub/Bitbucket: Automatically deploy whenever you push changes to your repo.
Azure CLI: For CLI enthusiasts, use:
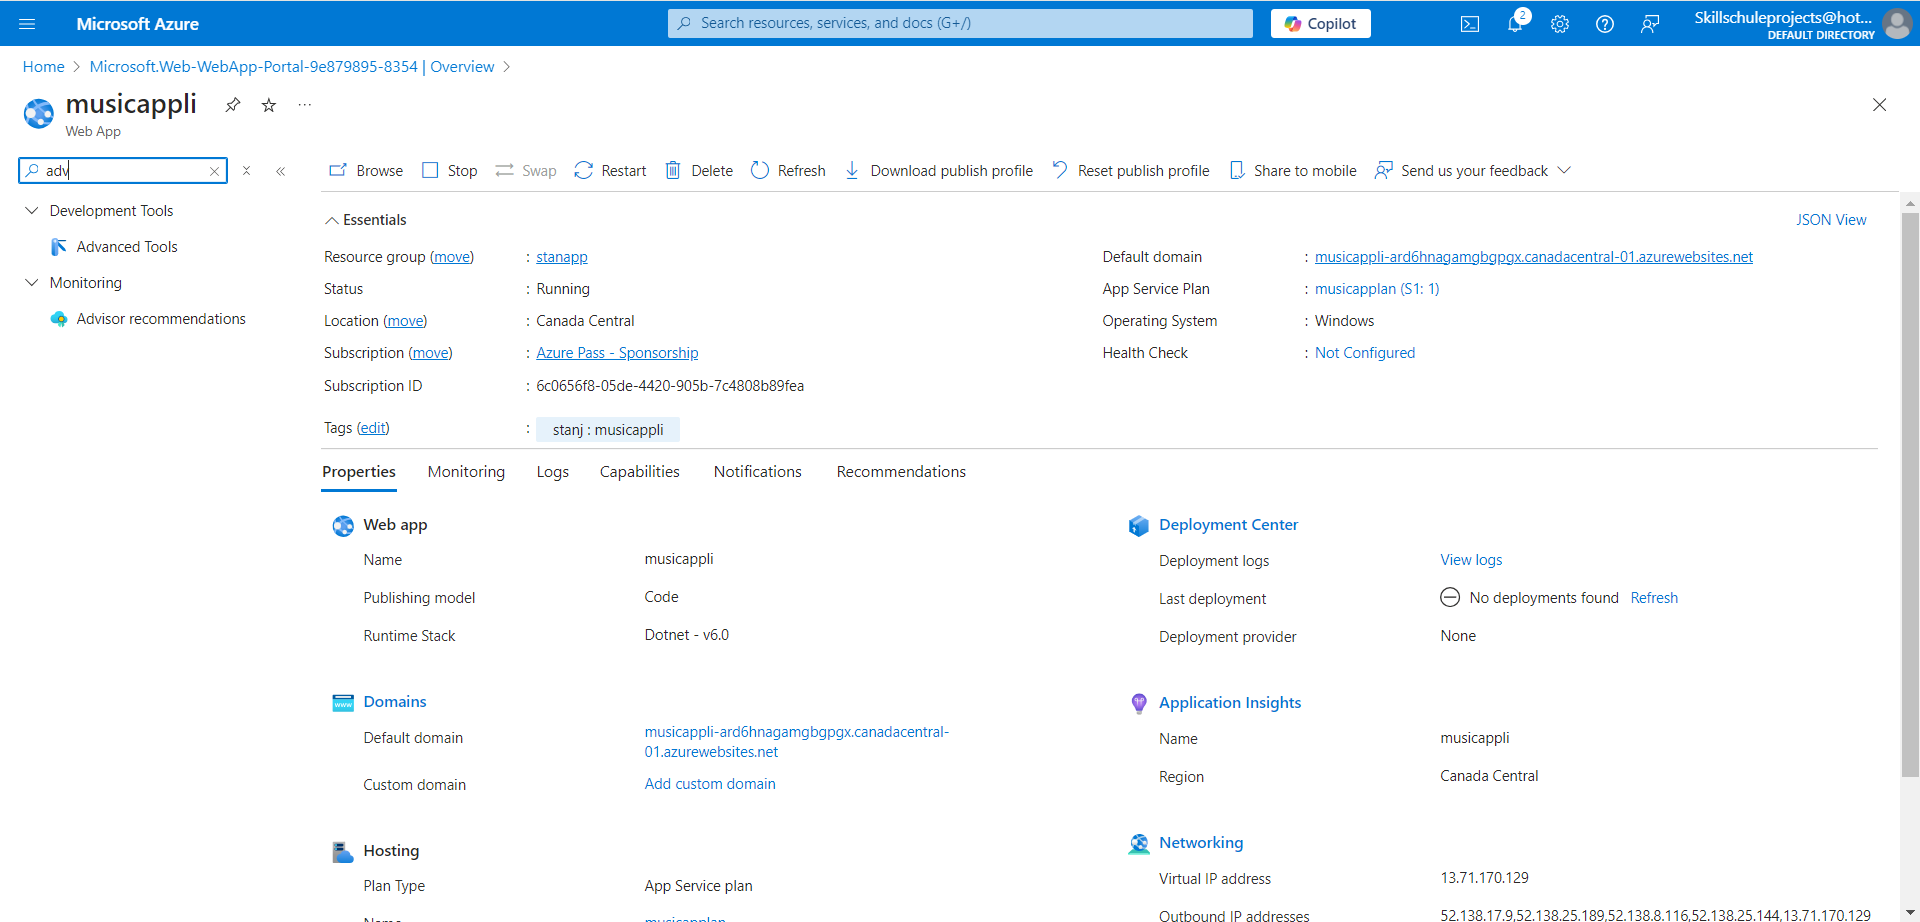
Once deployed, your app will be live as you can see mine above.
3. Using Deployment Slots for Safe Deployments
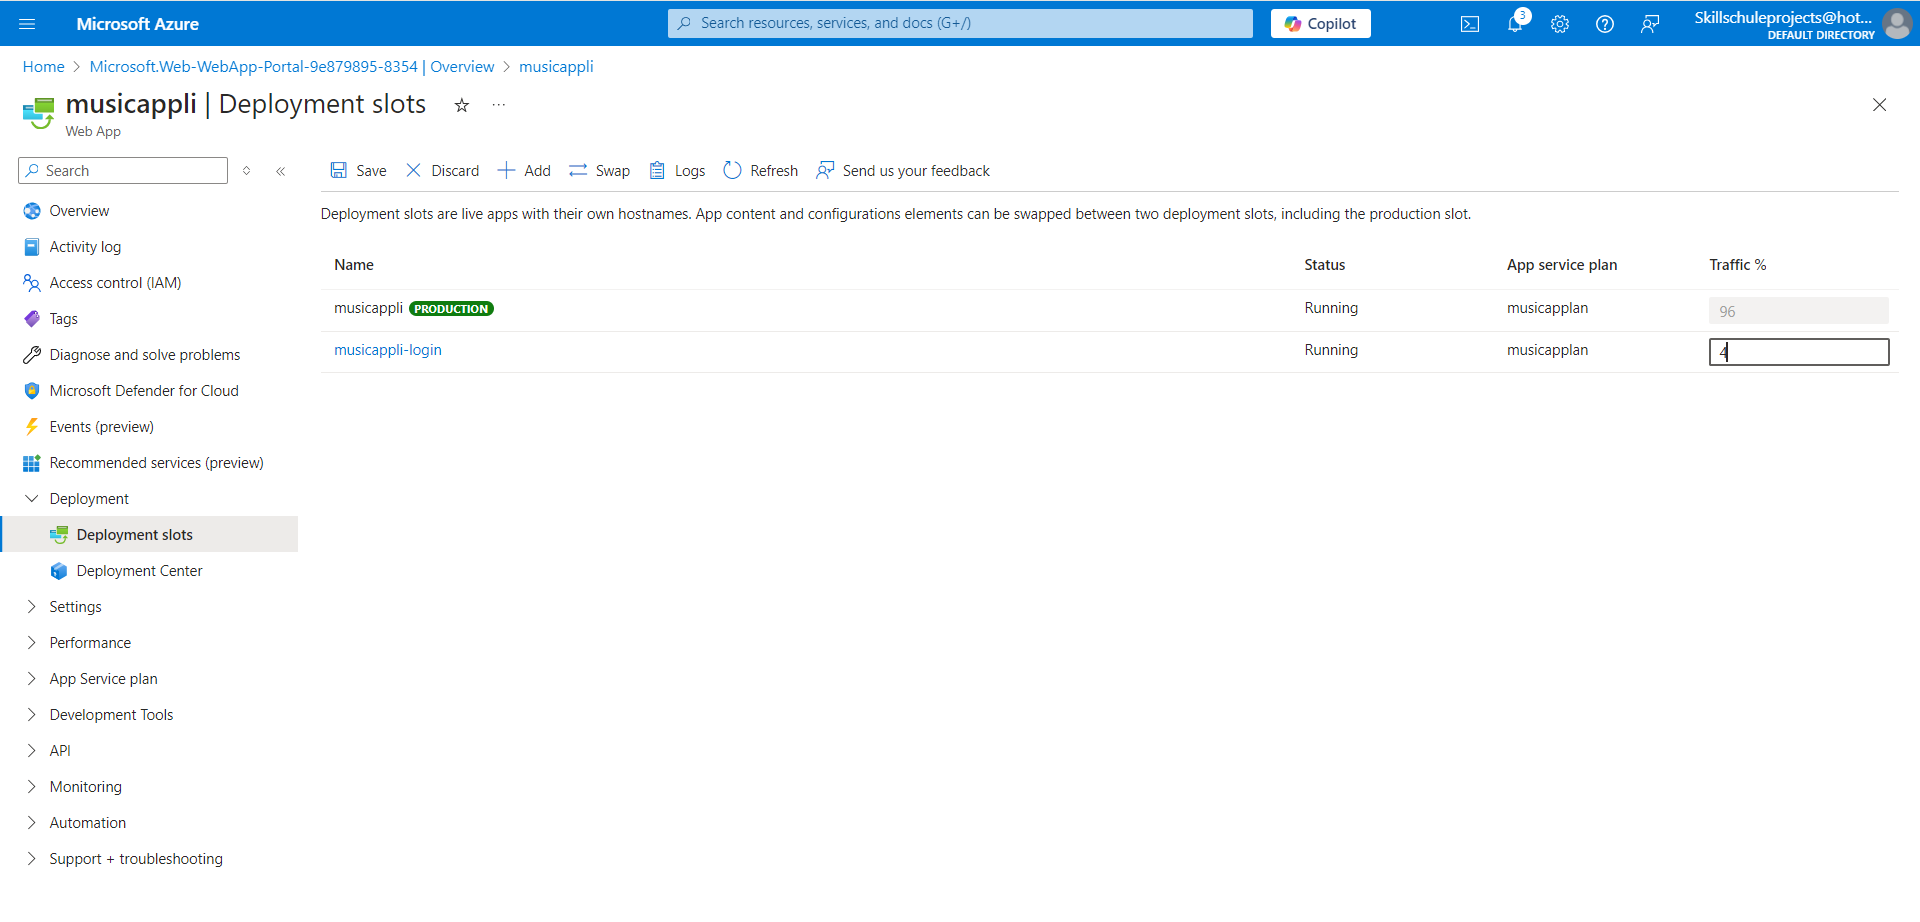
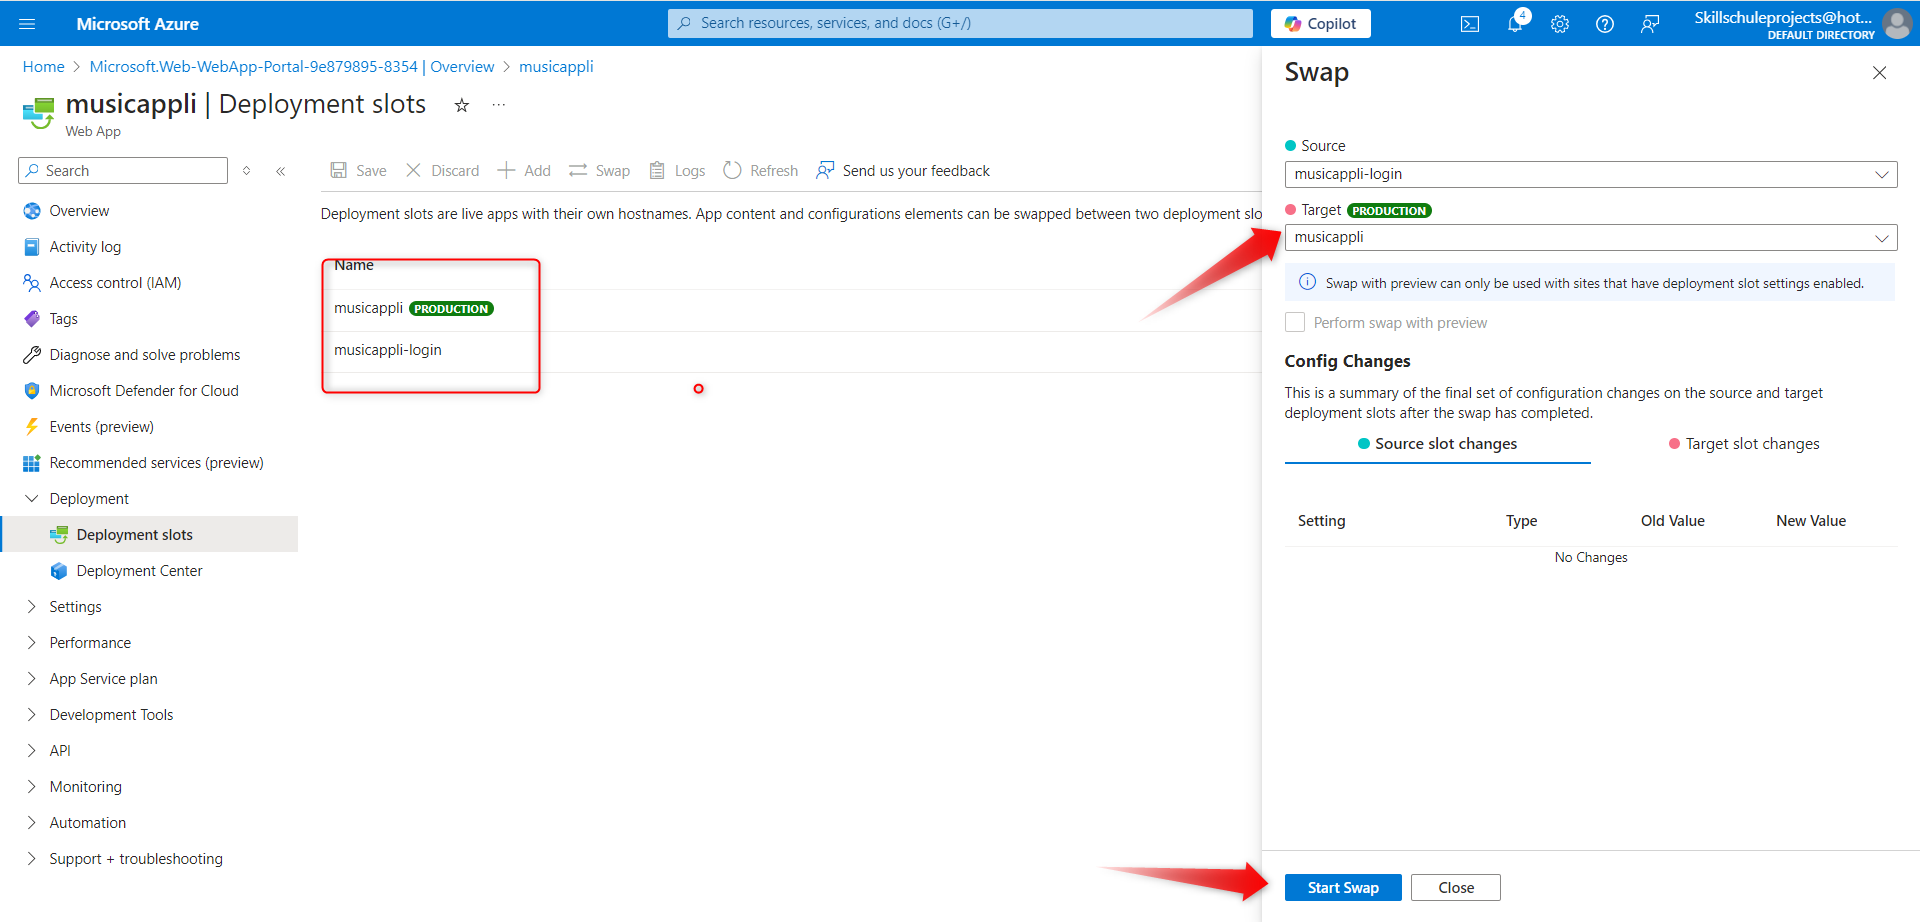
Deployment Slots are like secret backstages for your app, where you can stage your changes without affecting your live site. Imagine you’re making changes and you want to test them in a "staging" environment before going live—deployment slots let you do that!
Why Use Deployment Slots?
Test changes safely: Deploy updates to a staging slot and test them without affecting the production app.
Zero-downtime deployments: Swap slots with zero downtime for users, so your app remains available.
Rollback with ease: If something breaks in the staging slot, just swap back to the previous version.
How to Set Up a Deployment Slot
In your App Service panel, under Deployment, click on Deployment Slots.
Click + Add Slot.
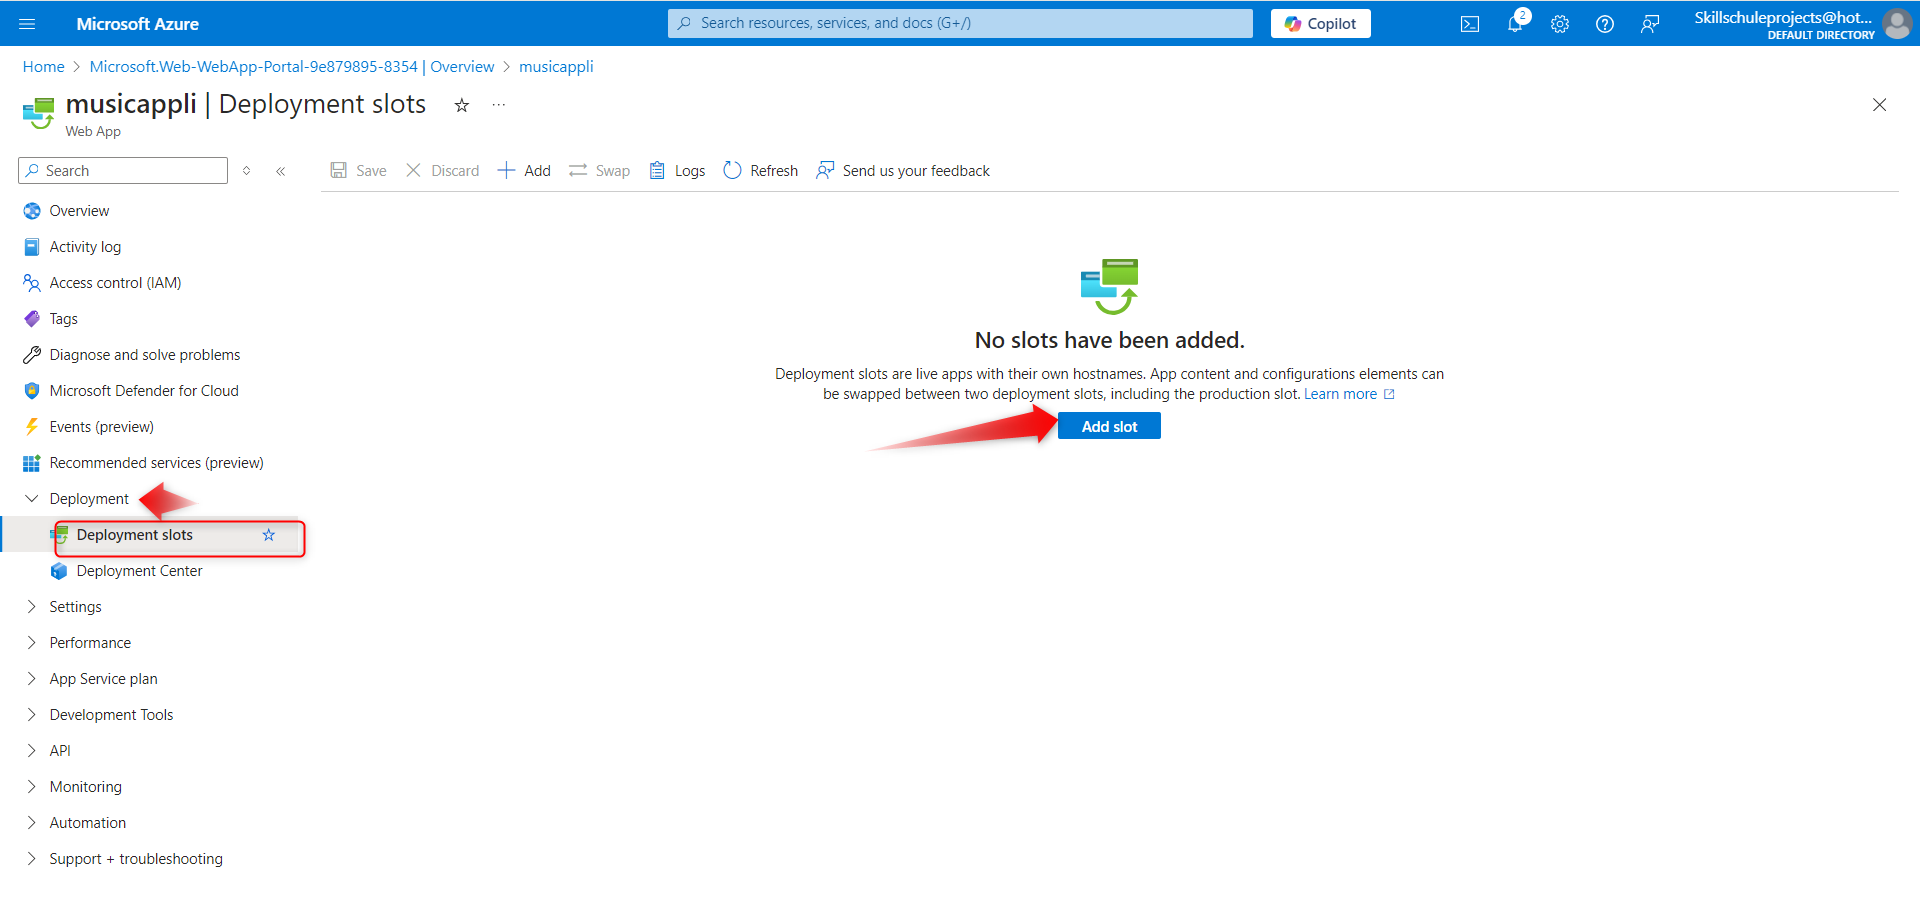
Give your slot a name (e.g.,
staging) and choose whether to clone the settings from the production slot or start fresh.Once created, you’ll have a staging environment where you can deploy your updates without affecting your live app
.
Deploy your code to this slot just like you would with your production app. When you’re ready to go live, just click Swap to move your changes from the staging slot to production. Easy peasy!
How to Use the Deployment Center?
Here’s how you can use the Deployment Center to deploy your app:
Step 1: Navigate to the Deployment Center
Go to the Azure Portal.
In the left-hand menu, search for your App Service (web app) and select it.
Under the Deployment section, click on Deployment Center.
Step 2: Choose a Deployment Source
The Deployment Center will prompt you to choose a source for your app’s code. You can pick one of the following options:
GitHub: Connect your GitHub repository for continuous deployment.
Bitbucket: Deploy directly from your Bitbucket repository.
Azure Repos: Use Azure DevOps for code hosting and deployment.
Local Git: If you want to deploy code directly from your machine, you can set up a Git repository within Azure.
FTP: If you prefer, you can deploy via FTP (though it’s less common with modern CI/CD practices).How to Use the Deployment Center?
Here’s how you can use the Deployment Center to deploy your app:
Step 1: Navigate to the Deployment Center
Go to the Azure Portal.
In the left-hand menu, search for your App Service (web app) and select it.
Under the Deployment section, click on Deployment Center.
Step 2: Choose a Deployment Source
The Deployment Center will prompt you to choose a source for your app’s code. You can pick one of the following options:
GitHub: Connect your GitHub repository for continuous deployment.
Bitbucket: Deploy directly from your Bitbucket repository.
Azure Repos: Use Azure DevOps for code hosting and deployment.
Local Git: If you want to deploy code directly from your machine, you can set up a Git repository within Azure.
- FTP: If you prefer, you can deploy via FTP (though it’s less common with modern CI/CD practices).
For the purpose of this article we will look at debug console in KUDU
tep 1: Open the Debug Console
Go to the Azure Portal.
In the App Service (your web app) dashboard, under the Development Tools section, select Advanced Tools (Kudu).
This will open the Kudu dashboard in a new tab.
Once in Kudu, you’ll see several options like Debug Console, SSH, and Log Streaming.
Click on Debug Console and select either CMD or PowerShell. The CMD console gives you access to your app’s file system, while PowerShell is more advanced for running scripts and commands.
Step 2: Using the Console
Navigate your app’s file system: You’ll see your app’s directories and files. You can browse through them, upload/download files, and view logs.
Check logs: The console is particularly useful for inspecting log files. You can find your logs in the
LogFilesfolder. These logs include application logs, web server logs, and detailed error logs that can help you debug issues.Run commands: You can run commands directly from the Debug Console.
FOLLOW THESE STEPS
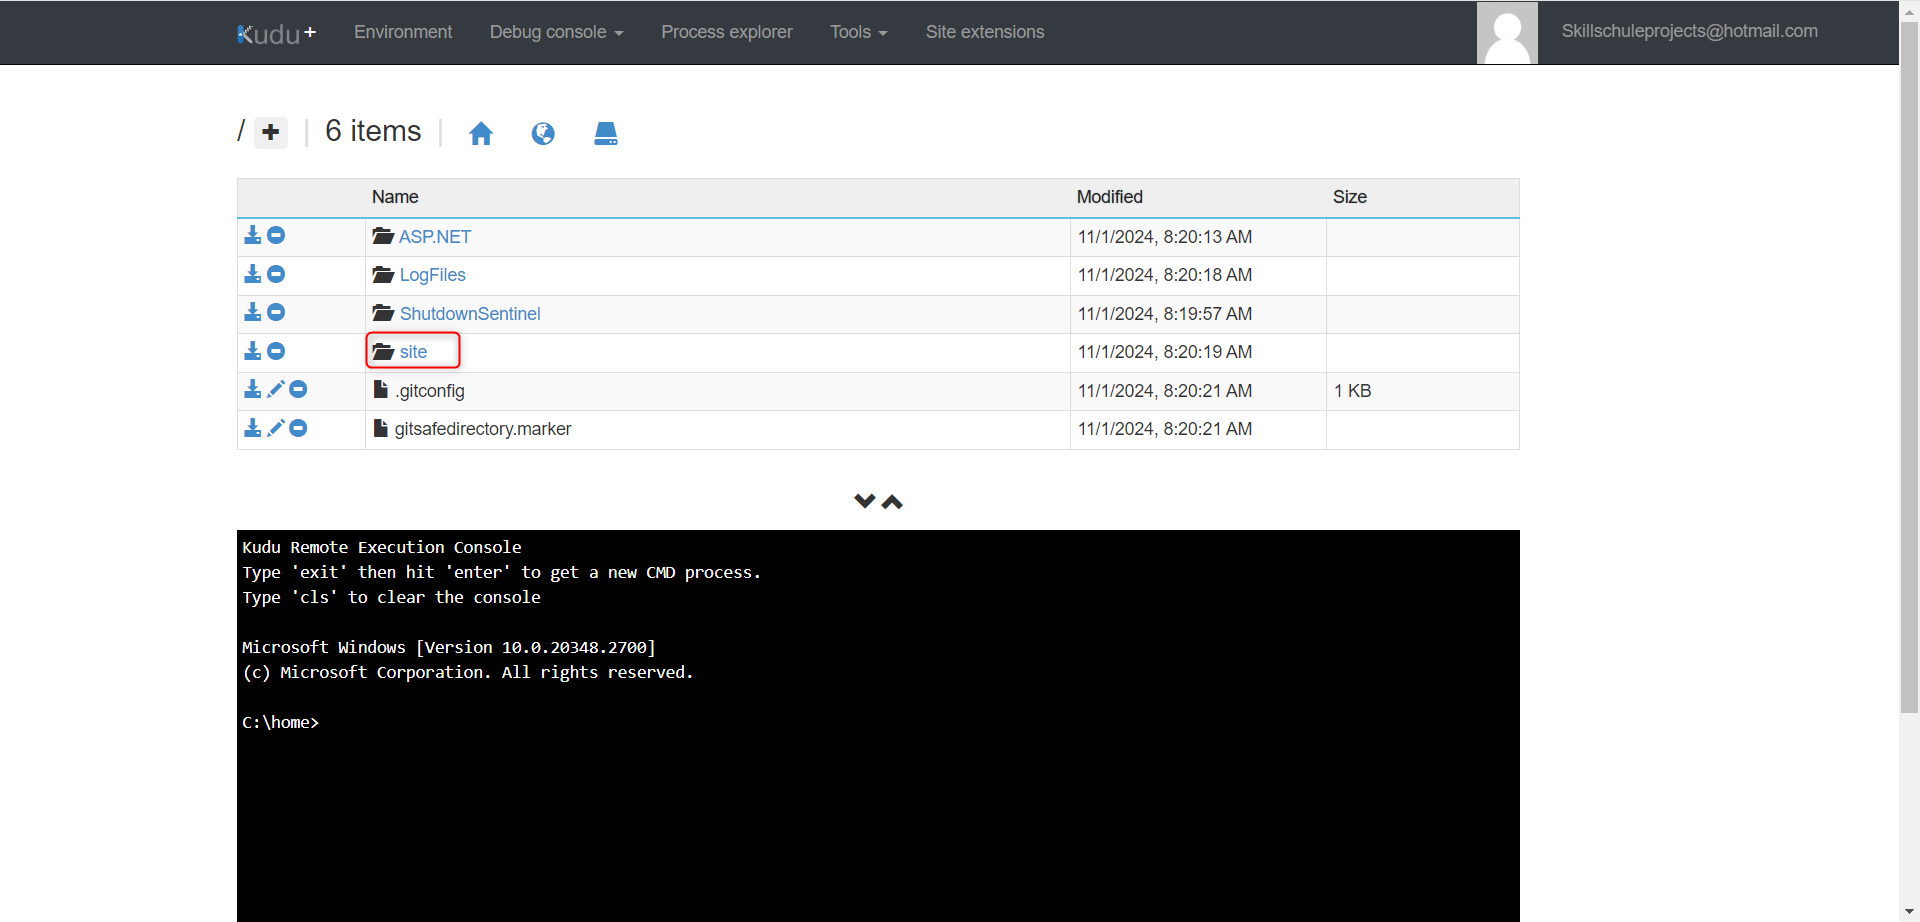
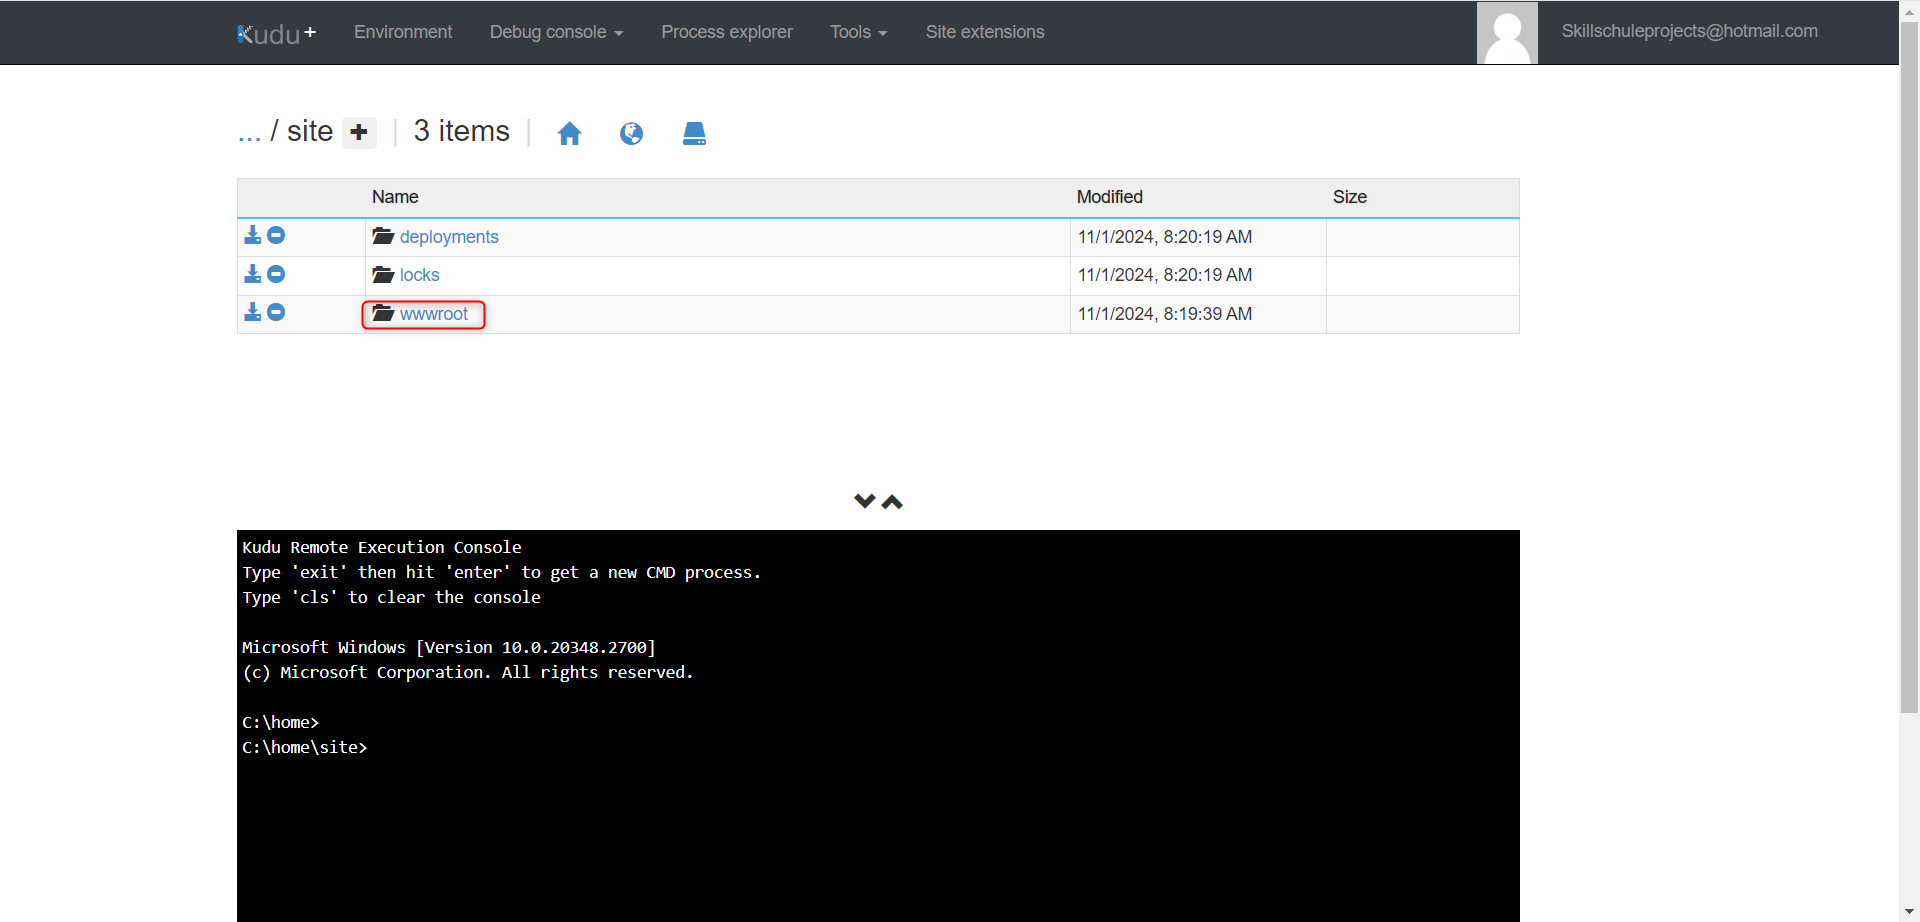
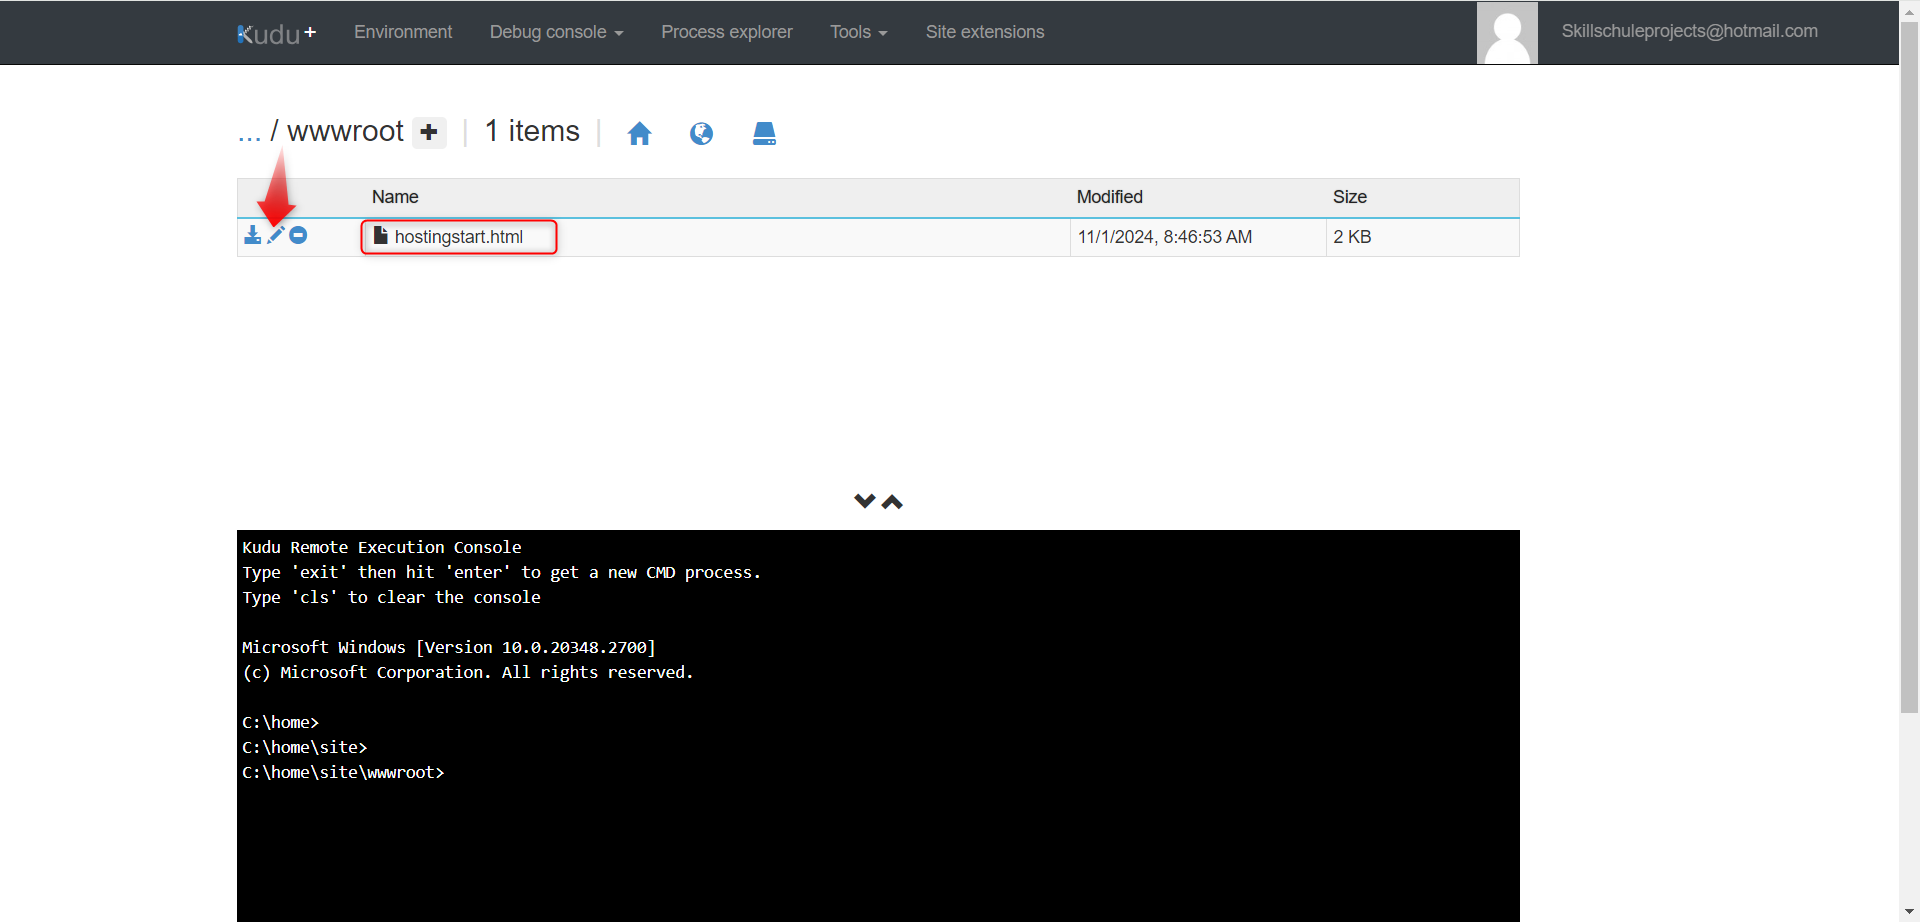
Once this opens you input your own code i used html css commands to build mine.
Key Differences Between Deployment Center and Debug Console
Deployment Center is all about automating the deployment process of your app to Azure. It integrates with your version control system (like GitHub) for continuous deployment, making it easy to keep your app up to date.
Debug Console is a tool for troubleshooting and managing files within your Azure app. It lets you explore your app’s file system, access logs, and run commands for debugging purposes.
Together, these two tools provide a complete solution for both deploying and maintaining your web apps on Azure.
4. Monitoring & Alerts: Keep an Eye on Your App
Now that your app is live, it’s time to keep tabs on it. Let’s set up some alerts so you’re the first to know if something goes wrong.
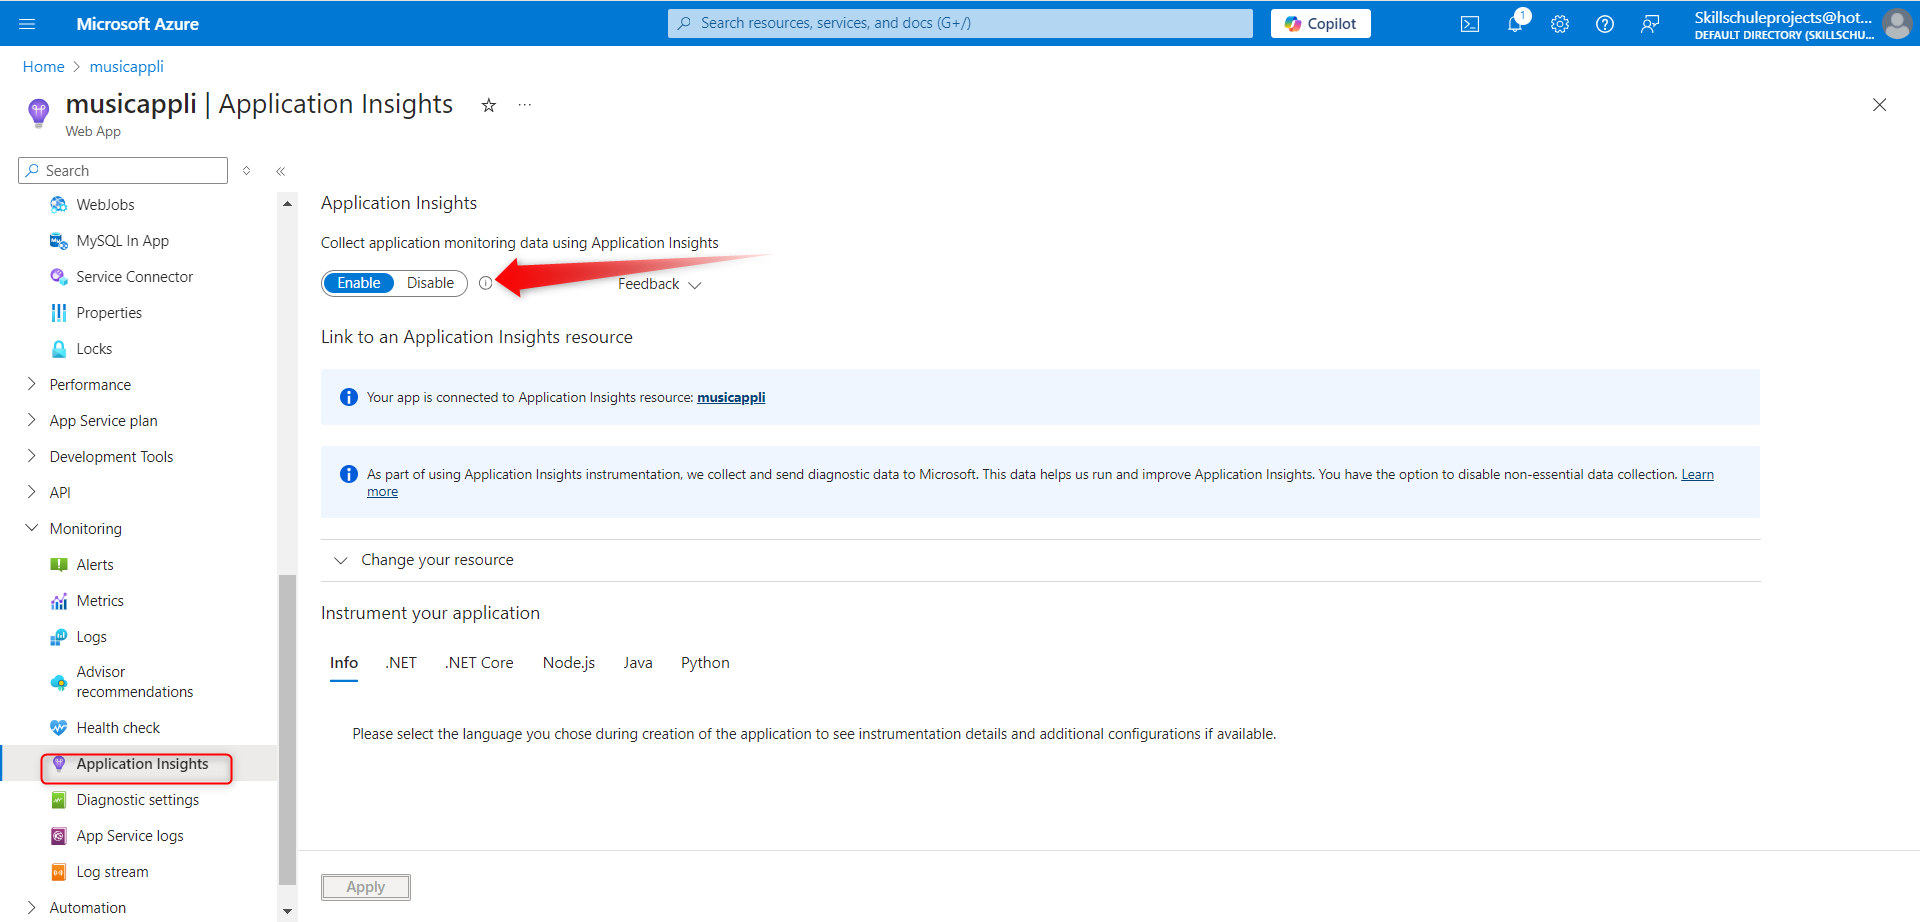
Step 1: Enable Application Insights
Application Insights is like the ultimate sidekick for monitoring your app. It gives you insights into how your app is performing and alerts you to any issues.
Here’s how to enable it:
In your Web App dashboard, under Monitoring, click Application Insights.
Click Turn on Application Insights, and Azure will automatically start tracking:
Response times: How fast is your app answering requests?
Request rates: How many people are visiting your app?
Exceptions: Are there any errors happening behind the scenes?
Once enabled, you’ll get real-time insights into how your app is performing. 🧐
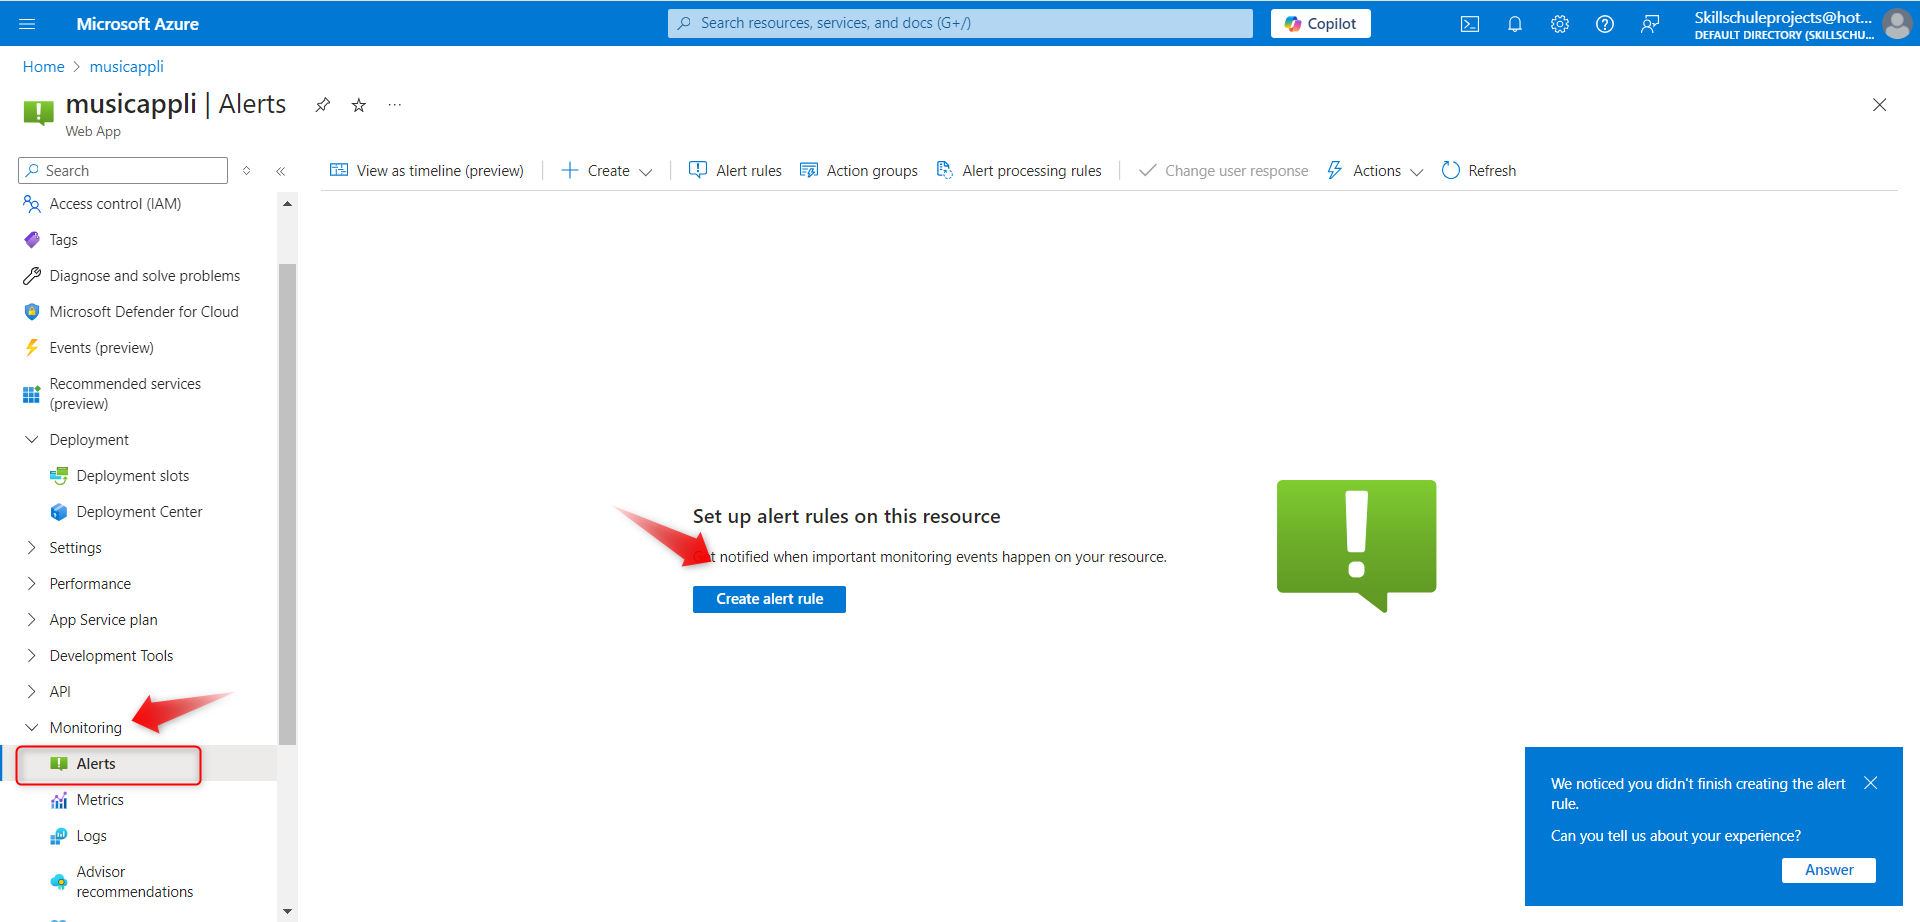
Step 2: Set Up Alerts
You want to be notified when something goes wrong, right? Here’s how to set up alerts:
Go to Azure Monitor: Search for Azure Monitor and click on it.
Create an Alert:
Click + New Alert Rule
.
- Select your Web App as the Scope.
Set the Condition: Choose what metric you want to monitor. For example:
Response Time: Alert if it exceeds a certain threshold (e.g., more than 2 seconds).
Failure Count: Alert if too many errors occur.
CPU Usage: Alert if the CPU usage gets too high.
Set the Action: Choose how you want to be notified—email, SMS, or even Slack.
Set the Severity: Choose how urgent the issue is (Severity 1 for critical issues, Severity 5 for minor ones).
Review & Create: Once everything’s set, hit Create.
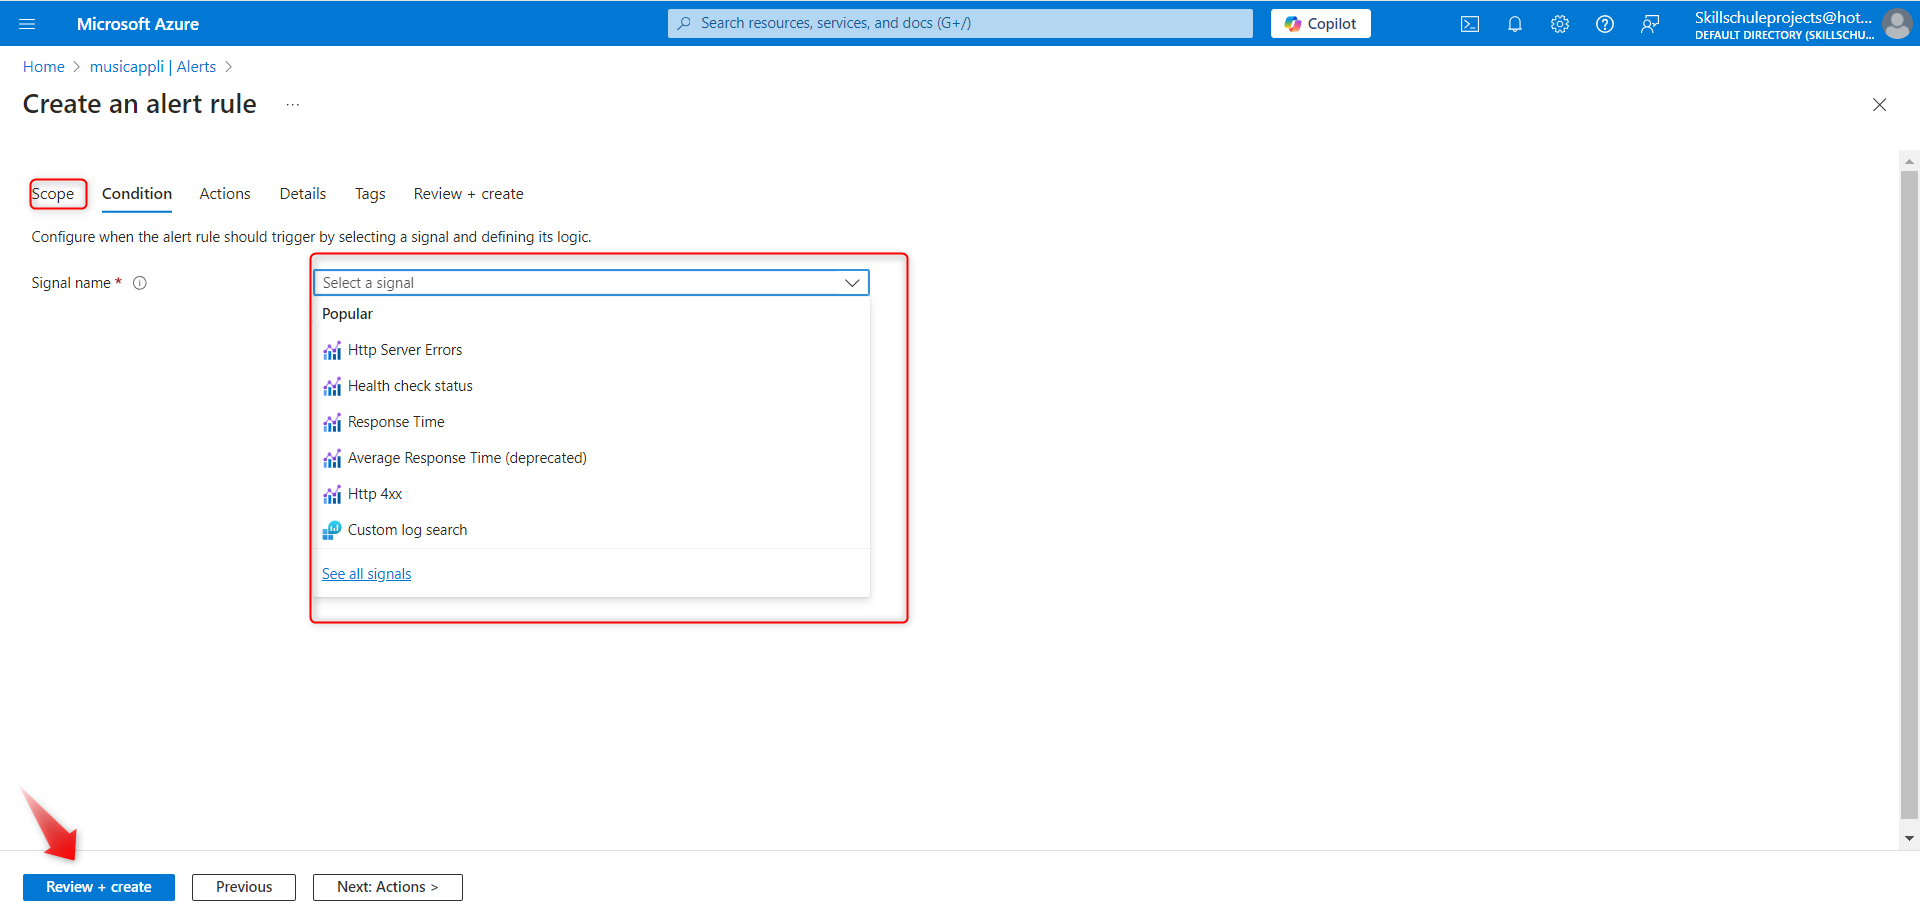
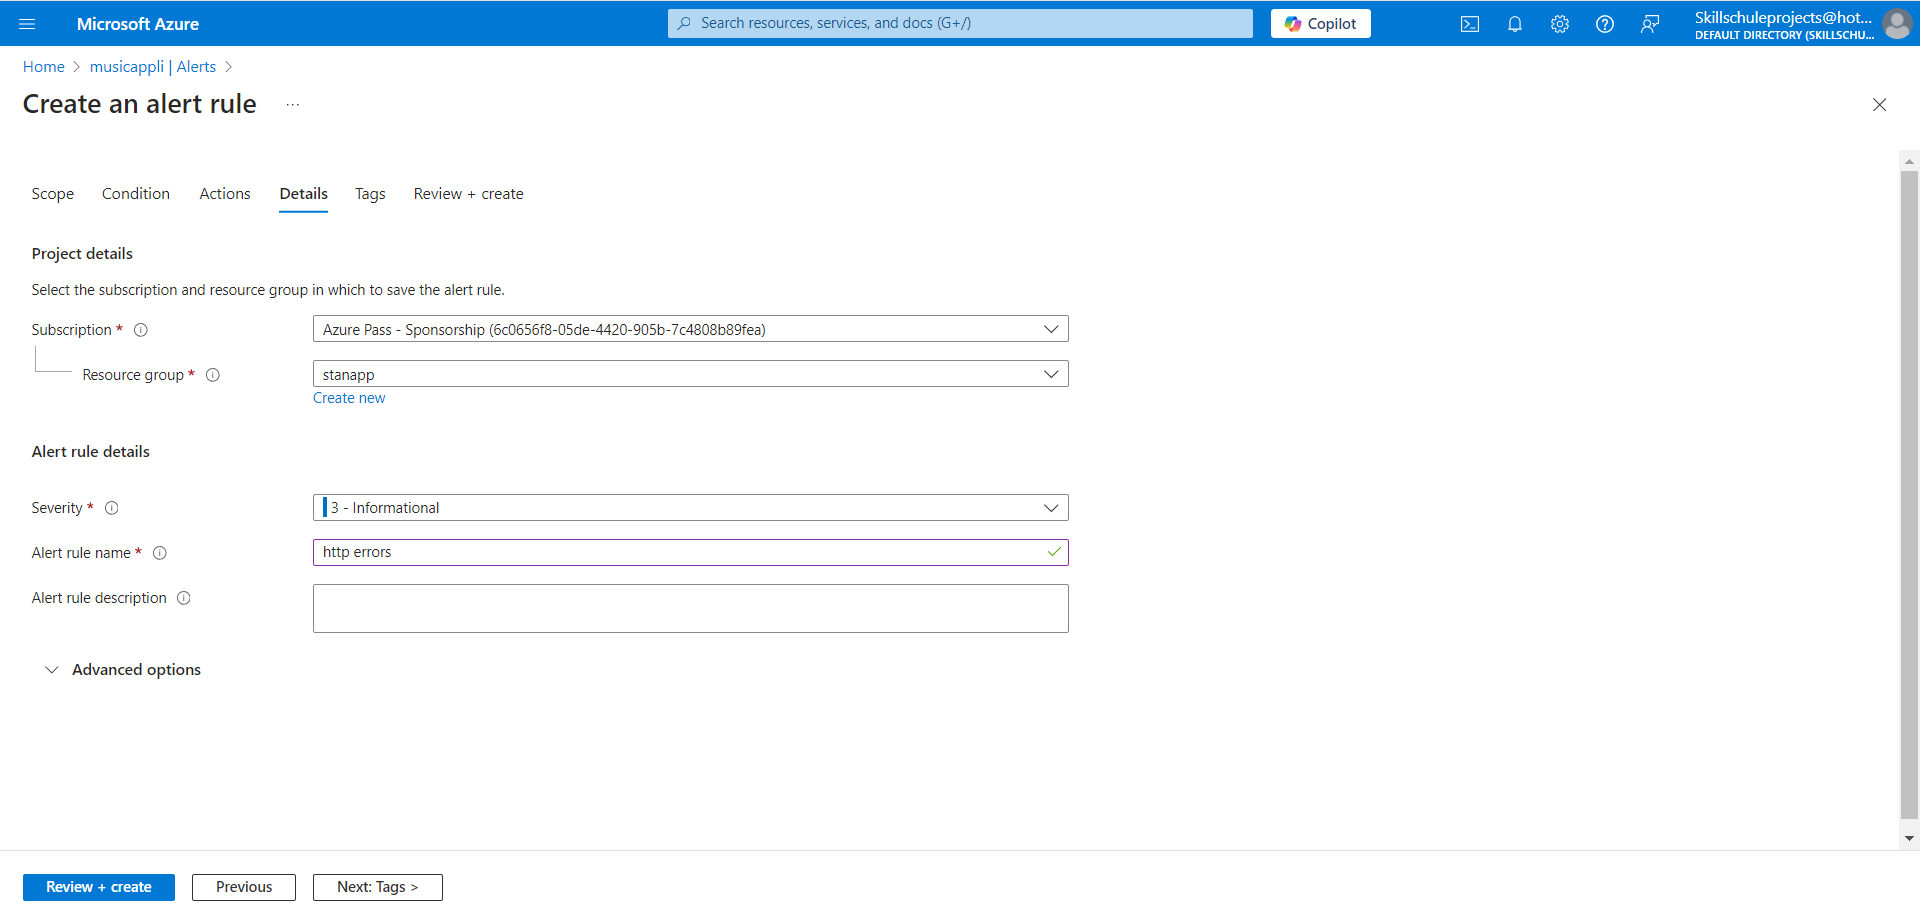
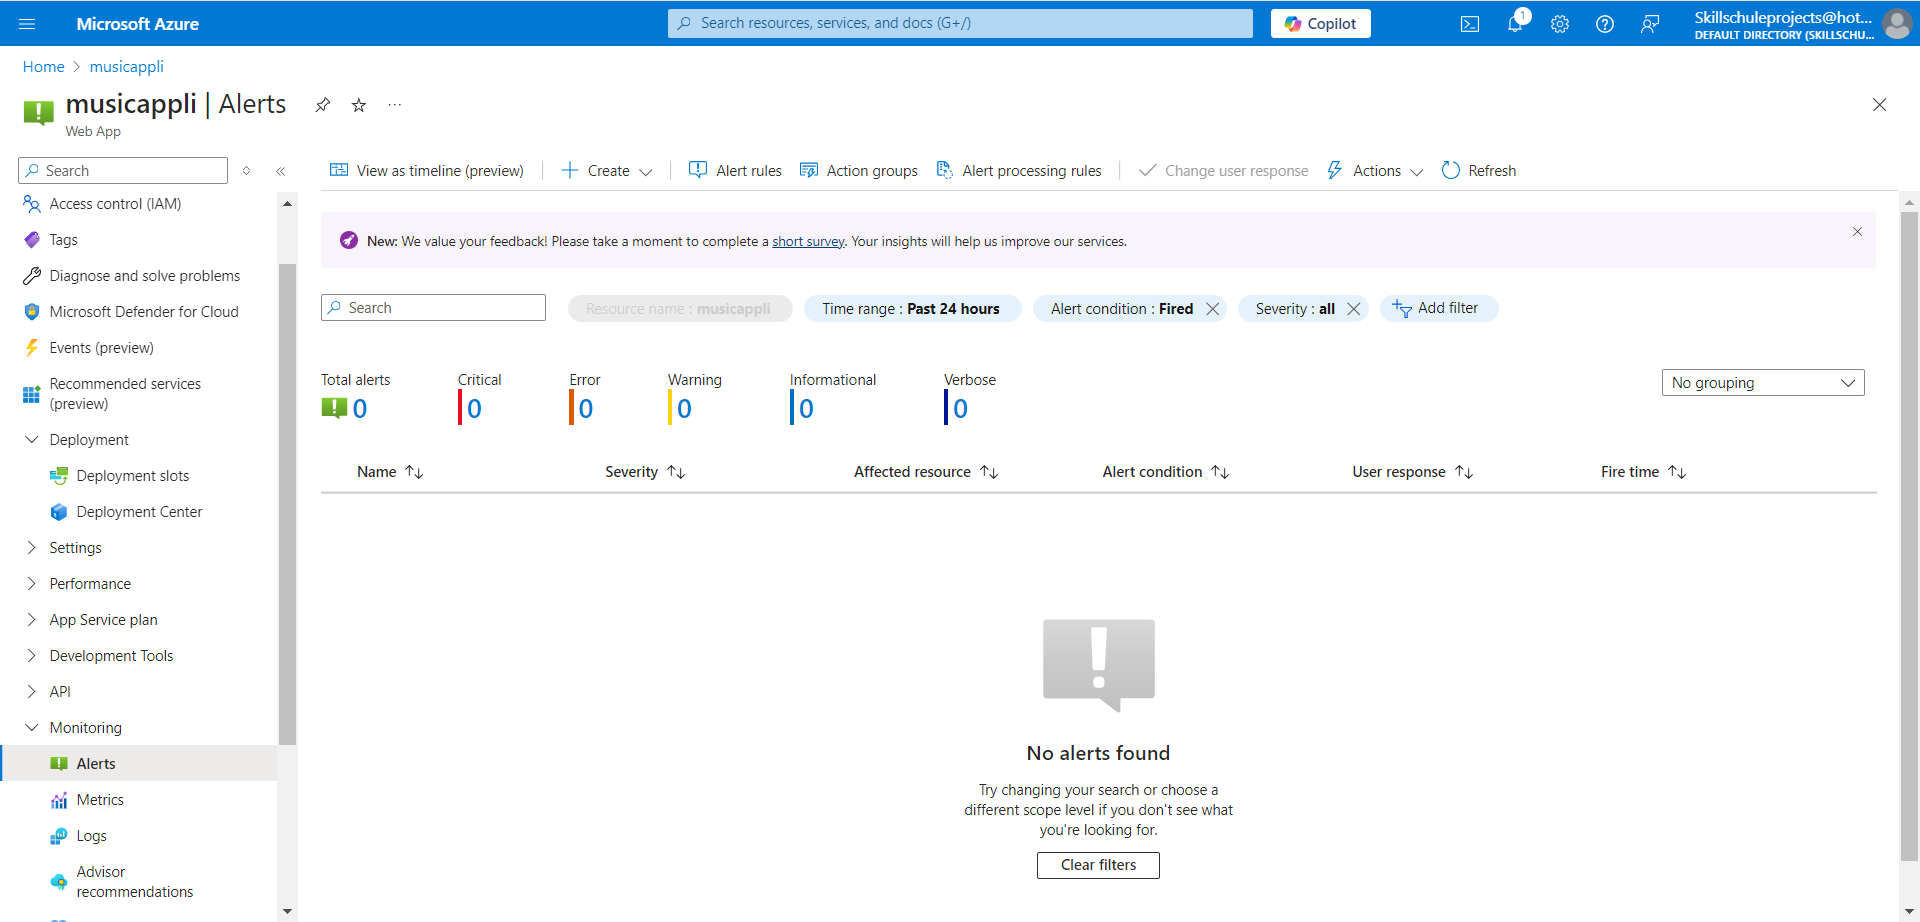
Now you’ll get alerted whenever things go sideways!
5. Advanced Monitoring & Alerts
If you want to go even further, consider these options:
Log-based Alerts: Set alerts based on specific log entries like app crashes or error messages.
Availability Tests: Use these to check if your web app is accessible from different regions.
Automate Fixes: You can use Azure Logic Apps or Azure Functions to automatically take action when an alert is triggered (like restarting the app or scaling it up/down).
6. Viewing Alerts and Diagnosing Issues
Once your alerts are set up, you can view them in Azure Monitor’s Alert History. This shows you when alerts were triggered and why.
To troubleshoot any issues:
Application Insights: Dive into detailed logs and metrics to see where things are going wrong.
Metrics: Look at performance data, including CPU and memory usage, to spot any resource hogs.
Diagnostics: Run full diagnostics to understand exactly what went wrong.
7. Best Practices for Keeping Your App Healthy
Set meaningful thresholds: Don’t set the alert thresholds too sensitive or too strict — find a balance that works for your app.
Automate fixes where possible: Use Azure Functions or Logic Apps to automatically respond to alerts, like scaling your app or restarting it when needed.
Integrate with your team: Set up alerts to notify the right people (maybe your DevOps team or on-call engineer).
Use Application Insights wisely: It’s not just for debugging; use it for proactive performance tuning.
Final Thoughts: You’re a Cloud Pro Now! 🌟
Congrats! You’ve successfully created a web app on Azure, deployed it safely using deployment slots, set up monitoring, and configured alerts to stay on top of things. You’re officially a cloud pro with all the right tools to keep your app running smoothly.
With App Services, Application Insights, Azure Monitor, and Deployment Slots, you have the perfect toolkit to deploy, monitor, and maintain your web app in the cloud with ease.
Now go ahead and start deploying your next app, monitor it like a pro, and enjoy the peace of mind that comes with being alerted when something needs your attention. You’ve got this! 💪🎉
Feel free to let me know if you want more details on any specific section! 😊
Subscribe to my newsletter
Read articles from Stanley Udebuani directly inside your inbox. Subscribe to the newsletter, and don't miss out.
Written by
