CI/CD Workflow for Deploying a Spring Boot Application with MongoDB on Kubernetes (Amazon EKS)
 Kandlagunta Venkata Siva Niranjan Reddy
Project Overview
Application: A Spring Boot application configured to connect with a MongoDB database.
Objective: To automate the CI/CD workflow for building, testing, and deploying the application in a Kubernetes cluster (Amazon EKS), ensuring seamless integration between the Spring Boot app and MongoDB.
Steps:
Step 1 - Launch an Ubuntu(22.04) T2 Large Instance
Step 2 - Install Jenkins, Docker and Trivy.
Step 3- create sonarqube container.
Step 4- Install Plugins for Docker , Sonarqube, Kubernetes, Aws.
Step 5 - Create a Pipeline Project in Jenkins using a Declarative Pipeline
Step 6 - Docker Image Build and Push
Step 7- Deploy the image using Docker
Step 8- Kubernetes (Amazon EKS) Setup. (ClickHere)
step 9- Jenkins on your Kubernetes (EKS) cluster ,taking control of the master node.
step10- Setting Up Slack Notifications in Jenkins
step 11 - Deploying the Spring Boot Mongo Application to EKS (Amazon Elastic Kubernetes Service)
Install Jenkins
Connect to your console, and enter these commands to Install Jenkins
vi jenkins.sh # run in root user
#!/bin/bash
sudo apt update -y
#sudo apt upgrade -y
wget -O - https://packages.adoptium.net/artifactory/api/gpg/key/public | tee /etc/apt/keyrings/adoptium.asc
echo "deb [signed-by=/etc/apt/keyrings/adoptium.asc] https://packages.adoptium.net/artifactory/deb $(awk -F= '/^VERSION_CODENAME/{print$2}' /etc/os-release) main" | tee /etc/apt/sources.list.d/adoptium.list
sudo apt update -y
sudo apt install temurin-17-jdk -y
/usr/bin/java --version
curl -fsSL https://pkg.jenkins.io/debian-stable/jenkins.io-2023.key | sudo tee \
                  /usr/share/keyrings/jenkins-keyring.asc > /dev/null
echo deb [signed-by=/usr/share/keyrings/jenkins-keyring.asc] \
                  https://pkg.jenkins.io/debian-stable binary/ | sudo tee \
                              /etc/apt/sources.list.d/jenkins.list > /dev/null
sudo apt-get update -y
sudo apt-get install jenkins -y
sudo systemctl start jenkins
sudo systemctl status jenkins
sudo chmod 777 jenkins.sh
./jenkins.sh    # this will installl jenkins
Once Jenkins is installed, you will need to go to your AWS EC2 Security Group and open Inbound Port 8080, since Jenkins works on Port 8080.

sudo cat /var/lib/jenkins/secrets/initialAdminPassword

Install Docker in Jenkins
sudo apt-get update
sudo apt-get install docker.io -y
sudo usermod -aG docker $USER   # ubuntu or ec2-user
newgrp docker
sudo chmod 777 /var/run/docker.sock
Install Trivy in jenkins
vi trivy.sh
sudo apt-get install wget apt-transport-https gnupg lsb-release -y
wget -qO - https://aquasecurity.github.io/trivy-repo/deb/public.key | gpg --dearmor | sudo tee /usr/share/keyrings/trivy.gpg > /dev/null
echo "deb [signed-by=/usr/share/keyrings/trivy.gpg] https://aquasecurity.github.io/trivy-repo/deb $(lsb_release -sc) main" | sudo tee -a /etc/apt/sources.list.d/trivy.list
sudo apt-get update
sudo apt-get install trivy -y
To verify Trivy is installed correctly:
trivy --version
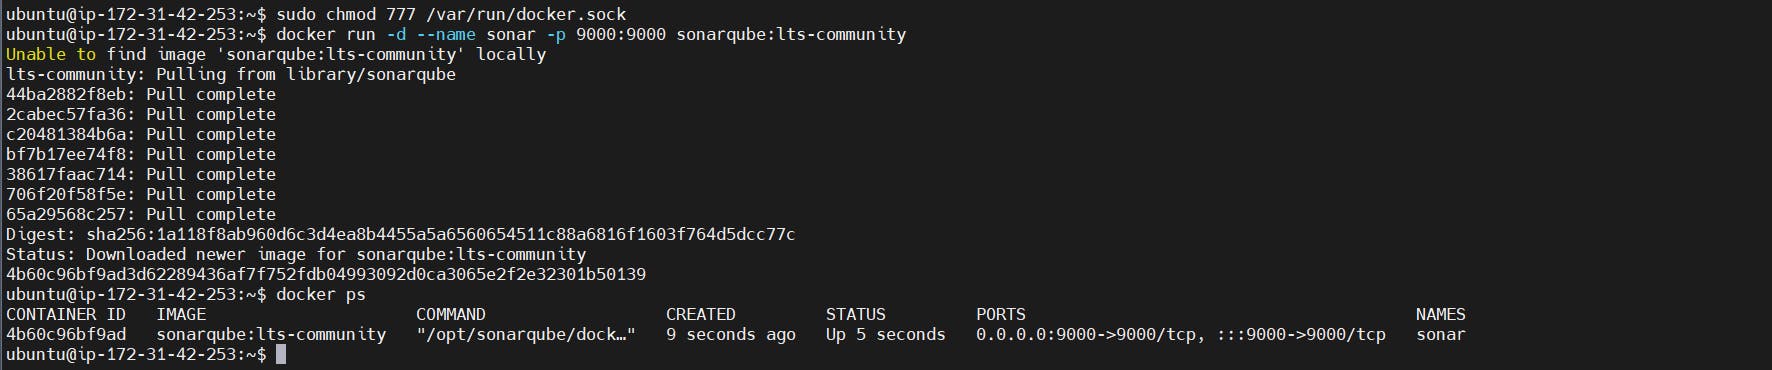
Create a Sonarqube Container using Docker.
Enable 9000 port in the security group.
docker run -d --name sonar -p 9000:9000 sonarqube:lts-community
http://<PublicIP>:9000

Enter username: admin and password: admin

Update Your SonarQube Password
SonarQube Dashboard:

Install Plugins for Docker, Sonarqube, Kubernetes, Aws
Docker-Related Plugins:
Docker
Docker Pipeline
Docker Build step

SonarQube-Related Plugins:
SonarQube Scanner
Quality Gates Plugin

Install the AWS Credentials Plugin:
- To interact with an EKS cluster from Jenkins, you typically need to AWS Credentials Plugin

Kubernetes-Related Plugins:
Kubernetes Plugin
Kubernetes CLI Plugin


Install Maven in Jenkins
Navigate to Manage Jenkins > Global Tool Configuration.
Under the Maven section, click Add Maven. Provide meaningful name

Configuring SonarQube Authentication Token in Jenkins


Manage Jenkins > Configure System.
Scroll down to the SonarQube servers section.
Click on Add SonarQube.
Name: Give a name to your SonarQube server (e.g.,
SonarQube).Server URL: Enter the URL of your SonarQube server (e.g.,
http://your-sonarqube-server-url).Authentication Token: Choose the credential you added earlier from the dropdown list.
If you haven't added the credentials yet, you can add them directly from the SonarQube servers configuration section:

Click on "Add" next to the dropdown list.
Select "Jenkins" (or the appropriate credentials domain).
Choose "Secret text" as the kind of credentials.
Enter your SonarQube token in the Secret field.
Provide an ID and Description to identify the token.
Click Add to save the credentials.

Choose the credential you added earlier from the dropdown list and save

Configuring Docker Authentication Token in Jenkins


provide : Read , Write , Delete Access permissions , then click on generate

Step 1: Add Docker Authentication Token in Jenkins
Go to Manage Jenkins > Manage Credentials.
Click on "Add Credentials".
In the Kind dropdown, select "Secret text".
Secret: Paste your Docker Authentication Token.
Description: Add a descriptive name to easily recognize the token.
Click "OK" to save the credentials

If you get docker login failed error while running pipeline
 sudo usermod -aG docker jenkins
 sudo systemctl restart jenkins
pipeline {
    agent any

    tools {
        maven 'maven'
    }
    stages {
        // Checkout Code
        stage('Checkout') {
            steps {
                git branch: 'feature',
                    credentialsId: '33e5e605-33c2-45d2-8c7d-4a94a80eb1ef',
                    url: 'https://github.com/KandlaguntaVenkataSivaNiranjanReddy/spring-boot-mongo-docker-kkfunda.git'
            }
        }

        // Build the Maven Project
        stage('Build') {
            steps {
                sh "mvn clean package"
            }
        }

        // File System Security Scan using Trivy
        stage('File System Trivy Scan') {
            steps {
                script {
                    def status = sh(script: "trivy fs --format table -o trivy-fs-report.html .", returnStatus: true)
                    if (status != 0) {
                        error "Trivy scan failed with exit code ${status}"
                    } else {
                        echo "Trivy scan completed successfully."
                    }
                }
            }
        }

        // Code Quality Analysis with SonarQube
        stage('SonarQube') {
            steps {
                withSonarQubeEnv('sonar') {
                    sh """
                    mvn sonar:sonar \
                        -Dsonar.projectKey=spring-boot-mongo \
                        -Dsonar.projectName='Spring Boot Mongo Project' \
                        -Dsonar.host.url=http://18.175.240.114:9000/
                    """
                }
            }
        }

        // Build Docker Image and Tag
        stage('Build & Tag Docker Image') {
            steps {
                script {
                    withDockerRegistry(credentialsId: '985fdb56-2bc9-4fc7-b69d-0c3dfddee456') {
                        sh "docker build -t niranjanreddy1231/mongospring:latest ."
                    }
                }
            }
        }

        // Push Docker Image to Registry
        stage('Push Docker Image') {
            steps {
                script {
                    withDockerRegistry(credentialsId: '985fdb56-2bc9-4fc7-b69d-0c3dfddee456') {
                        sh "docker push niranjanreddy1231/mongospring:latest"
                    }
                }
            }
        }
    }
}


Setting Up the EKS Cluster and Nodes: Click Here for a Step-by-Step Guide
Steps to Take Control of the EKS Master Plane in Jenkins
- Install AWS CLI:
curl "https://awscli.amazonaws.com/awscli-exe-linux-x86_64.zip" -o "awscliv2.zip"
sudo apt install unzip -y
unzip awscliv2.zip
After these steps, you’ll just need to run:
sudo ./aws/install
Verify the installation:
aws --version

- Install kubectl:

curl -LO "https://dl.k8s.io/release/$(curl -L -s https://dl.k8s.io/release/stable.txt)/bin/linux/amd64/kubectl"

sudo install -o root -g root -m 0755 kubectl /usr/local/bin/kubectl

kubectl version --client
curl -LO ...downloads the latest stable version ofkubectlfrom the Kubernetes website.sudo install -o root -g root -m 0755 kubectl /usr/local/bin/kubectlmoveskubectlto the/usr/local/bin/directory with appropriate permissions.
- Configure AWS CLI:
Run
aws configureto set up your AWS credentials and default region:aws configure
Enter your AWS Access Key,Secret Access Key Default Region(e.g.,
ap-south-1), and Output Format (e.g.,json).
- Update kubectl to Connect to Your EKS Cluster:
Use AWS CLI to update the
kubectlconfiguration for your EKS cluster:aws eks update-kubeconfig --region <region> --name <cluster-name>
Replace
<region>and<cluster-name>with your specific EKS cluster detailsverify that your cluster has been successfully created or updated.
aws eks list-clustersReplace
<region>and<cluster-name>with your specific EKS cluster details

cat /home/ubuntu/.kube/config
This command displays the contents of the kubeconfig file, which is used by kubectl to manage your Kubernetes cluster.
Jenkins on your Kubernetes (EKS) cluster successfully, taking control of the master node.
Add AWS Credentials in Jenkins
Go to Manage Jenkins page, click on "Manage Credentials”
Now, under (global) or in a specific domain if required, click on (Global credentials (unrestricted))
Select the AWS Credentials Type:
In the Kind dropdown, select "AWS Credentials".

Fill in the AWS Credentials:
ID: Provide a unique name for the credentials (e.g.,
aws-eks-cred).Access Key ID: Enter your
AWS_ACCESS_KEY_ID.Secret Access Key: Enter your
AWS_SECRET_ACCESS_KEY.

Setting Up Slack Notifications in Jenkins
Create a Slack Channel
In your Slack workspace, create a new channel for Jenkins notifications.
- Example:
#jio-project.
- Example:
This will be the channel where Jenkins sends its notifications.


Add the Jenkins CI App in Slack
Go to the Slack App Directory and search for Jenkins CI.
Select the app and click Add to Slack.


Follow the prompts to authorize the app and select the channel you created for notifications.
Slack will generate a token or webhook URL for integration.

Install the Slack Plugin in Jenkins
- Open your Jenkins dashboard and go to Manage Jenkins > Plugins

Configure Slack in Jenkins
Go to Manage Jenkins > Configure System.
Scroll to the Slack section

Workspace: Enter Your Slack workspace name.

click Add Credentials.
Select Secret text as the kind.

- Paste the Slack Bot Token (starts with
xoxb-...) into the Secret field.


Deploying the Spring Boot Mongo Application to EKS (Amazon Elastic Kubernetes Service)
pipeline {
    agent any

    tools {
        maven 'maven'
    }

    environment {
        AWS_DEFAULT_REGION = 'ap-south-1'  // Set default AWS region
    }

    stages {
        // Checkout Code
        stage('Checkout') {
            steps {
                git branch: 'feature',
                    credentialsId: '33e5e605-33c2-45d2-8c7d-4a94a80eb1ef',
                    url: 'https://github.com/KandlaguntaVenkataSivaNiranjanReddy/spring-boot-mongo-docker-kkfunda.git'
            }
        }

        // Build the Maven Project
        stage('Build') {
            steps {
                sh "mvn clean package"
            }
        }

        // File System Security Scan using Trivy
        stage('File System Trivy Scan') {
            steps {
                script {
                    def status = sh(script: "trivy fs --format table -o trivy-fs-report.html .", returnStatus: true)
                    if (status != 0) {
                        error "Trivy scan failed with exit code ${status}"
                    } else {
                        echo "Trivy scan completed successfully."
                    }
                }
            }
        }

        // Code Quality Analysis with SonarQube
        stage('SonarQube') {
            steps {
                withSonarQubeEnv('sonar') {
                    sh """
                    mvn sonar:sonar \
                        -Dsonar.projectKey=spring-boot-mongo \
                        -Dsonar.projectName='Spring Boot Mongo Project' \
                        -Dsonar.host.url=http://18.175.240.114:9000/
                    """
                }
            }
        }

        // Build Docker Image and Tag
        stage('Build & Tag Docker Image') {
            steps {
                script {
                    withDockerRegistry(credentialsId: '985fdb56-2bc9-4fc7-b69d-0c3dfddee456') {
                        sh "docker build -t niranjanreddy1231/mongospring:latest ."
                    }
                }
            }
        }

        // Push Docker Image to Registry
        stage('Push Docker Image') {
            steps {
                script {
                    withDockerRegistry(credentialsId: '985fdb56-2bc9-4fc7-b69d-0c3dfddee456') {
                        sh "docker push niranjanreddy1231/mongospring:latest"
                    }
                }
            }
        }

        // Configure AWS EKS Access
        stage('Setup KubeConfig') {
            steps {
                withCredentials([[$class: 'AmazonWebServicesCredentialsBinding',
                                  credentialsId: 'aws-eks-cred']]) {
                    script {
                        sh """
                        aws eks update-kubeconfig --region ap-south-1 --name EKS-Demo
                        """
                    }
                }
            }
        }

        // Deploy to Kubernetes Cluster
        stage('Deploy to Kubernetes') {
            steps {
                withCredentials([[$class: 'AmazonWebServicesCredentialsBinding',
                                  credentialsId: 'aws-eks-cred']]) {
                    script {
                        sh """
                        export KUBECONFIG=/var/lib/jenkins/.kube/config
                        kubectl apply -f springappmongo.yaml -n test-ns --validate=false
                        """
                    }
                }
            }
        }

        // Verify Deployed Pods
        stage('Verify Pods') {
            steps {
                withCredentials([[$class: 'AmazonWebServicesCredentialsBinding',
                                  credentialsId: 'aws-eks-cred']]) {
                    script {
                        sh "kubectl get pods -n test-ns"
                    }
                }
            }
        }
    }
     post {
        always {
            script {
                slackSend(
                    channel: "#jio-project", // Slack channel for notifications
                    color: currentBuild.result == 'SUCCESS' ? 'good' : 'danger', // Green for success, red for failure
                    message: """
                    *Job*: '${env.JOB_NAME}'
                    *Build*: #${env.BUILD_NUMBER}
                    *Status*: ${currentBuild.result}
                    *Details*: <${env.BUILD_URL}|Click here>
                    """
                )
            }
        }
    }
}


To Be Continued...
In the next section, we will explore how to integrate Helm for deploying our Mongo Spring Boot application on Kubernetes using Jenkins and Helm. Stay tuned for more!
Subscribe to my newsletter
Read articles from Kandlagunta Venkata Siva Niranjan Reddy directly inside your inbox. Subscribe to the newsletter, and don't miss out.
Written by