Secrets Management in K8s
 Subbu Tech Tutorials
Using credentials directly in the Helm chart's values.yaml file is convenient for testing and development, but it's not recommended for production or real-world scenarios due to security risks. In real-world deployments, sensitive information like database credentials should be managed securely.
Best Practices for Real-World Applications
Secrets Management: Use a secrets management tool (such as AWS Secrets Manager, HashiCorp Vault, or Azure Key Vault) integrated with Kubernetes. These tools provide more security and allow dynamic rotation of secrets.
External Secret Integration: Use tools like External Secrets Operator or AWS Secrets and Configuration Provider (ASCP) to pull secrets from external managers directly into Kubernetes.
Encryption: Ensure that Secrets in Kubernetes are encrypted at rest and consider using Role-Based Access Control (RBAC) to restrict access to them.
Avoid Hardcoding: Never store sensitive information directly in Helm values files, Git repositories, or environment variables in plain text.
Example with External Secrets Manager (AWS Secrets Manager)
If using AWS, you could store these credentials in AWS Secrets Manager and configure an external secrets operator to sync them into Kubernetes as native Secrets.
You can use AWS Secrets Manager secrets in your Helm charts for dev/QA environments also. To achieve this, you’ll need to integrate AWS Secrets Manager with Kubernetes. Here’s a common approach using AWS Secrets and Configuration Provider (ASCP) or External Secrets Operator to pull secrets from AWS Secrets Manager and inject them into your Kubernetes environment.
Step-by-Step Guide:
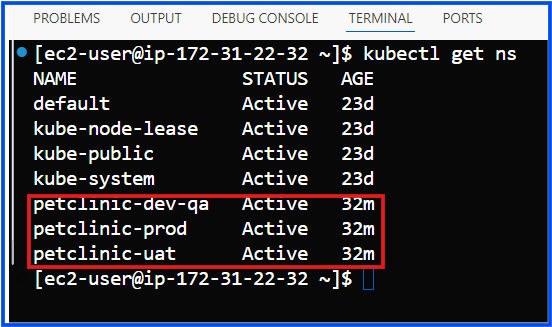
Install External Secrets Operator with support for multiple namespaces. Here’s how to proceed:
Step 1: Install External Secrets Operator in a Dedicated Namespace
Since you’ve removed everything, start fresh by creating a dedicated namespace for the External Secrets Operator (e.g., external-secrets) if it doesn’t already exist.
kubectl create namespace external-secrets
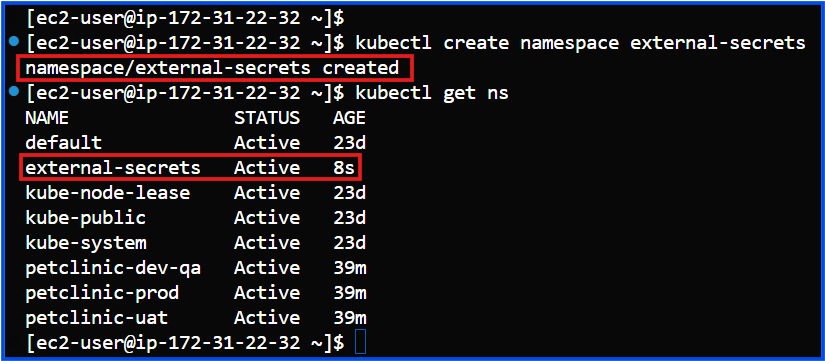
Step 2: Install External Secrets Operator with Namespace Scoping
Install the External Secrets Operator using Helm, specifying the namespaces it should watch (petclinic-dev-qa, petclinic-prod, and petclinic-uat). You can use the watchNamespace configuration to target these namespaces.
Create a
values.yamlOverride File (recommended for managing multiple namespaces):Create a file called
override-values.yamlwith the following content:watchNamespace: "petclinic-dev-qa,petclinic-prod,petclinic-uat"
Install External Secrets Operator with the Override File:
Run the following command to install the operator using the override file:
helm install external-secrets external-secrets/external-secrets --namespace external-secrets -f override-values.yaml --set installCRDs=true

Step 3: Verify Installation
After installation, verify that the External Secrets Operator is running in the external-secrets namespace and configured to watch the specified namespaces.
kubectl get pods -n external-secrets

Step 4: Create Service Accounts in Each Namespace
For each namespace (petclinic-dev-qa, petclinic-prod, petclinic-uat), create a service account with the necessary IAM permissions to access AWS Secrets Manager.
kubectl create serviceaccount secrets-manager-sa -n petclinic-dev-qa
kubectl create serviceaccount secrets-manager-sa -n petclinic-prod
kubectl create serviceaccount secrets-manager-sa -n petclinic-uat
To list all ServiceAccounts across all namespaces, you can use the following kubectl command:
kubectl get sa --all-namespaces

defaultServiceAccount: This is automatically created by Kubernetes in every namespace.secrets-manager-saServiceAccount: This is the ServiceAccount you created manually for accessing AWS Secrets Manager.
If you want to list only the secrets-manager-sa ServiceAccounts, you can further filter with grep:
kubectl get sa --all-namespaces | grep "secrets-manager-sa"

Step 5: Associate IAM Roles with Service Accounts
Use IAM Roles for Service Accounts (IRSA) in EKS to associate the necessary IAM role with each of these service accounts to allow access to AWS Secrets Manager.
This setup should enable External Secrets Operator to function across petclinic-dev-qa, petclinic-prod, and petclinic-uat namespaces, allowing you to securely manage secrets in each of these environments.
To associate an IAM role with the secrets-manager-sa ServiceAccount in each namespace (using IAM Roles for Service Accounts, or IRSA) in Amazon EKS, follow these steps:
Here’s an example IAM policy for accessing secrets:
{
  "Version": "2012-10-17",
  "Statement": [
    {
      "Effect": "Allow",
      "Action": [
        "secretsmanager:GetSecretValue"
      ],
      "Resource": "arn:aws:secretsmanager:<region>:<account-id>:secret:<secret-name>*"
    }
  ]
}
Replace <region>, <account-id>, and <secret-name> with the appropriate values.
Note: If you have different secrets for each namespace, you can specify multiple ARNs in the Resource field.
Ex: IAM policy for dev-qa/petclinic-secrets:
Create the IAM Policy
Log in to the AWS Management Console.
Go to IAM > Policies.
Click Create policy.
In the JSON tab, paste the policy JSON:
{
  "Version": "2012-10-17",
  "Statement": [
    {
      "Effect": "Allow",
      "Action": [
        "secretsmanager:GetSecretValue"
      ],
      "Resource": "arn:aws:secretsmanager:ap-south-1:905418425077:secret:dev-qa/petclinic-secrets*"
    }
  ]
}
Click Next: Tags (optional), and then Next: Review.
Give the policy a name, e.g.,
PetclinicSecretsAccessPolicy, and add a description if desired.Click Create policy to save it.

Step 2: Create an IAM Role with the New Policy (if not already created)
If you haven’t created an IAM role for this purpose, follow these steps to create one with a trust policy allowing your EKS cluster’s OIDC provider to assume the role.
Go to IAM > Roles.
Click Create role.
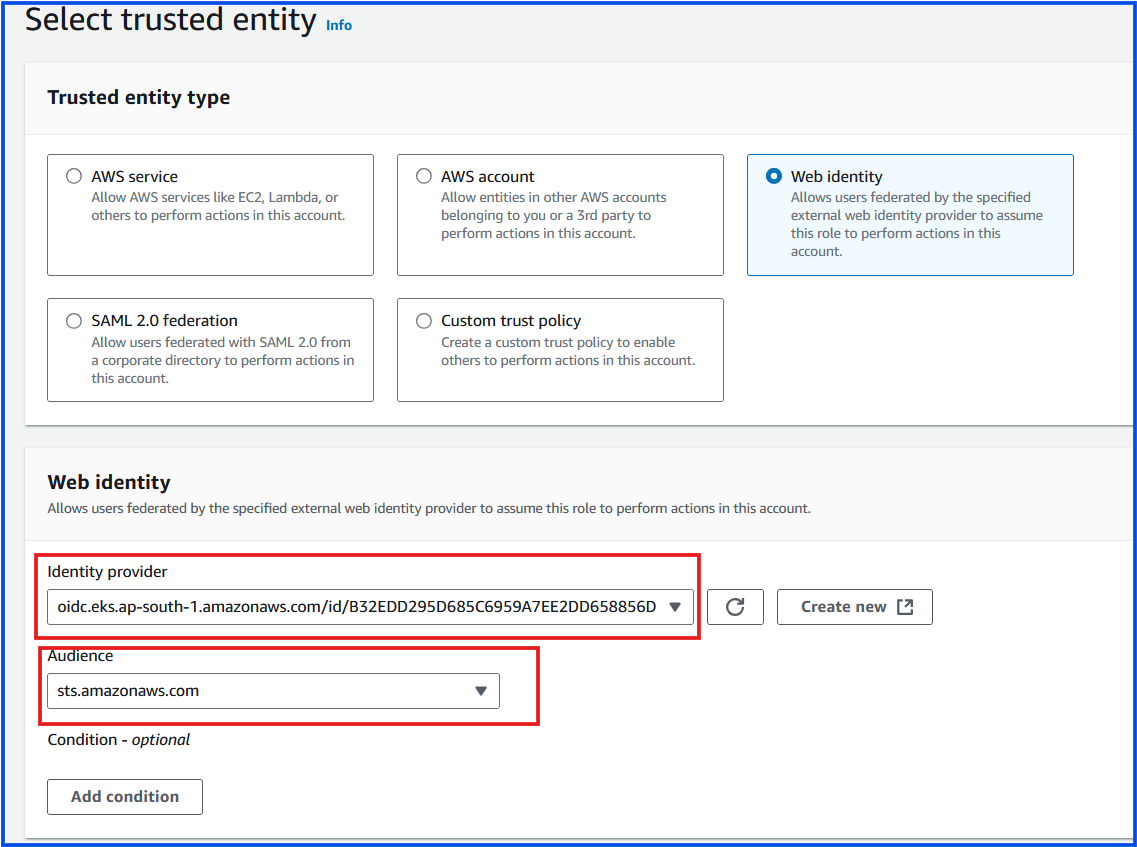
Choose Web Identity as the trusted entity type.
Select your EKS cluster’s OIDC provider under the identity provider.
Under Audience, choose
sts.amazonaws.com.Click Next: Permissions.
Attach the
PetclinicSecretsAccessPolicypolicy you just created.Click Next: Tags (optional), and then Next: Review.
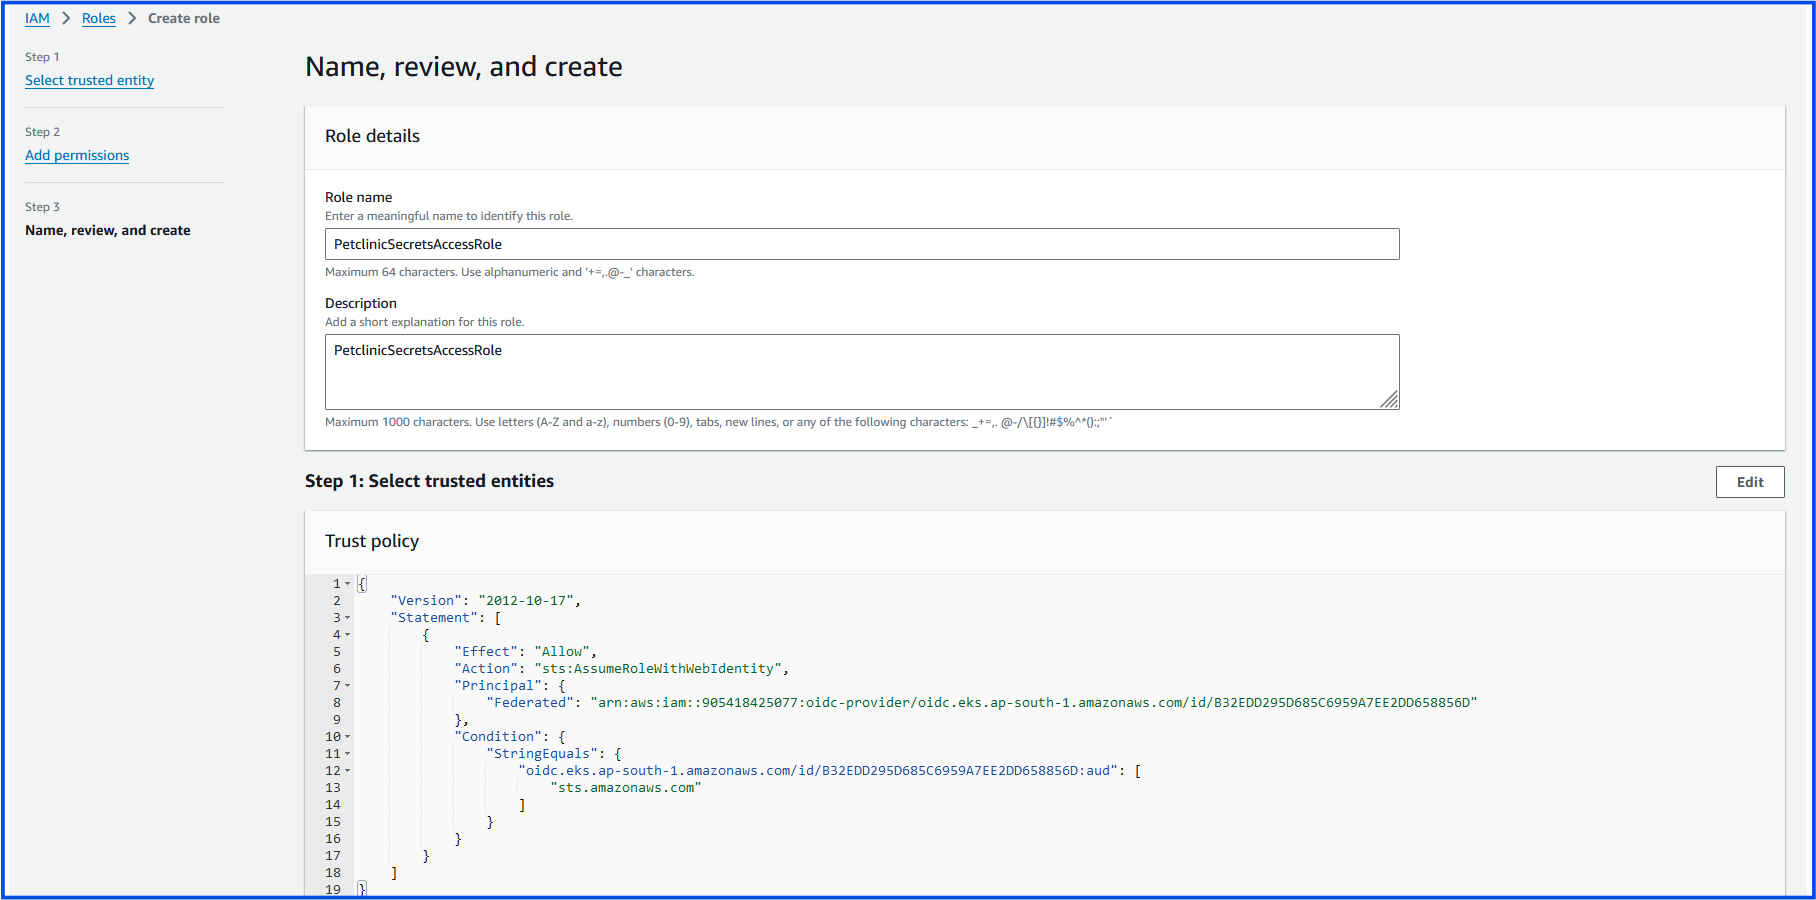
Give the role a name, e.g.,
PetclinicSecretsAccessRole.Click Create role.

Step 3: Add the Trust Policy for Specific Service Accounts
Now, modify the trust policy to allow specific Kubernetes service accounts to assume this IAM role.
Go to the IAM role you just created (e.g.,
PetclinicSecretsAccessRole).In the Trust relationships tab, click Edit trust policy.
Replace the trust policy JSON with something similar to this:
Example for Multiple Namespaces and Service Accounts
If you want to allow multiple service accounts across different namespaces (e.g., petclinic-dev-qa, petclinic-prod, and petclinic-uat), you can modify the sub condition to include each of them:
{
    "Version": "2012-10-17",
    "Statement": [
        {
            "Effect": "Allow",
            "Principal": {
                "Federated": "arn:aws:iam::905418425077:oidc-provider/oidc.eks.ap-south-1.amazonaws.com/id/B32EDD295D685C6959A7EE2DD658856D"
            },
            "Action": "sts:AssumeRoleWithWebIdentity",
            "Condition": {
                "StringEquals": {
                    "oidc.eks.ap-south-1.amazonaws.com/id/B32EDD295D685C6959A7EE2DD658856D:aud": "sts.amazonaws.com",
                    "oidc.eks.ap-south-1.amazonaws.com/id/B32EDD295D685C6959A7EE2DD658856D:sub": [
                        "system:serviceaccount:petclinic-dev-qa:secrets-manager-sa",
                        "system:serviceaccount:petclinic-prod:secrets-manager-sa",
                        "system:serviceaccount:petclinic-uat:secrets-manager-sa"
                    ]
                }
            }
        }
    ]
}
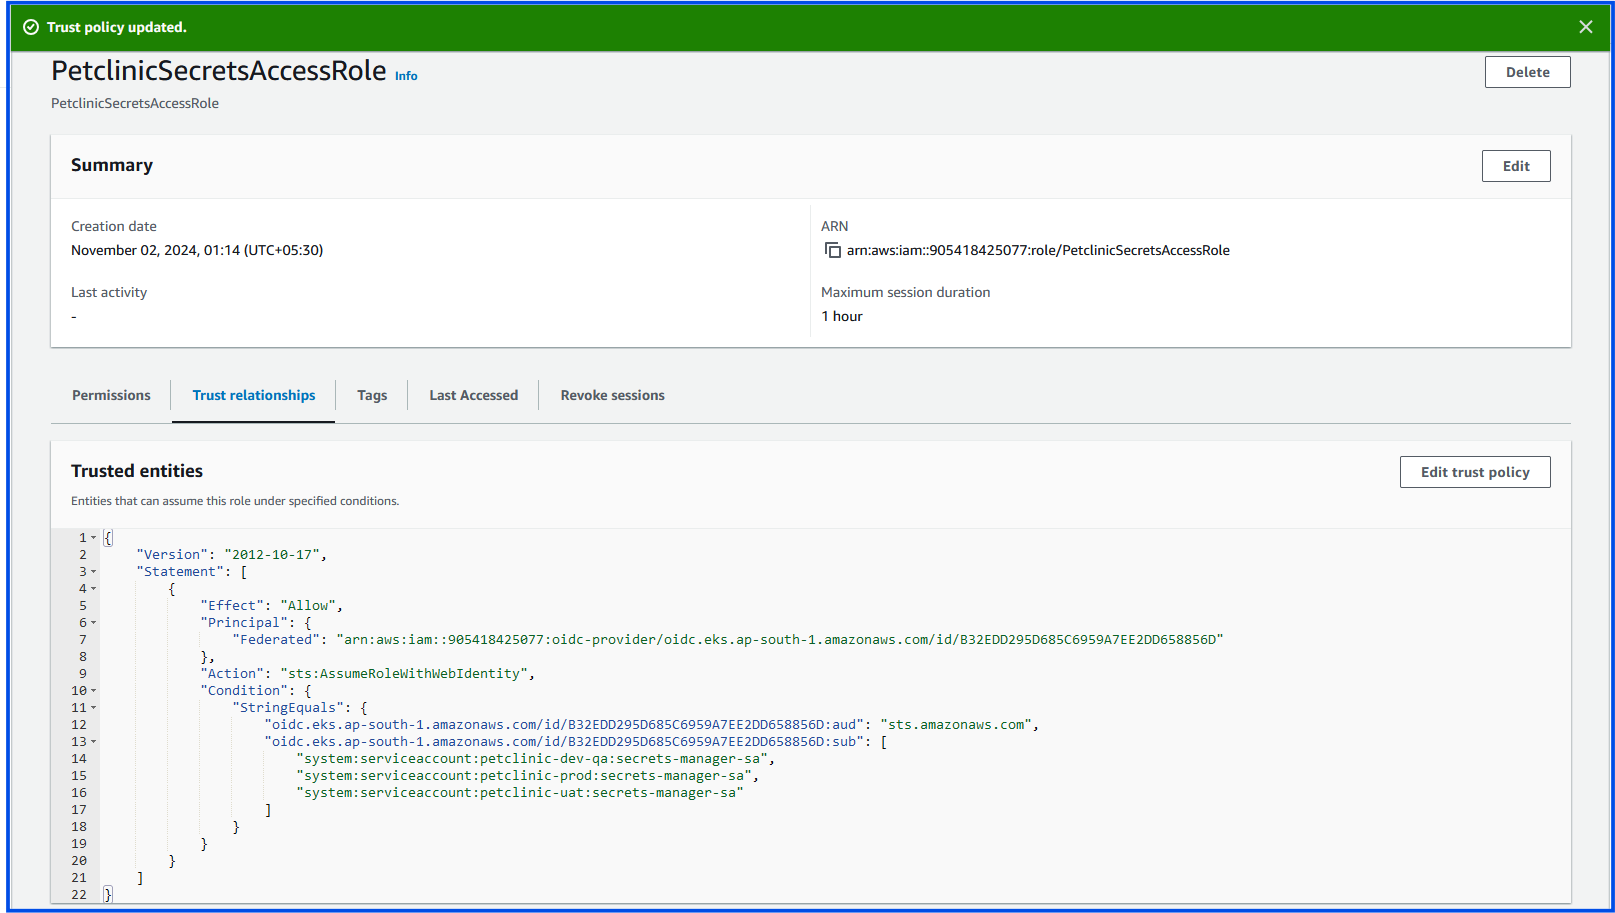
Now that the IAM role trust policy has been correctly configured, the next steps involve associating this IAM role with the Kubernetes service accounts and configuring External Secrets in your EKS cluster to use these secrets.
Step 1: Associate the IAM Role with Kubernetes Service Accounts
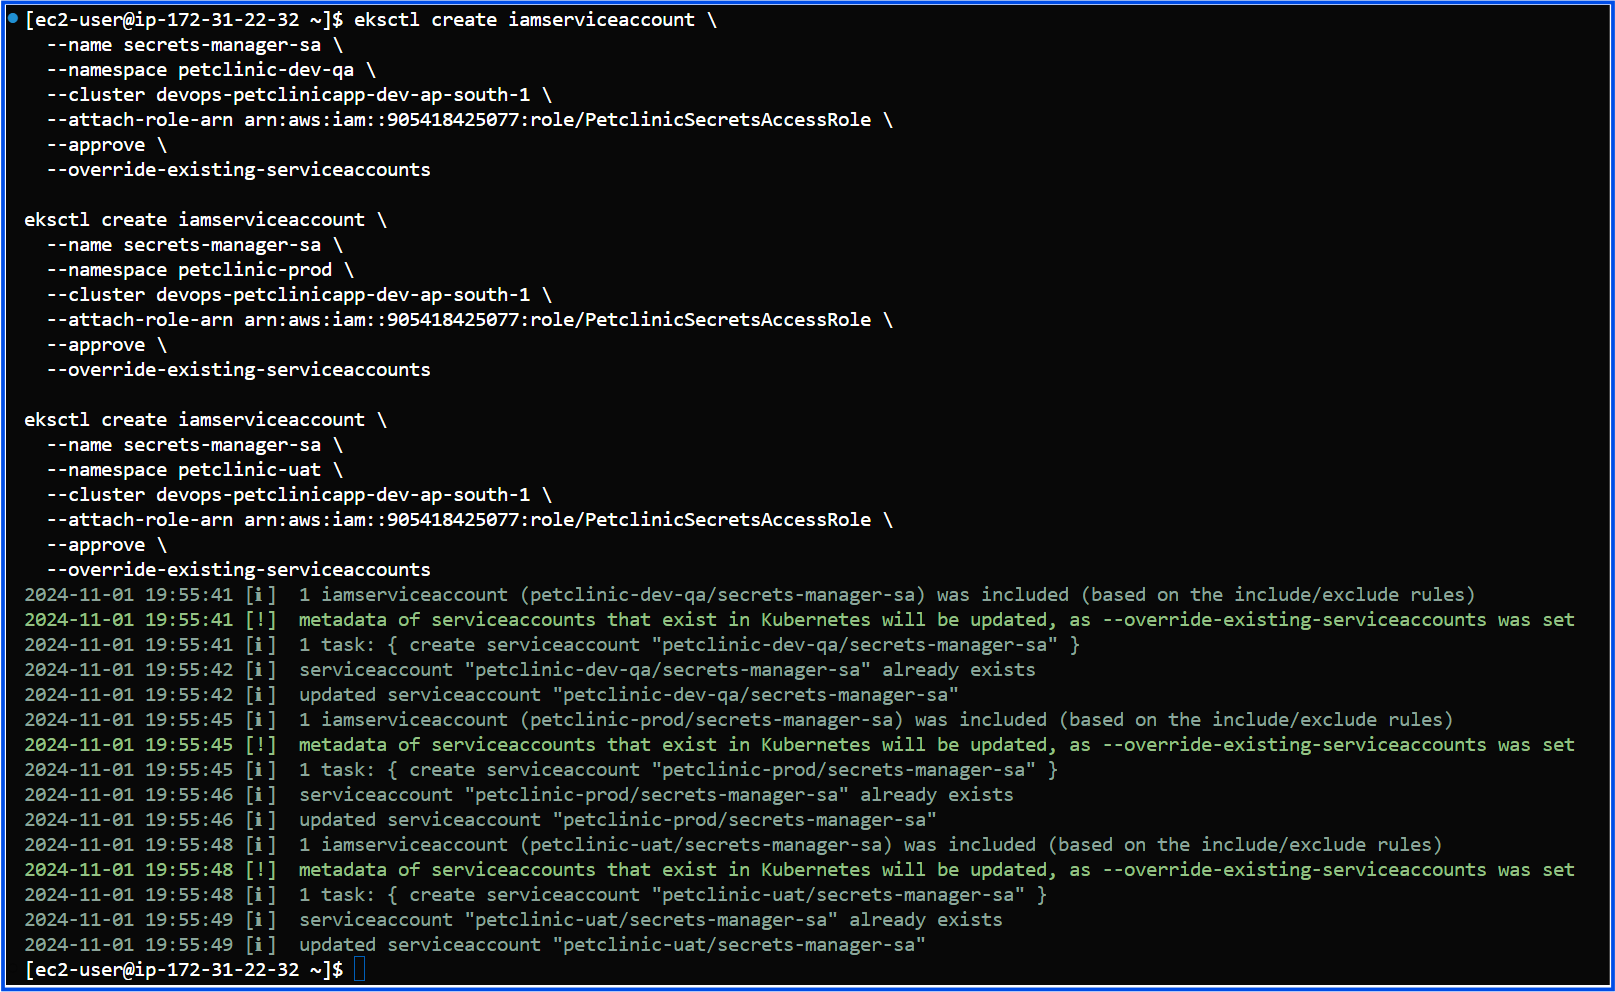
You need to annotate the secrets-manager-sa service account in each namespace (petclinic-dev-qa, petclinic-prod, petclinic-uat) with the IAM role so that these service accounts can assume the PetclinicSecretsAccessRole and access AWS Secrets Manager.
If you’re using eksctl, you can do this with the following commands:
eksctl create iamserviceaccount \
  --name secrets-manager-sa \
  --namespace petclinic-dev-qa \
  --cluster devops-petclinicapp-dev-ap-south-1 \
  --attach-role-arn arn:aws:iam::905418425077:role/PetclinicSecretsAccessRole \
  --approve

eksctl create iamserviceaccount \
  --name secrets-manager-sa \
  --namespace petclinic-prod \
  --cluster devops-petclinicapp-dev-ap-south-1 \
  --attach-role-arn arn:aws:iam::905418425077:role/PetclinicSecretsAccessRole \
  --approve

eksctl create iamserviceaccount \
  --name secrets-manager-sa \
  --namespace petclinic-uat \
  --cluster devops-petclinicapp-dev-ap-south-1 \
  --attach-role-arn arn:aws:iam::905418425077:role/PetclinicSecretsAccessRole \
  --approve
Here’s a step-by-step guide to configure and use the synced secrets in your applications:
Step 1: Create ExternalSecret Resources:
The ExternalSecret resource is what tells the External Secrets Operator to sync specific secrets from AWS Secrets Manager into Kubernetes. You will create one ExternalSecret for each namespace.
Here’s an example ExternalSecret configuration for the petclinic-dev-qa namespace:
ExternalSecret Manifest
Create a file named petclinic-mysql-secrets-dev-qa.yaml with the following content:
apiVersion: external-secrets.io/v1beta1
kind: ExternalSecret
metadata:
  name: petclinic-mysql-secrets
  namespace: petclinic-dev-qa
spec:
  refreshInterval: "1h"
  secretStoreRef:
    name: aws-secrets-manager
    kind: SecretStore
  target:
    name: mysql-credentials
    creationPolicy: Owner
  data:
    - secretKey: MYSQL_ROOT_PASSWORD
      remoteRef:
        key: dev-qa/petclinic-secrets
        property: MYSQL_ROOT_PASSWORD
    - secretKey: MYSQL_USER
      remoteRef:
        key: dev-qa/petclinic-secrets
        property: MYSQL_USER
    - secretKey: MYSQL_PASSWORD
      remoteRef:
        key: dev-qa/petclinic-secrets
        property: MYSQL_PASSWORD
    - secretKey: MYSQL_DATABASE
      remoteRef:
        key: dev-qa/petclinic-secrets
        property: MYSQL_DATABASE
refreshInterval: Defines how often the External Secrets Operator should check for changes in AWS Secrets Manager and sync the secrets.secretStoreRef: Specifies the name and kind of the secret store (in this case, AWS Secrets Manager).target.name: Defines the name of the Kubernetes secret that will be created (mysql-credentials).data: Maps each Kubernetes secret key (secretKey) to the corresponding AWS Secrets Manager key (remoteRef.key).
Apply the ExternalSecret:
kubectl apply -f petclinic-mysql-secrets-dev-qa.yaml
Repeat this process for the petclinic-prod and petclinic-uat namespaces, updating the namespace and key values as needed (e.g., prod/petclinic-secrets and uat/petclinic-secrets).
Step 2: Verify the Synced Kubernetes Secrets:
After applying the ExternalSecret resources, check if the Kubernetes secrets have been created in each namespace.
kubectl get secrets -n petclinic-dev-qa
kubectl get secrets -n petclinic-prod
kubectl get secrets -n petclinic-uat
You should see a secret named mysql-credentials in each namespace, containing the values pulled from AWS Secrets Manager.
Step 3: Update Application Deployments to Use the Synced Secrets:
Modify your application deployments to use the synced Kubernetes secrets. You’ll configure the environment variables in your container specification to reference these secrets.
Here’s an example of how to update your deployment YAML for the petclinic application in the petclinic-dev-qa namespace:
apiVersion: apps/v1
kind: Deployment
metadata:
  name: petclinic
  namespace: petclinic-dev-qa
spec:
  replicas: 1
  selector:
    matchLabels:
      app: petclinic
  template:
    metadata:
      labels:
        app: petclinic
    spec:
      serviceAccountName: secrets-manager-sa
      containers:
        - name: petclinic
          image: <petclinic-image>
          env:
            - name: MYSQL_ROOT_PASSWORD
              valueFrom:
                secretKeyRef:
                  name: mysql-credentials
                  key: MYSQL_ROOT_PASSWORD
            - name: MYSQL_USER
              valueFrom:
                secretKeyRef:
                  name: mysql-credentials
                  key: MYSQL_USER
            - name: MYSQL_PASSWORD
              valueFrom:
                secretKeyRef:
                  name: mysql-credentials
                  key: MYSQL_PASSWORD
            - name: MYSQL_DATABASE
              valueFrom:
                secretKeyRef:
                  name: mysql-credentials
                  key: MYSQL_DATABASE
Step 4: Apply the Updated Deployment
Apply the updated deployment file to configure your application to use the synced secrets:
kubectl apply -f <your-petclinic-deployment-file>.yaml
Step 5: Verify the Application
Check if the application is using the secrets correctly:
- Pod Logs: Check the application pod logs to ensure there are no errors related to missing or incorrect environment variables.
kubectl logs <pod-name> -n petclinic-dev-qa
Application Connectivity: Confirm that the application can connect to the MySQL database using the synced credentials.
Manage the creation of ExternalSecret resources through Helm:
To manage the creation of ExternalSecret resources through Helm, you can create a custom Helm chart or add templates for ExternalSecret resources to your existing application chart. This approach centralizes configuration management, making it easier to deploy and manage secrets across different environments (e.g., petclinic-dev-qa, petclinic-prod, and petclinic-uat).
Here's a step-by-step guide to managing ExternalSecret resources with Helm.
Step 1: Create a Helm Chart (if not already created)
To organize the configuration files in your repository for each environment (petclinic-dev-qa, petclinic-prod, petclinic-uat), you can structure them to keep each environment’s configuration separate and clear. Here’s a recommended directory structure to manage your Kubernetes secrets, configmaps, and Helm chart files for each namespace/environment.
petclinic-pro-config-repo/
├── configmaps/                        # ConfigMaps for all environments
│   ├── dev-qa/
│   │   └── sonar-config.yaml          # ConfigMap for SonarQube or other specific config for dev-qa
│   ├── prod/
│   │   └── sonar-config.yaml          # ConfigMap specific to prod
│   └── uat/
│       └── sonar-config.yaml          # ConfigMap specific to uat
├── secrets/                           # Secrets for all environments (e.g., external-secrets configurations)
│   ├── dev-qa/
│   │   └── sonar-secrets.yaml         # Secrets specific to dev-qa
│   ├── prod/
│   │   └── sonar-secrets.yaml         # Secrets specific to prod
│   └── uat/
│       └── sonar-secrets.yaml         # Secrets specific to uat
├── external-secrets/                  # Folder for ExternalSecrets configurations
│   ├── templates/
│   │   └── external-secrets.yaml      # Template for ExternalSecrets, shared across environments
│   ├── values/
│   │   ├── values-dev-qa.yaml         # Values file for dev-qa environment
│   │   ├── values-prod.yaml           # Values file for prod environment
│   │   └── values-uat.yaml            # Values file for uat environment
│   └── cluster-secret-store.yaml      # Cluster-wide secret store configuration
├── deployments/                       # Deployments for different applications and environments
│   ├── petclinic/
│   │   ├── dev-qa/
│   │   │   └── deployment.yaml        # Deployment file specific to dev-qa
│   │   ├── prod/
│   │   │   └── deployment.yaml        # Deployment file specific to prod
│   │   └── uat/
│   │       └── deployment.yaml        # Deployment file specific to uat
├── mysql-chart/                       # Helm chart for MySQL, stored separately
├── vars/
│   └── deployConfigs.groovy           # Shared library for deploying configurations
└── Jenkinsfile                        # Pipeline definition
Summary
Use External Secrets Operator to sync secrets from AWS Secrets Manager into Kubernetes.
Use
ExternalSecretresources to map AWS Secrets Manager keys to Kubernetes Secrets.Reference the Kubernetes Secret in your Helm chart to securely inject credentials.
This approach keeps sensitive data out of your values.yaml file and Helm charts, providing a secure way to manage credentials across environments.
Subscribe to my newsletter
Read articles from Subbu Tech Tutorials directly inside your inbox. Subscribe to the newsletter, and don't miss out.
Written by
