My GSoC'24 with Inkscape
 Ravi Arora
About My Project
A Node Based Filter Editor For Inkscape
My project was replacing the current filter editor in Inkscape, with a more functional, node based workflow, supporting a variety of other features which the current one lacked. Since these are all very niche terms, I'll try to break down what each of these does. The first part of this post contains an introduction to what filters are, using filters in Inkscape, etc. In the second part I cover some of the technical details of how I approached implementing this. The last part includes my thoughts on it and my journey with it.
The filter editor is intended to be merged in the next major Inkscape release (hopefully 1.5). For now, if you wish to play around with it, you can have a look at it here: https://gitlab.com/inkscape/inkscape/-/merge_requests/6578/pipelines

You can select the download from the download button to the right, if you see a green tick in the left pass of stages.
Feel free to report any bugs to me or give any feedback on my merge request or on Inkscape’s Rocket Chat (mention me using @Ravi.Arora), I’ll try to respond as soon as possible.
What is Inkscape and what are SVGs?
Inkscape is an open-source vector graphics drawing software. A vector graphic is a for of graphics which store information in the form of mathematical constructs, such as lines, circles, curves, etc. Unlike the images which we click from a camera, where we store information about which color appeared at which coordinate of the image, here, we store information in the form of these geometrical elements, along with supporting elements such as color, stroke properties etc. Since our computers and monitors, displays, etc. usually work by communicating colors for each pixel, a vector graphic is first converted to it’s raster form, based on various properties, such as how far in we are zoomed, etc. and then can be displayed on screen. The advantages of this are that we are never at a loss of clarity in the vector graphic, since these images are created on the basis of how we wish to view them, and we don’t run out of information of what comes between two pixels.
SVG is an XML based file format which specifies a way of storing vector graphics information. SVG viewers tend to support scaling the image to any extent, interactivity, etc. I’d like to keep this section brief since there are more structured ways to understand more about these, so I’ll link a few resources here
Resources:
SVG 101
A Guide To Inkscape - Tavmjong Bah
The Art of SVG Filters (for an example of what filters do)
What are Filters in SVG?
Filters are a functionality in SVG which allow us to apply raster effects to vector images. Raster effects are operations on raster images, where we apply some form of a function on a pixel and it’s neighboring pixels, to generate a new image, and simply this definition doesn’t do justice to what is capable using filters.
To start off with a simple example, let us take a simple object. We wish to blur it since it’s out of focus. Creating this with just the help of shapes, etc, seems’s like a relatively tough task. Maybe we could use some gradient at the edges to make it look like it blends into the background, but that isn’t a good approach and probably not applicable for any general object. However, we’d like artists to have flexibility to create art like this with in SVGs. Here’s where filters come in to help.
Each filter is a combination of certain filter primitives, I try to simplify what a primitive does here:
A primitive takes a channel or multiple channels as an input
- These inputs are usually taken from the output of another primitive, or from the raw vector element’s channels (Source Graphic, Source Alpha, … )
A primitive does some operation using the inputs, such as blurring the input (done by Gaussian Blur primitive), compositing multiple layers (done by Composite, Merge, etc.), etc.
A primitive provides an output which can be reused in another primitives input, or as the final image.
A filter allows using these primitives in a sequential order to create some great visual effects based on vector drawings. A brief way to understand how they work is that the vector graphic is first converted to raster, based on the scaling, and then filters are applied on the raster image. Here’s a simple application of using filters to achieve a simple artistic effect - creating a drop shadow.

Inkscape also offers a bunch of pre-made filters to use, which create some amazing effects, these are available in the Filter Gallery in the newer versions, and under the Filters menu at the top. Here’s a preview of some more of them, to give a better idea of what’s possible.
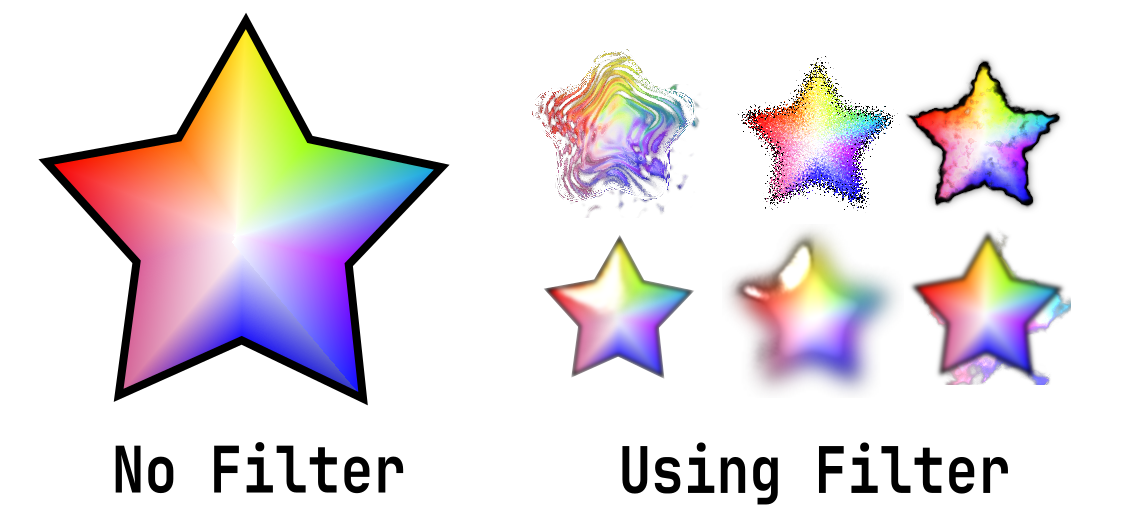
But the scope doesn’t just end here. It’s amazing how powerful filters can be, have a look at the artwork below by Lazur, achieved without even the need for a vector shape to work on, just using procedural filters, made on the new filter editor.

Using Filters in Inkscape with the Old Editor:
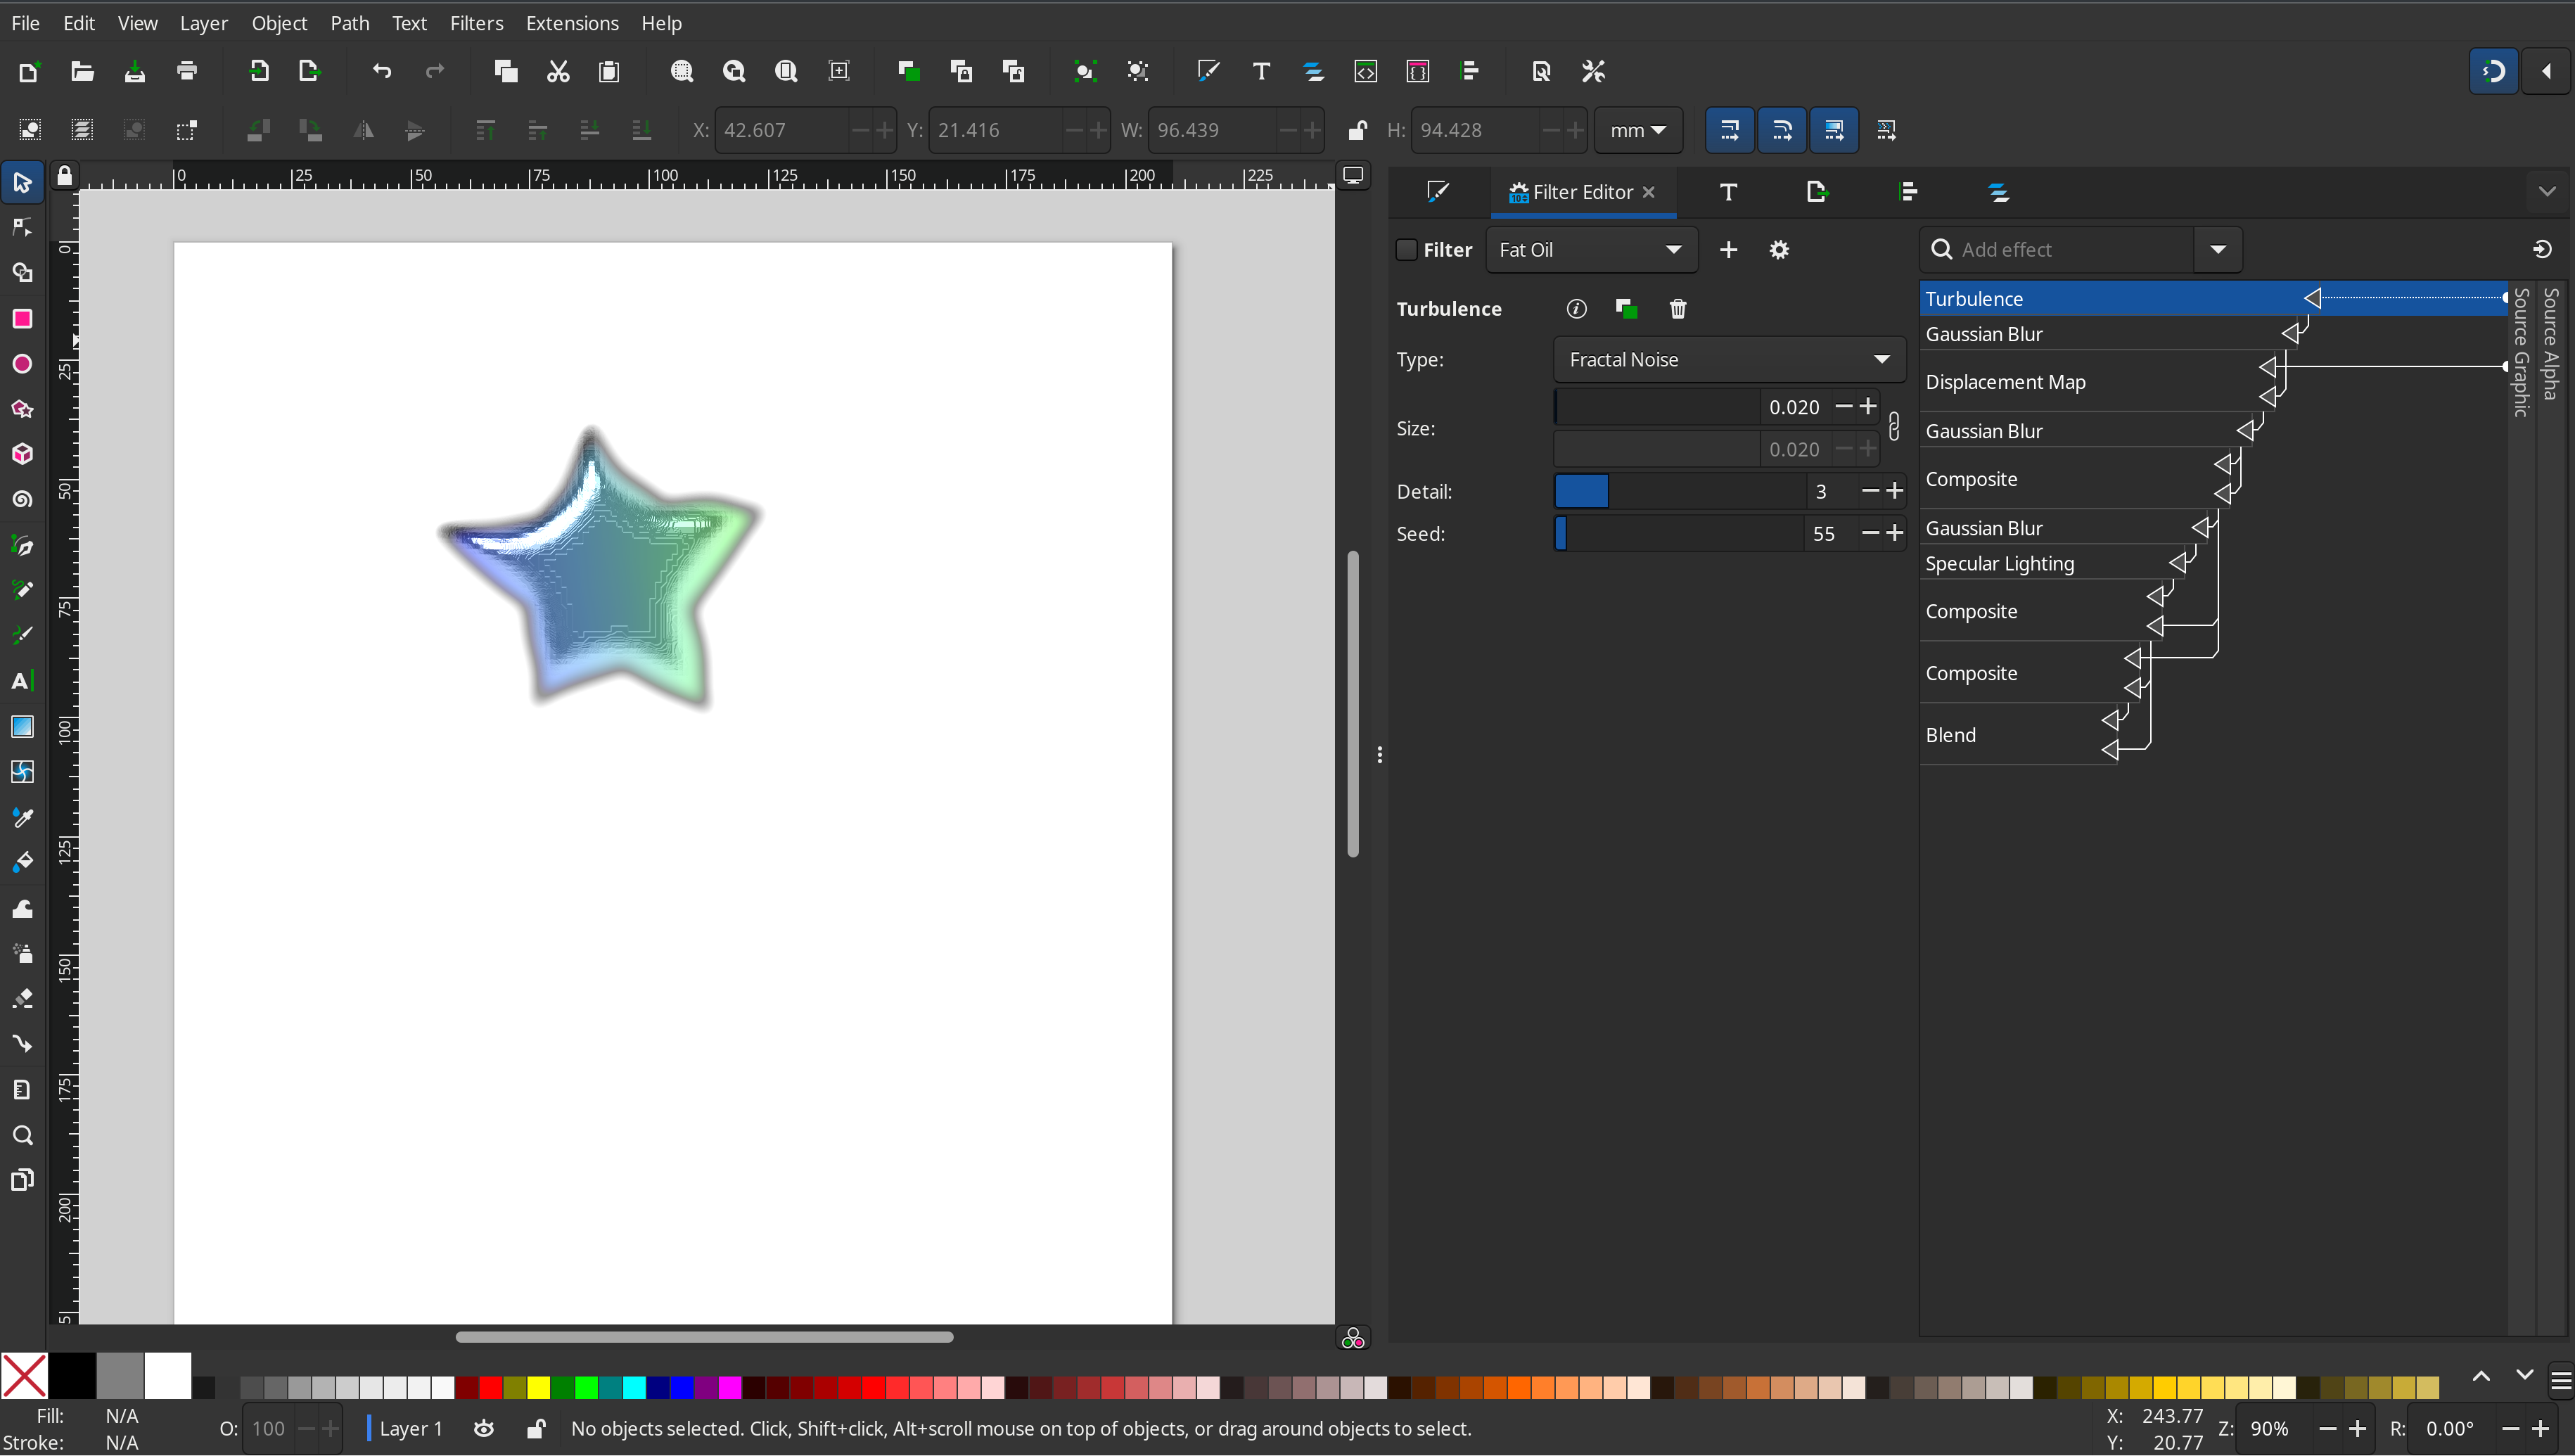
This is the old primitive editor. Effects are added using the add effect option, by default they go at the bottom. Connections go go from up to down, and connections are created by dragging the input of a channel to an output above. Reordering primitives requires dragging one primitive at a time. The editor also requires much more width as the number of nodes increases and the editor becomes much harder to read.
Problems with the Old Editor:
The old editor, while it provided complete functionality, wasn’t the most efficient way to create filters, for a lot of reasons:
The restricted top down layout made it awfully painful to work with more than a few primitives due to less readability
Constrained Workflow due to the restricted editor, lack of features such as selecting multiple primitives, duplication, preview, etc.
The new editor aims to resolve all of these issues as well as introduce new features to smoothen out the process for filter developers, while also making the editor intuitive to use for anyone beginning out.
Using the New Editor:
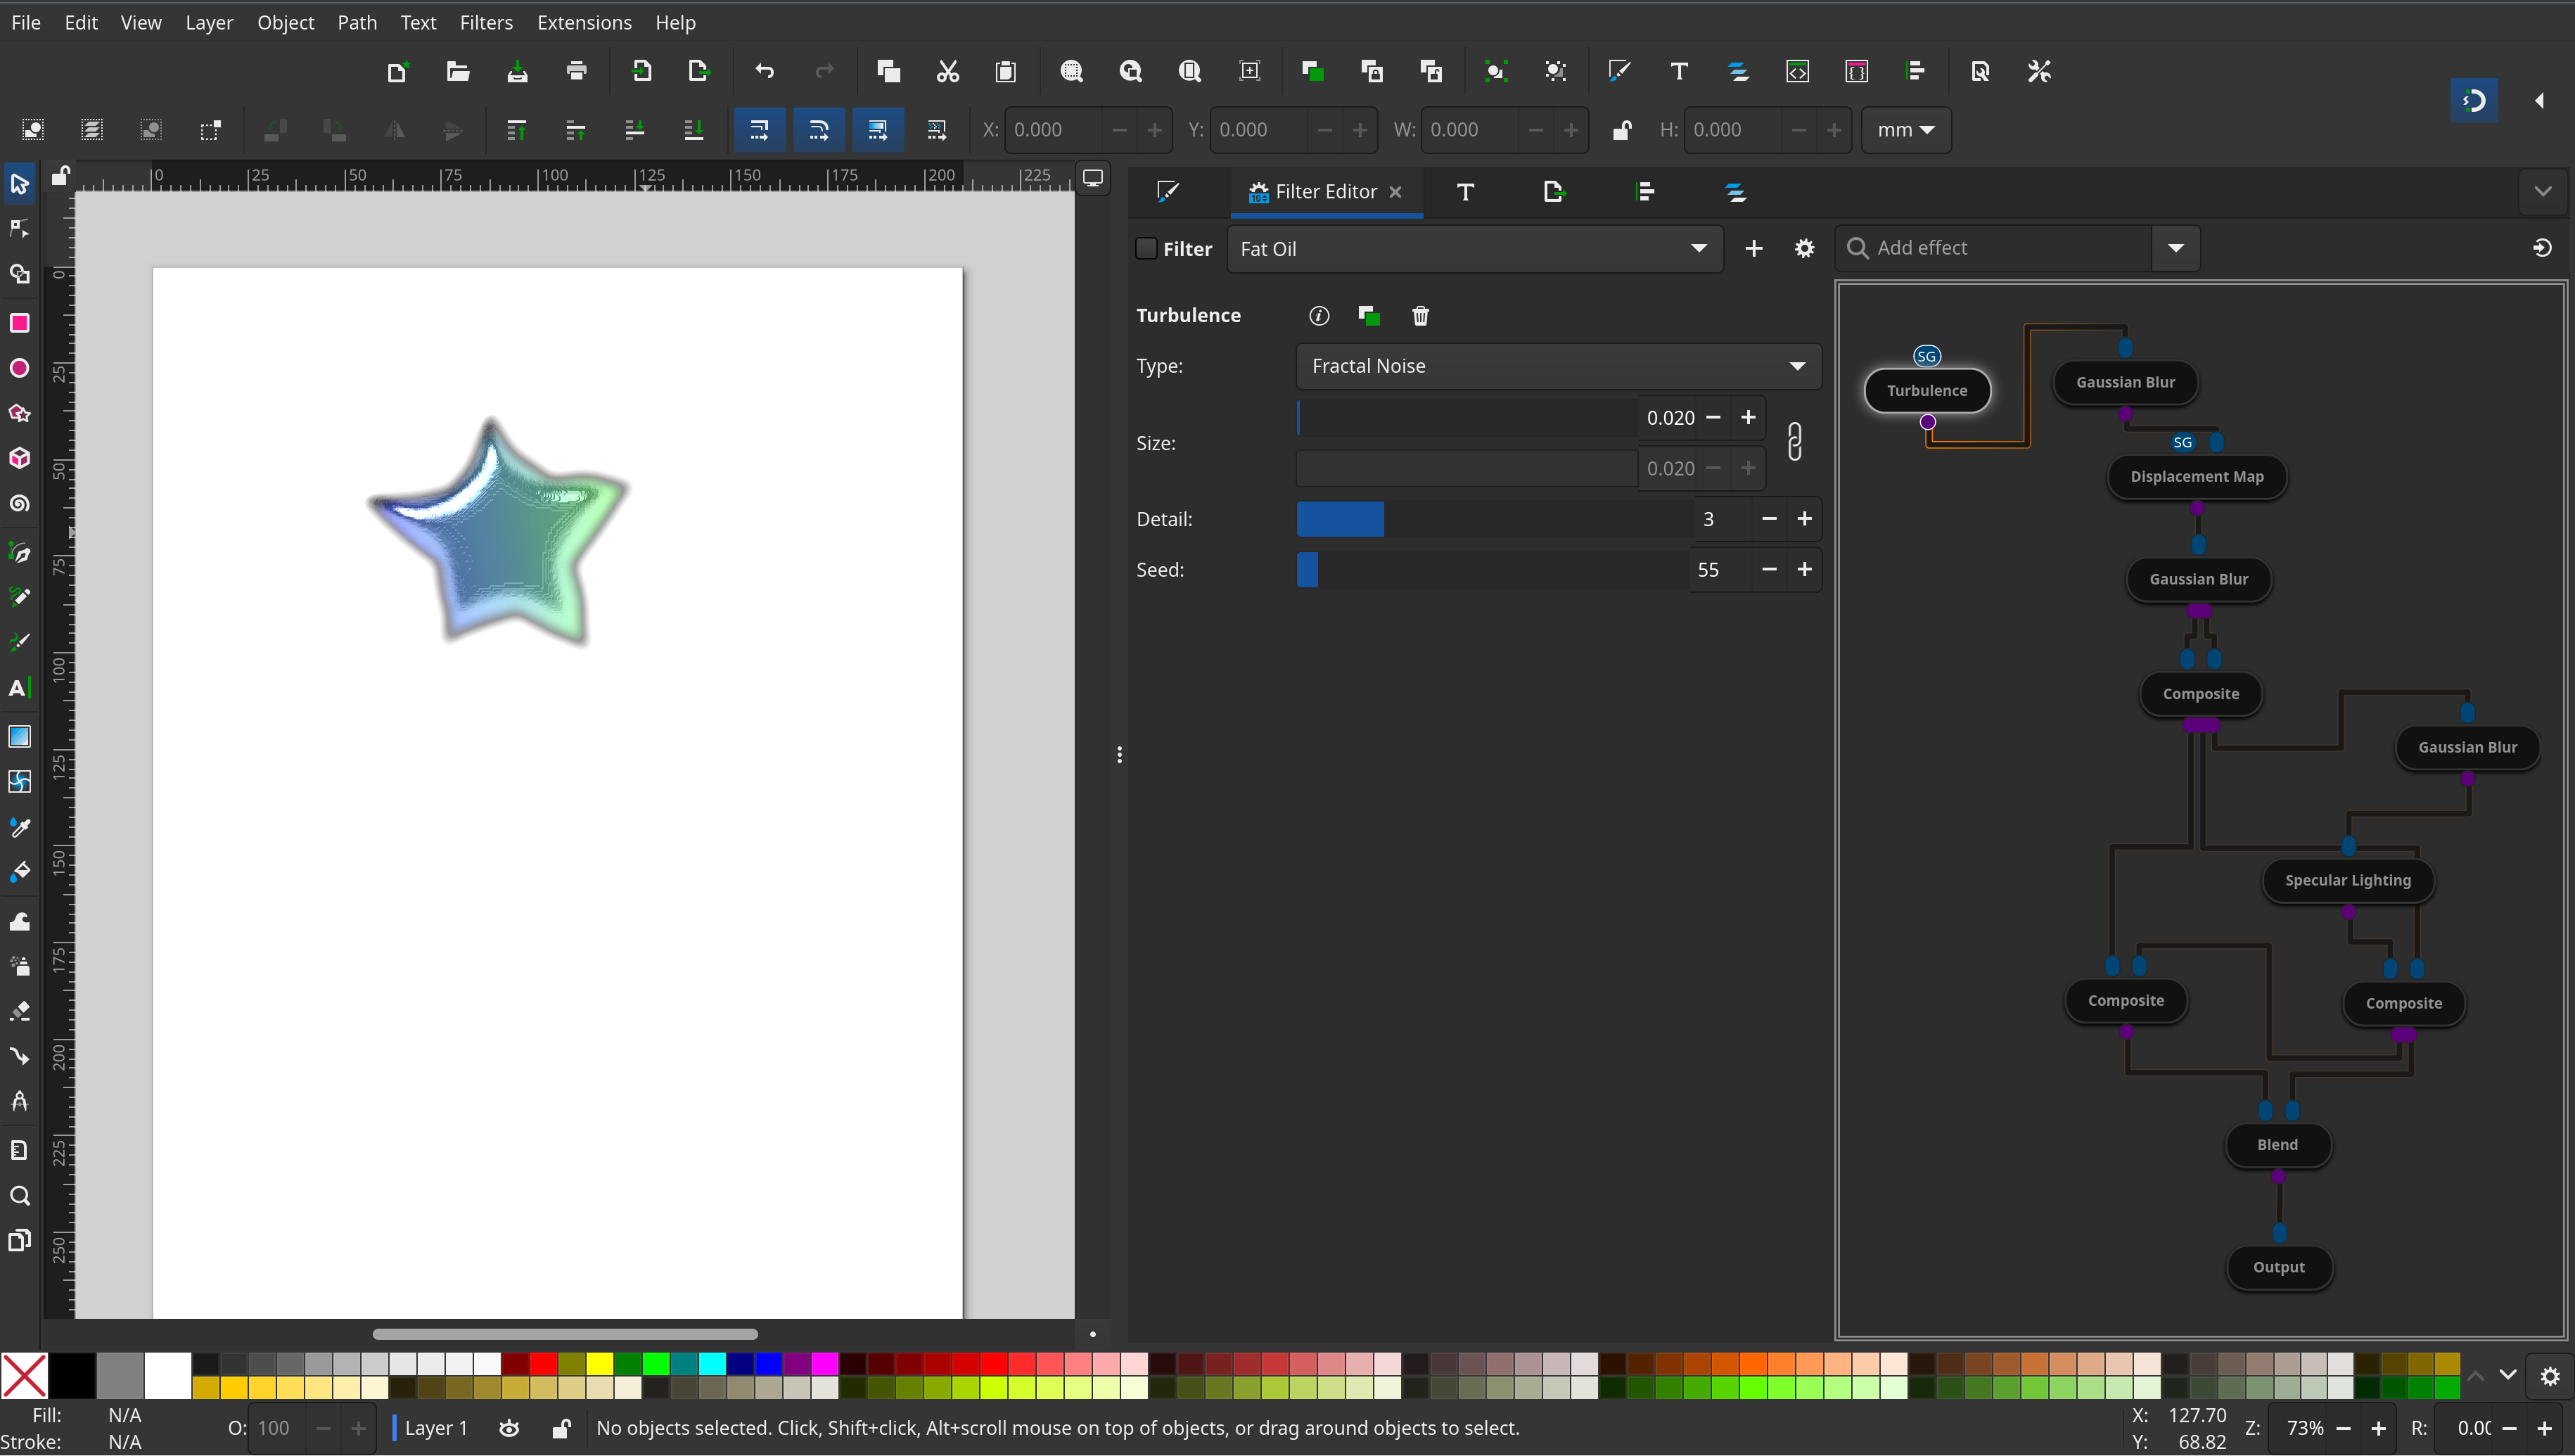
Here’s how the same filter can be made to look like in the new editor. The graph is much more intuitive on a single look, and more information can be packed in the same size.
Inputs:
Connections are made by simply dragging from the sources to sinks (purple to blue). Clicking on a sink toggles between Source Graphic, Source Alpha…
To break a connection, simply drag it off and drop it anywhere on the canvas.
The merge node has slightly different behaviour, since it can have any number of inputs to it. It always has an extra sink, which is used to create a connection to the node. Breaking any connection removes the sink and in corresponding to it.
Selection:
Drag for rubberband selection. Click to select a single node. Holding down shift adds to the current selection. Attributes are edited according to the first selected node.
Context Menu:
You can use the context menu to duplicate nodes, remove nodes, toggle the attribute editor (this is especially useful in the horizontal editor).
Preview:
The preview currently supports viewing a pre-defined object only. Selecting a primitive in the chain giving an output and pressing s let’s you see that single node in isolation. Pressing r let’s you view the output given by that node. h can be used to hide the preview, if you don’t wish to keep viewing it.
Custom Labels:
Right clicking on a node allows you to set a custom label for the node, adding clarity to what you want to achieve with a given node, which is very helpful in larger filters.
Note that the keybinds and shortcuts are subject to change on further UI testing, I’ll try to keep it updated before releases but cannot guarantee it.
Technical Aspects of Implementing the Editor:
Here I try to give insights on how I implemented the editor. I would like to admit that my implementation may not be the perfect one, but I’ve tried to the best of my abilities to pick the best approach at every point.
The UI (Choice of Widgets):
The canvas is implemented using a Scrolled Window, who’s child is a Fixed. The scrolled window uses up as much size as possible and forces it’s child to do the same. A fixed is a widget that allows the placing of widgets at a given coordinate. This is perfect for a node based editor since we don’t want a fixed layout for our nodes, the user should be free to place the nodes on the canvas wherever they wish to. Each node is a box containing three child boxes- one for the sinks (which indicate the inputs for a node, shown in blue in the image below), one for the related widgets on the node, the label, etc., and one for source, the output of a node (shown in purple).
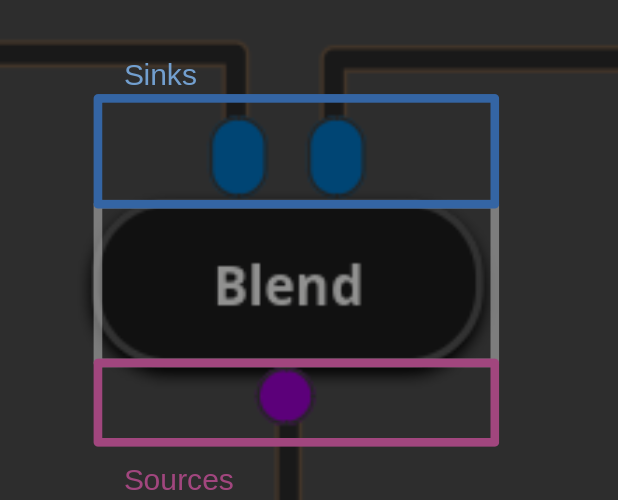
So the node is a vertical box, with a sinks and sources child boxes in horizontal orientation, and the middle widget container in vertical orientation.
The Document-Interface Synchronisation:
This part is probably the most important part to try and understand to get a better idea of how to implement a feature in Inkscape, since it is important to understand how the document model is implemented within of Inkscape, and how changes in the UI and changes in the document are ensured to go hand in hand.
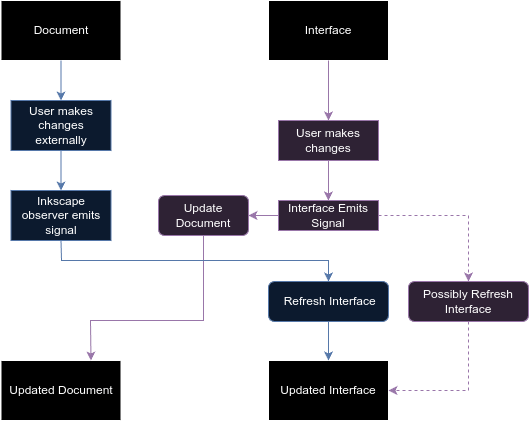
The above gives the gist of it. There’s two possible pipelines, where either the current interface is changed by the user, so we updated the document, and also the interface if needed, to ensure the consistency in the document, since the document should be the absolute decider in cases of discrepancy, and so it’s possibly a good option to refresh the interface according to the document, to ensure that the document and interface are always hand in hand. Note that the Refresh Interface function updates the interface in accordance to the document.
Alternatively, we also need to take into account the possibility of the user modifying a part of the document affecting us, from a different part of the software, such as the filter gallery can modify filters apart from the filter editor, or consider undo, in such a case, we refresh the interface to ensure the interface goes hand in hand with the document.
More thought can be put into the functions Update Document and Refresh Interface, especially in minimising the cases when they need to be called and how to make the minimal changes in both to ensure consistency (similar to a diff), but to be safe and to begin with, it might be a good idea to use as many calls to ensure they both stay in sync, and more thought can be put in to optimising it later.
A Brief Overview of The Editor’s Implementation:
As mentioned above, the editor contains a canvas where most of the node based work is based on.
Each Filter in the document is associated with an SPFilter object. SPFilter is a derived class of SPObject, which is a base class for all document nodes. This SPFilter can be used to manipulate all the properties of the filter object. Each filter has children Filter Primitives, which are now translated to SPFilterPrimitive objects. Each Filter Primitive or SPFilterPrimitive must also correspond to a node on the canvas.
We figure out the filter currently being targeted, using the filter selection dropdown. The canvas as well as the widgets for editing the attributes are now updated on the basis of the selected filter, and updated if the signal denoting the change in filter selection is called. Adding primitives now adds them under the current filter, and creates the corresponding SPFilterPrimitive's as well as nodes on the canvas. Similarly, selecting a primitive signals the attributes editor to update the UI for that primitive. In this manner, the changes corresponding to the canvas are pushed into the document, in a reversible manner, i.e., the canvas would load into the same state from the given document. This is the update document functionality.
We also implement the function to read the data from the primitives and filters and construct the canvas corresponding to it, which is the refresh interface functionality. An observer is set to watch the filter for changes to the document, and this signal is connected to the refresh interface. It’s also important to note that the observer must be temporarily disabled when making changes in the document from the canvas, else they would be signalled as well, which could be potentially problematic.
Since it’s important that the canvas stays the same on re-opening the document, i.e., the position of the nodes, the view of the canvas, etc., therefore these must be reflected in the document.
Undo is easy to implement if the approach used is the same as above. Why? Because undo simply changes the document to a previous version of itself. Undo is implemented using a diff of a sort within Inkscape, so when an undo is called, Inkscape simply goes to an earlier version of the document, and the signals are called, which means we can simply refresh the UI, to have undo working.
Note that the functions corresponding to undo are DocumentUndo::done and DocumentUndo::maybeDone, they differ in the sense that if the user does something miniscule such as moving a node on the graph, we don’t want to commit all of these movements and make a huge undo tree, rather, we often want to club these into one. This is where maybeDone comes into play which allows you to club changes in the document under a single undo, using a common key, until an unrelated change is pushed.
Sharing my Experience
I’ve had a really fun time working on Inkscape as a part of GSoC’24, and I’ll admit to it feeling a bit heavy times, since I was managing it with college running in parallel, yet I would still blindly recommend it to any colleagues to apply for the experience.
Skill Growth:
GSoC projects, from what I have seen, are not simple projects, and I don’t think they should be either. My project kept challenging me at times. At the time of writing my proposal, I was familiar with C and knew enough C++ to get around to basic competitive programming, and a little bit of software development with Qt. My project challenged me in a lot of ways, I got into deeper C++ due to the research I did during writing my proposal as well as completing the project, such as smart pointers, ownership, memory safety, better understanding of build systems, building libraries etc. Debugging is crucial for any development task, I got familiar with debugging and figuring out where issues arise from, and developed better intuition for the same. Developing the editor also made me realise the various strategies used for developing any application editing a file: editor-file synchronisation, strategies for implementing undo, etc. The degree of thinking that goes into this is not evident from a surface level view of it, however, working on it as a developer got me to appreciate the amount of thought that goes into this. This is why being presented with challenges constantly helped me hone various skills, and exploring the domain to a much deeper extent.
Anyone applying to GSoC can expect a fun and challenging time, with a lot of scope to learn. What’s also important to note is the fact that while you have mentors to aid you, you are probably going to have to figure out and work alone a lot of the time, which might seem like a downer but it is where real learning happens, when you take it as a challenge to figure out whatever is required to complete the tasks.
Networking and Getting to Know the Community:
GSoC also promotes community bonding and growth with the community. I’ve gotten a lot closer to a lot of members among the Inkscape organisation, especially the developers. Working in Inkscape allowed gave me experience in working in an organisational hierarchy, with developers with experience from decades of working in the industry. There guidance was insightful, both in technical aspects as well as on how to approach it, how to take on tasks. My mentors were Marc Jeanmougin and Tavmjong Bah, who are both extremely experienced developers. Tav (short for Tavmjong) is also the author of the book A GUIDE TO INKSCAPE.
Mentors are members of your organisation under whose guidance you work on your GSoC project. They’ll be there to guide you throughout, to help you make decisions at a lot of places and monitor your overall progress. Communication with them is key, and I overlooked this initially. I’ll add more on this in the section ahead. It’s important to set down your project scope and expectations with them, and discuss your progress regularly.
I’ve gotten to learn a lot from them and grown closer to them. One of the coolest things about the GSoC is the mentorship, considering mentors are often a lot more experienced than people beginning out, so to work under them is a great source of learning. It’s only natural that having mentors smoothens the process, and makes it more enjoyable. I’ve gotten to get a better understanding of their thought processes and how mine differed from them (so a better general idea of how to think from an experienced developers point of view), gotten technical help, as well as had casual conversations with them. Considering both my mentors are pretty senior in their respective fields, I’m appreciative that they always had time for me throughout the duration of the project.
Community:
The community has been a great support throughout too. I received criticism and feedback from various members on the editor, and valuable suggestions on how to approach a task every time I faced difficulty. I also got to learn a lot from the members, a lot of whom took up frequent meets to give feedback and guide me as well.
Mistakes I Made:
This is important, for anyone who’s beginning out with GSoC, it’s probably a good idea to go through this section, to remove any misconceptions from your mind.
BE CLEAR IN COMMUNICATION: Don’t hesitate to communicate problems or issues, don’t hesitate to communicate if you are stuck, don’t hesitate to seek out for help. Make sure to communicate all of these, along with any other conflicts with the project, if you aren’t going to be able to work for a few weeks, discuss it with your mentors and try getting an extension, rather than going offline unprecedented. I made this mistake, I was poor in communication to my mentors and I later realised this mistake I made, and realised I was a bit unjust to my mentors in this sense, and I tried to the best possible extent to make up for this by staying in constant communication through the rest of the duration.
BE CONSISTENT: To the best extent possible, try to ensure regular work, rather than on and off work. Sure, this is also circumstantial, based on whatever else comes up, but try to be regular. I had a conflict with college throughout and so I had to get myself multiple extensions, but that also broke the flow of work into multiple disjoint durations, and so it also became harder for my mentors to track my progress as well as for me to continue working on it. Plan out the weeks you are going to be able to work and set out goals for each week.
Will I Continue to Contribute?
Ofcourse! I loved contributing to Inkscape and will continue to do so. The editor is in a pretty usable state right now, but I see a lot of features I could add to completely supercharge the editor. I plan on seeing the node based editor through till it is considered to be one of the best node based editors (that’s the dream)!
Future Opportunities:
My GSoC experience also attracted a few offers, and has also opened up a few doors for me. I was approached by a startup offering an internship due to my experience in working with software and SVGs, with a lucrative pay. I didn’t take this up since I didn’t want to commit a lot of time to it, but the point is that GSoC experience adds value. It’s also something that employers seem to have a tendency to value, since working in GSoC can be considered similar to professional experience.
Summing it Up:
GSoC is definitely worth it! The experiences, the pride in contributing to open source, the learnings and the networking, all of them are a great experience. If you’re free in the summer and are eligible, it’s definitely worth applying.
Subscribe to my newsletter
Read articles from Ravi Arora directly inside your inbox. Subscribe to the newsletter, and don't miss out.
Written by
