Exploring Azure Deployments with Terraform Stacks
 Lukas Rottach
Imagine trying to keep your infrastructure code repeatable and reliable-only to find yourself reinventing the wheel for every environment. You tweak a setting here, change a configuration there, and before you know it, you're buried in a pile of nearly identical but frustratingly unique code. Terraform Stacks were created to solve this exact problem: they let you create reusable, consistent setups across environments without all the copy-paste chaos. Think of it as the secret to achieving the elusive "write once, run anywhere" dream in infrastructure, so you can finally break free from the repetition trap!
Until now, I would have turned to Terragrunt to solve problems like this, using it to keep my code repeatable and maintainable across environments. But in keeping with my motto of always change a running system, I think it's time to take a closer look at the Terraform Stacks. So let's dive in together and see what they have to offer!
Introduction
Terraform Stacks provide a way to simplify and organize complex infrastructure deployments. They let you group and manage infrastructure in a repeatable, modular way, making it easier to scale, update, and maintain across different environments. If you've been handling multiple configurations and trying to keep everything consistent, Terraform Stacks could be the tool that brings order to the chaos. Perfect for teams aiming to streamline their workflows, Terraform Stacks are worth exploring to make your infrastructure management smoother and more reliable.
I see a real benefit when you need to set up the same infrastructure multiple times with different input values, especially in the following scenarios:
Multiple environments (dev, test, prod)
Multiple regions
Multiple landing zones
Some thoughts before we start
To get started with Terraform Stacks, you need an HCP Terraform account. Currently, Stacks can only be provisioned through their cloud service. While there are methods to initialize and validate your Stacks locally, I haven't found a way to provision them directly from the command line.
In the introduction blog post from HashiCorp, the say this:
While our public beta is limited to HCP Terraform plans based on resources under management (RUM), certain Stacks functionality will be incorporated in upcoming releases of the community edition of Terraform. Workspaces will continue to have their use cases and Terraform will continue to work with both workspaces and Stacks.
Source: https://www.hashicorp.com/blog/terraform-stacks-explained
It's also important to mention that the free plans of HCP Terraform are limited to provisioning and managing up to 500 resources with Terraform Stacks. In my opinion, this is sufficient for testing and getting familiar with Terraform Stacks.
Preparation
Installing Terraform Stacks CLI
Before we dive into the project, there are a few things to mention. With Terraform Stacks, a new command-line tool was introduced. To initialize and validate your Stacks locally, the tfstacks command must be accessible on your command line.
On my MacBook I installed it like this:
brew tap hashicorp/tap
brew install hashicorp/tap/tfstacks
On my Ubuntu 22.04 based GitHub Codespace, I installed it like this:
wget -O- https://apt.releases.hashicorp.com/gpg | sudo gpg --dearmor -o /usr/share/keyrings/hashicorp-archive-keyring.gpg
echo "deb [signed-by=/usr/share/keyrings/hashicorp-archive-keyring.gpg] https://apt.releases.hashicorp.com $(lsb_release -cs) main" | sudo tee /etc/apt/sources.list.d/hashicorp.list
sudo apt update && sudo apt install terraform-stacks-cli
About Terraform CLI
While writing this post, the Terraform Stacks CLI does not work with the latest stable Terraform version (1.9.8 in my case). Every call from the Terraform Stacks CLI will fail with various errors. This issue is related to the terraform rpcapi command, which is only available in the Alpha build of Terraform.
The new command
terraform rpcapiexposes some Terraform Core functionality through an RPC interface compatible withgo-plugin. The exact RPC API exposed here is currently subject to change at any time, because it's here primarily as a vehicle to support the Terraform Stacks private preview and so will be broken if necessary to respond to feedback from private preview participants, or possibly for other reasons. Do not use this mechanism yet outside of Terraform Stacks private preview.See: https://github.com/hashicorp/terraform/releases/tag/v1.10.0-alpha20241023
To address this, we need to use the Alpha version of the Terraform CLI. I recommend using a tool like tfenv to manage your Terraform versions.
The Project
To get our hands-on with Terraform Stacks, we’ll create a fictional service made up of several Azure resources, including Virtual Machines, and a Virtual Network. The goal? Deploying this service across multiple Azure regions without crazy code duplication for each environment - a task that sounds like the perfect match for Terraform Stacks. Let’s dive in and see how this approach helps us streamline our setup!
Requirements
To get this setup running, please ensure you have the following tools and services available.
HCP Terraform account
Azure tenant including subscription
GitHub account
Azure CLI
Terraform CLI
Terraform Stacks CLI (see details above)
On the GitHub project page, you'll find the configuration for a GitHub Codespaces dev container, which simplifies some of the work for you.
Structure
The final project will look like something like this. We go into the details of every part during this project.
.
├── auth
│   ├── main.tf
│   ├── outputs.tf
│   ├── providers.tf
│   ├── terraform.tfstate
│   ├── terraform.tfvars
│   └── variables.tf
├── modules
│   └── microsoft.resources
│   └── microsoft.compute
│   └── microsoft.network
├── components.tfstack.hcl
├── deployments.tfdeploy.hcl
├── variables.tfstack.hcl
├── providers.tfstack.hcl
├── LICENSE
└── README.md
Authentication
First things first. Before even thinking about deploying a Terraform Stack, we need to plan how to authenticate the HCP platform on Azure.
In this blog, I want to introduce you to the basic concept of authentication related to Terraform Stacks. There are already plenty of resources on how to do this for different cloud platforms. Additionally, you can find sample code for setting up authentication for Terraform Stacks in the blog's repository under the ./auth/ folder.
Helpful resources
I highly recommend checking out the following resources for an in-depth understanding of Terraform Stack authentication and some more code examples.
https://developer.hashicorp.com/terraform/tutorials/cloud/stacks-deploy
https://developer.hashicorp.com/terraform/language/stacks/deploy/authenticate
https://github.com/hashicorp-education/learn-terraform-stacks-identity-tokens/tree/main/azure
https://github.com/hashicorp-guides/azure-stacks-example/tree/main
I especially want to highlight the blog post by Mattias Fjellström, which includes an excellent section on how to authenticate with Azure: https://mattias.engineer/blog/2024/terraform-stacks-azure/#destroy-the-stack
Concept
Authentication with Terraform Stacks using OIDC and workload identities involves creating short-lived JSON Web Tokens (JWTs) to ensure secure communication between Terraform and the target environment. Terraform uses a trust relationship with the environment's identity provider to authenticate with these tokens, avoiding the need for static credentials. The tokens are generated during deployment based on a set configuration, granting the necessary permissions only for the task's duration. This approach enhances security and reduces the risk of credential misuse.
Stacks have a built-in identity_token block that creates workload identity tokens, also known as JWT tokens. You can use these tokens to authenticate Stacks with Terraform providers securely.
Deployment
As mentioned above, I recommend checking out the official sample repositories from HashiCorp or the ./auth/ folder within the blog's repository.
Inside the variables.tf file, we define all the necessary values for creating the service principal. I want to highlight the deployment_names variable, which contains a list of strings. Here, we specify the list of deployments we want to execute later. In my case, I would specify ["westeurope", "eastus", "australiaeast"], because I’ve decided to go for a per region approach.
The provider.tf file contains the required provider configuration.
terraform {
  required_providers {
    azuread = {
      source  = "hashicorp/azuread"
      version = "~> 3.0.2"
    }

    azurerm = {
      source  = "hashicorp/azurerm"
      version = "~> 4.0"
    }
  }
}

provider "azuread" {}

provider "azurerm" {
  subscription_id = "<SUBID>"
  features {}
}
If you look at the main.tf file, you will see how the federated identity credentials are defined for each deployment listed. Also, note that different identities are created for the plan and apply operations.
I really enjoy this solution from Mattias Fjellström.
# data about the current subscription
data "azurerm_subscription" "current" {}

# create an app registration
resource "azuread_application" "hcp_terraform" {
  display_name = var.app_name
}

# create a service principal for the app
resource "azuread_service_principal" "hcp_terraform" {
  client_id = azuread_application.hcp_terraform.client_id
}

# assign the contributor role for the service principal
resource "azurerm_role_assignment" "contributor" {
  scope                = data.azurerm_subscription.current.id
  principal_id         = azuread_service_principal.hcp_terraform.object_id
  role_definition_name = "Contributor"
}

# create federated identity credentials for **plan** operations
# for each deployment name
resource "azuread_application_federated_identity_credential" "plan" {
  for_each       = toset(var.deployment_names)
  application_id = azuread_application.hcp_terraform.id
  display_name   = "stack-deployment-${each.value}-plan"
  audiences      = ["api://AzureADTokenExchange"]
  issuer         = "https://app.terraform.io"
  description    = "Plan operation for deployment '${each.value}'"
  subject = join(":", [
    "organization",
    var.organization_name,
    "project",
    var.project_name,
    "stack",
    var.stack_name,
    "deployment",
    each.value,
    "operation",
    "plan"
  ])
}

# create federated identity credentials for **apply** operations
# for each deployment name
resource "azuread_application_federated_identity_credential" "apply" {
  for_each       = toset(var.deployment_names)
  application_id = azuread_application.hcp_terraform.id
  display_name   = "stack-deployment-${each.value}-apply"
  audiences      = ["api://AzureADTokenExchange"]
  issuer         = "https://app.terraform.io"
  description    = "Apply operation for deployment '${each.value}'"
  subject = join(":", [
    "organization",
    var.organization_name,
    "project",
    var.project_name,
    "stack",
    var.stack_name,
    "deployment",
    each.value,
    "operation",
    "apply"
  ])
}
After setting everything up and filling out the required variables, you can initialize, plan, and apply this example to set up the necessary service principle in your environment.
Check out the source code in the project repository to see the complete version of the authentication deployment: https://github.com/lrottach/blog-az-terraform-stacks/tree/main/auth
Terraform Stacks
Git repo
The deployment of Terraform Stacks is initiated by your version control provider. As far as I know, this is currently the only way to work with Terraform Stacks.
I highly recommend starting your project in a Git repository from the beginning. We will need this later. In my case, I am using GitHub.
Modules
One part of our Terraform Stacks deployment are the Terraform modules, which you can find within the project's GitHub repositories. I won’t go into every detail because I assume you are already familiar with the concept of Terraform Modules.
Modules are crucial in Terraform Stacks. They contain the actual resource declarations and logic. Our components will reference these modules later.
In this example, I am using the following modules:
microsoft.resources/rgDeployment of a single Azure Resource Groupmicroosft.network/vnetDeployment of a single Virtual Networkmicrosoft.compute/vmDeployment of the amount X of a single virtual machine, joined to the Virtual Network defined above
Setup
Along with Terraform Stacks, HashiCorp introduced some new file extensions to help us build our Stack.
.tfstack.hclExtension to define the components, variables and providers.tfdeploy.hclExtension to set the entry point and configure our deployment. Inside these files you define how HCP Terraform should deploy your Stacks.
All of these files are written using common HCL language.
Provider
Just like in regular Terraform deployments, we need to declare a provider so that HCP Terraform can interact with our target cloud platform.
However, in Terraform Stacks, the provider configuration is build different in the following ways (Quote from: HashiCorp - Declare Providers):
Modules sourced by
componentblocks cannot declare their own providers. Instead, eachcomponentblock accepts a top-level map of providers.You must pass attributes to providers using a
configblock.You define provider alias names in the header of its block.
Providers in Stack configurations support the
for_eachmeta argument.
Let's create a providers.tfstack.hcl file in the root of our project.
required_providers {
  azurerm = {
    source  = "hashicorp/azurerm"
    version = "~> 4.0"
  }
}

provider "azurerm" "this" {
  config {
    features {}
    use_cli         = false
    use_oidc        = true
    oidc_token      = var.identity_token
    client_id       = var.client_id
    subscription_id = var.subscription_id
    tenant_id       = var.tenant_id
  }
}
In the first block, we list all the required providers we want to use in our project. Every provider you want to use must be added to the required_providers list.
The second block is used to configure the specific provider. In our case, we use the azurerm provider. Here, we define how the provider should authenticate. All the required properties will be passed in using variables we create in a later step. We use the alias this to pass the provider to our components later.
A great feature of Terraform Stacks is the support for the for_each argument for providers. This argument allows you to dynamically create providers based on your needs. For example, this can be useful for multi-region AWS deployments.
Variables
In the next step, we will create a file called variables.tfstack.hcl to store all of our variables.
// Provider Configuration
// **********************
variable "identity_token" {
  type        = string
  ephemeral   = true
  description = "Identity token for provider authentication"
}

variable "client_id" {
  type        = string
  description = "Azure app registration client ID"
  default = "<CLIENT-ID>"
}

variable "subscription_id" {
  type        = string
  description = "Azure subscription ID"
  default = "<SUBSCRIPTION-ID>"
}

variable "tenant_id" {
  type        = string
  description = "Azure tenant ID"
  default = "<TENANT-ID>"
}

// Deployment Variables
// **********************
variable "deployment_location" {
  type        = string
  description = "Azure location name"
}

// Will be used to create unique resource names
variable "project_identifier" {
  type        = string
  description = "Name suffix for resource names"
}

// Network Variables
// **********************
variable "vnet_address_space" {
  type        = list(string)
  description = "Address space for the virtual network"
}

variable "vnet_subnet_compute_range" {
  type        = string
  description = "Dedicated subnet for compute resources"
}

// Virtual Machine Variables
// **********************
variable "vm_size" {
  type        = string
  description = "Azure VM size"
  default     = "Standard_B1s"
}

variable "vm_os_disk_size" {
  type        = number
  description = "Size of the OS disk in GB"
  default     = 30
}

variable "vm_count" {
  type        = number
  description = "Number of virtual machines"
  default     = 1
}
The first section is used for our provider configuration. Here we define variables required for the authentication. Also note the identity_token variable which is required by our Stack. Make sure to set the ephemeral = true option on that variable. That property is used to mark a variable as transient, indicating that its value is temporary and should not be stored in the state file or persisted across runs.
All the other variables are used later in our deployments to provide the necessary information for deploying resources like networks and virtual machines.
Components
Now it's getting interesting. We continue by creating a components.tfstack.hcl file. Here we can define our components.
In Terraform Stacks, a Component is a basic building block that represents a specific part of your infrastructure within the Stack configuration. Each component is defined by a component block in your stack's configuration file and is linked to a Terraform module that outlines the needed infrastructure resources. By organizing your infrastructure into components, you can manage and deploy complex systems more efficiently, maintain consistency across environments, and simplify the deployment process on a large scale.
// Component: Resource Group
// **********************
component "rg" {
    source = "./modules/microsoft.resources/rg"
    inputs = {
        deployment_location = var.deployment_location
        project_identifier = var.project_identifier
    }

    providers = {
        azurerm = provider.azurerm.this
    }
}

// Component: Virtual Network
// **********************
component "vnet" {
    source = "./modules/microsoft.network/vnet"
    inputs = {
        // Deployment Variables
        deployment_location = var.deployment_location
        project_identifier = var.project_identifier
        rg_name = component.rg.rg_name

        // Network Variables
        vnet_address_space = var.vnet_address_space
        vnet_subnet_compute_range = var.vnet_subnet_compute_range
    }

    providers = {
        azurerm = provider.azurerm.this
    }
}

// Component: Virtual Machine
// **********************
component "vm" {
    source = "./modules/microsoft.compute/vm"
    inputs = {
        // Deployment Variables
        deployment_location = var.deployment_location
        project_identifier = var.project_identifier
        rg_name = component.rg.rg_name

        // Virtual Machine Variables
        vm_size = var.vm_size
        vm_count = var.vm_count
        vm_os_disk_size = var.vm_os_disk_size

        // Network Variables
        subnet_id = component.vnet.subnet_id
    }

    providers = {
        azurerm = provider.azurerm.this
    }
}
As you can see, I created one component per resource type. Behind each component sits a module.
A component consists of the following three blocks:
source- This property specifies the path in our project where the module code is located.providers- Here, we specify the providers we want to include in our component. You can pass more than one provider into a component.input- The input block is used to pass our variables into the module in the background.
It's also possible to reference outputs from another component, which can be very helpful. For example, we can use the output of a subnet ID and pass it into our VM module.
// Network Variables
subnet_id = component.vnet.subnet_id
Deployment
Now it’s time to create our first deployment. For Terraform Stacks we use a file called deployments.tfdeploy.hcl. Make sure to call this file .tfdeploy.hcl and not tfstacks.hcl.
identity_token "azurerm" {
  audience = [ "api://AzureADTokenExchange" ]
}

deployment "westeurope" {
  inputs = {
    // Deployment variables
    deployment_location       = "westeurope"
    project_identifier = "demo-stacks-wl1-we"

    // Virtual Machine variables
    vm_size = "Standard_B1s"
    vm_count = 2
    vm_os_disk_size = 64

    // Network variables
    vnet_address_space = [ "10.10.0.0/16" ]
    vnet_subnet_compute_range = "10.10.1.0/24"

    identity_token  = identity_token.azurerm.jwt
  }
}
The identity_token block is responsible for authorizing the authentication provider. This will only work if you have set up the federated authentication properly.
Each deployment is defined with a label. In my case, I will start with a single deployment for the West Europe Azure region, so mine is called westeurope.
Ensure that you name your deployment exactly as specified during the authentication setup. Any mismatch will cause an error during the deployment of your Stack.
Inside the deployment declaration, we specify the actual variables we want to use for our deployment. In my case, I am setting up the network and deploying my virtual machines.
Finish things up
Now that we have completed the first draft of our project, it's time to prepare for the next steps. For Terraform Stacks to work properly, you need a file called .terraform-version, which sets the version of Terraform used for deployment. Make sure to use the latest version which is compatible with Terraform Stacks Beta.
1.10.0-alpha20241023
Now we are good to go to run our first Terraform stacks CLI command tfstacks init to initialize our project.
To make sure our project was setup correctly we can check the configuration using tfstacks validate
Setup Terraform Stacks on HCP Terraform
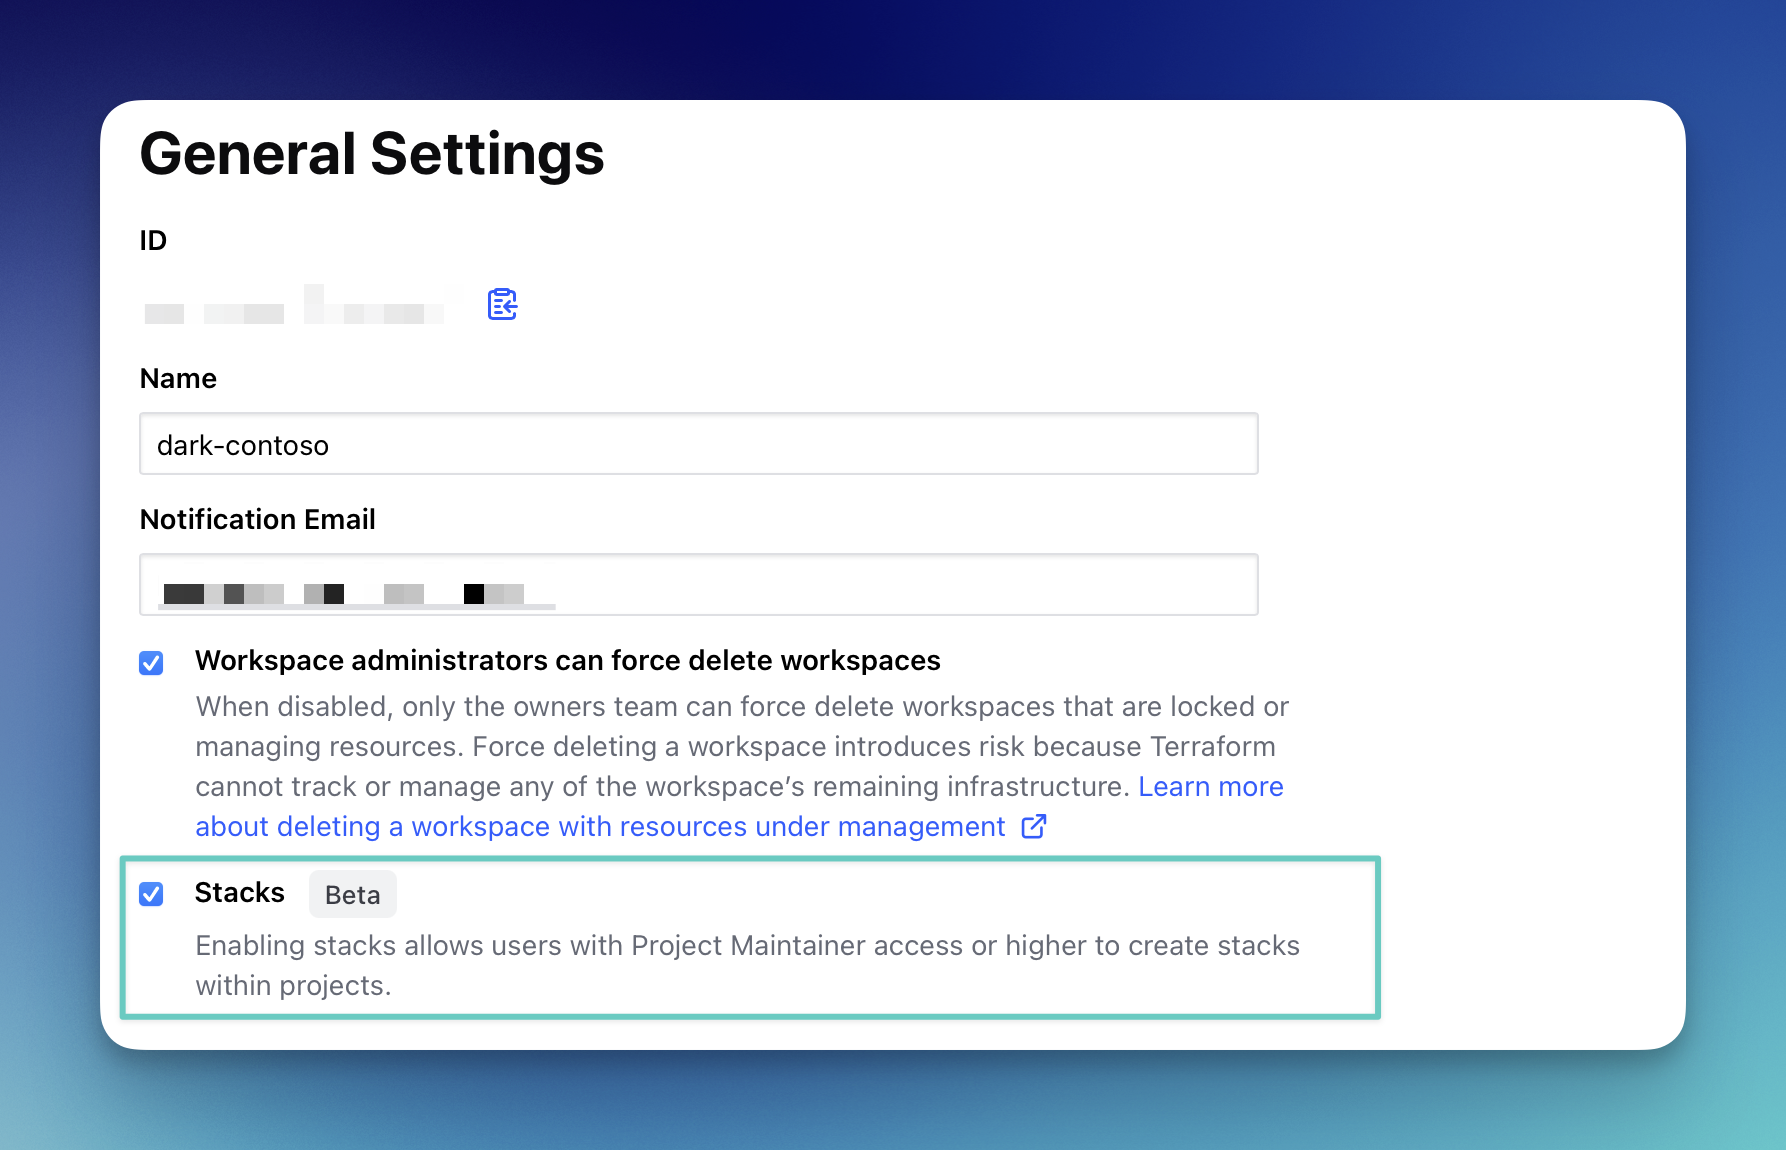
Before we can continue, setting up our first Terraform Stack we need to ensure we have enabled the beta for our HCP Terraform organization. Go to your organizations settings and select the checkbox for “Stacks [Beta]”.
Now, if you go to one of your HCP Terraform projects, a new menu called Stacks [Beta] should be visible.
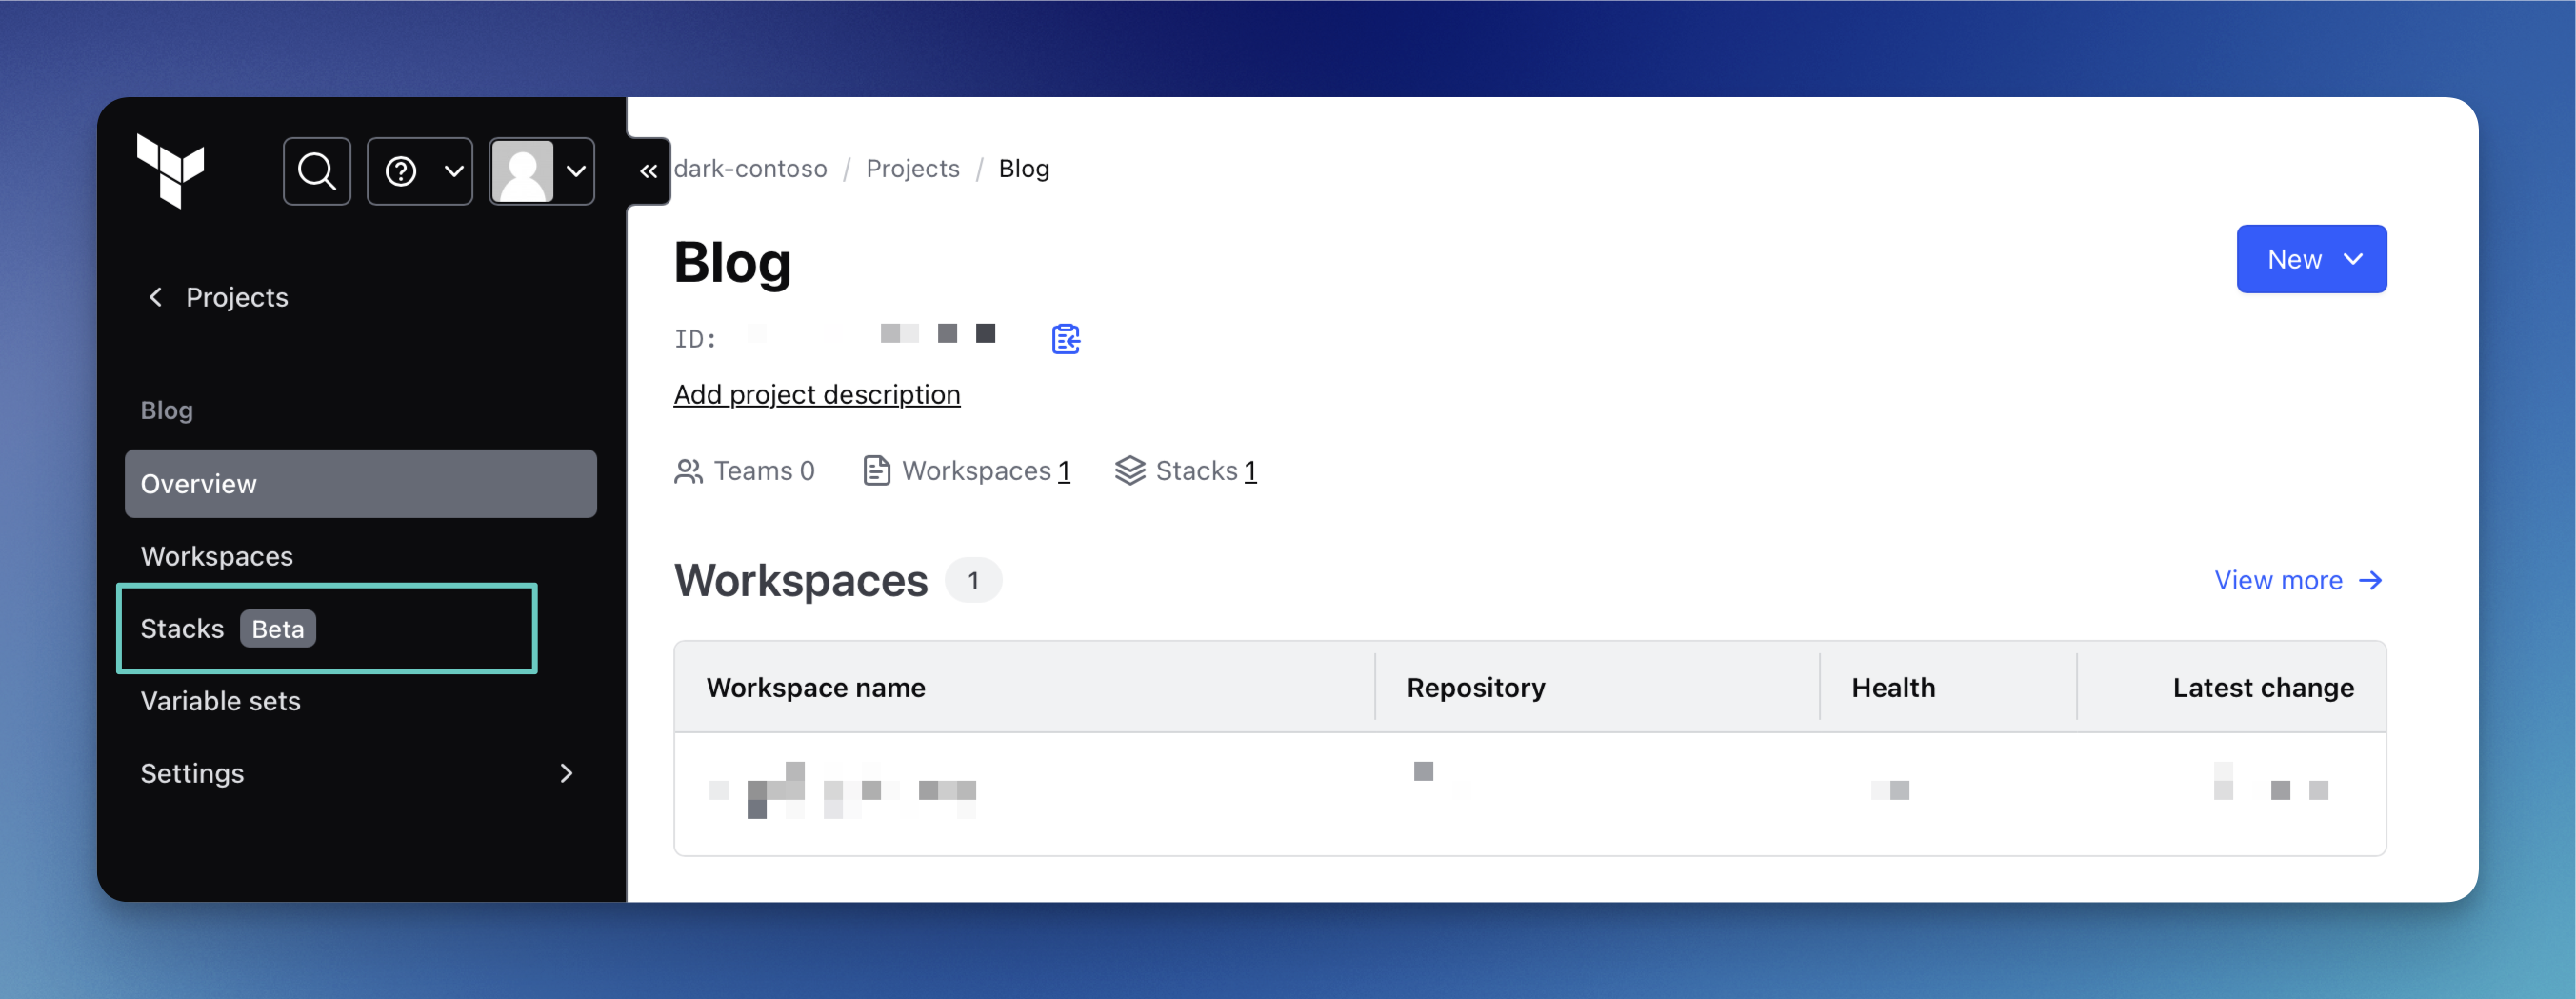
Select “New” in the top-right corner and then choose Stacks to create a new Terraform Stack.
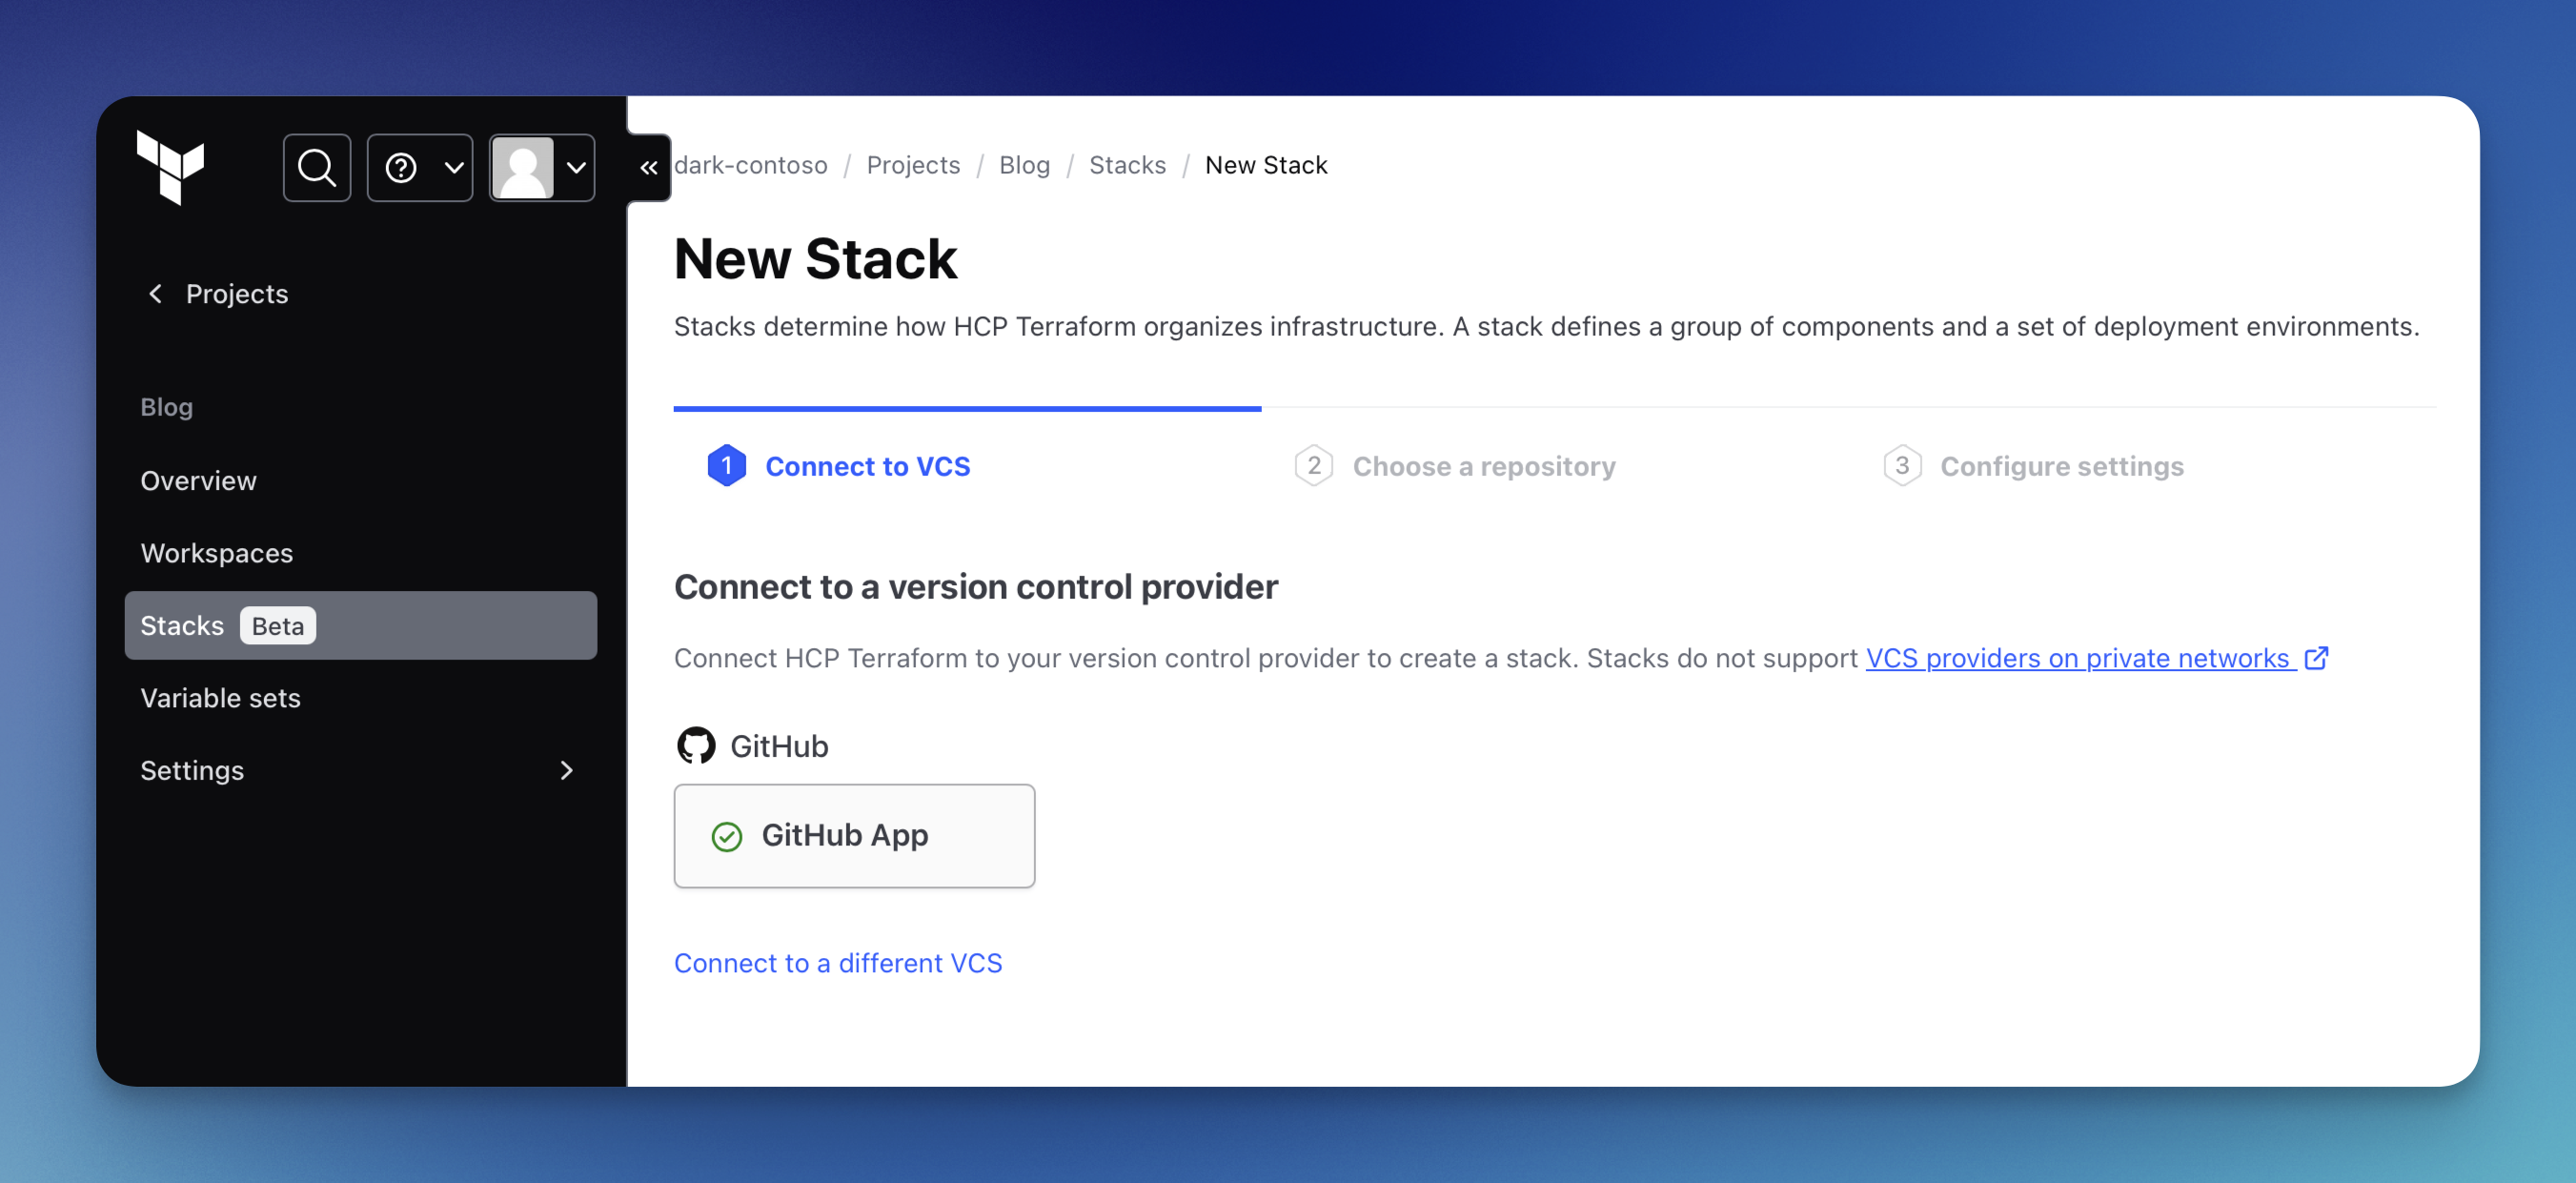
Before we can proceed to select our source repository and configure our stack, we need to set up the connection to our version control provider. I am using GitHub, but you can also choose "Connect to a different VCS" to set up another one.
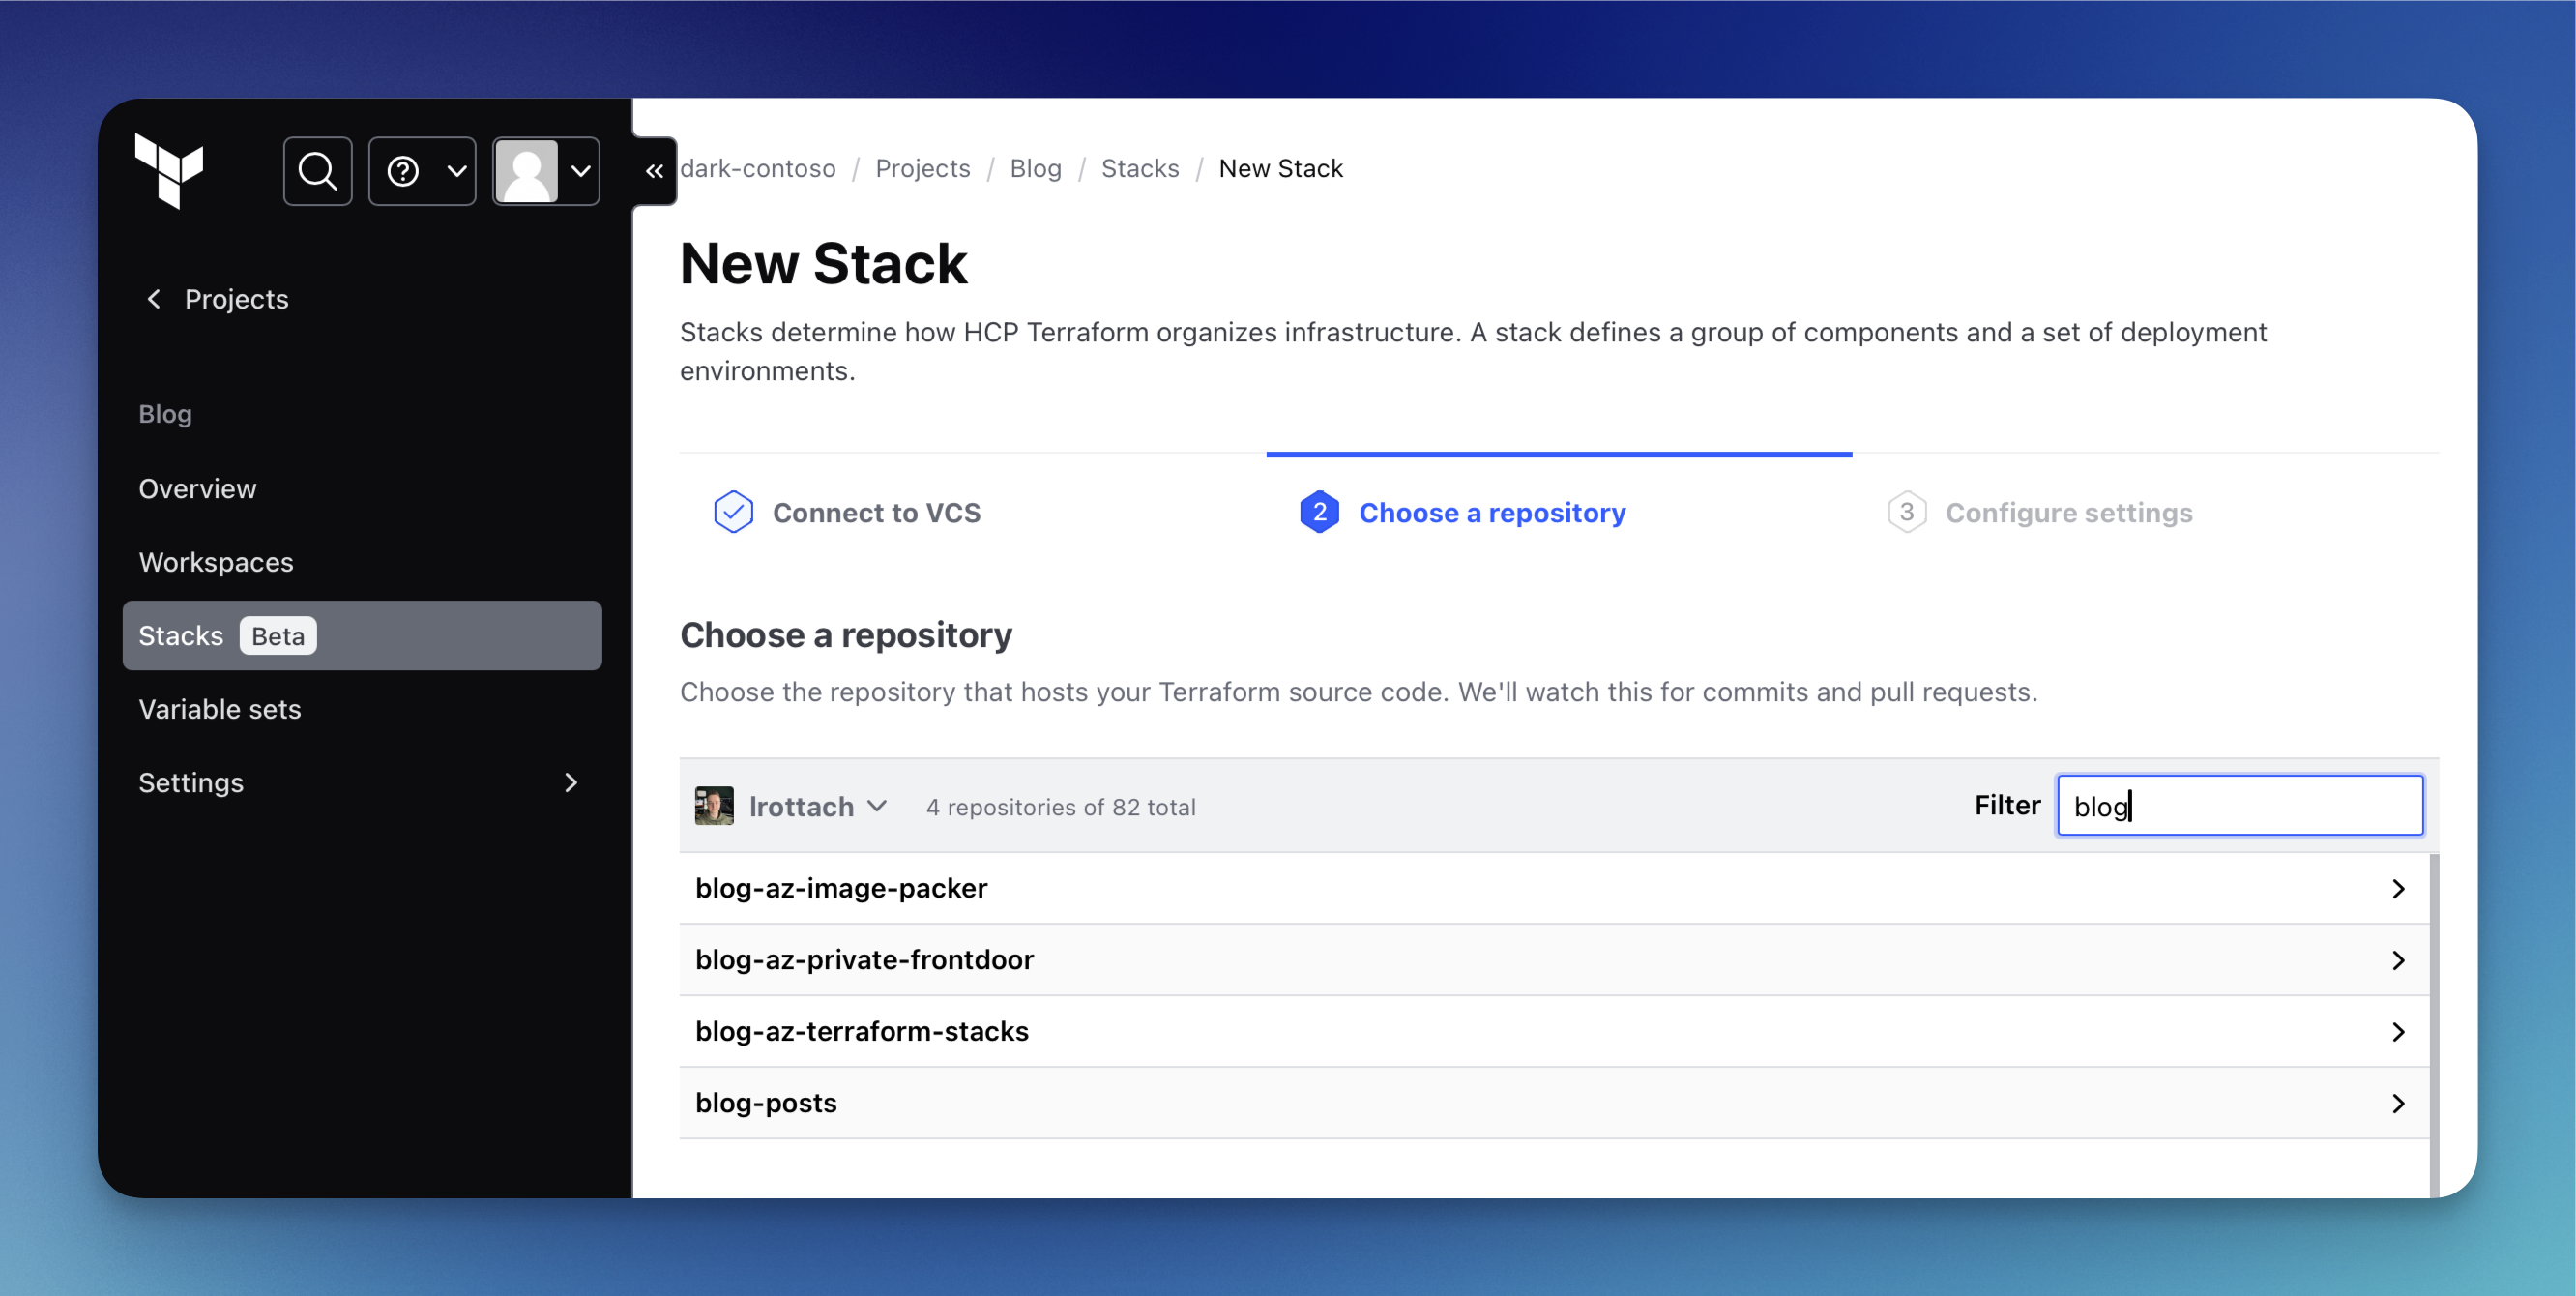
In the next step, we can choose the repository that hosts our Terraform Stacks code. Make sure to select the correct repository where your configuration is stored.
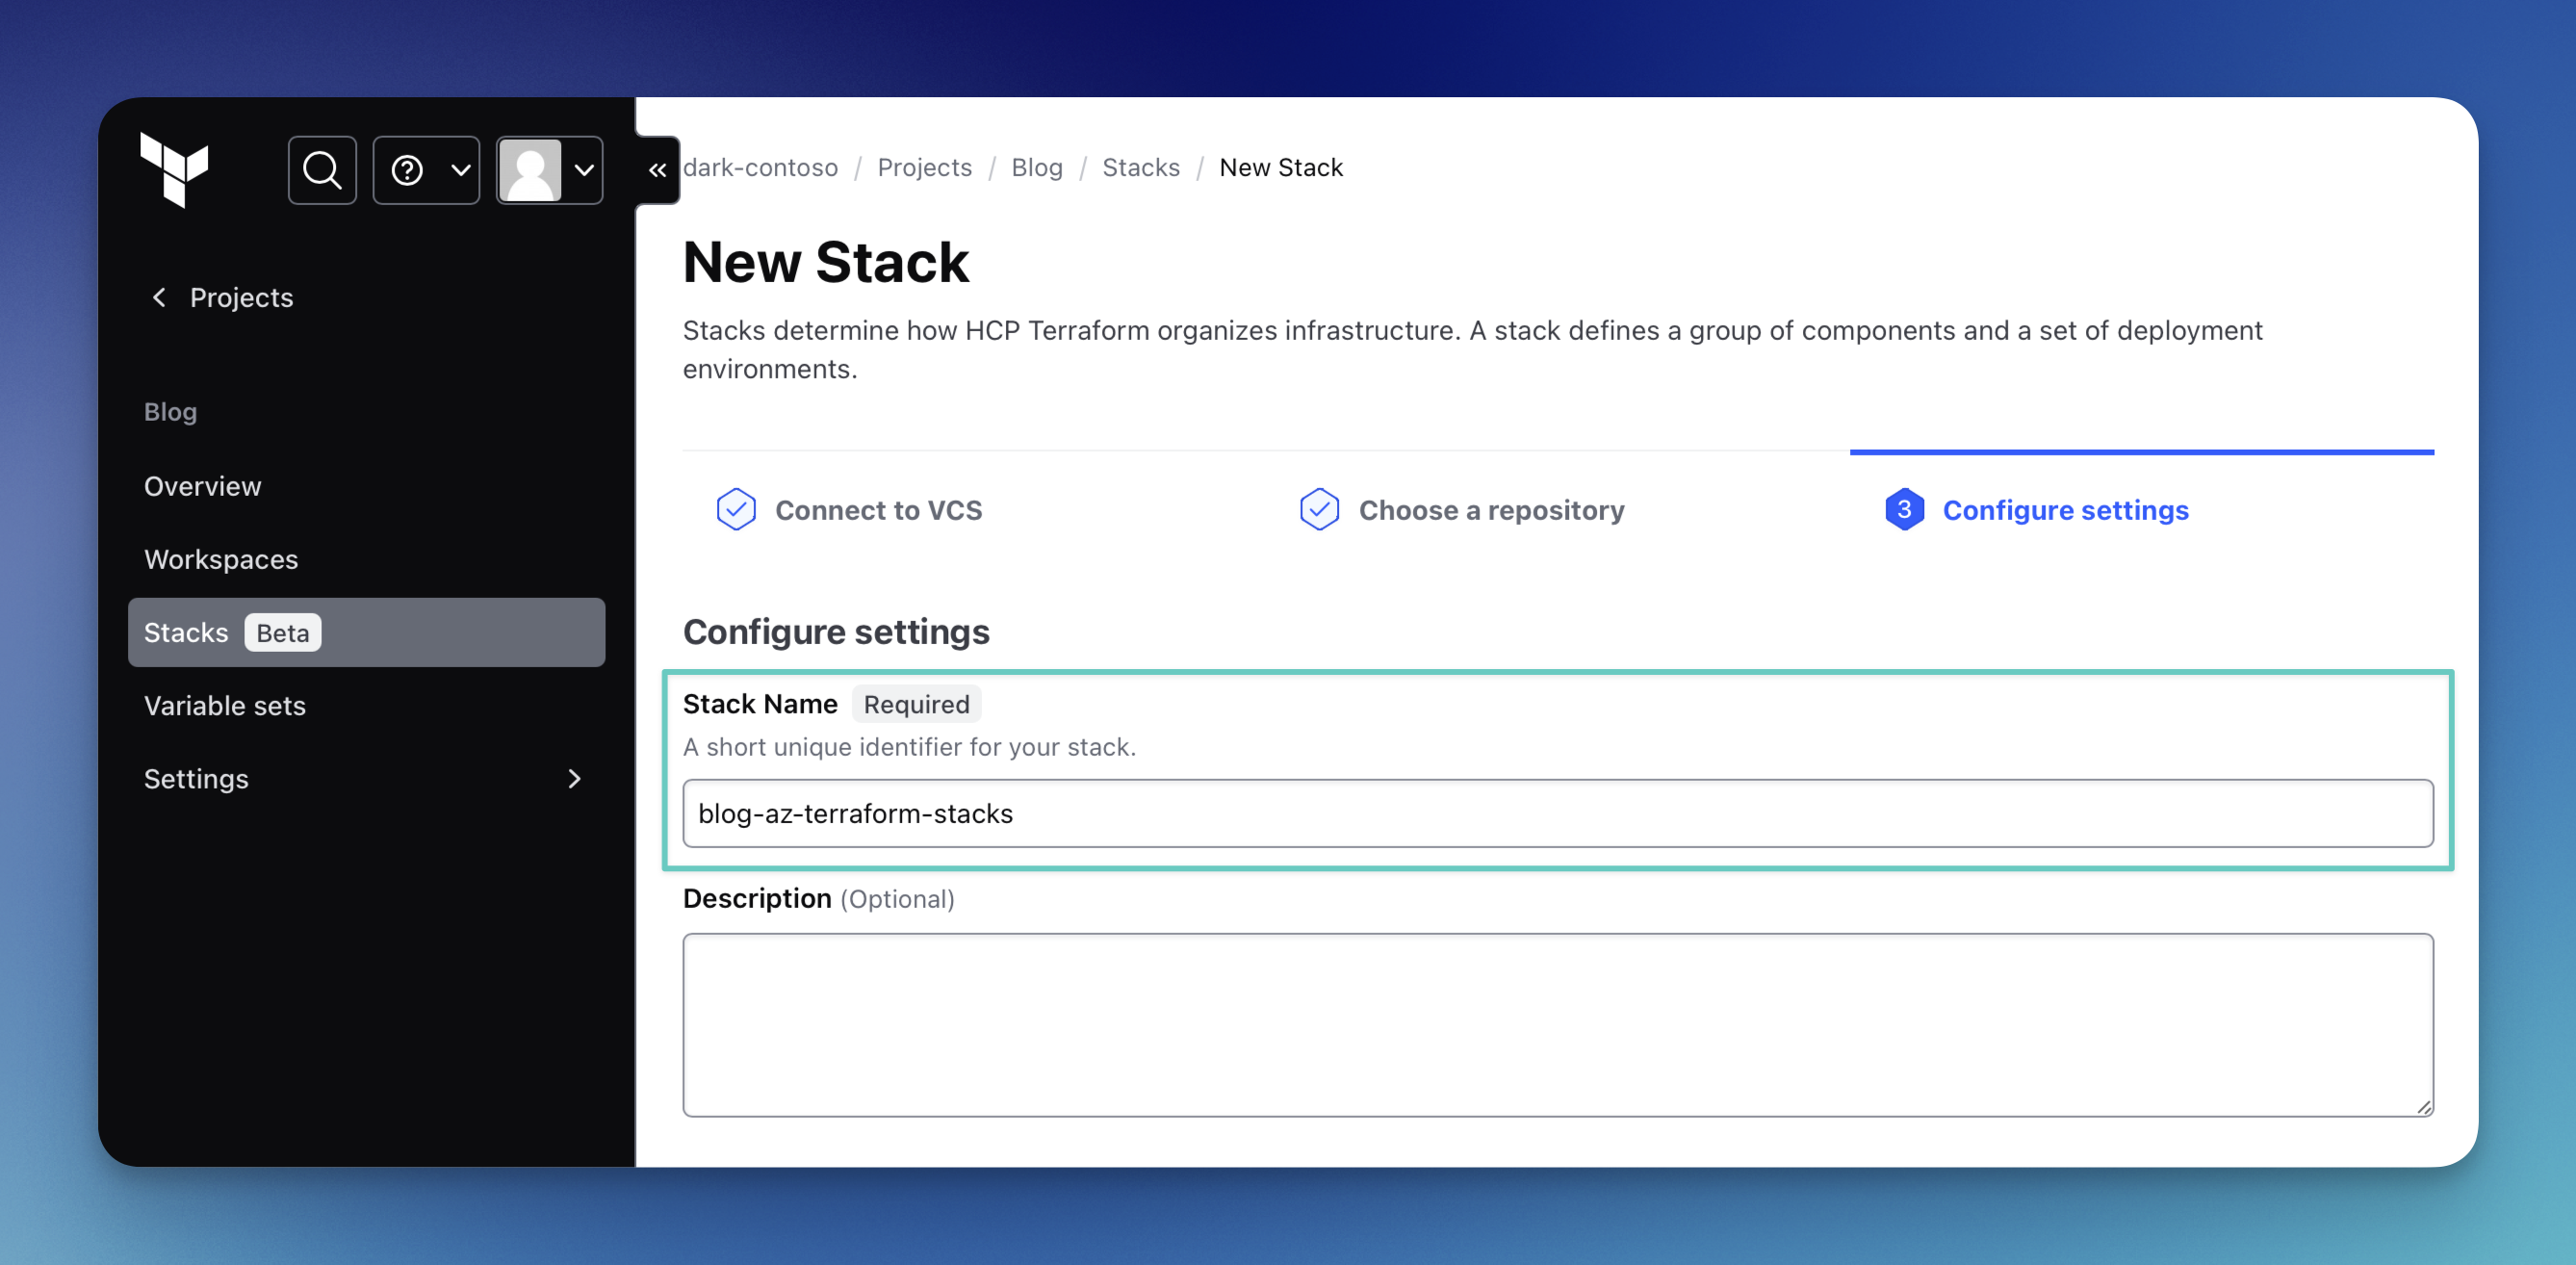
Next, we can name our stack and provide a suitable description. Please remember to name your stack consistently with how you set it up during the federated authentication configuration.
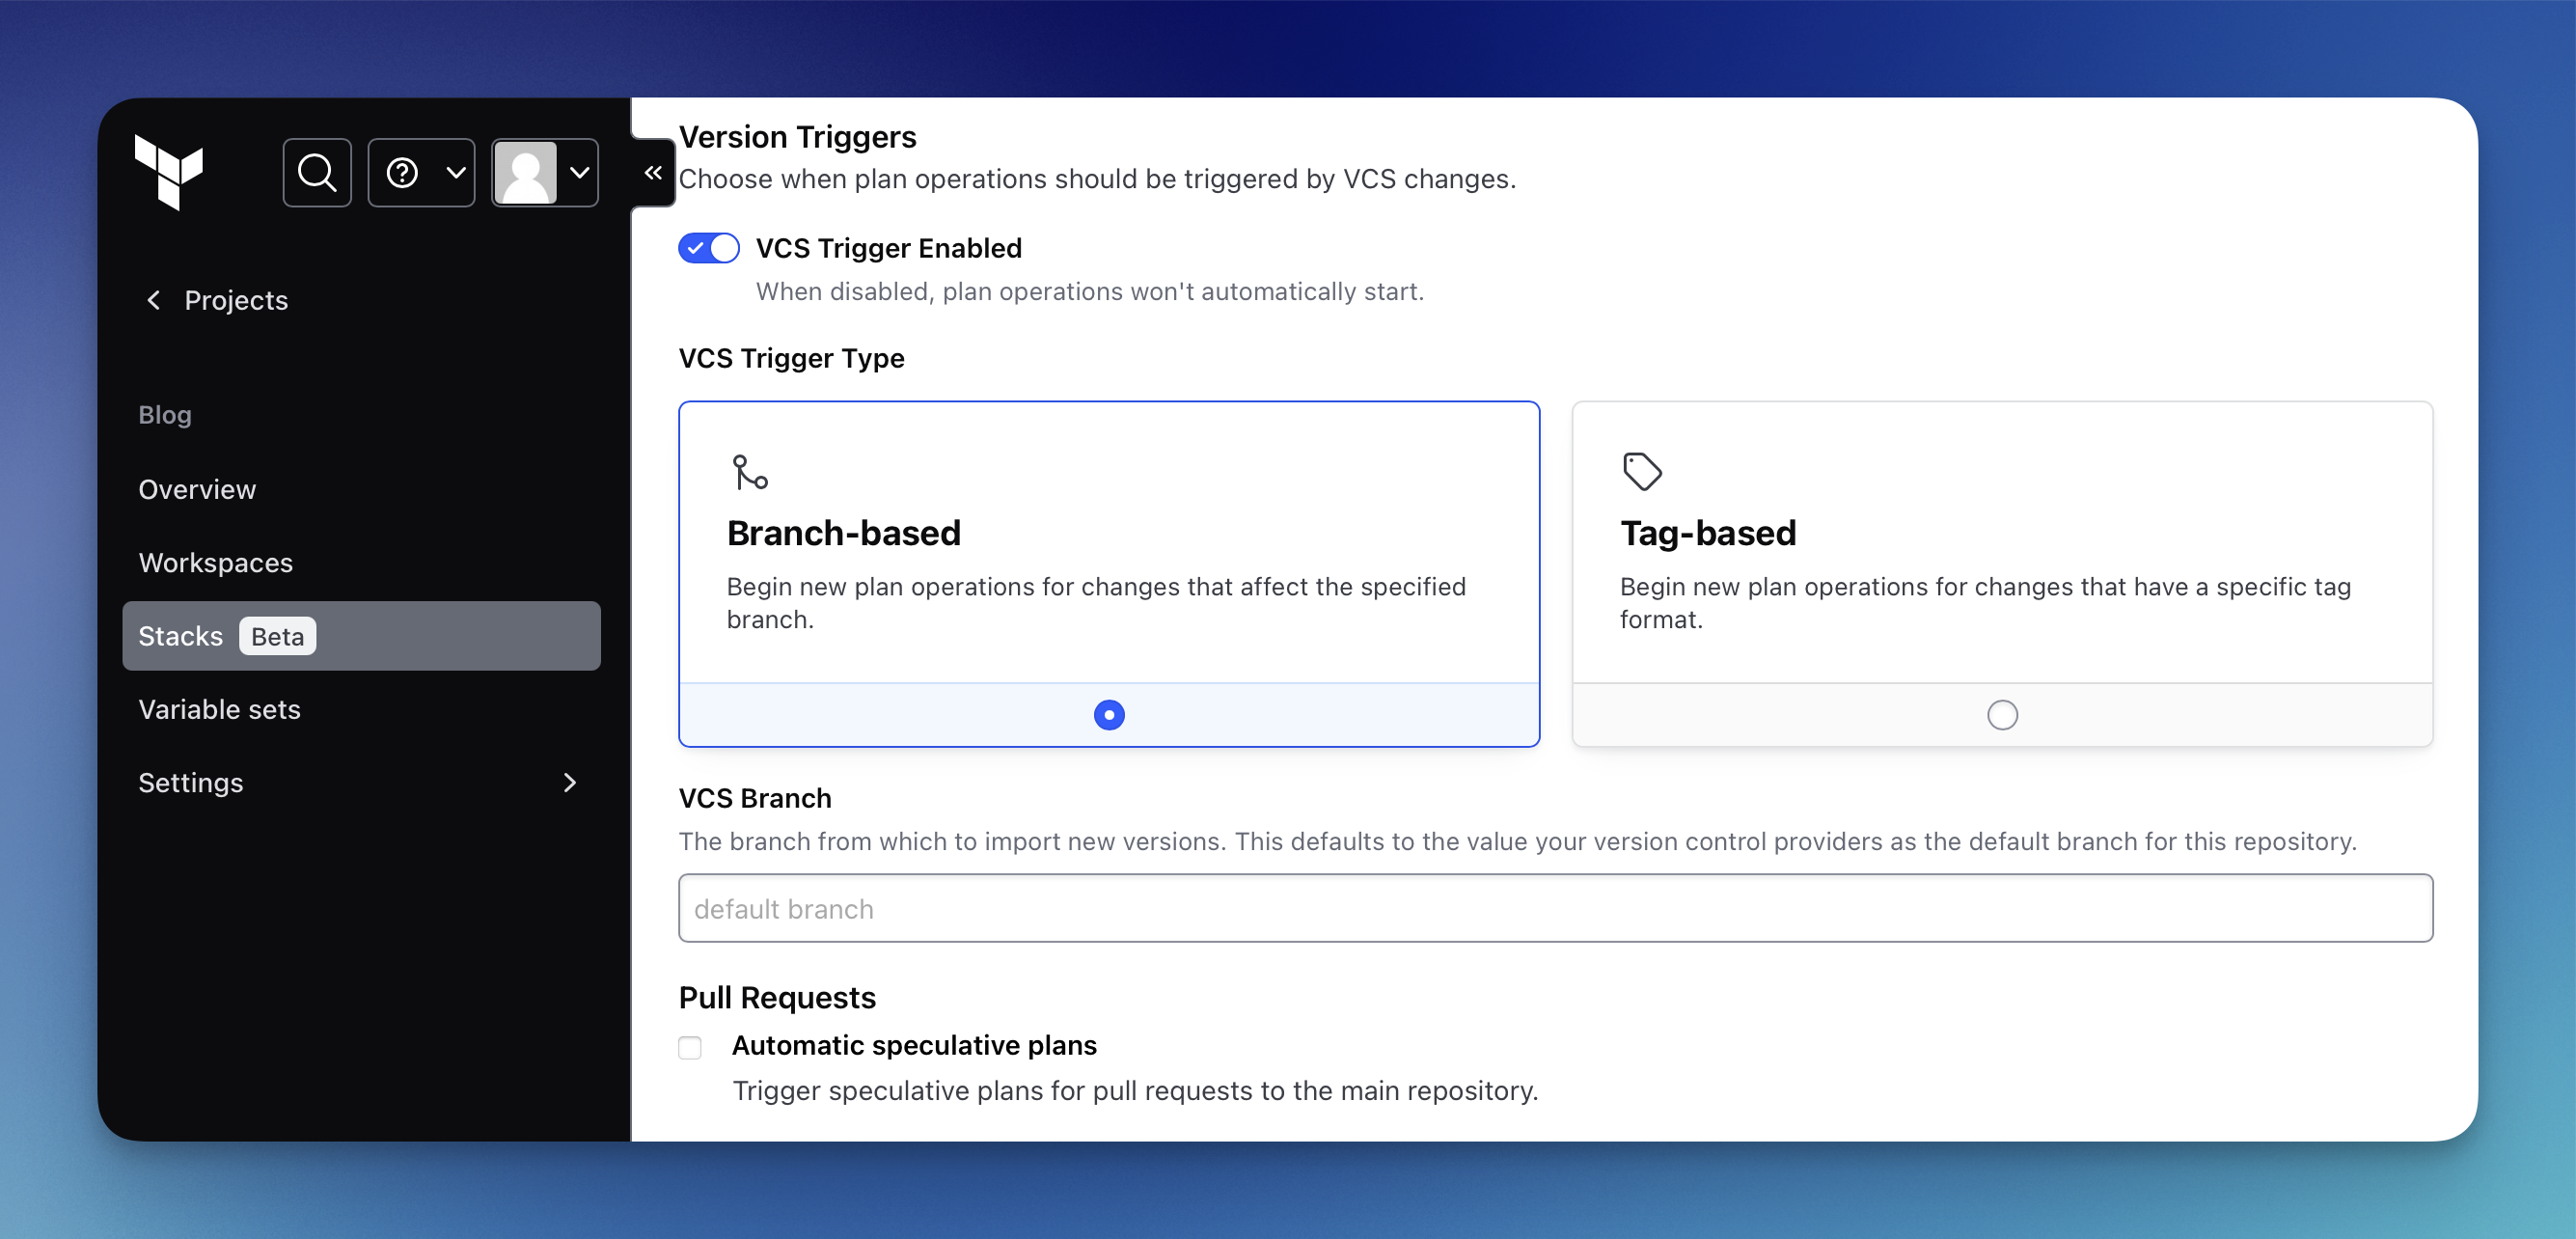
If you scroll down on that last page and expand the Advanced Configuration section, you'll find more options to set up triggers for your Terraform Stacks. Here, you can override your default source branch or switch your strategy from branch-based to tag-based, for example.
That's it. Now, if you go to your newly created stack, you should see that Terraform Stacks has immediately started to plan and roll out your project. Remember, with the default stack configuration, every push to your default branch will trigger the Terraform Stack.
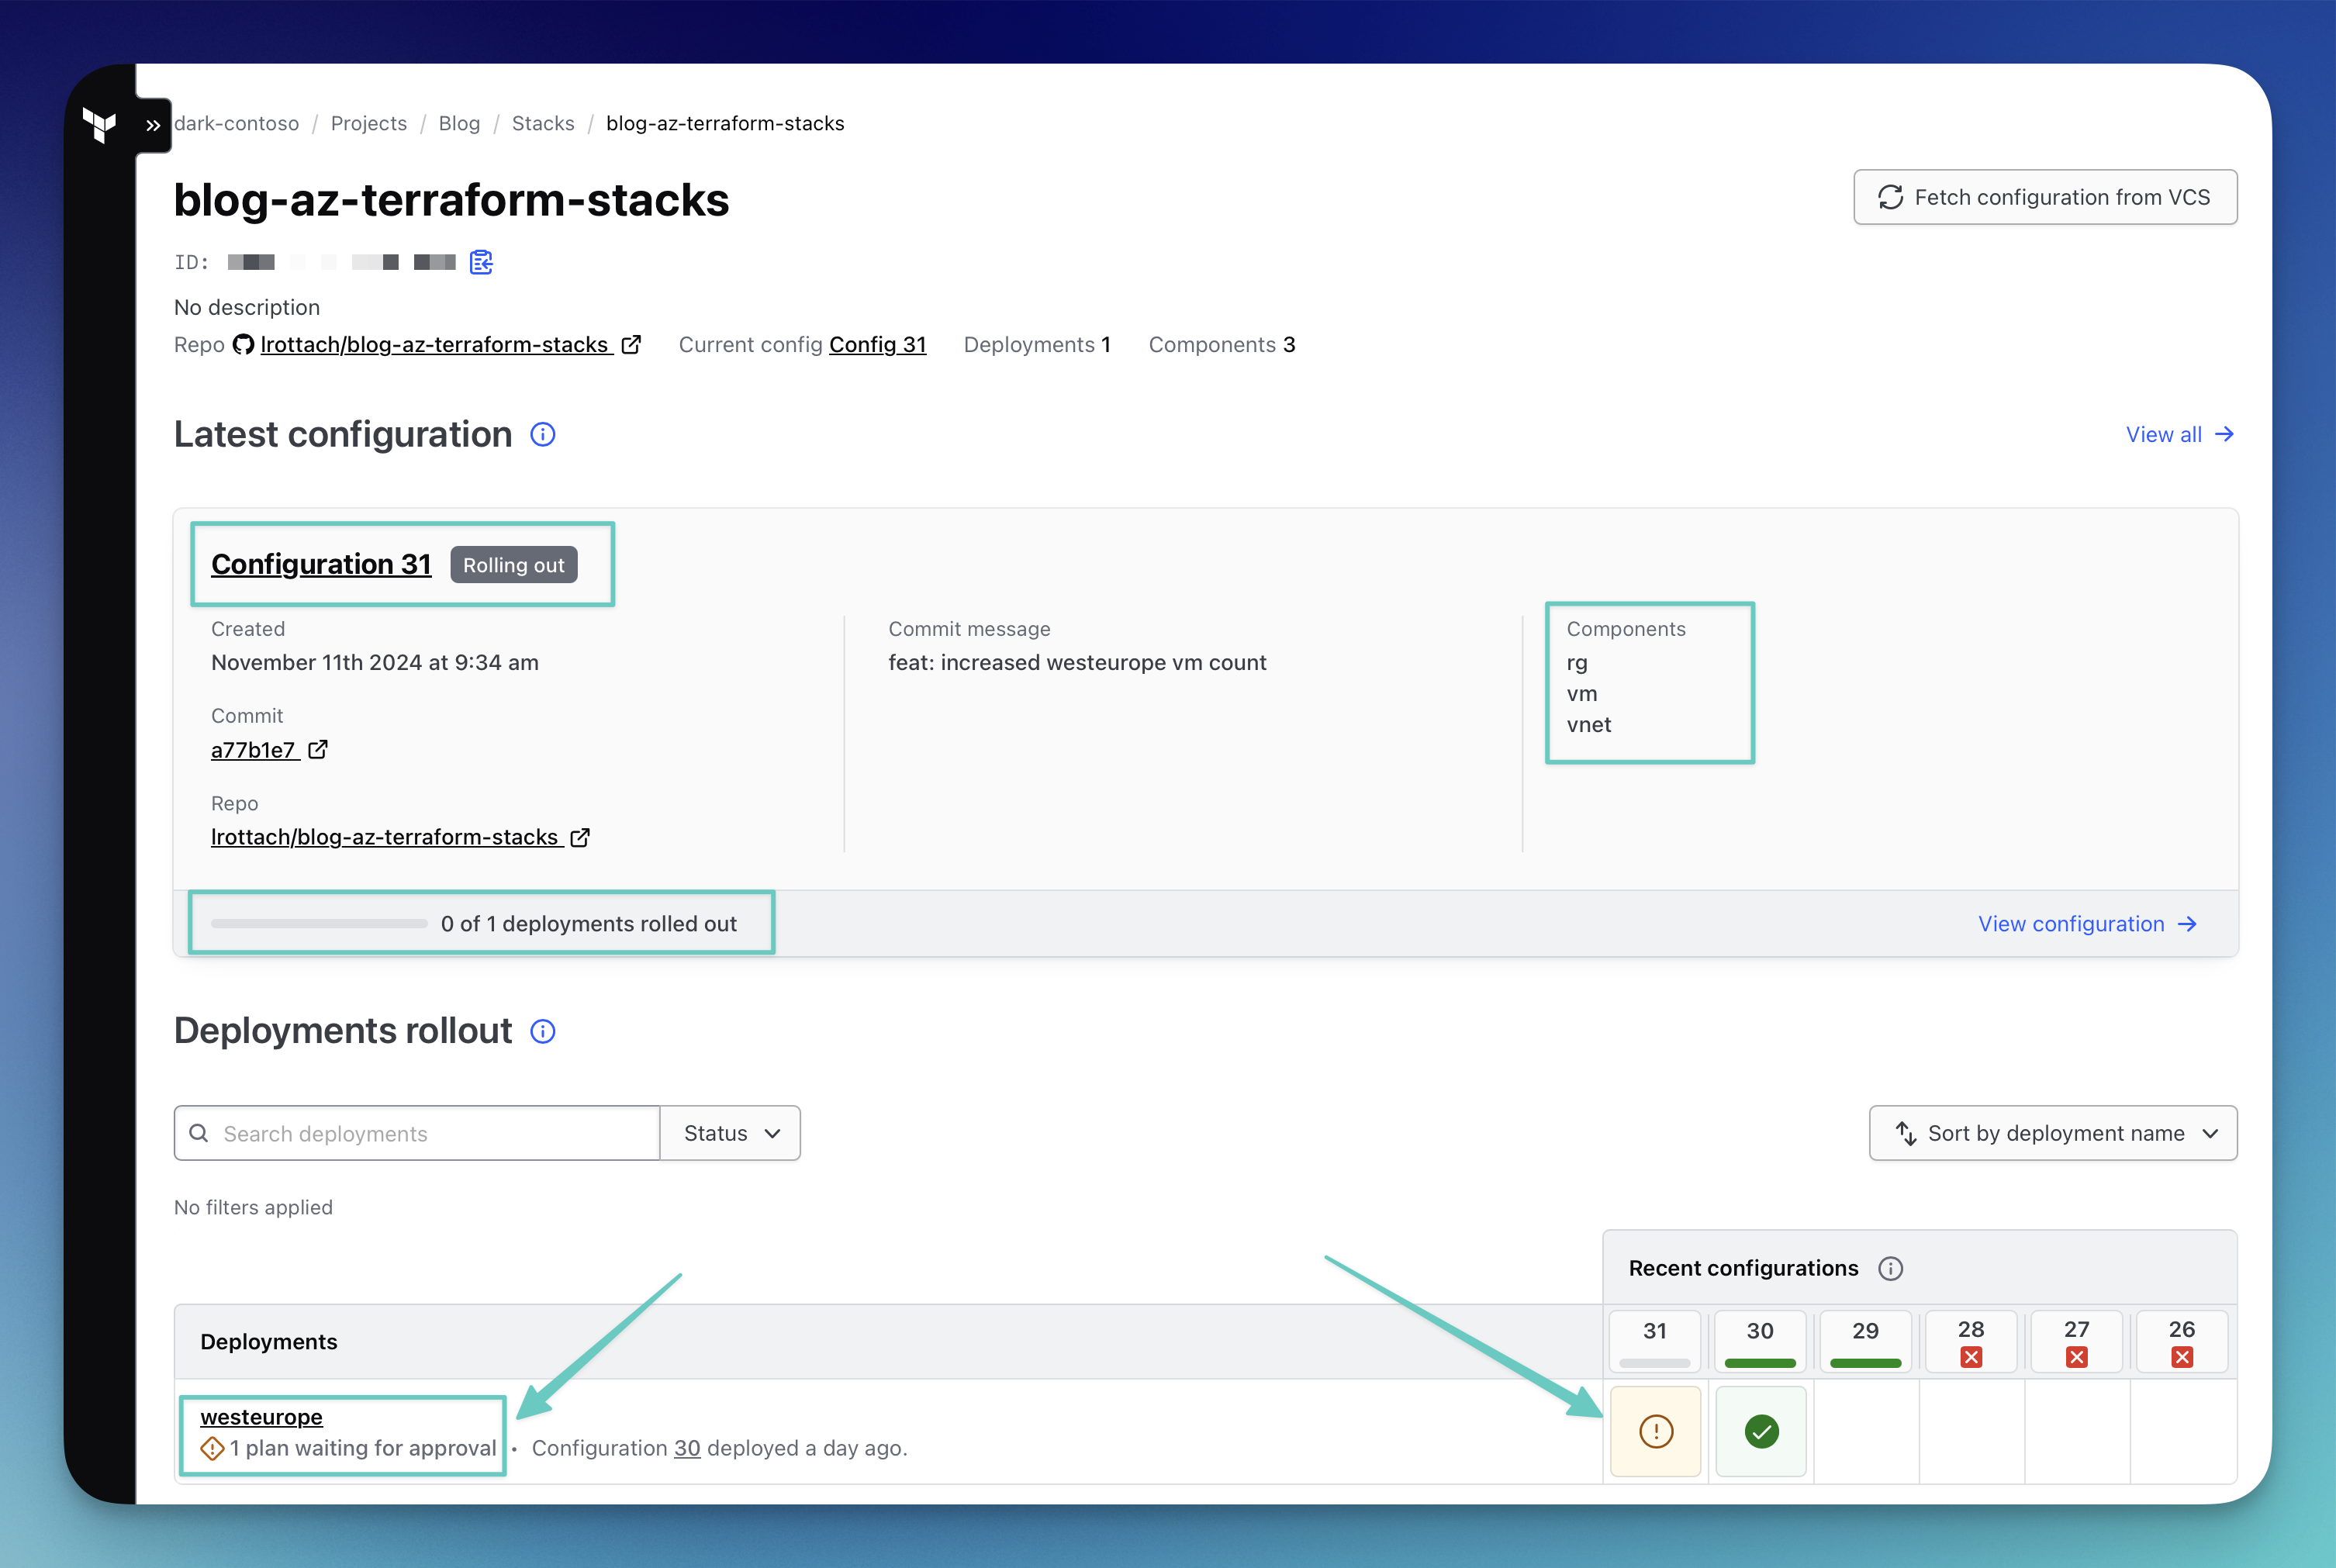
As you can see on the Stacks page above, you get a clear overview of what is currently happening. On the right side, you can see which components are being used by this stack. At the bottom, there is information indicating that one deployment is waiting for approval. So, let's click on it.
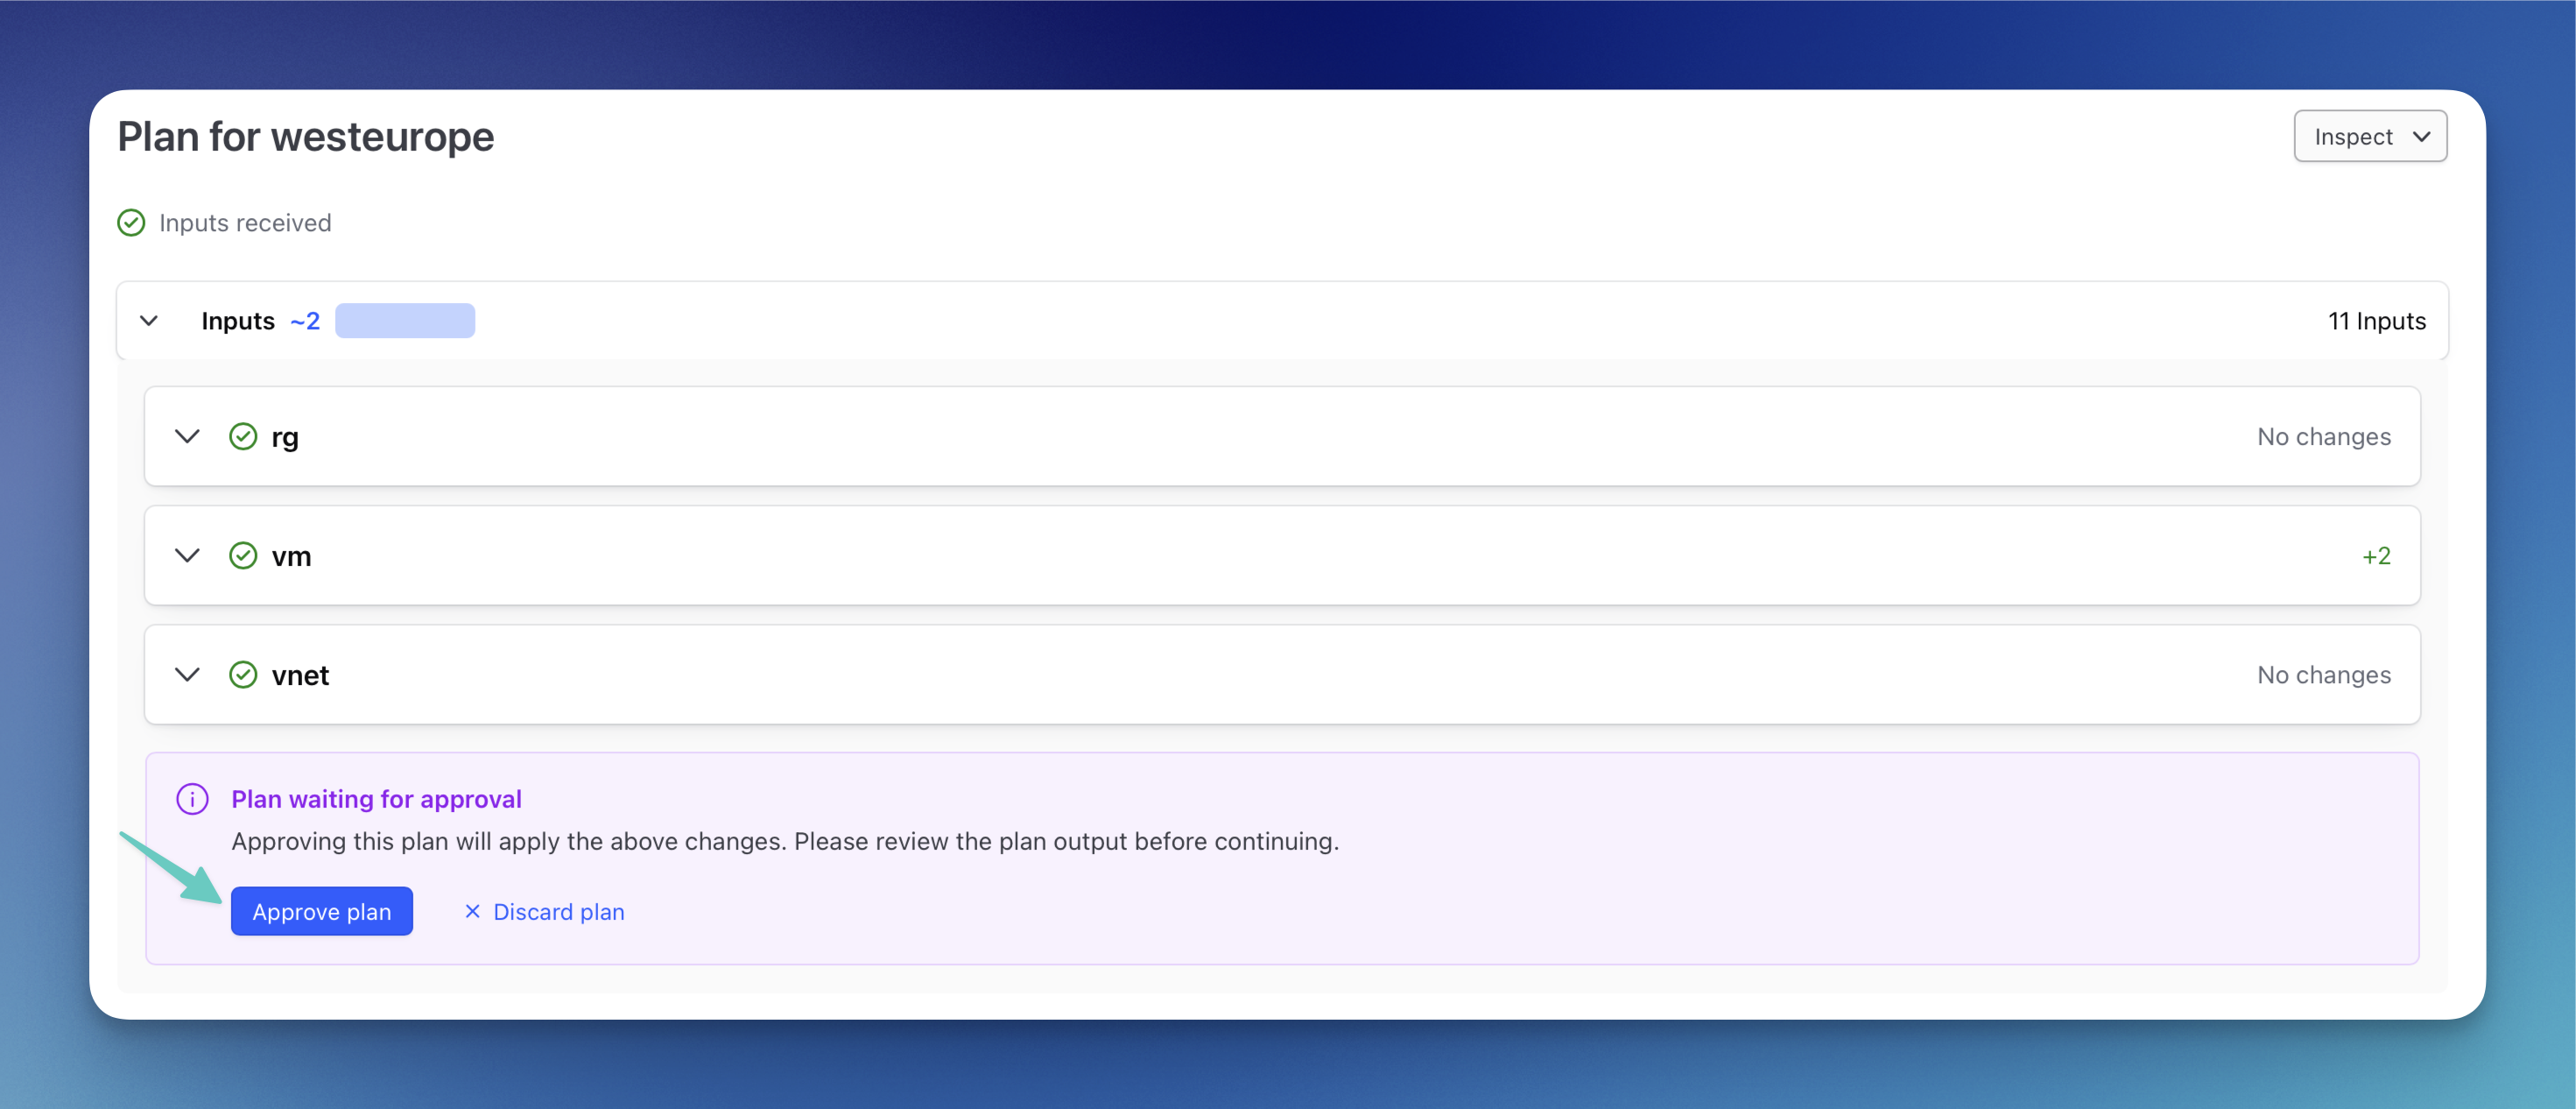
Here, we get an overview of all the changes for the stack. Once you have reviewed everything, you can approve the plan.

After some time we can see that our newest change was rolled out and the status of our stack is healthy.
Extending Our Stack
Now that we have confirmed our stack is working properly, it's time to expand it. From this point, you can adjust your deployment as much as you like. For example, you could increase the VM count for that region.
deployment "westeurope" {
  inputs = {
    // Deployment variables
    deployment_location       = "westeurope"
    project_identifier = "demo-stacks-wl1-we"

    // Virtual Machine variables
    vm_size = "Standard_B1s"
    vm_count = 3
    vm_os_disk_size = 64

    // Network variables
    vnet_address_space = [ "10.10.0.0/16" ]
    vnet_subnet_compute_range = "10.10.1.0/24"

    identity_token  = identity_token.azurerm.jwt
  }
}
In my case, I will add two more regions to my configuration because I want my service to be available in multiple Azure regions.
It's as simple as adding two more deployments to my deployments.tfdeploy.hcl.
// ***********************************************************************
//
//  Author: Lukas Rottach
//  GitHub: https://github.com/lrottach
//  Type: Terraform Stacks - Deployment
//  Version: 0.1.0
//
// ***********************************************************************

identity_token "azurerm" {
  audience = [ "api://AzureADTokenExchange" ]
}

deployment "westeurope" {
  inputs = {
    // Deployment variables
    deployment_location       = "westeurope"
    project_identifier = "demo-stacks-wl1-we"

    // Virtual Machine variables
    vm_size = "Standard_B1s"
    vm_count = 3
    vm_os_disk_size = 64

    // Network variables
    vnet_address_space = [ "10.10.0.0/16" ]
    vnet_subnet_compute_range = "10.10.1.0/24"

    identity_token  = identity_token.azurerm.jwt
  }
}

deployment "eastus" {
  inputs = {
    // Deployment variables
    deployment_location       = "eastus"
    project_identifier = "demo-stacks-wl1-eus"

    // Virtual Machine variables
    vm_size = "Standard_B1s"
    vm_count = 1
    vm_os_disk_size = 64

    // Network variables
    vnet_address_space = [ "10.20.0.0/16" ]
    vnet_subnet_compute_range = "10.20.1.0/24"

    identity_token  = identity_token.azurerm.jwt
  }
}

deployment "australiaeast" {
  inputs = {
    // Deployment variables
    deployment_location       = "australiaeast"
    project_identifier = "demo-stacks-wl1-ae"

    // Virtual Machine variables
    vm_size = "Standard_B1s"
    vm_count = 3
    vm_os_disk_size = 64

    // Network variables
    vnet_address_space = [ "10.30.0.0/16" ]
    vnet_subnet_compute_range = "10.30.1.0/24"

    identity_token  = identity_token.azurerm.jwt
  }
}
By using separate deployments, I can scale my service precisely as needed and configure it independently for each region.
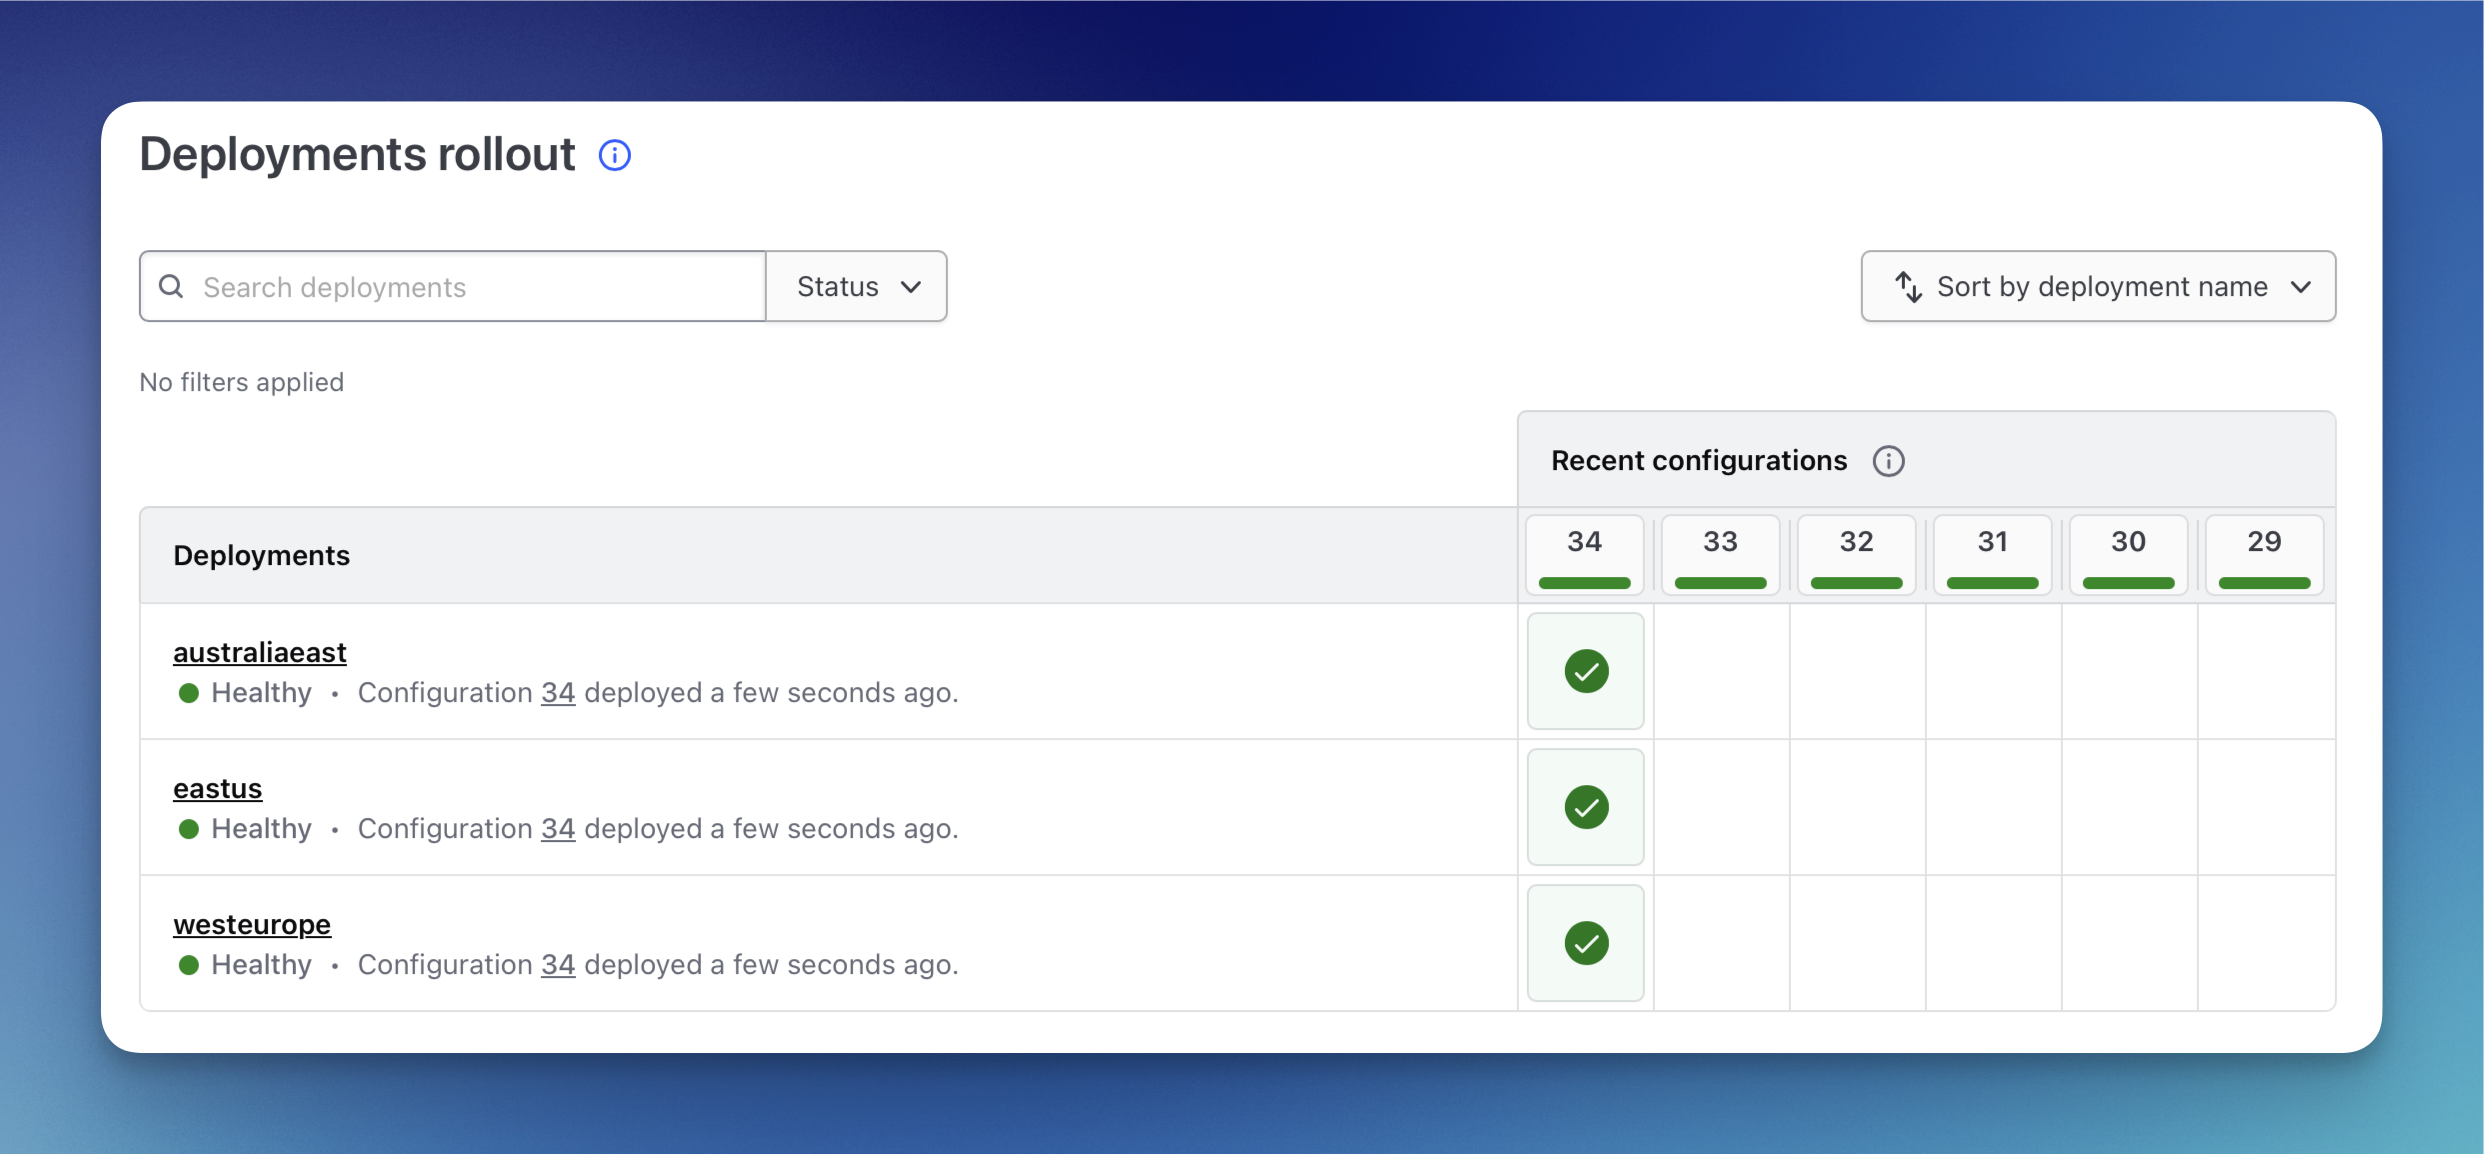
After a while, I can see that all of my regions are up and running.
Orchestration rules
A powerful new feature of Terraform Stacks is orchestration rules. These rules let you automate parts of your Stack deployments, like automatically approving plans when they meet specific conditions.
I want to set up my stack to automatically approve all changes, as long as a plan does not include any changes to my VNET component.
To achieve this, I will add the following orchestration rule to my deployments.tfdeploy.hcl.
orchestrate "auto_approve" "no_vnet_changes" {
    check {
        # Check that the pet component has no changes
        condition = context.plan.component_changes["component.vnet"].total == 0
        reason = "Not automatically approved because changes proposed to vnet component."
    }
}
By implementing the code above, we make sure that a changes does not get auto-approved if there are any changes proposed to the VNET component.
Of course, you can do much more using orchestration rules. I highly recommend you checking out the official documentation here: https://developer.hashicorp.com/terraform/language/stacks/deploy/conditions
Cleanup
Today, there is no solution like tfstacks destroy to remove a stack. You must do this on HCP Terraform for each deployment individually.
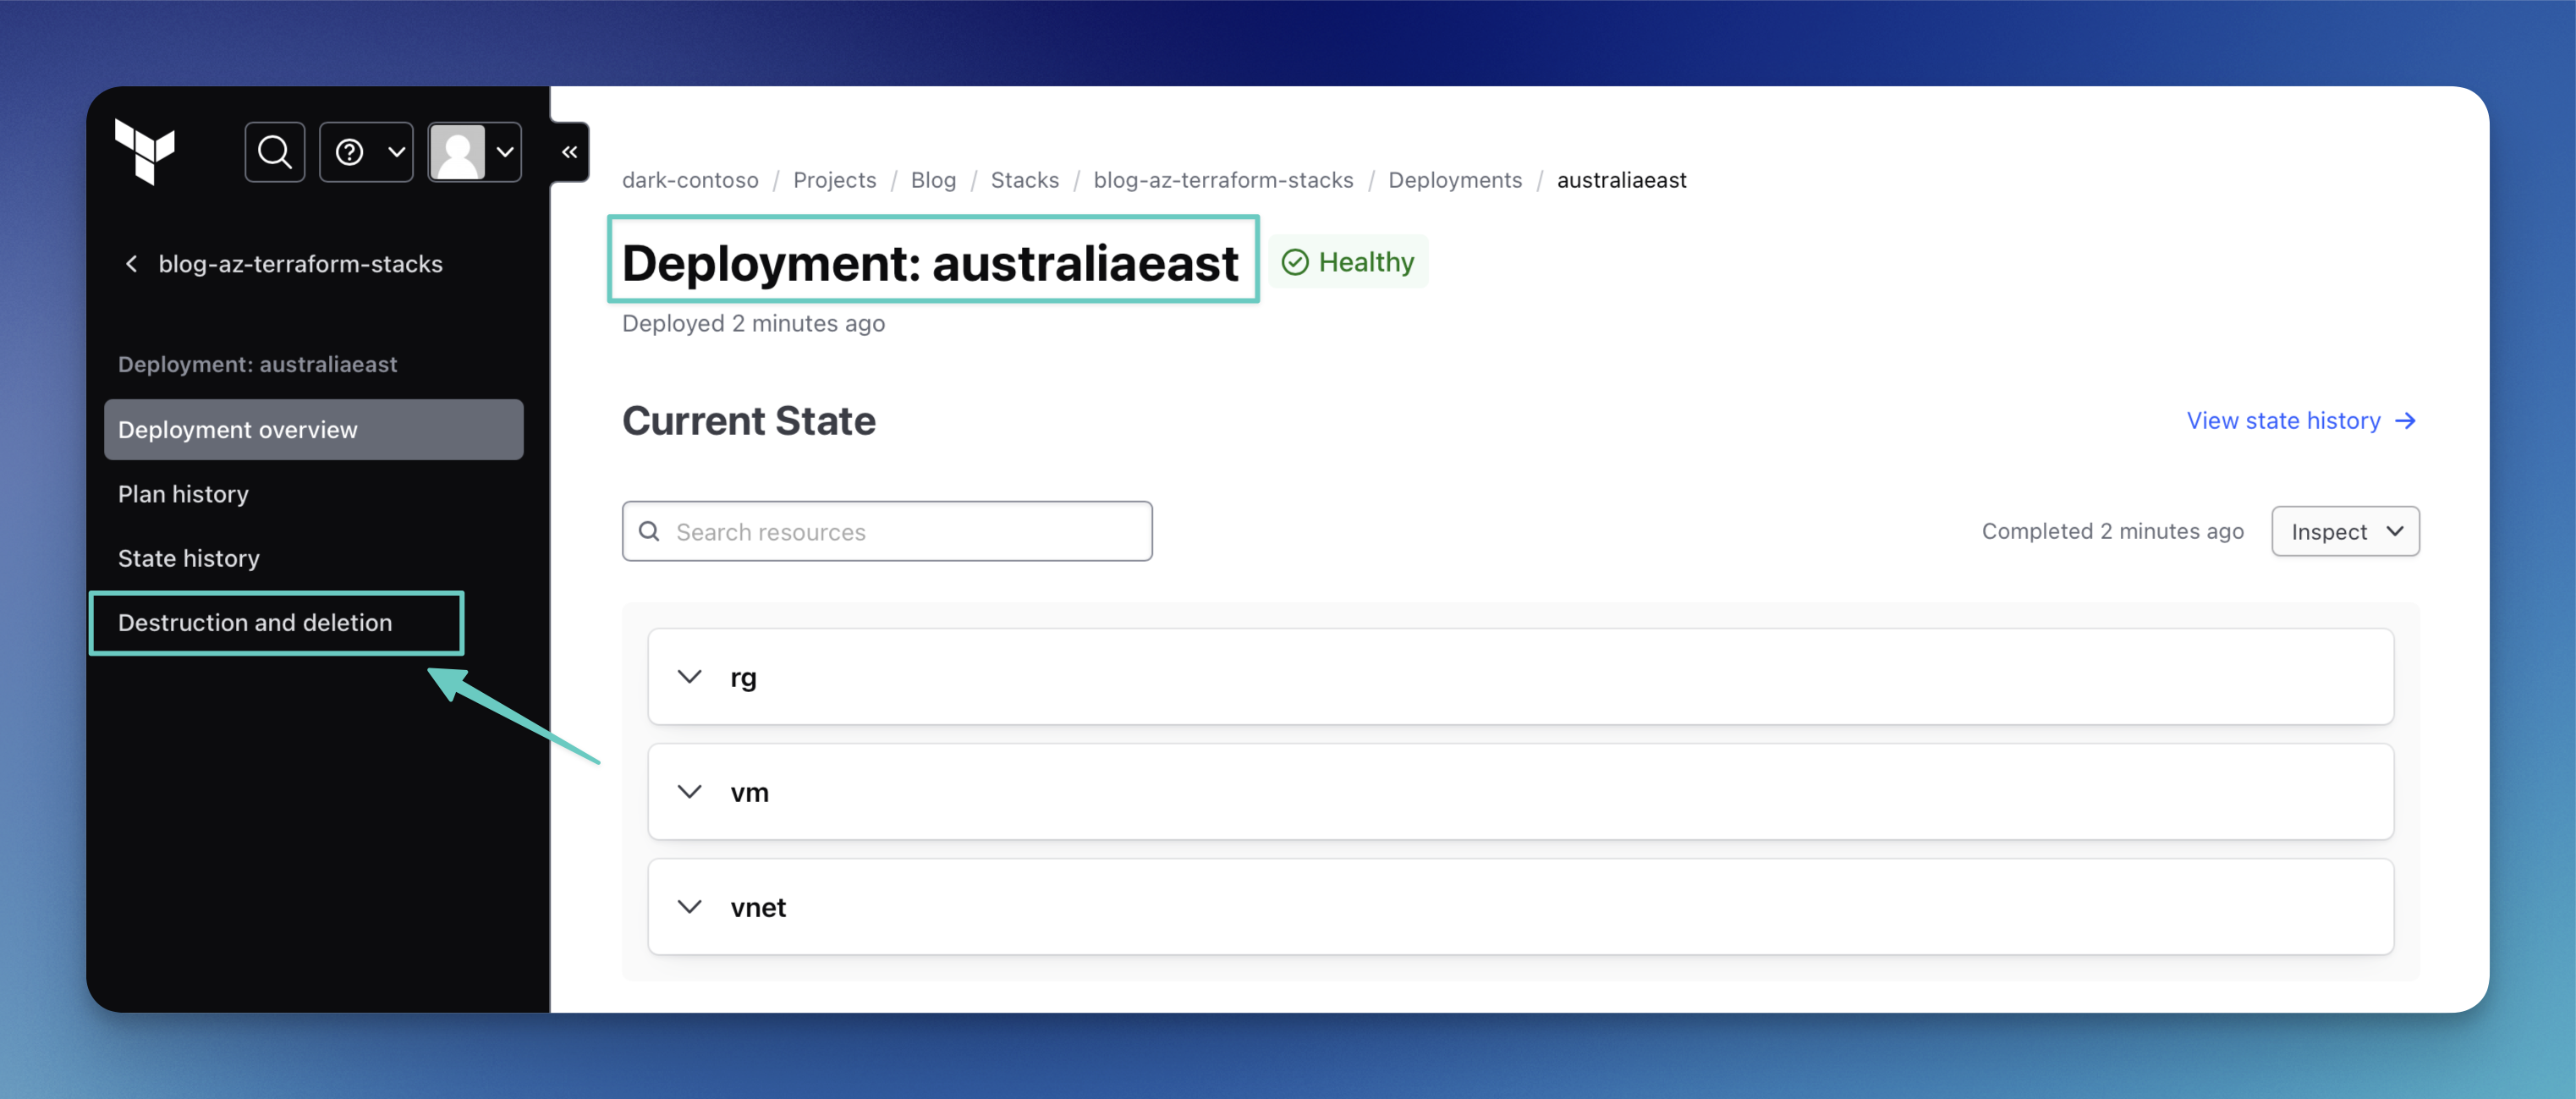
To do that, click on the deployment you want to destroy and navigate to “Destruction and deletion”.
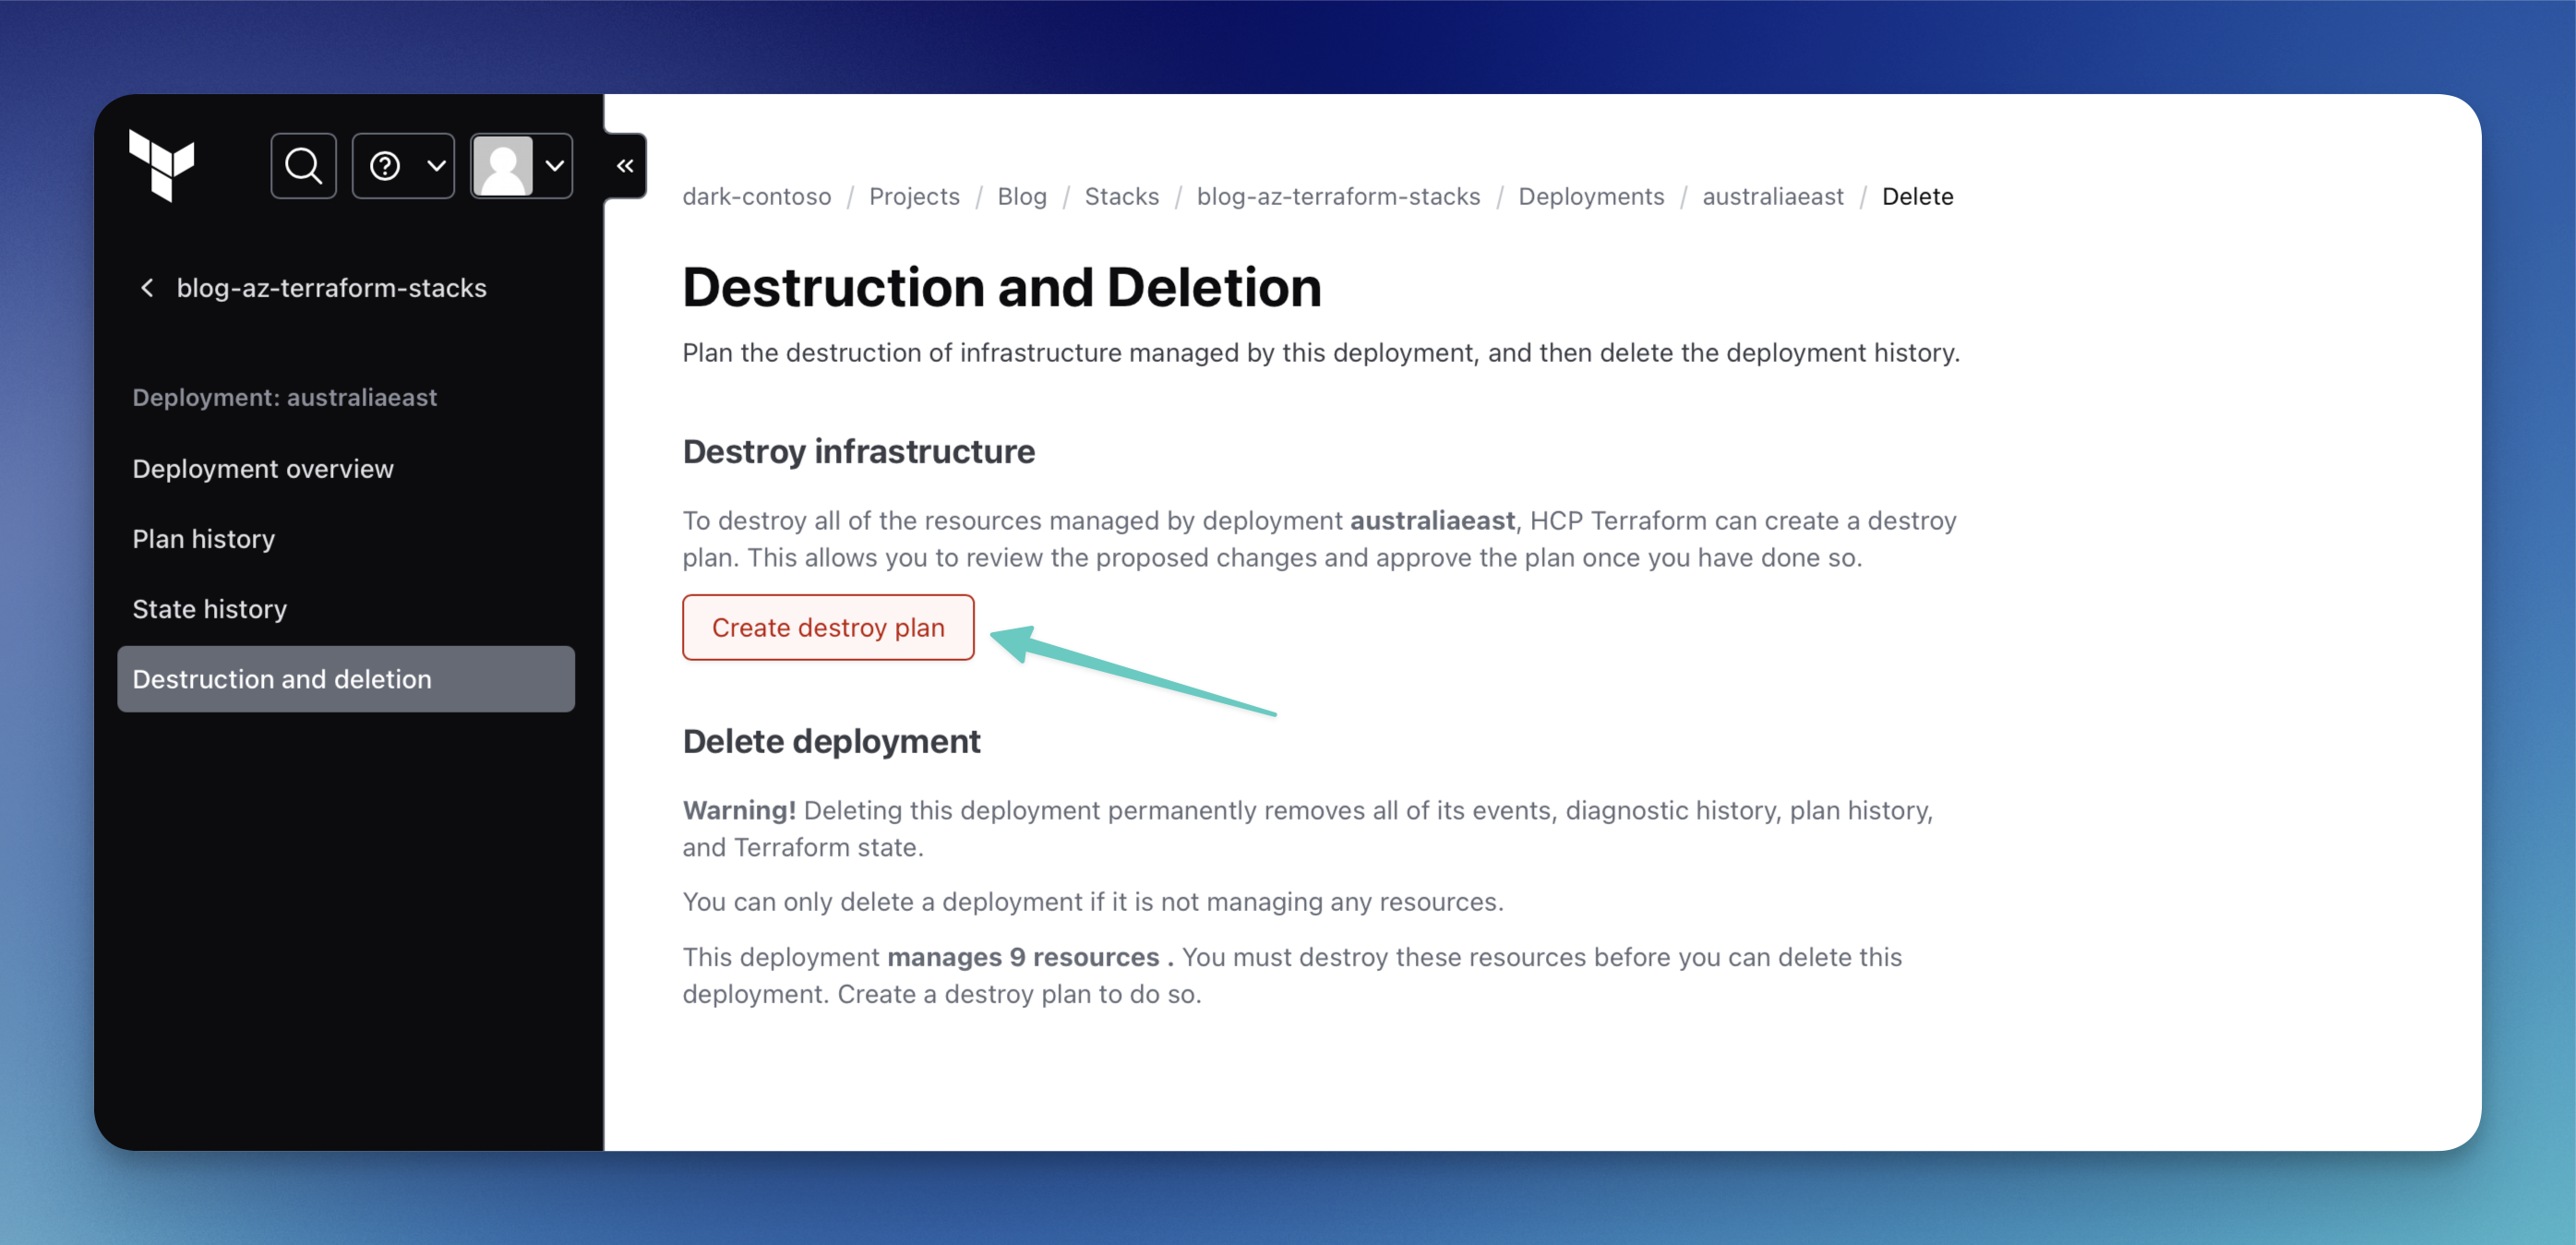
Here, you can create a destroy plan that will then remove this specific deployment. Please keep in mind that you need to repeat this process for each deployment you want to destroy.
Conclusion
In conclusion, Terraform Stacks offer a promising approach to managing infrastructure deployments by providing a structured, modular, and repeatable framework. They simplify the process of deploying complex systems across multiple environments and regions, reducing the need for repetitive code and manual configuration. This can lead to more efficient workflows, improved consistency, and easier scaling and maintenance of infrastructure.
The benefits of using Terraform Stacks include:
Reusability: By organizing infrastructure into components, Terraform Stacks allow for the reuse of code across different environments, reducing duplication and potential errors.
Scalability: The modular nature of Stacks makes it easier to scale infrastructure as needed, whether by adding new components or expanding existing ones.
Consistency: Stacks help maintain consistency across deployments, ensuring that infrastructure is set up in a uniform manner across all environments.
Automation: With orchestration rules, Terraform Stacks can automate parts of the deployment process, such as automatically approving changes under certain conditions, which can save time and reduce manual intervention.
However, there are some downsides to consider:
Complexity: For those new to Terraform or infrastructure as code, the learning curve for Terraform Stacks can be steep, especially with the introduction of new file types and configurations.
Beta Limitations: As Terraform Stacks are still in beta, there may be limitations in functionality and potential changes in future releases, which could affect stability and long-term planning.
Dependency on HCP: Currently, Terraform Stacks require an HCP Terraform account, which may not be ideal for all users, especially those who prefer self-hosted solutions.
Overall, Terraform Stacks represent a significant step forward in infrastructure management when it comes to native Terraform / HashiCorp tooling.
Terragrunt offers the flexibility of not being bound to the HCP platform, which can be advantageous for those who prefer a more independent approach to managing infrastructure. It allows for the reuse of Terraform configurations across different environments without the constraints of a specific cloud service, making it a versatile tool for infrastructure management.
Inspiration 🎼
Sadly, we've reached the end of this post. Before you go, here are my recommendations for two amazing albums: enjoy "Sempiternal" by Bring Me The Horizon and "Hypnotize" by System of a Down.
Enjoy it 🎧
Subscribe to my newsletter
Read articles from Lukas Rottach directly inside your inbox. Subscribe to the newsletter, and don't miss out.
Written by

Lukas Rottach
Lukas Rottach
I am an Azure Architect based in Switzerland, specializing in Azure Cloud technologies such as Azure Functions, Microsoft Graph, Azure Bicep and Terraform. My expertise lies in Infrastructure as Code, where I excel in automating and optimizing cloud infrastructures. With a strong passion for automation and development, I aim to share insights and practices to inspire and educate fellow tech enthusiasts. Join me on my journey through the dynamic world of the Azure cloud, where innovation meets efficiency.