Labels, Selectors, Services, and Endpoints in Kubernetes
 Kandlagunta Venkata Siva Niranjan Reddy
Labels and Selectors: The Backbone of Service Creation
In Kubernetes, labels and selectors are essential components, acting like tags to manage and route traffic effectively between Pods and Services.
What Are Labels?
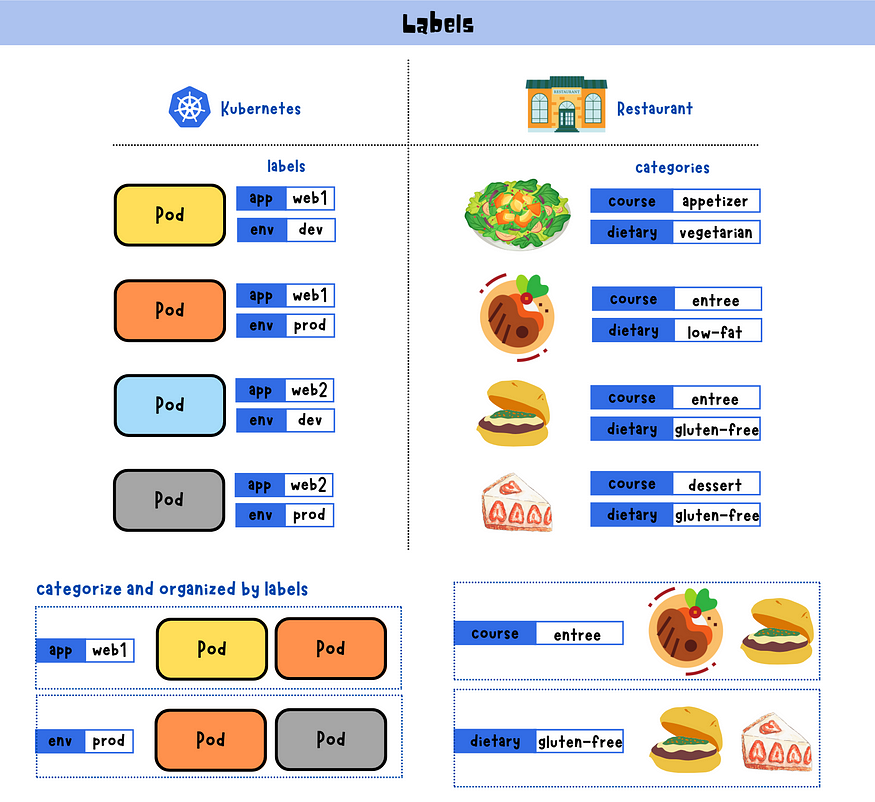
Definition: Labels are key-value pairs attached to Kubernetes objects (such as Pods, Services, etc.).
Purpose: They are used for categorization and organization.
Example: When creating a Pod, you attach a label to it. Later, you use this label to link the Pod to a Service using a selector.
How Labels Help in Grouping
- Grouping Example: Labeling multiple Pods with
app: web1forms a group of Pods with this label. Labeling Pods withenvironment: productiongroups them into the "production" environment.

Importance of Labels in Kubernetes
Finding Pods: Labels are commonly used to locate and manage groups of Pods or other Kubernetes objects.
Traffic Routing: Selectors use these labels to route traffic efficiently to the appropriate Pods.
Consequences of Missing Labels
No Service Creation: Services cannot identify or manage Pods without labels.
Broken Traffic Routing: Traffic cannot reach the right Pods, leading to communication failures.
Essential for Operations: Labels ensure smooth operations by enabling proper traffic management.
Services in Kubernetes
What Is a Service?
A Service is responsible for routing traffic to Pods. It uses labels to determine which Pods to send traffic to, based on the label selectors.
Key Role: Services maintain communication between Pods and provide high availability.
Dependency on Labels: Labels are essential for creating Services. Without them, Services cannot function.
Endpoints: Connecting Pods to Services
Definition: Endpoints contain the network information (like IPs and ports) of the Pods.
Function: They ensure traffic is directed to the correct set of Pods as specified by the Service’s selector.
Types of Kubernetes Services

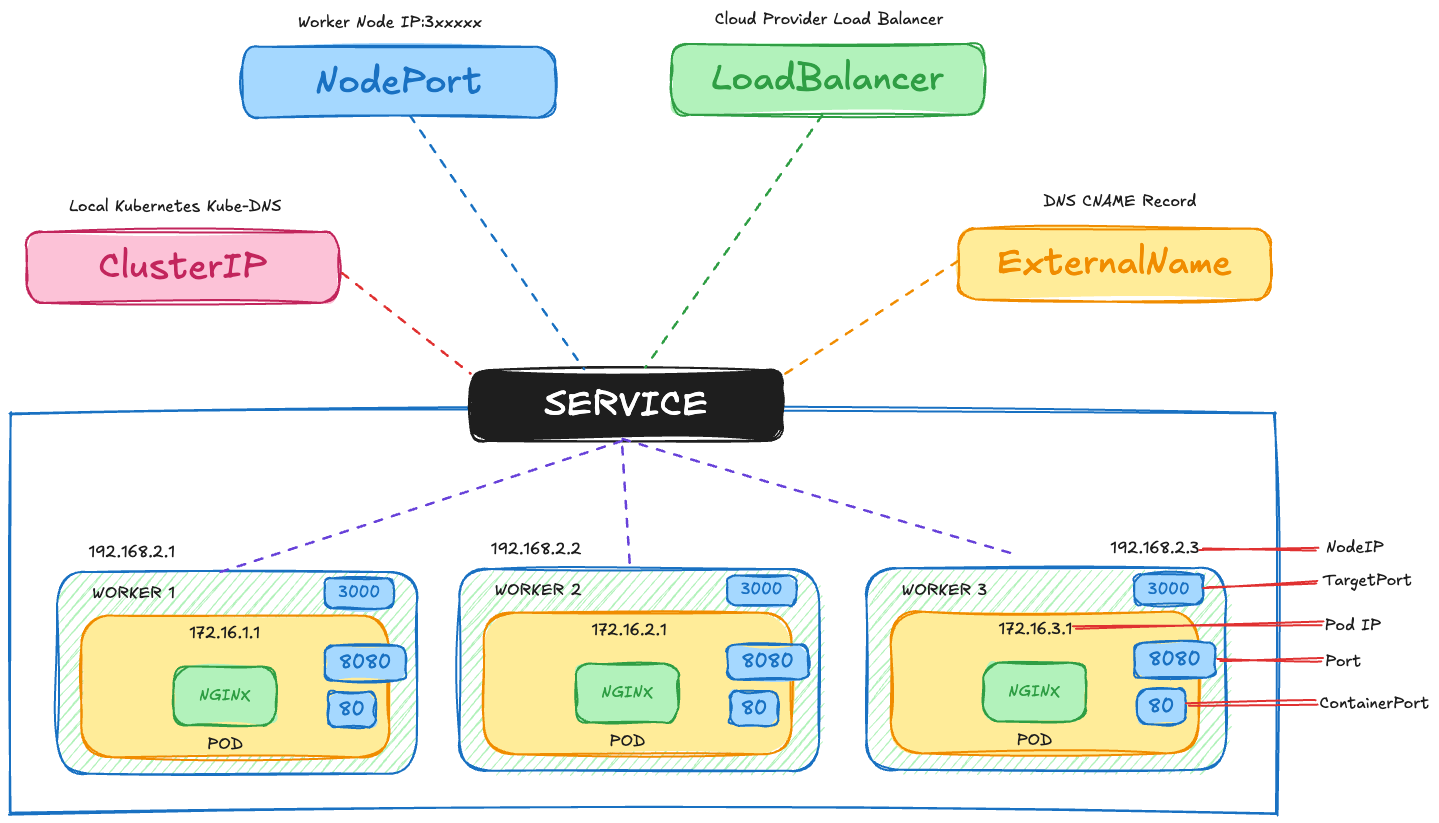
ClusterIP:
Use: Meant for communication inside the cluster only.
Default: It’s the default service type and is commonly used for apps that only need to talk to other parts of the cluster.
NodePort:
Use: Opens up the Service on a fixed port on each node’s IP address.
External Access: Allows traffic from outside the cluster to connect to your app.
LoadBalancer:
Use: Makes the Service available outside the cluster using a load balancer provided by your cloud provider.
Cloud Integration: Great for apps that need to be accessed from the internet.
ExternalName:
Use: Maps the Service to an external DNS name.
DNS Mapping: Makes it easier to reach external resources by using a simple name instead of an IP address.
How to Define a LoadBalancer Service
Imagine you need to set up a network of three NGINX servers and want to balance the load between them. We can do this using Kubernetes by creating multiple pods and a LoadBalancer service to handle the traffic.
Note: This configuration works only if your Kubernetes cluster is on a cloud provider that supports load balancing, like AWS, Azure, or Google Cloud.
Steps to Set Up
We’ll use a
Deploymentto create a ReplicaSet with three NGINX pods.We’ll then create a
LoadBalancerservice to automatically set up an external load balancer and distribute traffic across these pods.
apiVersion: apps/v1
kind: Deployment
metadata:
  name: nginx-deployment
spec:
  replicas: 3
  selector:
    matchLabels:
      app: nginx  # <--- Connects to the Service selector below
  template:
    metadata:
      labels:
        app: nginx
    spec:
      containers:
      - name: nginx
        image: nginx:latest
        ports:
        - containerPort: 80

---
apiVersion: v1
kind: Service
metadata:
  name: nginx-loadbalancer
spec:
  selector:
    app: nginx  # <--- Connects to the label in the Deployment
  type: LoadBalancer
  ports:
  - name: http
    port: 80
    targetPort: 8080
    protocol: TCP
When you apply both the Deployment and the Service in your cluster, the Service will use a selector to associate itself with the corresponding three pods that share the same labels.
You can run the following command to see the running pods:
kubectl get pods --output=wide
The output looks something like this:
NAME                              READY   STATUS    RESTARTS   AGE    IP            NODE         NOMINATED NODE   READINESS GATES
nginx-deployment-1569f5bf4-fgthj  1/1     Running   0          18h    10.244.2.5    k8s-node01   <none>           <none>
nginx-deployment-1569f5bf4-hjklv  1/1     Running   0          18h    10.244.1.4    k8s-node02   <none>           <none>
nginx-deployment-1569f5bf4-zxcvb  1/1     Running   0          18h    10.244.0.6    k8s-node03   <none>           <none>
Kubernetes uses Endpoints as objects to keep the IPs of each pod updated. Each service creates its own Endpoint object, which allows the cluster to keep track of each matching pod’s IPs automatically.
You can describe your service to see how Kubernetes Endpoints enumerate the matching pods:
kubectl describe service nginx-loadbalancer
The output looks something like this:
Name:                     nginx-loadbalancer
Namespace:                default
Labels:                   <none>
Annotations:              <none>
Selector:                 app=nginx
Type:                     LoadBalancer
IP Families:              <none>
IP:                       10.100.200.0
IPs:                      10.100.200.0
LoadBalancer Ingress:     192.0.2.1
Port:                     http  80/TCP
TargetPort:               8080/TCP
NodePort:                 http  31234/TCP
Endpoints:                10.244.2.5:8080,10.244.1.4:8080,10.244.0.6:8080
Session Affinity:         None
External Traffic Policy:  Cluster
Events:                   <none>
Kubernetes Endpoints keep the IPs updated, making traffic forwarding smoother via the Service. If pods are added, modified, or removed from the service selector, the Endpoints will update automatically. This functionality enables the Service to direct network traffic accurately to the right pods, because the Endpoints register the application’s necessary routing destination.
Each endpoint has the pod’s network IP and port and carries the same name as the Service. You can see this by describing the endpoints:
kubectl describe endpoints nginx-loadbalancer
The output looks something like this:
Name:         nginx-loadbalancer
Namespace:    default
Labels:       <none>
Annotations:  <none>
Subsets:
  Addresses:          10.244.2.5, 10.244.1.4, 10.244.0.6
  NotReadyAddresses:  <none>
  Ports:
    Name     Port  Protocol
    ----     ----  --------
    http     8080  TCP
Endpoints establish a stable network identity for the pods. They dynamically adjust as pod state changes, ensuring balanced distribution of network traffic among a dynamic set of pods.
Subscribe to my newsletter
Read articles from Kandlagunta Venkata Siva Niranjan Reddy directly inside your inbox. Subscribe to the newsletter, and don't miss out.
Written by
