Ansible for Beginners: Your Step-by-Step Guide to Getting Started with Automation
 Ritik Singh
Automation is the future of IT infrastructure management, and if you're new to this field, Ansible is a fantastic place to start. Ansible, an open-source tool developed by Red Hat, simplifies complex tasks like configuration management, application deployment, and orchestration by automating them through simple, human-readable commands. Whether you're a beginner or just curious about automation, this guide will help you dive into Ansible and get started with the basics.
What is Ansible?
Ansible is an open-source IT automation tool that allows you to manage multiple servers and systems efficiently. Its primary functions include:
Configuration Management: Ensuring that systems are in a specific desired state.
Application Deployment: Deploying applications across different environments.
Orchestration: Coordinating tasks to run in sequence or parallel on multiple systems.
Provisioning: Setting up servers and cloud environments.
Why Use Ansible?
Ansible stands out because it’s:
Simple: Uses a straightforward language (YAML) that is easy to learn.
Agentless: Doesn’t require any agent to be installed on target systems.
Efficient: Designed to work across multiple platforms with minimal setup.
Extensible: You can create your own modules if the built-in ones don’t fit your needs.
Ansible Terminology
Before diving into Ansible, here are some key terms to know:
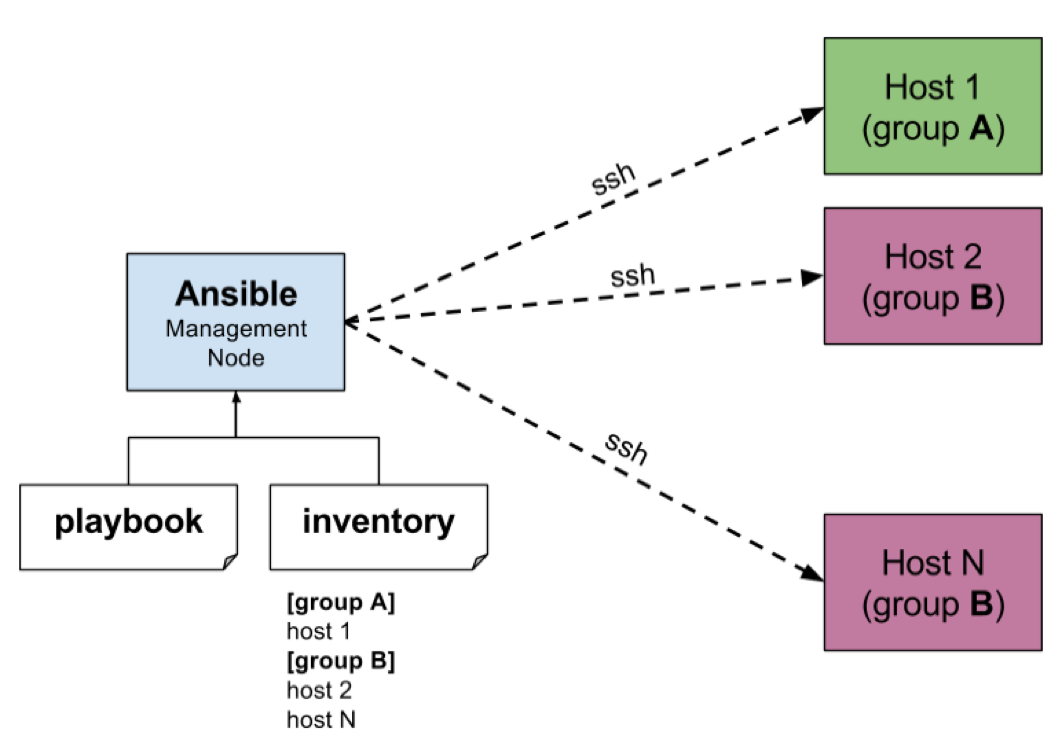
Playbook: A YAML file containing tasks to be executed on your systems.
Inventory: A list of systems (IP addresses or domain names) that you want to manage.
Module: Small programs used by Ansible to accomplish tasks like installing software, managing services, or modifying files.
Task: A single action performed on the target machines.
Role: A way to organize tasks, files, templates, and variables in a reusable format.
Installing Ansible
Getting started with Ansible is easy. Here’s a quick setup guide for installing Ansible on a Linux environment:
Update the system package manager
sudo apt update
Install Ansible
sudo apt install ansible -y
Once installed, verify the installation:
ansible --version
Step 1: Setting Up Your Inventory
Ansible requires an inventory file that lists the servers it should manage. This file can be as simple as a list of IP addresses or hostnames.
Create a file called hosts.ini:
[web_servers]
192.168.1.1
192.168.1.2

[database_servers]
192.168.1.3
The web_servers and database_servers are group names, which allow you to apply specific tasks to these groups in your playbooks.
Step 2: Writing Your First Playbook
A playbook is a YAML file that defines a list of tasks to be executed on your inventory. Let’s write a simple playbook to install Apache on all servers in the web_servers group.
Create a file called install_apache.yml:
- name: Install Apache on web servers
  hosts: web_servers
  become: yes

  tasks:
    - name: Ensure Apache is installed
      apt:
        name: apache2
        state: present

    - name: Start and enable Apache service
      service:
        name: apache2
        state: started
        enabled: yes
In this playbook:
hosts: web_serversspecifies the group to apply the tasks to.become: yesgrants sudo permissions.The
aptmodule installs Apache.The
servicemodule ensures that the Apache service is started and enabled.
Step 3: Running Your Playbook
To execute your playbook, run the following command in your terminal:
ansible-playbook -i hosts.ini install_apache.yml
Ansible will connect to each server in the web_servers group, install Apache, and start the service. After it finishes, you’ll see a summary of the tasks.
Step 4: Exploring Modules
Ansible comes with a vast library of modules, making it adaptable to many scenarios. Here are a few common modules:
apt/yum: For package management.
service: For managing services.
copy: To copy files from the control machine to the target.
command: To execute commands on the target machine.
user: For managing users on remote systems.
Experimenting with different modules will help you understand the full range of capabilities Ansible offers.
Step 5: Running Ad-Hoc Commands
Ansible also allows you to run commands ad-hoc without writing a playbook. This can be useful for quick tasks, such as checking connectivity or rebooting servers.
For example, to check if all your web servers are reachable:
ansible web_servers -m ping -i hosts.ini
To install Apache on all web servers without a playbook:
ansible web_servers -m apt -a "name=apache2 state=present" -i hosts.ini --become
Conclusion
Ansible is a robust tool that grows with your needs, from basic automation tasks to complex deployments. In this guide, we’ve covered the essential concepts of Ansible, from installation to creating and running playbooks. As you dive deeper, explore more advanced features like roles, custom modules, and Ansible Vault for securing sensitive data.
Learning Ansible may seem challenging at first, but with practice, it will become a powerful tool in your toolkit for simplifying and automating IT tasks. Happy automating!
I hope you will find this blog helpful. Follow and Give it a Like ❤️
Subscribe to my newsletter
Read articles from Ritik Singh directly inside your inbox. Subscribe to the newsletter, and don't miss out.
Written by
