[TIL/Swift] UIKit Programmatic UI 설정하기
 Donghan Kim
2 min read
비록 SwiftUI가 등장했고, 최근에는 많이 사용하는 추세를 보이지만 아직까지도 많은 기업들에서 Storyboard없이 UIKit을 활용하는 편이다.
처음 개발을 시작했을 때는 UIKit을 사용할 때 스토리보드를 활용하는 게 딱히 거부감도 없었는데 (안드로이드랑 비슷하다고 생각함) 현업에서는 보통 스토리보드를 아주 안좋게 보는 시선이 많았다. 확실히 디버깅에도 불리한 것 같고, 협업을 하는 경우에 xml 때문에 충돌이 자주 일어날 것 같았다.
맨날 세팅할 때마다 찾게되는 것 같아서 간단하게 정리했다. 스토리보드 없이 UIKit을 활용하기 위해서는 기본적으로 설정된 부분을 약간 수정하여 세팅을 해야한다.
스토리보드없이 UIKit 세팅
1. target/info에서 Main storyboard file base name 필드 찾아서 제거

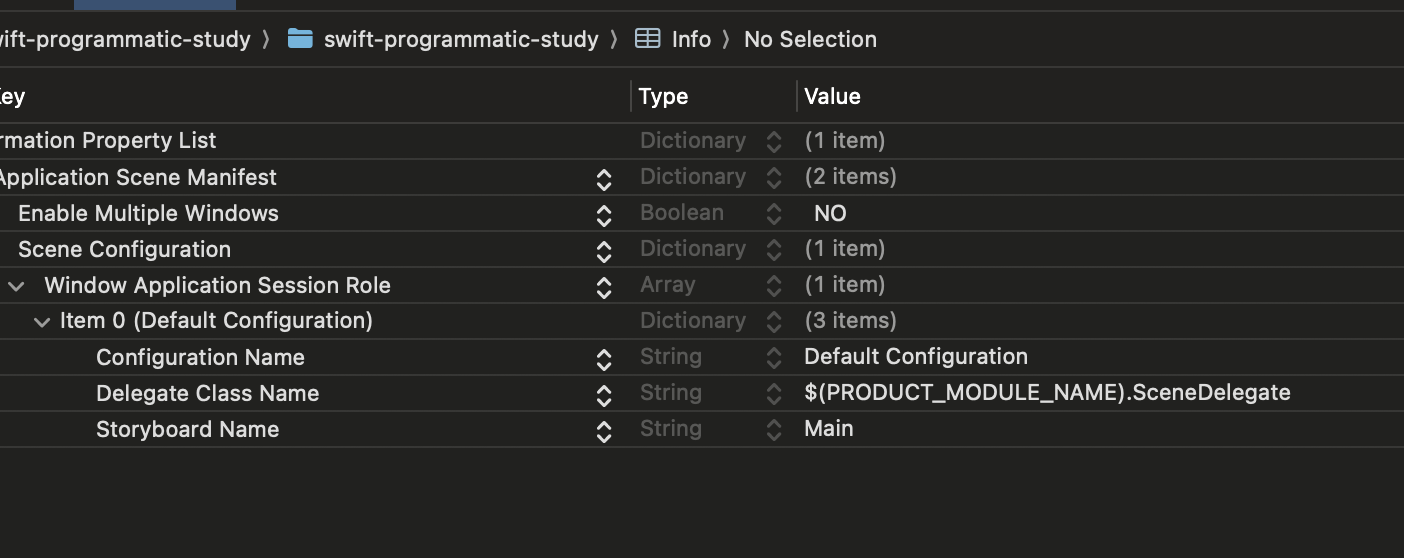
2. info.plist에서 Scene Configuration/Window Application Session Role/Storyboard Name 필드 제거
info 테이블에서 마우스 호버 시 생기는 -버튼 누르면 삭제
3. SceneDelegate 파일에서 ViewController를 연결
class SceneDelegate: UIResponder, UIWindowSceneDelegate {

    var window: UIWindow?

    func scene(_ scene: UIScene, willConnectTo session: UISceneSession, options connectionOptions: UIScene.ConnectionOptions) {

        // 기본 값은 _로 처리가 되어있다
        guard let windowScene = (scene as? UIWindowScene) else { return }

        // window 전체 화면 채우기
        window = UIWindow(frame: windowScene.coordinateSpace.bounds)
        // window에 windowScene 할당
        window?.windowScene = windowScene
        // root VC 연결
        window?.rootViewController = ViewController()
        // window 실제로 보이게 적용
        window?.makeKeyAndVisible()

    }
// ... 생략
기본값으로 SceneDelegate에서는 스토리보드를 사용하도록 세팅이 되어있는데 이 부분에다가 우리가 사용할 ViewController()를 설정해줘야한다.
이렇게 하면 Storyboard없이 UIKit 개발을 위한 기본적인 세팅이 완료된다!
0
Subscribe to my newsletter
Read articles from Donghan Kim directly inside your inbox. Subscribe to the newsletter, and don't miss out.
Written by

Donghan Kim
Donghan Kim
Web / iOS / Flutter Developer