Creating and Configuring VPC for a Secure 3-Tier Architecture on AWS
 Celestina Odili
Table of contents
- Introduction
- Step 1: Log in to the AWS Management Console
- Step 2: Create VPC
- Step 3: Create Subnets in Each Availability Zone
- Step 4: Create an Internet Gateway
- Step 5: Create a NAT Gateway (for Private Subnets)
- Step 6: Create Route Tables for Each Tier
- Step 7: Add Route
- Step 8: Associate Route Table with the Subnets
- Conclusion
Introduction
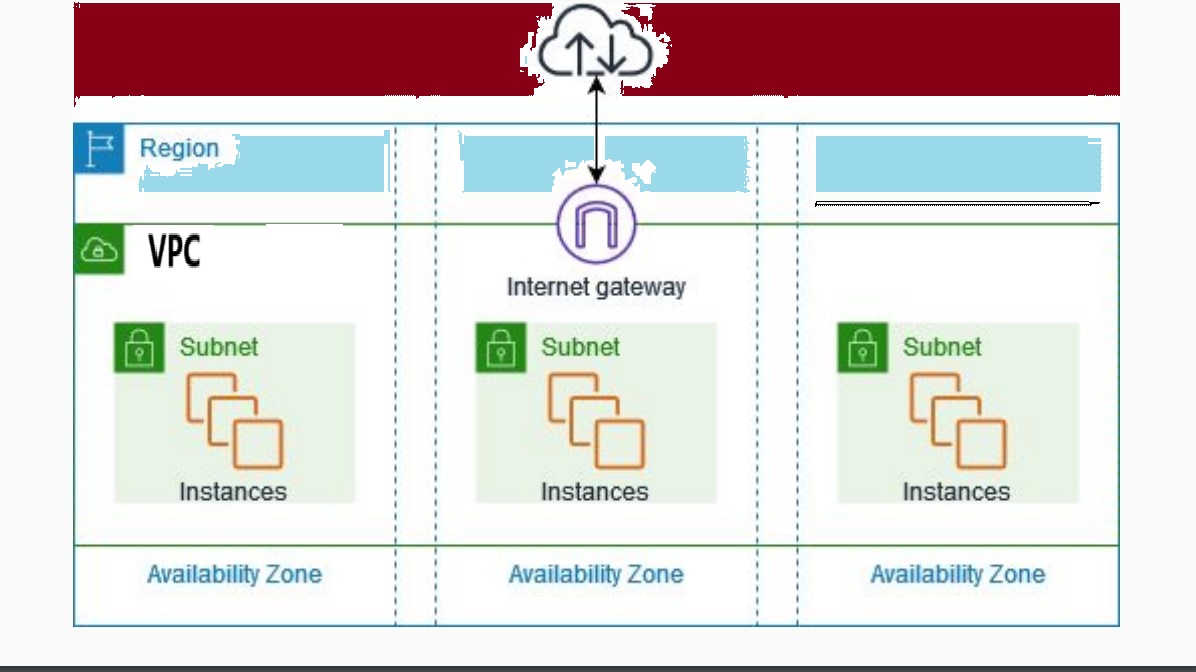
AWS Virtual Private Cloud (VPC) serves as the foundational network environment where all other resources operate. Starting with VPC in provisioning your resources is a best practice in cloud architecture because it provides a secure, flexible, and well organized foundation for building the rest of your AWS infrastructure.
In this article, you will create a 3-tier VPC for web, application, and database across three Availability Zones (AZs). Also, you will configure route tables, internet gateway and NAT gateway. The steps below provide a detail guide:
Step 1: Log in to the AWS Management Console
Go to the AWS Management Console.
Sign in using your AWS account credentials or create a free account if you do not have one.
Step 2: Create VPC
In the AWS Management Console, search for "VPC" in the search bar and select "VPC" from the services list.
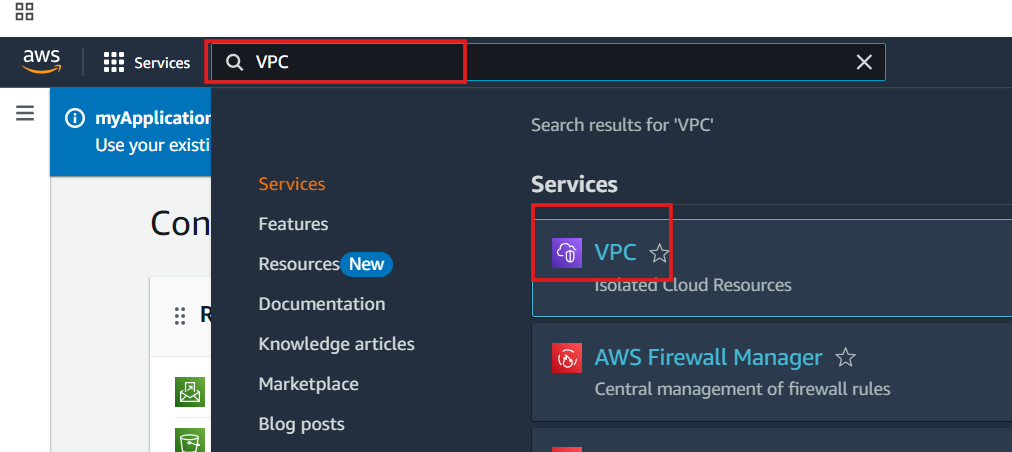
This will open the VPC dashboard. Choose a region
Click the "Create VPC" button.

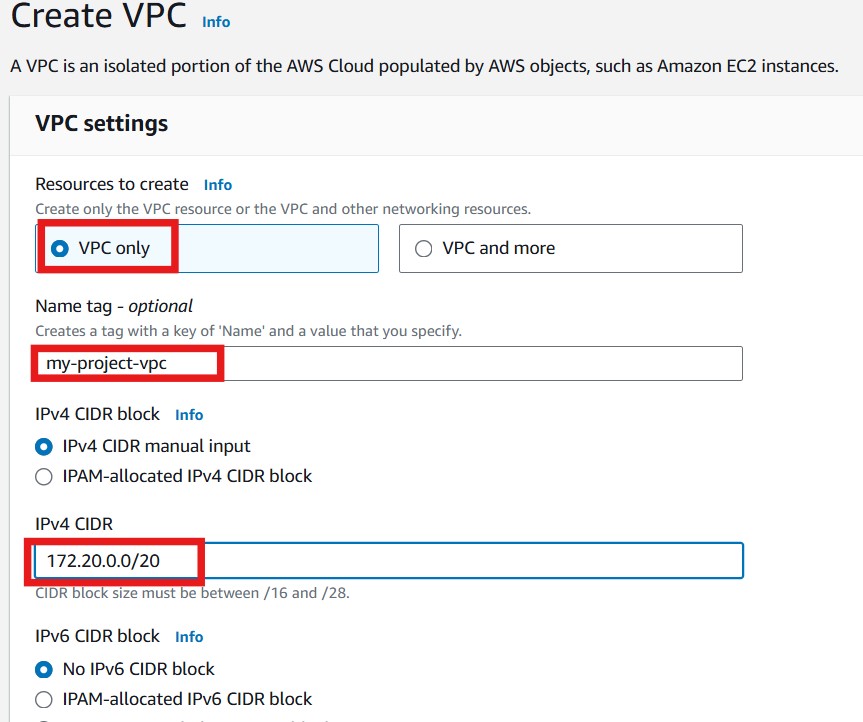
Configure the VPC Settings:
Select VPC only
Name tag: Provide a name for your VPC
IPv4 CIDR block: Specify the CIDR block for the VPC. This defines the IP address range for the VPC. For example
172.20.0.0/20IPv6 CIDR block (optional): Choose "No IPv6 CIDR block"
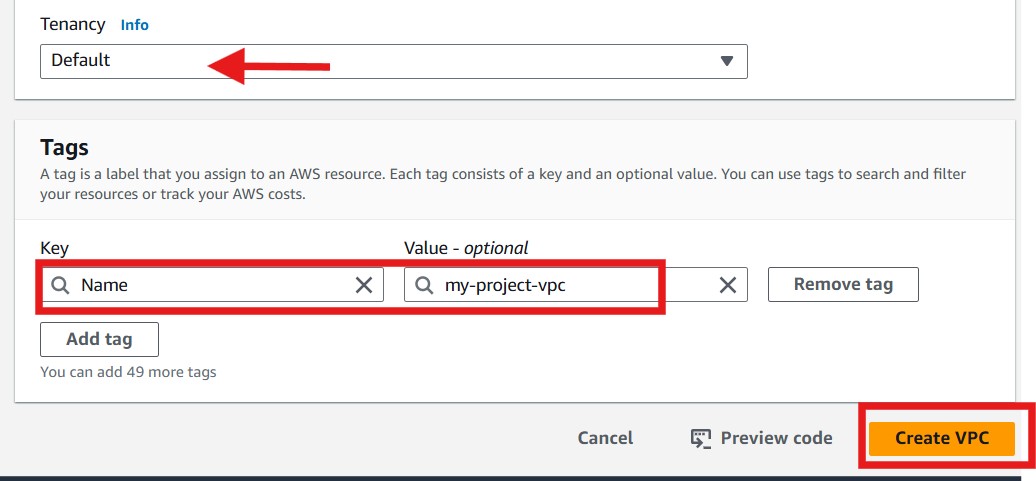
Tenancy: Select Default
Tags(Optional): Add a tag name and value.
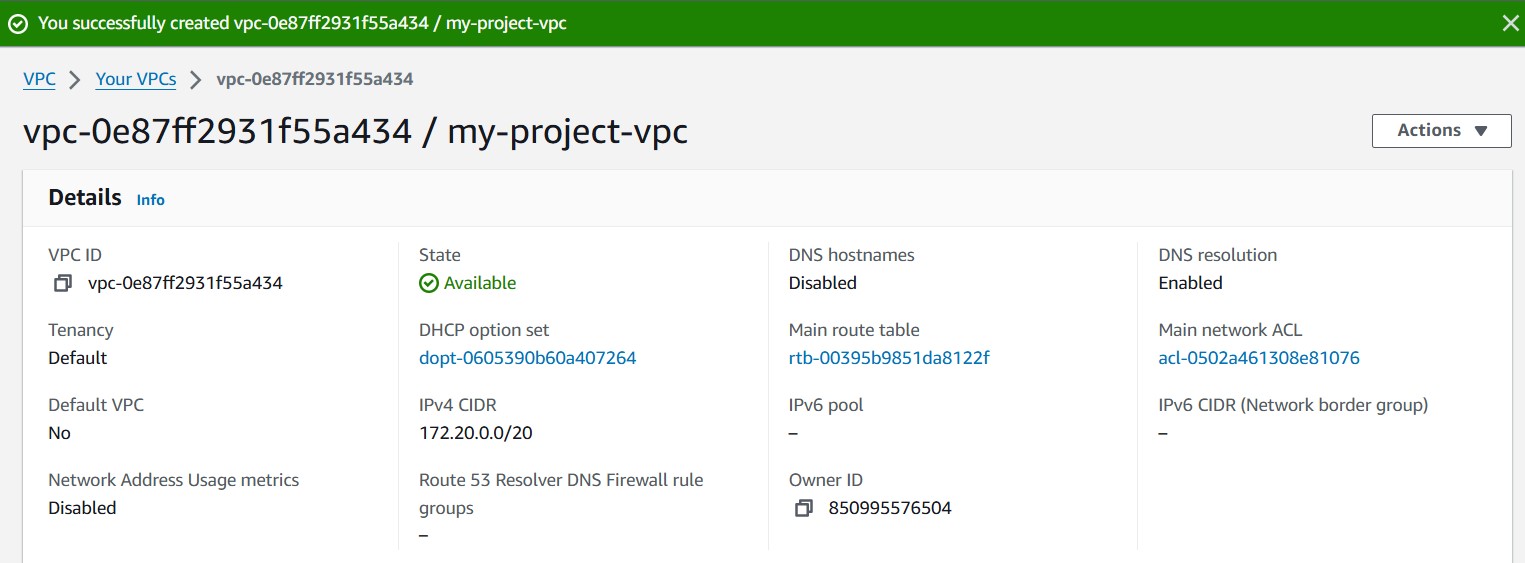
Click Create VPC
- Validate successful VPC creation. After a successful creation, your VPC status should be available
Step 3: Create Subnets in Each Availability Zone
For redundancy and high availability, create three subnets per tier, each in three different AZ. You will create nine subnets in total. Ensure they are all added before you click create subnet
In the VPC Dashboard, select Subnets from the left-hand menu.
Click Create subnet to begin creating a new subnet.

VPC ID: Choose the VPC in which you want to create the subnet. The associated VPC CIDR will be filled for you.
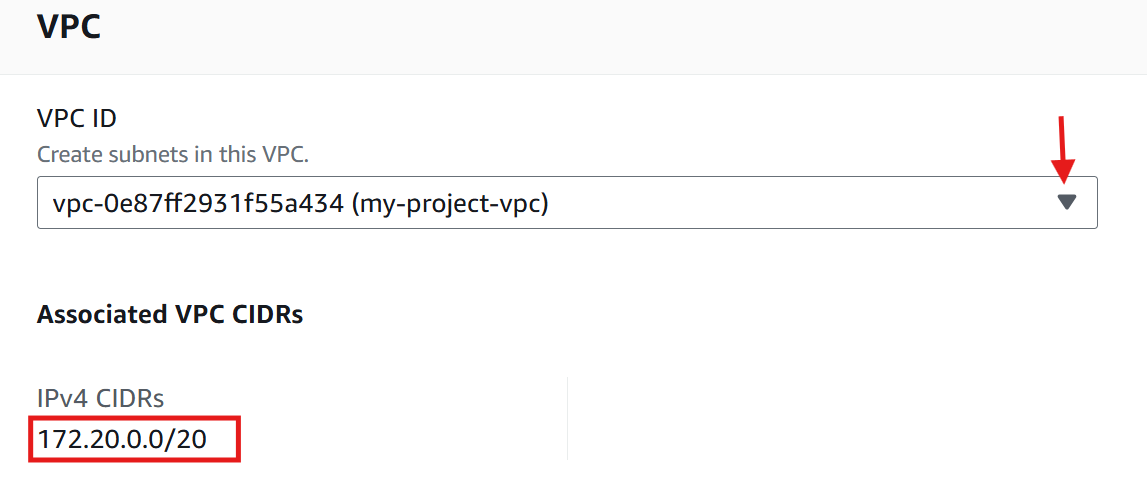
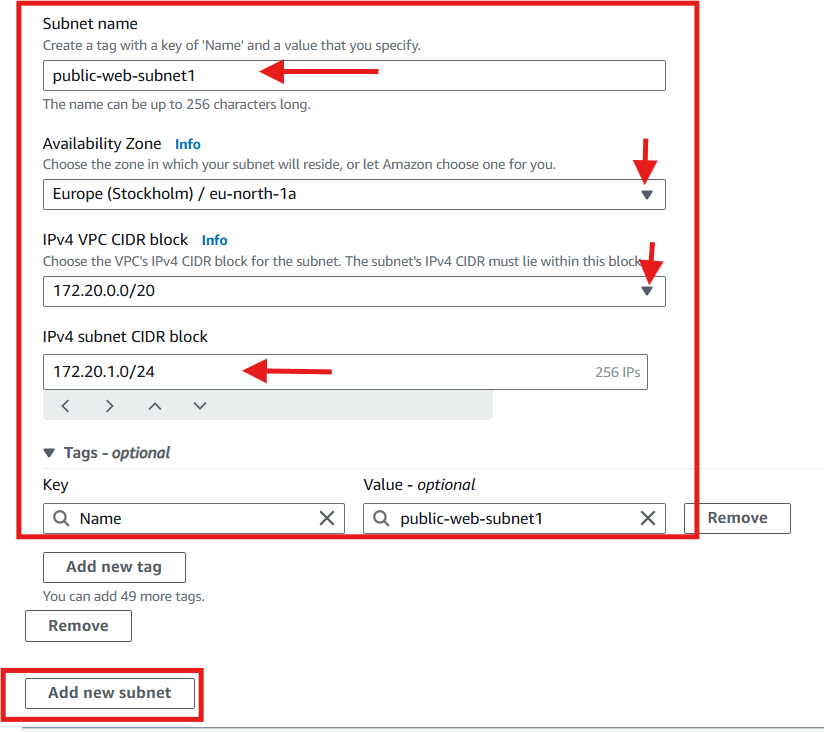
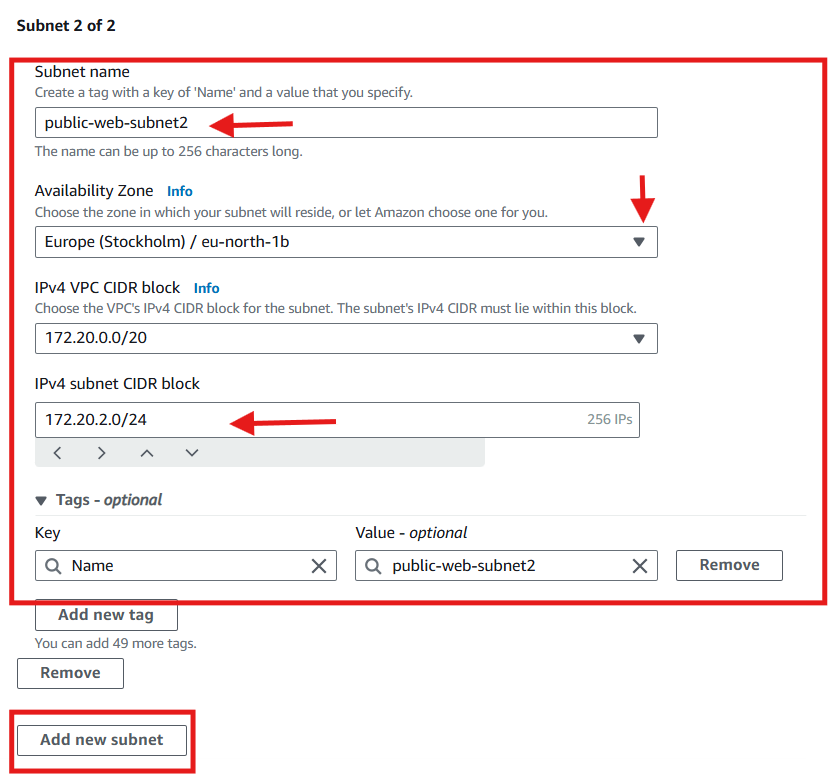
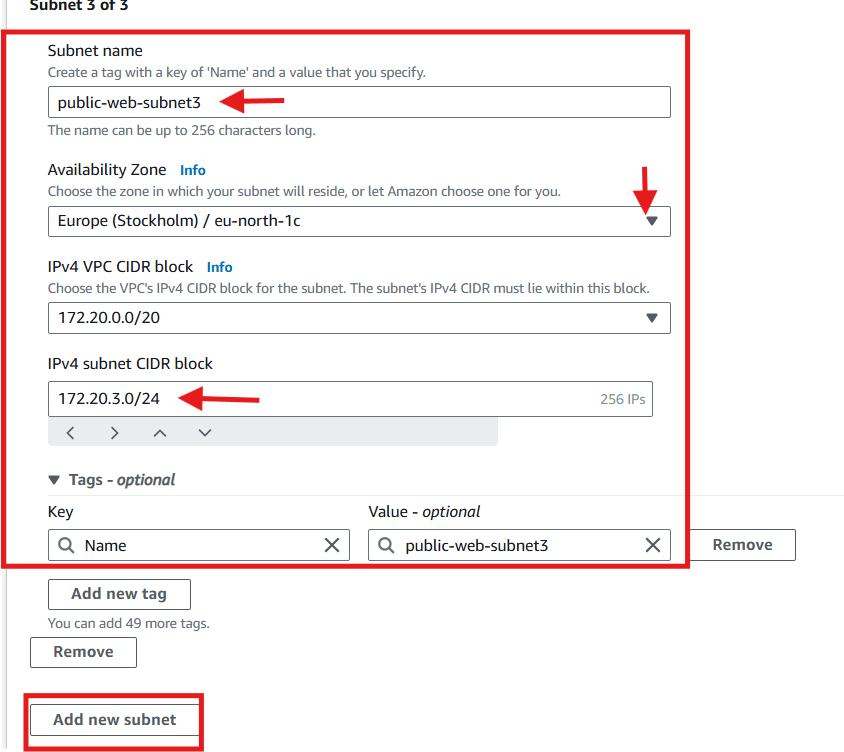
Configure the Subnet settings. Specify the name, availability zone and CIDR blocks for the subnet one after the other.
For Public Subnets (Web Tier):
CIDR Blocks for the subnets:
public-web-subnet1:
172.20.1.0/24(AZ1a)public-web-subnet2:
172.20.2.0/24(AZ1b)public-web-subnet3:
172.20.3.0/24(AZ1c)
Name tag: (Optional) Add a name tag to identify the subnet (e.g.,
Public-web-subnet-1).Select an Availability Zone (e.g.,
eu-north-1a).Choose the VPC's IPv4 CIDR block for the subnet. The subnet's IPv4 CIDR must lie within this block.
IPv4 subnet CIDR block. Specify an IP range for the subnet (e.g.,
172.20.1.0/24). This range should be a subset of the VPC CIDR block and must not overlap with other subnets in the same VPC.click Add new subnet to add the second and then up to the nineth subnets
For Private Subnets (App Tier):
CIDR Blocks for the subnets
private-app-subnet4:
172.20.4.0/24(AZ1a)private-app-subnet5:
172.20.5.0/24(AZ1b)private-app-subnet6:
172.20.6.0/24(AZ1c)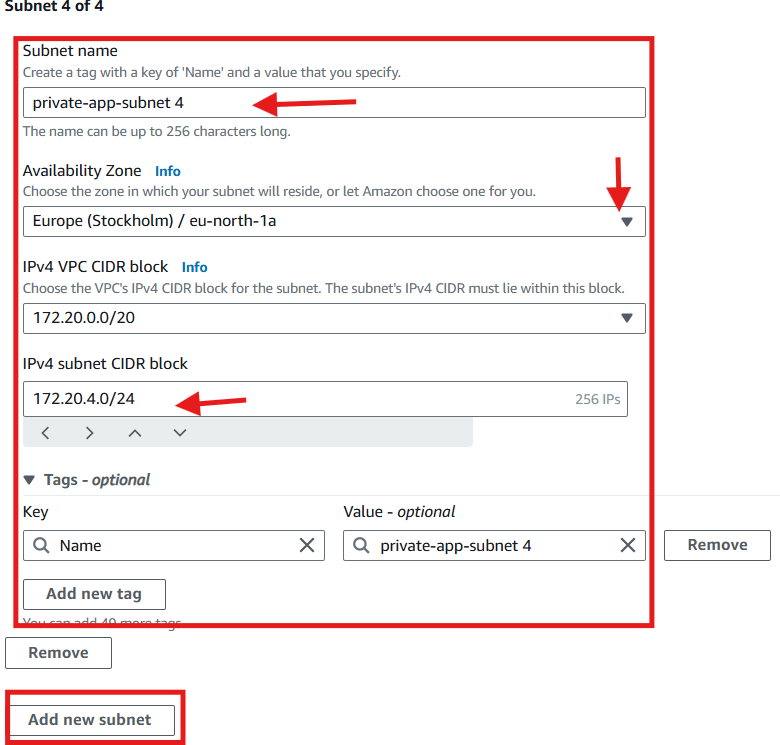
For Private Subnets (Database Tier):
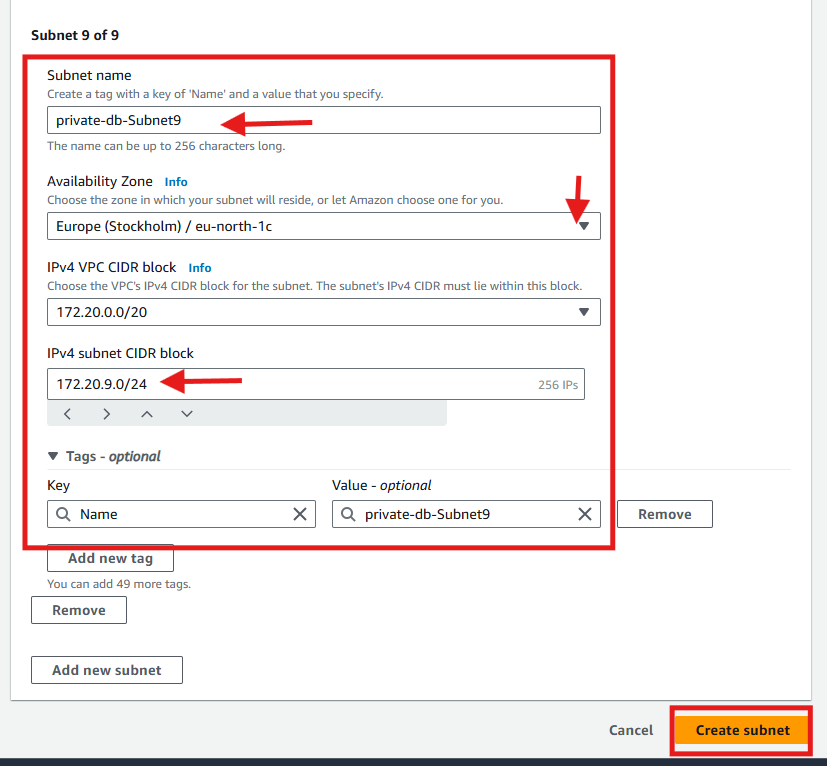
CIDR Blocks for the subnets
private-db-Subnet7:
172.20.7.0/24(AZ1a)private-db-Subnet8:
172.20.8.0/24(AZ1b)private-db-Subnet9:
172.20.9.0/24(AZ1c)
After adding the nineth subnet, Click Create subnet to finish the setup
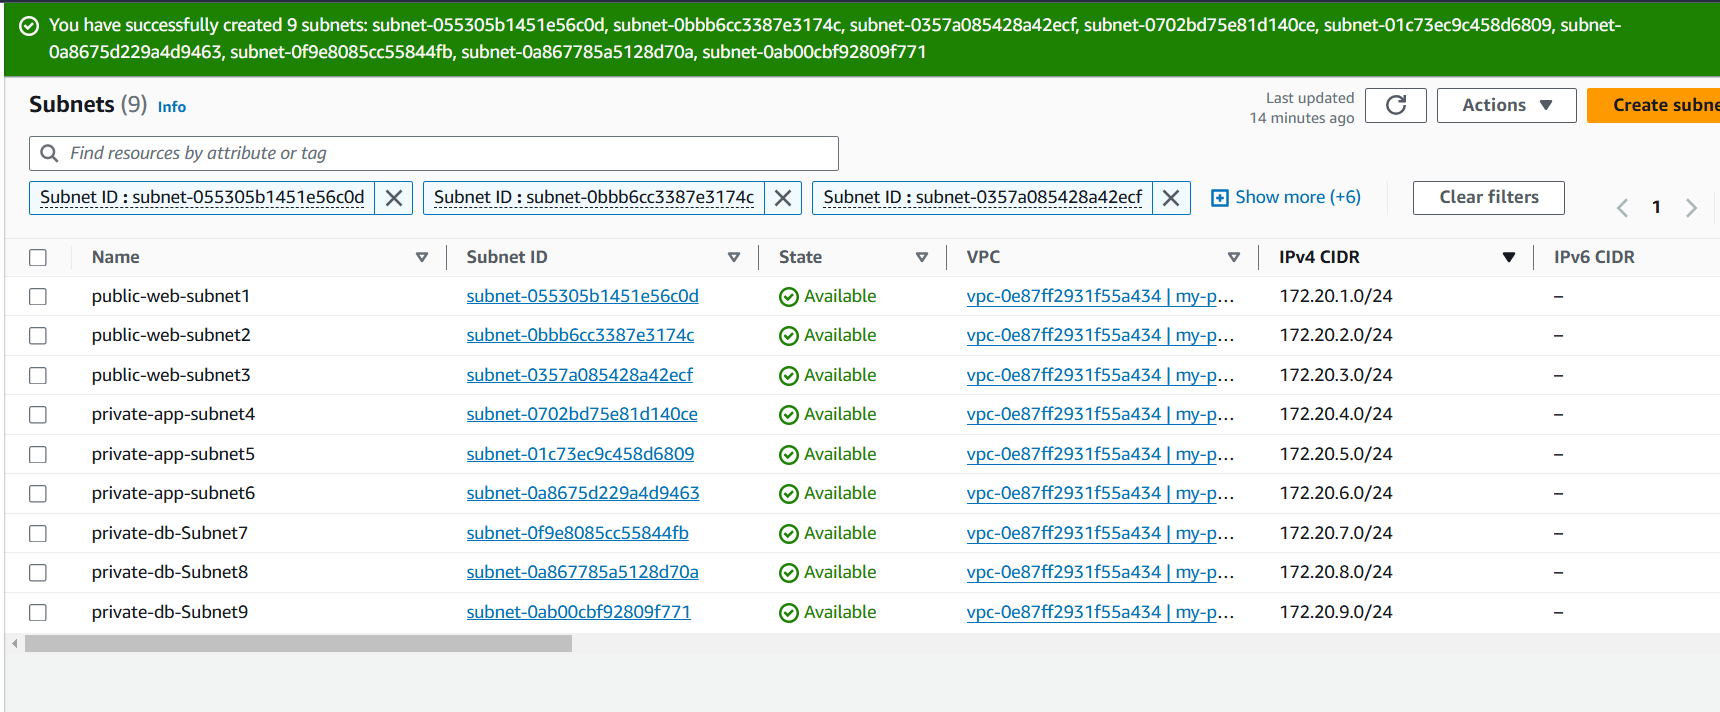
- Enable auto-assign IP address for the three public subnets. This is ensure automatic assignment of public IP addresses.
Select the public subnet
Click action
Select edit subnet settings
under Auto-assign IP settings, Enable auto-assign public IPV4 address
Click Save
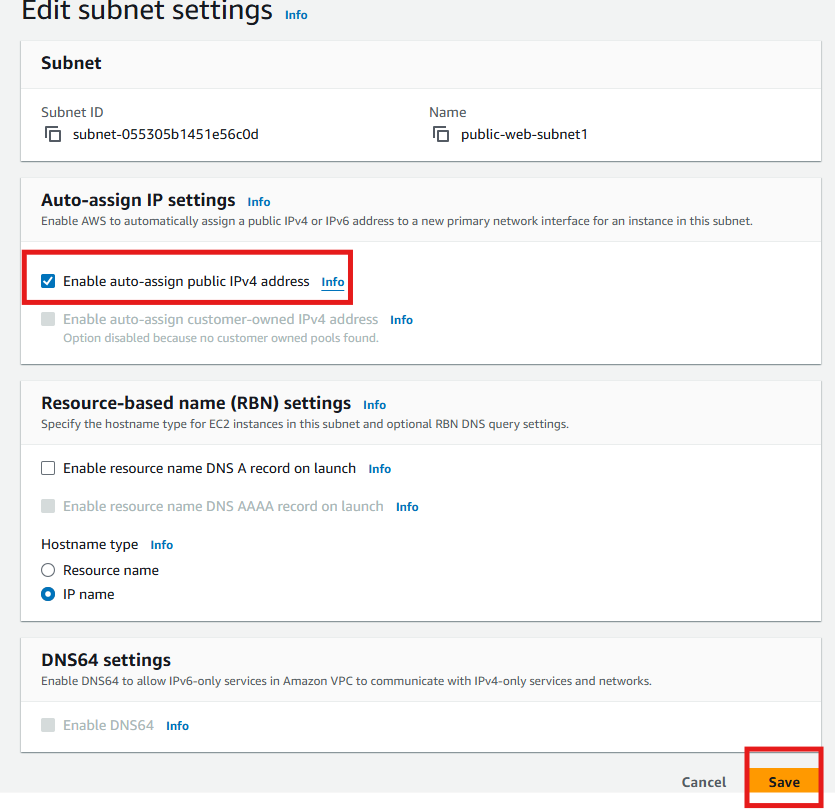
Repeat for the other two public subnets
Step 4: Create an Internet Gateway
Create an internet gateway and attach it to your VPC
Click Internet Gateways in the left hand menu, select Create Internet Gateway,
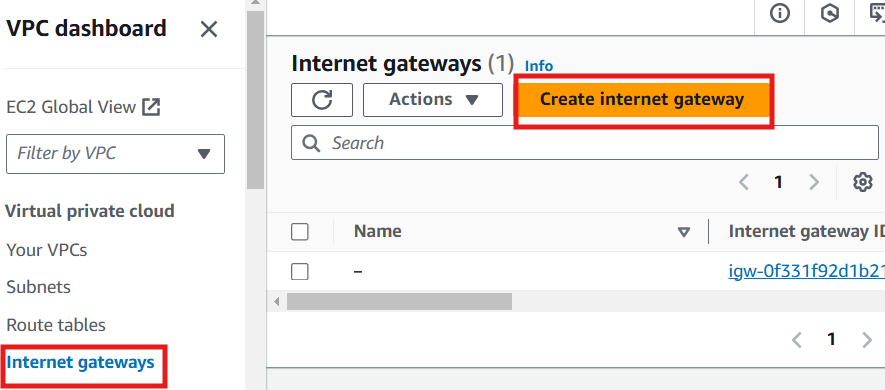
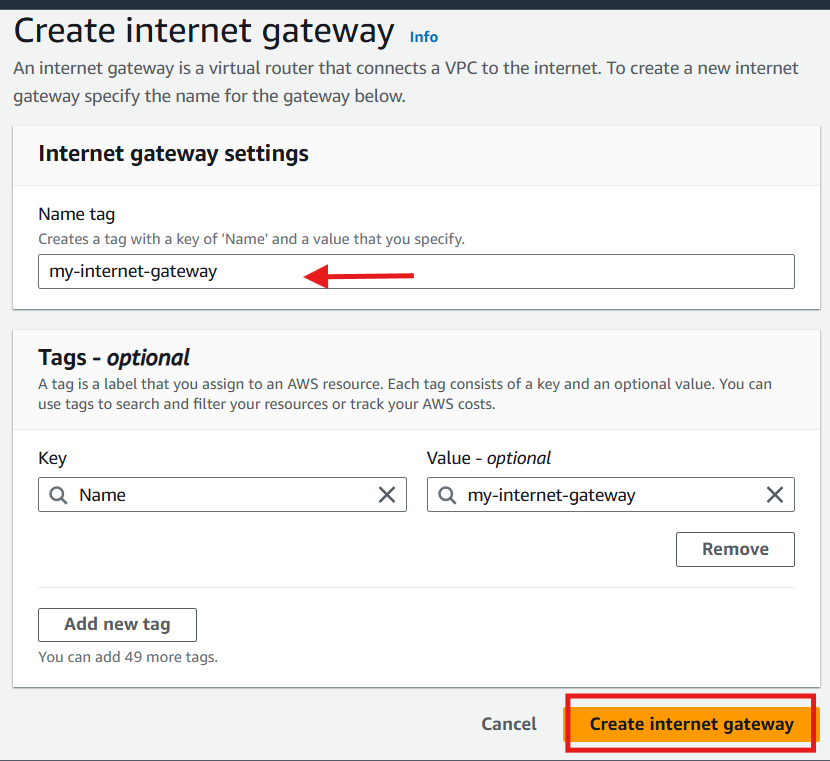
Provide a name
Click Create internet gateway
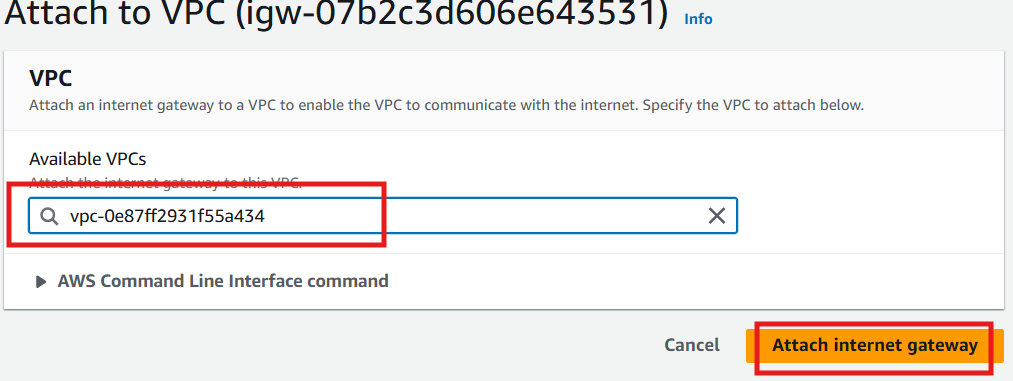
Click action
Click attach to VPC.

Select Your VPC
Click Attach internet gateway
Step 5: Create a NAT Gateway (for Private Subnets)
For instances in private subnets to access the internet (e.g., for updates), They need a NAT Gateway. The NAT Gateway should be Placed in a public subnet (Web Tier) and an Elastic IP (EIP) should be allocated to it. Allocating Elastic IP ensures you have a static IP.
Go to NAT Gateways section and select Create NAT Gateway.
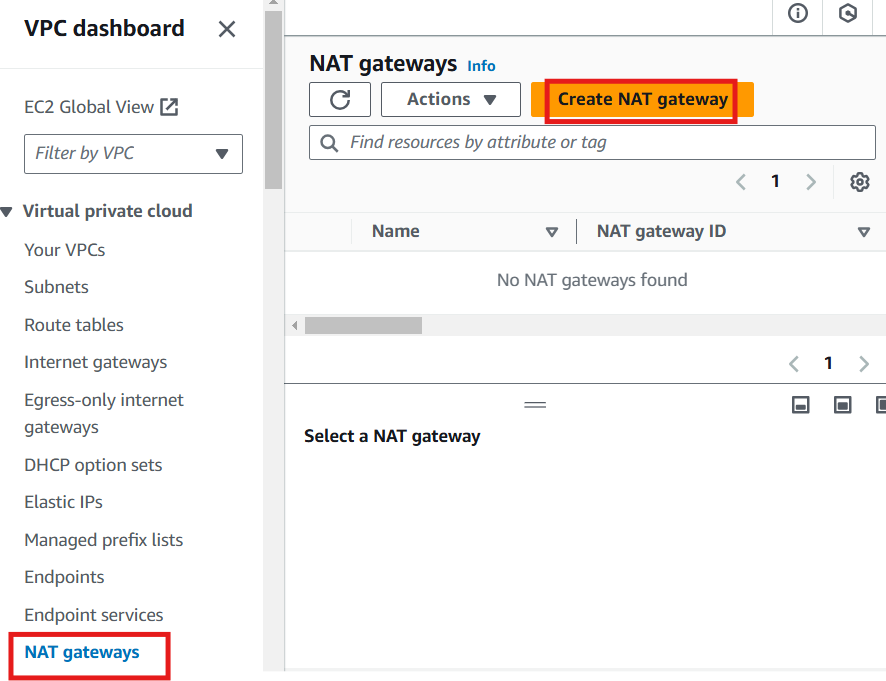
Place the NAT Gateway in a public subnet (Web Tier) and allocate an Elastic IP (EIP) to it.
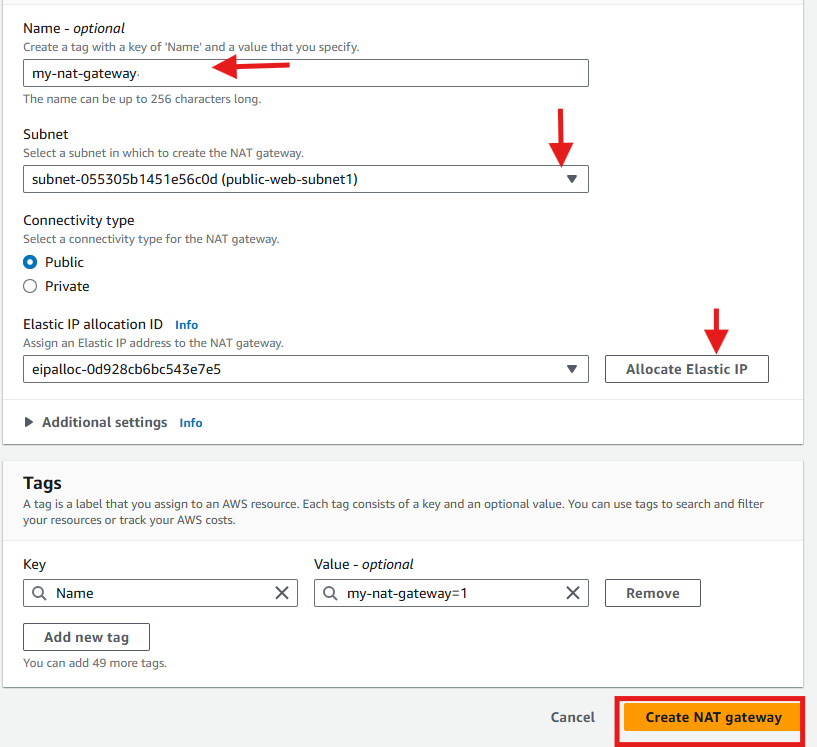
This will ensure high availability for internet access from private subnets.
Step 6: Create Route Tables for Each Tier
Create public route table for the web tier and private route tables for app and database tiers.
In the VPC Dashboard, select Route Tables from the left-hand menu.
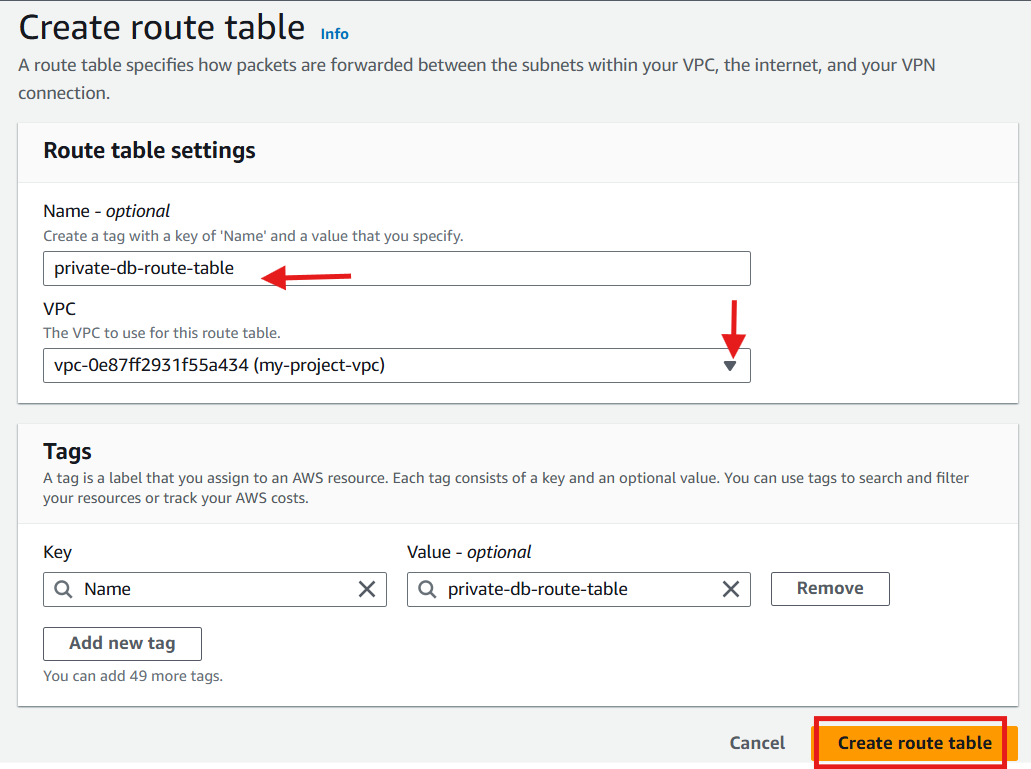
Click Create route table

For the public subnets route table
Name (optional): Give a name e.g
public-web-route-table.Select VPC (the one you created)
Click Create route table.
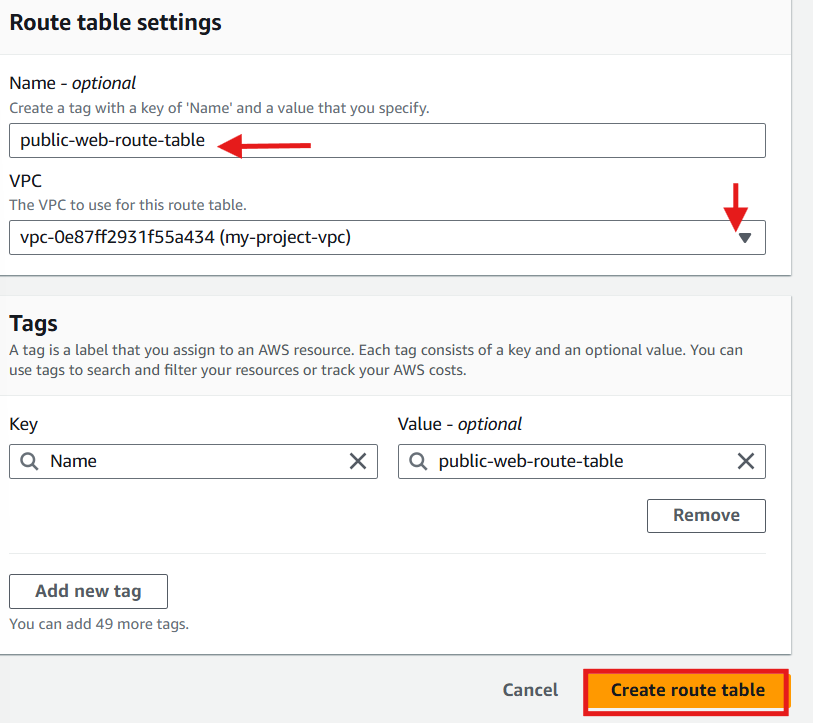
For Private Subnets Route Table (App and DB Tiers):
Repeat the create route table steps above to create separate route tables for each tier's private subnets with name private-app-route-table and private-db-route-table respectively.
App Tier Route Table:
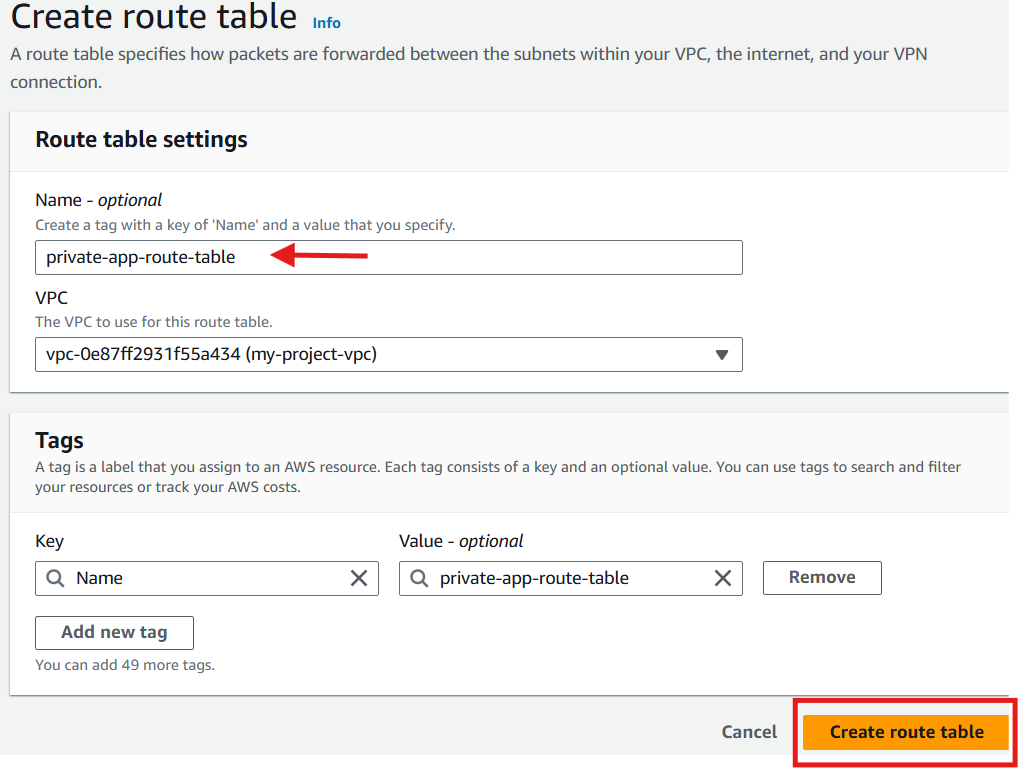
DB Tier Route Table:
Step 7: Add Route
Add route to the route tables for traffic flow through the internet gateway to the web tier and through the NAT gateway to the app and db tiers.
Web Tier
Select the public route table
Go to routes
Click edit routes
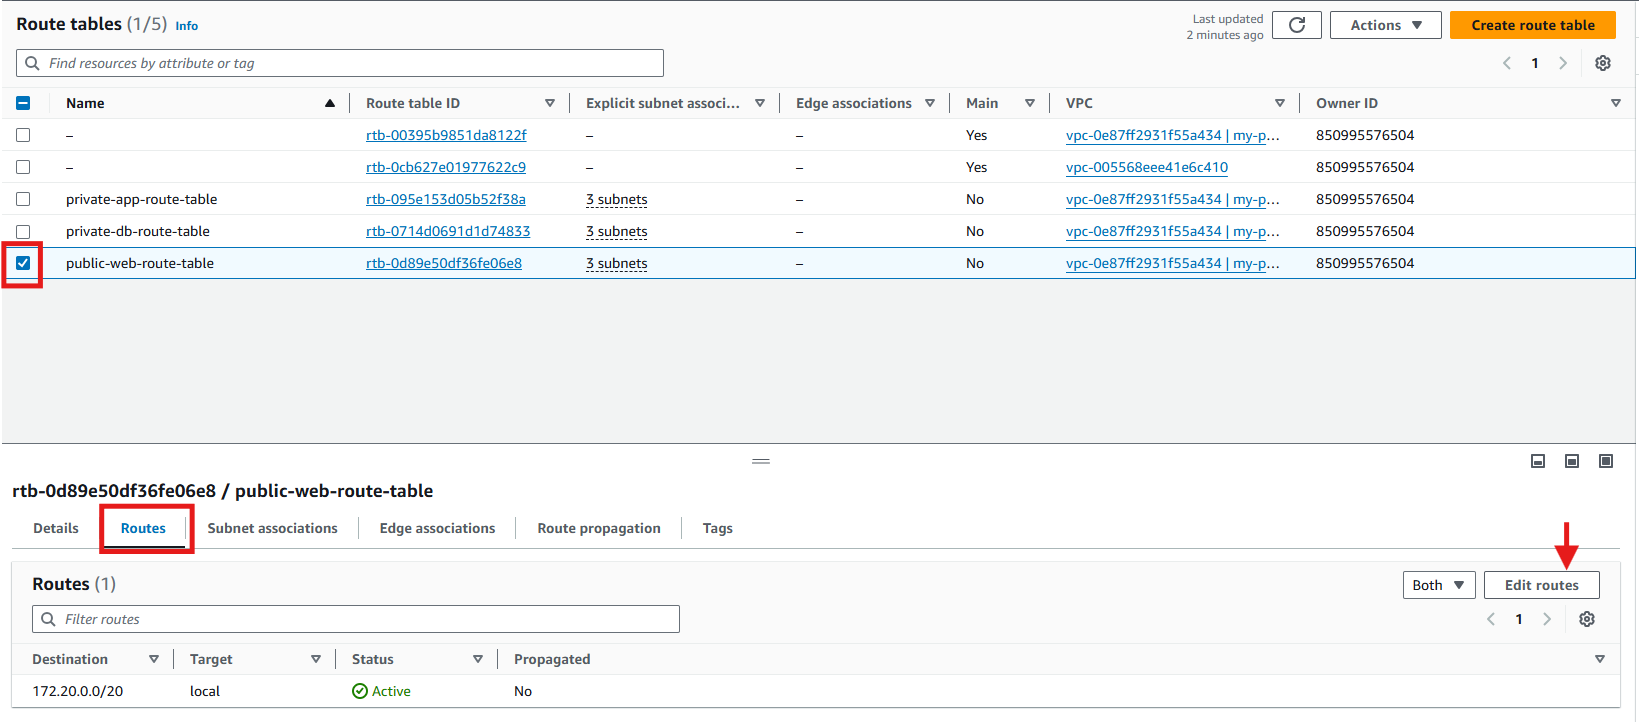
Click Add route
Select 0.0.0.0/0 for destination
Select internet gateway for Target and select your internet gateway
Click Save changes

App Tier
Select the private app route table
Repeat the other steps above for the web tier with NAT gateway being the target.

Database Tier
Select the private db route table
Repeat the other steps above for the web tier with NAT gateway being the target.

Step 8: Associate Route Table with the Subnets
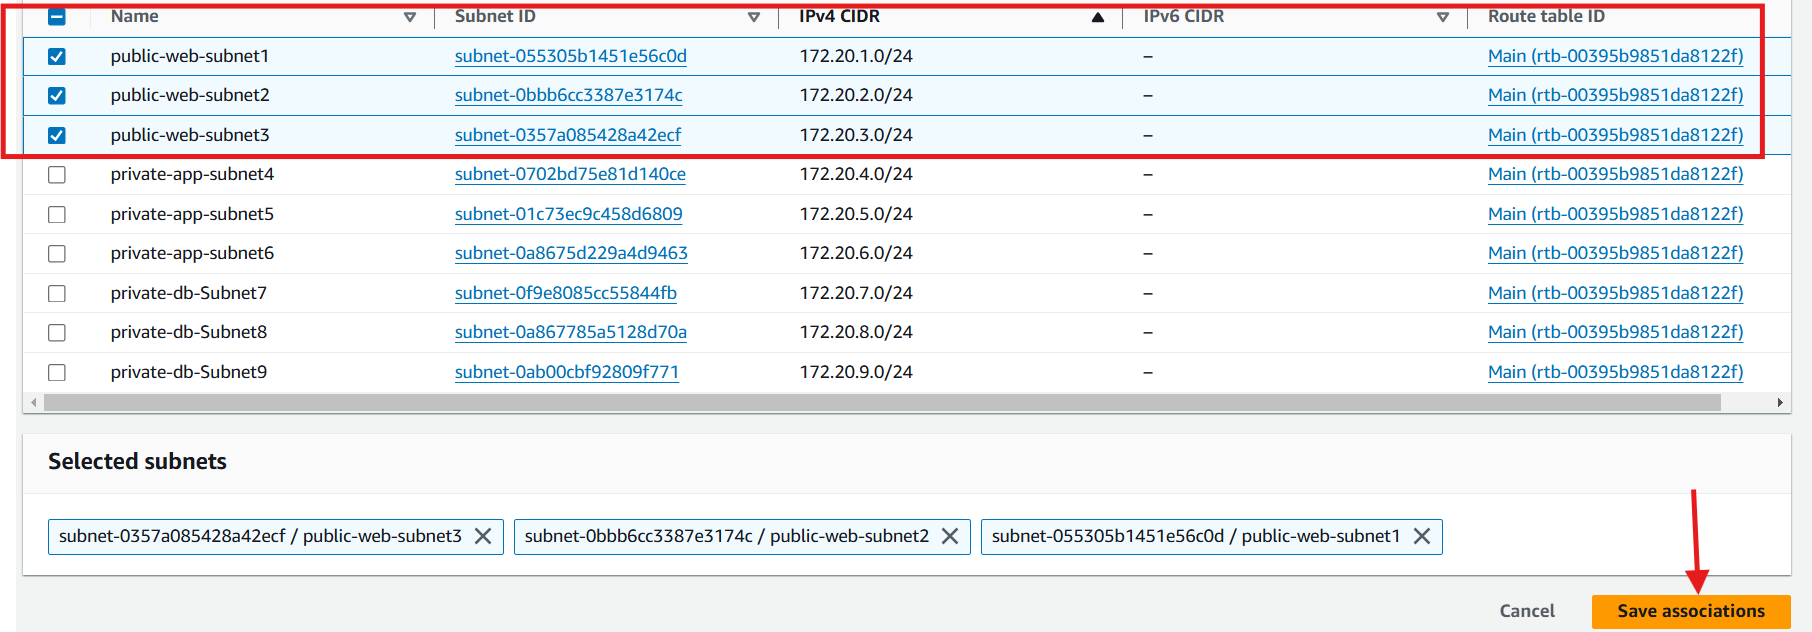
public web route table: Associate this route table with all three public subnets.
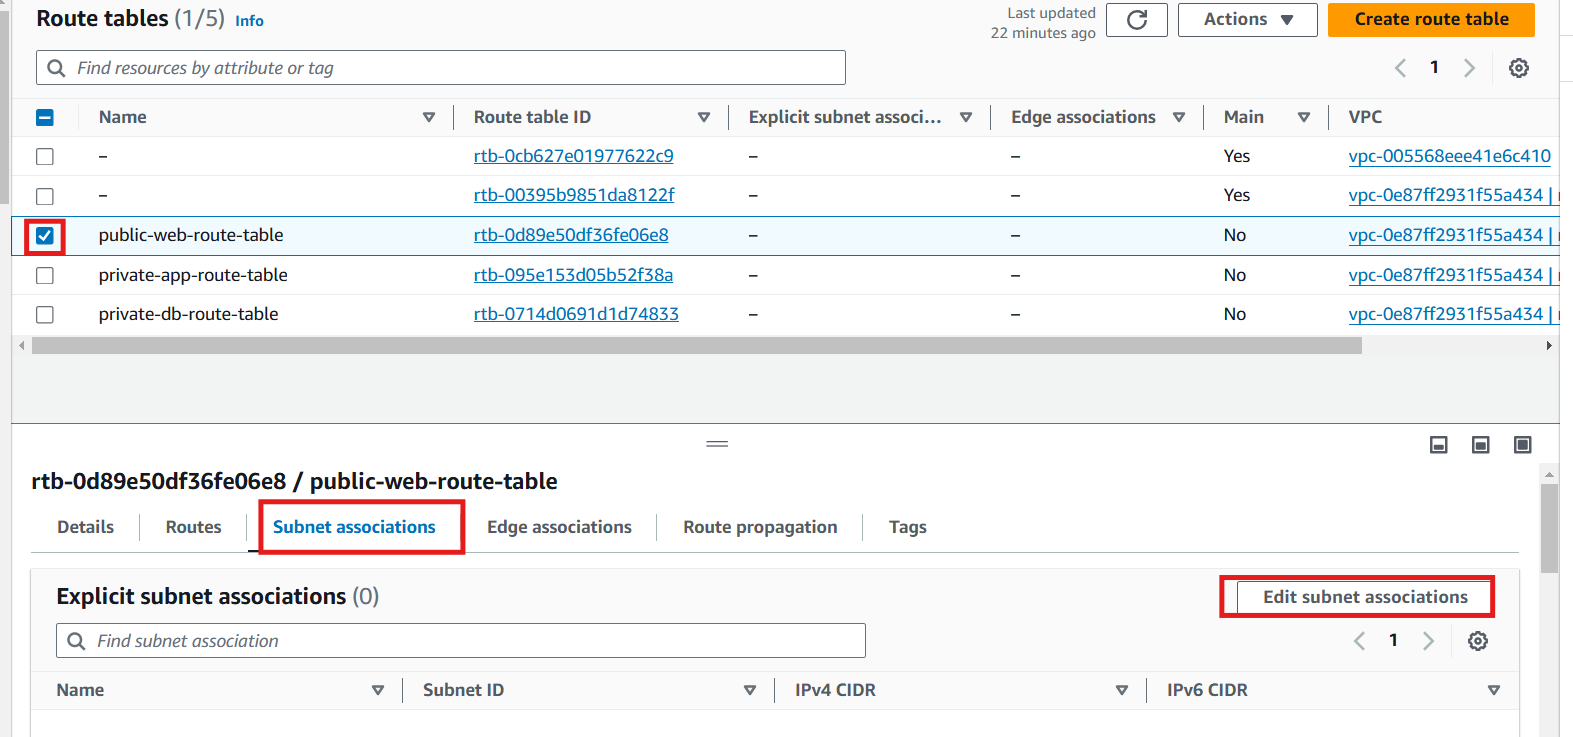
On the route table page, select the public route table
Click Subnet associations tab
Edit subnet associations
Select the the three public subnets
Save associations
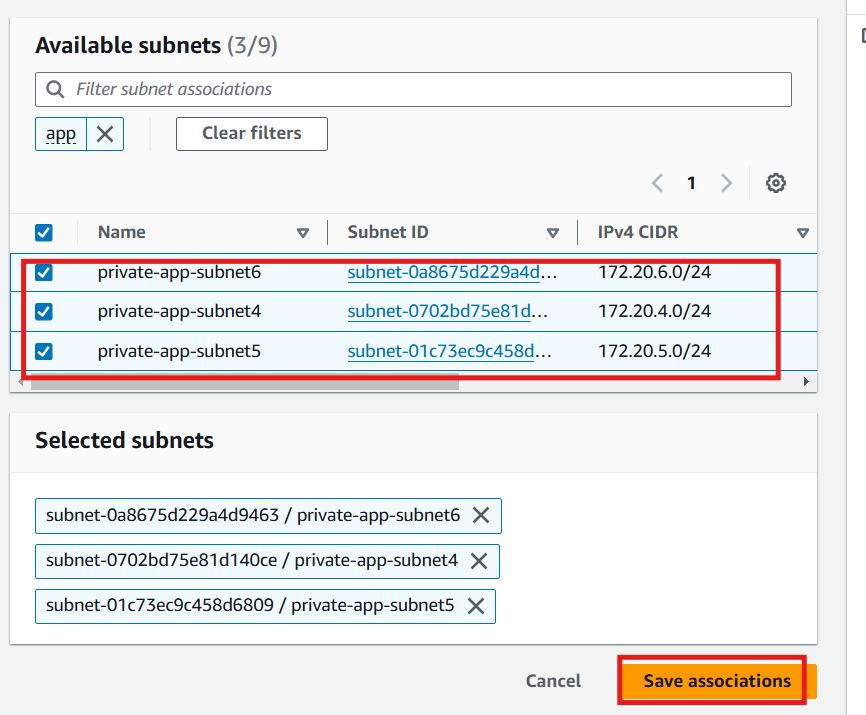
Private app route table: Associate this route table with all three private app subnets.
On the route table page, select the private app route table
Click Subnet associations tab
Edit subnet associations
Select the the three private app subnets
Save associations
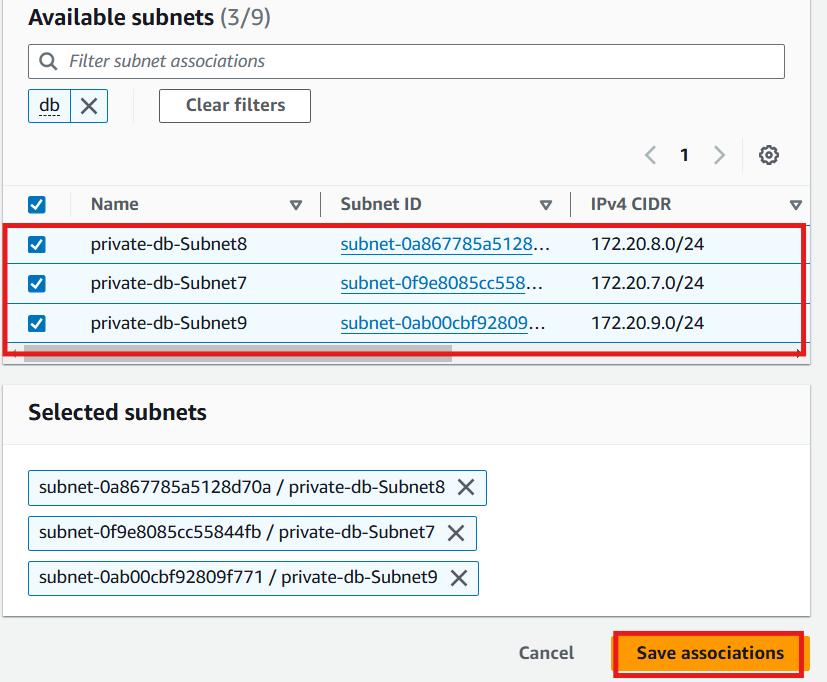
Private db route table: Associate this route table with all three private app subnets.
On the route table page, select the private app route table
Click Subnet associations tab
Edit subnet associations
Select the the three private app subnets
Save associations
You have successfully prepared a custom VPC environment for your 3-tier web application. You can now deploy your web application into your custom VPC.
Conclusion
Creating a 3-tier architecture within an AWS Virtual Private Cloud (VPC) establishes a strong, secure foundation for deploying scalable and resilient applications. By setting up separate layers for the web, application, and database tiers across multiple Availability Zones, you ensure high availability and fault tolerance. Configuring route tables, an internet gateway, and a NAT gateway enables controlled and efficient traffic flow, enhancing both security and performance.
Starting with a well structured VPC as your network foundation is a best practice in cloud architecture, providing flexibility for future growth and customization. With this setup, you are well prepared to build and manage complex applications on AWS while following key principles of security, scalability, and organized infrastructure.
To get notification for article on the 3-tier web application and more, click on follow or subscribe to my newsletter.
Subscribe to my newsletter
Read articles from Celestina Odili directly inside your inbox. Subscribe to the newsletter, and don't miss out.
Written by

Celestina Odili
Celestina Odili
Computer Scientist/ Cloud Engineer/DevOps Engineer / Technical writer