OCI Document Generator Update: Excel Template Support and more
 Timo Herwix
Introduction
At the start of the year, Oracle Cloud Infrastructure (OCI) rolled out a new pre-built function for generating PDF documents. Initially, you could only create a PDF from a Word template, which was super handy but had room to grow. Since the end of September 2024, Oracle has made this function even better by adding more document formats. Now, you can also create Excel and Word documents, and you can use Excel templates too, giving you more flexibility and options. This is pretty exciting because it opens up new ways to generate and automate documents. So, let's dive in and see how it works in practice 😉
If you're new to the OCI Document Generator and how it works in Oracle APEX, be sure to take a look at the previous blog first.
Prerequisites
Before we start, please make sure you have completed the following prerequisites listed below. This will enable you to move through this guide seamlessly.
OCI Tenancy ✅
OCI Object Storage ✅
Accessing an APEX Instance ✅
To follow this demo you need an APEX application that interacts with your Object Storage ✅
Follow the previous blog to set up the OCI Document Generator ✅
Let's take a look at what we have at this point
At this point, we have an APEX application that is fully integrated with our OCI Object Storage. Within this Storage, we have uploaded a basic Word template, which is the starting point for creating our documents. Alongside this template, we have also added a JSON file. This JSON file contains all the necessary dynamic parameters that will be used to populate the template with specific data. These parameters allow us to customize the document content dynamically, ensuring that each generated PDF document meets our specific requirements. This setup is essential for leveraging the capabilities of the OCI Document Generator, enabling us to efficiently create tailored documents based on our needs.
So, when we run the application and proceed to generate a PDF document, we get something like this.

Let's see What's New in the OCI Document Generator Update
As we mentioned earlier, Oracle has expanded what the Document Generator can do. Let's keep it simple and try generating a Word document instead of a PDF.
How to create a Word Document
To get started, log in to your APEX instance and navigate to the App Builder section. Once you're there, find your Demo App that we've been working on and go to Page 1.
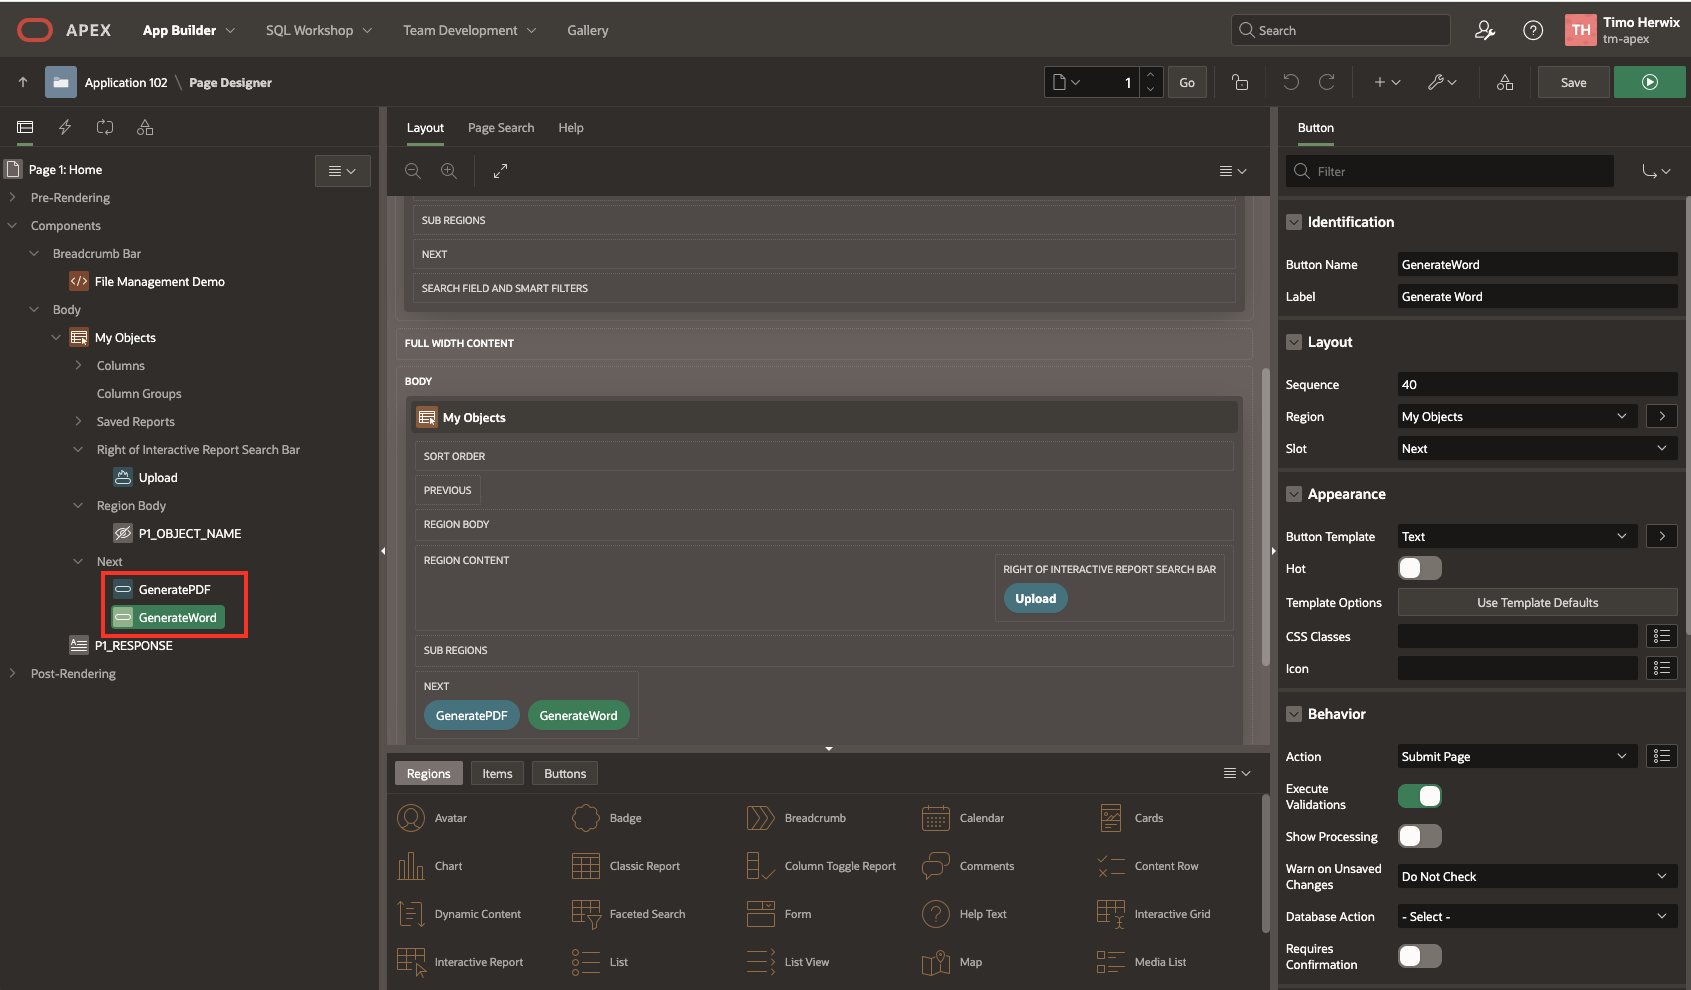
Let´s add a new Button to the My Objects Region in the Next position. Name it GenerateWord and make sure that the Action for the Button is Submit Page.
Now, we have two buttons: one for generating a PDF document and another for generating a Word document.
Next, let's customize the REST Data Source. Initially, we set all the required parameters here statically. To make it more flexible for different methods, we should make these parameters dynamic. So, click on Shared Components and then on REST Data Sources. Next, click on the REST Data Source already created for the OCI Document Generator. Once there, let's edit the POST operation by clicking on it. The request body template should currently look like this:
{
  "requestType": "SINGLE",
  "tagSyntax": "DOCGEN_1_0",
  "data": {
    "source": "OBJECT_STORAGE",
    "namespace": "my_namespace",
    "bucketName": "my_bucket",
    "objectName": "example.json",
    "contentType": "application/json"
  },
  "template": {
    "source": "OBJECT_STORAGE",
    "namespace": "my_namespace",
    "bucketName": "my_bucket",
    "objectName": "example.docx",
    "contentType": "application/vnd.openxmlformats-officedocument.wordprocessingml.document"
  },
  "output": {
    "target": "OBJECT_STORAGE",
    "namespace": "my_namespace",
    "bucketName": "my_bucket",
    "objectName": "example.pdf",
    "contentType": "application/pdf"
  }
}
As you can see, everything is currently static. Let's make it more dynamic by tweaking the Output section. We'll add two parameters so we can easily specify the Object Name and Content Type for the output.
{
  "requestType": "SINGLE",
  "tagSyntax": "DOCGEN_1_0",
  "data": {
    "source": "OBJECT_STORAGE",
    "namespace": "my_namespace",
    "bucketName": "my_bucket",
    "objectName": "example.json",
    "contentType": "application/json"
  },
  "template": {
    "source": "OBJECT_STORAGE",
    "namespace": "my_namespace",
    "bucketName": "my_bucket",
    "objectName": "example.docx",
    "contentType": "application/vnd.openxmlformats-officedocument.wordprocessingml.document"
  },
  "output": {
    "target": "OBJECT_STORAGE",
    "namespace": "my_namespace",
    "bucketName": "my_bucket",
    "objectName": "#OUTPUT_NAME#",
    "contentType": "#OUTPUT_FORMAT#"
  }
}
Next, just click on the Synchronize with Body button. This will ensure that any changes you've made to the parameters or settings in the request body are properly updated.

As you can see, we now have four parameters.

Finally, click on the Apply Changes button and go back to Page 1.
Navigate to the Processing tab on the left side, right-click on Processes, and select the Generate PDF process. Then, go to Server-Side Condition and choose GeneratePDF under When Button Pressed.

This ensures that the process runs only when we press the Generate PDF button.
Next, let's give the right parameters for the REST Request in the Process. To do this, right-click on the Process and then click Expand All Below. Now you can see the parameters we need for the REST Request. Click on OUTPUT_FORMAT and select Static as the Value type. Enter application/pdf as the Static Value.
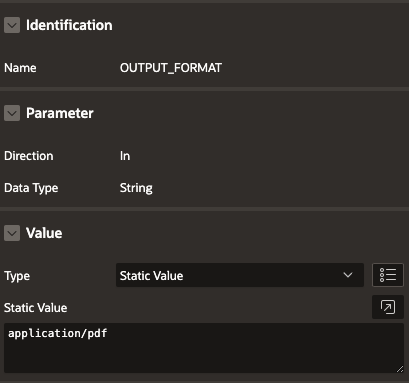
Do the same for OUTPUT_NAME and enter pdf-example.pdf as the Static Value.
At this point, there's nothing new for us; we've just made our process a bit more dynamic. Now, let's look how we can create the Word process.
Go back to Processes, right-click on Processes, and select Create Process. Let's call our new process Generate Word. For the type, pick Invoke API. In the Settings Section, choose REST Source as the type, select OCI Document Generator for the REST Source, and POST for the Operation. Then, go to Server-Side Condition and choose GenerateWord under When Button Pressed.
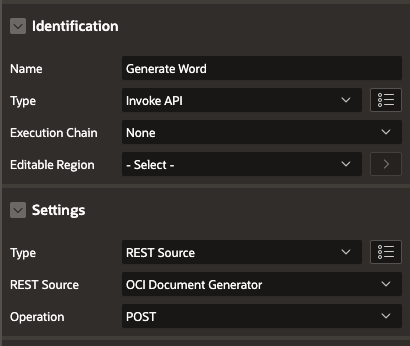
Finally, we have to adjust the parameters for that process.
Click on OUTPUT_FORMAT and select Static as the Value type. Enter application/vnd.openxmlformats-officedocument.wordprocessingml.document as the Static Value. Again, do the same for OUTPUT_NAME and enter word-example.docx as the Static Value. Last, switch the Ignore Output for the RESPONSE parameter to off and select P1_RESPONSE for the Item.
It should look like something like this:

Once we have made all the settings, we can now run the App and check whether we can create a PDF and Word document.
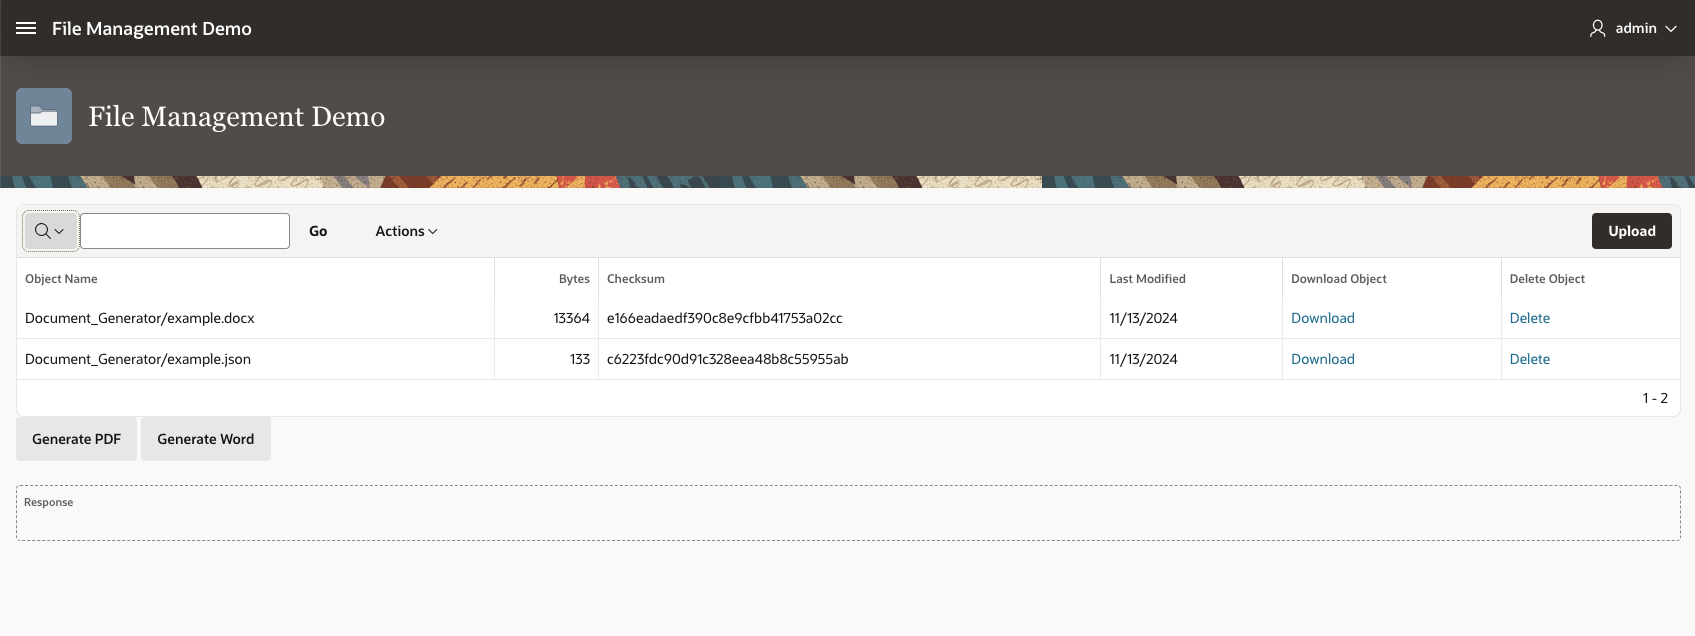
Click Generate PDF to create a PDF document. If everything went as planned, you'll see a new file in the Object Storage. In the Response, you get to see how the REST Request performed, and if it was successful, you'll see a Status 200. Now you can verify the content by downloading it. The document should look just right, with all the formatting and content in place.

To create the Word document, follow the same steps by clicking the Generate Word button. This action will initiate the process to generate a Word document based on the specified parameters and settings. Once the generation process is complete, you can download the document. And there you have it, a Word document that should look just like this.

Next, let's jump into exploring what we can do with Excel.
How to Create an Excel Document
For the Excel document, we'll start by creating a new Excel template and uploading it to our Object Storage.
Upload an Excel Template file
So, let's create an excel file and save it as excel-example.xlsx.
However, it should look something like this:
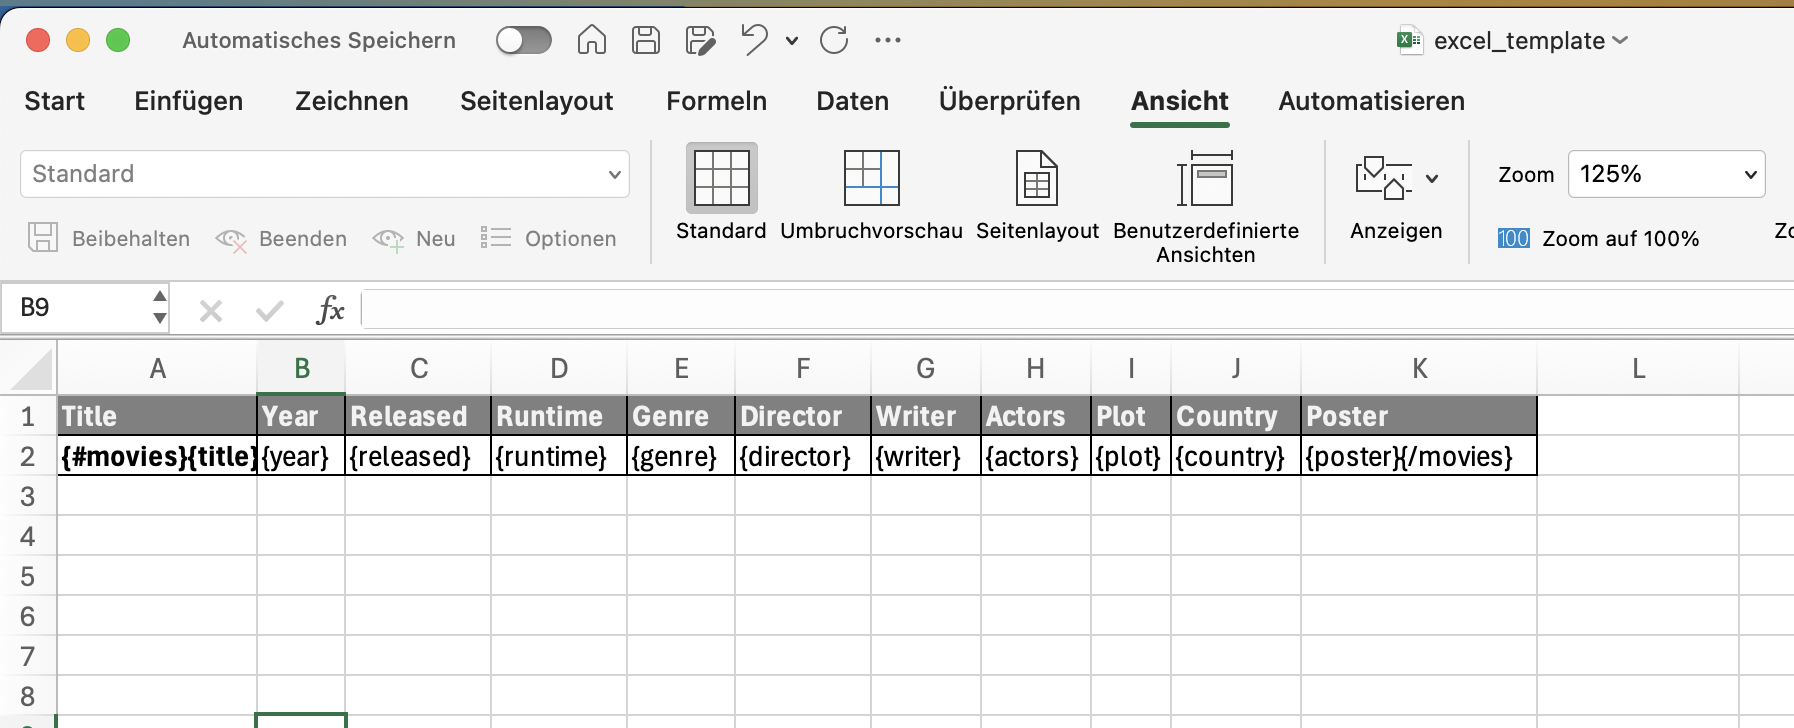
In this example, we used a simple {#loop} tag to generate multiple copies of a specific range of cells vertically within the Excel document. The section that gets duplicated is marked by the {#movies} and {/movies} tags, which show where the loop starts and ends. These tags are placed within the area that will be duplicated. Because of this, any cells below this section are automatically moved down to make room for the new copies.
Once you've got that, go ahead and upload the file to your Object Storage.
Upload an JSON data file
Next, we need a JSON file filled with the data we want to insert into those predefined tags we talked about. Just paste in the following json and save it as movies.json.
{
    "movies": [
      {
        "title": "Avatar",
        "year": "2009",
        "released": "18 Dec 2009",
        "runtime": "162 min",
        "genre": "Action, Adventure, Fantasy",
        "director": "James Cameron",
        "writer": "James Cameron",
        "actors": "Sam Worthington, Zoe Saldana, Sigourney Weaver, Stephen Lang",
        "plot": "A paraplegic marine dispatched to the moon Pandora on a unique mission becomes torn between following his orders and protecting the world he feels is his home.",
        "country": "USA, UK",
        "poster": "http://ia.media-imdb.com/images/M/MV5BMTYwOTEwNjAzMl5BMl5BanBnXkFtZTcwODc5MTUwMw@@._V1_SX300.jpg"
      },
      {
        "title": "I Am Legend",
        "year": "2007",
        "released": "14 Dec 2007",
        "runtime": "101 min",
        "genre": "Drama, Horror, Sci-Fi",
        "director": "Francis Lawrence",
        "writer": "Mark Protosevich (screenplay), Akiva Goldsman (screenplay), Richard Matheson (novel), John William Corrington, Joyce Hooper Corrington",
        "actors": "Will Smith, Alice Braga, Charlie Tahan, Salli Richardson-Whitfield",
        "plot": "years after a plague kills most of humanity and transforms the rest into monsters, the sole survivor in New York City struggles valiantly to find a cure.",
        "country": "USA",
        "poster": "http://ia.media-imdb.com/images/M/MV5BMTU4NzMyNDk1OV5BMl5BanBnXkFtZTcwOTEwMzU1MQ@@._V1_SX300.jpg"
      },
      {
        "title": "The Avengers",
        "year": "2012",
        "released": "04 May 2012",
        "runtime": "143 min",
        "genre": "Action, Sci-Fi, Thriller",
        "director": "Joss Whedon",
        "writer": "Joss Whedon (screenplay), Zak Penn (story), Joss Whedon (story)",
        "actors": "Robert Downey Jr., Chris Evans, Mark Ruffalo, Chris Hemsworth",
        "plot": "Earth's mightiest heroes must come together and learn to fight as a team if they are to stop the mischievous Loki and his alien army from enslaving humanity.",
        "country": "USA",
        "poster": "http://ia.media-imdb.com/images/M/MV5BMTk2NTI1MTU4N15BMl5BanBnXkFtZTcwODg0OTY0Nw@@._V1_SX300.jpg"
      },
      {
        "title": "The Wolf of Wall Street",
        "year": "2013",
        "released": "25 Dec 2013",
        "runtime": "180 min",
        "genre": "Biography, Comedy, Crime",
        "director": "Martin Scorsese",
        "writer": "Terence Winter (screenplay), Jordan Belfort (book)",
        "actors": "Leonardo DiCaprio, Jonah Hill, Margot Robbie, Matthew McConaughey",
        "plot": "Based on the true story of Jordan Belfort, from his rise to a wealthy stock-broker living the high life to his fall involving crime, corruption and the federal government.",
        "country": "USA",
        "poster": "http://ia.media-imdb.com/images/M/MV5BMjIxMjgxNTk0MF5BMl5BanBnXkFtZTgwNjIyOTg2MDE@._V1_SX300.jpg"
      },
      {
        "title": "Rogue One: A Star Wars Story",
        "year": "2016",
        "released": "16 Dec 2016",
        "runtime": "N/A",
        "genre": "Action, Adventure, Sci-Fi",
        "director": "Gareth Edwards",
        "writer": "Chris Weitz (screenplay), Tony Gilroy (screenplay), John Knoll (story), Gary Whitta (story), George Lucas (characters)",
        "actors": "Felicity Jones, Riz Ahmed, Mads Mikkelsen, Ben Mendelsohn",
        "plot": "The Rebellion makes a risky move to steal the plans to the Death Star, setting up the epic saga to follow.",
        "country": "USA",
        "poster": "https://images-na.ssl-images-amazon.com/images/M/MV5BMjQyMzI2OTA3OF5BMl5BanBnXkFtZTgwNDg5NjQ0OTE@._V1_SY1000_CR0,0,674,1000_AL_.jpg"
      }
    ]
}
Once you've finished that, go ahead and upload the file to your Object Storage.
Add more parameters to the REST Data Source that are needed for Excel
Next, let's adjust the REST data source again. So, click on Shared Components and then on REST Data Sources. Next, click on the REST Data Source already created for the OCI Document Generator. Once there, let's edit the POST operation by clicking on it. Replace the existing Request Body Template with the following:
{
  "requestType": "SINGLE",
  "tagSyntax": "DOCGEN_1_0",
  "data": {
    "source": "OBJECT_STORAGE",
    "namespace": "my_namespace",
    "bucketName": "my_bucket",
    "objectName": "#JSON#",
    "contentType": "application/json"
  },
  "template": {
    "source": "OBJECT_STORAGE",
    "namespace": "my_namespace",
    "bucketName": "my_bucket",
    "objectName": "#TEMPLATE#",
    "contentType": "#TEMPLATE_CONTENT_TYPE#"
  },
  "output": {
    "target": "OBJECT_STORAGE",
    "namespace": "my_namespace",
    "bucketName": "my_bucket",
    "objectName": "#OUTPUT_NAME#",
    "contentType": "#OUTPUT_FORMAT#"
  }
}
What we've done here is add three new parameters, TEMPLATE and TEMPLATE_CONTENT_TYPE, which are needed for setting up our Excel processing workflow and JSON for the source of our JSON parameter file. Next, just hit the Synchronize with Body button. This will make sure any changes you've made to the parameters or settings in the request body are updated correctly. After that, it should look something like this:

Finally, click on the Apply Changes button and go back to Page 1.
To ensure the PDF and Word processes work correctly, please remember to set the three new parameters.
JSON:
example.jsonTEMPLATE:
example.docxTEMPLATE_CONTENT_TYPE:
application/vnd.openxmlformats-officedocument.wordprocessingml.document
Create the Invoke API Process for the Excel document
Back to the APEX Builder, navigate to Page 1 in your application, and add a new button to the My Objects region in the Next position. Name it GenerateExcel and ensure the button's action is set to Submit Page.
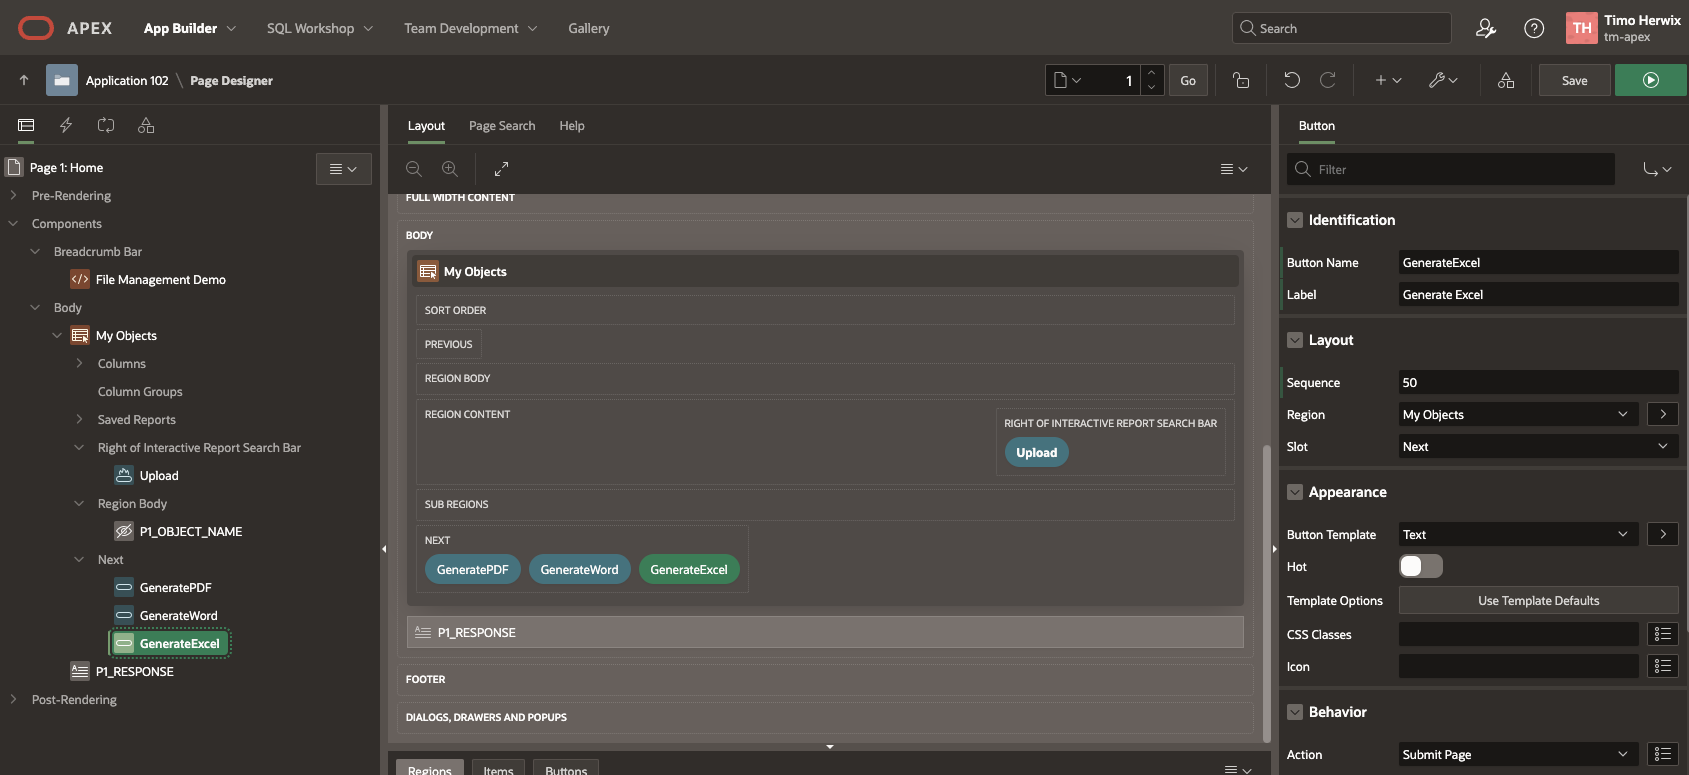
Go to the Processing tab on the left, right-click on Processes, and click Create Process. Let's name this new process Generate Excel. For the type, pick Invoke API. In the Settings section, choose REST Source as the type, select OCI Document Generator for the REST Source, and POST for the Operation. Then, go to Server-Side Condition and choose GenerateExcel under When Button Pressed.
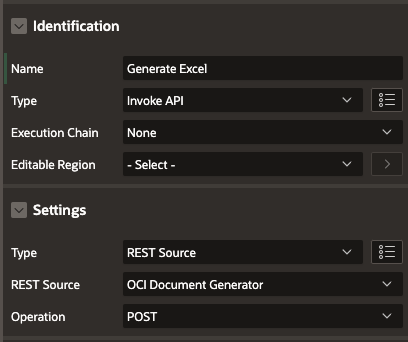
Next, we need to enter the parameters for that process.
Set the OUTPUT_FORMAT to Static with the value application/vnd.openxmlformats-officedocument.spreadsheetml.sheet, OUTPUT_NAME to excel-example.xlsx, TEMPLATE to excel_template.xlsx, TEMPLATE_CONTENT_TYPE to application/vnd.openxmlformats-officedocument.spreadsheetml.sheet, and JSON to movies.json. Finally, turn off Ignore Output for the RESPONSE parameter and pick P1_RESPONSE for the Item. It should look something like this:
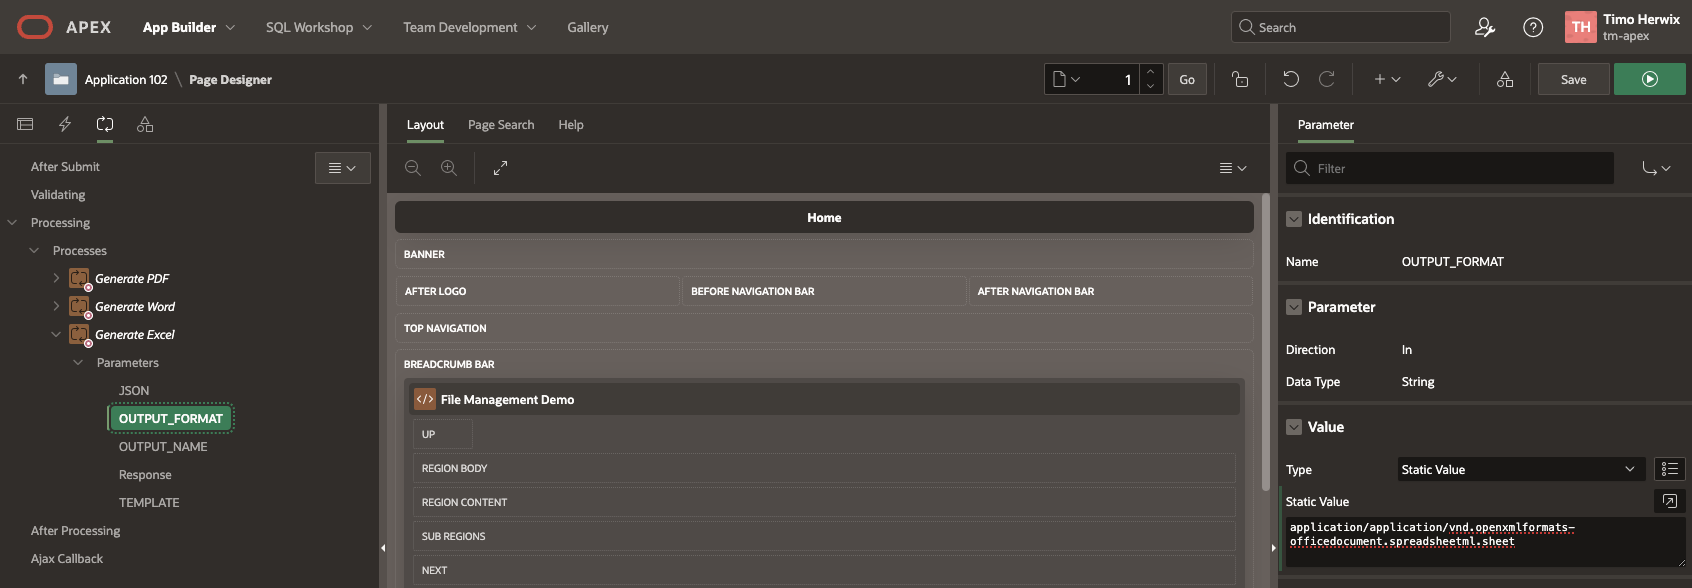
Once we've got everything set up, we can run the app and see if we can generate an Excel document. So let's click the Generate Excel button to execute the process and generate an Excel document based on the parameters and settings we chose. When it's done, you can download the Excel document. And there you have it, an Excel document that should look just like this.

Can we create a PDF using an Excel template?
In short, yes we can! 😊 Just change the OUTPUT_FORMAT parameter to application/pdf and make sure the OUTPUT_NAME ends with .pdf.

The formatting might need a little optimized, but you get the idea 😀
Can we create a Word document using an Excel template?
In short, nope, we can't!
APEX Office Print vs. OCI Document Generator - Part 2
Let's take a moment to compare APEX Office Print and the OCI Document Generator once more. This isn't about saying one is better than the other; it's really up to you to decide what works best for your needs.
However, I think we can explore the options and integration with Oracle APEX a little bit. From what I can tell, the OCI Document Generator is getting a little bit closer to what APEX Office Print offers. But, it's a definitely more complex to integrate and handle, so it's not exactly a No-code/Low-code solution with a complete workflow anymore. You'll need to configure and code several steps. Once you get the hang of it, though, it's pretty straightforward to use. Things are definitely going in the right direction, and I can't wait to see how the OCI Team keeps making things better. But honestly, I'm even more excited to see what the APEX Team will come up with to make this process easier for us developers. In my view, APEX Office Print is currently at the forefront here. And yes, we’re skipping the support details for now (Juergen Schuster knows what I mean 😋).
Conclusion
In conclusion, the recent updates to the OCI Document Generator have significantly enhanced its capabilities, offering more flexibility and options for document creation and automation. With the addition of Excel and Word document generation, as well as support for Excel templates, users can now create a wider variety of documents tailored to their specific needs. This development marks a step forward in document generation, providing users with powerful tools to streamline their workflows. As the OCI Document Generator continues to evolve, it will be interesting to see how it compares to other solutions like APEX Office Print and how it further integrates with Oracle APEX to simplify the process for developers.
References
Subscribe to my newsletter
Read articles from Timo Herwix directly inside your inbox. Subscribe to the newsletter, and don't miss out.
Written by

Timo Herwix
Timo Herwix
Timo joined Hyand in Ratingen, Germany, as a Senior Consultant in 2019, focusing on Oracle databases and APEX applications. With a background as a Data Warehouse Specialist, he has expertise in Database Administration, performance tuning, and SQL development. Timo is passionate about web development, cloud computing, and the architecture behind it, and became part of the Oracle ACE Community in 2023. He enjoys sharing his knowledge at conferences and through blog posts. When he's not working, you can find him traveling, hanging out with his family, or cooking up something in the kitchen.