☑️Day 68: Terraform and AWS EC2 - Infrastructure as Code in Practice🚀
 Kedar Pattanshetti
🔹Table of Contents :
Introduction
Prerequisites
Setting Up AWS CLI and Configuring Credentials
Exporting AWS Credentials as Environment Variables
Creating Terraform Configuration (
main.tf)Executing Terraform Commands
Adding an Output to Display EC2 Instance Public IP
Real-Time Scenarios and Use Cases
✅Introduction
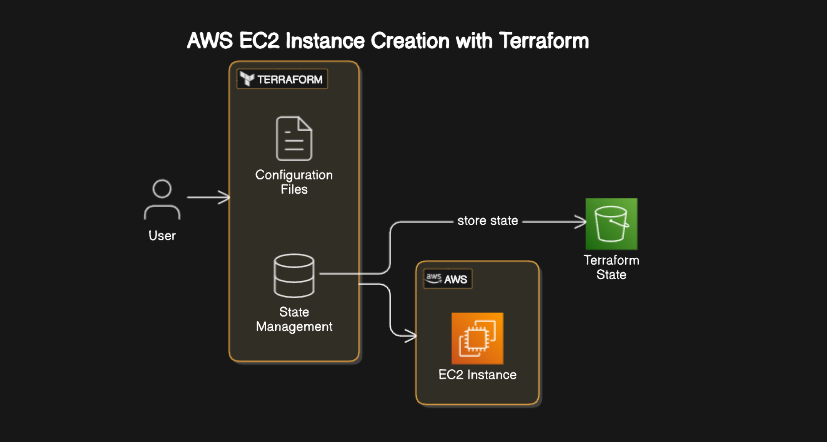
In today’s session, I created an EC2 instance on AWS using Terraform, which demonstrates the power of Infrastructure as Code (IaC) to manage cloud infrastructure in a seamless, scalable way. This newsletter will guide you through every command and configuration needed to set up an AWS instance using Terraform. Let's dive into the step-by-step instructions!
✅1. Setting Up AWS CLI and Credentials
First, we need to configure the AWS CLI on our local machine to let Terraform communicate with AWS.
Commands:
# Create a project directory and navigate into it
mkdir terraform-aws
cd terraform-aws

# Install AWS CLI if not already installed
sudo apt-get update
sudo apt-get install awscli

# Verify AWS CLI is installed
aws --version
AWS Configuration:
aws configure
Here, enter your AWS Access Key, Secret Access Key, preferred region, and output format when prompted. To check if configuration is successful, list your S3 buckets:
aws s3 ls
Environment Variables for AWS Credentials: To avoid storing your AWS credentials in your Terraform files, export the keys directly:
export AWS_ACCESS_KEY_ID=<your-access-key>
export AWS_SECRET_ACCESS_KEY=<your-secret-access-key>
✅2. Writing the Terraform Configuration File (main.tf)
Now, we’ll define our Terraform configuration to set up an EC2 instance on AWS. Create a main.tf file in your terraform-aws directory and add the following code:
# Specifying provider details and version constraints
terraform {
  required_providers {
    aws = {
      source  = "hashicorp/aws"
      version = ">= 4.16"
    }
  }
  required_version = ">= 1.2.0"
}

# Provider block to specify AWS and region
provider "aws" {
  region = "us-east-1"
}

# Resource block to create an EC2 instance
resource "aws_instance" "my_ec2_instance" {
  ami           = "ami-0c55b159cbfafe1f0"  # Replace with valid AMI ID for your region
  instance_type = "t2.micro"
  tags = {
    Name = "Terraform-Instance"
  }
}
Explanation:
The
terraformblock specifies the AWS provider source and version.The
providerblock configures AWS as the provider and sets the region.The
resourceblock defines an EC2 instance with an AMI ID and instance type. Update theamiwith a valid AMI ID in your region.
✅3. Initializing, Planning, and Applying the Configuration
With the main.tf configuration ready, follow these commands to deploy your infrastructure on AWS:
# Initialize the Terraform project, downloading necessary provider plugins
terraform init

# Preview the resources that will be created
terraform plan

# Apply the configuration to create the resources
terraform apply
- Type
yeswhen prompted to confirm the resource creation. Once the apply command completes, your EC2 instance will be created on AWS.
✅4. Adding an Output to Display EC2 Instance’s Public IP
To access the public IP of the EC2 instance easily, we’ll add an output block to our main.tf. Update the file as follows:
# Output block to display the public IP of the EC2 instance
output "ec2_public_ip" {
  value = aws_instance.my_ec2_instance.public_ip
}
Apply the Changes:
terraform apply
- After completion, Terraform will display the public IP of your new EC2 instance in the output.
✅5. Real-Time Scenarios and Use Cases for Terraform with AWS
Automation and Scaling: Terraform helps automate resource provisioning, making it ideal for deploying similar infrastructure across multiple environments.
Consistency in Infrastructure: As IaC, Terraform ensures consistent setups and quick teardown of infrastructure, saving both time and costs.
Cost Control: Resources can be easily removed using
terraform destroyto avoid unnecessary expenses.
Using Terraform with AWS allows you to define, deploy, and manage infrastructure quickly and efficiently.
Stay tuned for more hands-on tasks and in-depth learning!🚀
🚀Thanks for joining me on Day 68! Let’s keep learning and growing together!
Happy Learning! 😊
#90DaysOfDevOps
Subscribe to my newsletter
Read articles from Kedar Pattanshetti directly inside your inbox. Subscribe to the newsletter, and don't miss out.
Written by
