How to Support Multiple Languages In Your Flutter Application
 Tomer
Tomer
When building my own applications, I usually don’t stress about having multiple language support. All of my applications are pet projects of mine and I mostly use them to learn and advance my knowledge.
Without any intention, some of the applications that I have published to the Google Play Store are being used by a considerable amount of people (to my sheer astonishment).
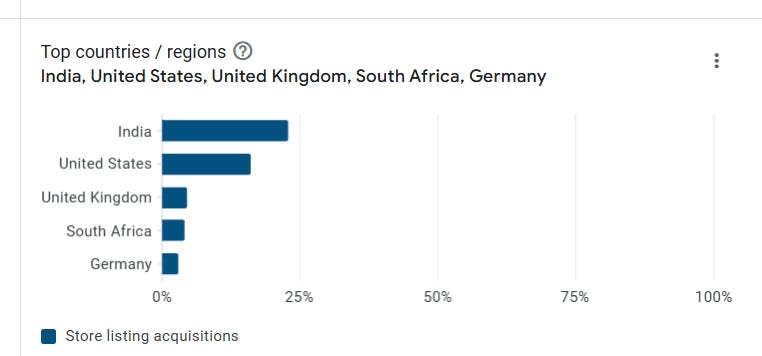
After patting myself on the back, I started looking at the data of the users who are interacting (or just downloaded) with my application(s). One of the insights available in the Google Play console is the country of origin of users. There, I found out that some of my applications have a loyal audience in some non-English-speaking countries.

A people pleaser by heart, I figured the best course of action would be to add support to the spoken languages at the top 3 or 4 countries on that list. That is where I discovered the wonderful world of Internationalizing a Flutter application.
And that leads us to the purpose of this article: helping you understand how to add multiple language support in your Flutter application.
Table of Contents
How to Set Up Localization in Flutter
First and foremost, you need to include two packages in your pubspec.yaml file:
dependencies:
  flutter:
    sdk: flutter
  flutter_localizations:
    sdk: flutter
  intl: any
After doing this, head over to the bottom of your pubspec.yaml file and under the flutter section, make sure to have the generate attribute set to true:
flutter:
  generate: true
To support this, you will need to create another .yaml file called l10.yaml with these configurations:
arb-dir: lib/l10n   /// This is where our translation files are located at
template-arb-file: app_en.arb       /// Sets the English template
output-localization-file: app_localizations.dart  /// Output file where the generate command will generate localizations
☝️ Head over here to read about more configuration options in the l10.yaml file
To allow your application support multiple languages, add the following to your MaterialApp widget:
return const MaterialApp(
  title: 'My Application',
  localizationsDelegates: [                    /// From here
    GlobalMaterialLocalizations.delegate,
    GlobalWidgetsLocalizations.delegate,
    GlobalCupertinoLocalizations.delegate,
  ],
  supportedLocales: [
    Locale('en'),
    Locale('hi'),
  ],                                           /// To here
  home: MainScreen(),
);
Having defined the languages we want to support, we need to create the files with the translations for these languages.
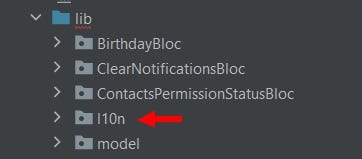
Create a folder called l10 under your lib directory:

Inside the folder, you need to place files with an .arb extension that will hold key-value pairs of translations. So, for example, if your application needs to support English and Hindi, you will need to create two files:
app_en.arb
app_hi.arb
The contents of these files look like this:
{
        "appTitle": "Birthday Calendar",
        "settings": "Settings",
        "addBirthday": "Add Birthday",
        /...
}
{
        "appTitle": "जन्मदिन कैलेंडर",
        "settings": "सेटिंग्स",
        "addBirthday": "जन्मदिन जोड़ें",
        /...
}
Basically, you have a JSON object, with key value pairs, where the keys are the same across all JSON files, but the values are written in a different language.
The following command is used to generate the files associated with the contents of the .arb files:
flutter gen-l10n
In files where you intend to use translations, you need to add the following import:
import 'package:flutter_gen/gen_l10n/app_localizations.dart';
To access one of the keys from the .arb files, you need to use this code:
AppLocalizations.of(context)!.appTitle //Or another key name from the .arb file
✋ Each time that you add more key-value pairs to your .arb files, you will need to run the command in the terminal to generate those translations. Otherwise, you won’t be able to access them through the code
Localizations With Dynamic Values
Seems straightforward up to this point, right? Well, what if you have places in your application that depend on data that is dynamic and not static? For example, in one of my applications, I have a string that includes an error and that error may change depending on the invocation of an API.
AlertDialog alertDialog = AlertDialog(
      title: const Text("Update Failed To Install ❌"),
      content:
          Text("Birthday Calendar has failed to update because: \n $error"),
      actions: [alertDialogTryAgainButton, alertDialogCancelButton],
    );
In order to use localized strings here, we need to create a key-value pair in our .arb file that has a placeholder for the error:
"updateFailedToInstallDescription": "Birthday Calendar has failed to update because: {error}"
And we can use it by doing this:
AlertDialog alertDialog = AlertDialog(
      title: Text(AppLocalizations.of(context)!.updateFailedToInstallTitle),
      content:
          Text(AppLocalizations.of(context)!.updateFailedToInstallDescription(error)),  /// <--- HERE
      actions: [alertDialogTryAgainButton, alertDialogCancelButton],
    );
Testing With Localization
So you added localizations to your application, but now you realize that your unit tests need to be revamped in order to accommodate for this change. We’ll break this section down into two types of tests you may have:
Unit tests
Integration tests
For one of my applications, I had a utility class that was paired with a unit test class. So far, so good. When I added localization support to that application, one of the utility methods changed, since it now had to return a value based on the localization. To do that, I had to pass over the AppLocalizations object as an argument to the method. That argument relied on the BuildContext:
 static String convertAndTranslateMonthNumber(
      int month, AppLocalizations appLocalizations) {
    switch (month) {
      case JANUARY_MONTH_NUMBER:
        return appLocalizations.january;
      case FEBRUARY_MONTH_NUMBER:
        return appLocalizations.february;
      case MARCH_MONTH_NUMBER:
        return appLocalizations.march;
      case APRIL_MONTH_NUMBER:
        return appLocalizations.april;
      case MAY_MONTH_NUMBER:
        return appLocalizations.may;
      case JUNE_MONTH_NUMBER:
        return appLocalizations.june;
      case JULY_MONTH_NUMBER:
        return appLocalizations.july;
      case AUGUST_MONTH_NUMBER:
        return appLocalizations.august;
      case SEPTEMBER_MONTH_NUMBER:
        return appLocalizations.september;
      case OCTOBER_MONTH_NUMBER:
        return appLocalizations.october;
      case NOVEMBER_MONTH_NUMBER:
        return appLocalizations.november;
      case DECEMBER_MONTH_NUMBER:
        return appLocalizations.december;
      default:
        return "";
    }
  }
This didn’t fare so well in my corresponding unit test class, since I had to create a BuildContext. Since doing that in a unit test class is problematic, there is a different way to get the AppLocalizations object without having to rely on a BuildContext.
final appLocalizations = lookupAppLocalizations(const Locale('en'))
This way, we state the locale we want and then we can use it in any of our tests. My unit test looks like this after the revision:
test("DateService convert month number 8 to August", () {
    final int monthNumber = 8;
    final String monthName =
        BirthdayCalendarDateUtils.convertAndTranslateMonthNumber(
            monthNumber, appLocalizations);
    expect(monthName, "August");
  });
As for integration tests, you will need to wrap your widget inside of a Localizations widget.
testWidgets("Your test description",
      (WidgetTester tester) async {
    await tester.pumpWidget(
        Localizations(
          delegates: [
            //localization delegates
          ],
          locale: Locale('en'),
          child: Widget(),
        );
    );
    //Your logic here
  });
To see how all of this is implemented inside of an application, you can go here.
And if you want to download the application, you can head here.
If you would like to read other articles I have written, you can find them here.
References
Subscribe to my newsletter
Read articles from Tomer directly inside your inbox. Subscribe to the newsletter, and don't miss out.
Written by
