"In-Depth Kubernetes Scheduling: Core Concepts, YAML Configurations, and Key Components"
 Shazia Massey
*Manual Scheduling:
Every Pod in Kubernetes includes a field called nodeName, which is not set by default when you create a Pod manifest. Typically, you don’t need to specify this field manually. Instead, Kubernetes automatically assigns it during the scheduling process.
Here’s how it works:
The Kubernetes Scheduler scans all Pods to identify those without a
nodeNameset. These Pods are considered candidates for scheduling.The scheduler then runs its scheduling algorithm to determine the most suitable Node for each candidate Pod, based on factors like resource availability, affinity rules, and taints/tolerations.
Once the appropriate Node is identified, the scheduler assigns the Pod to that Node by setting the
nodeNamefield to the name of the selected Node. This assignment is implemented by creating a binding object.
****What happens if there is no scheduler to monitor and schedule nodes?
If there is no scheduler to monitor and assign Pods to Nodes, the Pods remain in a Pending state because they have no Node allocated.
****What can you do about it?
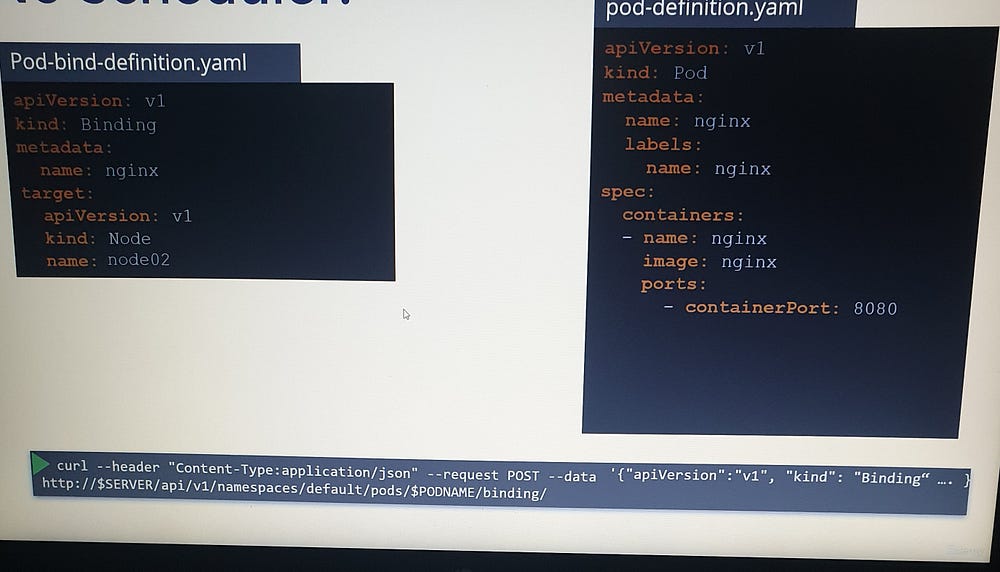
To resolve this, you can manually assign Pods to Nodes. The simplest way to do this is by specifying the nodeName field in the Pod specification file at the time of creation. This directly assigns the Pod to the specified Node. However, the nodeName field can only be set during Pod creation.
- ***What if the Pod is already created and you want to assign it to a Node?
Kubernetes does not allow you to modify thenodeNameproperty of an existing Pod. In such cases, you can create a binding object and send a POST request to the Pod's Binding API, which mimics the scheduler's behavior. The binding object specifies the target Node, and the POST request includes this data in JSON format. This approach allows you to manually bind a Pod to a specific Node after it has been created.
*Labels and Selectors:
*** how exactly do you specify labels in Kubernetes?
n a Kubernetes pod definition file, you can add a labels section under the metadata field, where labels are specified in key-value pairs, such as app: app-one. You can add as many labels as needed. Once the pod is created with these labels, you can select the pod using the kubectl get pods command with the --selector option, specifying a condition like app=app-one to filter the pods based on the label. This method helps in efficiently managing and selecting pods in a Kubernetes environment.
# Kubectl get pods --selector app=App1
This is one use case of labels and selectors. Kubernetes objects use labels and selectors internally to establish connections between different objects.
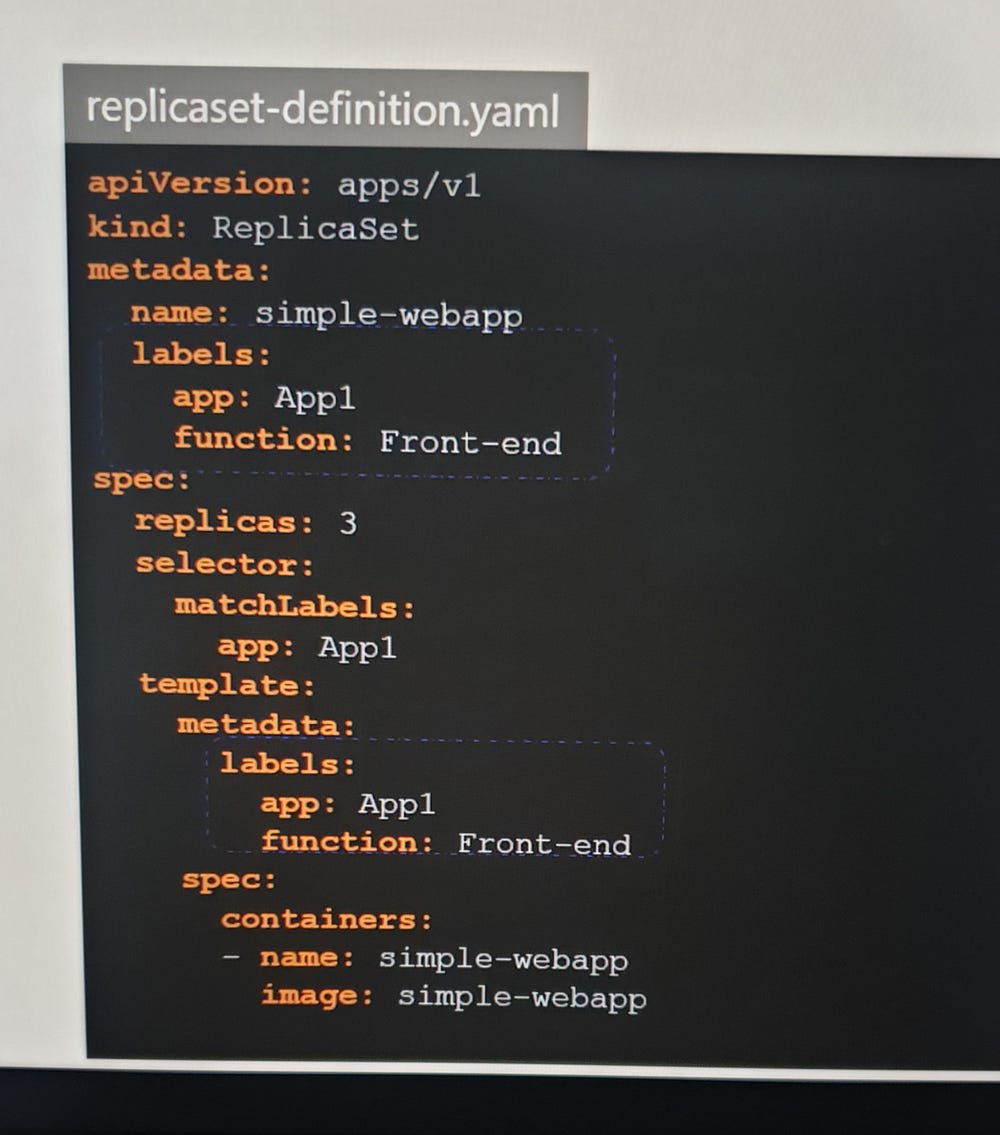
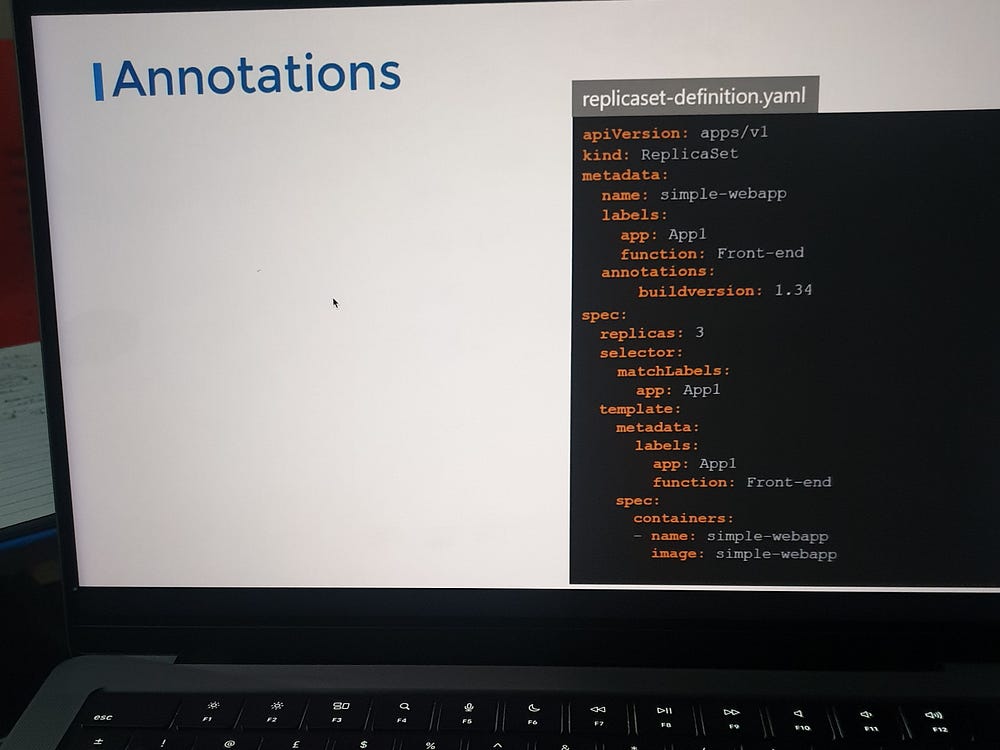
In a ReplicaSet definition file, labels are defined in two places: one under the template section, which applies to the pods, and another at the top, which pertains to the ReplicaSet itself. Beginners often confuse these. The labels under the template section are important for connecting the ReplicaSet to the pod. While the ReplicaSet's labels are used for discovering the ReplicaSet through other objects, our focus is on connecting the ReplicaSet to the pod using the selector field in the ReplicaSet specification, which matches the pod labels. A single label can suffice, but if there are multiple pods with the same label but different functions, using multiple labels ensures the ReplicaSet discovers the correct pods.
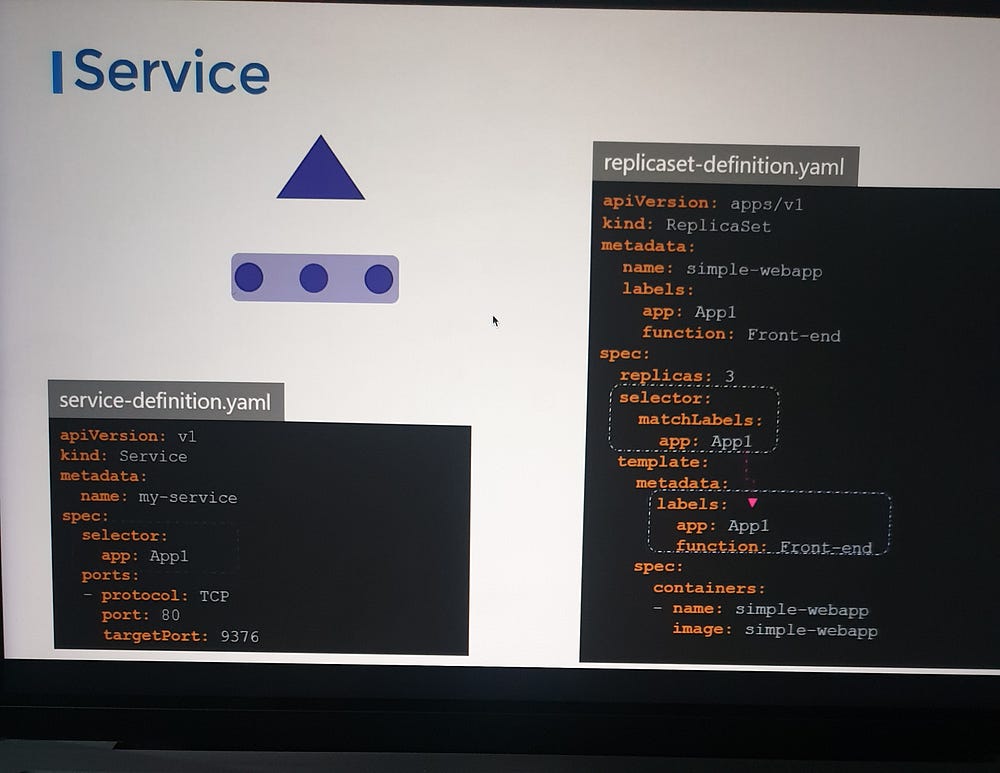
When a service is created, it uses the selector defined in the service definition file to match the labels set on the pods in the ReplicaSet definition file.
Additionally, annotations are used to record other informational details. While labels and selectors group and select objects, annotations store supplementary information, such as tool details (name, version, build info) or contact information (phone numbers, email addresses) that may be needed for integration purposes.
*Taints and Tolerations:
Taints and tolerations are used to control which pods can be scheduled on a node. In a cluster with three worker nodes (one, two, and three) and pods (A, B, C, D), the scheduler initially places pods evenly across the nodes. To restrict placement on node one, we add a “blue” taint to the node, preventing all pods from being scheduled there. To allow certain pods, like pod D, to be placed on node one, we add a toleration to pod D, making it compatible with the taint. As a result, only pod D is scheduled on node one, while the other pods are placed on different nodes based on the taint.
So remember, taints are set on nodes and tolerations are set on pods. So how do you do this?
Taints- Node:
# kubectl taint nodes node-name key=value:taint-effect
In Kubernetes, taints can have three effects that determine how a pod interacts with a tainted node:
NoSchedule: This effect prevents any pod that does not tolerate the taint from being scheduled on the node. Pods without the matching toleration are not allowed to run on the tainted node.
PreferNoSchedule: This effect tells the scheduler to avoid placing pods on the tainted node if possible. However, if no other nodes are available, it will still allow the pod to be scheduled on the tainted node.
NoExecute: This effect not only prevents new pods without the matching toleration from being scheduled on the node, but also evicts any already running pods that do not tolerate the taint.
These effects allow fine-grained control over pod placement and management on Kubernetes nodes.
Tolerations-Pod:
# kubectl taint nodes node1 app=blue:NoSchedule
Pod-definition.yaml:
apiversion:
kind: pod
metadata:
  name: my app-pod
spec:
  containers:
  - name: nginx-container
    image: nginx
  tolerations:
  - keys: "app"
  operator: "Equal"
  value: "blue"
  effect: "NoSchedule"
Tolerations are added to pods to allow them to be scheduled on tainted nodes. To add a toleration, first open the pod definition file. In the spec section, add a tolerations section and include the same values used when creating the taint. For example, set the key to app=blue, the operator to Equal, and the effect to NoSchedule, with all values enclosed in double quotes. When the pods are created or updated with the new tolerations, they will either be scheduled on nodes or evicted from existing nodes, depending on the effect set.
Taint-No Execute:
The NoExecute taint effect prevents non-tolerating pods from being scheduled on a node and evicts any running pods that don’t tolerate the taint. In our example, we taint node one for a specific application and add a toleration to pod D. This results in pod C being evicted from node one, while pod D continues running. Taints and tolerations control which pods can be placed on a node but don’t guarantee that a pod will always be scheduled on a specific node. For node-specific placement, node affinity is used.
Additionally, master nodes have a default taint to prevent scheduling pods, a behavior that can be modified but is generally avoided for application workloads.
# kubectl describe node kubemaster | grep Taint
Taints:          node-role.kubernetes.io/master:NoSchedule
*Node Selectors:
Node selectors in Kubernetes are used to constrain pods to specific nodes based on labels. They allow you to specify conditions for which nodes a pod can be scheduled on.
pod-definition.yaml
api version:
kind: pod
metadata:
   name: myapp-pod
spec:
   containers:
   - name: data-processor
     image: data-processor
   nodeSelector:
     size: Large
To limit this pod to run on the larger node, we add a new property called node selector to the spec section and specify the size as large.
**How does Kubernetes know which is the large node?
The key value pair of size and large are in fact labels assigned to the nodes. The scheduler uses these labels to match and identify the right node to place the pods on.
 # kubectl label nodes <node-name> <label-key>=<label-value>

 # kubeclt labe nodes node-1 size=large
This ensures the pod is scheduled on the larger node. While effective, node selectors are limited to exact matches with single labels. For complex requirements, like specifying multiple conditions (e.g., “place on large or medium nodes”), node affinity is needed, which we will explore next.
*Node Affinity:
Node affinity is a more advanced and flexible alternative to node selectors in Kubernetes. It allows you to define more complex rules for scheduling pods on specific nodes based on node labels. Node affinity supports conditions such as “preferred” or “required” for scheduling decisions.
Types of Node Affinity
RequiredDuringSchedulingIgnoredDuringExecution: Pods can only be scheduled on nodes that meet the specified criteria. If no such nodes exist, the pod will remain unscheduled.
PreferredDuringSchedulingIgnoredDuringExecution: Kubernetes attempts to schedule pods on nodes that meet the specified criteria, but it does not enforce this strictly. If no such nodes are available, the pod can still be scheduled elsewhere.
Example
Here’s how node affinity is specified in a pod definition file:
spec:
  affinity:
    nodeAffinity:
      requiredDuringSchedulingIgnoredDuringExecution:
        nodeSelectorTerms:
        - matchExpressions:
          - key: size
            operator: In
            values:
            - large
            - medium
      preferredDuringSchedulingIgnoredDuringExecution:
      - weight: 1
        preference:
          matchExpressions:
          - key: region
            operator: In
            values:
            - us-west
Explanation:
The
requiredDuringSchedulingIgnoredDuringExecutionensures the pod is scheduled only on nodes labeledsize=largeorsize=medium.The
preferredDuringSchedulingIgnoredDuringExecutionmakes the scheduler prioritize nodes labeledregion=us-westif multiple options are available.
Use Case:
Node affinity is useful for scenarios like:
Scheduling workloads close to specific hardware (e.g., GPUs or high-memory nodes).
Controlling workload placement across geographical zones or availability regions.
Type3:
The requiredDuringSchedulingRequiredDuringExecution feature (planned) would extend Kubernetes' node affinity rules to enforce placement conditions not only during scheduling but also throughout the pod's lifecycle.
What It Does
Required During Scheduling: Ensures that a pod is scheduled only on nodes matching the specified labels.
Required During Execution: Continuously validates that the pod’s assigned node still meets the affinity criteria. If the node’s labels or conditions change and no longer satisfy the affinity rules, the pod would be evicted or rescheduled.
Key Benefits
Continuous Enforcement: Unlike the existing
requiredDuringSchedulingIgnoredDuringExecution, this ensures affinity rules are upheld throughout the pod's lifecycle.Dynamic Adaptability: Automatically relocates pods if nodes become unsuitable, maintaining compliance with workload placement policies.
Enhanced Control: Suitable for critical applications that require strict adherence to resource or policy constraints, even after deployment.
*Resource Requirement and Limits:
Resource Requirements and Limits in Kubernetes allow you to manage how much CPU and memory a pod or container can use. These settings ensure fair resource distribution and prevent a single workload from monopolizing the cluster’s resources.
pod-definition.yaml
apiversion:
kind: pod
metadata:
  name: simple-webapp-color
  labels:
    name: simple-webapp-color
spec:
   containers:
   - name: simple-webapp-color
     image: simple-webapp-color
     ports:
       - containerport: 8080
     resources:
        memory: "1Gi"
        cpu:
     limits:
       memory: "2Gi"
       cpu: 2
LimitRange:
LimitRange is a Kubernetes resource used to enforce default resource requests, limits, and constraints within a namespace. It helps ensure that all pods and containers operate within defined resource boundaries, promoting efficient cluster resource utilization and preventing resource contention.
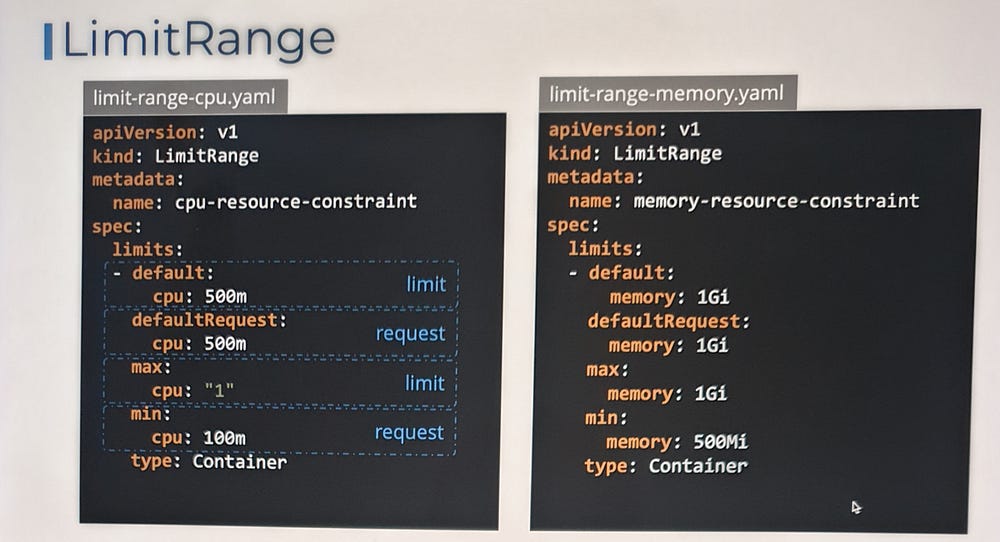
Note: These limits are enforced when a pod is created. So if you create or change a limit range, it does not affect existing pods. It’ll only affect newer pods that are created after the limit range is created or updated.
Resource Quotas:
Resource Quotas in Kubernetes enforce resource usage constraints within a namespace, ensuring fair distribution of resources across teams or applications in a shared cluster. By setting limits on the total resource usage per namespace, administrators can prevent one namespace from monopolizing cluster resources.
resource-quota.yaml
apiversion: v1
kind: ResourceQuota
metadata:
    name: my-resource-quota
spec:
  hard:
   requests.cpu: 4
   requests.memory: 4Gi
   limits.cpu: 10
   limits.memory: 10Gi
*DaemonSets:
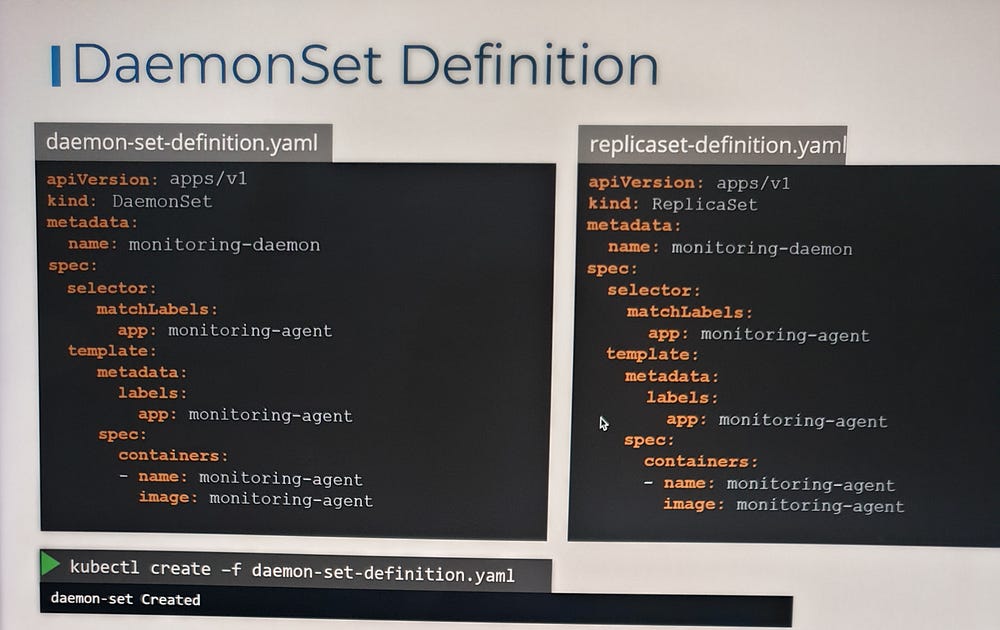
DaemonSet in Kubernetes is a specialized controller used to ensure that a specific pod runs on all (or selected) nodes in a cluster. This is useful for deploying system-level applications or tools that need to operate on every node, such as log collectors, monitoring agents, or network plugins.
Static Pods:
Earlier, we covered the Kubernetes architecture and how the kubelet interacts with the kube-apiserver to schedule pods based on the kube-scheduler’s decisions stored in etcd. But what happens if there is no master node, no API server, and no cluster components? Can the kubelet function independently?
Yes, the kubelet can operate independently on a node without the API server. It can manage containers using Docker and create static pods based on locally stored pod definition files. These files are placed in a designated directory, and the kubelet monitors this directory to create and maintain the pods. If a pod’s definition is modified or deleted, the kubelet reflects those changes automatically.
Key Points:
Static Pods: Created and managed by the kubelet without the API server’s intervention.
Pod Definition Files: These are placed in a directory (e.g.,
/etc/kubernetes/manifests), and the kubelet reads them to create pods.Kubelet’s Role: The kubelet ensures the pod’s lifecycle, restarting it if necessary.
Viewing Static Pods: Use
docker psto see the pods, askubectlrequires an API server to function.Cluster Integration: In a cluster, the kubelet creates both static pods and those requested by the API server. Static Pods are represented in the API server as read-only mirror objects.
Static Pods for Control Plane: You can use static pods to deploy Kubernetes control plane components (e.g., API server, etcd) directly on master nodes.
Static Pods vs DaemonSets:
Static Pods: Managed by the kubelet, independent of the Kubernetes control plane.
DaemonSets: Managed by the kube-apiserver and ensure a pod runs on all nodes in a cluster.
Use Case:
Static Pods are particularly useful for deploying control plane components on master nodes, ensuring they are resilient and self-healing, as the kubelet will automatically restart any failed pods.
This method is employed by tools like kubeadm for setting up Kubernetes clusters, where the control plane components are configured as static pods on master nodes.
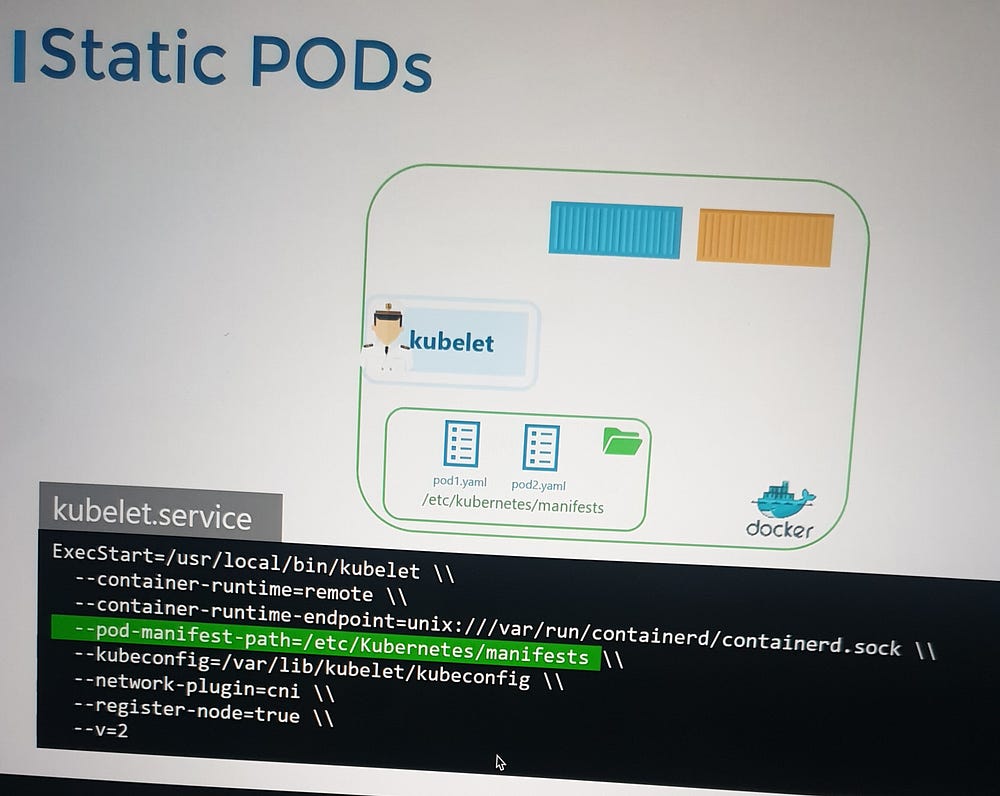
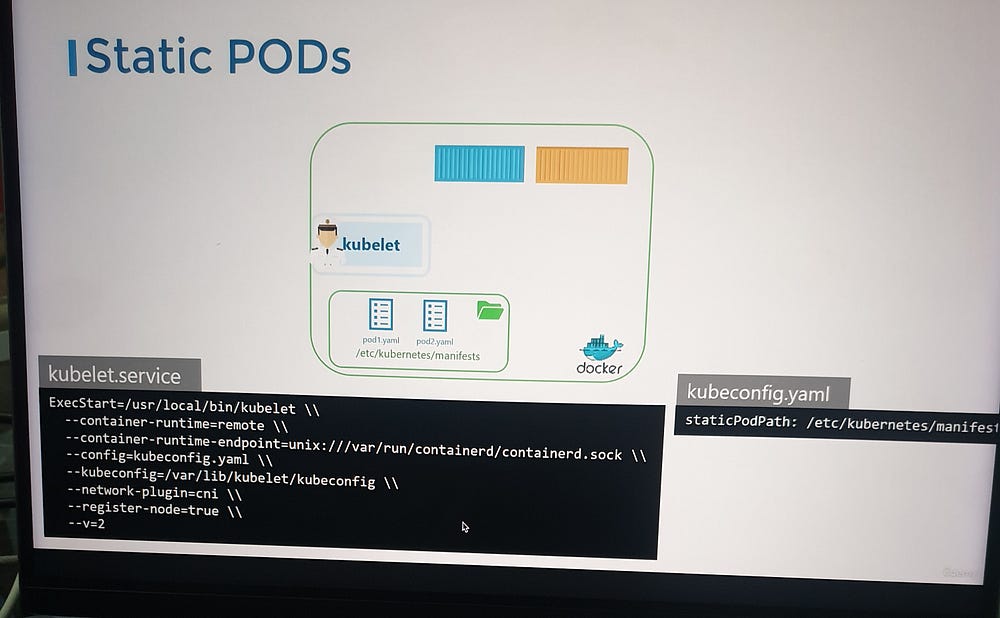
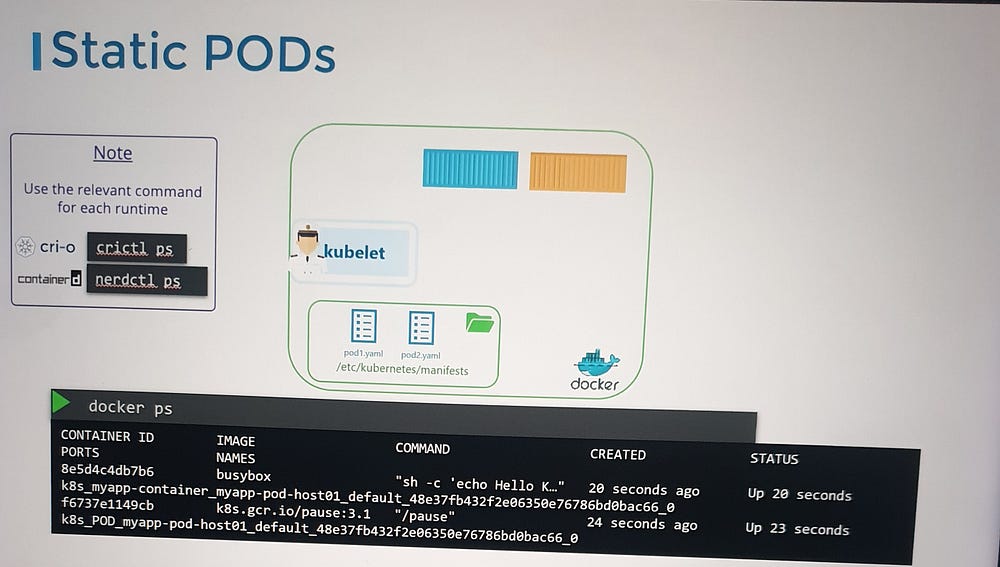
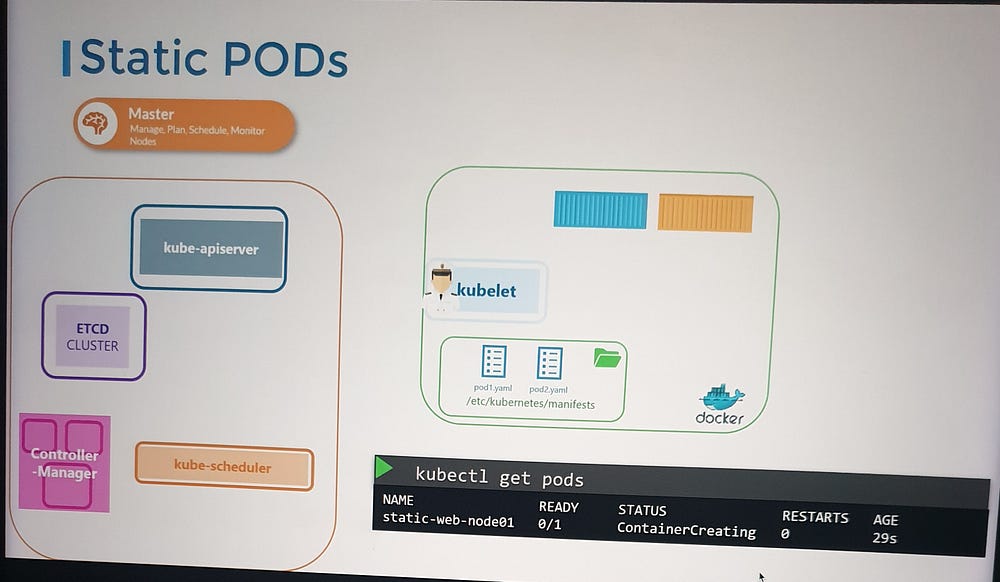
Kubelet.service
# --pod-manifest-path=/etc/kubernetes/manifests\\

# --config=kubeconfig.yaml\\


# kubeconfig.yaml
# static pod path:/etc/kubernetes/manifest

#ls /etc/kubernetes/manifests
etcd.yml   kube-apiserver.yml  kube-controller-manager.yml kube-scheduler.yml
*Multiple Schedulers:
In Kubernetes, the default scheduler is responsible for placing pods onto nodes. However, there are situations where you might want to use multiple schedulers in a cluster. This can be achieved by configuring additional schedulers besides the default one. Multiple schedulers allow you to have specialized scheduling logic for different types of workloads or use cases.
Key Concepts for Multiple Schedulers:
Default Scheduler: This is the built-in scheduler that handles the placement of most pods in a Kubernetes cluster.
Custom Schedulers: These are additional schedulers that you can configure to handle specific types of workloads. Custom schedulers can be implemented to meet specific requirements like custom affinity, resource allocation strategies, or scheduling based on specialized hardware.
Scheduler Name: When defining a pod, you can specify the scheduler name in the pod specification. By default, this is set to
default-scheduler. If you want the pod to be scheduled by a custom scheduler, you set this field to the custom scheduler’s name.
Deploy Additional Scheduler as a Pod:
In Kubernetes, you can deploy additional schedulers alongside the default scheduler to handle specific workloads, custom scheduling policies, or specialized use cases. Kubernetes allows for multiple schedulers to operate within the same cluster, ensuring flexibility for different workloads that require different scheduling logic.
Why Use Additional Schedulers?
By default, Kubernetes uses a single scheduler (the kube-scheduler) to place Pods on Nodes based on various criteria such as resource availability, taints, tolerations, and affinity rules. However, in some use cases, you may require specialized scheduling logic that the default scheduler cannot handle effectively. This is where an additional scheduler can be useful. Some reasons to use additional schedulers include:
Custom Scheduling Policies: If your application has specific scheduling requirements not met by the default scheduler (e.g., scheduling based on custom criteria like geographic region, custom resource types, or complex affinity rules).
Multiple Workload Types: Running workloads with distinct resource needs that require different handling. For example, one scheduler could be used for high-performance workloads while another handles general-purpose workloads.
High Availability: In large clusters, running multiple schedulers can provide fault tolerance and ensure that the scheduling workload is distributed.
# wget https://storage.googleapis.com/kubernetes-release/release/v1.12.0/bin/linux/amd64/kube-scheduler


kube-scheduler.service

# --config=/etc/kubernetes/config/kube-scheduler.yaml


my-scheduler-2.service

# --config=/etc/kubernetes/config/my-scheduler-2-config.yaml

my-scheduler.service

# --config=/etc/kubernetes/config/my-scheduler-config.yaml
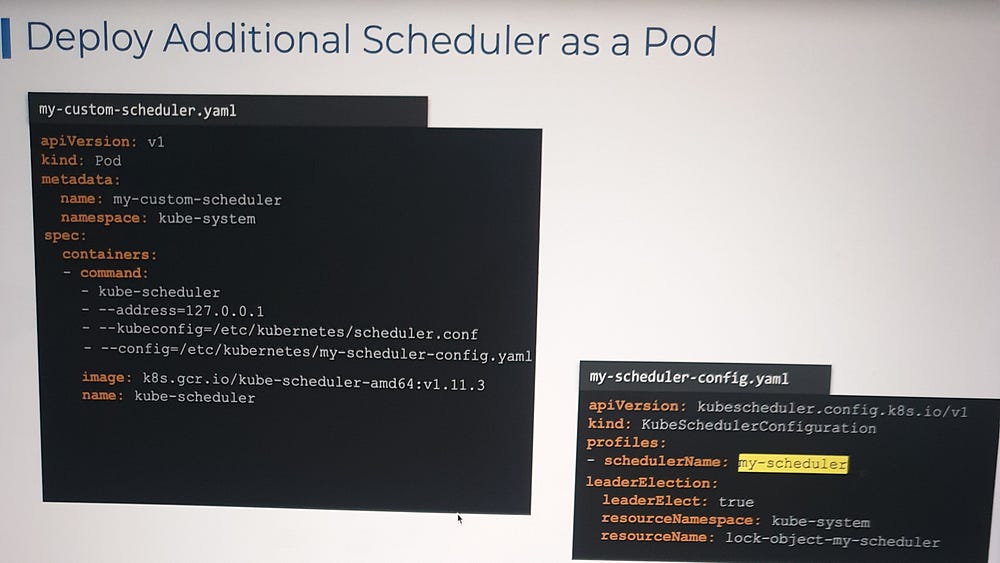
In Kubernetes, leader election is a mechanism used to ensure that among multiple instances of a component (such as a custom scheduler or controller), only one instance acts as the “leader” at any given time. This is particularly useful when you have multiple components performing similar tasks, and you want to prevent conflicts or duplicate work. Leader election ensures that only one instance performs a critical operation, while others remain in standby mode, ready to take over in case the current leader fails.
How Leader Election Works in Kubernetes:
Leader Election Config: Kubernetes provides leader election via a configuration that utilizes Kubernetes’ ConfigMaps or Endpoints to coordinate and manage leadership. The component (like a custom scheduler or controller) periodically tries to acquire leadership by updating a shared resource (usually a ConfigMap or Endpoints object).
Kubernetes API Resources: Leader election is typically implemented using leases in Kubernetes, which are stored in ConfigMaps or Endpoints resources within the cluster.
Leader Election in Practice:
Multiple Pods for Leader Election: If you deploy multiple instances of a service, such as a custom scheduler or a controller, you configure leader election so that only one instance is selected as the leader. The leader performs the actual tasks, while the other instances wait in standby mode.
Leader Election Process:
Each instance attempts to acquire a lease on the ConfigMap or Endpoints resource.
The first instance to acquire the lease becomes the leader.
The leader periodically renews the lease to maintain leadership.
If the leader fails to renew the lease (e.g., due to a crash), another instance can acquire the lease and become the new leader.
3. Failure Handling: If the current leader instance fails or becomes unavailable, Kubernetes will automatically trigger the leader election process to elect a new leader from the remaining instances.
*Scheduler Profiles:
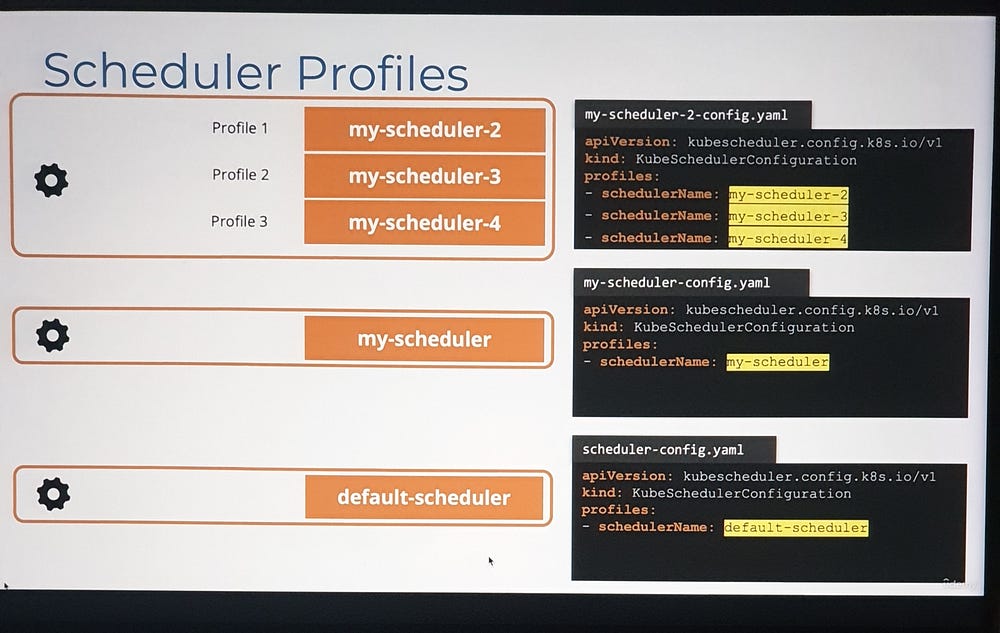
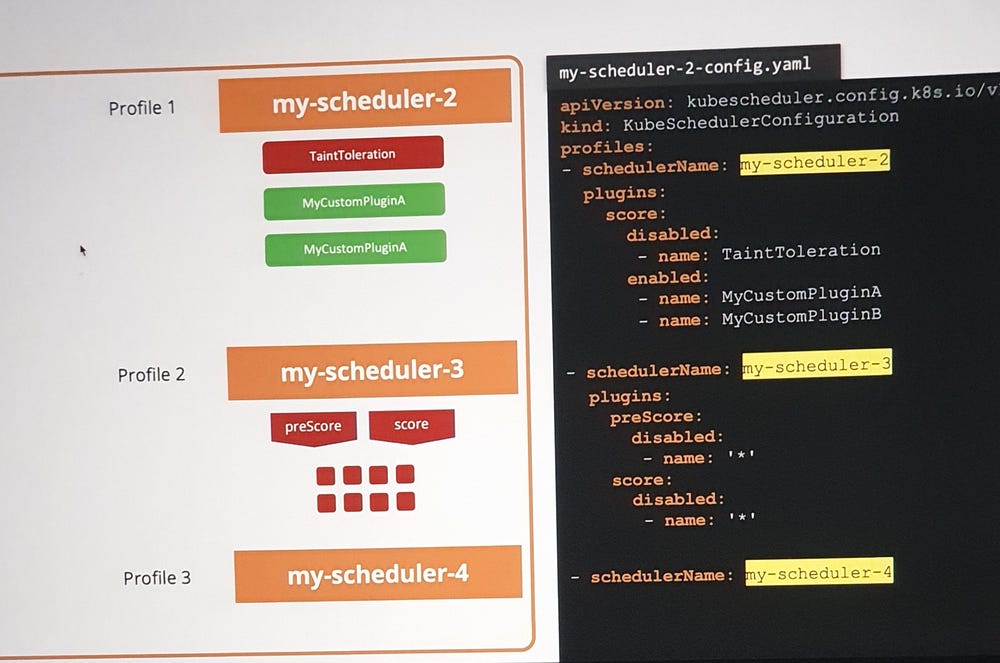
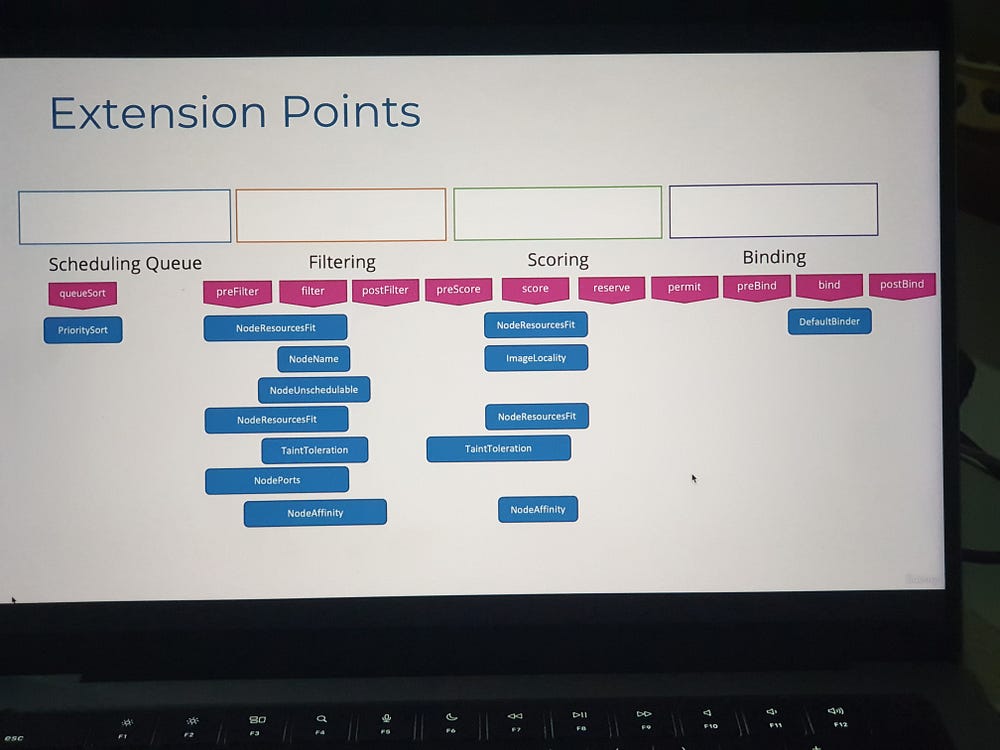
In Kubernetes, Scheduler Profiles provide a way to configure different scheduling behaviors for workloads. This feature allows you to use multiple configurations for the scheduler to meet different requirements, such as prioritizing specific workloads, using custom scheduling algorithms, or integrating third-party schedulers.
pod-definition.yaml
apiversion: v1
kind: pod
metadate:
  name: simple-webapp-color
spec:
  priorityclassName: high-priority
  containers:
  - name: simple-webapp-color
    image: simple-webapp-color
      resources:
        requests:
           memory: "1Gi"
           cpu: 10
apiversion: scheduling.k8s.io/v1
kind: priorityclass
metadata:
  name: high-priority
value: 1000000
globalDefault: false
description: "This priority class should be used for xyz service pods only."
This blog covered the essential Kubernetes scheduling concepts, including node selectors, affinity, tolerations, and custom schedulers. By understanding these key components and YAML configurations, Kubernetes administrators can optimize resource allocation, ensure workload efficiency, and manage complex applications in a cloud-native environment. Mastering Kubernetes scheduling is essential for achieving scalability and reliability in modern infrastructures.
Subscribe to my newsletter
Read articles from Shazia Massey directly inside your inbox. Subscribe to the newsletter, and don't miss out.
Written by
