Automate AWS Glue ETL Deployment with CI/CD and CodePipeline with Failed Job Notifications
 Kiran Bhandari
Let's start by understanding what AWS CodePipeline is and what we can achieve with it.
AWS CodePipeline is a powerful service that automates continuous delivery pipelines, enabling fast and reliable updates to your applications and infrastructure. This service fully automates your release process from end to end, ensuring that every change you make to your codebase is efficiently and consistently delivered. The process begins with your source repository, where CodePipeline monitors for any changes or updates. Once a change is detected, it triggers a series of stages including build, test, and deployment. During the build stage, your code is compiled and packaged. In the test stage, automated tests are run to ensure the quality and functionality of the code. Finally, in the deployment stage, the code is deployed to your desired environment, whether it be development, staging, or production. By automating these steps, CodePipeline helps you maintain a high level of code quality and reduces the time it takes to deliver new features and fixes to your users.
Continuous integration (CI) and continuous delivery (CD) are practices that help development teams push out code changes more frequently and reliably. This whole process is called the CI/CD pipeline.
It's time to set up an AWS CodePipeline CI/CD pipeline! Since I enjoy working with data pipelines, I'm going to automate the deployment of AWS Glue workflow jobs. Watching intricate workflows seamlessly handle data processing is one of the reasons I love AWS Glue. To ensure everything runs smoothly, I'll also include a failure notification trigger. Let's get started!
Create IAM Role for CodePipeline
Make sure you have a role policy that has sufficient permissions to run the CodePipeline. This role will allow CodePipeline to interact with other AWS services on your behalf, ensuring that the pipeline can execute all necessary actions.
Creating an IAM Role:
codepipelineroleOpen the IAM console and navigate to the "Roles" section.
Click on the "Create role" button.
Select "AWS service" as the type of trusted entity.
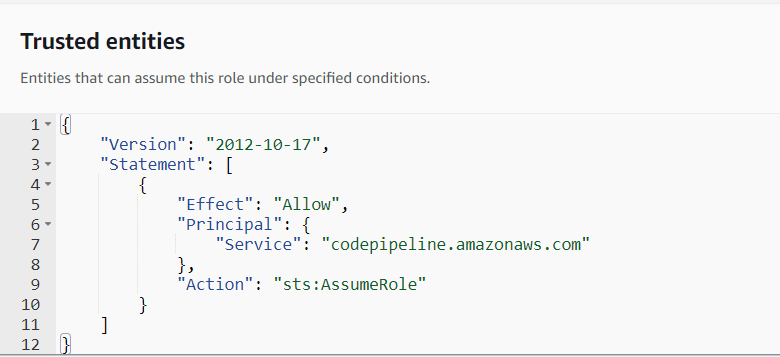
Choose "CodePipeline" from the list of services. (If you don't find CodePipeline, choose EC2. Once the role policies have been added, we can change the "Trust Policy" to
codepipelineas shown below:
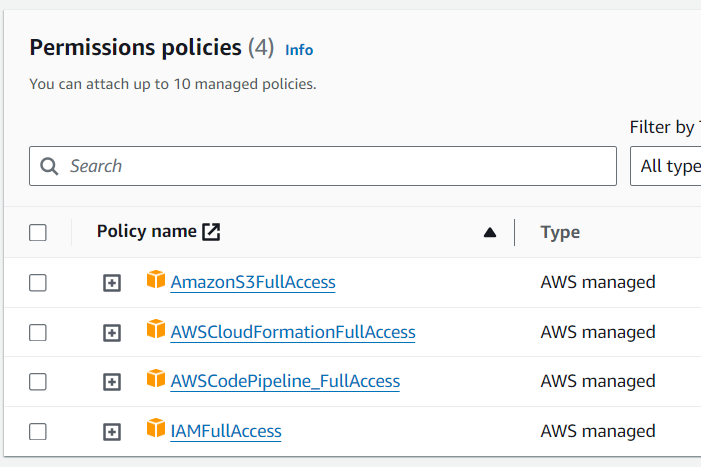
Click "Next: Permissions" and attach the necessary policies, such as
AWSCodePipelineFullAccess,AmazonS3FullAccess,AWSCodeBuildAdminAccess,IAMFullAccess, andAWSCloudFormationFullAccess.For production environments, it's a good idea to limit access. However, since this is just a demo, we're giving full access. Name your role something like codepipelinerole and click "Create role" to finish. This will set up an IAM role with all the permissions your CodePipeline needs.

Or you can create the custom IAM role policies according to your requirements
  {
    "Version": "2012-10-17",
    "Statement": [
      {
        "Effect": "Allow",
        "Action": [
          "iam:PassRole",
          "s3:*",
          "codepipeline:*",
          "codebuild:*",
          "cloudformation:*"
        ],
        "Resource": "*"
      }
    ]
  }
Create a CloudFormation yaml file
To create a comprehensive Glue workflow using a YAML template, follow these detailed steps. This will help you define and manage your Glue jobs efficiently.
First, you need to create a YAML file that includes all the necessary configurations for your Glue workflow. This YAML file will define the various components of your workflow, such as jobs, triggers, and failed job trigger.
Here is an example of a complete Glue workflow YAML template:
 AWSTemplateFormatVersion: "2010-09-09"
 Description: AWS CloudFormation to provision AWS Glue Workflows, Triggers, and Jobs

 Parameters:
   EnvironmentType:
     Type: String
     Default: dev # set your environment accordingly

   AWSAccountID:
     Type: String
     Default: 123456789012 # Your AWS Account ID

   IAMRole:
     Type: String
     Default: GlueETLRole # IAM Role for Glue jobs

   S3GlueLogs:
     Type: String
     Default: s3://my-glue-logs/ # S3 location for Glue logs

   GlueWorkflowName:
     Type: String
     Default: demo-test

   JobName1:
     Type: String
     Default: my_glue_job_one

   JobName2:
     Type: String
     Default: my_glue_job_two

   JobNameFail:
     Type: String
     Default: failed_notification_job

 Resources:
   # Glue Workflow
   GlueWorkflow:
     Type: AWS::Glue::Workflow
     Properties:
       Name: !Join ["_", [!Ref GlueWorkflowName, !Ref EnvironmentType]]

   # First Trigger (Scheduled)
   TriggerOne:
     Type: AWS::Glue::Trigger
     Properties:
       Name: !Join ["_", ["TriggerOne", !Ref EnvironmentType]]
       Type: SCHEDULED
       Schedule: cron(0 5 * * ? *) # Runs once a day at 5:00 AM UTC
       StartOnCreation: true
       WorkflowName: !Ref GlueWorkflow
       Actions:
         - JobName: !Ref GlueJobOne

   # Second Trigger (Conditional on JobOne Success)
   TriggerTwo:
     Type: AWS::Glue::Trigger
     Properties:
       Name: !Join ["_", ["TriggerTwo", !Ref EnvironmentType]]
       Type: CONDITIONAL
       StartOnCreation: true
       WorkflowName: !Ref GlueWorkflow
       Predicate:
         Conditions:
           - JobName: !Ref GlueJobOne
             LogicalOperator: EQUALS
             State: SUCCEEDED
       Actions:
         - JobName: !Ref GlueJobTwo

   # Failed Notification Trigger (If Either Job Fails)
   FailedNotificationTrigger:
     Type: AWS::Glue::Trigger
     Properties:
       Name: !Join ["_", ["FailedTrigger", !Ref EnvironmentType]]
       Type: CONDITIONAL
       StartOnCreation: true
       WorkflowName: !Ref GlueWorkflow
       Predicate:
         Logical: ANY
         Conditions:
           - JobName: !Ref GlueJobOne
             LogicalOperator: EQUALS
             State: FAILED
           - JobName: !Ref GlueJobTwo
             LogicalOperator: EQUALS
             State: FAILED
       Actions:
         - JobName: !Ref GlueJobFail

   # Glue Job One
   GlueJobOne:
     Type: AWS::Glue::Job
     Properties:
       Role: !Sub arn:aws:iam::${AWSAccountID}:role/${IAMRole}
       Command:
         Name: glueetl
         ScriptLocation: !Sub "s3://aws-glue-scripts-${AWSAccountID}/scripts/${EnvironmentType}/my_glue_job_one.py"
       AllocatedCapacity: 5
       GlueVersion: "3.0"
       Name: !Ref JobName1
       DefaultArguments:
         "--TempDir": !Sub "s3://aws-glue-temporary-${AWSAccountID}/${EnvironmentType}/temp"
         "--enable-continuous-cloudwatch-log": true
         "--enable-spark-ui": true
         "--spark-event-logs-path": !Ref S3GlueLogs

   # Glue Job Two
   GlueJobTwo:
     Type: AWS::Glue::Job
     Properties:
       Role: !Sub arn:aws:iam::${AWSAccountID}:role/${IAMRole}
       Command:
         Name: glueetl
         ScriptLocation: !Sub "s3://aws-glue-scripts-${AWSAccountID}/${EnvironmentType}/scripts/my_glue_job_two.py"
       AllocatedCapacity: 5
       GlueVersion: "3.0"
       Name: !Ref JobName2
       DefaultArguments:
         "--TempDir": !Sub "s3://aws-glue-temporary-${AWSAccountID}/${EnvironmentType}/temp"
         "--enable-continuous-cloudwatch-log": true
         "--enable-spark-ui": true
         "--spark-event-logs-path": !Ref S3GlueLogs

   # Failed Notification Job
   GlueJobFail:
     Type: AWS::Glue::Job
     Properties:
       Role: !Sub arn:aws:iam::${AWSAccountID}:role/${IAMRole}
       Command:
         Name: pythonshell
         ScriptLocation: !Sub "s3://aws-glue-scripts-${AWSAccountID}/${EnvironmentType}/scripts/failed_notification_job.py"
       GlueVersion: "3.0"
       Name: !Ref JobNameFail
       DefaultArguments:
         "--TempDir": !Sub "s3://aws-glue-temporary-${AWSAccountID}/${EnvironmentType}/temp"
         "--enable-continuous-cloudwatch-log": true
Update S3 location:
S3 Bucket Name:
aws-glue-scripts-123456789012S3 Bucket Name:
aws-glue-temporary-123456789012- Purpose: This bucket holds temporary files generated by Spark when the job runs.
Feel free to tweak the bucket names and update your YAML template file as needed!
Create a Pipeline
Go to AWS CodePipeline and click on
create pipeline. Name the pipelinemyglueworkflowpipeline. For the role name, choose the existing role option and select the IAM Rolecodepipelinerole. Keep the default settings in the advanced settings.In the Source section, choose
AWS CodeCommit.Next, you need to select the repository that will store your code. If you haven't created a repository yet, follow these steps:
Navigate to AWS CodeCommit in the AWS Management Console.
Click on
Create repository.Name the repository
myglueworkflowrepository. You can give it a description if you like, but it's optional.Click on
Create.
Once the repository is created, go back to your pipeline setup in AWS CodePipeline. In the Source section, select AWS CodeCommit as the source provider. Then, choose the repository you just created, mygluerepository.
After selecting the repository, configure the branch you want to use. Typically, this will be the main branch, but you can choose any branch that suits your workflow.
Next, move on to the Build stage. Here, you can choose a build provider. If you are using AWS CodeBuild, follow these steps:
In the Build section, click on
Add build stage.Choose
AWS CodeBuildas the build provider.Select an existing CodeBuild project or create a new one. If creating a new project, configure it with the necessary build specifications.
Finally, configure the Deploy stage. This is where you specify how and where your application will be deployed. Depending on your deployment strategy, you might choose AWS Elastic Beanstalk, AWS Lambda, or another service.
After configuring all the stages, review your pipeline settings and click on Create pipeline. Your pipeline will now be set up and ready to use, automatically triggering builds and deployments whenever changes are pushed to the mygluerepository repository.
Note: Effective July 25, 2024, AWS CodeCommit will no longer be available for new customers or accounts. However, existing organizations that are already using CodeCommit will continue to have access to the service.
Subscribe to my newsletter
Read articles from Kiran Bhandari directly inside your inbox. Subscribe to the newsletter, and don't miss out.
Written by

Kiran Bhandari
Kiran Bhandari
Detail-oriented Data Engineer with 1.5 years of experience designing and maintaining data pipelines. Proficient in ETL processes and optimizing data for analytics. Adept at collaborating with cross-functional teams to deliver quality data solutions. Strong analytical skills with a passion for continuous learning and professional growth