A Complete Introduction to Amazon S3 Storage Services
 Jay Kasundra
Amazon Simple Storage Service is storage for the Internet
Amazon S3 has a simple web services interface that you can use to store and retrieve any amount of data, at any time, from anywhere on the web.
Advantages of S3
Creating buckets – Create and name a bucket that stores data. Buckets are the fundamental container in Amazon S3 for data storage.
Storing data – Store an infinite amount of data in a bucket. Upload as many objects as you like into an Amazon S3 bucket. Each object can contain up to 5 TB of data.
Downloading data – Download your data or enable others to do so. Download your data anytime you like, or allow others to do the same.
Permissions – Grant or deny access to others who want to upload or download data into your Amazon S3 bucket.
Use Cases of S3
Backup and Storage
Disaster Recovery
Archive
Static Website
S3 Concepts
Buckets
To upload your data (such as photos, videos, or documents) to Amazon S3, you first need to create an S3 bucket in one of the AWS Regions.
A bucket is specific to a region.
A bucket is a container for objects stored in Amazon S3.
Every object is contained in a bucket.
By default, you can create up to 100 buckets in each of your AWS accounts. If you need more buckets, you can increase your account bucket limit to a maximum of 1,000 buckets by submitting a service limit increase.
Guidelines for Creating Buckets
Bucket name should be globally unique and the namespace is shared in all accounts. This means that after a bucket is created, the name of that bucket cannot be used by another AWS account in any AWS Region until the bucket is deleted.
Bucket names must be at least 3 and no more than 63 characters long.
Bucket names must not contain uppercase characters or underscores.
Bucket names must start with a lowercase letter or number.
Bucket names must not be formatted as an IP address (for example, 192.168.5.4).
After you create the bucket, you cannot change the name, so choose wisely.
Choose a bucket name that reflects the objects in the bucket because the bucket name is visible in the URL that points to the objects that you're going to put in your bucket.
Regions
You can choose the geographical AWS Region where Amazon S3 will store the buckets that you create.
You might choose a Region to optimize latency, minimize costs, or address regulatory requirements.
Objects stored in a Region never leave the Region unless you explicitly transfer them to another Region.
Creation of S3 Buckets
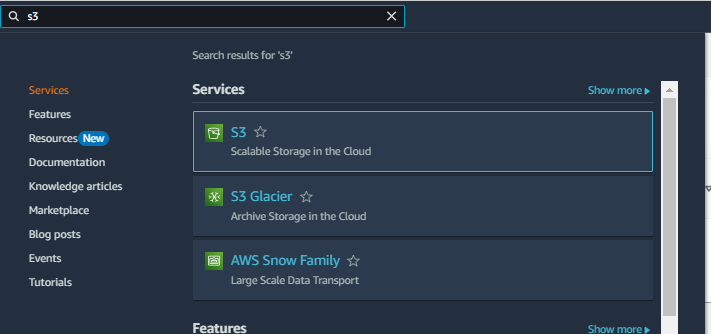
To find the S3, enter the keyword “S3” into the search bar at the top of the AWS console and select the first result for S3. Click on “Create bucket”.

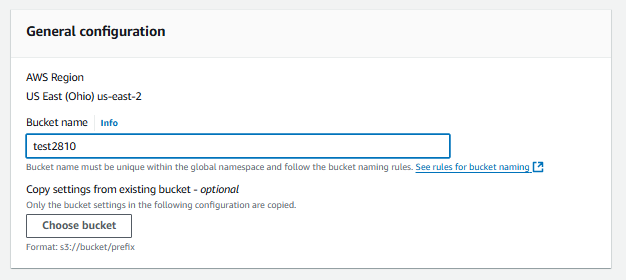
Enter the unique bucket name, then click on "Create bucket." You will see the AWS Region specified above the bucket name input bar.
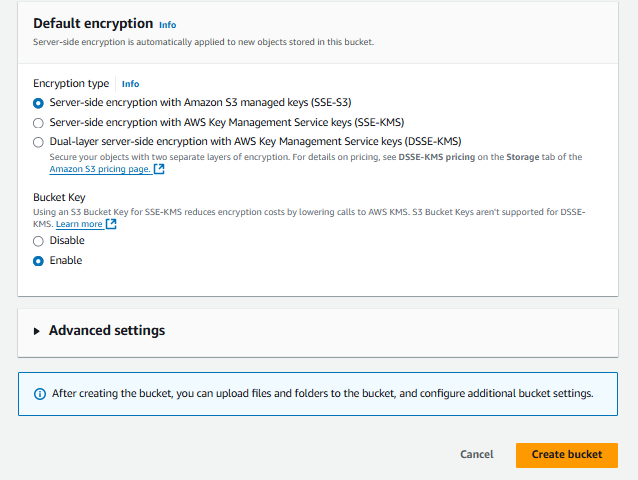
Bucket is created.

S3 Objects
Amazon S3 is a simple key-value store designed to hold as many objects as you need.
You store these objects in one or more buckets.
S3 supports object level storage i.e., it stores the file as a whole and does not divide them.
An object size can be in between 0 KB and 5 TB.
When you upload an object in a bucket, it replicates itself in multiple availability zones in the same region.
Objects in Buckets
To upload objects to buckets, open the bucket and click on "Upload."

Click on “Add files” and select the file from your device.
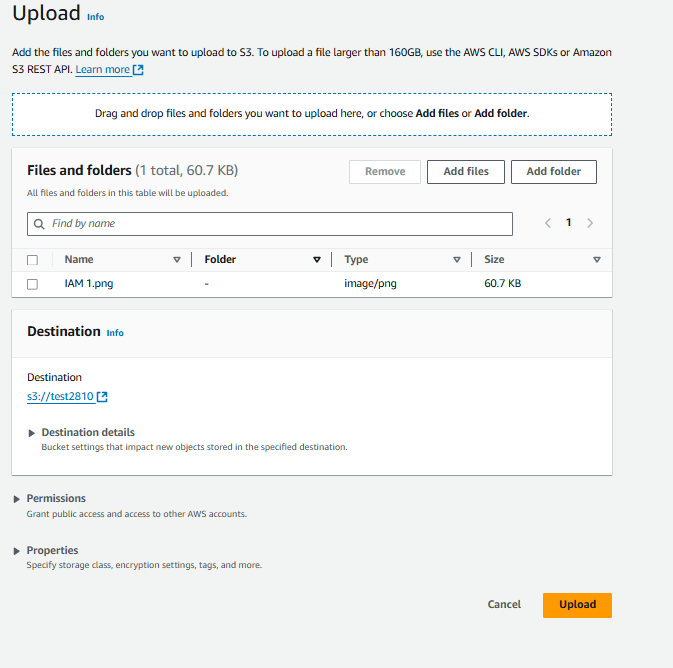
Object is successfully uploaded to the bucket.

Object Versioning
When you re-upload the same object name in a bucket, it replaces the whole object.
You can use versioning to keep multiple versions of an object in one bucket.
For example, you could store my-image.jpg (version 1) and my-image.jpg (version 2) in a single bucket.
You must explicitly enable versioning on your bucket. By default, versioning is disabled.
Regardless of whether you have enabled versioning, each object in your bucket has a version ID.
If you have not enabled versioning, Amazon S3 sets the value of the version ID to null. If you have enabled versioning, Amazon S3 assigns a unique version ID value for the object.
This functionality prevents you from accidentally overwriting or deleting objects and affords you the opportunity to retrieve a previous version of an object
How to Enable Object Versioning and How It's Used
To enable object versioning, open your bucket and click on "Properties," then click on "Edit" next to Bucket Versioning.

Enable the object versioning and Click on “Save changes”
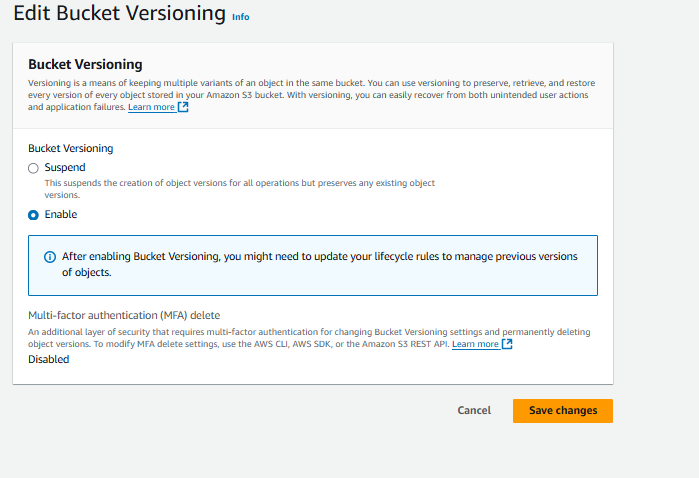
Now, when you upload objects with the same name, you can have multiple versions of the same file. To view the different versions, click on "Show versions."

How to make bucket access as public.
To make bucket access public, open your bucket and click on "Permissions," then click on "Edit" next to Block public access.
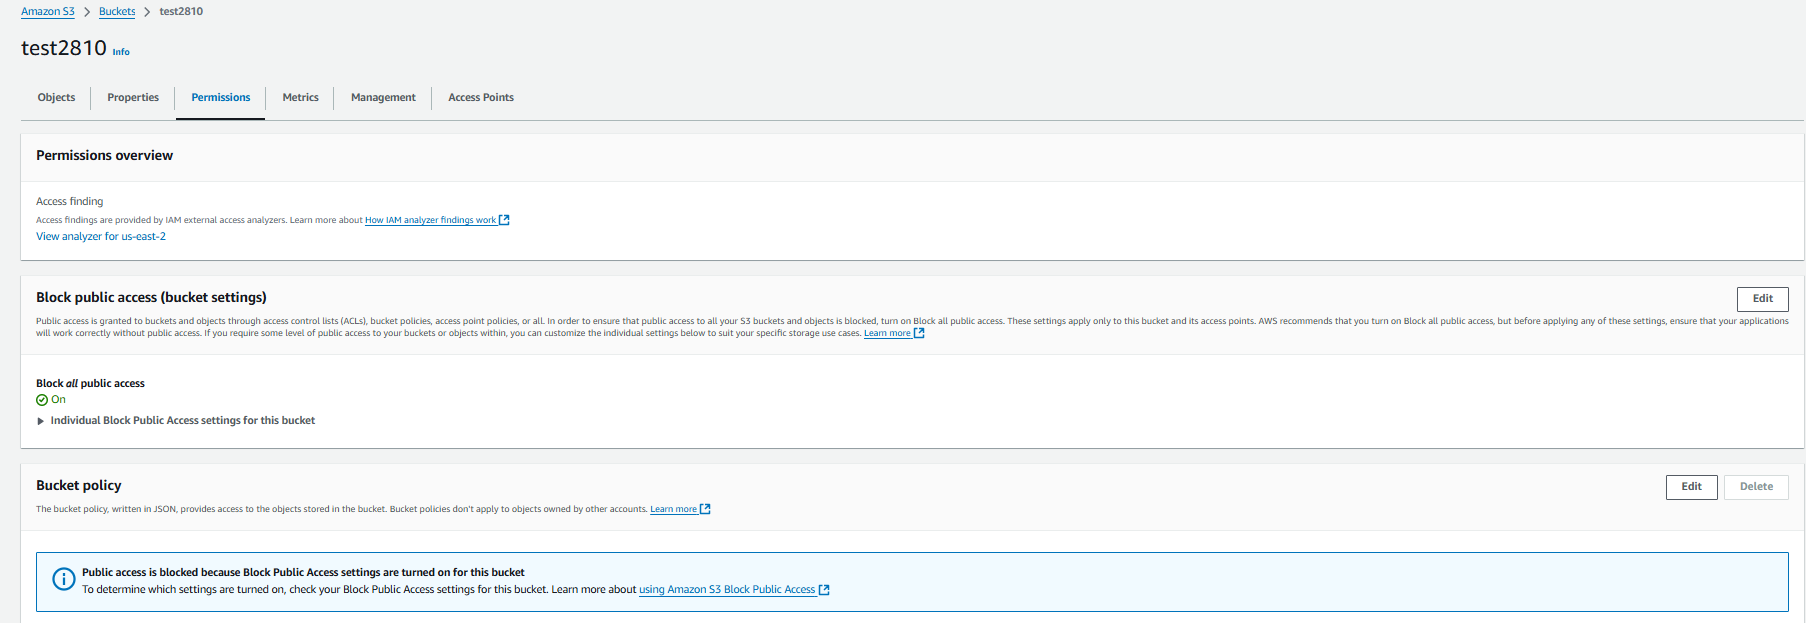
Uncheck “Block all public access” and click on “Save changes”. Click on “Confirm”. Note - Even if bucket is public objects are still private.
To make an object publicly accessible, ensure the bucket is public. Then, open your bucket, click on "Permissions," and select "Edit" next to Object ownership.

Select "ACLs enabled," check the acknowledgment message, and then click on "Save changes."
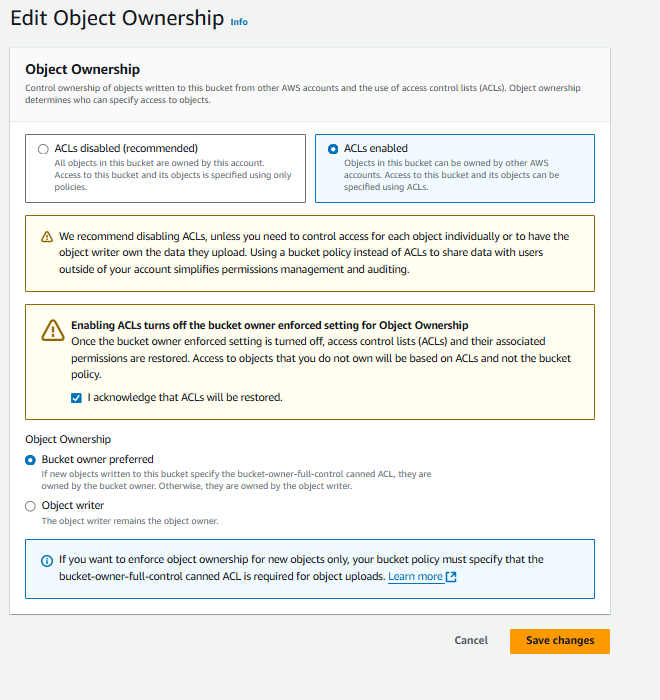
Now open the object you want to make publicly accessible. Click on "Permissions," then click on "Edit."

Now check both "Read" options next to "Everyone (public access)." Click on “Save changes”
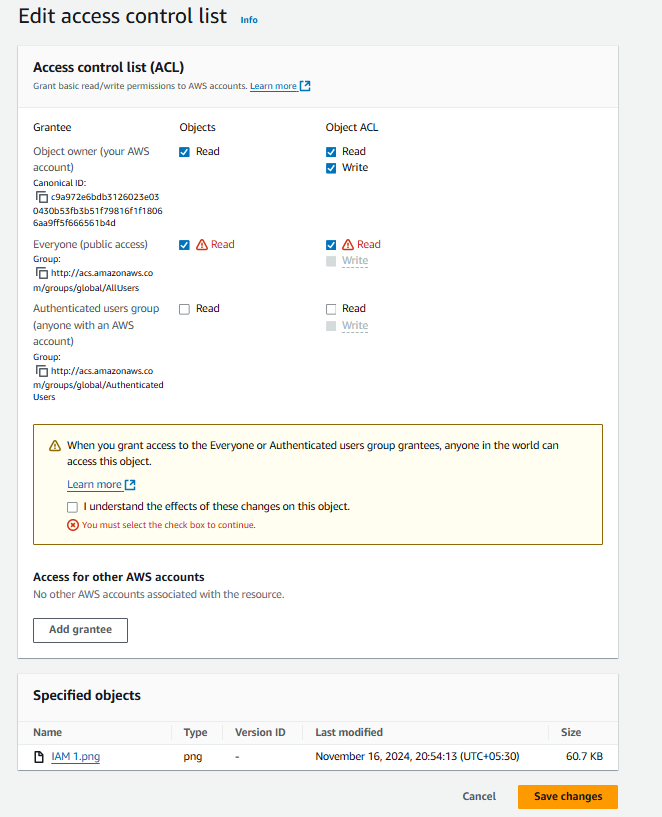
Now the object is public anyone can access that object.
Static Website Hosting using S3
You can host a static website on Amazon S3. On a static website, individual web pages include static content.
To host a static website, you configure an Amazon S3 bucket for website hosting and then upload your website content to the bucket.
This bucket must have public read access. It is intentional that everyone in the world will have read access to this bucket.
For hosting static website following points should be followed:
Public access to bucket
ACL enabled
Public access in object
Hosting of static website on S3
Upload any index file to the bucket. And make the access public.
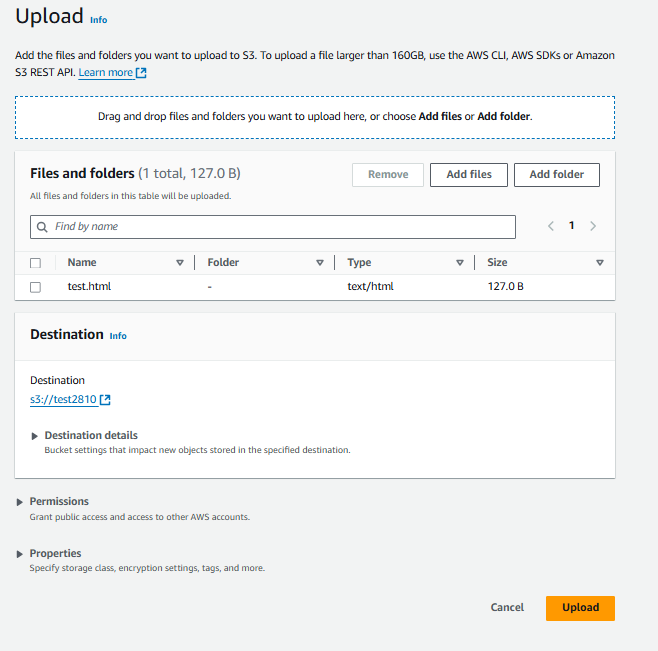
Now enable static website hosting from the bucket properties tab and click on "Edit" next to "Static Website Hosting."

Select the “Enable” radio button and give name of you index file. Click on “Save changes”
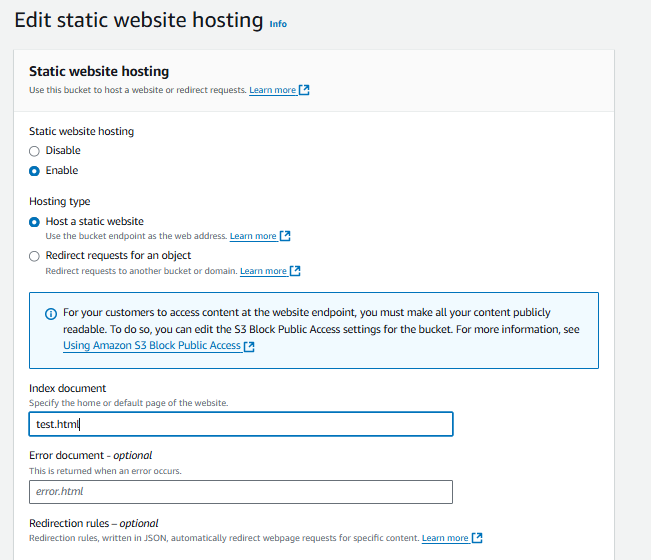
Copy the website link and paste it into your browser. You will be able to see the static website.

Presigned URL
When both the bucket and object are private, you can still give someone temporary access to your object using a presigned URL.
Select your object and click on “Actions.” Then, choose “Share with presigned URL” from the dropdown menu.

Enter the time you want to share access to your object with someone. Then click on “Create presigned URL.”
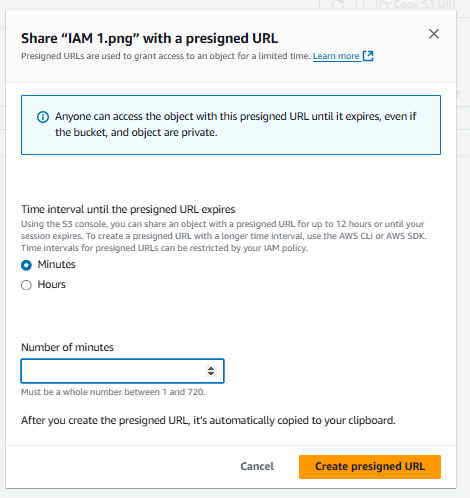
Now anyone with the presigned URL can access that object.
Storage Classes
Standard
- The default storage class. If you don't specify the storage class when you upload an object, Amazon S3 assigns the Standard storage class.
Infrequent
The Standard_IA and Onezone_IA storage classes are designed for long-lived and infrequently accessed data
Standard_IA and Onezone_IA objects are available for millisecond access (similar to the Standard storage class)
Amazon S3 charges a retrieval fee for these objects, so they are most suitable for infrequently accessed data.
The Standard_IA and Onezone_IA storage classes are suitable for objects larger than 128KB that you plan to store for at least 30 days. If an object is less than 128 KB, Amazon S3 charges you for 128 KB.
Onezone_IA - Amazon S3 stores the object data in only one Availability Zone, which makes it less expensive than Standard_IA
Archive
Glacier:
Long-term data archiving with retrieval times ranging from minutes to hours
It has minimum storage duration period of 90 days
If you have deleted, overwritten, or transitioned to a different storage class an object before the 90-day minimum, you are charged for 90 days.
Glacier Deep archive
Archiving rarely accessed data with a default retrieval time of 12 hours
It has minimum storage duration period of 180 days
If you have deleted, overwritten, or transitioned to a different storage class an object before the 180-day minimum, you are charged for 180 days.
Glacier Instant retrieval
It is an archive storage class that delivers the lowest-cost storage for data archiving and is organized to provide you with the highest performance and with more flexibility.
S3 Glacier Instant Retrieval delivers the fastest access to archive storage.
Intelligent Tiering
The Intelligent Tiering storage class is designed to optimize storage costs by automatically moving data to the most cost-effective storage access tier, without performance impact or operational overhead.
Intelligent Tiering delivers automatic cost savings by moving data on a granular object level between two access tiers, when access patterns change
Frequent access tier
Lower-cost infrequent access tier
Object Lifecycle
To manage your objects so that they are stored cost effectively throughout their lifecycle, configure their lifecycle.
A lifecycle configuration is a set of rules that define actions that Amazon S3 applies to a group of objects.
There are two types of actions:
Transition actions - Define when objects transition to another storage class.
Expiration actions - Define when objects expire. Amazon S3 deletes expired objects on your behalf.
Working of Object lifecycle
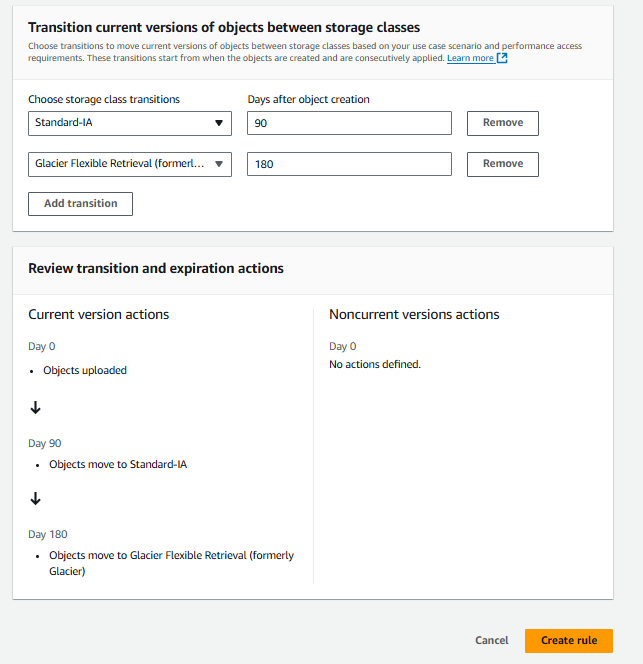
Go to Management tab in your bucket and Click on “Create lifecycle rule”

Enter a name for the lifecycle rule. Choose "Apply to all objects in the bucket" and check the acknowledgment box. Then, select "Transition current versions of the objects between storage classes" under Lifecycle rule actions.
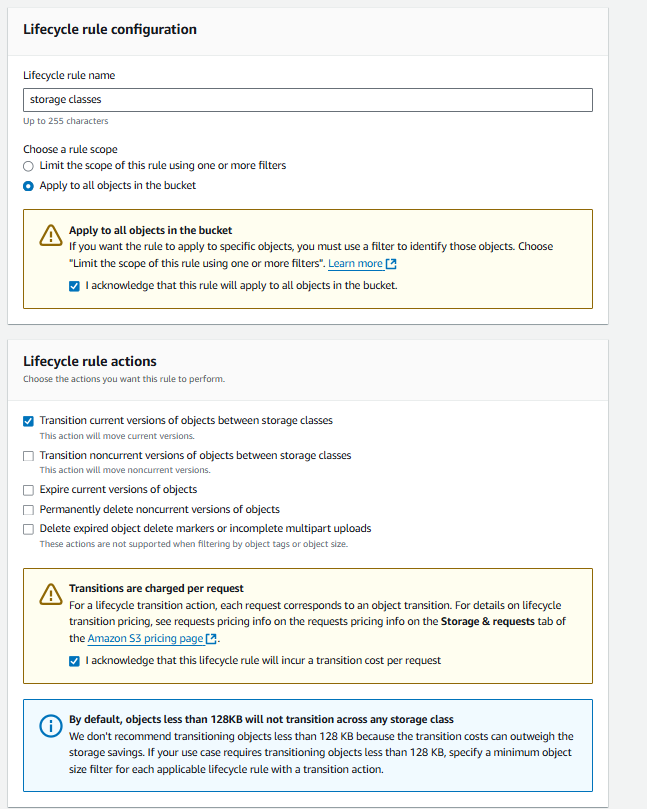
Select the storage classes and add a transition rule according to your preference. Click on “Create rule”.
Replication
Replication enables automatic, asynchronous copying of objects across Amazon S3 buckets.
Buckets that are configured for object replication can be owned by the same AWS account or by different accounts.
You can copy objects between different AWS Regions or within the same Region.
Their are two types Object Replication:
Cross-Region replication (CRR) is used to copy objects across Amazon S3 buckets in different AWS Regions.
Same-Region replication (SRR) is used to copy objects across Amazon S3 buckets in the same AWS Region.
Working of Object Replication
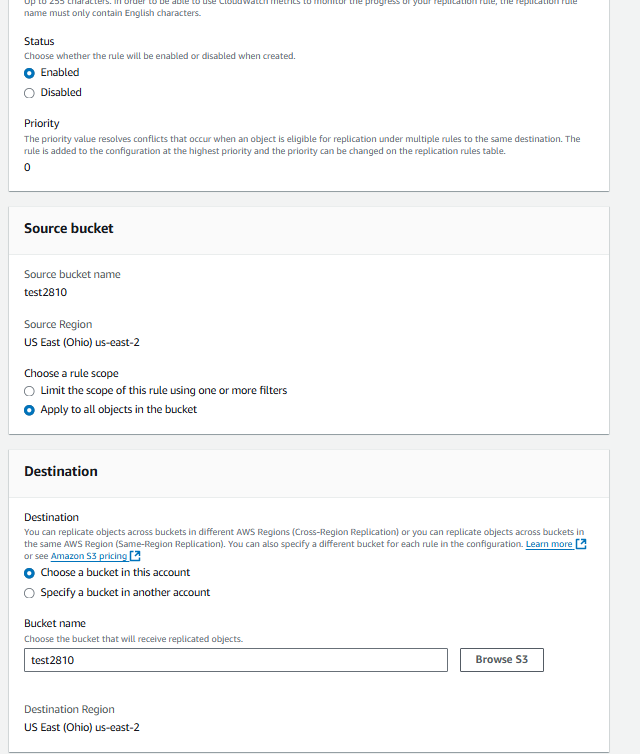
Go to the Management tab in your bucket and click on "Create replication rule."

Keep Status as “Enabled” , then rule scope as “Apply to all objects in the bucket” then browse and choose your bucket to replicate
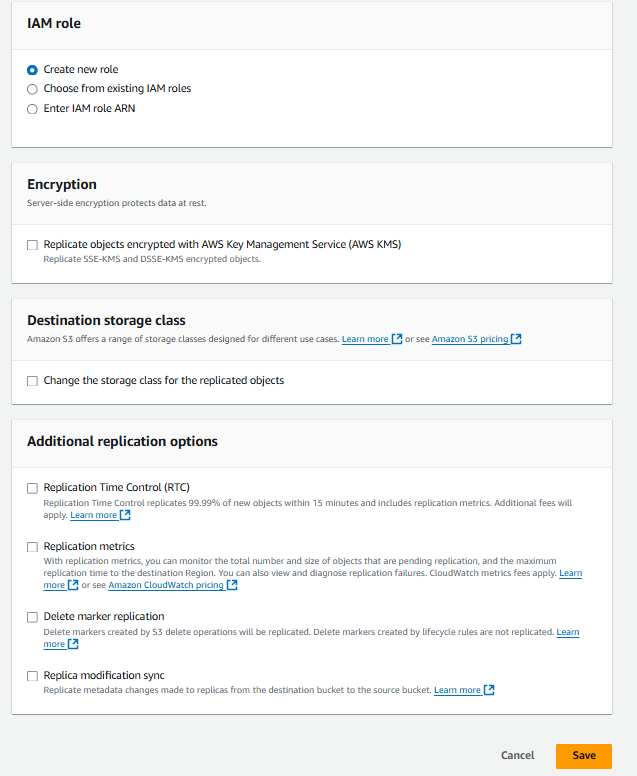
Choose new IAM role. Click on Save.
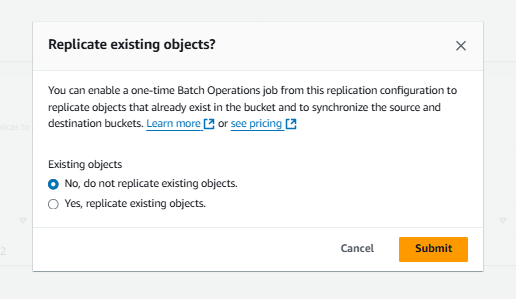
Generally, the replication rule applies to newly uploaded objects. However, if you want to apply it to existing objects, there is an extra charge of $0.25 for a batch job. Click on "Submit" to create the replication rule.
S3 Encryption
Data protection refers to protecting data while in-transit (as it travels to and from Amazon S3) and at rest (while it is stored on disks in Amazon S3 data centers).
You have the following options for protecting data at rest in Amazon S3:
Server-Side Encryption – Request Amazon S3 to encrypt your object before saving it on disks in its data centers and then decrypt it when you download the objects.
Client-Side Encryption – Encrypt data client-side and upload the encrypted data to Amazon S3. In this case, you manage the encryption process, the encryption keys, and related tools.
Server Side Encryption
Server-side encryption is the encryption of data at its destination by the application or service that receives it.
Amazon S3 encrypts your data at the object level as it writes it to disks in its data centers and decrypts it for you when you access it.
As long as you authenticate your request and you have access permissions, there is no difference in the way you access encrypted or unencrypted objects.
SSE-S3
Server-Side Encryption with Amazon S3-Managed Keys (SSE-S3)
When you use Server-Side Encryption with Amazon S3-Managed Keys (SSE-S3), each object is encrypted with a unique key.
As an additional safeguard, it encrypts the key itself with a master key that it regularly rotates.
SSE-KMS
Server-Side Encryption with Customer Master Keys (CMKs) Stored in AWS Key Management Service (SSE-KMS)
Server-Side Encryption with Customer Master Keys (CMKs) Stored in AWS Key Management Service (SSE-KMS) is similar to SSE-S3, but with some additional benefits and charges for using this service.
SSE-C
Server-Side Encryption with Customer-Provided Keys (SSE-C)With Server
Side Encryption with Customer-Provided Keys (SSE-C), you manage the encryption keys and Amazon S3 manages the encryption, as it writes to disks, and decryption, when you access your objects.
Client Side Encryption
Client side encryption is the act of encrypting data before sending it to Amazon S3.
To enable client-side encryption, you have the following options:
Use a customer master key (CMK) stored in AWS Key Management Service (AWS KMS).
Use a master key you store within your application.
Subscribe to my newsletter
Read articles from Jay Kasundra directly inside your inbox. Subscribe to the newsletter, and don't miss out.
Written by
