Building a FullStack Blogging Application: A DevOps Pipeline with Jenkins, Maven, SonarQube, Nexus, Docker, Trivy, and AWS EKS
 Manoj Shet
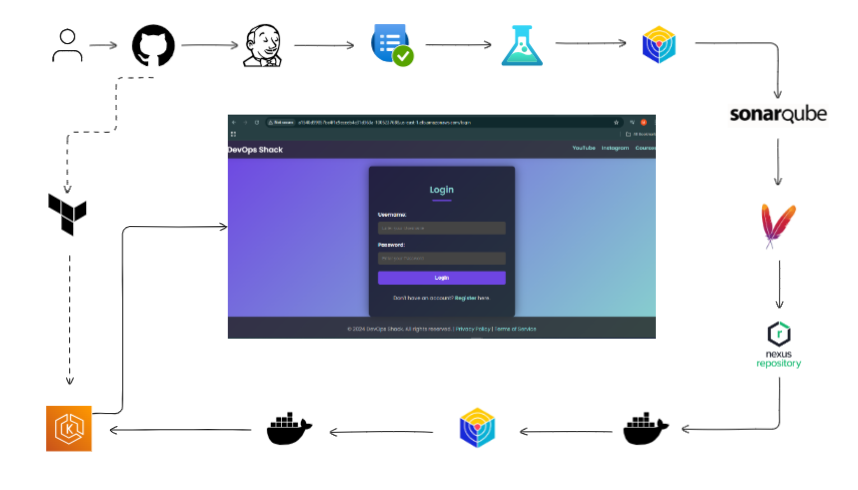
Building an efficient and reliable DevOps pipeline is essential for streamlined application delivery in modern development environments. This blog details the design and implementation of a comprehensive DevOps pipeline tailored for a Java-based FullStack Blogging application, highlighting automation, scalability, and security across all stages.
This pipeline incorporates Jenkins for continuous integration, Maven for build management, SonarQube for code quality checks, Nexus for artifact storage, Docker for containerization, Trivy for security scanning, and AWS EKS for deployment. Each tool plays a key role in transforming code into production-ready applications with minimal manual effort, demonstrating a practical approach to DevOps for cloud-native applications. Explore this end-to-end journey to understand the process of building a pipeline optimized for efficient code-to-production workflows.
Table of Contents
Introduction to the DevOps Pipeline
Pipeline Setup with Jenkins
Building the Application with Maven
Code Quality Analysis using SonarQube
Artifact Management with Nexus
Containerization and Image Scanning with Docker and Trivy
Deployment on AWS EKS
Conclusion
1. Introduction to the DevOps Pipeline
The DevOps pipeline was designed for a FullStack Blogging application, and each tool in the pipeline plays a specific role in ensuring a smooth and efficient workflow. Here’s a quick overview of each tool and its purpose in the pipeline:
Jenkins: Orchestrates the pipeline, automating each step from build to deployment.
Maven: Handles dependency management and build automation for the Java application.
SonarQube: Performs static code analysis to ensure code quality and detect potential security vulnerabilities.
Nexus: Serves as an artifact repository, storing the generated build artifacts.
Docker: Containerizes the application, creating a consistent environment for deployment.
Trivy: Scans both the filesystem and Docker images for security vulnerabilities.
AWS EKS: Manages and deploys the application on a scalable Kubernetes environment.
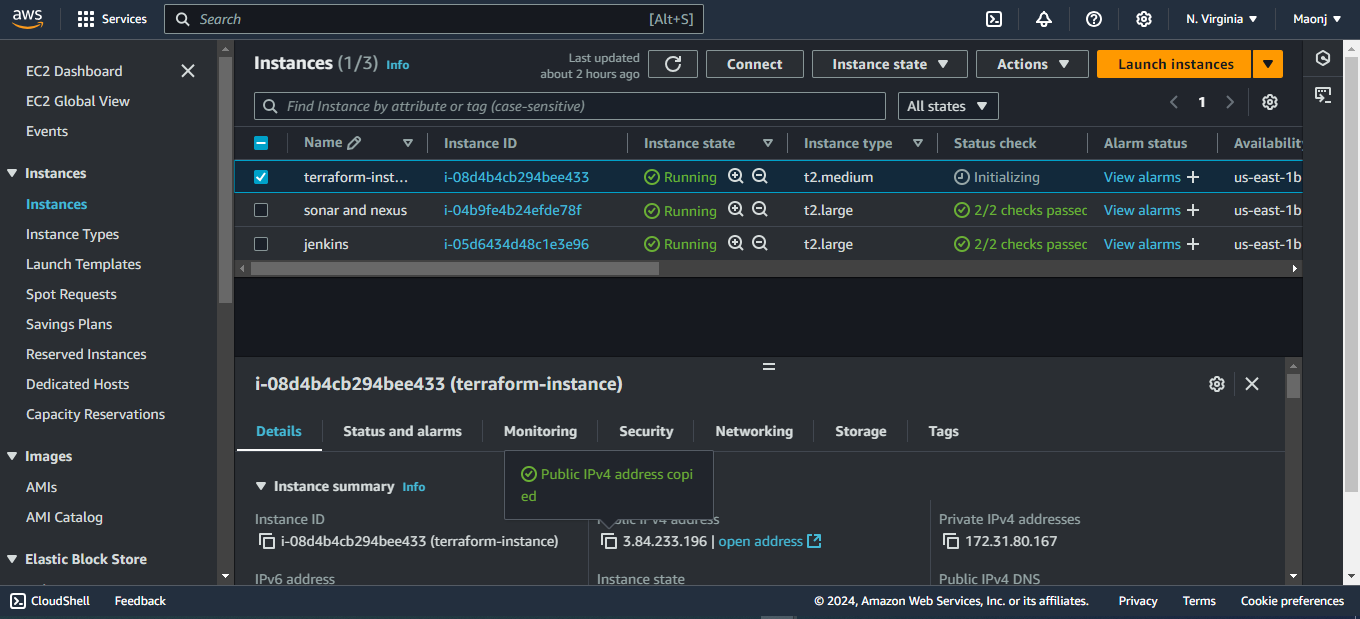
2. Pipeline Setup with Jenkins
Jenkins is the CI/CD tool that automates each stage of this DevOps pipeline. It triggers the build process, manages integrations with other tools, and handles deployments to ensure a continuous and reliable flow.
Jenkins Pipeline Configuration
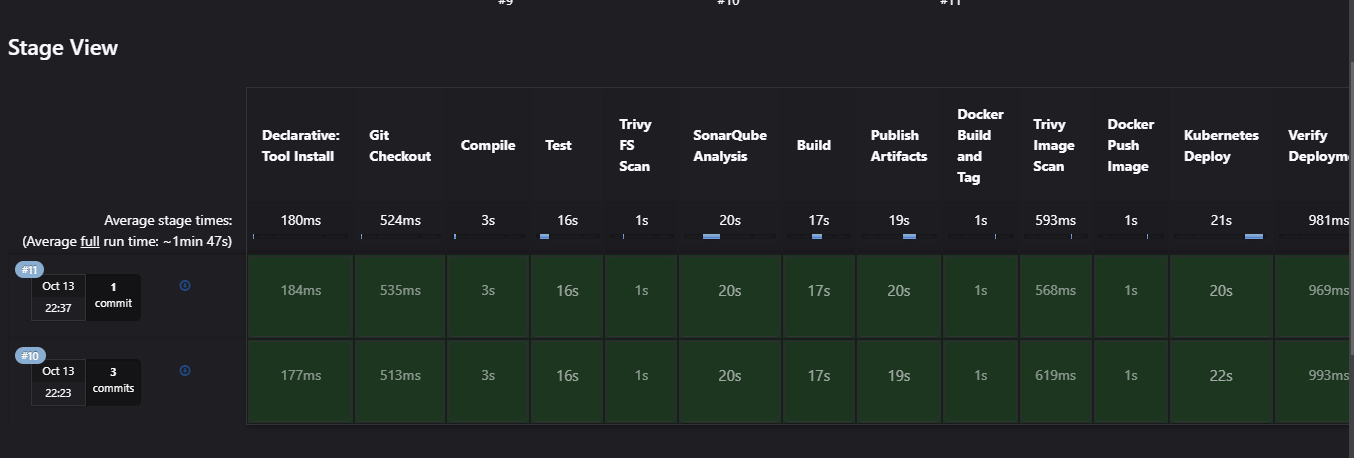
The Jenkins pipeline is divided into stages, each representing a specific step in the development lifecycle. Below is an overview of the stages configured:
Source Code Checkout: Jenkins pulls the latest code from the version control repository (e.g., GitHub or GitLab).
Build with Maven: Jenkins triggers a Maven build to compile the code, run tests, and create a packaged artifact (JAR file).
Static Code Analysis: This stage runs SonarQube scans to check for code quality issues.
Artifact Upload to Nexus: The built artifact is pushed to Nexus, making it available for deployment.
Docker Build and Push: Jenkins builds a Docker image from the Dockerfile, tags it with a version, and pushes it to DockerHub.
Trivy Security Scan: The Docker image is scanned for vulnerabilities to ensure a secure release.
Deployment to AWS EKS: Finally, Jenkins triggers the deployment to AWS EKS, where the application is hosted on a Kubernetes cluster.
Jenkins Plugins Used
SonarQube Scanner Plugin: Integrates SonarQube with Jenkins to perform static code analysis and maintain code quality.
Maven Integration Plugin: Enables Jenkins to run Maven builds, compile code, and generate artifacts.
Pipeline Maven Integration Plugin: Allows integration of Maven commands directly into Jenkins pipelines for flexible build steps.
Config File Provider Plugin: Manages configuration files in Jenkins, making it easy to inject settings like settings.xml for Maven configurations.
Docker and Docker Pipeline Plugin: Enables Jenkins to build Docker images, push them to registries, and run Docker containers in pipelines.
Kubernetes Plugin: Integrates Jenkins with Kubernetes to provision build agents (pods) within a Kubernetes cluster for scalable and efficient builds.
This setup provides a clear, automated pipeline that not only integrates code but also ensures quality and security checks at every stage.
pipeline {
    agent any


    tools {
        jdk 'jdk17'
        maven 'maven3'
    }

    environment {
        SCANNER_HOME = tool 'sonar-scanner'
    }

    stages {
        stage('Git Checkout') {
            steps {
                git branch: 'main', url: '<repo-url>'
            }
        }
        stage('Compile') {
            steps {
                sh 'mvn compile'
            }
        }
        stage('Test') {
            steps {
                sh 'mvn test'
            }
        }
        stage('Trivy FS Scan') {
            steps {
                sh "trivy fs --format table -o fs.html ."
            }
        }
        stage('SonarQube Analysis') {
            steps {
                withSonarQubeEnv('sonarqube-server') {
                    sh '''$SCANNER_HOME/bin/sonar-scanner -Dsonar.projectName=<project-name> -Dsonar.projectKey=<project-key> -Dsonar.java.binaries=target'''
                }
            }
        }
        stage('Build') {
            steps {
                sh 'mvn package'
            }
        }
        stage('Publish Artifacts') {
            steps {
                withMaven(globalMavenSettingsConfig: '<global-settings-name>', jdk: '', maven: 'maven3', mavenSettingsConfig: '', traceability: true) {
                    sh 'mvn deploy'
                }

            }
        }
        stage('Docker Build and Tag Image') {
            steps {
                script {
                    withDockerRegistry(credentialsId: '<your-credentials>', toolName: 'docker') {
                        sh "docker build -t <dockerhub-userid>/<image_name>:<tag> ."
                    }
                }
            }
        }
        stage('Trivy Image Scan') {
            steps {
                sh "trivy image --format table -o fs.html <dockerhub-userid>/<image_name>:<tag>"
            }
        }
        stage('Push Image') {
            steps {
                script {
                    withDockerRegistry(credentialsId: '<your-credentials>', toolName: 'docker') {
                        sh "docker push <dockerhub-userid>/<image_name>:<tag>"
                    }
                }
            }
        }
        stage('Kubernetes Deploy'){
            steps{
                withKubeConfig(caCertificate:'',clusterName:'<cluster-name>',contextName:'',credentiaslID:'<your-credentiasl>',namespace:'<namespace>',restrictKubeConfigAccess:false,serverUrl:'<URL>'){
                    sh "kubectl apply -f deployment-service.yml"
                }
            }
        }
        stage('Verify Deployment'){
            steps{
                withKubeConfig(caCertificate:'',clusterName:'<cluster-name>',contextName:'',credentiaslID:'<your-credentiasl>',namespace:'<namespace>',restrictKubeConfigAccess:false,serverUrl:'<URL>'){
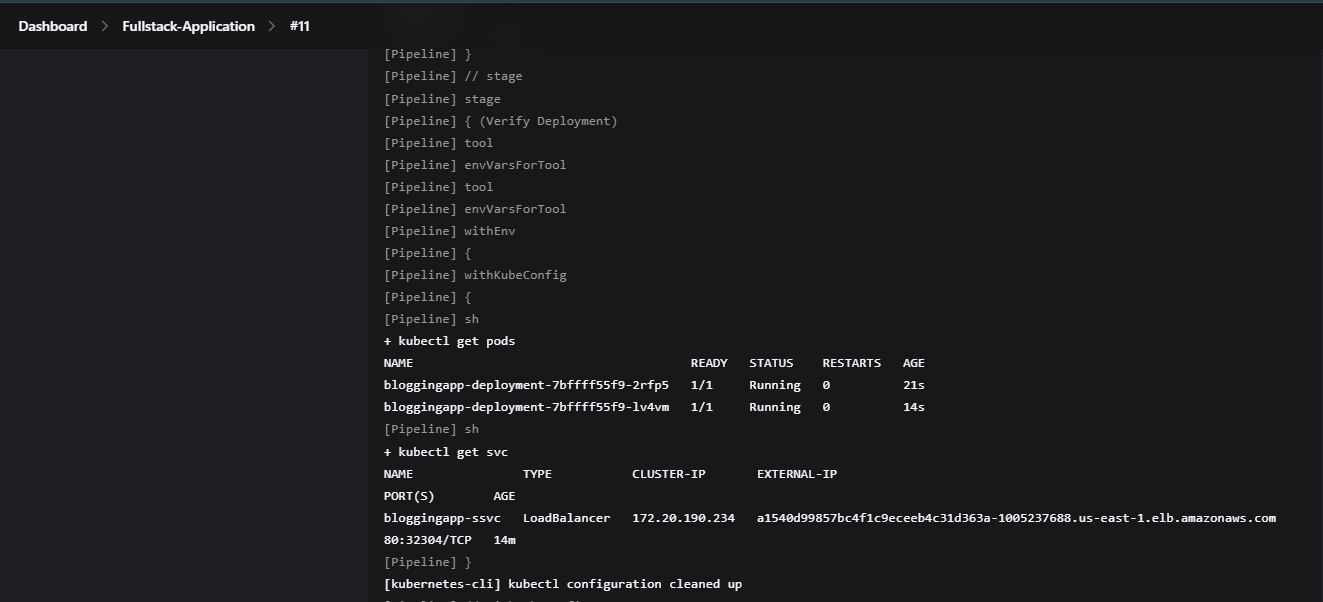
                    sh "kubectl get pods"
                    sh "kubectl get svc"
                }
            }
        }
    }

}
3. Building the Application with Maven
Maven serves as the build automation tool in this pipeline. Maven simplifies dependency management and ensures that the application is built and packaged consistently each time a new build is triggered.
Key Maven Tasks in the Pipeline
Dependency Resolution: Maven downloads and manages all required dependencies for the Java application, eliminating compatibility issues.
Compilation and Testing: The source code is compiled, and unit tests are executed to ensure stability.
Packaging: Maven packages the compiled code into an executable JAR file, ready for deployment.
In this pipeline, Maven’s role is essential for creating reliable builds and for generating artifacts that are easy to manage and deploy.
4. Code Quality Analysis using SonarQube
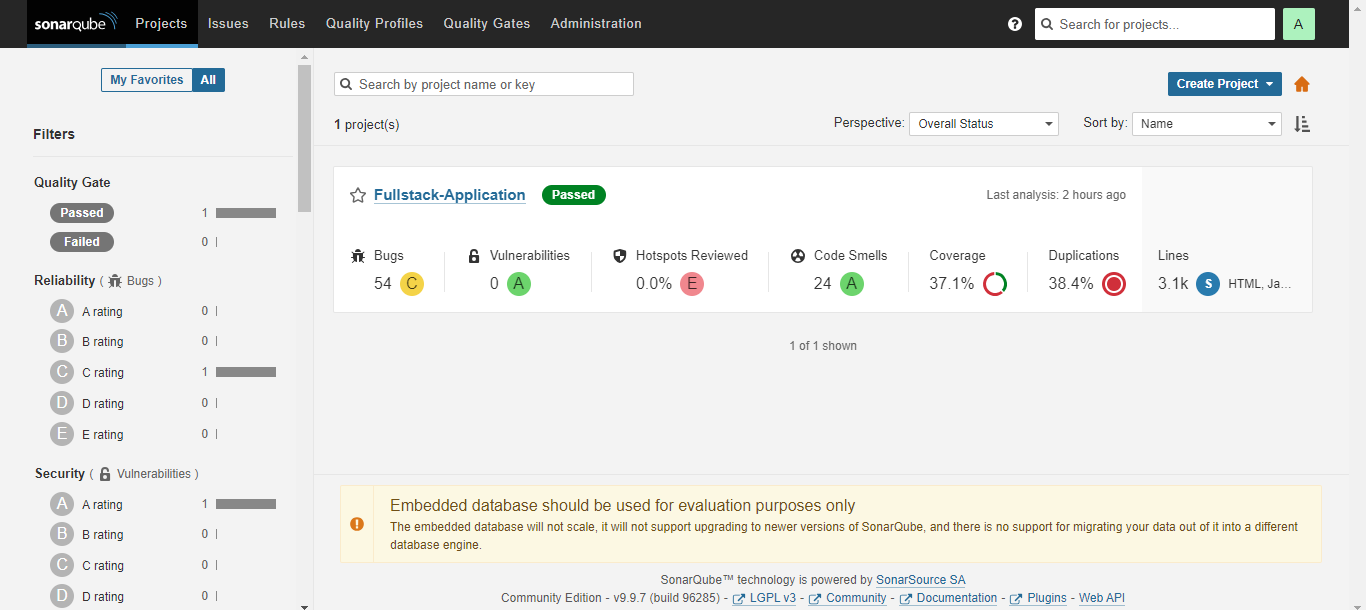
In the DevOps pipeline for the FullStack Blogging application, SonarQube is integrated primarily for static code analysis to detect issues like bugs, vulnerabilities, and code smells before deployment. This integration enhances code quality without enforcing a strict quality gate in Jenkins. Instead, the SonarQube stage simply provides valuable insights into the codebase, helping the development team address potential issues over time.
SonarQube Integration in the Pipeline
Static Code Analysis: During the SonarQube analysis stage, the pipeline uses SonarQube to scan the codebase, identifying any code issues and providing metrics related to code quality. This analysis assists in identifying areas for improvement but does not enforce a blocking quality gate.
Metrics Collection: SonarQube gathers various metrics such as maintainability, security vulnerabilities, and technical debt, giving the team a deeper understanding of the code's overall health. These metrics are accessible for reference and incremental improvements.
In this setup, SonarQube runs the scan and reports issues without blocking the pipeline based on a quality gate, allowing flexibility while still ensuring a focus on code quality and maintainability.
5. Artifact Management with Nexus
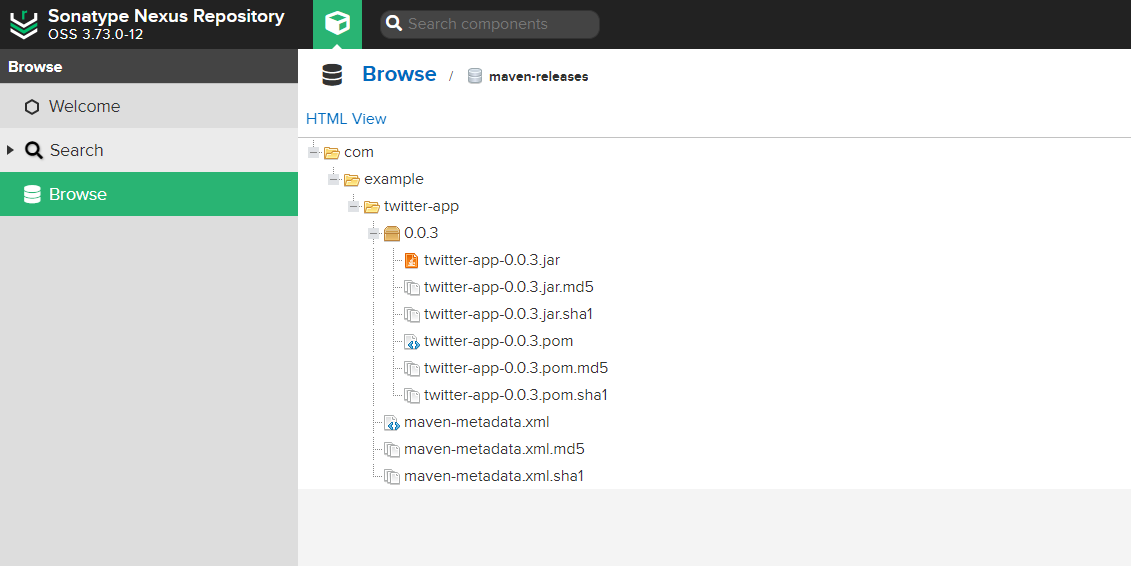
In the DevOps pipeline for the FullStack Blogging application, Nexus serves as the artifact repository, providing a secure and versioned storage solution for build artifacts. This configuration ensures that each artifact is traceable and readily accessible, supporting reliable deployments across different environments.
Nexus Artifact Repository Configuration
Build and Packaging: After successfully running the mvn package stage in Jenkins, the application is packaged as a JAR file, preparing it for storage and later deployment. This step ensures that only successfully built artifacts are promoted to Nexus.
Jenkins and Nexus Integration: Nexus is configured in Jenkins using the Config File Provider plugin, which allows Jenkins to securely access Nexus through a global Maven settings file. This settings file, managed by the plugin, includes the credentials (user ID and password) and links to the Maven snapshot and release repositories in Nexus.
Global Settings File for Maven: Using the Config File Provider plugin, a global Maven settings file was created in Jenkins, linking Nexus as the artifact repository. The pom.xml file is configured with URLs for both the snapshot and release repositories, ensuring Maven can push builds to Nexus based on the release type.
Artifact Upload to Nexus: In the Nexus stage following mvn package, Jenkins automatically uploads the packaged JAR file to Nexus. With the repositories defined in the pom.xml file, artifacts are pushed to the appropriate snapshot or release repository.
Versioning and Storage: Nexus automatically versions each artifact, enabling traceability and providing a reliable source for accessing specific builds. This versioning supports rollbacks or redeployment if necessary.
This Nexus configuration enables the pipeline to manage artifacts efficiently, ensuring a consistent and reliable approach to artifact storage and deployment across environments.
6. Containerization and Image Scanning with Docker and Trivy
Containerization and security are vital stages in the DevOps pipeline for the FullStack Blogging application. Docker is used to package the application into containers, while Trivy ensures that the container images are secure before they are deployed. Together, these tools provide a robust solution for both building and securing the application.
Docker: Building and Pushing the Image
Dockerfile: The Dockerfile defines the application's environment, dependencies, and runtime configuration. It specifies everything needed to build a container image, including the base image, the installation of necessary dependencies, and the application setup. For the FullStack Blogging application, the Dockerfile ensures the Java environment is configured correctly, setting up the necessary tools to run the application in a containerized environment.
Image Build: Jenkins automates the building of the Docker image through a pipeline stage. The Dockerfile is used to create an image that contains all the application’s dependencies and configuration. The image is built with a specific version tag to ensure that each version of the application is traceable and can be easily identified in the registry.
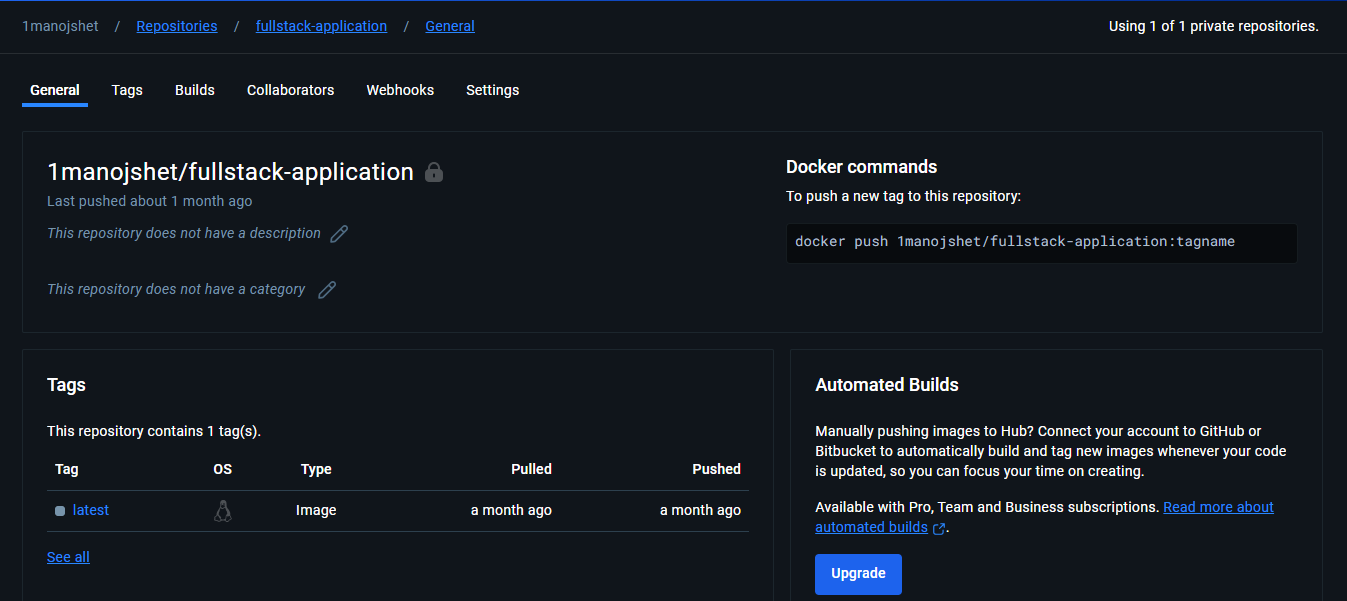
Push to DockerHub: Once the Docker image is successfully built, it is pushed to DockerHub, a popular container registry. DockerHub serves as a centralized location where the image is stored and can be easily accessed for deployment. This step ensures that the image is available for deployment across various environments and that it can be pulled whenever needed, ensuring consistency in deployment across all stages.
Trivy: Security Scanning
Security is a critical aspect of containerized applications. Trivy is integrated into the pipeline to perform security scans on both the filesystem and the Docker image itself, ensuring that any potential vulnerabilities are detected and addressed before deployment.
File System Scan: Trivy first scans the base filesystem for known vulnerabilities. This scan checks the operating system layers of the container image to ensure that no known security issues exist in the base image. It checks for outdated packages, unpatched vulnerabilities, and other security flaws that could compromise the system.
Docker Image Scan: After the Docker image is built, Trivy performs a scan on the image itself, focusing on the application dependencies and libraries included in the container. This scan checks for known vulnerabilities in the software dependencies, ensuring that no insecure libraries or outdated packages are included in the image. This step is crucial for maintaining the security integrity of the application, as it helps identify any issues that might arise from outdated or vulnerable libraries.
By incorporating both the filesystem and image scans, Trivy helps identify potential security risks early in the pipeline, allowing them to be mitigated before deployment. This proactive security approach helps enhance the overall reliability and security of the application, ensuring that only secure images are pushed to production.
7. Deployment on AWS EKS
The final stage of the pipeline involves deploying the FullStack Blogging application to AWS EKS (Elastic Kubernetes Service), a fully managed Kubernetes service that provides the necessary tools to run containerized applications at scale.
AWS EKS Deployment Configuration
Kubernetes Deployment:
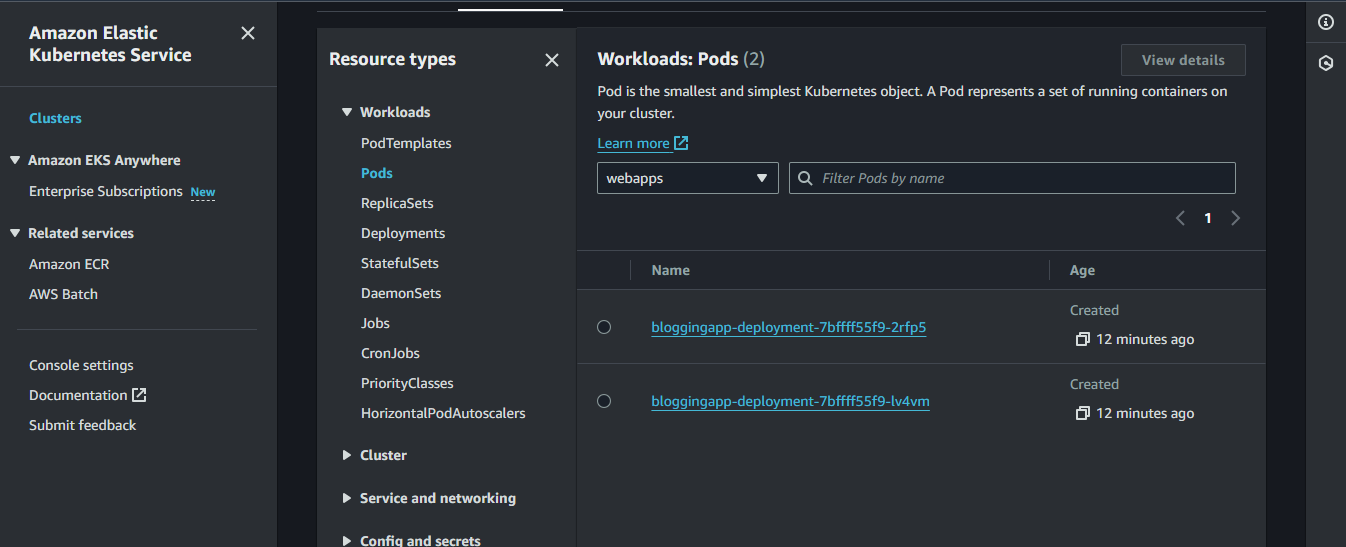
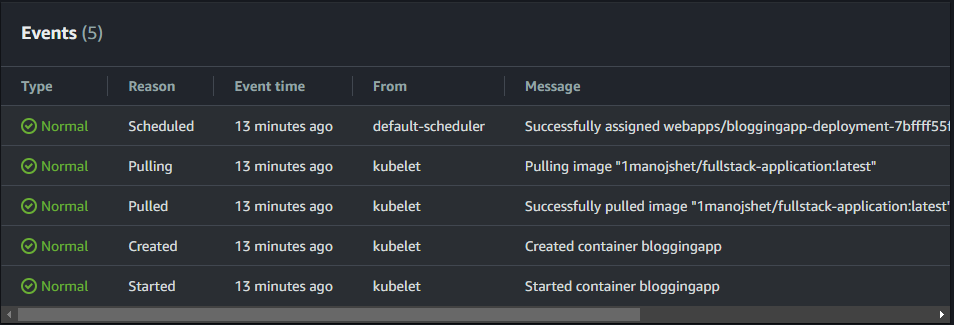
After the Docker image is built and pushed to DockerHub, it is pulled into AWS EKS for deployment. The application’s deployment is managed using a Deployment YAML file, which defines the desired state for the application. This includes the container image, the number of replicas, and the necessary resources (CPU and memory) for each pod.The Deployment YAML ensures that the application is consistently running with the required number of replicas. If a pod fails, Kubernetes automatically replaces it to maintain the desired state.
apiVersion: apps/v1
kind: Deployment
metadata:
  name: bloggingapp-deployment
spec:
  selector:
    matchLabels:
      app: bloggingapp
  replicas: 2
  template:
    metadata:
      labels:
        app: bloggingapp
    spec:
      containers:
        - name: bloggingapp
          image: <dockerhub-userid>/<image_name>:<tag>
          imagePullPolicy: Always
          ports:
            - containerPort: 8080
      imagePullSecrets:
        - name: regcred # Reference to the Docker registry secret
Kubernetes Service:
Alongside the deployment, a Service YAML file is configured to expose the application and route traffic to the correct pods. The Service ensures that the application is accessible from within the Kubernetes cluster or externally, depending on the configuration.The Service YAML defines how the application will be exposed (using ClusterIP, NodePort, or LoadBalancer) and provides load balancing for the application, directing incoming traffic evenly across the available pods.
apiVersion: v1
kind: Service
metadata:
  name: bloggingapp-ssvc
spec:
  selector:
    app: bloggingapp
  ports:
    - protocol: "TCP"
      port: 80
      targetPort: 8080
  type: LoadBalancer
By using Deployment and Service YAML files, the application is successfully deployed and made accessible in the AWS EKS cluster. The Deployment ensures the application is always running with the desired number of replicas, while the Service manages traffic routing and load balancing, providing a stable and reliable environment for the application.

7. Application Deployment and External Access on AWS EKS
The final stage of the pipeline involves deploying the FullStack Blogging application to AWS EKS (Elastic Kubernetes Service), utilizing Kubernetes Deployment and Service configurations. The deployment ensures the application runs smoothly, while the service manages access to the application from both inside and outside the Kubernetes cluster.
Kubernetes Service with Load Balancer for External Access
Kubernetes Service Configuration:
By default, Kubernetes services are assigned an internal IP within the cluster. However, to expose the application to the outside world, the Service YAML file is configured with the type LoadBalancer. This instructs Kubernetes to automatically provision an AWS Load Balancer and assign an external link to the service.Load Balancer Creation:
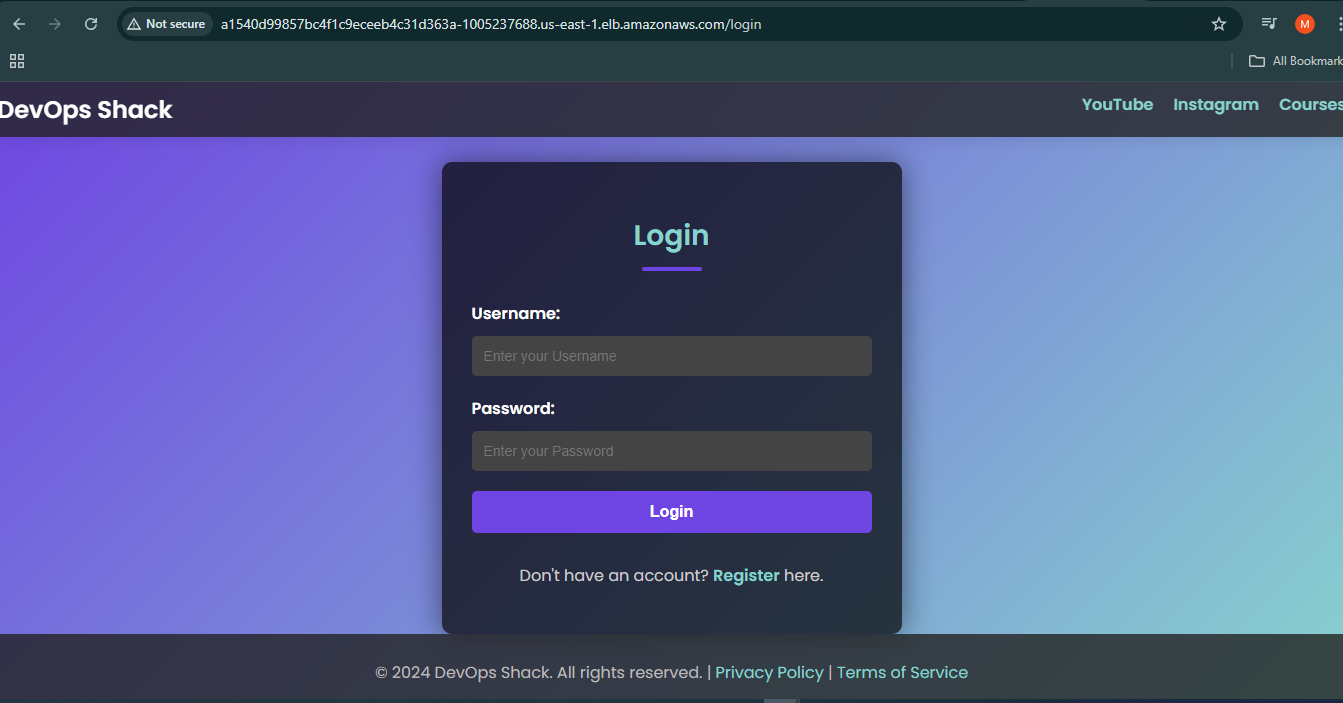
When the Service is set to LoadBalancer, AWS automatically provisions an Elastic Load Balancer (ELB). This load balancer routes incoming traffic to the Kubernetes pods running the application, ensuring high availability and even distribution of traffic across all running instances.Accessing the Application:
After deploying the Service, AWS EKS provides a link (URL) that can be used to access the application externally. This link is associated with the Load Balancer and allows users to reach the application over the internet, making it available to users outside the cluster. The link is the entry point for accessing the application via a web browser or other clients.

8. Conclusion
This DevOps pipeline for the FullStack Blogging application showcases how multiple tools can be seamlessly integrated into a CI/CD workflow to automate and optimize various stages of software delivery. By incorporating industry-standard tools such as Jenkins, Maven, SonarQube, Nexus, Docker, Trivy, and AWS EKS, the pipeline ensures a robust and efficient process from code integration to deployment.
Automating every step, from code commits to testing, artifact management, and deployment, minimizes the need for manual intervention, reducing human error and ensuring consistent results across environments. Code quality is ensured through static analysis with SonarQube, vulnerabilities are identified and mitigated using Trivy, and secure artifact storage is handled by Nexus. Docker enables easy containerization and portability, while AWS EKS provides scalability and high availability for production deployment. These automated steps guarantee rapid, reliable, and consistent releases.
With the integration of these tools, this DevOps pipeline not only streamlines the software delivery process but also ensures that the application is continuously tested, secure, and optimized throughout its lifecycle. By adopting such practices, teams can improve the efficiency of their development workflows, reduce time to market, and significantly enhance the quality and reliability of the applications they deploy.
Whether you're working on a small blogging application or a large, complex microservices architecture, the principles of automation, security, and scalability remain applicable. This guide serves as a practical example of how to structure a DevOps pipeline that can be adapted for a wide range of projects. It is hoped that this insight encourages further exploration of these tools and practices, empowering developers and teams to experiment with and refine their own CI/CD pipelines in their DevOps journey.
A special thanks to Aditya Jaiswal (DevOps Shack) YouTube channel for the guidance provided in the video, which greatly helped in setting up and executing this pipeline. The step-by-step explanations and insights shared in the video were invaluable throughout the process, providing a clear understanding of the tools and techniques used in the pipeline.
Ultimately, the implementation of such a pipeline not only improves operational efficiency but also helps foster a culture of continuous improvement, where each deployment cycle brings the opportunity for learning, optimization, and growth. With this foundation, your journey toward mastering DevOps practices can become smoother, with an increased focus on innovation and delivering high-quality software at speed.
Subscribe to my newsletter
Read articles from Manoj Shet directly inside your inbox. Subscribe to the newsletter, and don't miss out.
Written by
