Beginner's Introduction to Go
 Patrick Sungkharisma
Table of contents
Go, often referred to as Golang, has rapidly gained popularity among developers and organizations worldwide these days. Its simplicity, efficiency, and concurrency have made it popular among individual developers and companies alike. Companies like Google, Uber, Twitch, and many other big companies have also adopted Go into their codebase. Already installed Go and want to start learning? Here are some quick introductions to get you started!
Basic Syntax
Let's start by discussing the learning curve of Go. Many developers, including myself, find Go to be a relatively easy language to pick up. To illustrate its simplicity, let's examine some of its syntax. We will have a quick run-through on some of Go’s most used syntax.
Initializing Variables and Constants
There are some ways how to initialize a variable in Go. Here are some of them.
  // option 1
  newVariable := "Hello World"

  // option 2
  var newInt int = 5

  // option 3
  var (
      newString string = "example"
      newBool bool = true
      newInt64 int64
  )
You might wonder what the
:=symbol means. Actually in Go, you can use:=to initialize a variable. The code will automatically detect what data type it is. If you want to manually declare the data type, you can use the syntax shown in options 2 and 3. If you have multiple variables, you can use option 3 instead to avoid writingvarover and over again.You can also initialize with a zero value, as shown in option 3. If you initialize with a zero value, the variable will be filled with a default value from Go. This default value depends on the data type. For numbers like integers and floats, it will be 0. For strings, it will be an empty string. For booleans, it will be false.
Other than variables, you can also declare a constant in Go. The main difference between
varandconstis in their mutability. You can change the value ofvarlater, but you can’t change the value ofconstlater. This is how you declare a constant.const ( myFirstConst = "hello world" )Making a Function
This is how you make a function in Go. The basic syntax is:
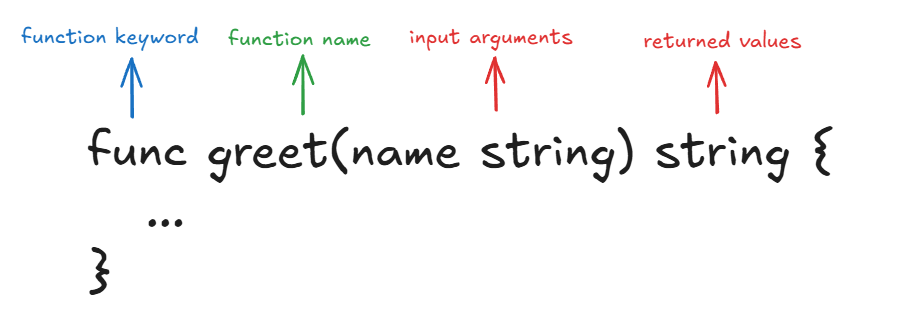
This is the example code:
  package main
  import "fmt"

  func greet(name string) string {
      return "Hi, " + name + "!"
  }

  func main() {
      result := greet("Patrick")
      fmt.Println(result)
  }

  /*
      Hi, Patrick!
  */
Please note that we can have multiple returned values. We also can name each of the returned values, just like in input arguments. To call the function, you just need to do this.
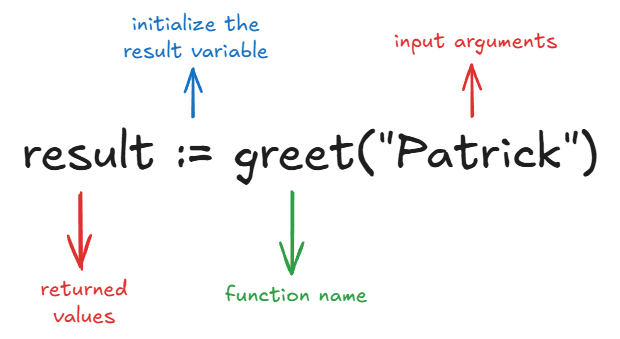
As you may know, you may be familiar with something called private and public functions from other programming languages. In Go, we only rely on the function names to determine this. Public functions start with a capital letter and are accessible from other packages. Private functions, on the other hand, start with a lowercase letter and are accessible only within the same package.
  package main
  import "fmt"

  func privateFunction() {
      fmt.Println("This is a private function")
  }

  func PublicFunction() {
      fmt.Println("This is a public function")
  }

  func main() {
      privateFunction()
      PublicFunction()
  }

  /*
      This is a private function
      This is a public function
  */
Data Structure
There are 4 main built-in data structures in Go, they are arrays, slices, maps, and structs. We will do a quick overview of all of them.
Array
Array, like in most other programming languages, is a collection of elements with the same data type. In Go, arrays have fixed size. Arrays are mainly used when you need fixed-size collections of elements. This is the breakdown of the array syntax:
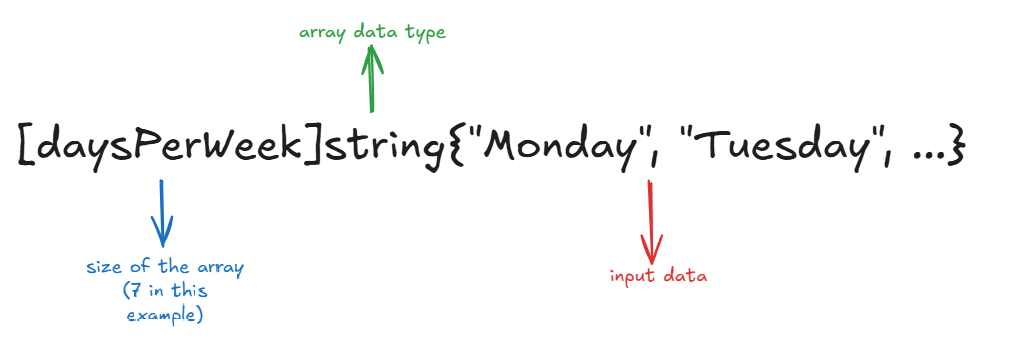
This is an example of an array data structure.
  package main
  import "fmt"

  const (
      daysPerWeek = 7
  )

  func main() {
      dayNames := [daysPerWeek]string{"Monday", "Tuesday", "Wednesday", "Thursday", "Friday", "Saturday", "Sunday"}

      for _, dayName := range dayNames {
          fmt.Println("Today is ", dayName)
      }
  }

  /*
      Today is Monday
      Today is Tuesday
      Today is Wednesday
      Today is Thursday
      Today is Friday
      Today is Saturday
      Today is Sunday
  */
In Go, to assign values to a data structure, usually we use
{}. For arrays, we can use all various data types available to Go such as string, int64, bool, etc.Slice
Slices in Go are similar to arrays, but with dynamic sizing. Generally, slices are used more often than arrays due to their flexibility. You can use slices rather than arrays when you don't need precise memory control. Slice syntax is similar to an array. Let’s have a look.
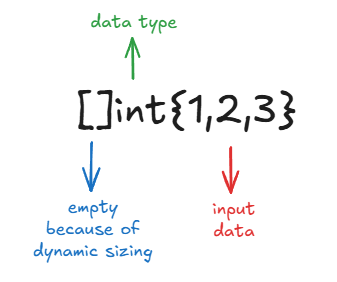
Here's an example of how to use a slice.
  package main
  import "fmt"

  func main() {
      sliceOfNumbers := []int{1,2,3}
      fmt.Println(sliceOfNumbers)

      sliceOfNumbers = append(sliceOfNumbers, []int{4,5}...)
      fmt.Println(sliceOfNumbers)

      sliceOfNumbers = append(sliceOfNumbers, 6)
      fmt.Println(sliceOfNumbers)
  }

  /*
      [1 2 3]
      [1 2 3 4 5]
      [1 2 3 4 5 6]
  */
It is similar to an array, right? Notice that the
[]here is empty. This is because slices have dynamic sizing.In slices, you can append new values into it by using the
appendsyntax. Append takes 2 arguments, the first one is the slice that you want to append, and the second one is the value that you want to append. You can append a single value or another slice here. If you want to append another slice, please make sure that both slices have the same data type.Map
Map stores a key-value data pair into the data structure. The advantage of a map is that we can get, insert, and delete the key in O(1) time complexity on an average case. When we want to use a map, make sure to initialize the map first. This is important when you don’t want to directly assign a value to the map right away. There are 2 main ways to initialize a map:
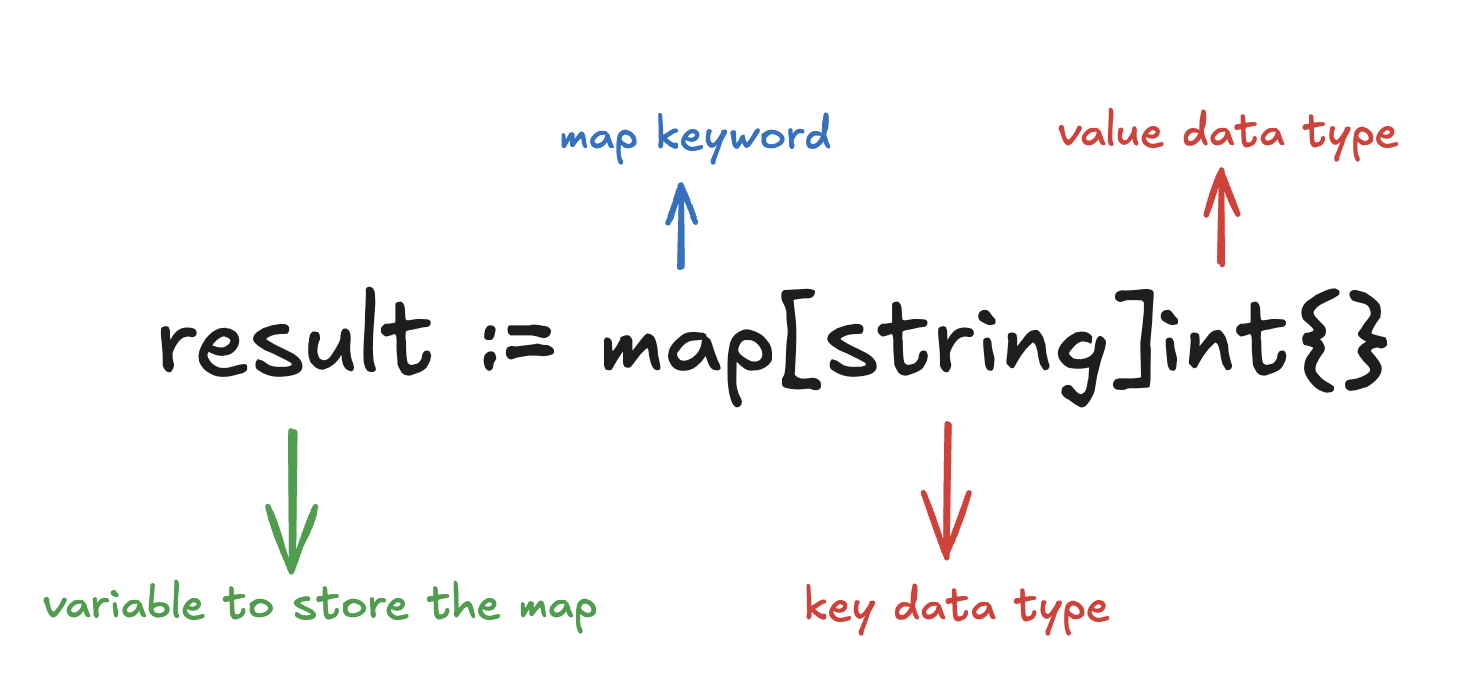
The first one is using our usual method to initialize a variable by using an empty
{}syntax.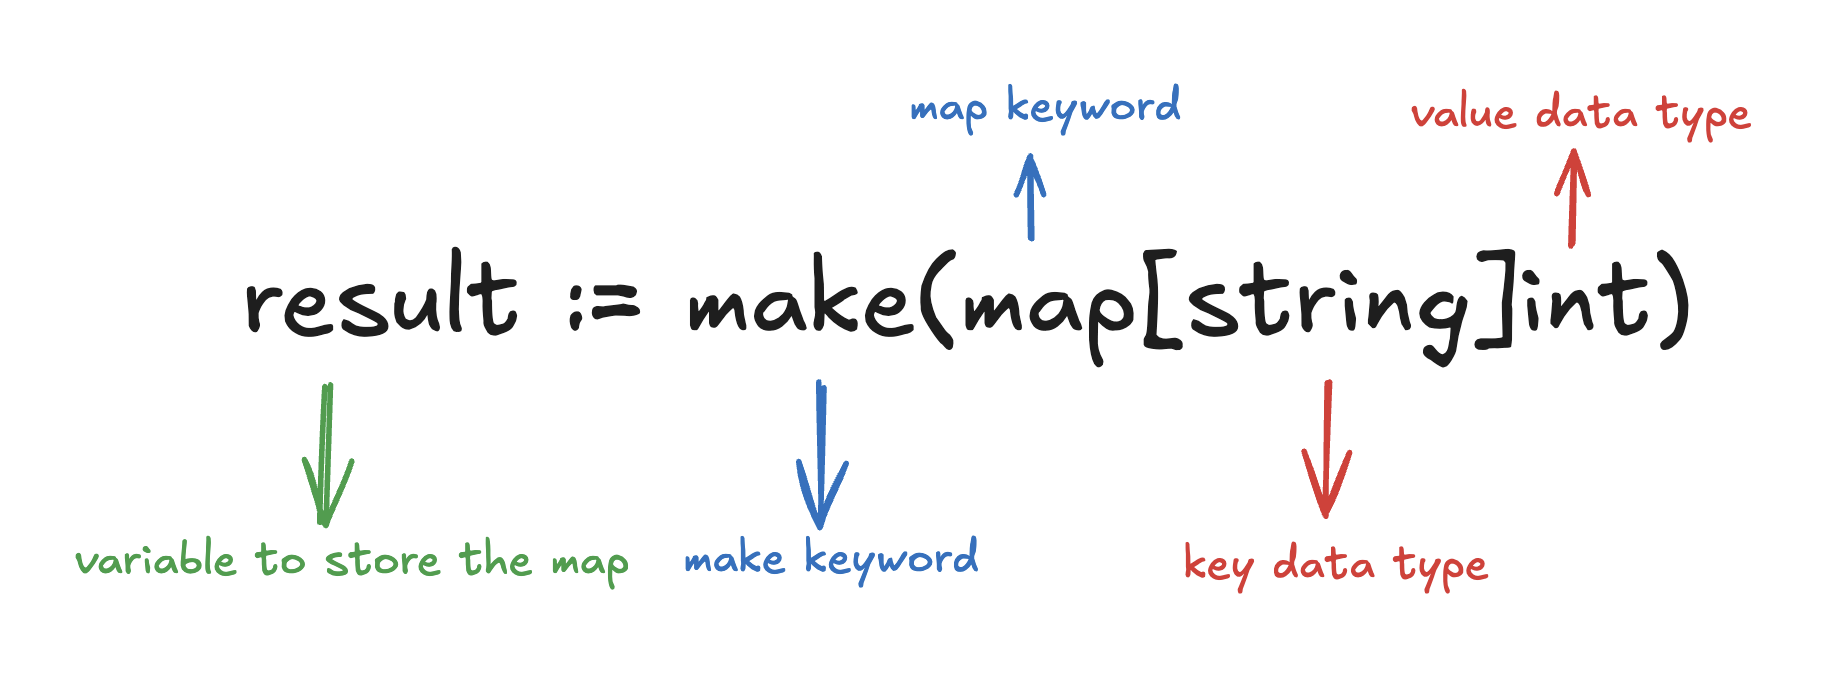
The second approach is by using the
make()keyword. We can also use themake()syntax to initialize other data structures such as slices. If we don’t initialize the map before usage, it will produce a runtime error. This is because we are trying to assign values to aNULL(nilin Go) map. So before assigning values, make sure to initialize it first! Let’s take a look at some examples of how to use a map in Go.package main import "fmt" func main() { romanNumber := map[string]int{ "I": 1, "V": 5, "X": 10, "L": 50, "C": 100, "D": 500, "M": 1000, } fmt.Println(romanNumber) } /* map[C:100 D:500 I:1 L:50 M:1000 V:5 X:10] */This example assigns map values directly, similar to how we do with previous data structure examples. The key differences between maps and slices, besides their structure, lie in how they store data. Notice that when we print the map data, the order is randomized and not properly structured like slices or arrays. This is expected behavior because maps store values using a hash function for efficient key-value retrieval.
  package main
  import "fmt"

  func main() {
      input := "please count the alphabet count of this string"
      alphabetMap := make(map[rune]int)

      for _, alphabet := range input {
          if alphabet == ' ' {
              continue
          }
          alphabetMap[alphabet]++
      }

      for alphabet, count := range alphabetMap {
          fmt.Printf("%c: %d\n", alphabet, count)
      }
  }

  /*
      p: 2
      s: 3
      o: 3
      u: 2
      h: 3
      g: 1
      e: 4
      t: 6
      b: 1
      f: 1
      i: 2
      r: 1
      l: 2
      a: 3
      c: 2
      n: 3
  */
This is the example of initializing a map first and then assigning the values later.
runeis a data type in go to handle a character.Other than inserting and retrieving key-value pairs, you can also delete key-value pairs from maps. This is how to delete a key in Go.
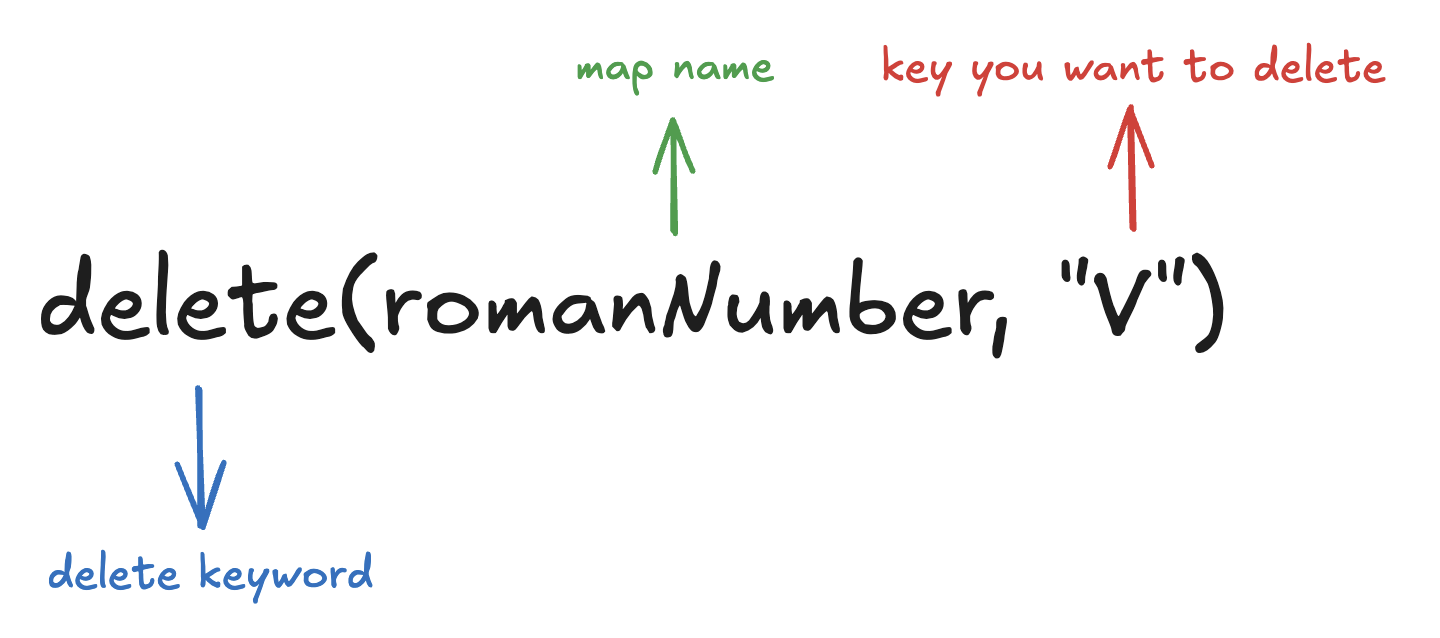
Struct
The last built-in data structure in Go is struct. Because Go is not a strictly object-oriented language, it doesn’t have complete OOP(Object Oriented Programming) features like C or Java does. Instead, Go has something called struct. We can treat struct as an object in Go. Here is how you declare a struct.
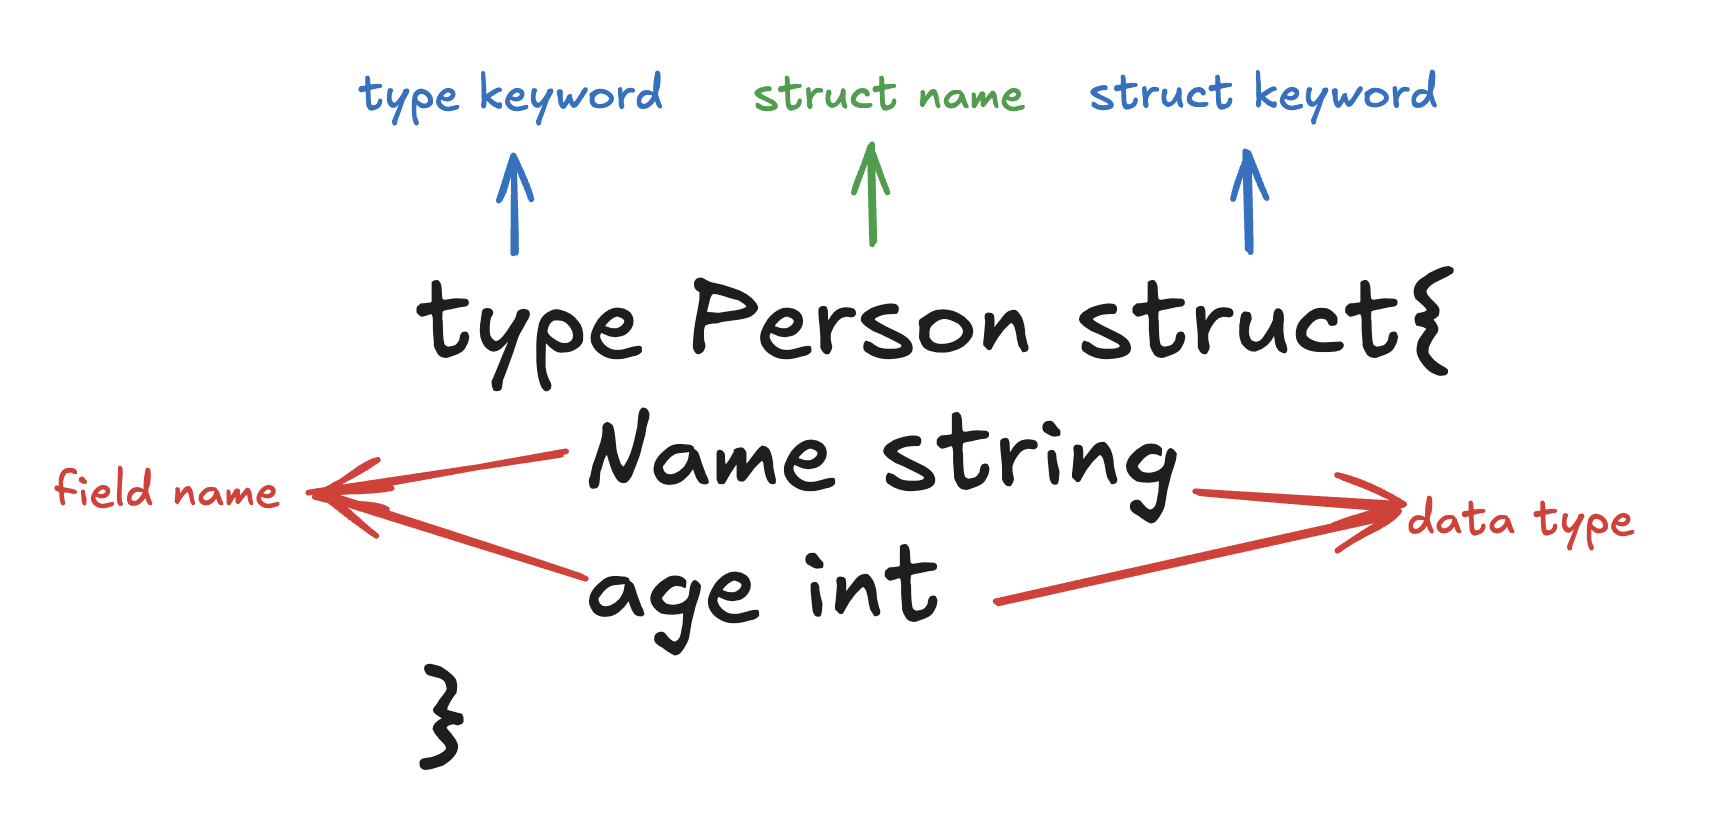
Inside a struct, we can define various fields with different data types as shown above. Did you notice that the
Namefield starts with an uppercase letter, whileagestarts with a lowercase letter? Yes, public and private rule also applies to struct fields. In fact, this public and private rule applies to all variables in Go. Note that the struct name itself must start with an uppercase letter.How do we use a struct? Let’s take a look at the example below.
  package main
  import "fmt"

  type Person struct {
      Name string
      Age  int
  }

  func main() {
      person1 := Person{
          Name: "Patrick",
          Age:  25,
      }

      person2 := Person{
          Name: "Sungkharisma",
          Age:  25,
      }

      fmt.Println("This is person 1: ", person1)
      fmt.Println("This is person 2: ", person2)
  }

  /*
      This is person 1:  {Patrick 25}
      This is person 2:  {Sungkharisma 25}
  */
As we can see, we can initialize a struct and define the value inside it just like how we create a new object.
Control Flow: Conditionals and Loops
Let’s take a look at this Go code.
  package main
  import "fmt"

  func main() {
      for i := 1; i <= 5; i ++ {
          if i % 2 == 0 {
              fmt.Println("this is an even number: ", i)
          } else {
              fmt.Println("this is an odd number: ", i)
          }
      }
  }

  /*
      this is an odd number:  1
      this is an even number:  2
      this is an odd number:  3
      this is an even number:  4
      this is an odd number:  5
  */
We are going to break down the code step-by-step. First, we are going to see the
forloop used in the code. This is the syntax breakdown: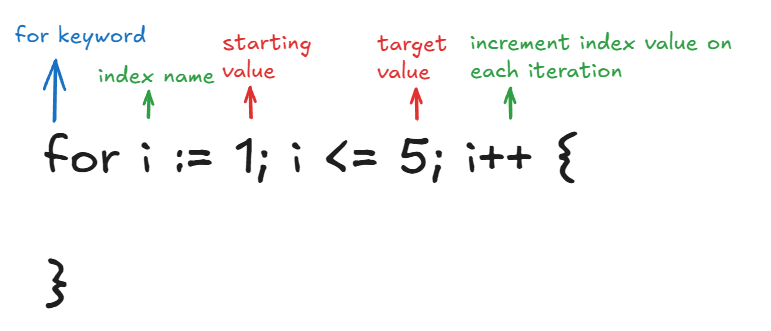
This is not the only way on how to use
for. Let’s take a look at another way to use theforkeyword with the same logic.package main import "fmt" func main() { i := 1 for i <= 5 { if i%2 == 0 { fmt.Println("this is an even number: ", i) } else { fmt.Println("this is an odd number: ", i) } i++ } } /* this is an odd number: 1 this is an even number: 2 this is an odd number: 3 this is an even number: 4 this is an odd number: 5 */In this example,
foris used like awhileloop in other languages. Go doesn't have awhilekeyword for loops.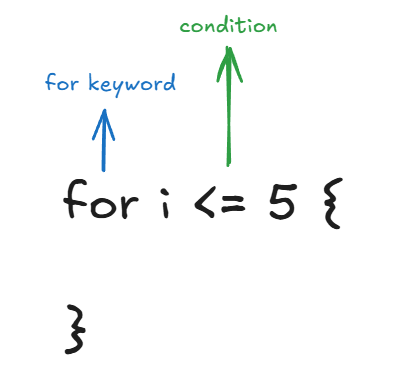
Other than that, we have 1 more example for looping in Go. This is how we use it.
  package main
  import "fmt"

  func main() {
      numbers := []int{1, 2, 3, 4, 5}

      for _, number := range numbers {
          if number%2 == 0 {
              fmt.Println("this is an even number: ", number)
          } else {
              fmt.Println("this is an odd number: ", number)
          }
      }
  }

  /*
      this is an odd number:  1
      this is an even number:  2
      this is an odd number:  3
      this is an even number:  4
      this is an odd number:  5
  */
This is the breakdown of the syntax.
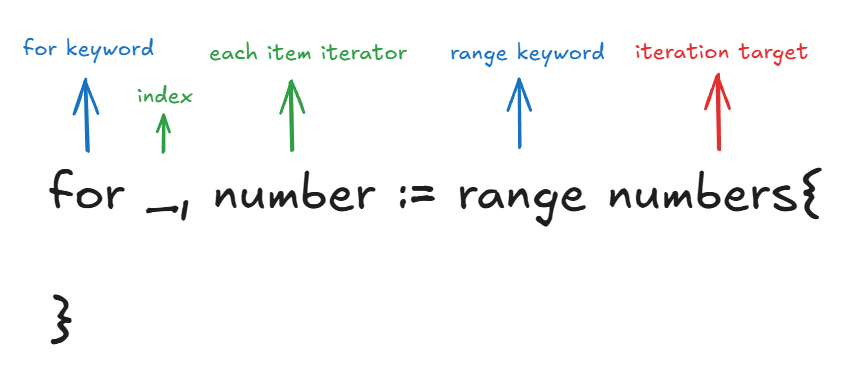
If you are iterating something like an array or a slice, it is better to use this
forsyntax. Note that we can use the_symbol if we don’t want to use that variable. In this example, the index is omitted because we are not going to use it in the code.Now, let's move on to conditional statements. We've used the
ifkeyword in the example above, but, Go also supports switch-case. We are going to look at theifsyntax first.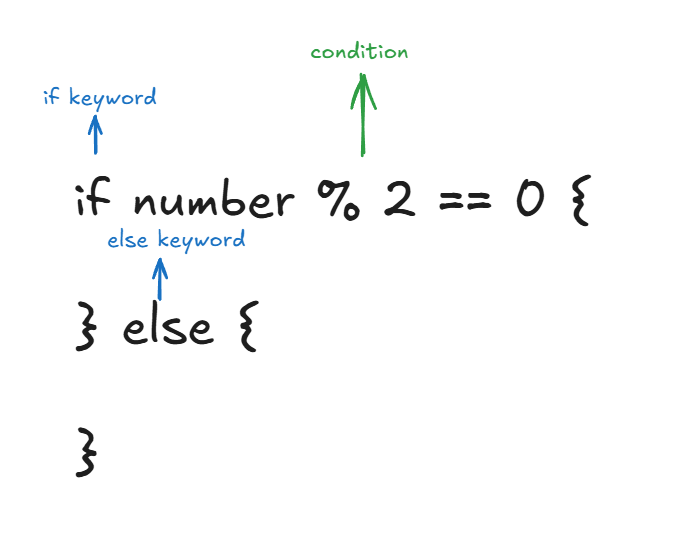
The
ifsyntax is pretty straightforward. We can use if, else if, and else here just like how we use it in other programming languages.You can also use a
switchstatement if you prefer. We have a standard switch-case syntax in Go, withswitch,case, anddefaultkeyword. Here is an example ofswitchsyntax in Go.package main import "fmt" func main() { fruit := "apple" switch fruit { case "apple": fmt.Println("Apple is a fruit") case "banana": fmt.Println("Banana is a fruit") case "orange": fmt.Println("Orange is a fruit") default: fmt.Println("Unknown fruit") } } /* Apple is a fruit */
Standard Libraries
Go has many built-in packages or standard libraries that we can use to solve our day-to-day problems. Here are some examples of built-in packages that we are going to use when we code in Go.
fmt
fmtstands for format package in Go. In my personal experience, this library is very good for debugging our code. However, it is not solely used for debugging, we can also use it for formatting strings.package main import "fmt" func main() { result := 0 for i := 1; i <= 3; i++ { result += i * i fmt.Printf("This is the current result: %d\n", result) } } /* This is the current result: 1 This is the current result: 5 This is the current result: 14 */In this example, we're using the
fmtpackage to debug the result of each loop iteration. Have you noticed the difference between thefmt.Println()syntax that we used in previous examples and thefmt.Printf()syntax in this example? Yes, we can use format specifiers like%d,%v,%s, and many more to specify data types. Did you also notice another difference? Correct,fmt.Println()automatically adds a newline to its output, whilefmt.Printf()doesn't.package main import "fmt" func main() { input := 123.456789 formattedString := fmt.Sprintf("The formatted value of input is %.2f", input) fmt.Println(formattedString) }This is the next use case of the
fmtpackage. You can format a string using thefmt.Sprintf()syntax. By using the%.2fformat, we can change the input into 2 decimal places. Now, try changing the format to%.3f. What is the expected outcome?There are also other use cases such as formatted input by using
fmt.Scan()and error handling usingfmt.Errorf(). You can explore more about them if you are interested.strings
String manipulation is one of the most common tasks we encounter daily. Luckily, Go provides a very good package called
stringsto assist us. This library helps us with string search, comparison, modification, and conversion. We will go through some examples.Split
  package main

  import (
      "fmt"
      "strings"
  )

  func main() {
      inputString := "this,string,is,separated,by,comma"
      splitInputString := strings.Split(inputString, ",")
      fmt.Println(splitInputString)
  }

  /*
      [this string is separated by comma]
  */
This function splits the string using a
,delimiter. The result is a slice where each index contains a split word.Contains
  package main

  import (
      "fmt"
      "strings"
  )

  func main() {
      inputString := "my name is patrick and i am learning go"
      result := strings.Contains(inputString, "patrick")
      fmt.Println(result)
  }

  /*
      true
  */
This function will check if a string contains a specific word.
ToLower and ToUpper
  package main

  import (
      "fmt"
      "strings"
  )

  func main() {
      inputString := "ThIS sTring NEedS to BE FiXeD"

      allLowercase := strings.ToLower(inputString)
      fmt.Println(allLowercase)

      allUppercase := strings.ToUpper(inputString)
      fmt.Println(allUppercase)
  }

  /*
      this string needs to be fixed
      THIS STRING NEEDS TO BE FIXED
  */
The third code changes the string to uppercase and lowercase.
Replace
  package main

  import (
      "fmt"
      "strings"
  )

  func main() {
      inputString := "the string is wrong wrong wrong"

      result := strings.Replace(inputString, "wrong", "right", 2)
      fmt.Println(result)
  }

  /*
      the string is right right wrong
  */
The last example will replace the target word with the desired word. This function can even specify the number of words to be replaced. There are many other uses for this library, you can explore them further later!
strconv
This library allows you to convert strings to numbers and numbers to strings. Let's take a closer look.
  package main
  import (
      "fmt"
      "strconv"
  )

  func main() {
      input := "12"

      stringToIntResult, err := strconv.ParseInt(input, 10, 64)
      if err != nil {
          fmt.Println("not valid!")
      }

      fmt.Println(stringToIntResult)
  }

  /*
      12
  */
This example converts a string called “12“ to an integer with value 12. Notice that it also returns an error variable. This is because, when we enter the input, it is not guaranteed to be a valid number to parse right? We can do some logging and return an error if the parsing fails. This is the code example for an invalid input.
  package main

  import (
      "fmt"
      "strconv"
  )

  func main() {
      input := "abc"

      stringToIntResult, err := strconv.ParseInt(input, 10, 64)
      if err != nil {
          fmt.Println("not valid!")
      }

      fmt.Println(stringToIntResult)
  }

  /*
      not valid!
      0
  */
time
For time-based code logic, we can use the built-in
timepackage. For example, if we need to fill thecreated_atorupdated_atvalue in our database, we can use thetimepackage! Here's an example of how to use thetimepackage to get the current time:package main import ( "fmt" "time" ) func main() { // base format currentTime := time.Now() fmt.Println(currentTime) // RFC3339 format formattedTime := currentTime.Format(time.RFC3339) fmt.Println(formattedTime) // custom format format := "2 January 2006 15:04:05" customFormatTime := currentTime.Format(format) fmt.Println(customFormatTime) } /* 2009-11-10 23:00:00 +0000 UTC m=+0.000000001 2009-11-10T23:00:00Z 10 November 2009 23:00:00 */The base syntax is
time.Now(). However, you can also format the time using built-in formats like RFC3339 or create your own custom format, as shown in the example code.You can also create a custom date by using this code:
  package main

  import (
      "fmt"
      "time"
  )

  func main() {
      customTime := time.Date(2024, 11, 13, 12, 30, 0, 0, time.UTC)
      fmt.Println(customTime)

      location, _ := time.LoadLocation("Asia/Jakarta")
      customTime = customTime.In(location)
      fmt.Println(customTime)
  }

  /*
      2024-11-13 12:30:00 +0000 UTC
      2024-11-13 19:30:00 +0700 WIB
  */
In the code, we created a custom time with UTC timezone. We can also load a timezone from a location such as
Asia/Jakartawhich is UTC +7.Other than creating date and time, we can also use the
timepackage for counting duration in seconds, milliseconds, or any other time units. Here are some examples:package main import ( "fmt" "time" ) func main() { customTime := time.Date(2024, 11, 13, 12, 30, 0, 0, time.UTC) fmt.Println(customTime) addDuration := time.Duration(24 * time.Hour) newCustomTime := customTime.Add(addDuration) fmt.Println(newCustomTime) timeDifferences := newCustomTime.Sub(customTime) fmt.Println(timeDifferences) } /* 2024-11-13 12:30:00 +0000 UTC 2024-11-14 12:30:00 +0000 UTC 24h0m0s */Here, we create a custom time and add a defined duration of 1 day, or 24 hours. As the output shows, the date changes from 13 to 14. The
newCustomTime.Sub()method subtractscustomTimefromnewCustomTime. As expected, the result is 24 hours, matching ouraddDurationvalue.net/http
We can use this package to make HTTP connections in Go. Here's a basic example.
  package main

  import (
      "fmt"
      "net/http"
  )

  func handler(w http.ResponseWriter, r *http.Request) {
      _, err := fmt.Fprintf(w, "this is a basic HTTP server")
      if err != nil {
          return
      }
  }

  func main() {
      http.HandleFunc("/", handler)
      fmt.Println("Server is listening on port 8080...")
      err := http.ListenAndServe(":8080", nil)
      if err != nil {
          fmt.Println("server error: ", err)
      }
  }

  /*
      Server is listening on port 8080...
  */
This basic code creates an HTTP server on port 8080. If we open
localhost:8080/on a web browser, we'll see this result.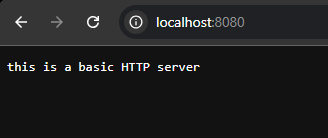
As shown in the image above, our HTTP server is now up and running. This is a basic example of creating an HTTP server. While we can use the built-in package, you can also use frameworks like Gin to build HTTP servers.
Other useful packages
Go also offers many other useful built-in packages, including
context,log,sync,encoding/json,os,math,crypto, and more.
Concurrency
Next, we are going to take a look at one of Go’s core features, concurrency. So, what is so special about concurrency?
Concurrency is basically executing multiple tasks simultaneously. Go use goroutines and channels to achieve this. Since this is an introductory article, we won’t deep dive into concurrency just yet.
We will quickly discuss what a goroutine is. Goroutine is a lightweight thread managed by the Go runtime. Here are the characteristics of a goroutine.
Lightweight: Goroutines consume a lot less memory than traditional threads.
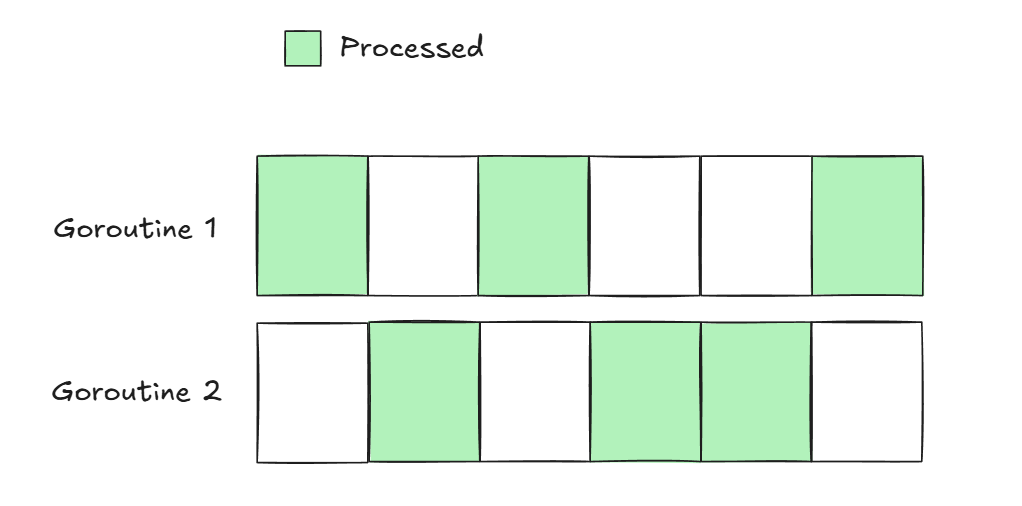
Efficient: Goroutines are managed by the Go runtime. When a goroutine is blocked, the Go runtime can switch to another ready goroutine for processing. So even if we are using single core machine, it can still run concurrently. Please note that the core concept of goroutines is concurrency, not parallelism. But, if we are using multiple cores machine and the resources are available, it can be parallel. You can see the simplified illustration of goroutine scheduling in the picture below.
Simple: Goroutines are very simple to use. We just need to add
gosyntax in front of a function name, or we can just do it with an inner functiongo func() {}. Let’s hop in to see the code example!First, we have 2 functions as follows:
  // function 1
  for i := 1; i <= 10; i = i+2 {
      fmt.Println("[function1] this is an odd number: ", i)
      time.Sleep(10 * time.Millisecond)
  }
// function 2 for i := 2; i <= 10; i = i+2 { fmt.Println("[function2] this is an even number: ", i) time.Sleep(10 * time.Millisecond) }Function 1 will print odd numbers, and function 2 will print even numbers. Each function will wait 10 milliseconds on each iteration. If we perform these tasks sequentially, we must wait for function 1 to complete before continuing to function 2. However, if we use goroutines, while one function is paused during its 10-millisecond wait, the Go runtime scheduler can allocate time to the other function.
Let’s see the code to make a goroutine.
  go func() {
      for i := 1; i <= 10; i = i+2 {
          fmt.Println("[function1] this is an odd number: ", i)
          time.Sleep(10 * time.Millisecond)
      }
  }()
We are using
gosyntax to initialize a goroutine. We can usego func()syntax to make an inner function, or we can also usegofollowed by a function name that we have defined beforehand.This is the full code combined between function 1 and function 2.
package main import ( "fmt" "sync" "time" ) func main() { var wg sync.WaitGroup fmt.Println("start!") wg.Add(1) go func() { defer wg.Done() for i := 1; i <= 10; i = i + 2 { fmt.Println("[function1] this is an odd number: ", i) time.Sleep(10 * time.Millisecond) } }() wg.Add(1) go func() { defer wg.Done() for i := 2; i <= 10; i = i + 2 { fmt.Println("[function2] this is an even number: ", i) time.Sleep(10 * time.Millisecond) } }() wg.Wait() fmt.Println("done!") return } /* start! [function2] this is an even number: 2 [function1] this is an odd number: 1 [function1] this is an odd number: 3 [function2] this is an even number: 4 [function2] this is an even number: 6 [function1] this is an odd number: 5 [function1] this is an odd number: 7 [function2] this is an even number: 8 [function2] this is an even number: 10 [function1] this is an odd number: 9 done! */sync.WaitGroupis a synchronization primitive in Go that allows you to wait for a group of goroutines to finish their execution before continuing with the main code.wg.Add(1)increments the WaitGroup's counter, signaling the start of a new goroutine.wg.Done()decrements the counter, indicating that a goroutine has completed its task. To signal completion, we callwg.Done()within the goroutine function. Usingdefer()ensures thatwg.Done()is executed when the surrounding code block finishes.wg.Wait()blocks the code flow until all goroutines have finished and the counter reaches zero.
At the output results, we can see that the result alternates between function 1 and function 2. However, there are some cases when function 1 is called twice before function 2, or vice versa. This is completely normal, as we can’t predict the exact order of goroutine execution. It is purely managed by the Go runtime scheduler.
On the example above, goroutines utilize the sync package for synchronization primitives like WaitGroup. In addition to the WaitGroup syntax, other functions such as sync.Mutex() are commonly used for concurrency control in Go. So make sure to look into these later!
Conclusion
That concludes our beginner introduction to Go! I hope that this introduction article helps you to learn some basic syntax of Go, some standard libraries of Go, and one of Go’s core features which is concurrency. What I recommend to you after reading this article, is to learn about these few things:
Try to take a look at Go’s official documentation.
Deepen your Go concepts such as how to use interfaces and pointers, learn advanced concurrency concepts such as using channels and mutexes, and try out other standard libraries that you can see in this documentation!
Try to take a look at Go’s web development framework such as Gin.
Try learning how to connect your application with resources such as databases or caches.
You can also look into other useful Go learning resources such as A Tour of Go or Go by Example.
You may start to take a look at Go’s repository code structure. You can try and find a popular Go starter template like this. I use my own Go template using a clean architecture approach that you can see here!
Just jump in and improvise! Start doing your own projects or tackle the tasks given to you. Over time, you'll slowly learn more and more about Go.
Once again thank you for reading and I hope you gain something new by reading this article!
Subscribe to my newsletter
Read articles from Patrick Sungkharisma directly inside your inbox. Subscribe to the newsletter, and don't miss out.
Written by
