Understanding Kubernetes
 Shah Abul Kalam A K
What is Kubernetes ? (or K8s for short)
Definition
Before diving into the definition, let's take a moment to appreciate the weird name "Kubernetes." It comes from the Greek word "κυβερνήτης" (kubernētēs), meaning helmsman or pilot - the one who steers the ship.
So, what ship are we referring to? Containerized applications. Kubernetes is the captain 🧑✈️ guiding or orchestrating them in the world of infrastructure.
It is technically an open source container orchestration tool developed by Google. 🌐
It helps you manage containerized applications in different deployment environments like physical, virtual, or cloud. ☁️
Why we need it?
Rise of Microservices - The move to microservices architecture has increased the use of container technologies, so we need Kubernetes to orchestrate and manage these containers.
Features of Kubernetes
High Availability and Zero Downtime ⏱️
Seamless Scalability and High Performance 🚀
Robust Disaster Recovery with Backup and Restore 🔄
Kubernetes Main Components
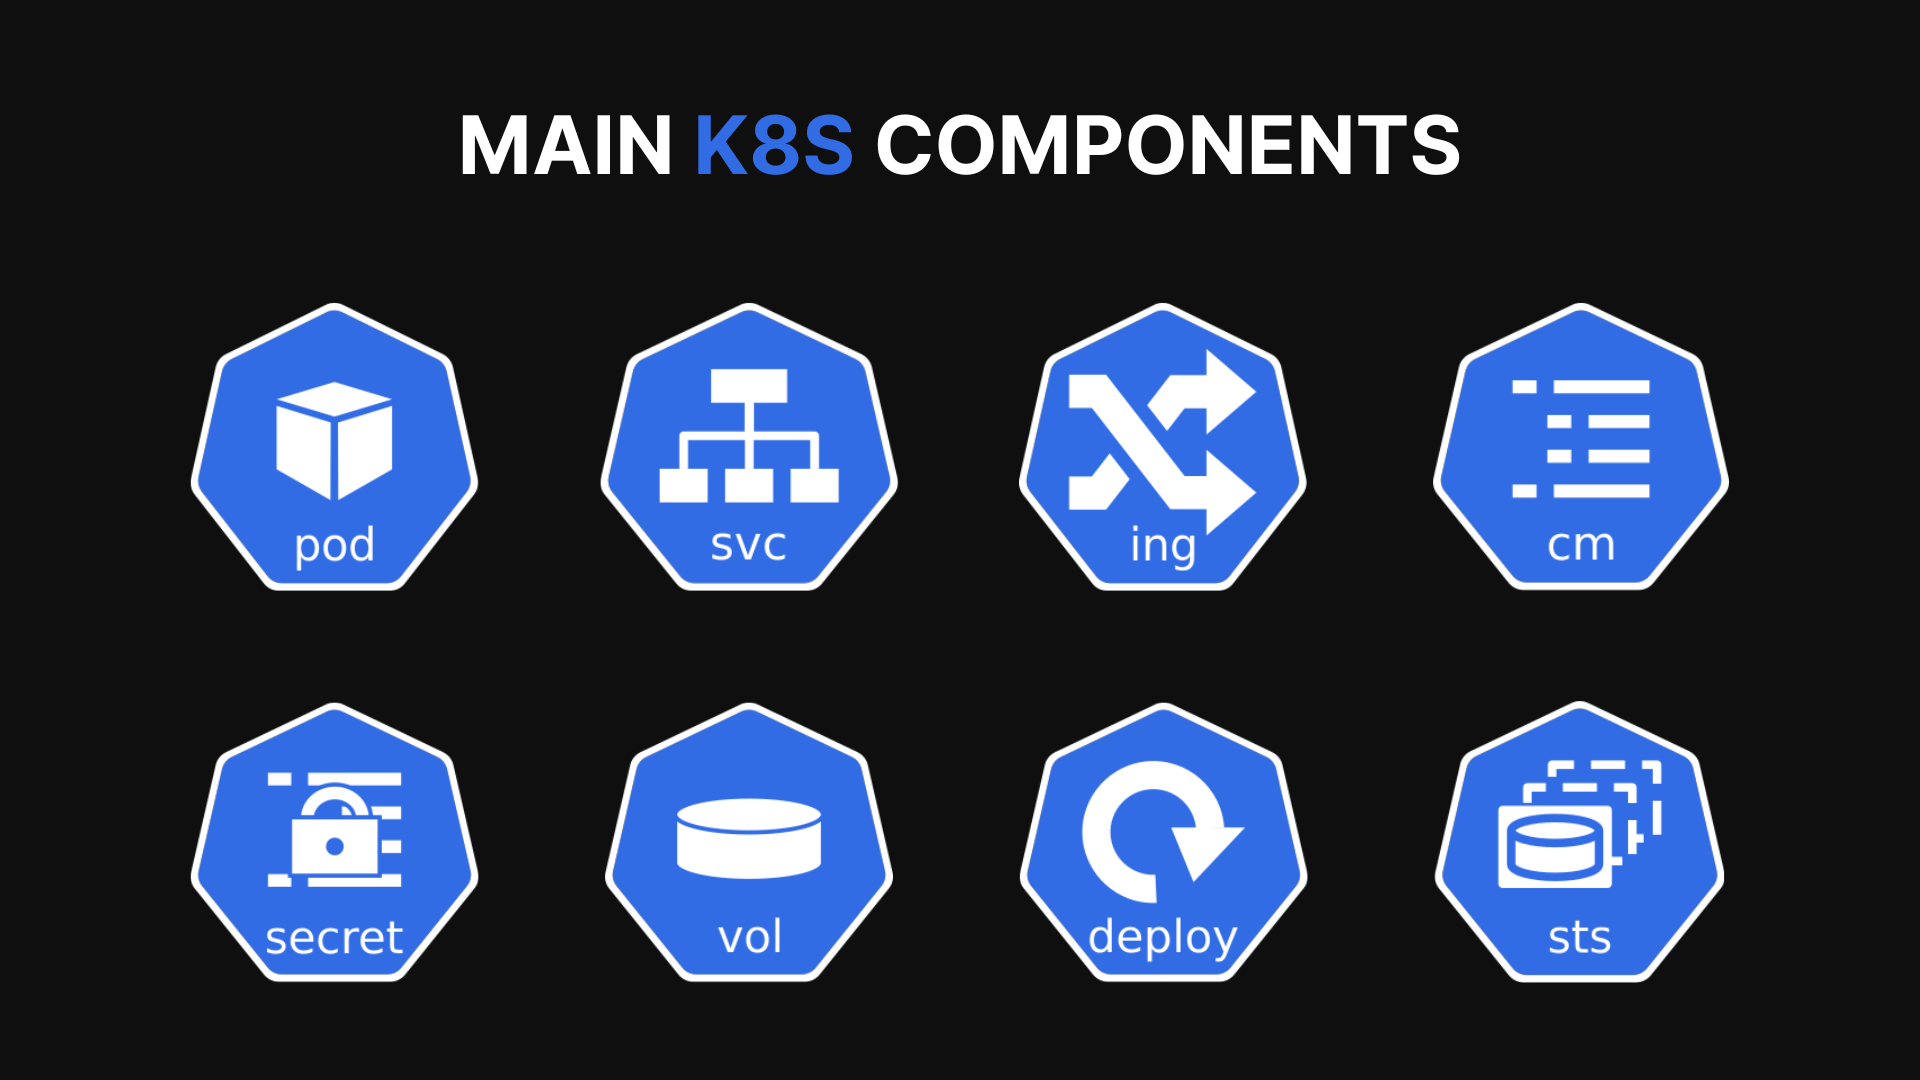
Pod
Consists of multiple containers with one of the container being the main application.
It is an abstraction over container.
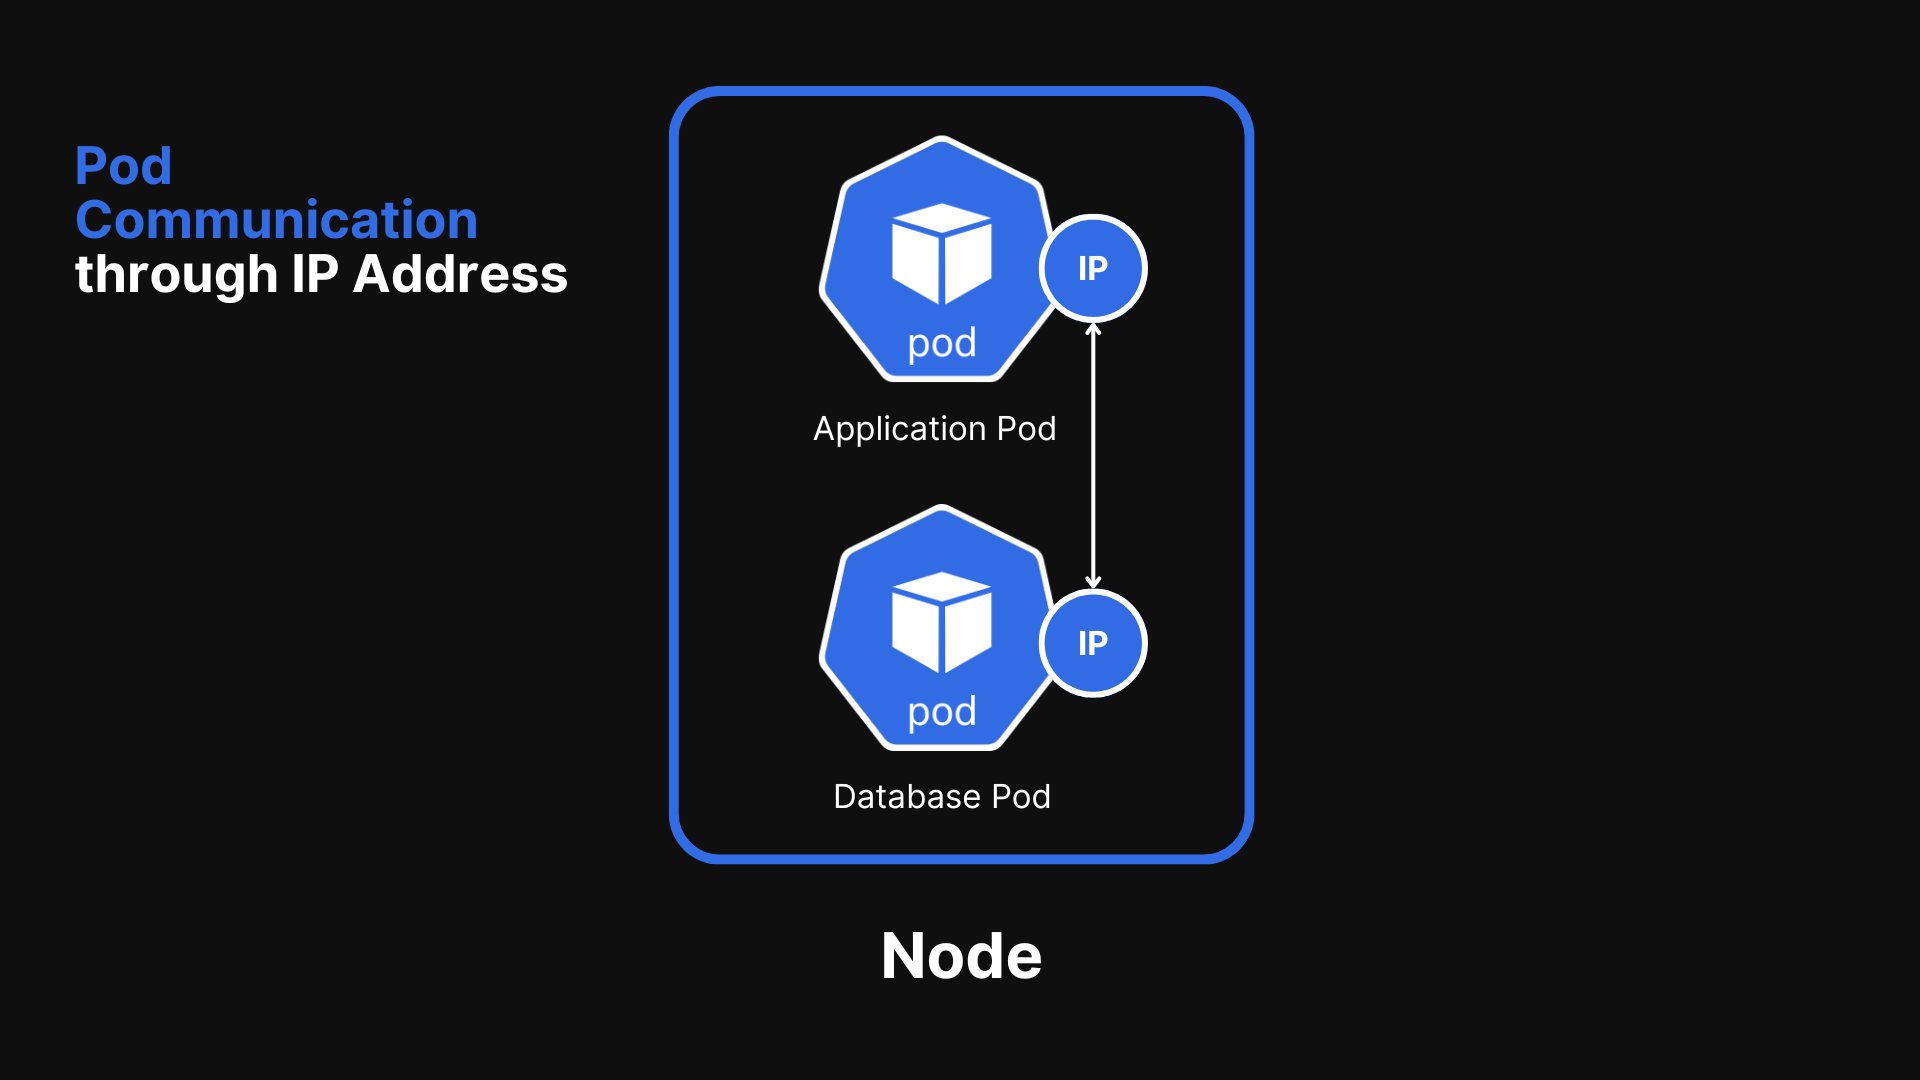
Pods communicate with each other using IP address but pods can die easily, so pods automatically replace themselves with different IP address, each pod gets it’s own IP address. Changing the IP addresses every time creates a tedious job, to counter this, we use service & Ingress.
Service
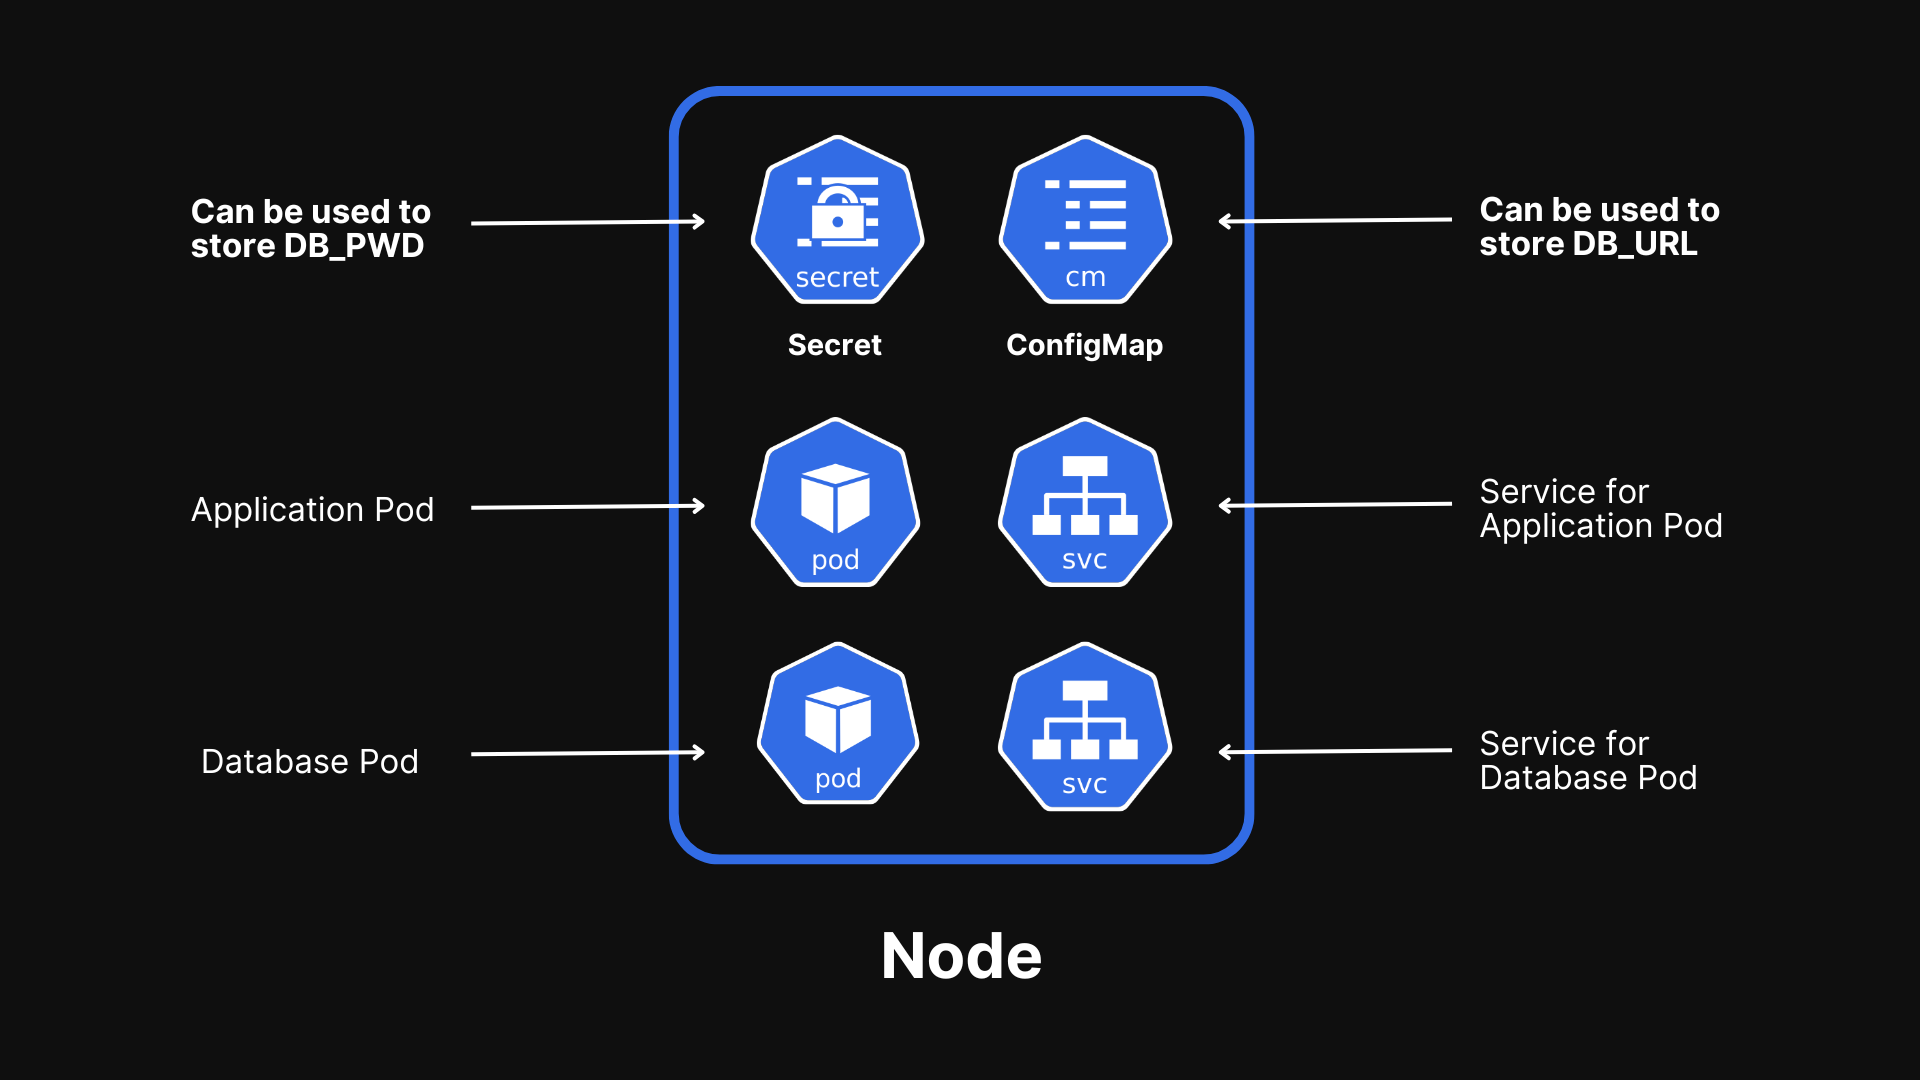
Each pod gets a ‘service‘ that has a permanent IP address, so if the pod dies, we don’t have to worry about the communication between pods.
Service has 2 functionalities
- Permanent address of pods
- Load balancing ⚖️
Example to open the service on browser
http://124.89.101.2:8080Where
124.89.101.2is the Node address &8080is the port number of the pod.btw, this is an external service, exposing a service externally like this is typically only recommended for development or testing purposes and not for production.
Fundamentally there are two types of Services
Internal Service - Which are used to communicate within the Kubernetes cluster and among the pods.
External Service - Used for testing purposes, the URL is exposed and can be accessed through a browser.
Ingress
Kubernetes Ingress is an API object that manages external access to services within the K8s cluster, typically HTTP to HTTPS. 🌐 It provides a way to expose services to the outside world, route requests based on defined rules, and enable features like load balancing ⚖️, SSL termination 🔒, and path-based routing. 🛤️
ConfigMap
External configuration of the application like DB_URL or any environment variables. It is a key-value store used to store configuration data separately from application code.
Keeps these settings separate from your app's code, so you can change them anytime without needing to rebuild or restart your app.
Note - Do not put credentials into ConfigMap 🚫🔑
Secret
It is like a ConfigMap but designed specifically for storing sensitive data, such as passwords, API keys, or tokens that should be base64 encoded. 🔐 It keeps this information safe by encoding it and restricting access, so your app can use it securely.
⚠️This built-in security mechanism is not enabled by default.
Volume
Just like with Docker containers, if you restart them, the data is lost, and similarly, the pods lose data too. To counter this, we use Kubernetes Volume.
A volume allows data to persist. It can come from different sources, like the host machine, cloud storage, or network drives, and is shared across containers in a pod.
⚠️K8 doesn’t manage data in the cluster.
Deployment
K8 creates cluster replications in case one node or cluster dies the service, which acts as a load-balancer starts up the least busiest node to take it’s place.
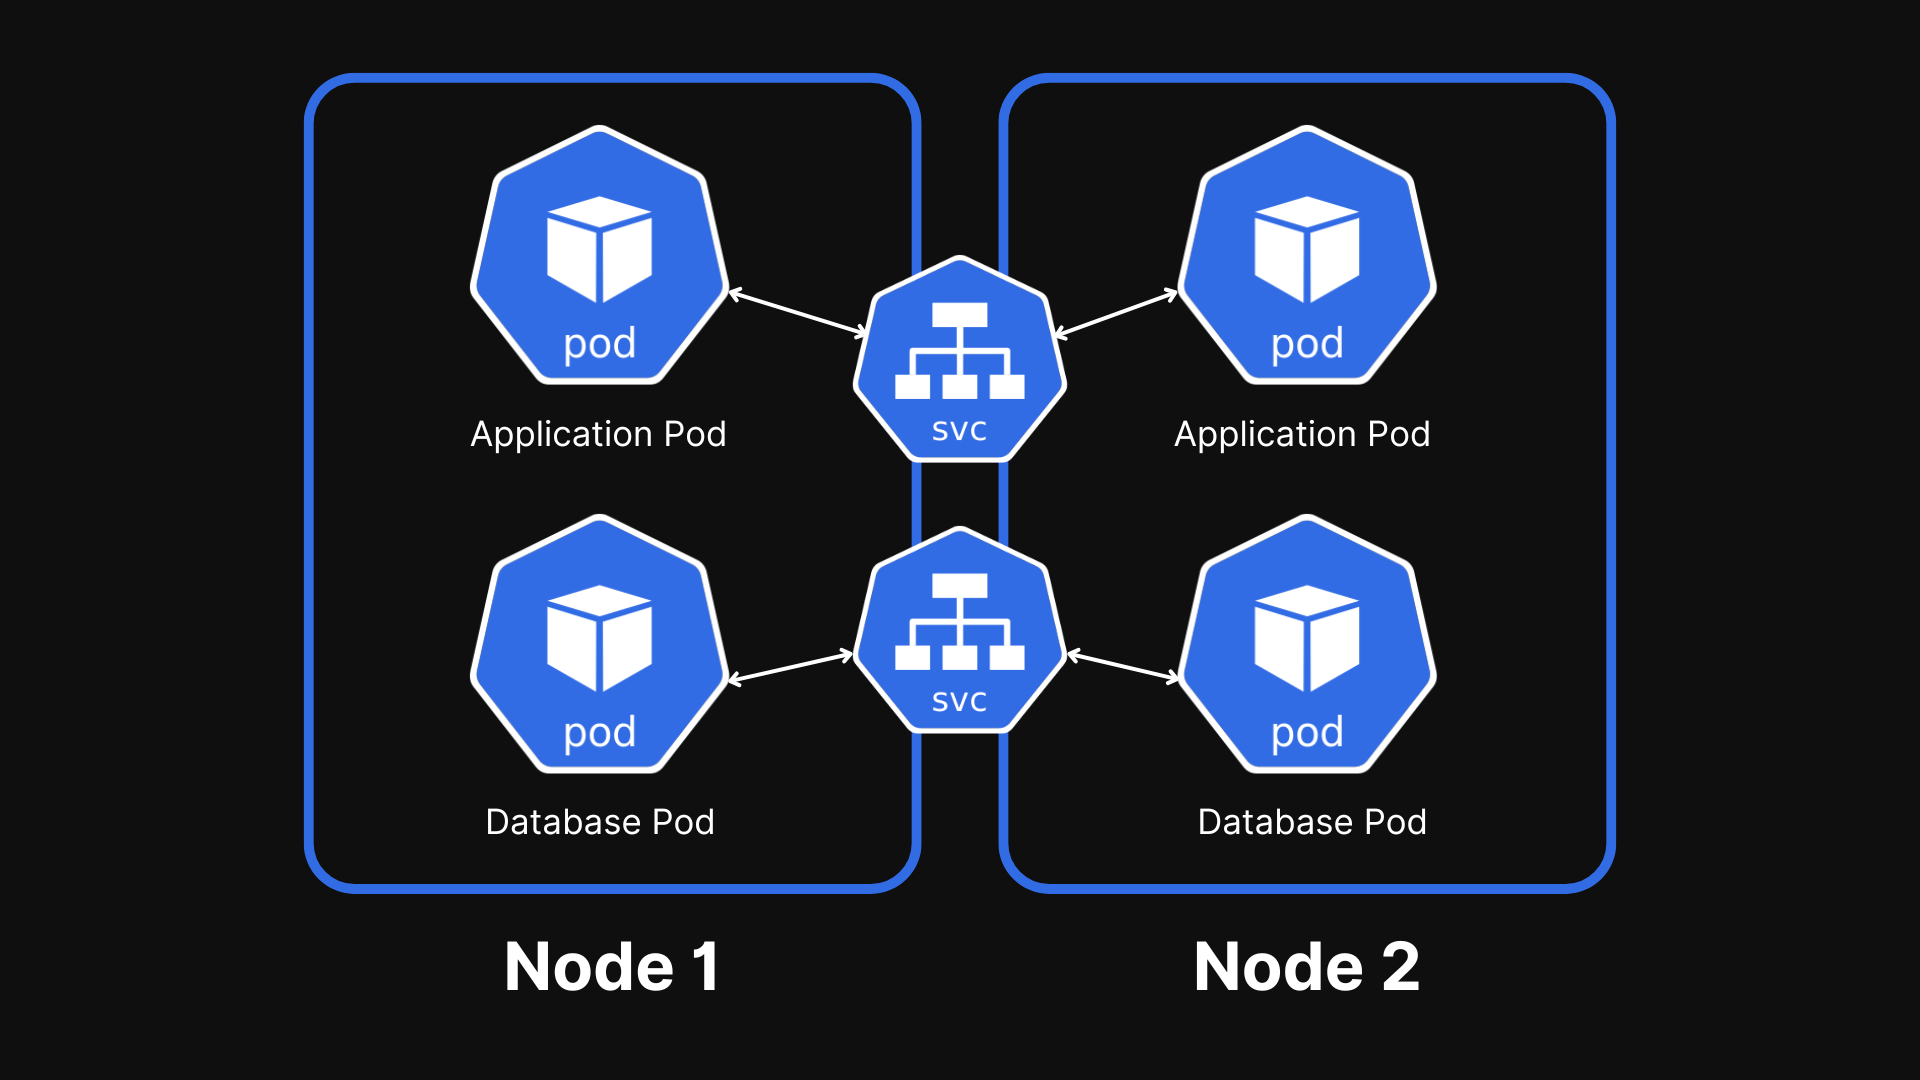
In order to create those replicated nodes, we need to define them. So, we use “Deployments“ a blueprint for your pods.
You can scale up / scale down the number of pod replications.
In practice you would mostly work with Deployments not pods.
DB’s can’t be replicated via deployment
Statefulset
This is designed to maintain the state of individual pods across restarts, providing persistent storage among multiple DB pods. 💾
Deployment for State LESS apps like a normal web application 🌐
Statefulset for State FULL apps like Databases 🗄️
Deploying the Statefulset is very tedious work, so basically, most people host the DB outside of the K8 cluster.
Overview of Main components of K8
Pod - Abstraction of Containers
Service - Communication between Pods
Ingress - Route traffic into cluster
ConfigMap & Secret - External configuration
Volume - Data persistence
Deployment - Pod Blueprints with replicating mechanism for normal use case.
Statefulset - A pod blueprint for applications handling databases.
With these components, we can build a pretty powerful Kubernetes Cluster.
Kubernetes Architecture
There are two types of nodes Kubernetes operates on,
Slave / Worker Node 🛠️
Master Node 🧠
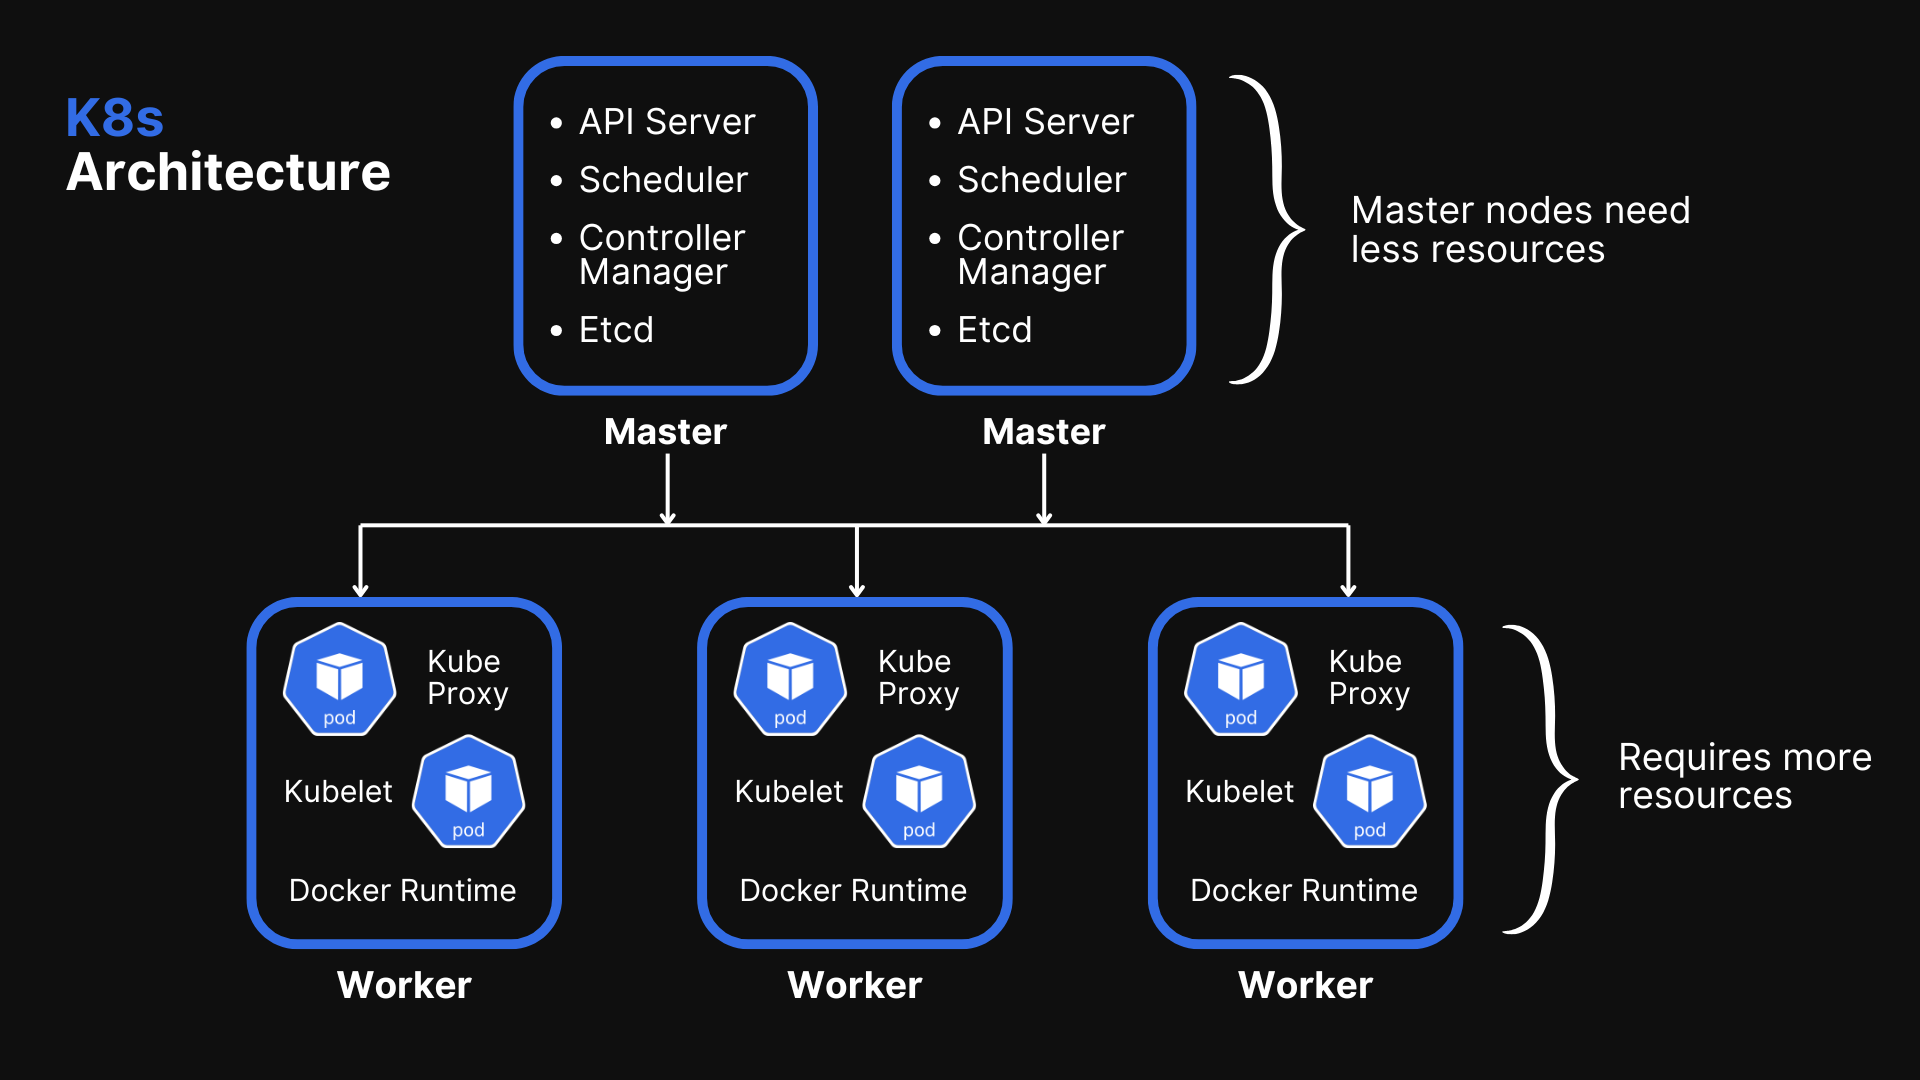
Worker Node ⚒️
Each node has multiple pods in it.
Worker nodes do the actual work
3 Processes must be installed on every node.
Container runtime / Docker
Kubelet - Interacts with both, the container & node. Kubelet also starts the pod with the container inside.
Kube Proxy - Forwards requests of services
So how do you interact with this cluster? How to schedule pod, monitor, restart, join a new node?
Answer - All these managing processes is done by Master Node.
Master Node 🧠
4 Processes must run on every master node.
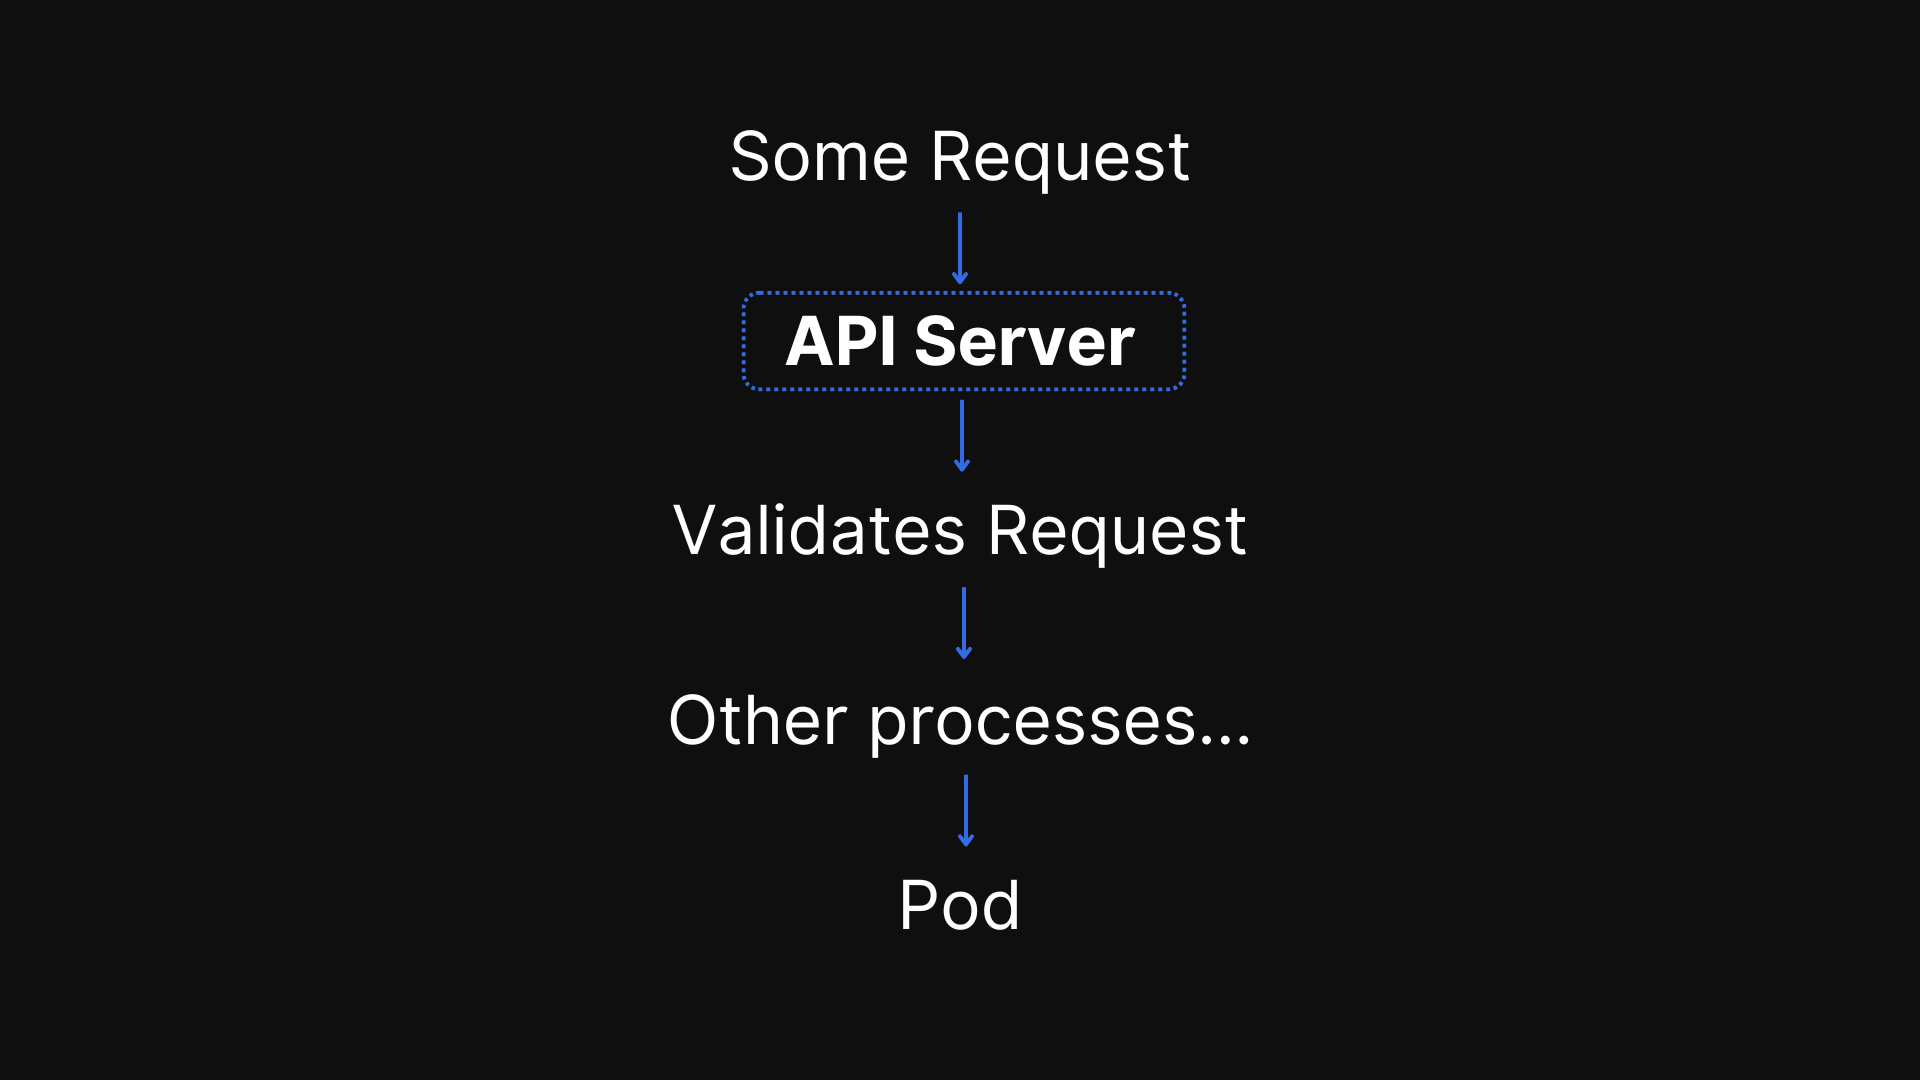
API Server - can be used to interact with the client (K8 dashboard, Kubelet, K8 API) It is a cluster gateway, also acts as a gatekeeper for authentication.
You can also make an update or query through API Server.
It is an only entry point to the cluster.
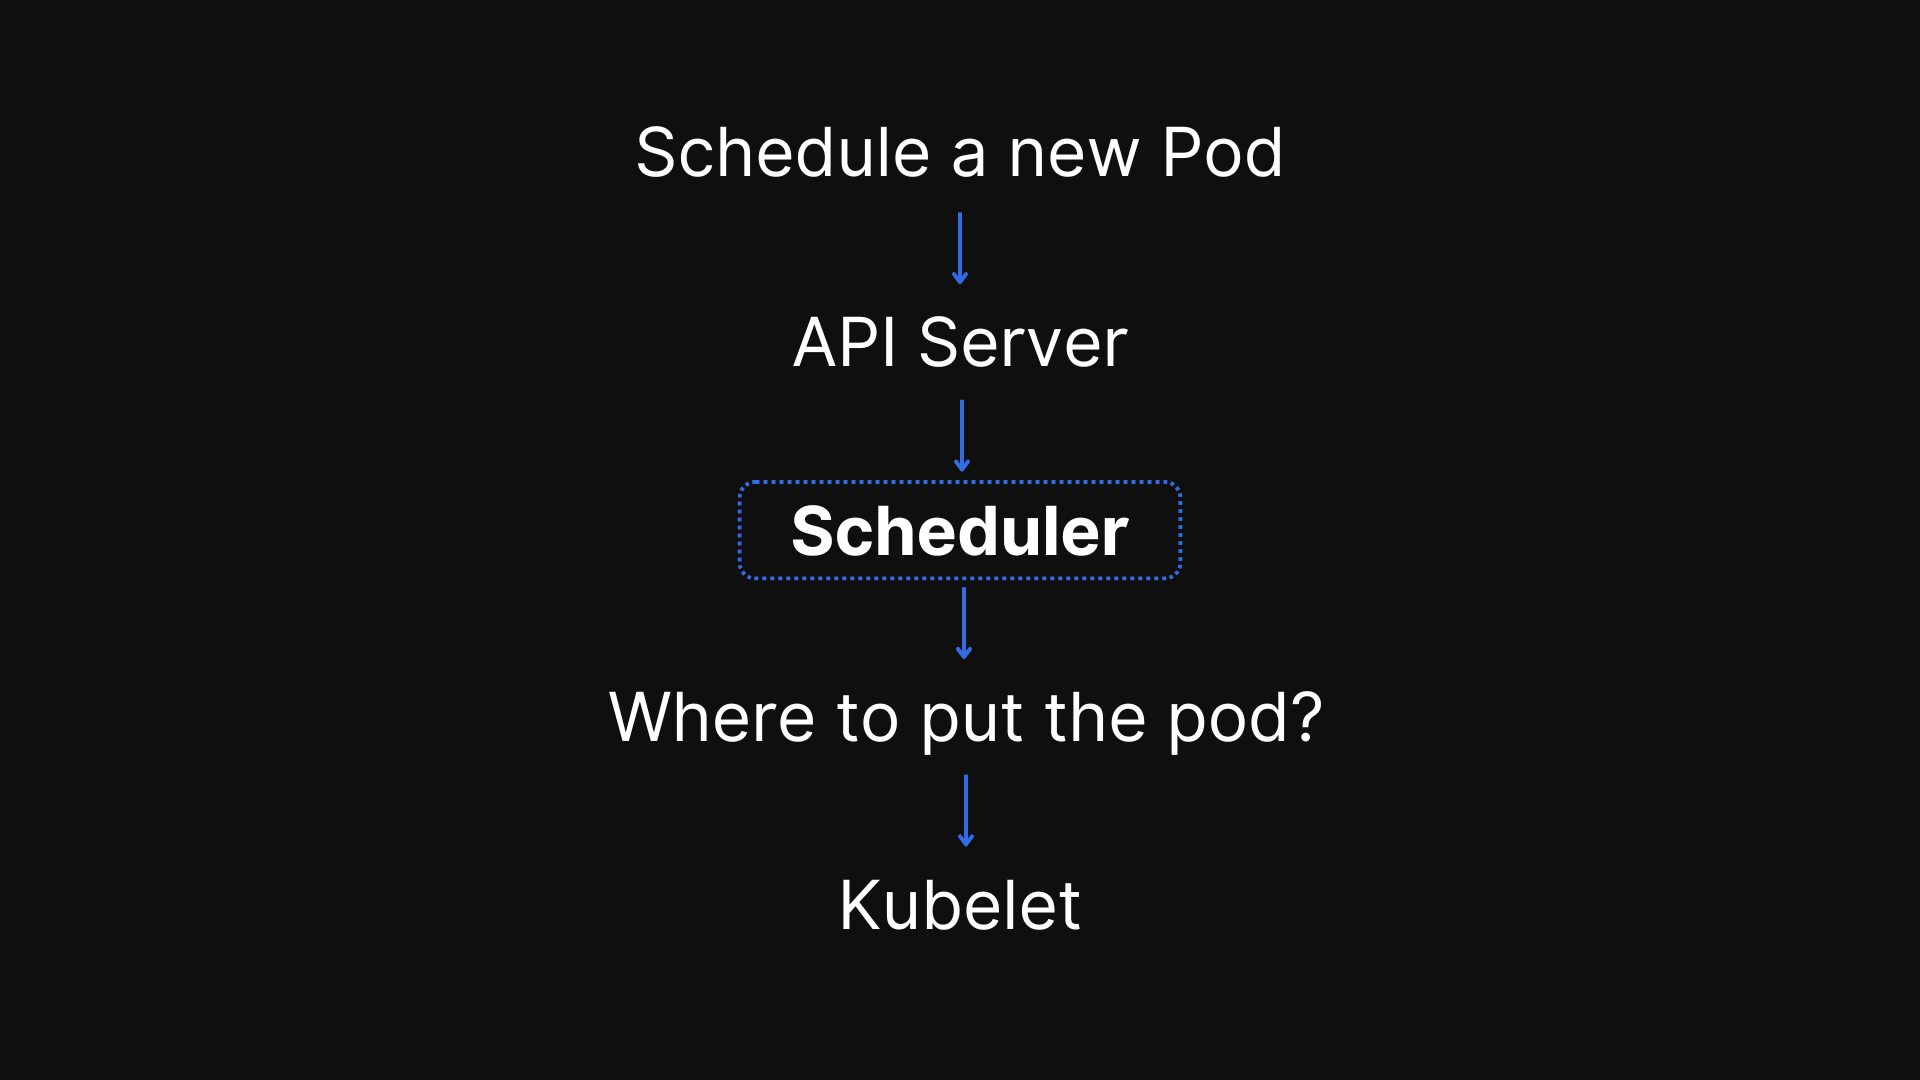
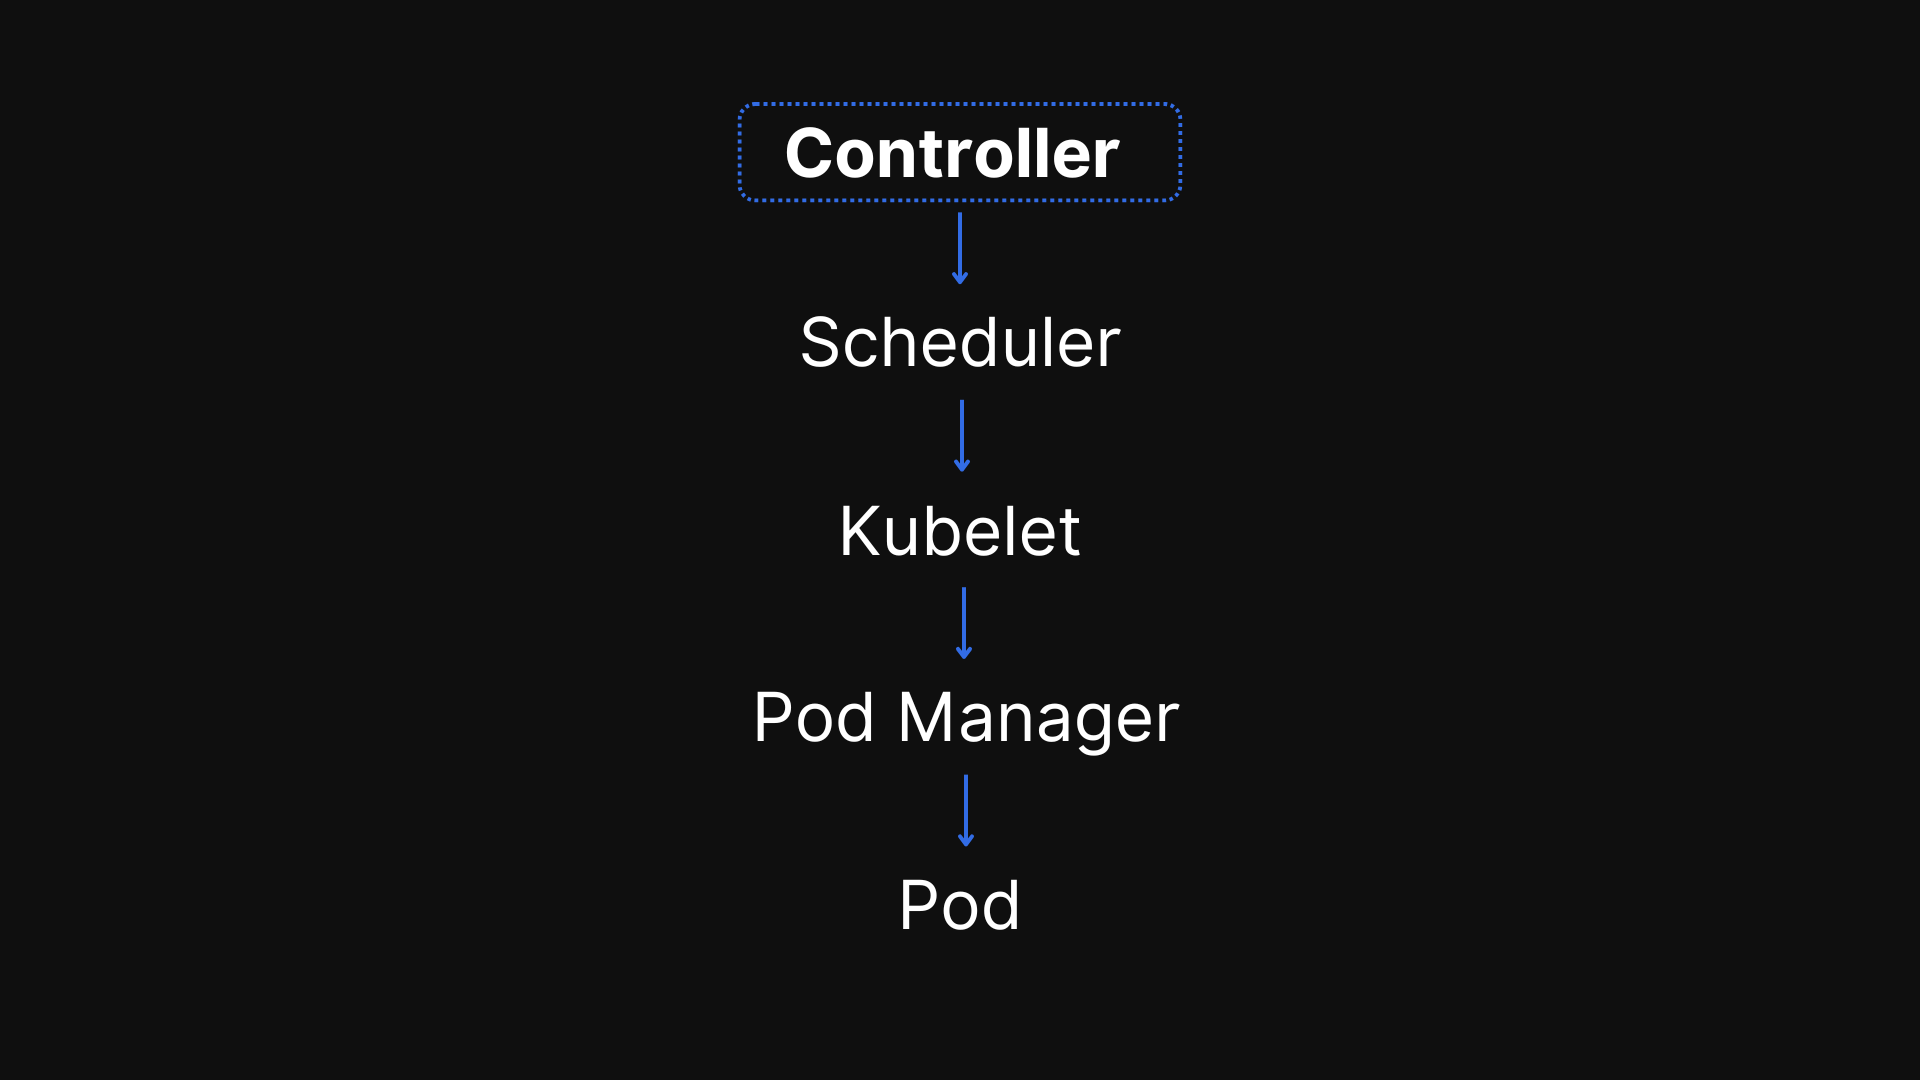
Scheduler - Used for scheduling pods.
Scheduler just decides on which node the new pod should be scheduled.
Controller manager
Detects cluster state changes, example - if the pod crashes or dies, It tries to recover as soon as possible.
Etcd
It is the cluster brain, cluster changes get stored in key-value format.
How is etcd the brain? - Data.
Scheduler & controller Manager takes the data from etcd as it stores them.
Application data is not stored in etcd.
When there are multiple master nodes, API server is load balanced, etcd has distributed storage across all Masters.
Minikube 📦 & Kubectl
Minikube - Virtual box for K8 📦
It is a test/local cluster setup where Master and Node processes run on ONE machine with docker pre-installed.
Minikube creates a virtual box on your laptop, Node runs in that virtual box. It is a ONE NODE K8 cluster for testing purpose only.
Kubectl - Command-line tool for K8 cluster
There are 3 ways to access the entry point of the K8’s cluster i.e. API Service
Kubernetes UI Dashboard - A web-based interface for managing and monitoring the cluster.
API - Directly interacting with the Kubernetes API via RESTful endpoints.
CLI (Kubectl) - The command-line interface is widely used for its flexibility and scripting capabilities.
The CLI is the most powerful compared to other two.
Kubectl not just works for Minikube cluster but also Cloud clusters like AWS EKS, Azure AKS etc.
Installation ℹ️
You can install Minikube from here🔗, and Kubectl from here🔗.
After installation of K8’s Minikube and Kubectl, run these commands to verify the installation.
minikube start --driver=docker or minikube start --driver=hyperv
Here, Minikube needs to run in a virtual hypervisor. You can run it on Docker or any other hypervisor.
minikube status
kubectl get nodes
Kubectl CLI - For configuring the Minikube cluster.
Minikube CLI - For start up or deleting the cluster.
Main Kubectl Commands 🧑🏼💻
Basic CRUD operations using Kubectl
Note - We don’t create pods in K8 instead we use an abstraction called “Deployment“ as a pod is the smallest unit in the K8 cluster.
kubectl get nodes➡️ Gets the status of nodeskubectl get pod➡️ Gets all the podskubectl get services➡️ Gets all the serviceskubectl create deployment nginx-depl --image=nginx➡️ Heredeploymentis the component and an abstraction of pod.nginx-deplis the name given to the pod and--image=nginxis pulling the docker image of nginx from DockerHubkubectl get deployment➡️ Gets all the deployment unitskubectl get replicaset➡️ Gets all the replicas of the pod (Replicaset manages replicas of the pod)kubectl edit deployment nginx-depl➡️ Will take you to the configuration YAML file opened in an editor where all the default values are present. Thenginx-deplis the file name here, you have to replace it with your deployment name.kubectl delete deployment nginx-depl➡️ Deletes the deployment
Debugging a Pod
Kubectl logs <POD_NAME>➡️ Gives the overview about the pod status overtime, here<POD_NAME>can be obtained fromkubectl get podkubectl describe pod <POD_NAME>➡️ Gives a detailed description of the pod status overtime.kubectl exec -it <POD_NAME> --bin/bash➡️ Enter inside the pod through bash terminal-itstands for interactive terminal
orkubectl exec -it <POD_NAME> --bin/sh➡️ Enter inside the pod through shell terminalkubectl delete -f nginx-depl.yaml➡️ Deletes the deployment file. (-fstands for file)nginx-deplas usual is the example file name.nano nginx-depl.yaml➡️ Nano is a simple and easy-to-use text editor, we can use this command to open our yaml file for editing or debugging.Kubectl apply -f nginx-depl.yaml➡️ After making changes in the yaml file you have to enter this command, so that the changes take place in the pod.
YAML Configuration File
There are 3 parts of config file:
Metadata - Consists of name, label, etc.
Specification - Attributes of
specare specific to thekindwhether it’s deployment, service or any other component.Status - Automatically generated & added by K8
apiVersion: apps/v1  # Specifies the API version for Deployment.
kind: Deployment     # Indicates this resource is a Deployment.
metadata:
  name: mongodb-deployment  # Name of the Deployment, used to identify it.
spec:
  replicas: 1  # Defines the number of pod replicas to create.
  selector:
    matchLabels:
      app: mongodb  # Ensures the Deployment manages pods with this label.
  template:
    metadata:
      labels:
        app: mongodb  # Labels applied to pods created by this Deployment.
    spec:
      containers:
      - name: mongodb  # Name of the container inside the pod.
        image: mongo:4.2.1  # Specifies the MongoDB image and version to use.
        ports:
        - containerPort: 21017  # The port MongoDB listens on within the container.
Desired state is always = Actual state (K8s is self healing)
Where does the status data come from? Etcd - the brain, it holds the current status of K8s components.
Note - YAML is strict with indentations
In spec there’s an attribute called template which further has it’s own metadata & spec section.
Under spec of the template is the blueprint of pod, with container Image, name, port, etc.
Connections are established using labels & selectors. Labels are present in metadata and Selectors are present in spec.
To get a detailed information & the IP address of the pod:
kubectl get pod -o wide - o stands for output
To get the deployment in YAML format:
kubectl get deployment nginx-depl -o yaml - With this you also get the status.
Mini Project 💻
Now, let’s put all that we’ve learnt to practice!
Below diagram shows the flow of data between the browser and the pods. For demonstration purpose I have used MongoDB and Mongo Express Container application.
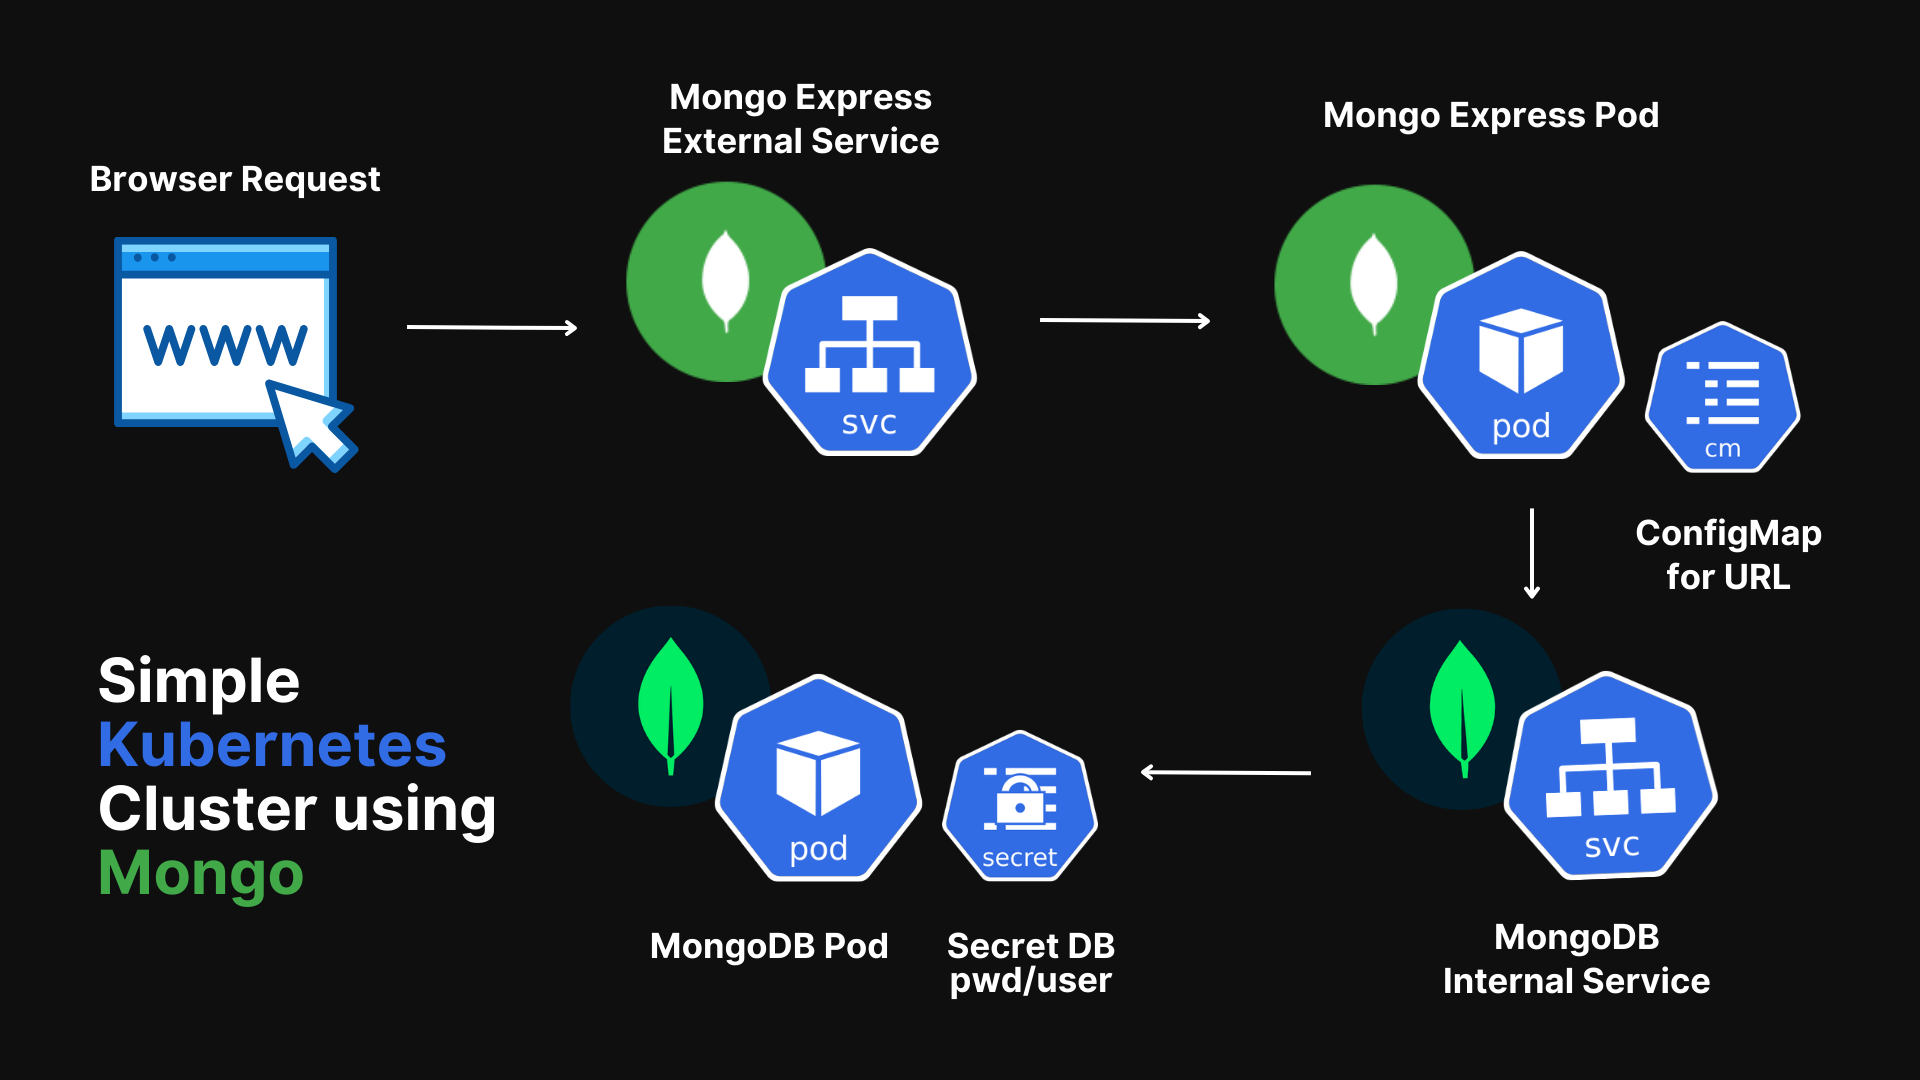
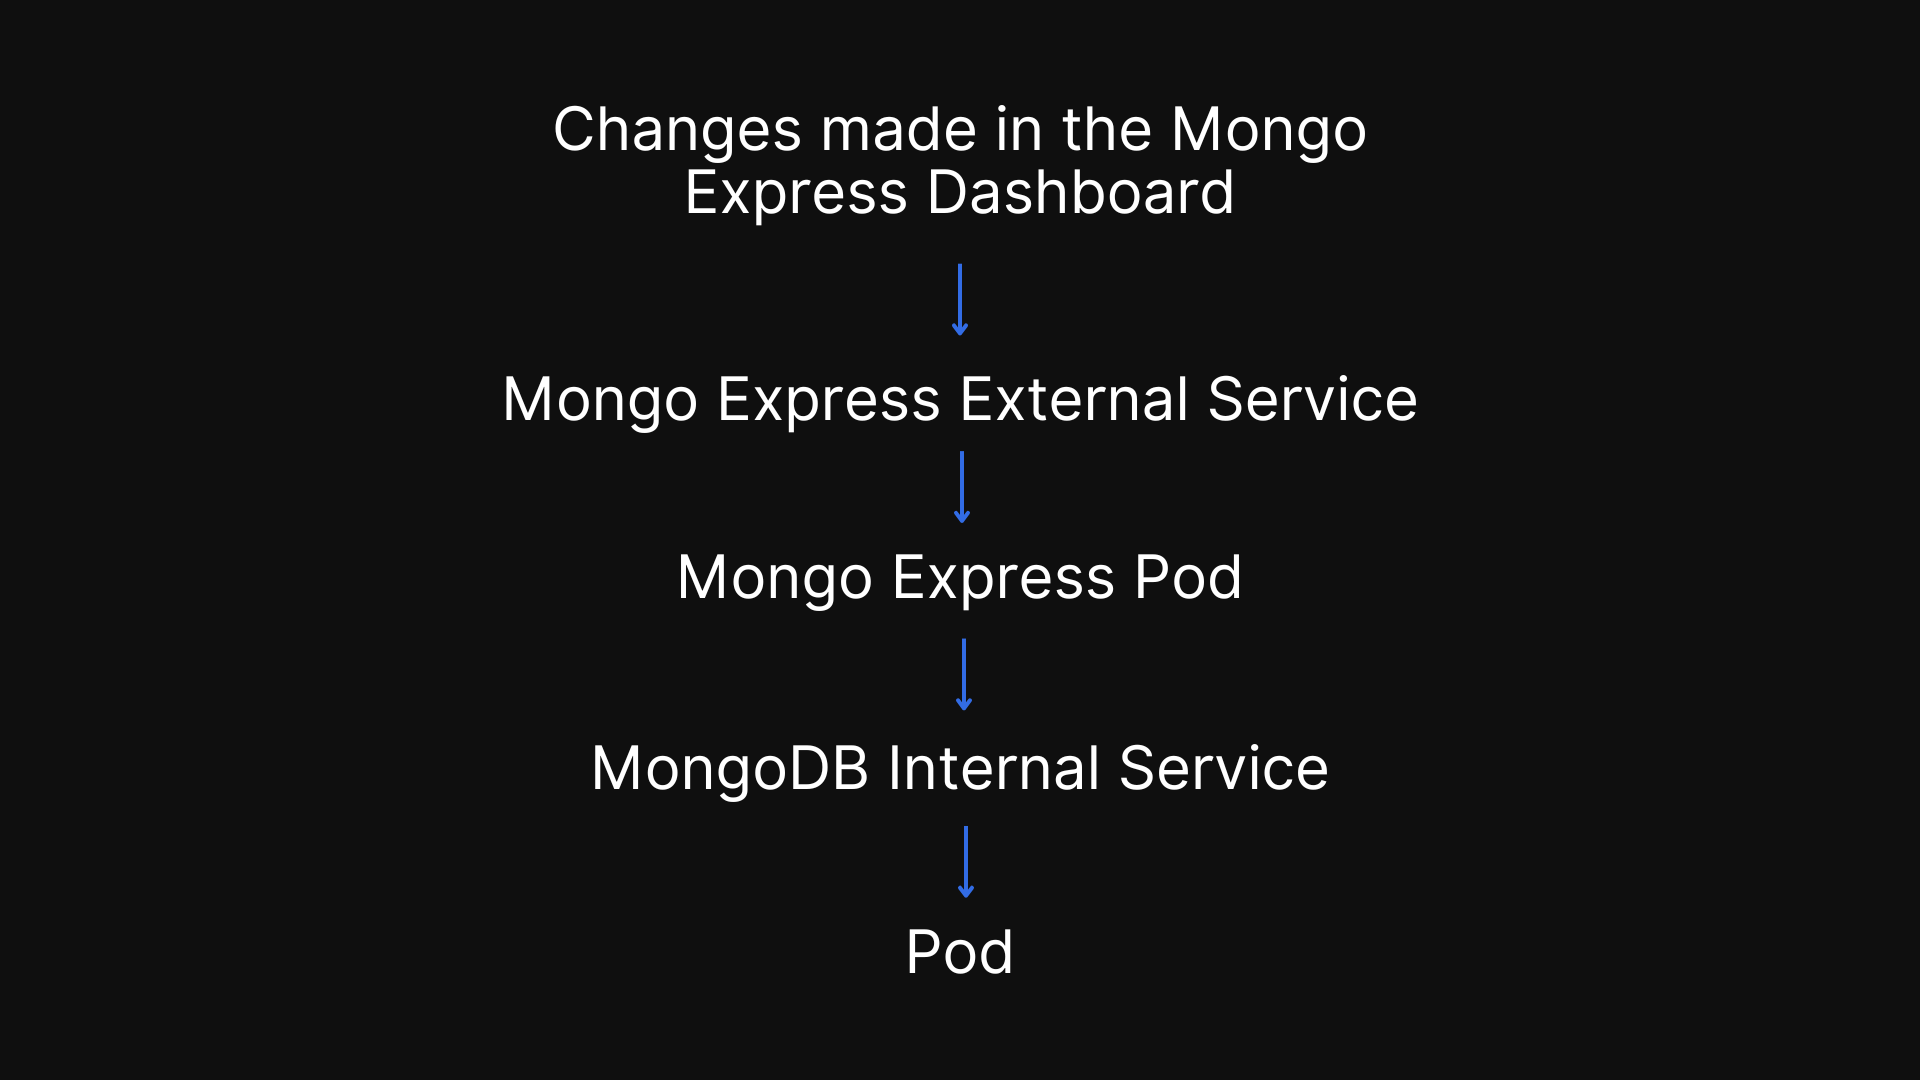
Here, the browser sends a request to the Mongo Express Dashboard, for example, to create or update a table or column.
To create this mini project, we'll start in reverse order by first setting up the components for MongoDB and then for Mongo Express.
MongoDB
First, we write the YAML code for MongoDB deployment, and save the name mongodb-deployment.yaml
Remember, Pod = Deployment
apiVersion: apps/v1 # Specifies the API version for the Deployment resource
kind: Deployment # Declares this resource as a Deployment
metadata:
  name: mongodb-deployment # Names the Deployment as mongodb-deployment
  labels:
    app: mongodb # Labels used for identifying resources
spec:
  replicas: 1 # Ensures only one replica (pod) of MongoDB is running
  selector:
    matchLabels:
      app: mongodb # Matches pods with the label app: mongodb
  template:
    metadata:
      labels:
        app: mongodb # Assigns the app: mongodb label to the pods
    spec:
      containers: # Container Blueprint starts from here
      - name: mongodb # Name of the container
        image: mongo:4.2.1 # Specifies the MongoDB image version
        ports:
        - containerPort: 21017 # MongoDB container listens on this port
        env:
        - name: MONGO_INITDB_ROOT_USERNAME # Environment variable for MongoDB root username
          valueFrom:
            secretKeyRef:
              name: mongodb-secret # Refers to the Kubernetes Secret containing the username
              key: mongo-root-username # The specific key in the Secret for the username
        - name: MONGO_INITDB_ROOT_PASSWORD # Environment variable for MongoDB root password
          valueFrom:
            secretKeyRef:
              name: mongodb-secret # Refers to the Kubernetes Secret containing the password
              key: mongo-root-password # The specific key in the Secret for the password
--- # These lines signify change in 'kind' of component.
apiVersion: v1 # Specifies the API version for the Service resource
kind: Service # Declares this resource as a Service
metadata:
  name: mongodb-service # Names the Service as mongodb-service
spec:
  selector:
    app: mongodb # Connects to pods with the app: mongodb label
  ports:
    - protocol: TCP # Uses TCP protocol for communication
      port: 27017 # Exposes the Service on port 27017
      targetPort: 27017 # Maps to the container's port 27017
The above file includes both the components Deployment and Internal Service divided by ---
apiVersion: v1 # Specifies the API version for the Secret resource
kind: Secret # Declares this resource as a Secret
metadata:
  name: mongodb-secret # Names the Secret as mongodb-secret
type: Opaque # Indicates the Secret contains arbitrary user-defined data
data:
  mongo-root-username: dXNlcm5hbWU= # Base64-encoded value for the MongoDB root username
  mongo-root-password: cGFzc3dvcmQ= # Base64-encoded value for the MongoDB root password
The above file is a Secret file for storing the databases’ root username and root password that is referred in the main deployment file.
You can make the Base64-encoded value through your Linux terminal -
echo -n <USERNAME OR PASSWORD> | base64
After writing both deployment and secret, first we need to apply secret and then deployment due to it’s referencing.
kubectl apply -f mongodb-secret.yaml
kubectl apply -f mongodb-deployment.yaml
Mongo Express
Creating the Mongo Express deployment is similar to creating the MongoDB deployment. However, I used the Mongo Express 0.49 container image and different environment variables.
apiVersion: apps/v1 # Specifies the API version for the Deployment resource
kind: Deployment # Declares this resource as a Deployment
metadata:
  name: mongo-express # Names the Deployment as mongo-express
  labels:
    app: mongo-express # Labels used for identifying resources
spec:
  replicas: 1 # Ensures only one replica (pod) of Mongo Express is running
  selector:
    matchLabels:
      app: mongo-express # Matches pods with the label app: mongo-express
  template:
    metadata:
      labels:
        app: mongo-express # Assigns the app: mongo-express label to the pods
    spec:
      containers:
      - name: mongo-express # Name of the container
        image: mongo-express:0.49 # Specifies the Mongo Express image version
        ports:
        - containerPort: 8081 # The container listens on this port
        env:
        - name: ME_CONFIG_MONGODB_ADMINUSERNAME # Environment variable for the MongoDB admin username
          valueFrom:
            secretKeyRef:
              name: mongodb-secret # Refers to the Kubernetes Secret containing the username
              key: mongo-root-username # The specific key in the Secret for the username
        - name: ME_CONFIG_MONGODB_ADMINPASSWORD # Environment variable for the MongoDB admin password
          valueFrom:
            secretKeyRef:
              name: mongodb-secret # Refers to the Kubernetes Secret containing the password
              key: mongo-root-password # The specific key in the Secret for the password
        - name: ME_CONFIG_MONGODB_SERVER # Environment variable for the MongoDB server URL
          valueFrom:
            configMapKeyRef:
              name: mongodb-configmap # Refers to the ConfigMap containing the database URL
              key: database_url # The specific key in the ConfigMap for the URL
--- # These lines signify change in 'kind' of component.
apiVersion: v1 # Specifies the API version for the Service resource
kind: Service # Declares this resource as a Service
metadata:
  name: mongo-express-service # Names the Service as mongo-express-service
spec:
  selector:
    app: mongo-express # Connects to pods with the app: mongo-express label
  type: LoadBalancer # Exposes the Service externally via a LoadBalancer
  ports:
    - protocol: TCP # Uses TCP protocol for communication
      port: 8081 # Exposes the Service on port 8081
      targetPort: 8081 # Maps to the container's port 8081
      nodePort: 30000 # Assigns a static NodePort (30000) for external access
The service defined in this YAML file is external, by just specifying the type to LoadBalancer and adding an extra attribute under ports called as **nodePort (**More on this soon)
Note - the nodePort will work only between the ports 30000 - 32767
apiVersion: v1
kind: ConfigMap
metadata:
  name: mongodb-configmap
data:
  database_url: mongodb-service
The above is the ConfigMap YAML file, where the DB URL refers to the MongoDB internal service. 🗂️
Like Secret, ConfigMap should also be applied before the pod/deployment.
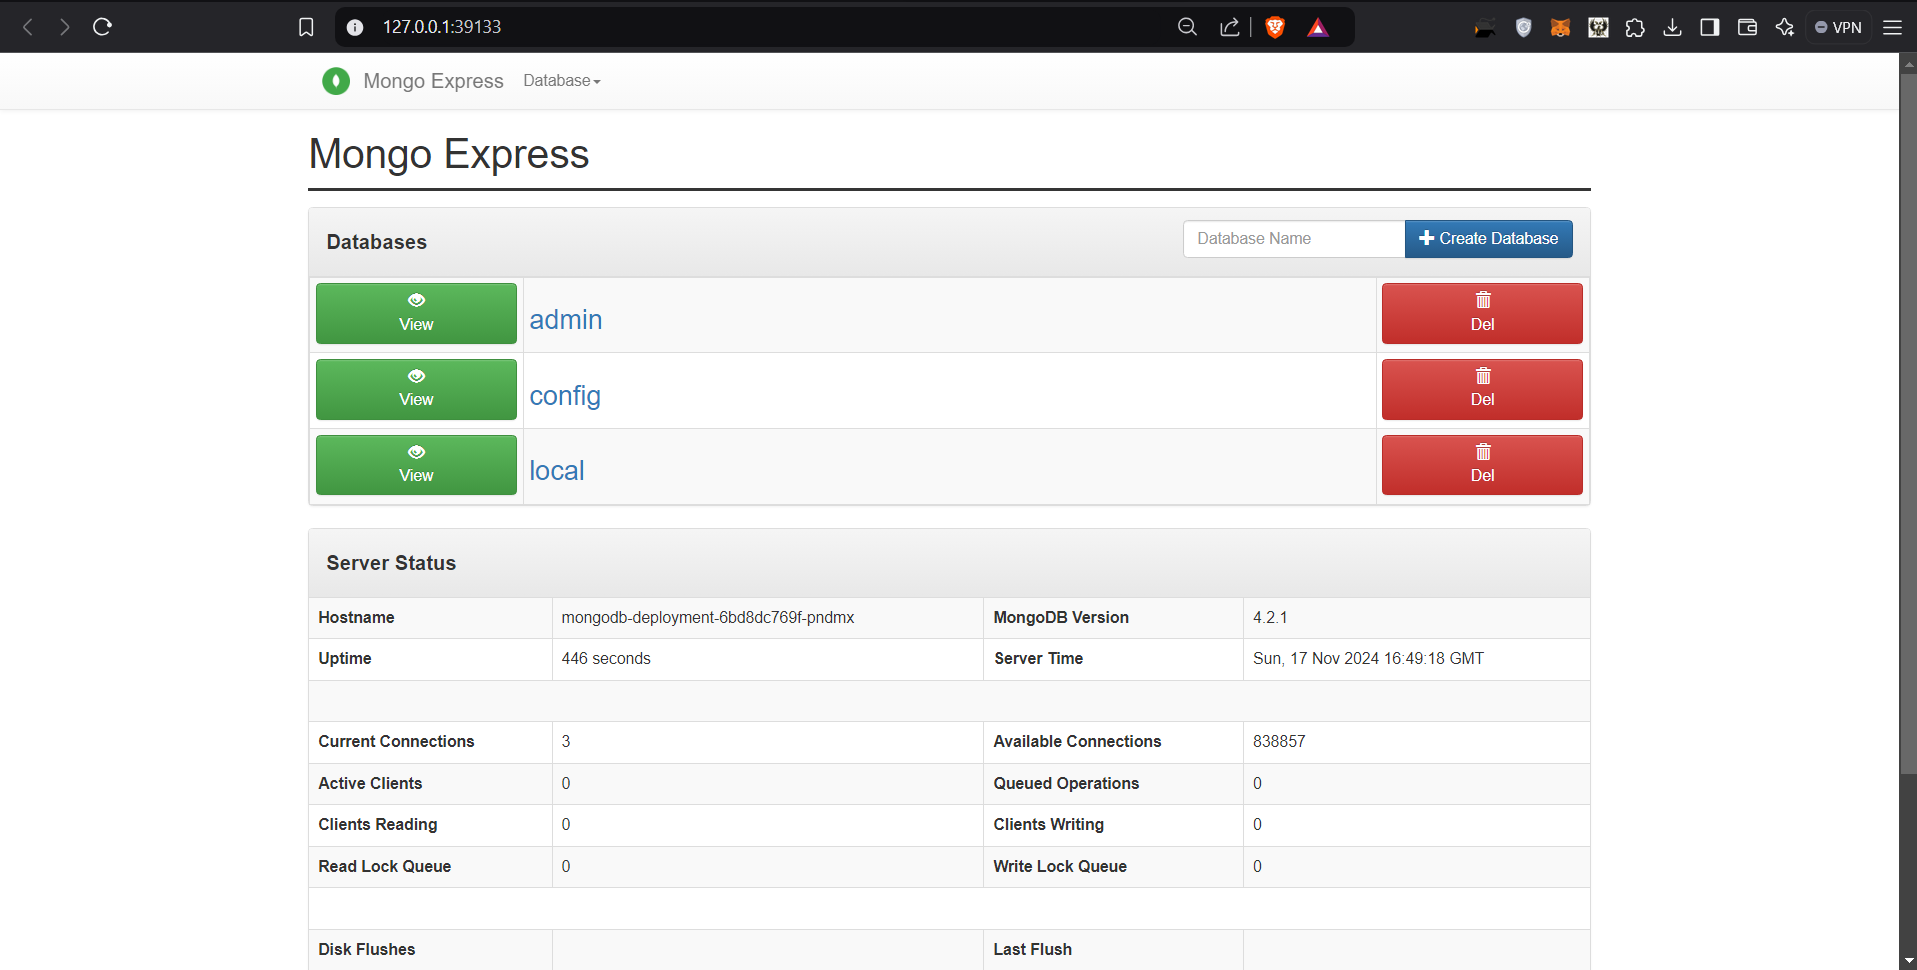
Finally, to run the mongo-express on your browser after applying the deployment files, use this command in the terminal -
minikube service mongo-express-service
This command will start the test node in Minikube and provide you with the IP address. You can use this IP address in your browser to access the Mongo Express dashboard running on the Kubernetes cluster. 🌐
The image below shows an overview of how data flows in the Kubernetes cluster.
That’s it!
Conclusion 🎉
If you've made it this far, congratulations! 🎊 You've gained impressive knowledge about container orchestration with Kubernetes. I hope this article helped you understand the basics of managing multiple pods as an abstraction of containers. I'm planning to write another article on Kubernetes that will explore deeper concepts like K8s Ingress, Namespaces, Helm, Volumes, Statefulset, and more. 🚀
Stay relevant and keep learning! 📚
Adios 👋
Subscribe to my newsletter
Read articles from Shah Abul Kalam A K directly inside your inbox. Subscribe to the newsletter, and don't miss out.
Written by

Shah Abul Kalam A K
Shah Abul Kalam A K
Hi, my name is Shah and I'm learning my way through various fascinating technologies.