Mastering AWS Step Functions: A Hands-On Guide to Integrating DynamoDB and SQS
 Navya A
Introduction
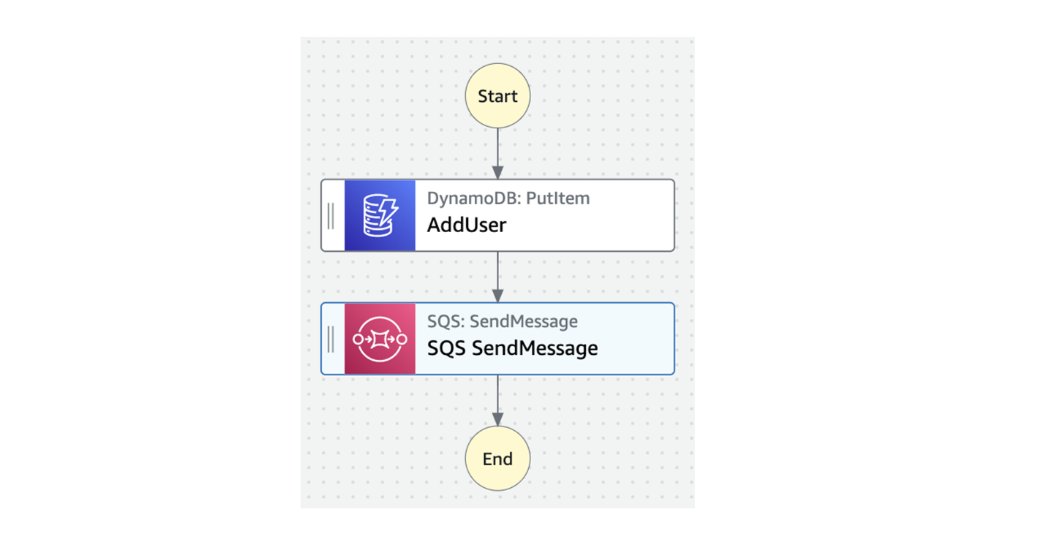
AWS Step Functions is a powerful workflow orchestration service enabling seamless integration with AWS services. This guide explores how to leverage AWS Step Functions to automate workflows by directly integrating with Amazon DynamoDB and Amazon SQS. By the end of this tutorial, you’ll learn to create and execute a state machine that performs API calls without additional Lambda functions, reducing complexity and operational overhead.
Key Learning Objectives
Explore the AWS Step Functions Workflow Studio.
Create and test a simple state machine.
Integrate DynamoDB's
PutItemAPI directly.Integrate SQS's
SendMessageAPI directly.
Prerequisites
Basic knowledge of:
AWS Step Functions
Amazon DynamoDB
Amazon SQS
Step 1: Accessing the AWS Step Functions Console
Log in to the AWS Management Console.
In the search bar, type Step Functions and select the service.
Click State machines from the left navigation menu.
Click Create state machine.

Step 2: Exploring the Workflow Studio
Select the Blank template and click Select.
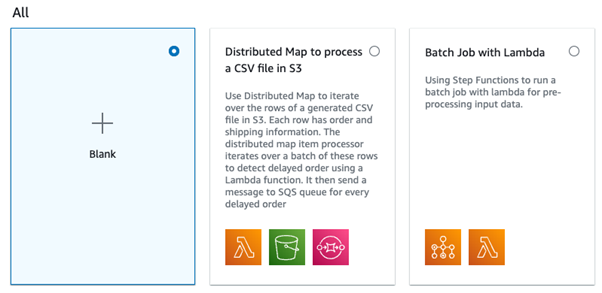
You’ll be redirected to the Workflow Studio, a visual editor for designing state machines.
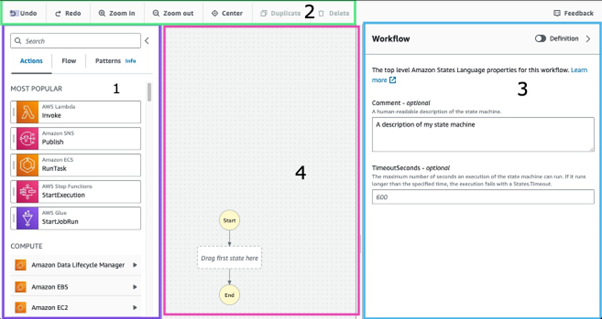
State machine actions and states:
This panel defaults to display the Actions tab, which contains the service integrations supported by AWS Step Functions. The list includes notable service API actions such as invoking an AWS Lambda function and running an Amazon Elastic Container Service task.
If you click on the Flow tab, you'll be presented with the different types of AWS Step Function states, opens in a new tab available to all state machines. Examples include the conditional choice state and the iterative map state types.
Each of these lists contains draggable diagram elements that you can drop into the diagram editor section.
Diagram editing and rendering tools:
The top of the Workflow Studio contains basic editing options for your state machine diagram including Undo and Redo, as well as the option to zoom in, out, or center your diagram.
The Editor dropdown menu is a useful feature that allows you to export your state machine diagram in SVG or PNG format.
Definition configuration:
On the left, you have the two options available to define your state machine components.
The Form tab is displayed by default. You haven't configured your state machine yet so you see the initial Comment and TimeoutSeconds fields. The form view of your state machine will present configuration options for the various actions and states you drag onto your diagram. This view will change depending on the element that is currently selected.
The Definition tab renders the Amazon States Language definition of your state machine. The JSON displayed can be shared with fellow team members along with the diagram, and also be used in case you'd like to provision a state machine using AWS CloudFormation, opens in a new tab.
State Machine Diagram:
- Each state machine diagram comes with a Start and End state displayed by default. This is the section that you will drag and drop elements into as you assemble your state machine.
Step 3: Creating a State Machine with DynamoDB Integration
Configure the DynamoDB PutItem State:
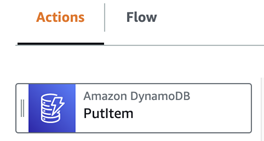
From the Actions panel, locate and drag Amazon DynamoDB → PutItem to the editor.
Set the following configuration:
State name:
AddUserAPI Parameters:
  jsonCopy code{
    "TableName": "LabTable",
    "Item": {
      "id": { "S.$": "$.id" },
      "first_name": { "S.$": "$.first_name" },
      "last_name": { "S.$": "$.last_name" }
    }
  }
Click Definition to review the auto-generated JSON configuration.
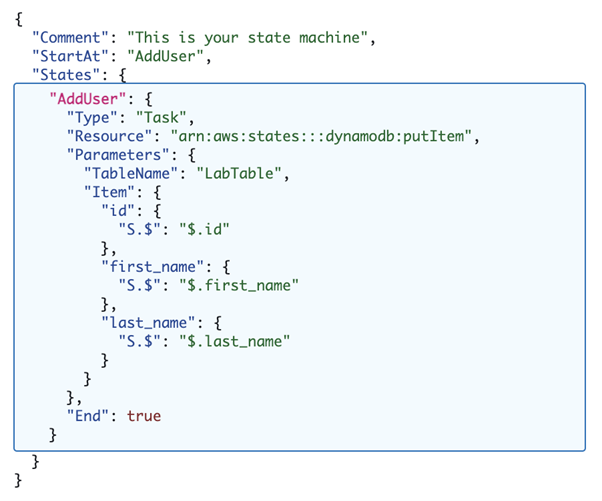
Save and Execute the State Machine:
Set the state machine name as
LabStateMachine.Choose an existing IAM role with
dynamodb:PutItempermissions.Click Create.
Test the state machine:
Click Start execution.
Provide input in JSON format:
  jsonCopy code{
    "id": "sf9hdkgp",
    "first_name": "Cori",
    "last_name": "Thao"
  }
The AddUser task state defined in this state machine will perform the put item API action into the LabTable DynamoDB table. The Item object defined in the task's parameters uses $ to inform the state machine that the parameter values for this action will be retrieved from the state machine's context object, opens in a new tab. The context object is the internal JSON object that is accessible throughout a state machine execution.
When you start a new execution for your state machine, you will be passing in an input object. the values after the $ indicate which values are to be passed in as parameters for your DynamoDB put item call.
- Confirm the
Succeededstatus in the execution results.
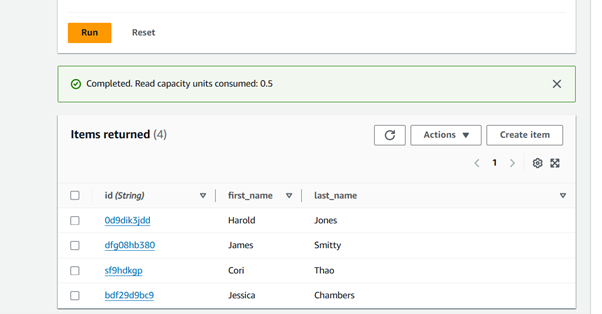
Verify in DynamoDB:
Navigate to the DynamoDB service and open the
LabTabletable.Check for the new entry:
id:
sf9hdkgpfirst_name:
Corilast_name:
Thao
Step 4: Adding an SQS Integration
Configure the SQS SendMessage State:
In Workflow Studio, drag Amazon SQS → SendMessage below the
AddUseraction.Configure:
State name:
CreateUserProfileQueue URL: Select the
LabQueue(pre-configured).Message:
  jsonCopy code{
    "id.$": "$.id",
    "first_name.$": "$.first_name",
    "last_name.$": "$.last_name",
    "status": "NEW_USER"
  }
Save the state machine.
Update the AddUser Output:
Select the
AddUserstate in the diagram.Click the Output tab and choose Discard result and keep original input.

Prior to this state machine update, you only had a single state, so there was no need to configure a specific type of state output. With the addition of the CreateUserProfile state, it's important to maintain the state machine's context object for any downstream states to utilize.
In this case, you have just discarded the result of the DynamoDB put item API call, and replaced it with the original input that you pass when you start a new execution. If you don't set this output correctly, the input of the CreateUserProfile will be an API response object instead of the required user data you just configured
Save and Test the State Machine:
Save the updated state machine.
Execute with new input:
 jsonCopy code{
   "id": "1109kdid",
   "first_name": "Kevin",
   "last_name": "Inglewood"
 }
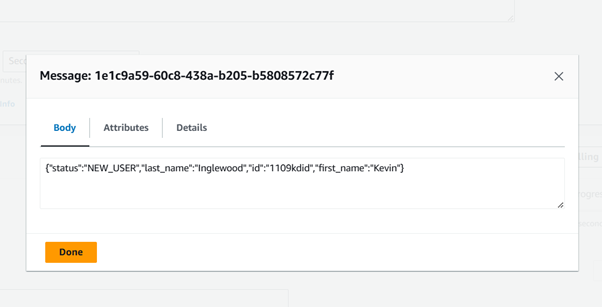
Verify in SQS:
Navigate to SQS and select
LabQueue.Poll for messages to verify:
id:
1109kdidfirst_name:
Kevinlast_name:
Inglewoodstatus:
NEW_USER
Summary
In this guide, you learned to create an AWS Step Functions state machine integrating directly with DynamoDB and SQS. This method simplifies workflows by reducing dependency on Lambda functions, ensuring scalability and maintainability.
Subscribe to my newsletter
Read articles from Navya A directly inside your inbox. Subscribe to the newsletter, and don't miss out.
Written by

Navya A
Navya A
👋 Welcome to my Hashnode profile! I'm a passionate technologist with expertise in AWS, DevOps, Kubernetes, Terraform, Datree, and various cloud technologies. Here's a glimpse into what I bring to the table: 🌟 Cloud Aficionado: I thrive in the world of cloud technologies, particularly AWS. From architecting scalable infrastructure to optimizing cost efficiency, I love diving deep into the AWS ecosystem and crafting robust solutions. 🚀 DevOps Champion: As a DevOps enthusiast, I embrace the culture of collaboration and continuous improvement. I specialize in streamlining development workflows, implementing CI/CD pipelines, and automating infrastructure deployment using modern tools like Kubernetes. ⛵ Kubernetes Navigator: Navigating the seas of containerization is my forte. With a solid grasp on Kubernetes, I orchestrate containerized applications, manage deployments, and ensure seamless scalability while maximizing resource utilization. 🏗️ Terraform Magician: Building infrastructure as code is where I excel. With Terraform, I conjure up infrastructure blueprints, define infrastructure-as-code, and provision resources across multiple cloud platforms, ensuring consistent and reproducible deployments. 🌳 Datree Guardian: In my quest for secure and compliant code, I leverage Datree to enforce best practices and prevent misconfigurations. I'm passionate about maintaining code quality, security, and reliability in every project I undertake. 🌐 Cloud Explorer: The ever-evolving cloud landscape fascinates me, and I'm constantly exploring new technologies and trends. From serverless architectures to big data analytics, I'm eager to stay ahead of the curve and help you harness the full potential of the cloud. Whether you need assistance in designing scalable architectures, optimizing your infrastructure, or enhancing your DevOps practices, I'm here to collaborate and share my knowledge. Let's embark on a journey together, where we leverage cutting-edge technologies to build robust and efficient solutions in the cloud! 🚀💻