Linux Essentials Day 0.
 Sumeet
Linux has been a game-changer for me personally. Its lightweight distros and cool, funky terminals always give me that "hacker" vibe whenever I use it.
I genuinely believe that every IT professional should incorporate Linux into their toolkit as a foundation—it pays off immensely in the long run. With that said, here are 11 essential Linux topics that everyone should aim to master, as they're used 99% of the time in most production environments.
For those starting out, I recommend practicing these commands in a more hands-on, production-like setting. You can use VMware Workstation, and spin up a free-tier Ubuntu instance on AWS or DigitalOcean. I’d personally avoid using WSL in Windows, as it limits your ability to practice these commands fully.
Next, you'll need to choose an operating system to work with. I recommend starting with the latest Ubuntu desktop version, or if you prefer something lighter, you can opt for a Debian-based OS, such as version 11 or 12.
Let's understand the directory structure first:
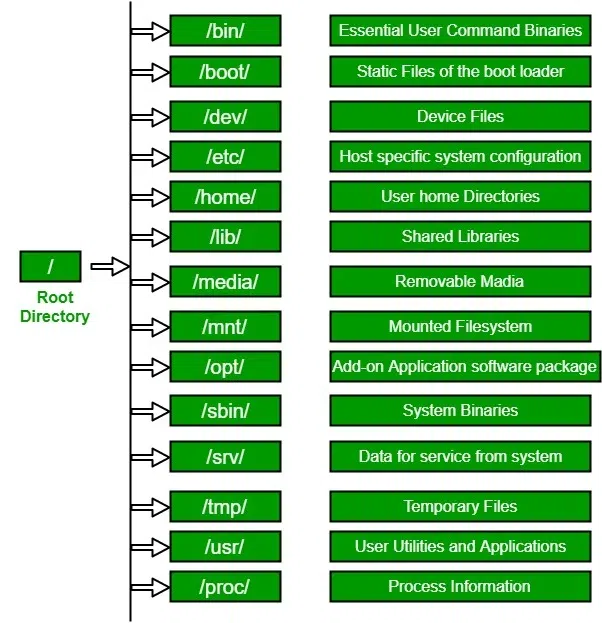
/: The root directory, which is the top-most directory in the Linux filesystem hierarchy. All other directories branch off from here.
/bin/: Contains essential user command binaries like basic system commands.
/boot/: Stores static files related to the bootloader, essential for booting the system.
/dev/: Holds device files, representing hardware devices.
/etc/: Contains system configuration files specific to the host.
/home/: User-specific home directories for personal files.
/lib/: Shared libraries and essential system binaries required for system boot.
/media/: Mount point for removable media like USB drives.
/mnt/: Temporary mount point for filesystems.
/opt/: Add-on software packages from vendors.
/sbin/: System binaries used by the administrator.
/srv/: Data for services provided by the system.
/tmp/: Temporary files that can be deleted periodically.
/usr/: User applications and utilities.
/proc/: Virtual filesystem providing information about running processes.
Let’s start with the commands now:
1) Basic Navigational commands
start by pressing CTRL + ALT + T opens a terminal window
( A terminal window in Linux is a text-based interface that allows users to interact with the operating system by typing commands. It provides access to the shell )
noc@Controlnode:~$ whoami
noc
noc@Controlnode:~$
(who the hell Am I ) As the name suggests, the command displays the identity of the user you are currently logged in as.
noc@Controlnode:~$ pwd
/home/noc
noc@Controlnode:~$
( Where the hell Am I ) As the name implies, the command displays the current working directory where the user is located. This is helpful in situations where you need to move a file or folder to a specific directory but don't know the full path.
noc@Controlnode:~$ ls -lh
total 56K
drwxrwxr-x  3 noc noc 4.0K Jul 11 10:23 ansible_maria-db
drwxrwxr-x  3 noc noc 4.0K Jul 27 07:17 ansible_netbox
drwxrwxr-x  6 noc noc 4.0K Jul 25 06:48 ansible_scripts
drwxr-xr-x  2 noc noc 4.0K Jul  2 21:34 Desktop
drwxr-xr-x  2 noc noc 4.0K Jul  2 21:34 Documents
drwxr-xr-x  2 noc noc 4.0K Jul  2 21:34 Downloads
drwxr-xr-x  2 noc noc 4.0K Jul  2 21:34 Music
drwxrwxr-x  5 noc noc 4.0K Jul 13 04:32 myenv
drwxrwxr-x 10 noc noc 4.0K Jul 27 07:10 netbox-docker
drwxr-xr-x  2 noc noc 4.0K Jul  2 21:34 Pictures
drwxr-xr-x  2 noc noc 4.0K Jul  2 21:34 Public
-rw-rw-r--  1 noc noc    0 Oct 24 01:31 samplefile.txt
drwx------  3 noc noc 4.0K Jul  2 21:38 snap
drwxr-xr-x  2 noc noc 4.0K Jul  2 21:34 Templates
drwxr-xr-x  2 noc noc 4.0K Jul  2 21:34 Videos
noc@Controlnode:~$
The -lh is a combination of two arguments (or options) passed to the ls command.
· -l (long format): This option provides a detailed listing of files and directories. It includes information such as file type, permissions, number of links, owner, group, size, and the last modified date.
· -h (human-readable): This option makes the file sizes easier to read by converting them into a more understandable format (e.g., KB, MB, GB) instead of showing sizes in bytes.
The first column shows the type of object—either a directory or a file—along with its permissions. For example, the owner has full permissions: read, write, and execute (rwx). The next set of permissions is for the owner’s group, which also has (rwx). Lastly, the permissions for all other users are set to read and execute (rx).
Following this, we see the user and the group associated with the file or directory. Then, the size of the object is displayed in kilobytes, along with the date it was last modified.
Arguments are options you pass to terminal commands to modify their behavior. To learn more, access the manual pages (man pages) using man [command]. For example, man grep provides detailed information about the grep command, including its arguments and options.
noc@Controlnode:~$ cd Documents/
noc@Controlnode:~/Documents$ pwd
/home/noc/Documents
noc@Controlnode:~/Documents$ cd ..
noc@Controlnode:~$ pwd
/home/noc
The cd command is used to change into a specified directory, such as cd /Documents, which is helpful when you know the full path. You can also use cd .. to navigate up to the parent directory. For instance, if you're in /home/noc/documents, running cd .. will take you to /home/user.
noc@Controlnode:~$ clear
The clear command removes all the clutter from your terminal, giving you a fresh, empty screen.
noc@Controlnode:/$ find
noc@Controlnode:/$ find * -name "samplefile*" | grep samplefile | less
The find command searches for files and directories within a specified directory structure based on criteria such as name, type, size, or modification date. For example, using * -name "samplefile*" | grep samplefile | less allows us to locate any directory containing "sample file" in its name. Additional options refine the search further based on specific keywords.
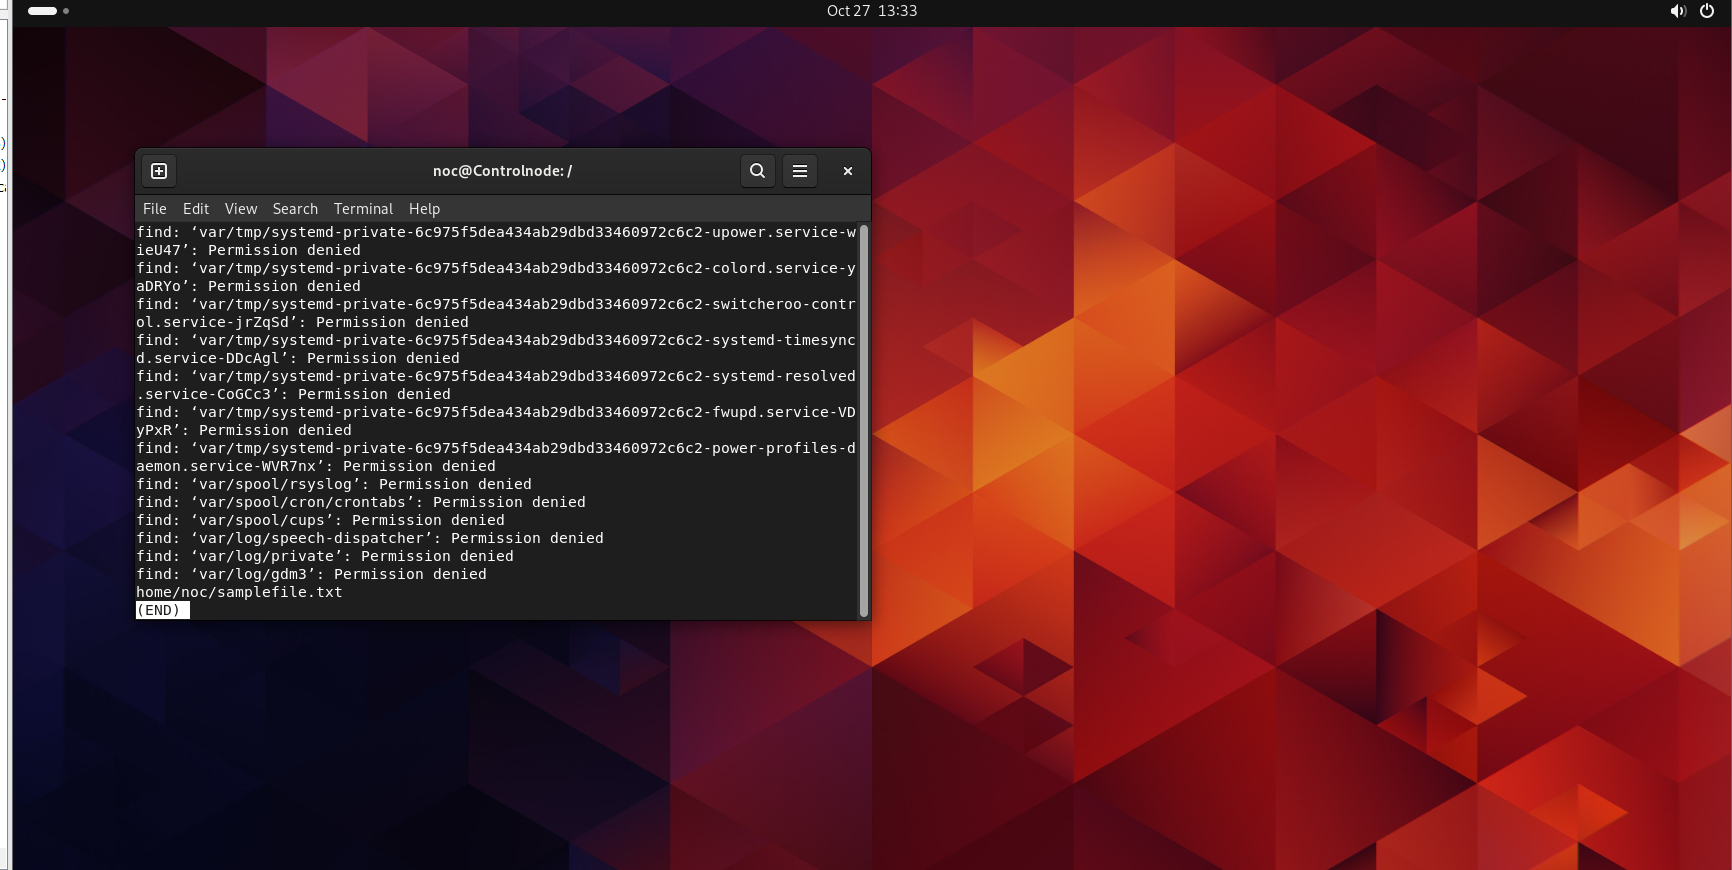
As seen in the image above, we can view the output of the find command showing the location of samplefile.txt.
2) User Management
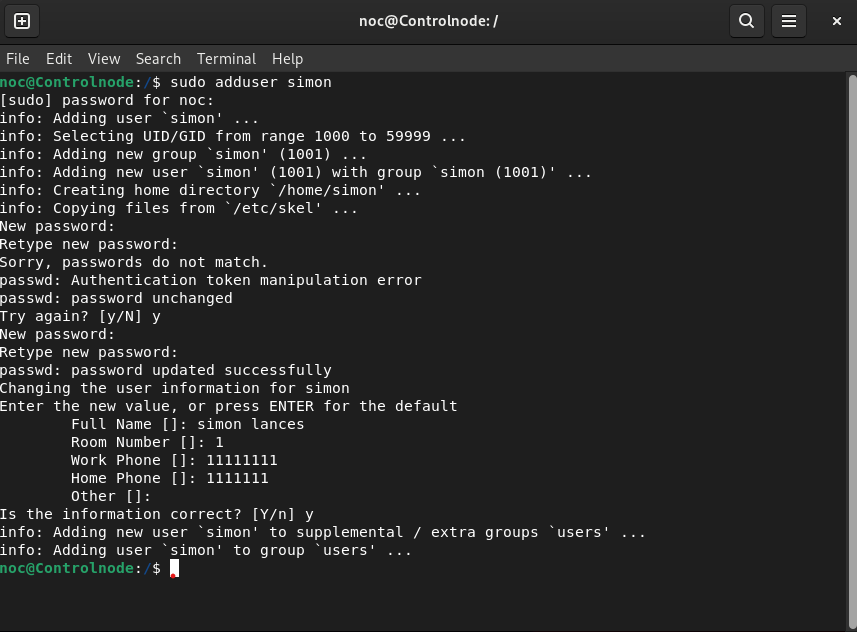
noc@Controlnode:/$ sudo adduser simon
The above command adds the user "Simon" to the system, requiring root privileges for the creation.
noc@Controlnode:/$ sudo passwd simon
New password:
The above command sets a password for the user "simon," requiring root privileges to execute, excluding the user "simon" from performing this action independently.
noc@Controlnode:/$ su simon
Password:
simon@Controlnode:/$
The above command allows us to switch users.
noc@Controlnode:~$ sudo userdel simon
[sudo] password for noc:
noc@Controlnode:~$ su simon
su: user simon does not exist or the user entry does not contain all the required fields
noc@Controlnode:~$
As a final step, we confirm the deletion of user Simon with the command mentioned above. However, when we attempt to switch to user Simon, we receive an error indicating that the user does not exist.
3) System Information.
 noc@Controlnode:~$ lsb_release -a
No LSB modules are available.
Distributor ID:    Ubuntu
Description:    Ubuntu 24.04 LTS
Release:    24.04
Codename:    noble
noc@Controlnode:~$
Ever, curious to learn more about the operating system we're using? The above command provides us information with valuable insights into it.
noc@Controlnode:~$ hostname
Controlnode
noc@Controlnode:~$ sudo hostname Lab_enviroment
[sudo] password for noc:
The hostname command displays the current hostname of the system, which is the name used to identify the device on a network.
noc@Controlnode:~$ sudo hostname Lab_enviroment
[sudo] password for noc:
To set a new hostname we can use the above command.
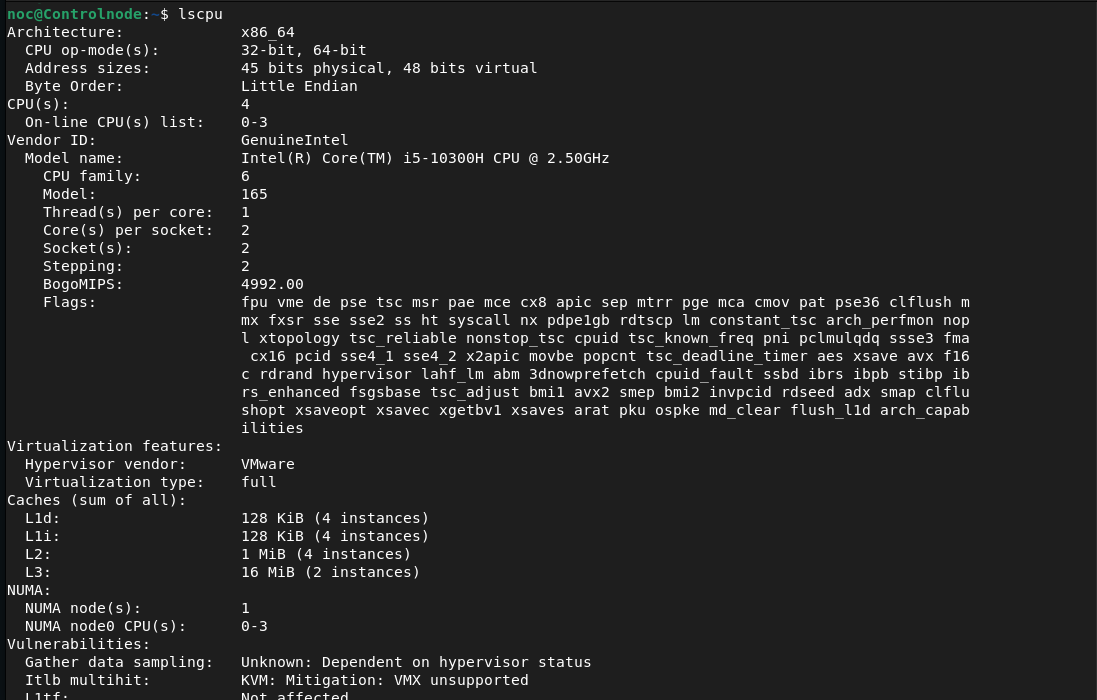
noc@Controlnode:~$ lscpu
The lscpu command provides detailed information about the CPU architecture, including the number of cores, threads, model name, CPU family, and cache size. It's useful for understanding your machine's hardware capabilities.
noc@Controlnode:~$ lsblk
The lsblk command lists all attached block devices, such as hard drives, SSDs, and USB drives, along with their partitions. It displays details like device name, size, type, and mount point, providing insight into your system's storage configuration.
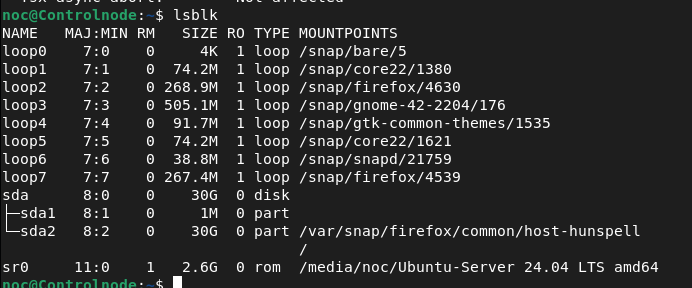
Here's a concise interpretation of our lsblk output:
Loop Devices (loop0 to loop7): These are virtual devices for mounting snap packages in Ubuntu.
sda: This is a physical disk with a size of 30 GB.
sda1: A 1 MB partition, likely for a specific purpose (e.g., bootloader).
sda2: A 30 GB partition mounted at
/var/snap/firefox/common/host-hunspelland as the root directory (/).
sr0: A CD-ROM drive (removable) with a size of 2.6 GB, currently mounted at
/media/noc/Ubuntu-Server 24.04 LTS amd64.
4) File Management.
noc@Controlnode:~$ mkdir Lab_Directory
The mkdir command allows us to create a new directory with the specified name; in the example above, we named the directory Lab_Directory.
noc@Controlnode:~$ rm -r Lab_Directory/
The rm command is commonly used for deletion, and adding the -r argument allows you to delete a directory along with its contents
noc@Controlnode:~$ cat samplefile.txt
This is Business
noc@Controlnode:~$
To view a file's content without opening it, most engineers use the cat command, which is particularly useful for text-based files.
noc@Controlnode:~/ansible_netbox$ more data.json
The more command is a simple pager program that enables you to view the contents of a file one screen at a time. This is particularly useful in situations where the output is larger than expected, such as with log files.
noc@Controlnode:~/ansible_netbox$ head -n 20 data.json
The head command is used to display the beginning part of a file. By default, it shows the first 10 lines, but you can adjust the number of lines displayed as needed.
noc@Controlnode:~/ansible_netbox$ tail -n 20 data.json
The tail command in Linux is used to display the end of a file. By default, it shows the last 10 lines, but you can customize this behavior as needed.
noc@Controlnode:/var/log$ cat syslog | less
cat in combination with less allows you to view the contents of a file (or multiple files) in a paginated manner. This is useful when the file is too large to fit in the terminal window. e.g syslog details.
noc@Controlnode:~$ cp file.txt /path/to/destination/
noc@Controlnode:~$ cp file1.txt file2.txt
The cp command is used to copy files and directories, enabling users to create duplicates of files or entire directory structures. It functions similarly to the copy feature in Windows, allowing files to be copied to any destination.
and file2.txt does not exist, the cp command will create file2.txt and copy the contents of file1.txt into it.
noc@Controlnode:~$ mv file.txt /path/to/destination/
noc@Controlnode:~$ mv oldname.txt newname.txt
The mv command in Linux is used to move or rename files and directories. It is a versatile command that can handle both operations depending on the specified parameters. similar to a cut in windows
noc@Controlnode:~$ touch file1.txt
The touch command is a standard utility in Unix and Unix-like operating systems used to create empty files or update the timestamp of existing files.
The chmod command is used to change the permissions of a file or directory. The permissions are set using a three-digit code, with each digit representing the permissions for the owner, group, and other users, respectively. The possible permissions are:
· Read (4)
· Write (2)
· Execute (1)
To set read, write, and execute permissions, you can use the following command:
noc@Controlnode:~$ chmod 754 file1.txt
· Owner: read, write, execute (7)
· Group: read, execute (5)
· Others: read, execute (4)
This allows the owner to read, write, and execute the file, the group to read and execute, and others to only read and execute.
Permissions are typically represented in three categories:
User (u): the owner of the file
Group (g): users who are members of the file's group
Others (o): all other users
noc@Controlnode:~$ sudo chown www-data:www-data /var/www/html
Similarly, the chown command changes the ownership of a file or directory to a specified user and/or group, allowing administrators to control access by setting ownership, which directly influences permissions. In the example above, both the user and group are set to www-data. Take precautions while using this command, as it may prevent services or applications from writing to certain files and folders.
5) System Monitoring.
noc@Controlnode:~$ ps aux
The ps aux command shows all running processes with detailed information:
ps: Displays current processes.
a: Includes all users' processes.
u: User-friendly format (CPU/memory usage).
x: Shows processes without a controlling terminal.
Output includes USER, PID, %CPU, %MEM, VSZ, RSS, TTY, STAT, START, TIME, and COMMAND. Use it to monitor and manage processes.
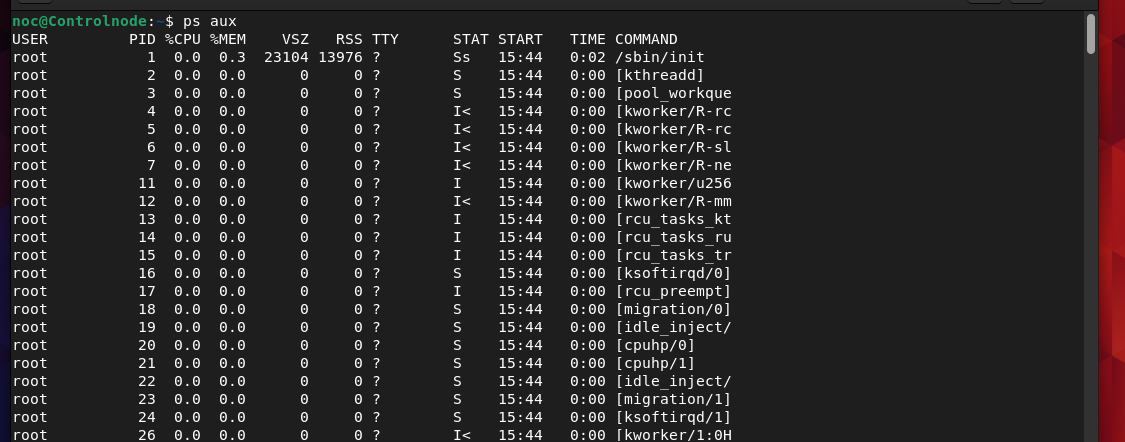
To view details of specific processes, you can pipe the output through grep. For example, in the image below, we use the netstat service as a demonstration.

noc@Controlnode:~$ htop
The htop command is a real-time system monitoring tool that offers a dynamic overview of system processes and resource usage. It presents information including CPU usage, memory usage, swap usage, and running processes, similar to the Task Manager in Windows.
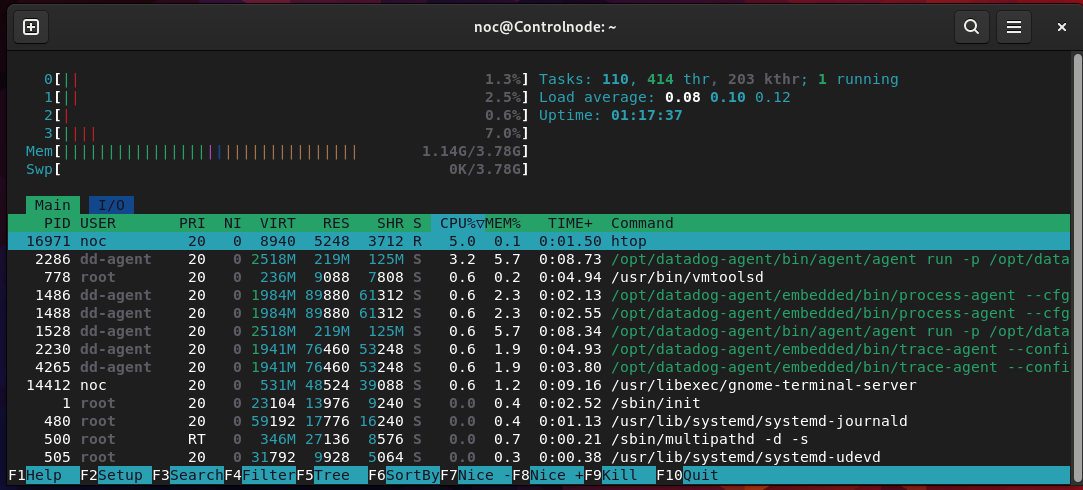
The image above shows the utilization of the virtual CPU and its 4GB memory, along with additional details.
noc@Controlnode:~$ df -h
The df -h command displays the amount of disk space used and available on filesystems or drives.

noc@Controlnode:~$ du -h
The du -h Estimates and reports the disk space used by files and directories.
noc@Controlnode:~$ free -m
The free -m command is used to display the amount of free and used memory in the system. The -m option formats the output in megabytes, making it easier to read.
noc@Controlnode:~$ kill -9 PID
kill command is used to terminate processes. It can send various signals to a process, with the most common being -9 signal to terminate the process.
Commonly Used Signals
| Signal Name | Number | Description |
| SIGHUP | 1 | Hangup signal (often used to reload config) |
| SIGINT | 2 | Interrupt signal (Ctrl+C) |
| SIGQUIT | 3 | Quit signal (produces core dump) |
| SIGTERM | 15 | Termination signal (default for kill) |
| SIGKILL | 9 | Forcefully terminate process |
| SIGSTOP | 19 | Stop process (cannot be caught or ignored) |
| SIGCONT | 18 | Continue process if stopped |
noc@Controlnode:~$ uptime
uptime command in Linux is used to display how long the system has been running, along with some additional information about system load averages.
Load Average ?
before we learn about load average there are a few prerequisites that we need to wrap our heads around.
consider a system where that has a 4-core CPU now what does 4 cores mean In a 4-core CPU, you can think of the four cores as four virtual CPUs that can process tasks simultaneously.
Load average is a metric that indicates the average number of processes waiting for CPU time over specific time intervals—typically 1, 5, and 15 minutes. It reflects how busy the system is and helps assess CPU utilization, especially in multi-core systems.
Load Average in a 4-Core System.
Breakdown for a 4-Core System:
1-Minute Average: This value reflects the most recent demand on the CPU. For example, a load average of 1.0 means that, on average, one process was waiting for CPU time at the last minute. This indicates that the CPU is lightly loaded, as it can easily handle this with one of its four cores.
5-Minute Average: This average provides a smooth view of the workload over the past five minutes. A load average of 2.0 indicates that there were, on average, two processes waiting for CPU time. With four cores available, this means the system is at 50% utilization, suggesting moderate load and good performance.
15-Minute Average: This value shows trends in system load over the last fifteen minutes. A load average of 3.0 indicates that three processes were waiting for CPU time on average. For a 4-core system, this reflects 75% utilization, meaning the system has been busier but is still capable of handling the load without significant performance issues.
noc@Controlnode:~$ date
date command is used to display or set the system date and time.
6) Networking.
noc@Controlnode:~$ ip a
ip a command displays network interface information.

noc@Controlnode:~$ ping 8.8.8.8
ping is a network diagnostic command used to test the reachability of a host on a network.
noc@Controlnode:~$ traceroute
The traceroute command is a network diagnostic tool used to trace the path that packets take from the source host to a destination host across a network.
Firewall capabilities.
Linux offers two options for its firewall capabilities the decision to choose between the two is based on experience and requirements of the system I suggest starting out with ufw in general then moving to ip tables lets find out a few differences between both.
UFW is a user-friendly interface for managing firewall rules in Linux, streamlining the configuration of iptables. It provides simple commands to allow or deny traffic based on ports, services, or IP addresses, making it a popular choice for both servers and desktops while maintaining effective security. For example, when hosting an Apache web server, you can allow incoming traffic only on HTTPS and port 22 for SSH while denying all other incoming connections.
noc@Controlnode:~$ sudo ufw enable
noc@Controlnode:~$ sudo ufw allow 22
noc@Controlnode:~$ sudo ufw allow 443
noc@Controlnode:~$ sudo ufw default allow outgoing
noc@Controlnode:~$ sudo ufw status verbose
IPTABLES
iptables is a powerful command-line tool for configuring Linux's packet filtering system, providing detailed control over network traffic through customizable rules. While it offers extensive security capabilities, its complexity may be challenging for less experienced users, making user-friendly interfaces like UFW a helpful alternative.
noc@Controlnode:~$ netstat -tulnp
netstat can show you which services or ports are currently open and listening on your system, as well as details on active connections. This helps identify any unauthorized open ports or unusual network activity, making it useful for network troubleshooting and security checks.
Here are some frequently used netstat options:
-a: Displays all active connections and listening ports.
-t: Shows only TCP connections.
-u: Shows only UDP connections.
-l: Lists only listening ports.
-n: Displays addresses and port numbers in numeric form (no DNS resolution).
-p: Shows the PID and program name for each connection (requires root privileges).
-r: Displays the routing table.
-i: Shows network interfaces and their statistics.
-s: Shows per-protocol statistics (e.g., TCP, UDP).
-c: Refreshes netstat output continuously (Linux only, like a real-time monitor).

You can refine the output of the netstat command by using grep to filter and display a few known services specifically in the above example we filtered for port 514 which is a syslog port.
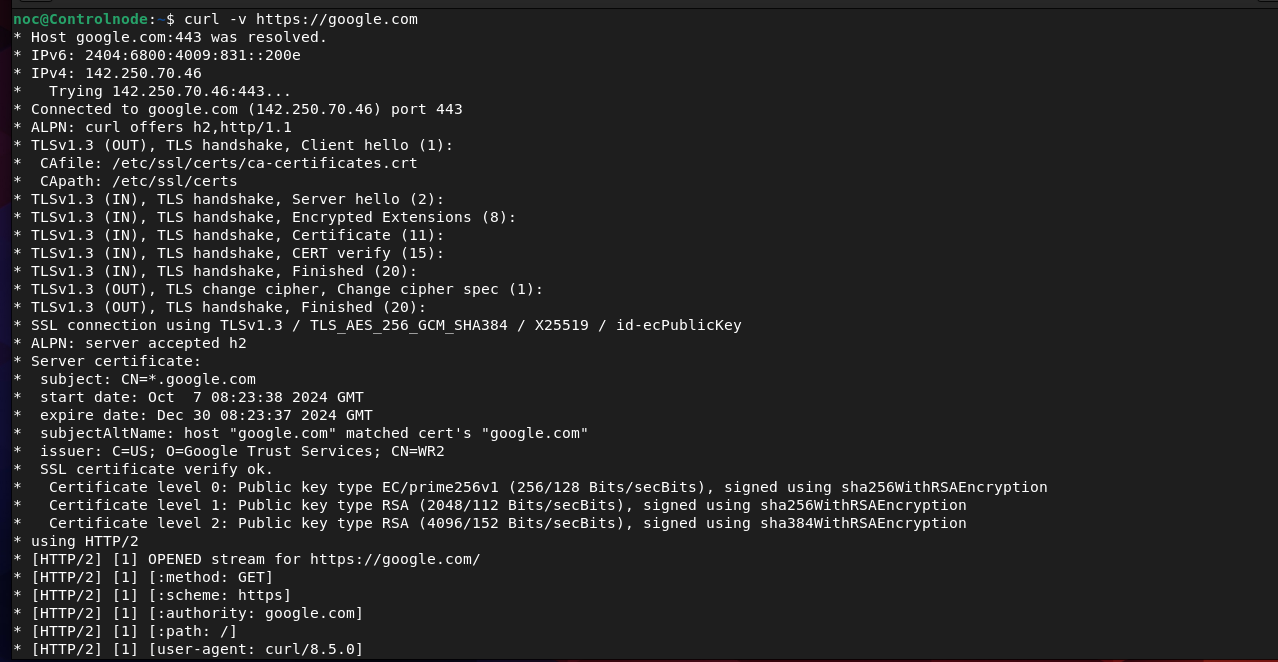
noc@Controlnode:~$ curl -v https://google.com
Primarily designed for interacting with APIs and performing HTTP requests. It supports a wide range of protocols (HTTP, HTTPS, FTP, etc.) and is often used for testing and debugging RESTful APIs.
noc@Controlnode:~$ wget https://wordpress.org/latest.zip
The wget command is a non-interactive utility used for downloading files from the web. It supports HTTP, HTTPS, and FTP protocols, allowing you to fetch files or even mirror entire websites directly from the command line.
In the above example, we download the latest version of WordPress in a compressed ZIP file from the official WordPress website. After downloading, you can unzip it to install or set up WordPress on a server.

7) Text Processing.
noc@Controlnode:~$ grep
The grep command is used to search for specific patterns or strings within files. It scans each line in a file (or output from other commands) and displays lines that match the given pattern.An example of grep was used in the previous few commands.
noc@Controlnode:~$ ps aux | awk ‘{print$1 , $2}’
The awk command is a powerful text-processing tool used for pattern scanning and processing. It allows you to filter and manipulate text, especially in columns, within files or output streams. Commonly used to search, extract, and format data.
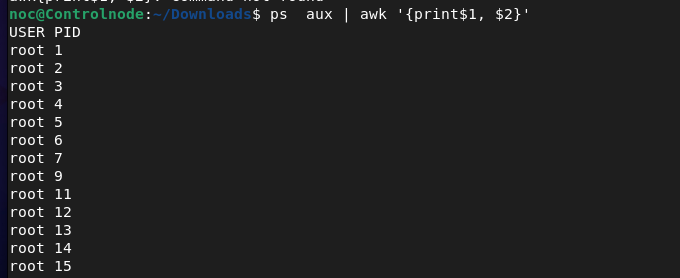
In the above example, we displayed the first two columns of ps aux command.
noc@Controlnode:~$ sed -i 's/800/900/' file1.txt
The sed command is especially known for finding and replacing text in a file, which makes it very handy.
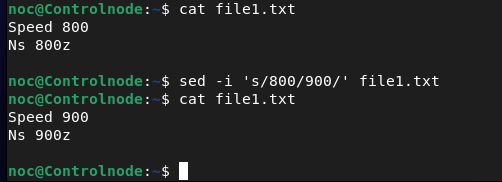
In the above example, all occurrences of lines beginning with 800 in file1.txt have been changed to start with 900.
Text Editor Nano or Vi ?
The debate whether to use nano or vi is debatable if you’re a beginner I would suggest you start out with nano get comfortable then move to vi.
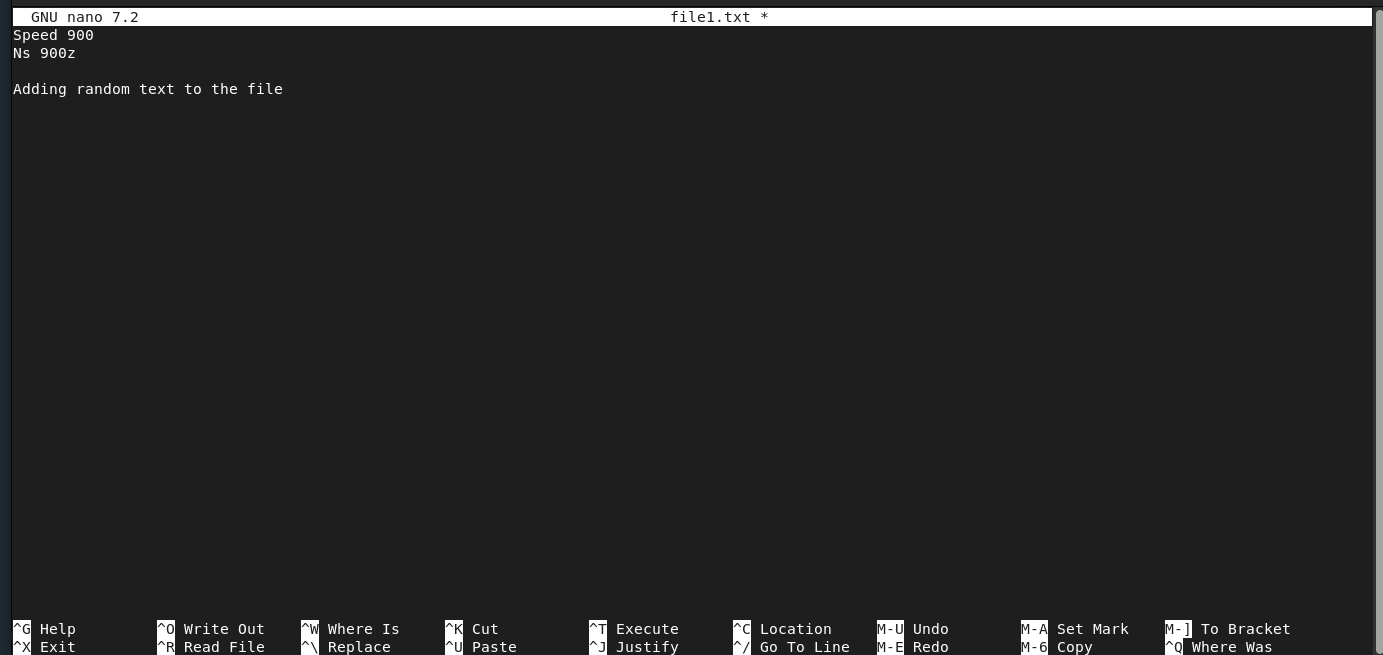
In the example above, we open file1.txt with the command sudo nano file1.txt. We then add some random text to the file.
In nano, you can also search for specific text by pressing CTRL + W and typing the characters to search. To save changes, use CTRL + O, and to exit, use CTRL + X.
8) File Compressing.
Remember the time before computers when offices were organized in general all the files stacked together in the same section this is what archiving means
Archiving refers to the process of combining multiple files or directories into a single file, often for storage or distribution purposes. This is typically done using tools like tar
noc@Controlnode:~$tar -cvf commonfile.tar file1.txt file2.txt

In the above example, we have archived file 1 and file 2 together in a tarball called commonfile.tar if you want to unarchive the tarball again just use the below command.
noc@Controlnode:~$ tar -xvf commonfile.tar
Some people may think archiving and compression are the same, but they’re not. Next, let's look at exactly how they differ.

If you've spent most of your life using Windows, you're likely familiar with WinRAR, which is used to compress files. Similarly, in Linux, compressing refers to reducing the size of files or directories to conserve disk space or improve data transfer efficiency. Popular compression tools in Linux include gzip, bzip2, xz, and zip.
noc@Controlnode:~$ gzip commonfile.tar
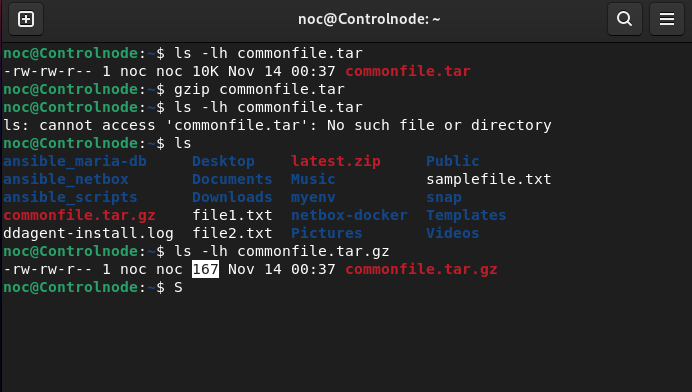
As shown above, the original commonfile.tar archive was 10 KB, but after compression, its size was reduced to just 167 bytes.
In summary, compressing reduces the size of files, while archiving bundles multiple files together. Both are frequently used in tandem, but they serve different purposes.
9) Disk Management.
noc@Controlnode:~$ lsblk
The lsblk command displays information about block devices (e.g., hard drives, SSDs, USB drives) in a tree format, showing details like device name, size, type, and mount points, helping users understand device layouts and mounted filesystems.
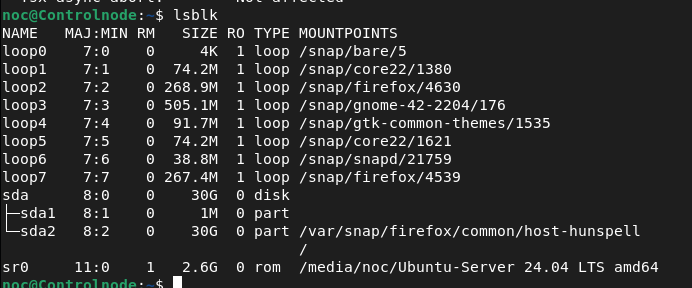
Currently, the only hard drive on my system is sda, which provides around 30GB of storage and is mounted at / (the root of the file system). Let’s proceed by adding a secondary hard drive with a storage capacity of your choice. You can refer to YouTube videos or search online for guidance on adding a hard drive, whether your setup is hosted on the cloud or running on VMware Workstation, depending on your preference.
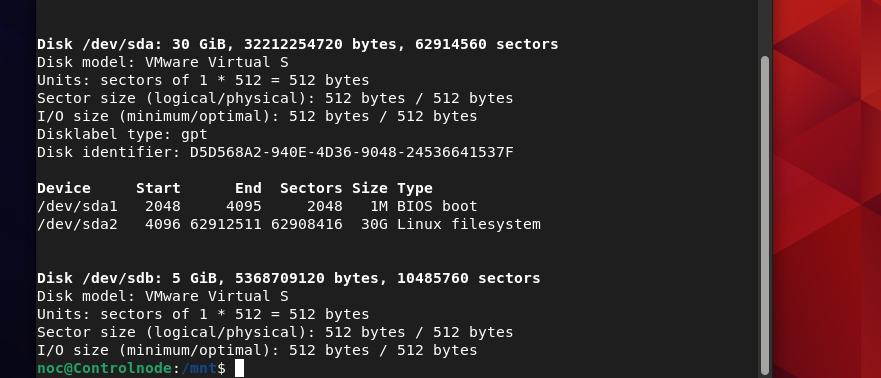
Ensure your system is powered off when adding the new drive. Afterward, I used the fdisk -l command to display a detailed list of both existing and newly attached drives. As you can see, the sdb drive has been successfully added with a storage capacity of 5GB.
Next, we’ll partition the drive.
This is particularly useful in scenarios where you have a 1000GB hard drive and want to create separate 500GB partitions for the system.
noc@Controlnode:~$ sudo fdisk /dev/sdb
The fdisk command along with the drive name allows us to partition the drive with the following options.
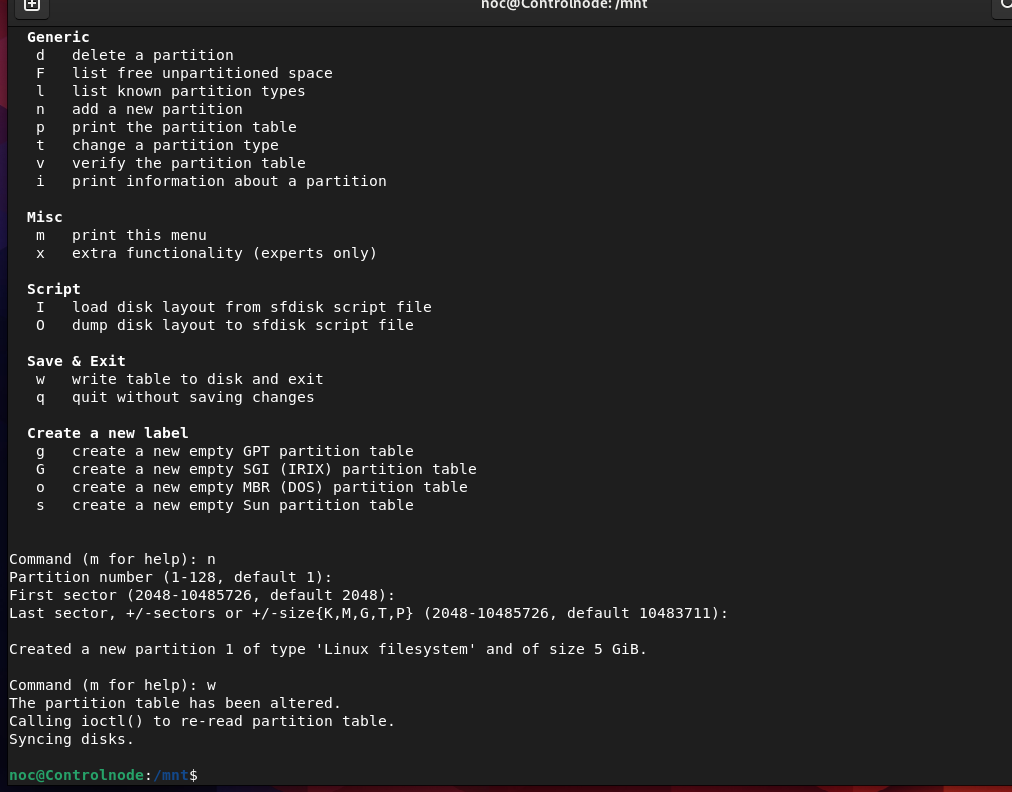
Next, we select the type of partition method we want whether it’s MBR or GPT here`s a short info on both.
MBR (Master Boot Record): An older partitioning standard that supports up to 4 primary partitions and a maximum disk size of 2TB. It stores partition and boot information in the first sector of the disk.
GPT (GUID Partition Table): A modern partitioning standard that supports disks larger than 2TB and allows unlimited partitions (practically limited by the OS). It stores multiple copies of partition information for better reliability and uses UEFI instead of BIOS.
once we select a partition method we create a new partition by selecting n followed by the partition number e.g 1,2,3 next select the first sector as default and the last sector by the type of partition storage you want to create.
First Sector:
This is the starting point of the partition. It specifies where the partition begins on the disk. The first sector value is chosen to align with the disk's partition table and filesystem requirements. By default, fdisk often aligns partitions for optimal performance (e.g., starting at sector 2048).
Last Sector:
This is the endpoint of the partition. It determines the size of the partition based on how many sectors it spans from the first sector. You can specify the last sector manually or use a size (e.g., +5G) to automatically calculate it.
Here’s an example of how to create two 500GB partitions on a 1000GB hard drive. Below are the steps to follow:
Create the First Partition:
Press
nto create a new partition.Select
primarywhen prompted.Accept the default first sector (starting point of the partition).
When asked for the last sector, enter
+500Gto create a partition of 500GB.Create the Second Partition:
Press
nagain to create another partition.Select
primaryagain.Accept the default first sector (it will start right after the first partition).
When prompted for the last sector, enter
+500Gto allocate the remaining 500GB.
Write the Partition Table:
Press w to save changes and exit fdisk.
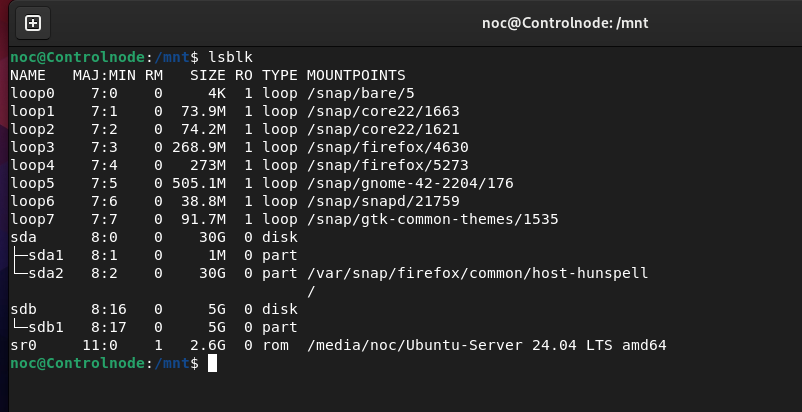
In the previous example, we added a 5GB partition. Next, we proceed to format the filesystem for the newly created partition. Below are the commonly used formats used.
ext Family (Extended Filesystem):
ext2:
Older filesystem, no journaling (faster but less reliable).
Suitable for USB drives or small storage devices.
ext3:
Adds journaling for better reliability during crashes or power loss.
Common in older Linux systems.
ext4:
Default and most widely used Linux filesystem.
FAT Family (Windows Compatibility):
FAT32:
Cross-platform support, but limited to files up to 4GB and volumes up to 2TB.
Common for USB drives and SD cards.
exFAT:
- Improved version of FAT32 with support for large files and volumes.
Widely used for external storage devs.
NTFS (New Technology File System):
Windows-native filesystem.
Linux supports NTFS through tools like
ntfs-3g.
Useful for sharing drives between Linux and Windows systems.
noc@Controlnode:~$ sudo mkfs.ext4 /dev/sdb1
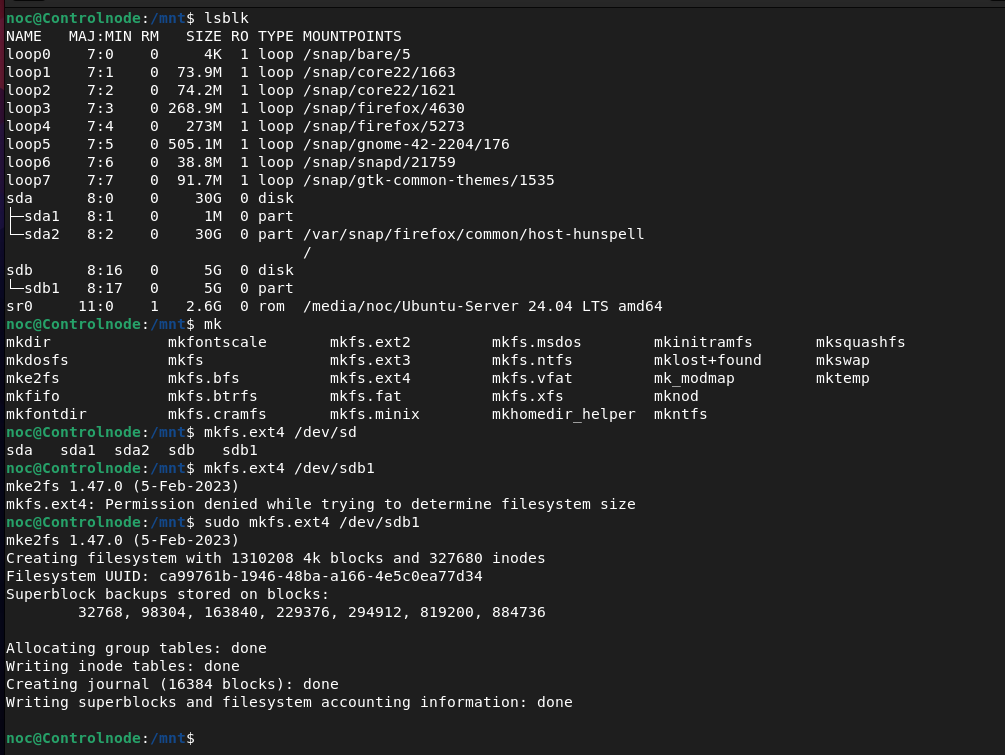
Once the drive is formatted, it still isn't mounted. To mount the drive, I create a directory at /mnt/Mount-test. You can mount the drive at any location in the filesystem, but it's common practice to use /mnt for hard drives and /media for media devices like CD drives or USB drives.
noc@Controlnode:~$ sudo mount /dev/sdb1 /mnt/Mount-test
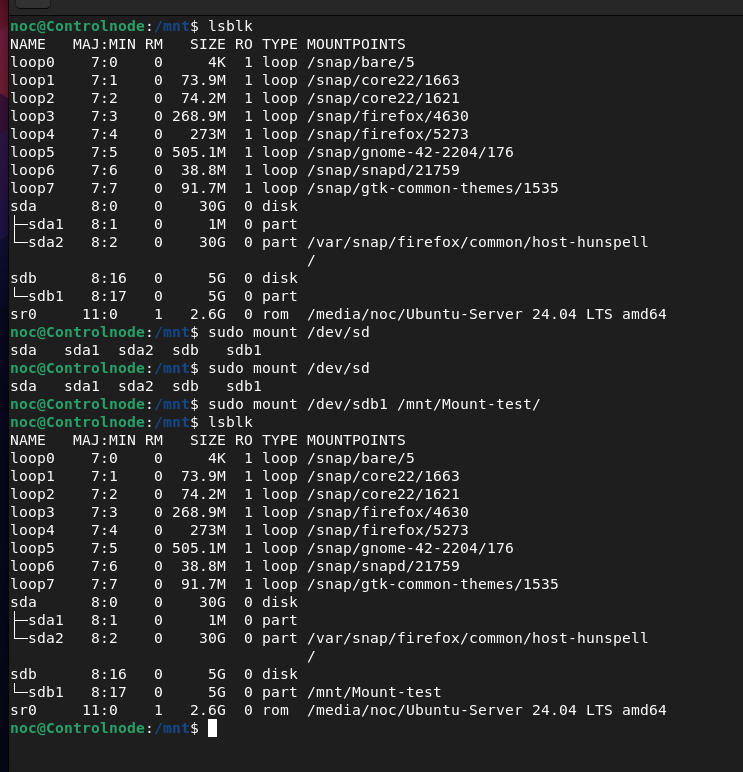
A bonus tip: After rebooting the system, the mounting point will be lost because the changes are not permanent. To make them permanent, you need to edit the /etc/fstab file. Here are the changes you need to make:
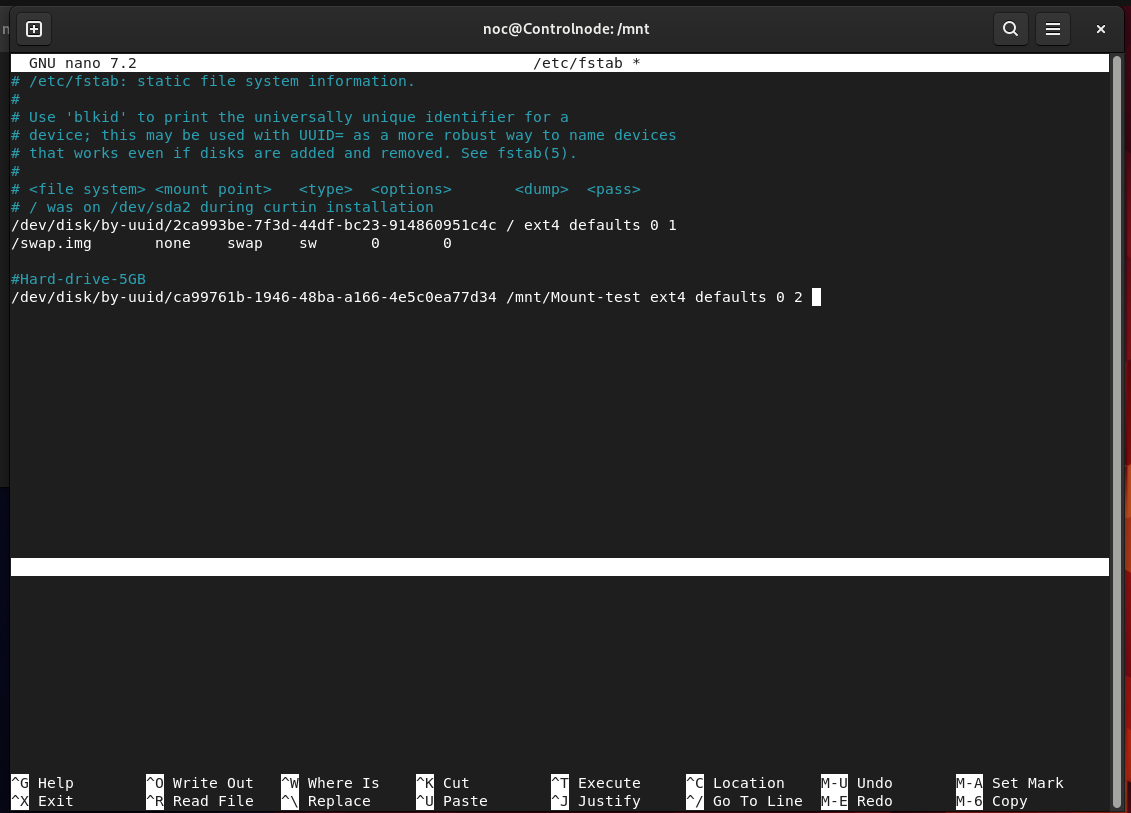
To add the ID of the second hard drive to the /etc/fstab file, you can first find the drive ID using the blkid command e.g blkid /dev/sdb1 then, in the /etc/fstab file, include the drive ID, followed by the mount point, format type, options (set to defaults), and the 0 and 2 values for dump and pass, respectively.
Here`s a short explanation of the option selected
1. Options:
This column defines the mount options that specify how a filesystem should be mounted. These options affect the behavior of the filesystem (e.g., read-only, noatime, etc.). Some common options include:
defaults: A set of standard options, includingrw(read-write),suid(allow setuid programs),dev(device files),exec(allow execution of binaries), andauto(automatically mount at boot).ro: Mount the filesystem as read-only.rw: Mount the filesystem as read-write.noatime: Do not update the access time for files when they are read.nosuid: Ignore set-user-identifier (setuid) and set-group-identifier (setgid) bits.nodev: Do not interpret device files on the filesystem.nofail: Allow the system to boot even if the device is not available.
2. Dump:
This column is used by the dump command, which is a utility for backing up file systems. It determines whether or not the filesystem should be backed up.
0: Do not dump (no backup).1: Dump the filesystem (include it in backups).
Typically, most filesystems are set to 0, meaning they are not backed up by dump. For the root filesystem (/), this would generally be set to 1 to include it in the backup.
3. Pass:
The pass column is used by the fsck (filesystem check) utility to determine the order in which filesystems should be checked at boot time.
0: Do not check the filesystem (skipsfsckon boot).1: Check this filesystem first, typically used for the root filesystem (/).2: Check other filesystems after those with1.
The root filesystem usually has an 1 in this field to ensure it's checked first. Other filesystems are typically set to 2 check after the root filesystem.
10) Package Manager.
apt (Advanced Package Tool) is a command-line tool used in Debian-based Linux distributions (like Ubuntu or Debian) for managing software packages. It simplifies tasks like installing, updating, and removing packages, and handling dependencies automatically. Common commands include
noc@Controlnode:~$ sudo apt update && upgrade.
11) Bash Scripting
Bash scripting is the process of writing scripts in the Bash (Bourne Again Shell), a command-line interpreter used in Linux and other Unix-like operating systems. These scripts are essentially a series of commands written in a text file that the shell can execute in sequence.
Bash scripts are commonly used for automating tasks such as file management, system monitoring, backups, and process automation. They support variables, conditionals (e.g., if, else), loops (e.g., for, while), functions, and input/output redirection, making them versatile and powerful for system administration and other tasks.
#!/bin/bash

# Define the file name or creating a variable
filename="myfile.txt"

# Create the file and write some text
echo "This is a new file created by the Bash script." > $filename

# Confirm the file creation
echo "File '$filename' has been created and text has been written."
In the above example, we create a simple Bash script where we declare a variable called filename with the value myfile.txt. We then use the echo command to direct text into the file specified by the variable. Finally, we use the echo command again to confirm the creation of the file by the bash script.
Additionally, you can schedule the execution of the Bash script using crontab, which functions similarly to the Windows Task Scheduler.
IF YOU HAVE FOUND THE ARTICLE HELPFUL HIT THE LIKE BUTTON.
Thank you Happy Learning :)
Subscribe to my newsletter
Read articles from Sumeet directly inside your inbox. Subscribe to the newsletter, and don't miss out.
Written by
Sumeet
Sumeet
Skilled in managing carrier-grade ISP infrastructure, enterprise environments, and server operations. Enthusiastic about optimizing high-performance networks and exploring emerging technologies. Committed to continuous learning and driven to leverage cloud solutions and automation tools to enhance innovation and efficiency.