Create Resources on AWS Using Ansible
 Harsh Soni
Table of contents

If you're starting with cloud automation using Ansible, setting up AWS resources is a great project to try. In this blog, I'll show you how I created an AWS EC2 instance with Ansible. This guide is easy to follow and meant for anyone who knows the basics of Ansible and AWS.
Prerequisites
Before starting, ensure you have the following:
An AWS account.
Ansible installed on your local machine.
Python installed, along with the boto3 module.
Step 1: Install the Required Collections and Libraries
Ansible uses collections to support specific platforms or tools. For AWS, you'll need the amazon.aws collection and the Python boto3 module.
Install AWS Collection:
ansible-galaxy collection install amazon.aws
Install Boto3 Module:
pip install boto3
Step 2: Create a Role for EC2 Management
Roles in Ansible help organize tasks, making your playbooks modular and reusable. Start by creating a role for managing EC2 instances.
ansible-galaxy role init ec2
This command creates a directory structure where you can add your tasks, variables, and other configurations.

Step 3: Set Up AWS Credentials
To access AWS APIs, you'll need to use an Access Key and Secret Key. However, storing these keys securely is critical. Here's how you can handle it safely using Ansible Vault.
Secure AWS Credentials with Ansible Vault
Generate a Vault Password:
Use the following command to create a secure vault password file.openssl rand -base64 2048 > vault.passCreate a Vault File for AWS Credentials:
Store your AWS Access Key and Secret Key in a YAML file. Use Ansible Vault to encrypt it.ansible-vault create group_vars/all/pass.yml --vault-password-file vault.passInside pass.yml, add your AWS credentials:
 aws_access_key: YOUR_ACCESS_KEY
 aws_secret_key: YOUR_SECRET_KEY

Step 4: Create the Playbook
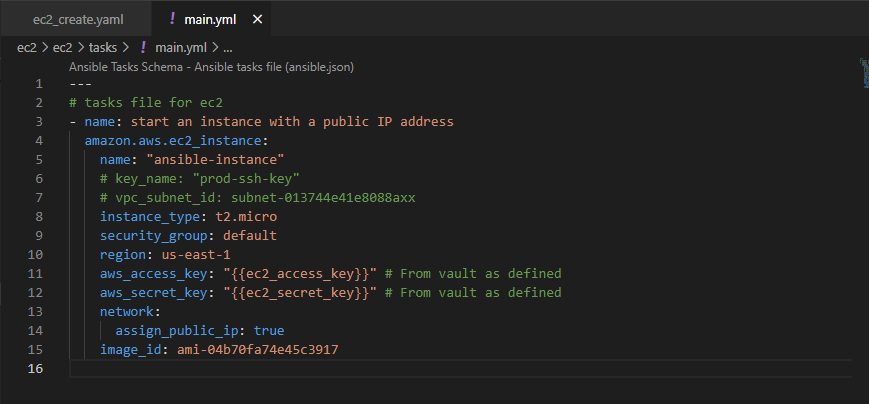
Now, let’s write the playbook to create an EC2 instance. Below is an example of a playbook file, ec2_create.yaml:

Step 5: Execute the Playbook
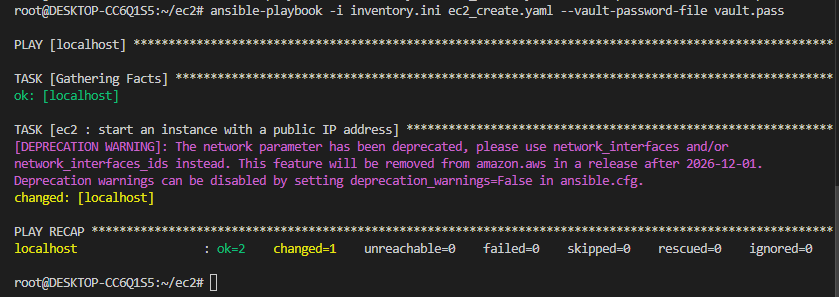
With everything set up, it's time to run the playbook and create your EC2 instance!
ansible-playbook ec2_create.yaml --vault-password-file vault.pass
Once executed, Ansible will launch the EC2 instance, and you’ll see the instance ID in the output.


Success!
Congratulations, you've successfully created an EC2 instance on AWS using Ansible. 🎉
This simple example can be a starting point for automating more complex infrastructure setups. With Ansible's power and AWS's scalability, the possibilities are endless.
Let me know in the comments if you tried this or if you have any questions!
Happy automating! 🚀
Subscribe to my newsletter
Read articles from Harsh Soni directly inside your inbox. Subscribe to the newsletter, and don't miss out.
Written by

Harsh Soni
Harsh Soni
👋 Hello! I'm Harsh, a DevOps enthusiast driven by a passion for continuous learning and innovation. With hands-on experience across cloud platforms, infrastructure tools, and programming languages, I'm committed to creating scalable, automated, and efficient solutions. Let’s connect, share knowledge, and build amazing things together! SKILLS: 🔹Languages & Runtimes: Python, C#, Shell Scripting, YAML 🔹Cloud Expertise: AWS (proficient in EC2, ELB, EBS, S3, VPC, Route53, SES, SNS, CloudFormation, CloudWatch) 🔹Infrastructure & DevOps Tools: Docker, Terraform, AWS CloudFormation 🔹Development & CI/CD: Linux, Git, GitHub Actions, Jenkins, Jira, GitLab (beginner), AWS DevOps 🔹Web Development: HTML, CSS, Bootstrap, .NET, Python, SQL Why Connect with Me? I'm a detail-oriented professional with strong communication skills, always ready to tackle complex problems with a positive mindset. Whether you’re here to network or explore potential collaborations, feel free to reach out. Let’s grow together in the DevOps journey! 📧 Contact Me: harshsoni6011@gmail.com