Day 6 : File Permissions and Access Control Lists
 Saad Asif Mujawar
Table of contents

Task 1 : Understanding File Permissions
- Create a simple file and run ls -ltr to see the details of the files.
Each of the three permissions are assigned to three defined categories of users. The categories are:
Owner: The owner of the file or application. Use
chownto change the ownership permission of a file or directory.Group: The group that owns the file or application. Use
chgrpto change the group permission of a file or directory.Others: All users with access to the system (outside the users in a group). Use
chmodto change the other users' permissions of a file or directory.
- Change the user permissions of the file and note the changes after running ls -ltr.
Solution :

We first created a file name demofile.txt using touch command. Then we used ls -ltr to see details of the file. As you can it shows file’s permissions, user, group, date, and time along with file name. Then, we did some permission, user, and group changes of the file. We used chown to change the owner of the file to demo_new_user. Used chgrp to change group of file to demo_new_group. And chmod to change permissions of file, we gave the execution permission to all (owner, group, others) by +x. Now, when we saw file details again, you can see the changes in details.
If you are thinking how to create new user and new group, Here’s the solution

Use useradd -m <name_of_user> to create new user. Use groupadd <name_of_group> to create new group, done.
Task 2 : Writing an Article
- Write an article about file permissions based on your understanding from the notes.
Solution :
FILE PERMISSIONS
File Permissions are nothing but the Permissions to access, edit, and execute the file. It is known as Read, Write and Execute and denoted as r w x respectively.
These permissions are given to User, Group, and to Others as per requirement.
Now what is meant by:
User : User is a owner who owns the file or who created a file.

The highlighted ubuntu is the name of the user (owner) of the file.
Group : Group is a collection of users, if a group have some permissions, then all the users under the group are can also have the same permissions.

The highlighted ubuntu is the name of the group under which file comes.
Others : Other means all other users which aren’t the owner or they aren’t under any group.
If you have understood the above three terms, its time to know how to give or modify the permissions to these three. First of all have a look on this
- rwx rwx rwx
As u can see the hyphen - in the beginning, it indicates that this is a file. If there is d instead of - it means this is a Directory (Folder).
First set of rwx : This indicates the permissions of the Owner. Second set of rwx : This indicates the permissions of the User. Third set of rwx : This indicates the permissions of Other users.
As we know r for Read, w for Write, and x for Execute permission. But if there is - at the place of any of these threes For Eg. rw- r-- r-- it indicates that User have Read and Write permission but not the Execute permission, And Group and Other users only have Read permission but not the Write and Execute permission. In short - denotes No particular permission.
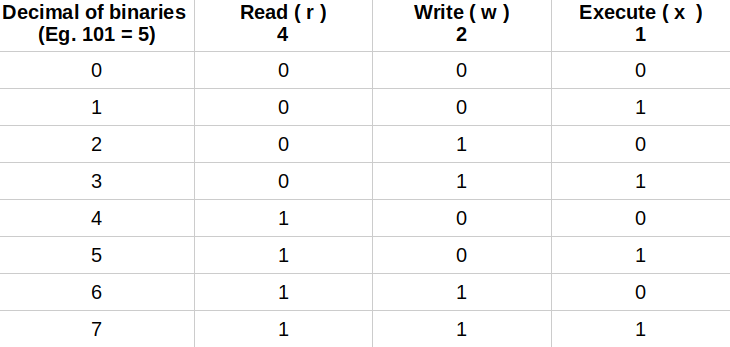
If you know about binary to decimal conversion, then definitely you’ll get the above table, if not don’t worry. Just keep in mind that values of Read = 4, Write = 2, Execute = 1. Now whatever permissions you want to give to Owner, Groups, and Other user, just give the values. For example you want to give permission of just Read so give 4, if you want to give Read + Write (i.e 4 + 2) so give 6.
Let’s take an example, we created a file demo.txt, and then when we check its details the file have Read & Write permissions to Owner & Group, and Read only permission to Other users (i.e rw- rw- r--). Now i want to give Execute permission to the Owner and Group but i don’t want to give any permission to Other users, so i’ll give 770 (i.e 7 for all permission to Owner, 7 for all permission to group, and 0 for no permission to Other users).

Let’s take another one more example so that you’ll understand it clearly. Suppose we have to give Read & Write permissions to the Owner & User and to Other users we just want to give execute permission, for this we’ll give 551 (i.e 5 for Read Write permission to Owner, 5 for Read Write permission to group, and 1 for Execute permission to Other users). Hope you got the idea !

NOTE : To modify owner and group of the file, see the task 1, it covers this things.
Task 3 : Access Control Lists (ACL)
- Read about ACL and try out the commands getfacl and setfacl.
Solution :
What is ACL? ACL stands for Access Control List, it is the feature in Linux that allows us to give specific permissions to Users, Groups and Other users for files or directories. It is more flexible to assign permissions than the standard file permission methods. It includes two commands getfacl and setfacl.
This requires ACL to be installed on your system. If it's not installed, run the sudo apt-get install acl command, and you'll be able to use these commands.
Getfacl : getfacl stands for Get File Access Control List. It is the command to get the file details in a systematic manner. It display info about file’s owner, group, and permissions.
Setfacl : setfacl stands for Set FIle Access Control List. It is used to set the permissions, or to modify Owner, Group of the file.
- Create a directory and set specific ACL permissions for different users and groups. Verify the permissions using getfacl.
Solution :
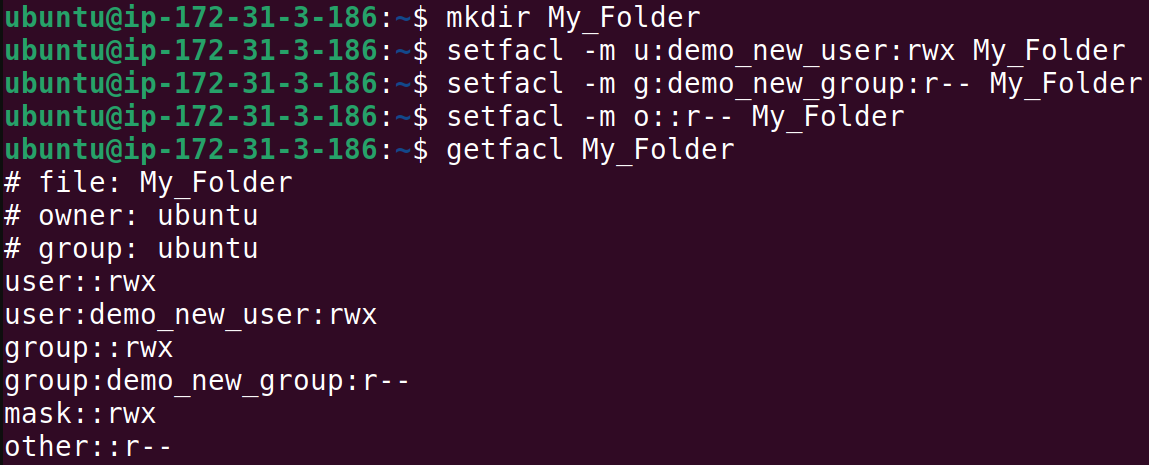
Let’s do an Example : We created a directory My_Folder by mkdir. Then we assigned Read, Write and Execute permissions to the User demo_new_user for My_Folder directory. And we assigned Read only permission to the group demo_new_group and Other users. Now when we run getfacl , you can see the details of a directory.
Task 4 : Additional Tasks
- Create a script that changes the permissions of multiple files in a directory based on user input.
Solution :
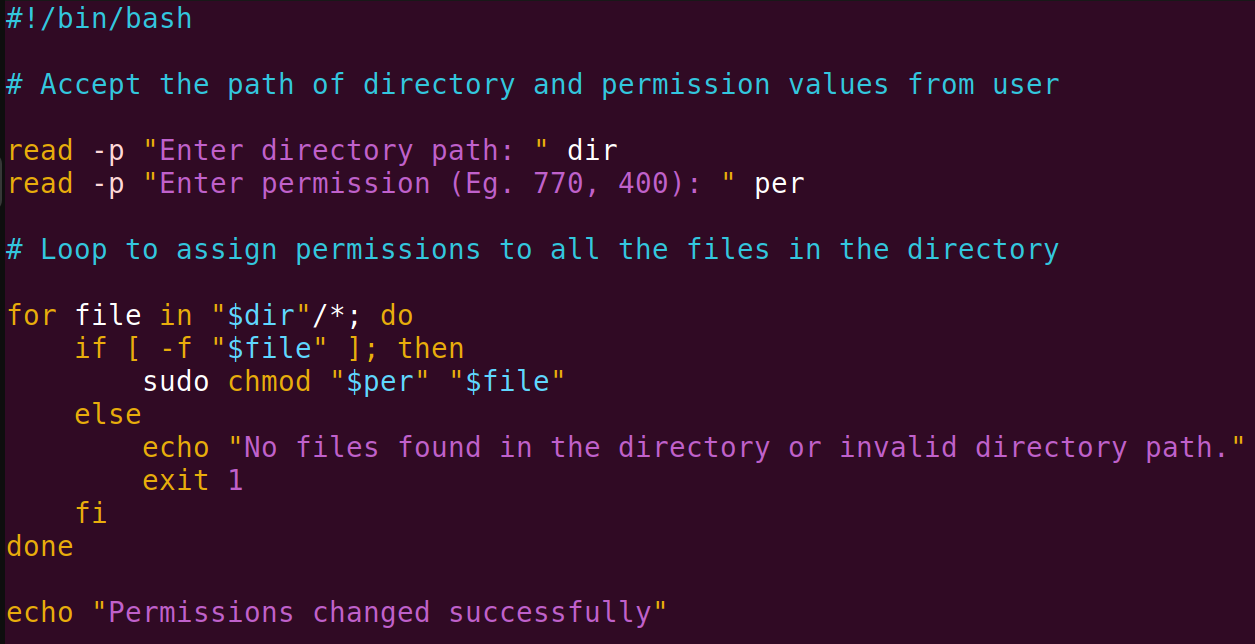
Script to alter the file permissions present in given directory by user :
Explanation :
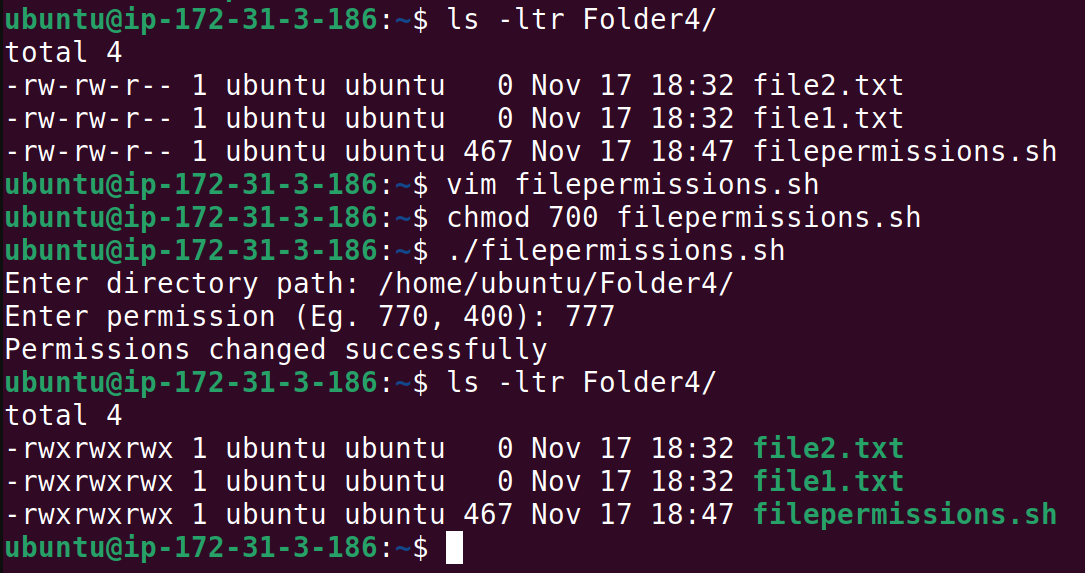
We have a folder named Folder4, as you can see it contains 3 files. We made a script using vim and gave execute permission to it using chmod 700 and executed it ./filepermissions.sh. We give a path of directory and give 700 permission. Now you can see files got the permissions we gave.
- Write a script that sets ACL permissions for a user on a given file, based on user input.
Solution :
Script for ACL permission :
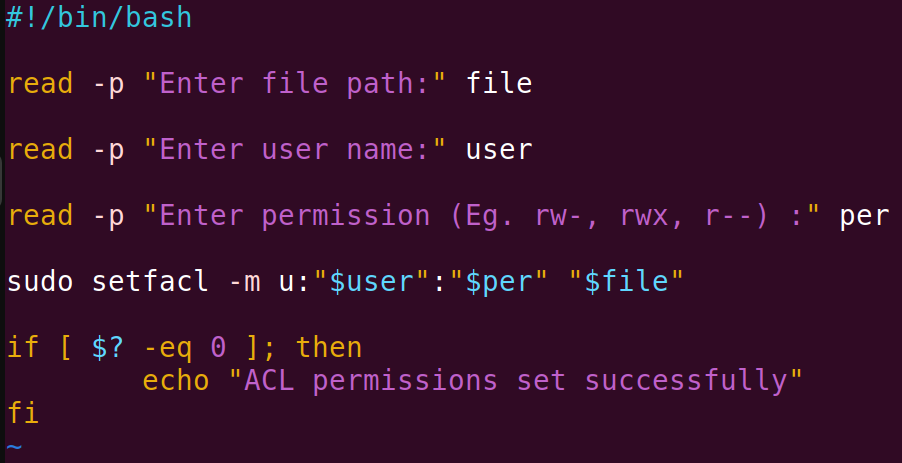
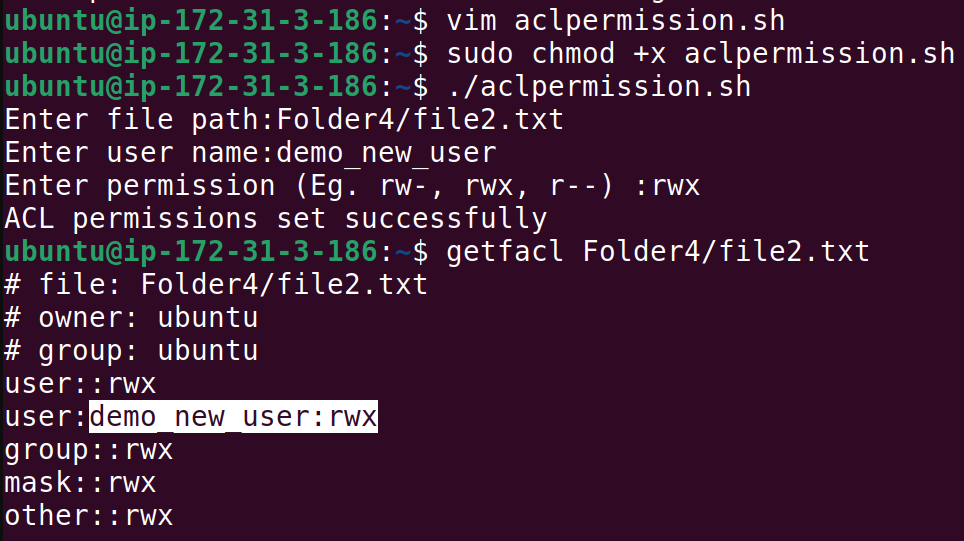
Explanation :
We create a script that’ll accept file path, username and permissions to assign from user and set the permission by setfacl. Then we gave execute permission to it sudo chmod +x aclpermission.sh . We changed the permissions of a user of file as you can see the highlighted line.
Task 5 : Understanding Sticky Bit, SUID, and SGID
- Read about sticky bit, SUID, and SGID.
Solution :
What is Sticky bit? Sticky bit is a permission in Linux generally used on directories. It restrict changes in file name and deletion of files within that directory to Other users even if they have Write permission. Only owner of the directory or root user can rename or delete the files within that directory.

See the image, we made a Folder and allocate it sticky bit chmod +t New_Folder and check its details ls -ld New_Folder. You can see that t at the end drwxrwxr-t says that sticky bit is set to the directory. This will protect the Directory from being deleted or renamed by Other users.
If you want to remove sticky bit, just use chmod -t New_Folder.
What is SUID? SUID (Set User ID) is a type of permission that allows other users to execute a file with the permissions of file owner, even if that user doesn’t have execute permission. It is like giving temporary root user like permissions.

Here u you can see, you can use chmod u+s file1.txt to set SUID. When you see the file details you can see that S in user permissions -rwSrw-r-- indicates that the file have SUID.
To remove the SUID use chmod u-s file1.txt.
What is SGID? SGID (Set Group ID) is a type of permission similar to SUID, it allows other group to execute a file with the permissions of file’s group, even if that group doesn’t have execute permission. It is like giving temporary root user like permissions.

Here u you can see, you can use chmod g+s file2.txt to set SGID. When you see the file details you can see that S in groups permissions -rw-rwSr-- indicates that the file have SGID.
Task 6 : Backup and Restore Permissions
- Create a script that backs up the current permissions of files in a directory to a file.
Solution :
Script for backup current permission of files in a directory :
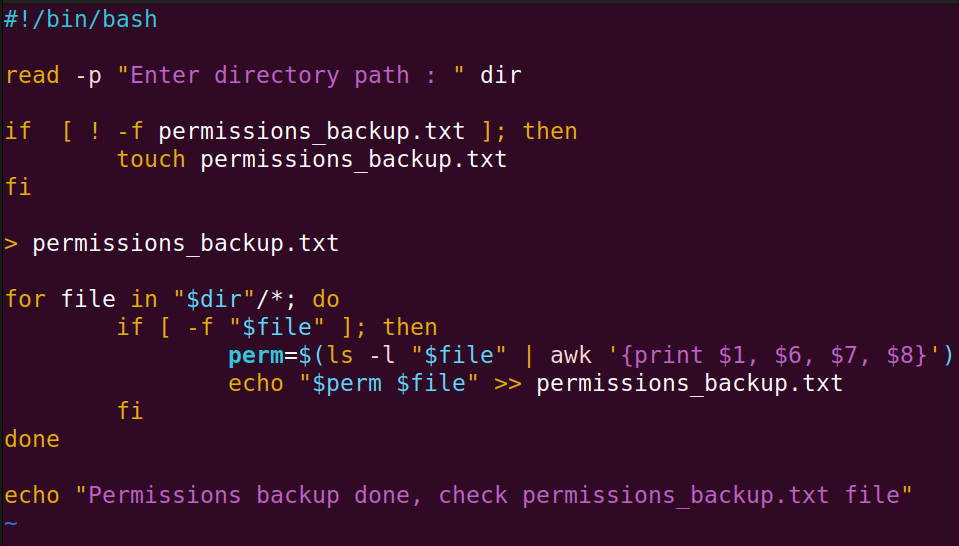
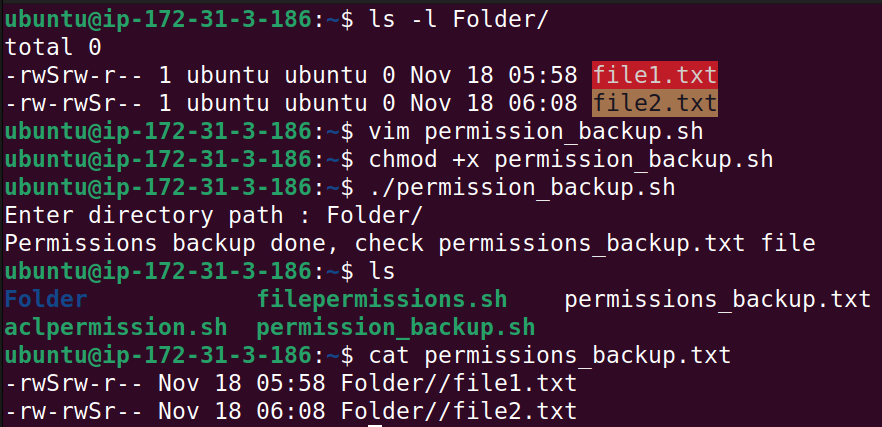
In a Folder there are two files, we created vim permission_backup.sh script, gave it the execute permission chmod +x permission_backup.sh. After executing ./permission_backup.sh you can see that permissions_backup.txt file is created which contains current permission information.
- Create another script that restores the permissions from the backup file.
Solution :
Script for permission restore from backup file :
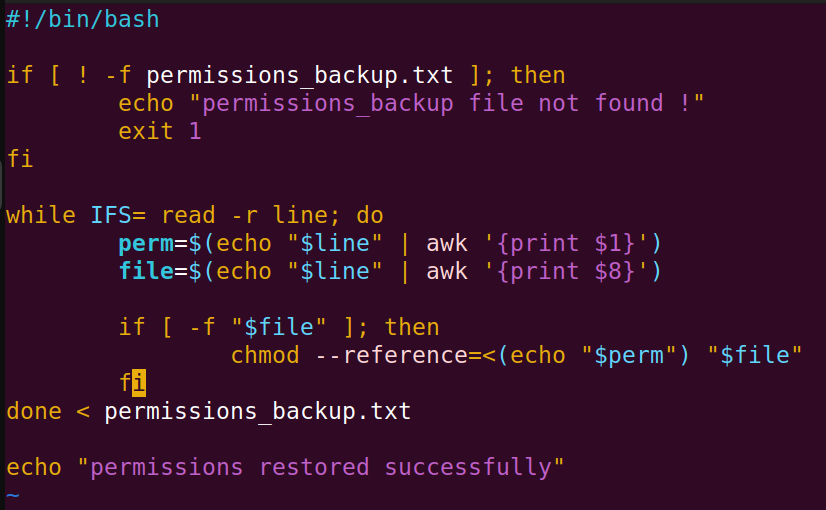

Give execute permission to script chmod +x restore_permissions.sh and execute it ./restore_permissions.txt to restore permissions.
Here we completed the task.
Follow to learn more with us, keep learning !
Also follow on LinkedIn for updates .
Subscribe to my newsletter
Read articles from Saad Asif Mujawar directly inside your inbox. Subscribe to the newsletter, and don't miss out.
Written by
Saad Asif Mujawar
Saad Asif Mujawar
Hi, I am Saad, an aspiring DevOps Engineer. My specialization and career interest lie in DevOps and Cloud Computing. I have a deep interest in automating post-development processes with innovative tools and methodologies. I'm always eager to explore and adopt new technologies in DevOps that can help streamline workflows and optimize performance.