Efficient Flutter App Development Using Clean Architecture
 Robin
RobinDeveloping an application can be a messy task, especially as the app grows. This growth can lead to bugs, disrupted workflows, and difficulties in refactoring. That’s why different architectures have been developed to help manage this complexity. One such architecture is Clean Architecture, which I will present and explain to you today. Let’s dive right in!
What is Clean Architecture?
Clean Architecture is a design pattern that focuses on splitting your app’s code into three distinct layers. By doing so, you separate the concerns of your code efficiently, making it easier to test and maintain in the long run.
Why do we need Clean Architecture?
Clean Architecture aims to solve a few common problems. Code is often tightly coupled, meaning that a change in part A often also requires a change in part B. In a small app, that might not be a problem, but in larger applications, adding a new feature should not require changing 30 different classes across multiple files. Clean Architecture solves that problem by splitting each concern into its own section. Doing so greatly improves code maintenance and allows easier testing because each section can be tested individually. If one section needs to be refactored or changed, you can do so without affecting the rest of the codebase.
The 3 Layers
Now that we understand what Clean Architecture is and why we need it, we can move on to understand how it actually works. I talked about splitting the code into different sections; these sections are called layers. In a Flutter application, the code is split into 3 main layers: data, domain, and presentation.
Presentation Layer
Inside the presentation layer will be all of the UI-related code. You should split this layer into 3 more parts: pages, widgets, and states. Widgets will be responsible for all the UI elements. All of these widgets should be stateless and should not handle any state, meaning that all values should just be passed, and all methods that might be needed to change the state should be passed as callbacks to these widgets. Inside the states section will be all the state logic (ChangeNotifier or whatever you might use). The pages will then use the widgets and the states to combine everything into the app's presentation. Here you will use stateful widgets, if needed. Each major part of your app should have a corresponding page in this section.
Domain Layer
This layer is responsible for handling the business logic and is the communication point between the presentation layer and the data layer. You should again split this layer into 3 parts: entities, repositories, and use cases. Entities will be the object classes holding your data. The repositories are abstract classes that define the methods needed to transfer entities from the frontend to the backend. Use cases are classes that use an implementation of the abstract repositories to actually get the data and pass it to the presentation layer. Every business logic should lie here. Each interaction that a user can do inside the app should have its own use case. Important for the data layer is that it has no references to any other layer and should work fully on its own (no Flutter code, only Dart).
Data Layer
At last, there is the data layer, responsible for saving and retrieving the data. Whether this is done through API calls to a backend server or through a local database on the device is not important. This layer will be split into 3 parts as well: Data Source, Models, Repositories. The Data Source is either a local database API or an external API. The Models represent the data in a format that the data source understands. The repositories are the implementation of the abstract classes inside the domain layer and are responsible for communicating directly with the data source and converting the data into the correct format for the domain layer to receive.
Practical Example
To show you this architecture in practice, I built a classic todo application. Inside, you can create todos, delete todos, and check them for being done. No fancy stuff here, just some simple requirements, so you can focus on the architecture part.

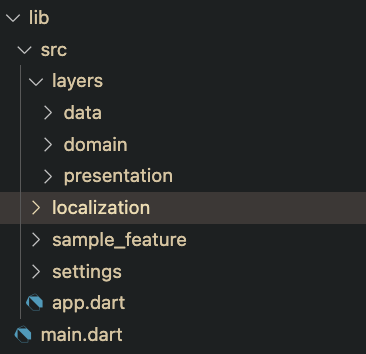
Inside the libs folder, I created the 3 folders, representing each layer. This is the first step for starting a clean architecture project. Because the domain layer can work fully on its own and does not depend on any other layer, we will start by implementing this one.
Domain Layer

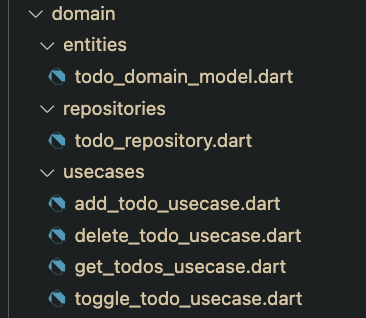
Like I said, the domain layer is split into 3 sections again.
Entities
// todo_domain_model.dart
class TodoDomainModel {
  TodoDomainModel(this.id, this.title, this.isCompleted);
  int? id;
  String title;
  bool isCompleted;
}
In my entities folder, there is just this todo domain model with 3 properties.
Repository
// todo_repository.dart

abstract class TodoRepository {
  Future<void> addTodo(TodoDomainModel todo);
  Future<void> updateTodo(TodoDomainModel todo);
  Future<List<TodoDomainModel>> getTodos();
  Future<void> deleteTodo(TodoDomainModel todo);
}
The TodoRepository is an abstract class that defines what actions are needed for the use cases to work (no actual implementation here).
Usecases
// add_todo_usecase.dart
class AddTodoUsecase {
  final TodoRepository todoRepository;
  AddTodoUsecase(this.todoRepository);

  Future<void> call(String name) async {
    var todo = TodoDomainModel(null, name, false);
    await todoRepository.addTodo(todo);
  }
}

// delete_todo_usecase.dart
class DeleteTodoUsecase {
  final TodoRepository todoRepository;
  DeleteTodoUsecase(this.todoRepository);

  Future<void> call(TodoDomainModel todo) async{
    await todoRepository.deleteTodo(todo);
  }
}
// get_todo_usecase.dart
class GetTodosUsecase {
  final TodoRepository todoRepository;
  GetTodosUsecase(this.todoRepository);

  Future<List<TodoDomainModel>> call() async{
    return await todoRepository.getTodos();
  }
}
// toggle_todo_usecase.dart
class ToggleTodoUsecase {
  final TodoRepository repository;
  ToggleTodoUsecase(this.repository);

  Future<void> call(TodoDomainModel todo) async{
    todo.isCompleted = !todo.isCompleted;
    repository.updateTodo(todo);
  }
}
Each use case gets its own class and its own file, each doing just one thing. Every use case gets a TodoRepository passed. The actual implementation of this repository is irrelevant for the use cases, as long as they implement the original TodoRepository. For this example, there is not much business logic inside these use cases, but in the ToggleTodoUsecase, you can see that the isCompleted property is getting inverted, which is already some type of business logic.
Data Layer

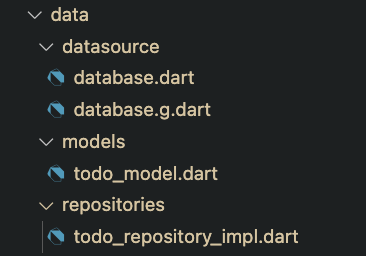
Moving on to the data layer. As you can see, I split the layer into 3 sections again.
Datasource
// database.dart
import 'package:drift/drift.dart';
import 'package:drift_flutter/drift_flutter.dart';
import './../models/todo_model.dart';

part 'database.g.dart';

@DriftDatabase(tables: [Todos])
class AppDatabase extends _$AppDatabase{
  AppDatabase(): super(_openConnection());

  @override
  int get schemaVersion => 1;

  static QueryExecutor _openConnection(){
    return driftDatabase(name: "tododb");
  }
}
I chose the drift database as my local database implementation. This file creates the AppDatabase class, which will be used to save and retrieve data from a local SQLite database. You don't need to understand how that works because it is drift-related. The only important part is @DriftDatabase(tables: [Todos]), because here we pass the Todos model to our database.
The second file you saw in the screenshot of the datasource section (database.g.dart) is also not important; this is just some drift-related code that gets generated when you use drift. If you want to understand more about drift, you can check out my blog post here.
Models
import 'package:drift/drift.dart';

class Todos extends Table {
  IntColumn get id => integer().autoIncrement()();
  TextColumn get title => text().withLength(min: 1, max: 50)();
  BoolColumn get isCompleted => boolean().withDefault(const Constant(false))();
}
This class represents the TodoDomainModel in a format that the datasource (drift) can understand.
Repositories
  final AppDatabase database;
  TodoRepositoryImpl(this.database);
  @override
  Future<void> addTodo(TodoDomainModel todo) async{
      final companion = TodosCompanion(
        title: Value(todo.title),
        isCompleted: Value(todo.isCompleted)
      );
      await database.into(database.todos).insert(companion);
  }
  @override
  Future<void> updateTodo(TodoDomainModel todo) async {
    if (todo.id == null) {
      return;
    }
    final companion = TodosCompanion(
        title: Value(todo.title),
        isCompleted: Value(todo.isCompleted));
    await (database.update(database.todos)
          ..where((tbl) => tbl.id.equals(todo.id as int)))
        .write(companion);
  }
  @override
  Future<List<TodoDomainModel>> getTodos() async{
      var wordPairDbModels = await database.select(database.todos).get();
      List<TodoDomainModel> domainModels = [];
      for(final todo in wordPairDbModels){
          domainModels.add(TodoDomainModel
          (
            todo.id,
            todo.title,
            todo.isCompleted
          ));
      }
      return domainModels;
  }
  @override
  Future<void> deleteTodo(TodoDomainModel todo) async{
    if(todo.id == null){
      return;
    }
     await (database.delete(database.todos)
          ..where((tbl) => tbl.id.equals(todo.id as int))).go();
  }
}
The TodoRepositoryImpl implements the TodoRepository from the domain layer. Here, we implement the actual code that communicates with the datasource using the previously created AppDatabase class. Notice how I convert the Todo types from the drift source into TodoDomainModels before returning them. This step is crucial to prevent the domain layer from depending on the data layer.
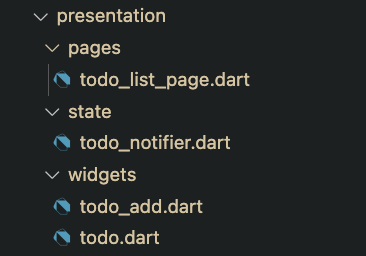
Presentation Layer

As you can see, this layer is again split into three sections. Before we look into each file, it is important to understand how I communicate with the domain layer. In this practical example, I used providers to be able to call the different use cases and change the state of my UI. A provider is just a way to tell your app how to create a class and what dependency it needs, so you don’t have to manually do that every time you want to use one of them. Instead, you just call the provider of that class type to get the instance anywhere in your UI code. This configuration is usually done at the very top of your application, in my case in the app.dart file inside the build method of the MyApp class.
class MyApp extends StatelessWidget {
  const MyApp({
    super.key,
    required this.settingsController,
  });

  final SettingsController settingsController;

  @override
  Widget build(BuildContext context) {
    // Glue the SettingsController to the MaterialApp.
    //
    // The ListenableBuilder Widget listens to the SettingsController for changes.
    // Whenever the user updates their settings, the MaterialApp is rebuilt.
    return MultiProvider(
        providers: [
          Provider<AppDatabase>(
            create: (_) => AppDatabase(),
            dispose: (_, db) => db.close,
          ),
          ProxyProvider<AppDatabase, TodoRepositoryImpl>(
              update: (_, db, __) => TodoRepositoryImpl(db)),
          ProxyProvider<TodoRepositoryImpl, AddTodoUsecase>(
              update: (_, repo, __) => AddTodoUsecase(repo)),
          ProxyProvider<TodoRepositoryImpl, GetTodosUsecase>(
            update: (_, repo, __) => GetTodosUsecase(repo),
          ),
          ProxyProvider<TodoRepositoryImpl, DeleteTodoUsecase>(
            update: (_, repo, __) => DeleteTodoUsecase(repo),
          ),
          ProxyProvider<TodoRepositoryImpl, ToggleTodoUsecase>(
            update: (_, repo, __) => ToggleTodoUsecase(repo),
          ),
          ChangeNotifierProvider(
            create: (context) => TodoNotifier(
                getTodosUseCase:
                    Provider.of<GetTodosUsecase>(context, listen: false),
                addTodoUseCase:
                    Provider.of<AddTodoUsecase>(context, listen: false),
                deleteTodoUseCase:
                    Provider.of<DeleteTodoUsecase>(context, listen: false),
                toggleTodoUsecase:
                    Provider.of<ToggleTodoUsecase>(context, listen: false)),
          )
        ],
        child: ListenableBuilder(
          listenable: settingsController,
          builder: (BuildContext context, Widget? child) {
            return const MaterialApp(title: "Todo App", home: TodoListScreen());
          },
        ));
  }
}
I wrap the rest of the app's code in a MultiProvider, where I define all the classes that I want to access from my UI. The MultiProvider then manages all the providers and their dependencies to ensure that all instances are created in the correct order.
In my UI, I simply need to do something like this:
final addTodoProvider = Provider.of<AddTodoUsecase>(context);
to be able to access my use case. You don't have to understand this concept fully, just know that when I call Provider.of<classname>(context), I ask the provider to give me an instance of that class. Now let's look at the different files in this layer.
State
// todo_notifier.dart
class TodoNotifier extends ChangeNotifier {
  final GetTodosUsecase getTodosUseCase;
  final AddTodoUsecase addTodoUseCase;
  final DeleteTodoUsecase deleteTodoUseCase;
  final ToggleTodoUsecase toggleTodoUsecase;

  List<TodoDomainModel> _todos = [];
  List<TodoDomainModel> get todos => _todos;

  TodoNotifier({
    required this.getTodosUseCase,
    required this.addTodoUseCase,
    required this.deleteTodoUseCase,
    required this.toggleTodoUsecase
  });

  Future<void> loadTodos() async {
    _todos = await getTodosUseCase();
    notifyListeners(); // Benachrichtigt die Widgets über die Änderungen
  }

  Future<void> deleteTodoById(TodoDomainModel todo) async {
    await deleteTodoUseCase(todo);
    await loadTodos();
  }

  Future<void> toggleTodo(TodoDomainModel todo)async{
    await toggleTodoUsecase(todo);
    await loadTodos();
  }

  Future<void> createTodo(String name)async{
    await addTodoUseCase(name);
    await loadTodos();
  }
}
For my state, I just use a simple ChangeNotifier that holds a list of todos and defines the different methods to manipulate the list. Each of these methods uses one of the use cases defined inside my domain layer and then calls loadTodos, which gets all the todos and signals a state change.
If you looked closely inside my provider code, you saw that this class is also used as a provider, …
          ChangeNotifierProvider(
            create: (context) => TodoNotifier(
                getTodosUseCase:
                    Provider.of<GetTodosUsecase>(context, listen: false),
                addTodoUseCase:
                    Provider.of<AddTodoUsecase>(context, listen: false),
                deleteTodoUseCase:
                    Provider.of<DeleteTodoUsecase>(context, listen: false),
                toggleTodoUsecase:
                    Provider.of<ToggleTodoUsecase>(context, listen: false)),
          )
giving me the ability to call it in my UI using the Provider.of code, but more on that later.
Widgets
I created 2 stateless widgets.
// todo.dart
class TodoWidget extends StatelessWidget {
  final TodoDomainModel todo;
  final Future<void> Function() onDelete;
  final Future<void> Function() toggleDone;
  const TodoWidget(
      {super.key,
      required this.todo,
      required this.onDelete,
      required this.toggleDone});

  @override
  Widget build(BuildContext context) {
    return ListTile(
      title: Text(todo.title),
      subtitle: Checkbox(value: todo.isCompleted, onChanged: (val) async => await toggleDone()),
      trailing: IconButton(
        icon: const Icon(Icons.delete),
        onPressed: () async => await onDelete(),
      ),
    );
  }
}
This widget gets passed a todo and two callback functions to delete or toggle the todo when pressing the checkbox or the iconbutton.
// todo_add.dart
class TodoAdd extends StatefulWidget {
  final Future<void> Function(String name) addHabit;
  final VoidCallback closeScreen;

  const TodoAdd({
    super.key,
    required this.addHabit,
    required this.closeScreen,
  });

  @override
  _TodoAddState createState() => _TodoAddState();
}

class _TodoAddState extends State<TodoAdd> {
  final TextEditingController _textController = TextEditingController();

  @override
  void dispose() {
    _textController.dispose(); // Controller richtig entsorgen
    super.dispose();
  }

  @override
  Widget build(BuildContext context) {
    return Column(
      children: [
        const Text("Add Todo"),
        TextField(
          controller: _textController,
          decoration: const InputDecoration(
            labelText: 'Enter your name',
            border: OutlineInputBorder(),
          ),
        ),
        const SizedBox(height: 20),
        Row(
          children: [
            ElevatedButton(
              onPressed: () {
                widget.addHabit(_textController.text); // Zugriff auf die Methode von TodoAdd
              },
              child: const Text('Submit'),
            ),
            ElevatedButton(
              onPressed: widget.closeScreen,
              child: const Text("Close"),
            ),
          ],
        ),
      ],
    );
  }
}
This widget is used to create a todo. It receives a callback to close the widget if the user changes their mind and to add a todo to the list. You won't find any state logic inside these widgets; they are only used to build the UI.
Pages
// todo_list_page.dart
class TodoListScreen extends StatefulWidget {
  const TodoListScreen({super.key});
  @override
  TodoListScreenState createState() => TodoListScreenState();
}

class TodoListScreenState extends State<TodoListScreen> {
  bool showAddTodo = false;

  void toogleShowAddTodo(bool visibility) {
    setState(() {
      showAddTodo = visibility;
    });
  }

  @override
  Widget build(BuildContext context) {
    final todoProvider = Provider.of<TodoNotifier>(context);
    todoProvider.loadTodos();
    return Scaffold(
      appBar: AppBar(title: const Text('Todo List')),
      body: showAddTodo
          ? TodoAdd(
              addHabit: (text) async => {
                    if (text.isNotEmpty) {await todoProvider.createTodo(text)},
                    toogleShowAddTodo(false)
                  },
              closeScreen: () => toogleShowAddTodo(false))
          : ListView.builder(
              itemCount: todoProvider.todos.length,
              itemBuilder: (context, index) {
                final todo = todoProvider.todos[index];
                return TodoWidget(
                    todo: todo,
                    onDelete: () async =>
                        await todoProvider.deleteTodoUseCase(todo),
                    toggleDone: () async =>
                        await todoProvider.toggleTodo(todo));
              },
            ),
      floatingActionButton: showAddTodo == false
          ? FloatingActionButton(
              onPressed: () {
                // Beispiel: Hinzufügen eines neuen Todos
                toogleShowAddTodo(true);
              },
              child: const Icon(Icons.add),
            )
          : Container(),
    );
  }
}
The TodoListScreen is a stateful widget, holding the showAddTodo state to be able to show the TodoAdd Widget if needed.
final todoProvider = Provider.of<TodoNotifier>(context);
In this line, I ask the provider to give me the instance of the TodoNotifier. Using a ListView, I show a TodoWidget for each entry inside the todo list. Here, I pass the callbacks for onDelete and toggleDone to actually use the TodoNotifier's functions, which use the use cases from the domain layer that use the repositories implemented in the data layer. The same goes for the TodoAdd widget, which gets displayed when pressing the FloatingActionButton. And that's it, you just learned how to create a todo app with clean architecture!
Conclussion
In conclusion, adopting Clean Architecture in Flutter app development can significantly enhance the maintainability and scalability of your applications. By organizing your code into distinct layers—presentation, domain, and data—you can effectively manage complexity, reduce tight coupling, and facilitate easier testing and refactoring. This structured approach not only streamlines the development process but also ensures that your app remains robust and adaptable as it grows. By following the principles outlined in this article, you can build efficient and clean Flutter applications that stand the test of time.
Thank you for taking the time to explore the principles of Clean Architecture in Flutter app development with me. I hope this guide has provided you with valuable insights and practical steps to enhance your coding practices. By implementing these strategies, you can create applications that are not only efficient and scalable but also easier to maintain and extend. Your journey towards cleaner and more organized code is a commendable step towards building robust applications that can adapt to future challenges. Happy coding!
Subscribe to my newsletter
Read articles from Robin directly inside your inbox. Subscribe to the newsletter, and don't miss out.
Written by
