Building Multilingual React Apps: Practical Guide to i18next and RTL Support
 Othmane Kahtal
In previous article, we understood why localization and internationalization are crucial parts that should be handled to create globally-ready products or apps. Now, in this article, we'll jump into a practical guide about how you can set up and configure your React app for localization using the i18next framework, and how we can adapt the UI for RTL languages using Tailwind CSS. Let's begin.
Setup React Project
Create new project & configure Tailwind.css
Before we dive in, you'll need a React project with Tailwind CSS configured. Feel free to set up the project in your preferred way, or to save time, you can clone repository and start from the base branch
Install necessary dependencies
We'll need these key dependencies:
i18next- core internationalization frameworkreact-i18next- React bindings for i18nexti18next-browser-languagedetector- auto-detects user's language preference from browser settings (optional)
📒 Note: The language detector is optional if you prefer implementing your own language switcher, which we'll also cover in this guide
💡 Quick Link: For this section's code, check out the base branch
Basic i18next Configuration
Initialize i18next
Let's start with the basic configuration. To understand how i18next works, we first need to create a configuration file. This file needs to be bundled, so we'll import it at the root of our app
import i18n from "i18next";
import { initReactI18next } from "react-i18next";
import LanguageDetector from "i18next-browser-languagedetector";

i18n
  .use(LanguageDetector)
  .use(initReactI18next)
  .init({
    debug: true,
    lng:"en",
    fallbackLng: "en",
    interpolation: {
      escapeValue: false, // not needed for react as it escapes by default
    },
    resources: {
      en: {
        translation: {
          welcome: "Hi",
        },
      },
      de: {
        translation: {
          welcome: "Hallo",
        },
      },
      ar: {
        translation: {
          welcome: "مرحبا",
        },
      },
    },
  });

export default i18n;
root app file: main.tsx (in my case)
import { StrictMode } from "react";
import { createRoot } from "react-dom/client";
import "./index.css";

import App from "./app";
import "./app/i18n";

createRoot(document.getElementById("root")!).render(
  <StrictMode>
    <App />
  </StrictMode>
);
Now let's test our localization setup. Open the App file and verify that everything works correctly
import { useTranslation } from "react-i18next";

function App() {
  const { t } = useTranslation();
  return (
    <div className="h-screen flex justify-center items-center">
      <h1 className="text-red-600 font-bold">{t("welcome")}</h1>
    </div>
  );
}
export default App;
if you see a message like this in your browser's console, congratulations! 🎉 The localization setup is working correctly

and you get this result in the interface:

Now let's explore the key configuration options:
use: Loads additional i18next plugins (more details)debug: Enables debugging in development (more details)fallbackLng: Sets default language when translations are missing (more details)
lng: Sets default languageinterpolation: Handles dynamic values in translations (more details)resources: Defines translations in key-value format (more details)
Let's dive into implementing localization:
useTranslation: The main hook provided byi18nextthat returns:t: Function that translates your contenti18n: Instance that manages language switching and other configuration options
i18next provides multiple ways to handle translations based on your needs:
withTranslation: A Higher-Order Component (HOC) that gives your component access totandi18n(more details)import React from 'react'; import { withTranslation } from 'react-i18next'; function App({ t, i18n }) { return <div className="h-screen flex justify-center items-center"> <h1 className="text-red-600 font-bold">{t("welcome")}</h1> </div> } export default withTranslation()(App);Translation: A render prop component that providestfunction andi18ninstance to your component (more details)import React from 'react'; import { Translation } from 'react-i18next'; export function App() { return ( <Translation> { (t, { i18n }) => <div className="h-screen flex justify-center items-center"> <h1 className="text-red-600 font-bold">{t("welcome")}</h1> </div> } </Translation> ) }<Trans>: A component that handles complex translations with React elements and interpolation (more details)
📒 Note: In most cases, you'll only need useTranslation hook, which provides a simpler and more straightforward way to handle translations.
💡 Quick Link: For explore more language tags locale codes check out Wikipedia
💡 Quick Link: For this section's code, check out the basic-configuration branch
Translation File Organization
As discussed in our previous article, localization involves collaboration with translators and legal teams. Therefore, we need a well-organized and structured approach to manage translations, In this section, we'll dive into that
JSON structure
For better translation management, we can separate our translations into JSON files and spread them into the i18next configuration like this:
import i18n from "i18next";
import { initReactI18next } from "react-i18next";
import LanguageDetector from "i18next-browser-languagedetector";
import enTranslation from "../locales/english/translation.json";
import deTranslation from "../locales/deutsch/translation.json";
import arTranslation from "../locales/arabic/translation.json";
i18n
  .use(LanguageDetector)
  .use(initReactI18next)
  .init({
    debug: true,
    lng: "en",
    fallbackLng: "ar",
    interpolation: {
      escapeValue: false, // not needed for react as it escapes by default
    },
    resources: {
      en: {
        translation: {
          ...enTranslation,
        },
      },
      de: {
        translation: {
          ...deTranslation,
        },
      },
      ar: {
        translation: {
          ...arTranslation,
        },
      },
    },
  });

export default i18n;
📒 Note: We'll improve this later by using the i18next-http-backend plugin to enhance performance when loading translations.
💡 Quick Link: For this section's code, check out the json-structure branch
Namespaces
When considering performance, we need to optimize how translations are loaded. i18next provides a powerful feature called namespaces that helps us:
Split translations into multiple files
Load translations on demand, not on initial page load
Organize translations into logical categories
Common namespace examples:
common: Shared translations (buttons, labels)validation: Form validation messagesauth: Authentication-related content
This approach improves both performance and maintainability by loading only the translations needed for each part of your application, let’s dive into it
I've organized the translations into these namespaces:
auth: Authentication-related contentcommon: Shared actions and frequently used textvalidation: Form validation messages
// File structure:
// src/
//  locales/
//    english/
//      common.json
//      validation.json
//      auth.json


// English (english/common.json)
{
 "actions": {
   "create": "Create",
   "delete": "Delete",
   "cancel": "Cancel",
   "save": "Save"
 },
 "messages": {
   "loading": "Please wait...",
   "success": "Operation completed successfully",
   "error": "Something went wrong"
 }
}

// English (english/validation.json)
{
  "required": "This field is required",
  "email": "Please enter a valid email",
  "password": {
    "min": "Password must be at least {{min}} characters",
    "match": "Passwords do not match"
  }
}

// English (english/auth.json)
{
  "login": {
    "title": "Welcome Back",
    "submit": "Sign In",
    "forgotPassword": "Forgot Password?"
  },
  "register": {
    "title": "Create Account",
    "submit": "Sign Up"
  }
}
back to configuration to fit current change:
import i18n from "i18next";
import { initReactI18next } from "react-i18next";
import LanguageDetector from "i18next-browser-languagedetector";

import enCommon from "../locales/english/common.json";
import enValidation from "../locales/english/validation.json";
import enAuth from "../locales/english/auth.json";

import deCommon from "../locales/deutsch/common.json";
import deValidation from "../locales/deutsch/validation.json";
import deAuth from "../locales/deutsch/auth.json";

import arCommon from "../locales/arabic/common.json";
import arValidation from "../locales/arabic/validation.json";
import arAuth from "../locales/arabic/auth.json";

i18n
  .use(LanguageDetector)
  .use(initReactI18next)
  .init({
    debug: true,
    lng: "en",
    fallbackLng: "en",

    // Define default namespace
    defaultNS: "common",

    interpolation: {
      escapeValue: false, // not needed for react as it escapes by default
    },

    resources: {
      en: {
        common: enCommon,
        validation: enValidation,
        auth: enAuth,
      },
      de: {
        common: deCommon,
        validation: deValidation,
        auth: deAuth,
      },
      ar: {
        common: arCommon,
        validation: arValidation,
        auth: arAuth,
      },
    },
  });

export default i18n;
Now let's test our implementation. I've created a login form component that includes validation. First, install the required packages:
pnpm install zod react-hook-form @hookform/resolvers
Let's create our form component that leverages namespaces with form validation:
import { useTranslation } from "react-i18next";
import { z } from "zod";
import { useForm } from "react-hook-form";
import { zodResolver } from "@hookform/resolvers/zod";

function LoginForm() {
  const { t } = useTranslation(["auth", "validation", "common"]);

  const loginSchema = z.object({
    email: z
      .string()
      .min(1, t("validation:required"))
      .email(t("validation:email")),
    password: z.string().min(8, t("validation:password.min", { min: 8 })),
  });

  type LoginFormData = z.infer<typeof loginSchema>;

  const {
    register,
    handleSubmit,
    formState: { errors },
  } = useForm<LoginFormData>({
    resolver: zodResolver(loginSchema),
  });

  const onSubmit = (data: LoginFormData) => {
    console.log(data);
  };

  return (
    <div className="min-h-screen flex items-center justify-center bg-gray-50 py-12 px-4 sm:px-6 lg:px-8">
      <div className="max-w-md w-full space-y-8">
        <div>
          <h1 className="mt-6 text-center text-3xl font-extrabold text-gray-900">
            {t("auth:login.title")}
          </h1>
        </div>

        <form className="mt-8 space-y-6" onSubmit={handleSubmit(onSubmit)}>
          <div className="rounded-md shadow-sm -space-y-px">
            <div>
              <input
                {...register("email")}
                type="email"
                className="appearance-none rounded-none relative block w-full px-3 py-2 border border-gray-300 placeholder-gray-500 text-gray-900 rounded-t-md focus:outline-none focus:ring-indigo-500 focus:border-indigo-500 focus:z-10 sm:text-sm"
              />
              {errors.email && (
                <span className="text-red-500 text-xs mt-1">
                  {errors.email.message}
                </span>
              )}
            </div>

            <div>
              <input
                {...register("password")}
                type="password"
                className="appearance-none rounded-none relative block w-full px-3 py-2 border border-gray-300 placeholder-gray-500 text-gray-900 rounded-b-md focus:outline-none focus:ring-indigo-500 focus:border-indigo-500 focus:z-10 sm:text-sm"
              />
              {errors.password && (
                <span className="text-red-500 text-xs mt-1">
                  {errors.password.message}
                </span>
              )}
            </div>
          </div>

          <div className="flex items-center justify-between">
            <a
              href="#"
              className="text-sm text-indigo-600 hover:text-indigo-500"
            >
              {t("auth:login.forgotPassword")}
            </a>
          </div>

          <div className="flex gap-4">
            <button
              type="submit"
              className="group relative w-full flex justify-center py-2 px-4 border border-transparent text-sm font-medium rounded-md text-white bg-indigo-600 hover:bg-indigo-700 focus:outline-none focus:ring-2 focus:ring-offset-2 focus:ring-indigo-500"
            >
              {t("auth:login.submit")}
            </button>
            <button
              type="button"
              className="group relative w-full flex justify-center py-2 px-4 border border-gray-300 text-sm font-medium rounded-md text-gray-700 bg-white hover:bg-gray-50 focus:outline-none focus:ring-2 focus:ring-offset-2 focus:ring-indigo-500"
            >
              {t("common:actions.cancel")}
            </button>
          </div>
        </form>
      </div>
    </div>
  );
}

export default LoginForm;
Import the form component into your main interface/App file:
import LoginForm from "../components/auth/login/form";

function App() {
  return <LoginForm />;
}
export default App;
Expected result:
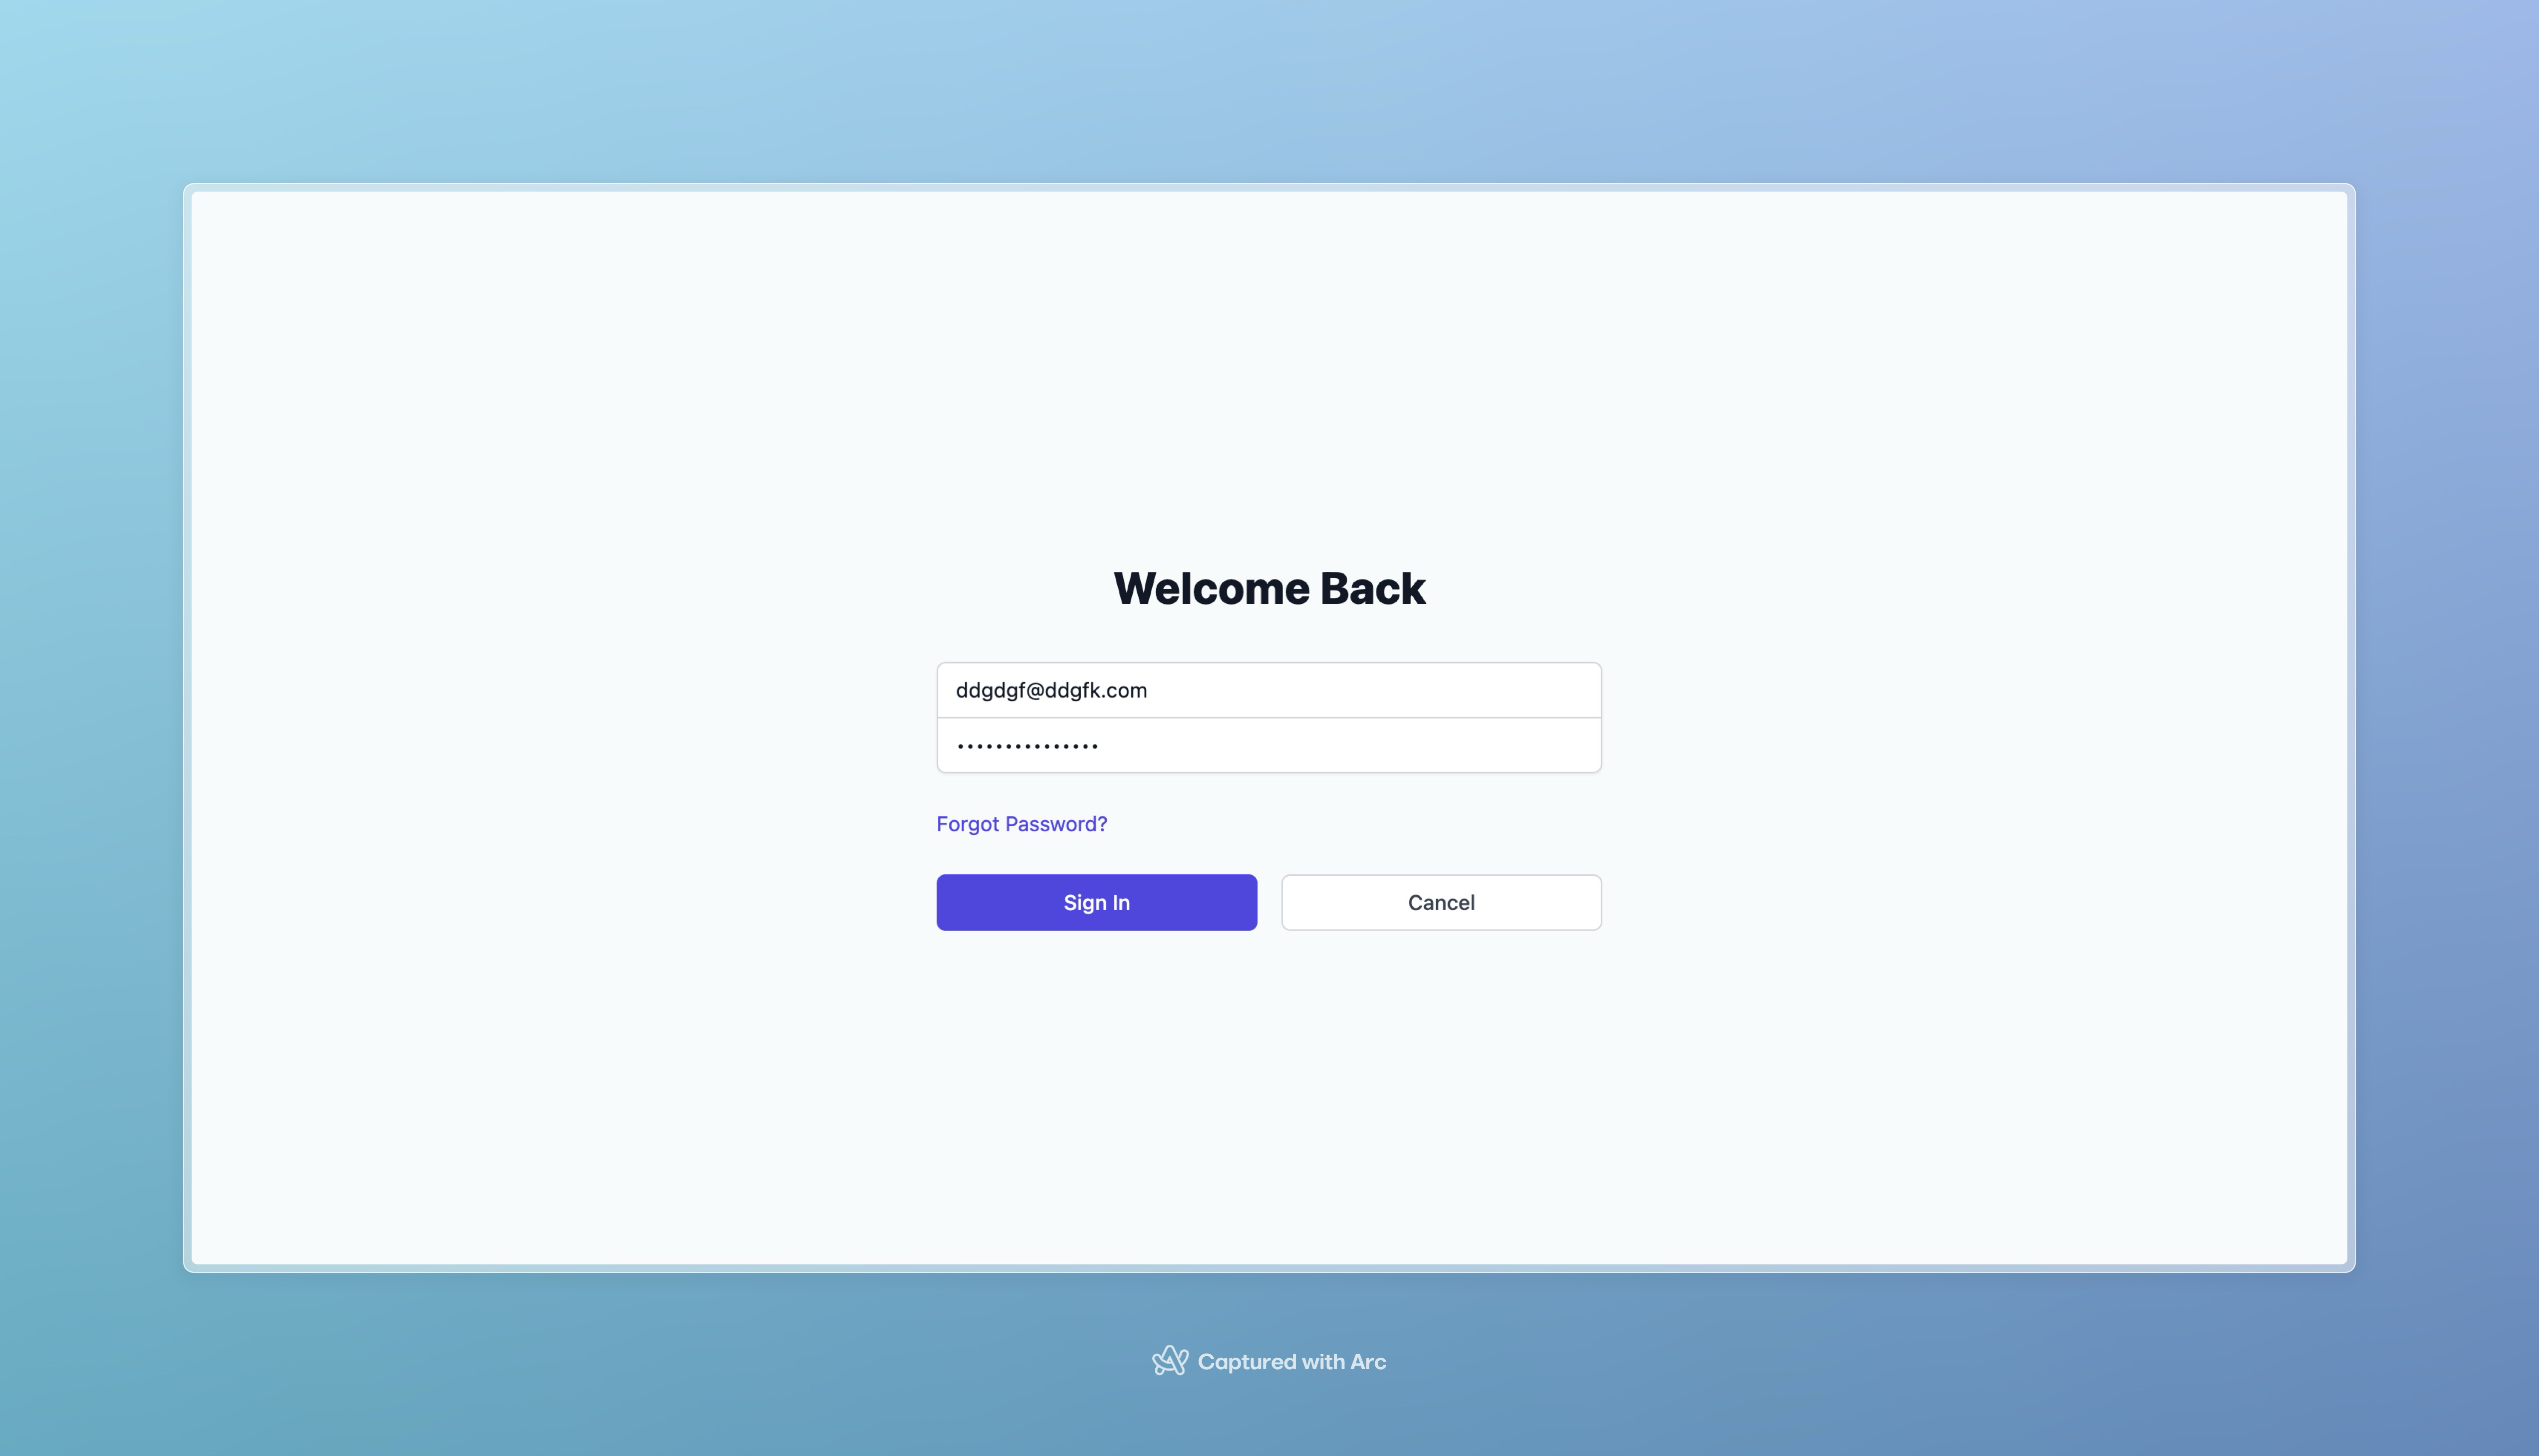
now let’s break out the details:
In our configuration, we:
Changed the default namespace from
translationto multiple namespaces:auth,common, andvalidationSet
commonas the default namespace usingdefaultNS: 'common'
To use these namespaces in components:
Load required namespaces:
const { t } = useTranslation(["auth", "validation", "common"]);Access translations using namespace prefix:
  <h1 className="mt-6 text-center text-3xl font-extrabold text-gray-900">
    {t("auth:login.title")}
  </h1>
💡 Quick Link: For this section's code, check out the namespaces branch
Core Translation Features
What makes i18next a mature, production-ready framework is its ability to handle complex scenarios such as:
Plural forms
Number and date formatting
Translation interpolation
Dynamic values and variables
Basic text translation
Let's look at a real example. Imagine we have a dashboard where we want to display a personalized greeting. For instance, if the user's name is Othmane, we want to show 'Hello Othmane!'. Here's how to implement this:
In your localization folder (
/locales/[language]/common.json), add these translations:"greeting": { "title": "Hello, {{name}}", "subtitle": "Welcome to your dashboard" },Add new component
dashboardand import it to page:import { useTranslation } from "react-i18next"; function Dashboard() { const { t } = useTranslation(); // This can be dynamic based on your needs const userName = "Othmane"; return ( <div className="min-h-screen flex items-center justify-center"> <div className="max-w-2xl w-full mx-auto p-8 bg-white rounded-lg shadow-lg"> <h1 className="text-3xl font-bold text-center bg-gradient-to-r from-blue-600 to-purple-600 bg-clip-text text-transparent"> {t("greeting.title", { name: userName })} </h1> <p className="mt-4 text-lg text-gray-600 text-center leading-relaxed"> {t("greeting.subtitle")} </p> </div> </div> ); } export default Dashboard;There's no need to explicitly specify 'common' as the namespace in
useTranslation(), since we've already configured it as the default namespace in our i18n configuration. This simplifies our code and reduces redundancy while maintaining the same functionality.Expected result:
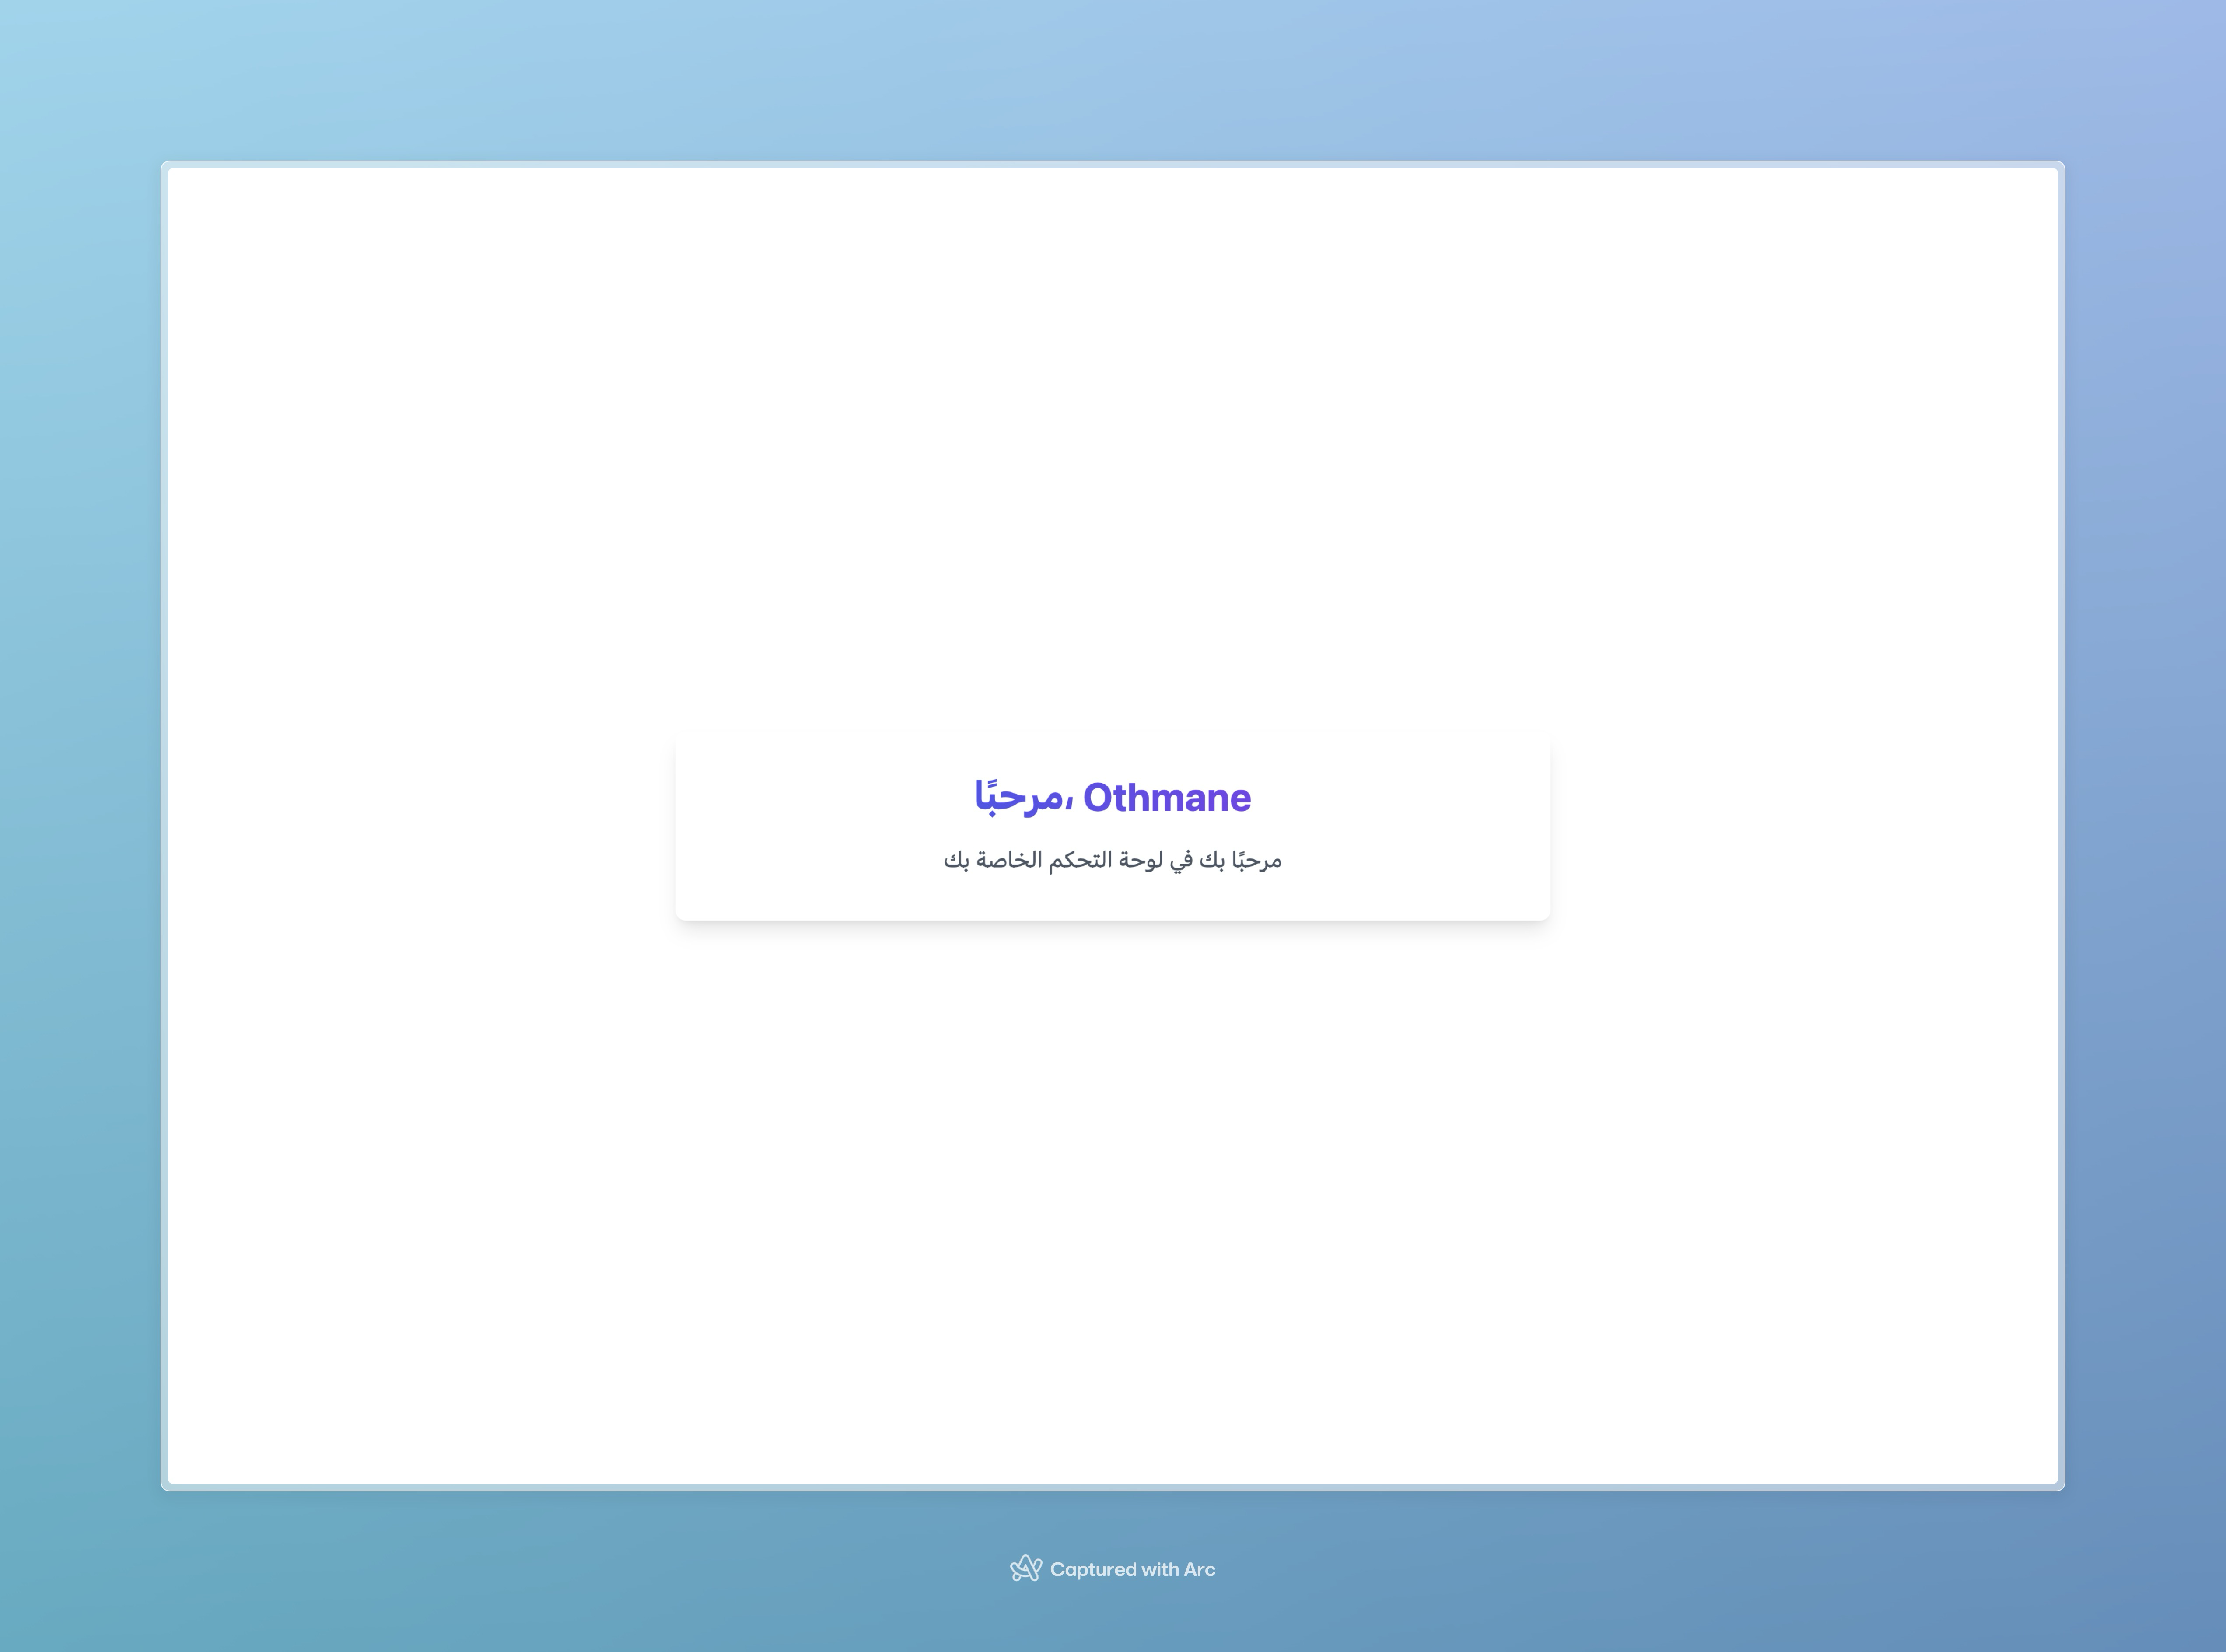
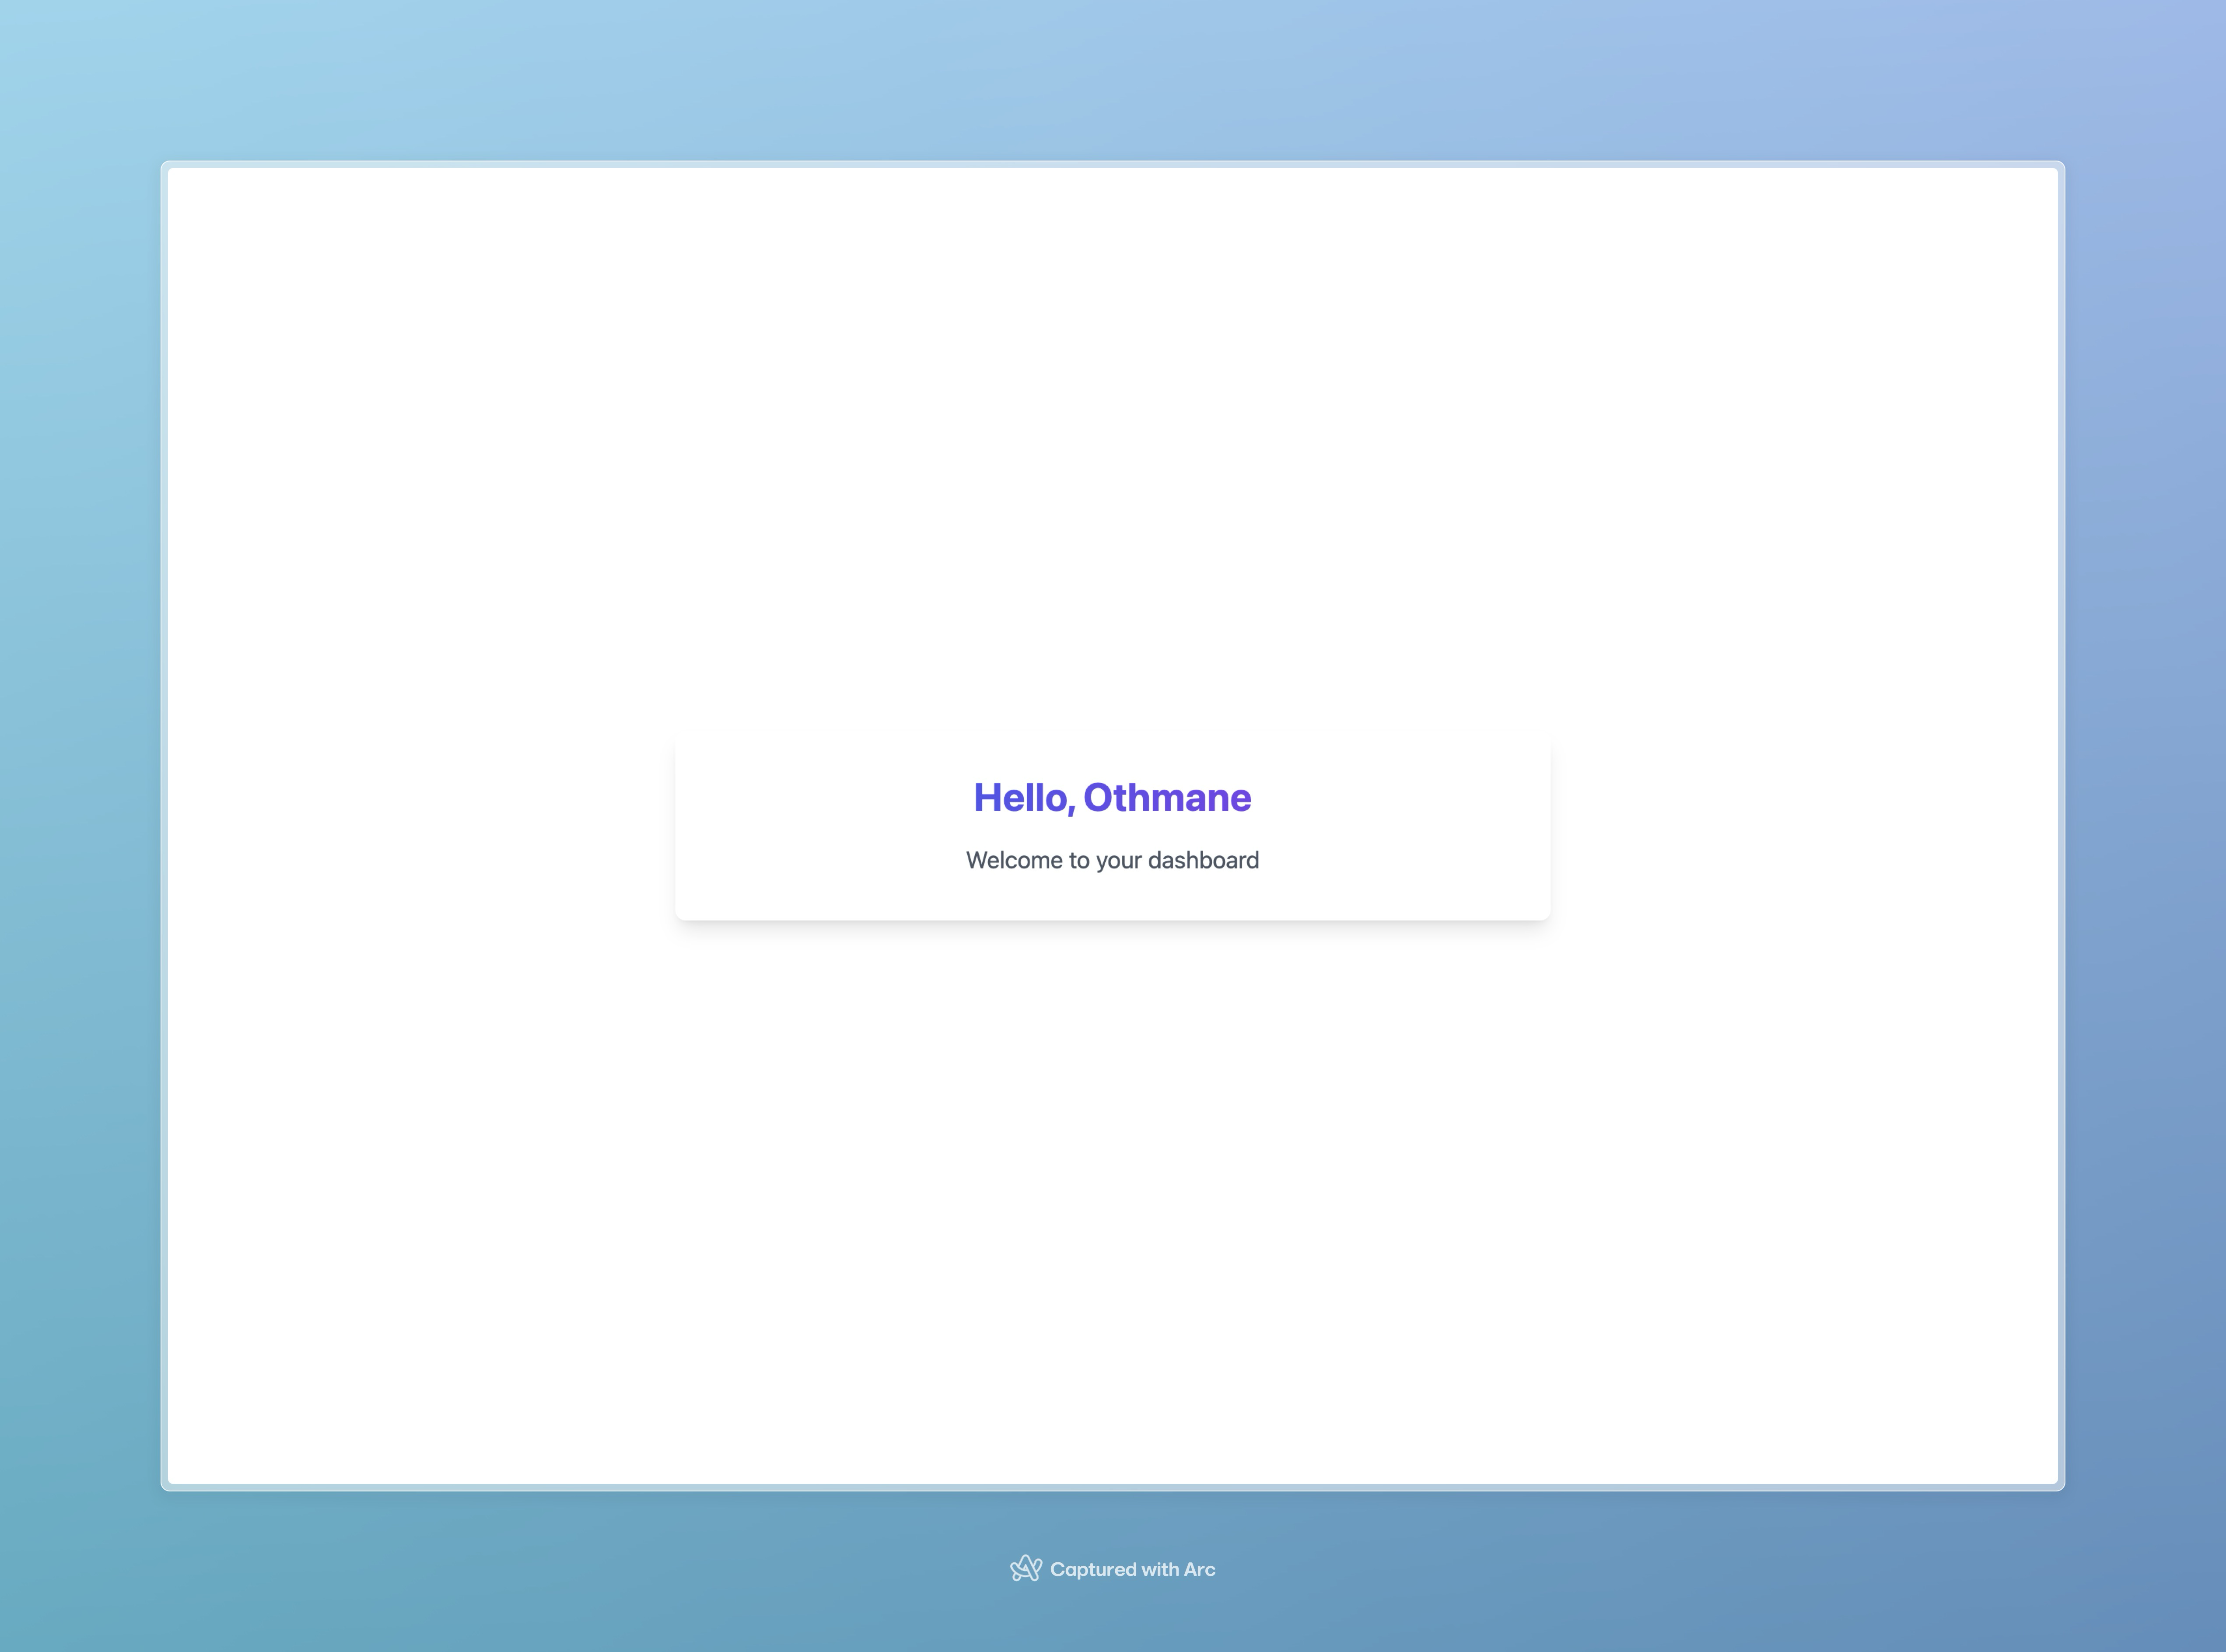
📝 Note: Arabic is a Right-to-Left (RTL) language. We will cover later how to handle RTL text direction using Tailwind CSS's built-in RTL support through the rtl: directive. This includes:
Text alignment
Margin and padding
Borders and shadows
Layout direction
Handling plurals
Handling plurals is a crucial and challenging aspect of internationalization, as it extends beyond the simple singular/plural format found in English. Many languages, such as Arabic and Russian, have multiple plural forms. The i18n framework efficiently manages these complexities by providing built-in support for the plural rules of all your supported languages.
starting by real example and break out the details box, we have a listItem we need to render the total of those items based on counter that dynamically passed to t function:
In your localization folder (
/locales/en/common.json), add these translations:"item_zero": "No items", "item_one": "{{count}} item", "item_other": "{{count}} items", "pluralExample": { "title": "Plural example", "currentLang": "current Language" },In your localization folder (
/locales/ar/common.json), add these translations:"item_zero": "لا توجد عناصر", "item_one": "عنصر واحد", "item_two": "عنصران", "item_few": "{{count}} عناصر", "item_many": "{{count}} عنصراً", "item_other": "{{count}} عنصر", "pluralExample": { "title": "مثال الجمع", "currentLang": "اللغة الحالية" },Add new component
dashboardand import it to page:import { useTranslation } from "react-i18next"; export default function ItemsList() { const { t, i18n } = useTranslation(); const quantities = [0, 1, 2, 3, 11, 100]; return ( <div className="min-h-screen flex items-center justify-center bg-gray-50"> <div className="max-w-2xl w-full mx-auto p-8 bg-white rounded-xl shadow-lg"> {/* Header Section */} <div className="mb-8 text-center"> <h2 className="text-2xl font-bold bg-gradient-to-r from-blue-600 to-purple-600 bg-clip-text text-transparent"> {t("pluralExample.title")} </h2> <p className="mt-2 text-gray-600"> {t("pluralExample.currentLang")}:{" "} {i18n.language === "en" ? "English" : "العربية"} </p> </div> {/* Examples Grid */} <div className="grid grid-cols-1 md:grid-cols-2 gap-4"> {quantities.map((count) => ( <div key={count} className="p-4 border border-gray-200 rounded-lg hover:border-blue-500 transition-colors duration-300" > <div className="flex items-center justify-between"> <span className="text-lg font-semibold text-blue-600"> {count} </span> <span className="text-gray-700">{t("item", { count })}</span> </div> </div> ))} </div> {/* Language Switch Button */} <div className="mt-8 text-center"> <button onClick={() => i18n.changeLanguage(i18n.language === "en" ? "ar" : "en") } className="px-6 py-2 bg-gradient-to-r from-blue-600 to-purple-600 text-white rounded-lg hover:from-blue-700 hover:to-purple-700 transition-all duration-300 focus:outline-none focus:ring-2 focus:ring-blue-500 focus:ring-offset-2" > Switch to {i18n.language === "en" ? "Arabic" : "English"} </button> </div> </div> </div> ); }Expected result:
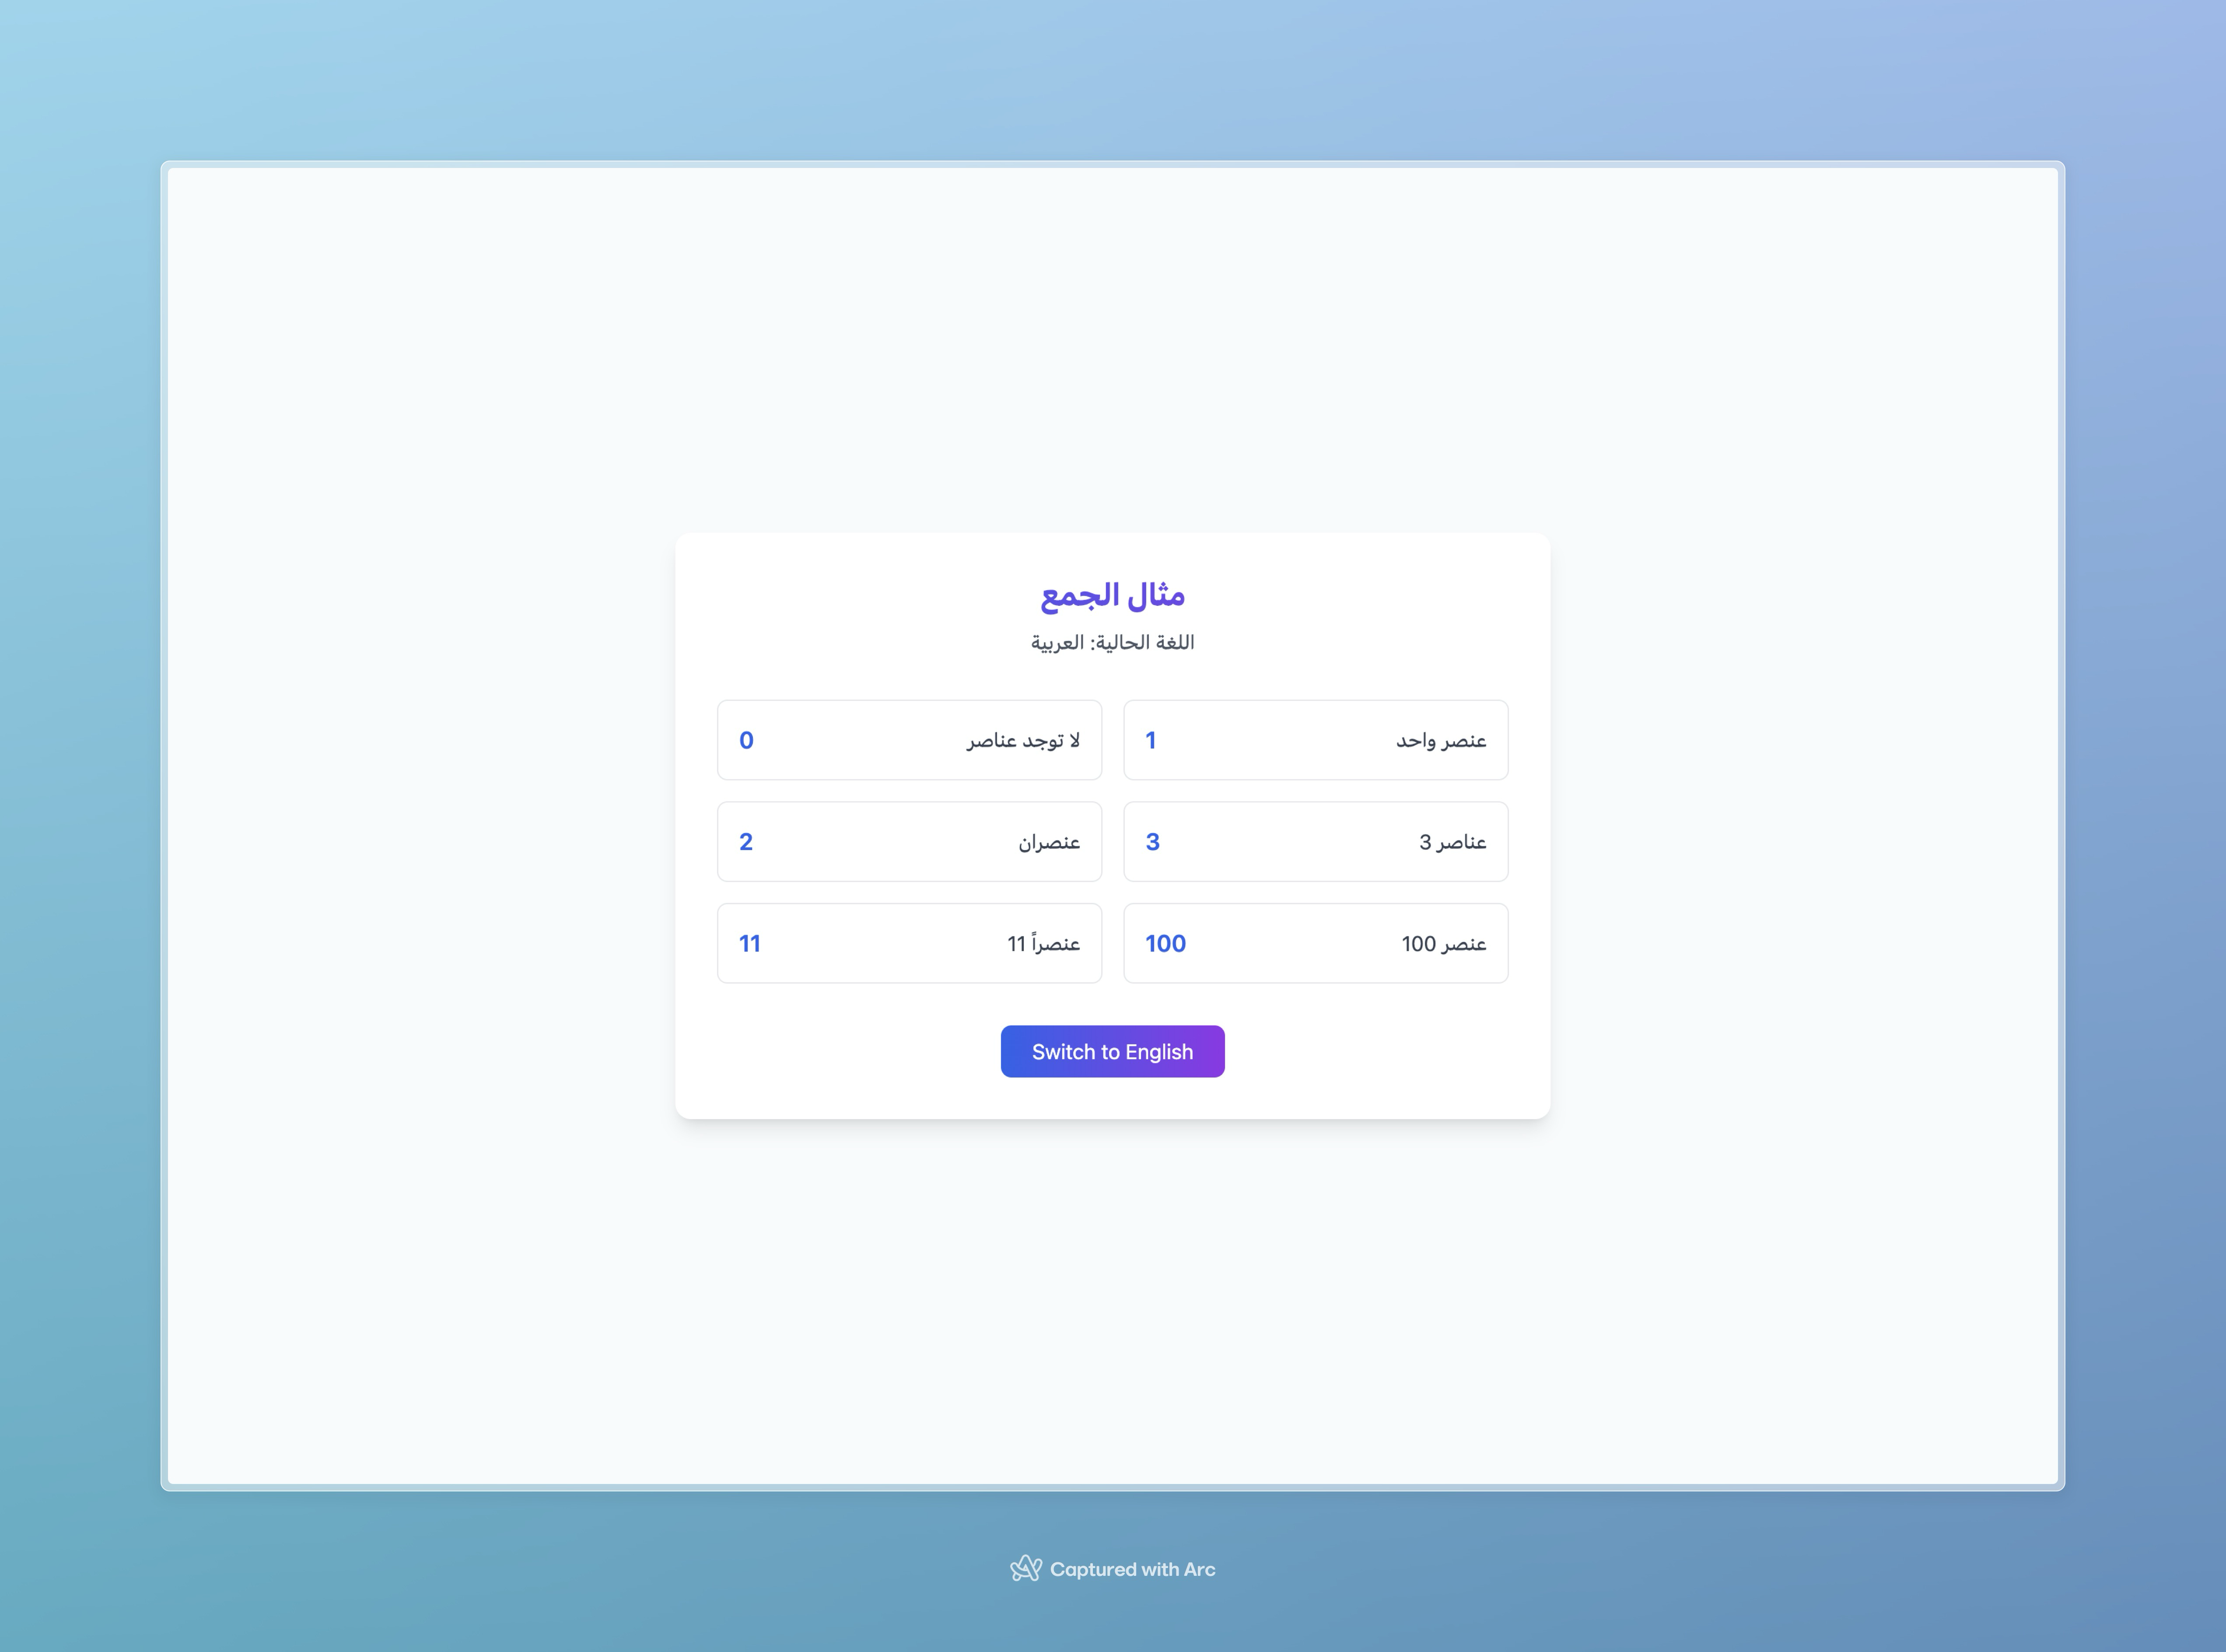
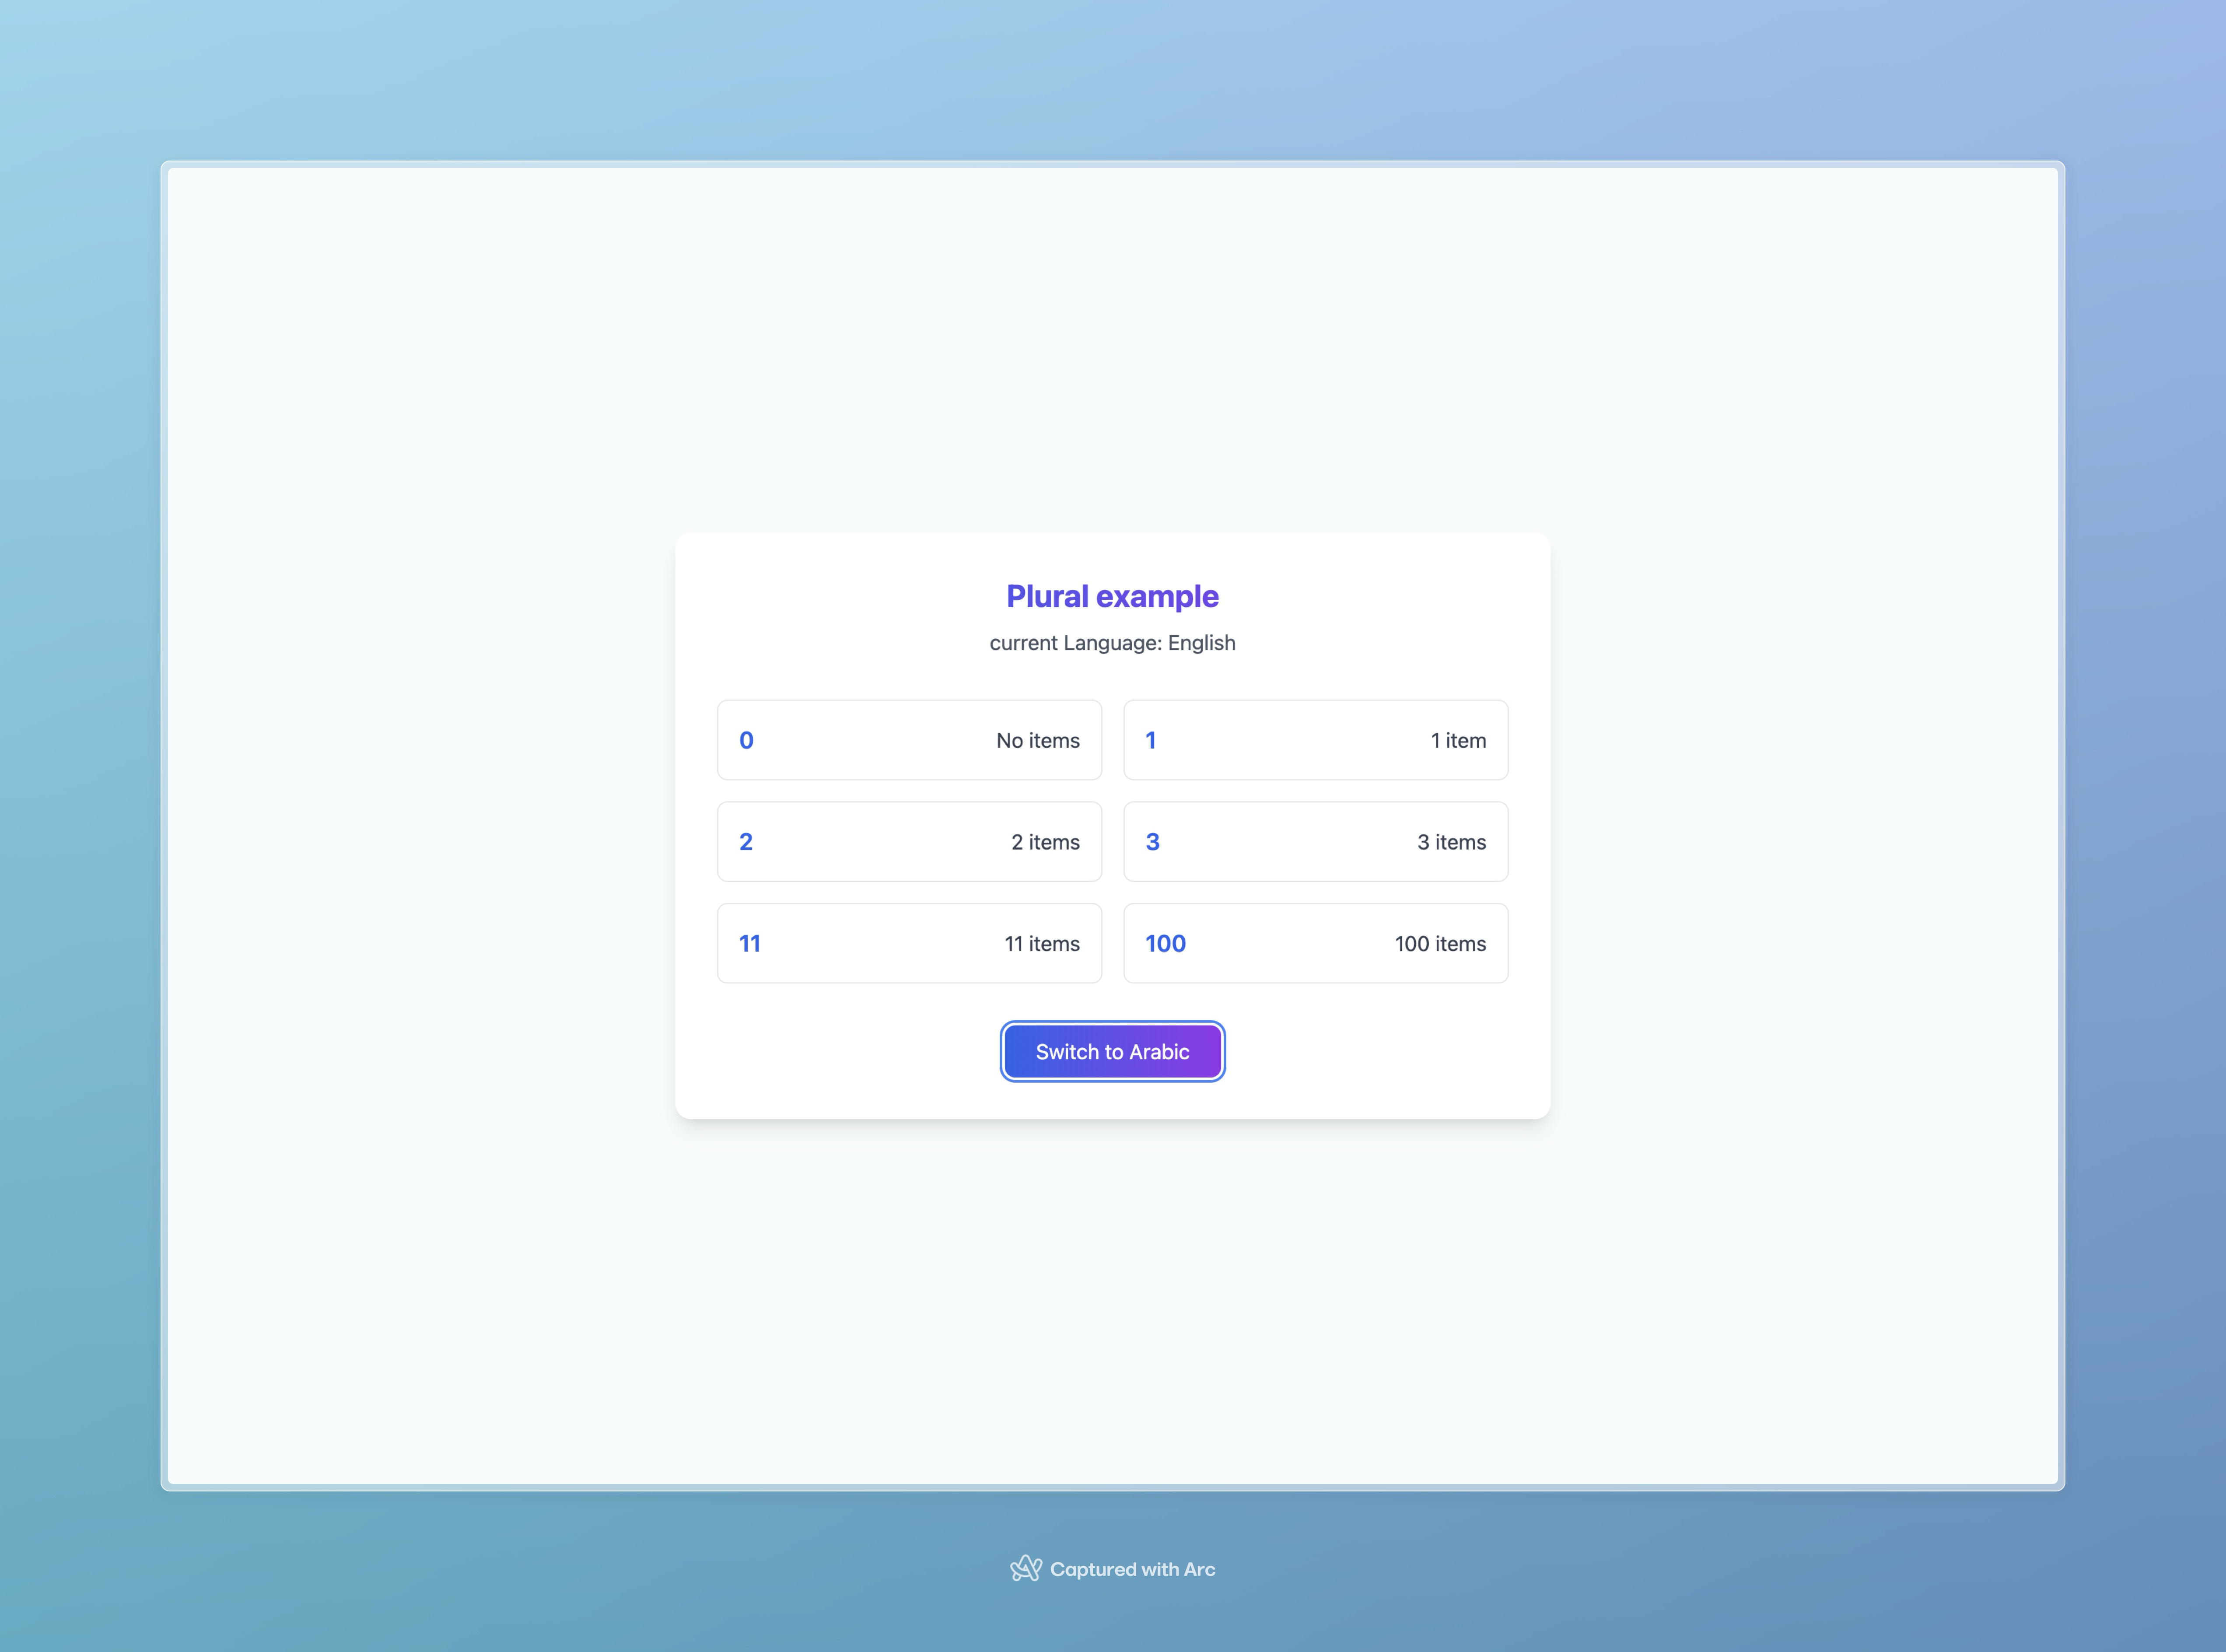
Different languages have varying rules for handling plural forms:
English (2 forms):
one: for exactly 1 (1 item)other: for 0 and numbers greater than 1 (0 items, 2 items, etc.)
Arabic (6 forms):
zero: for 0one: for exactly 1two: for exactly 2few: for 3-10many: for 11-99other: for 100+
Example quantities:
0 → No items | لا توجد عناصر
1 → 1 item | عنصر واحد
2 → 2 items | عنصران
5 → 5 items | 5 عناصر
15 → 15 items | 15 عنصراً
100 → 100 items | 100 عنصر
i18n automatically handles these rules based on the selected language and the provided count value.
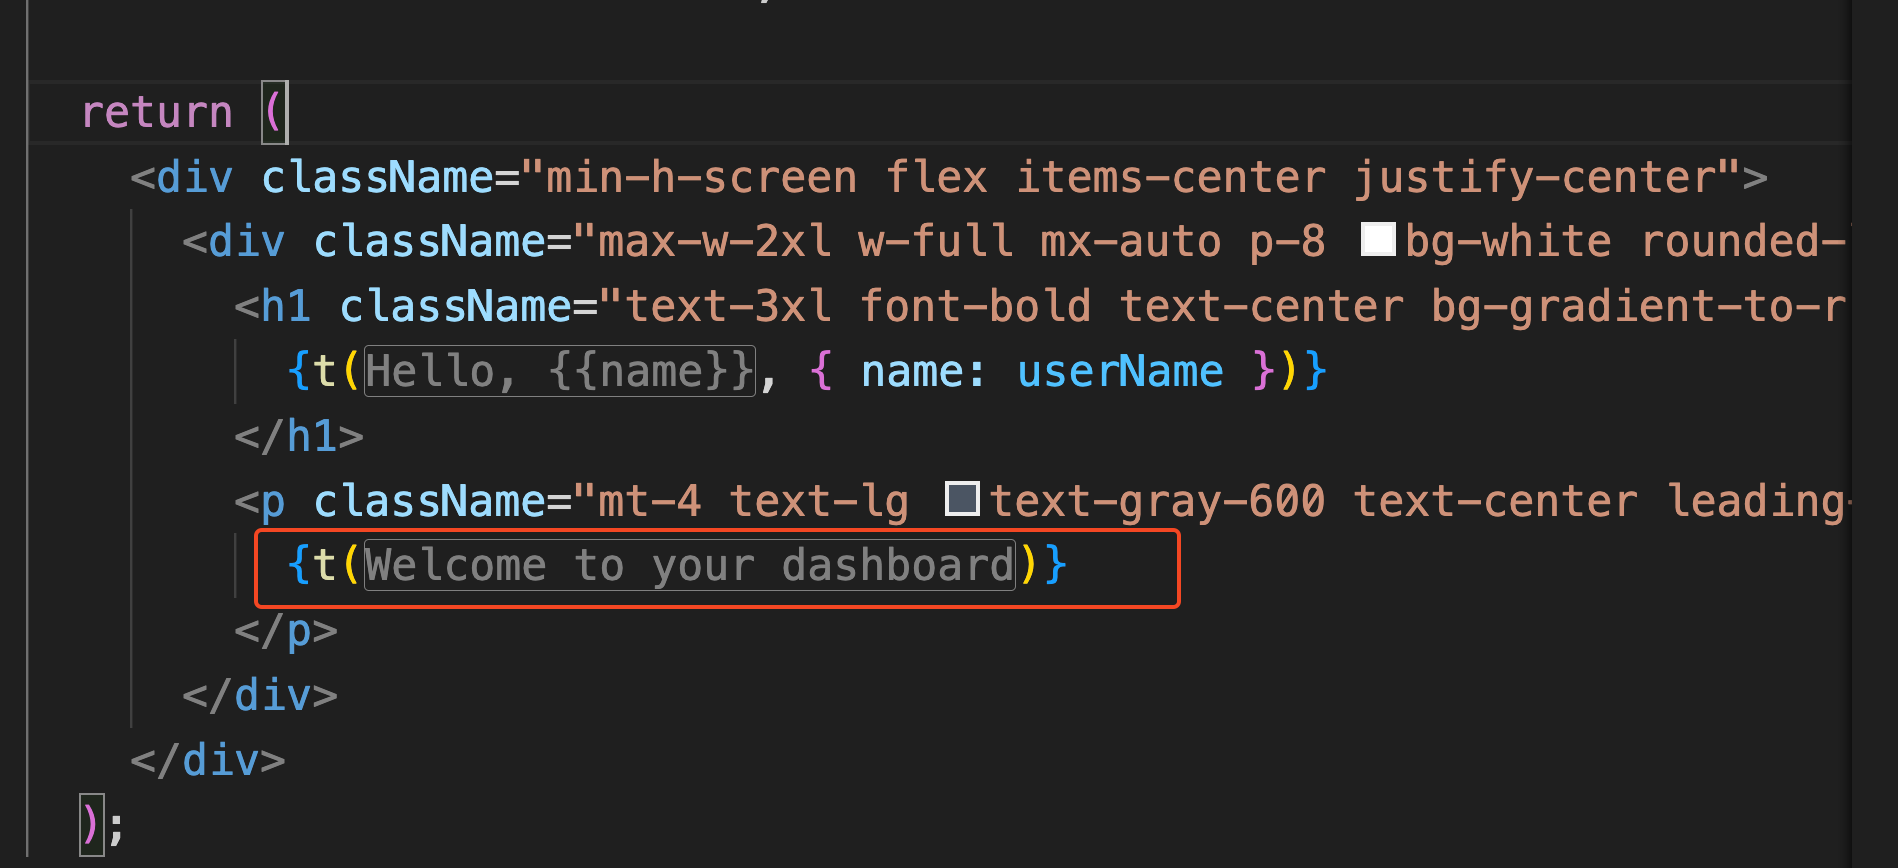
📝 Note: To enhance your multilingual development workflow in VSCode, you can use the i18n-ally extension. It provides:
Real-time translation previews in your code
Locale file management
Auto-completion for translation keys
Inline translation annotations
In this project, I've configured i18n-ally with English as the source language. This extension works with any framework and helps streamline translation management.
💡 Quick Link: For this section's code, check out the Plural branch
Number & Date formatting
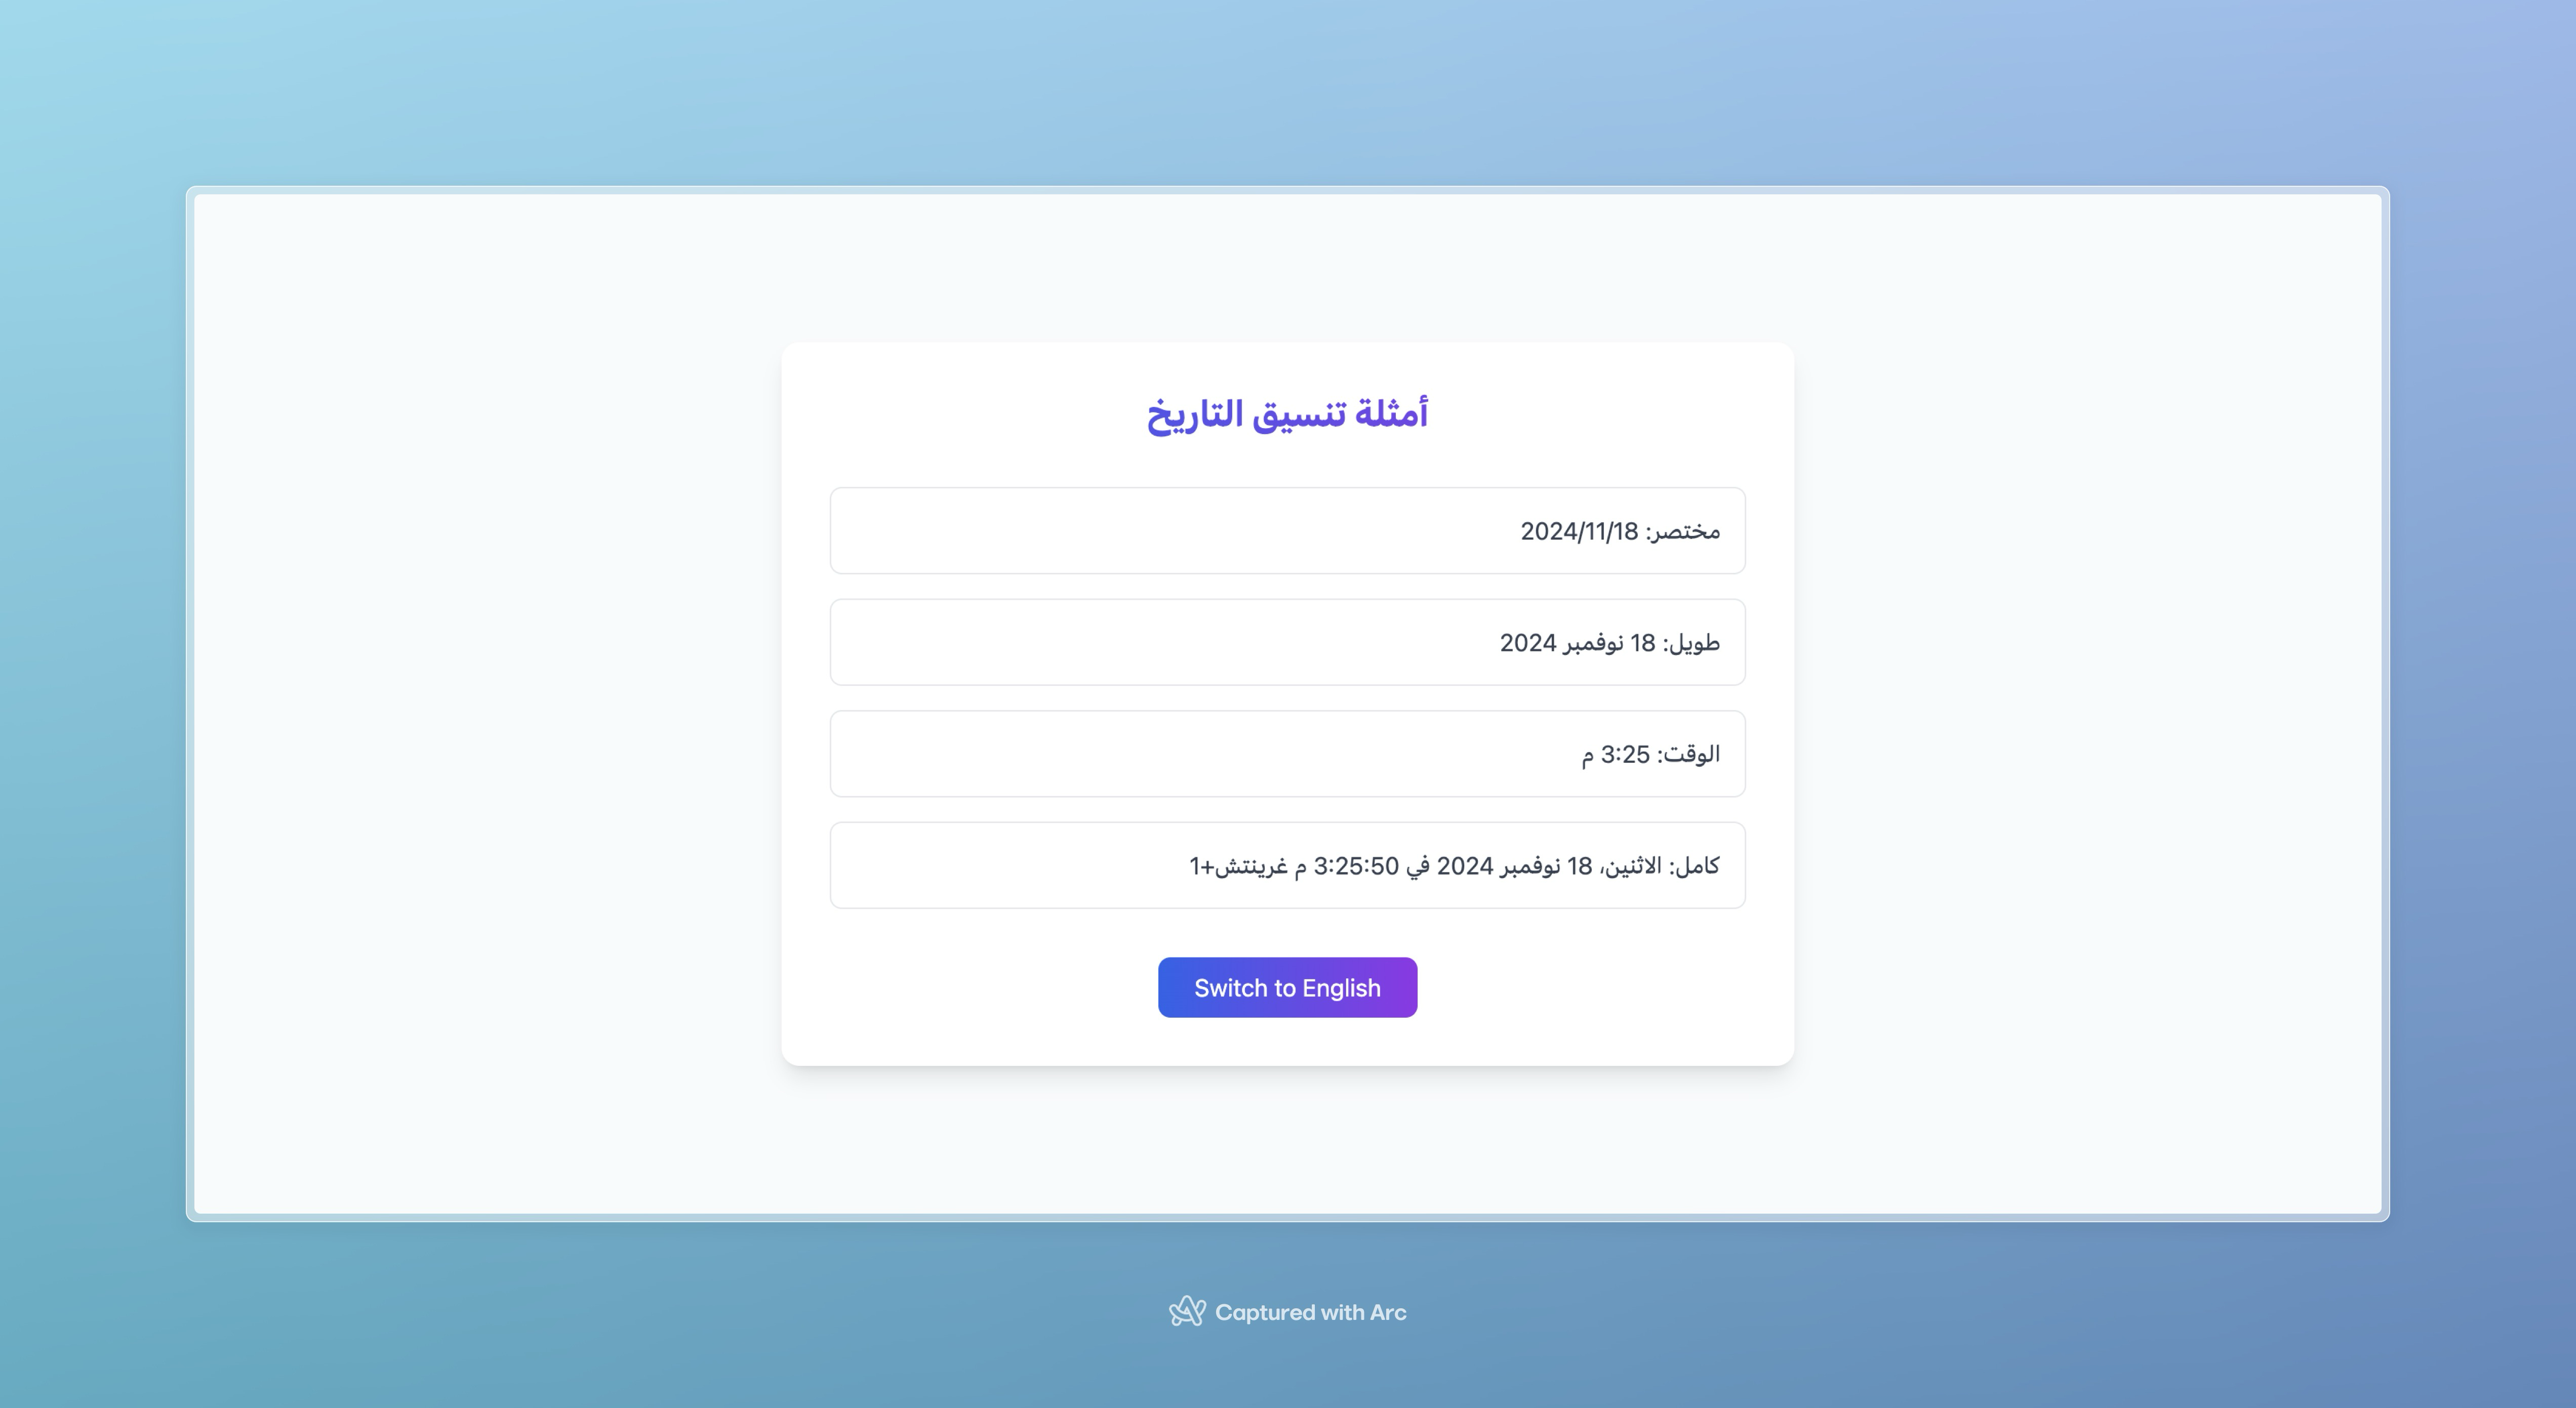
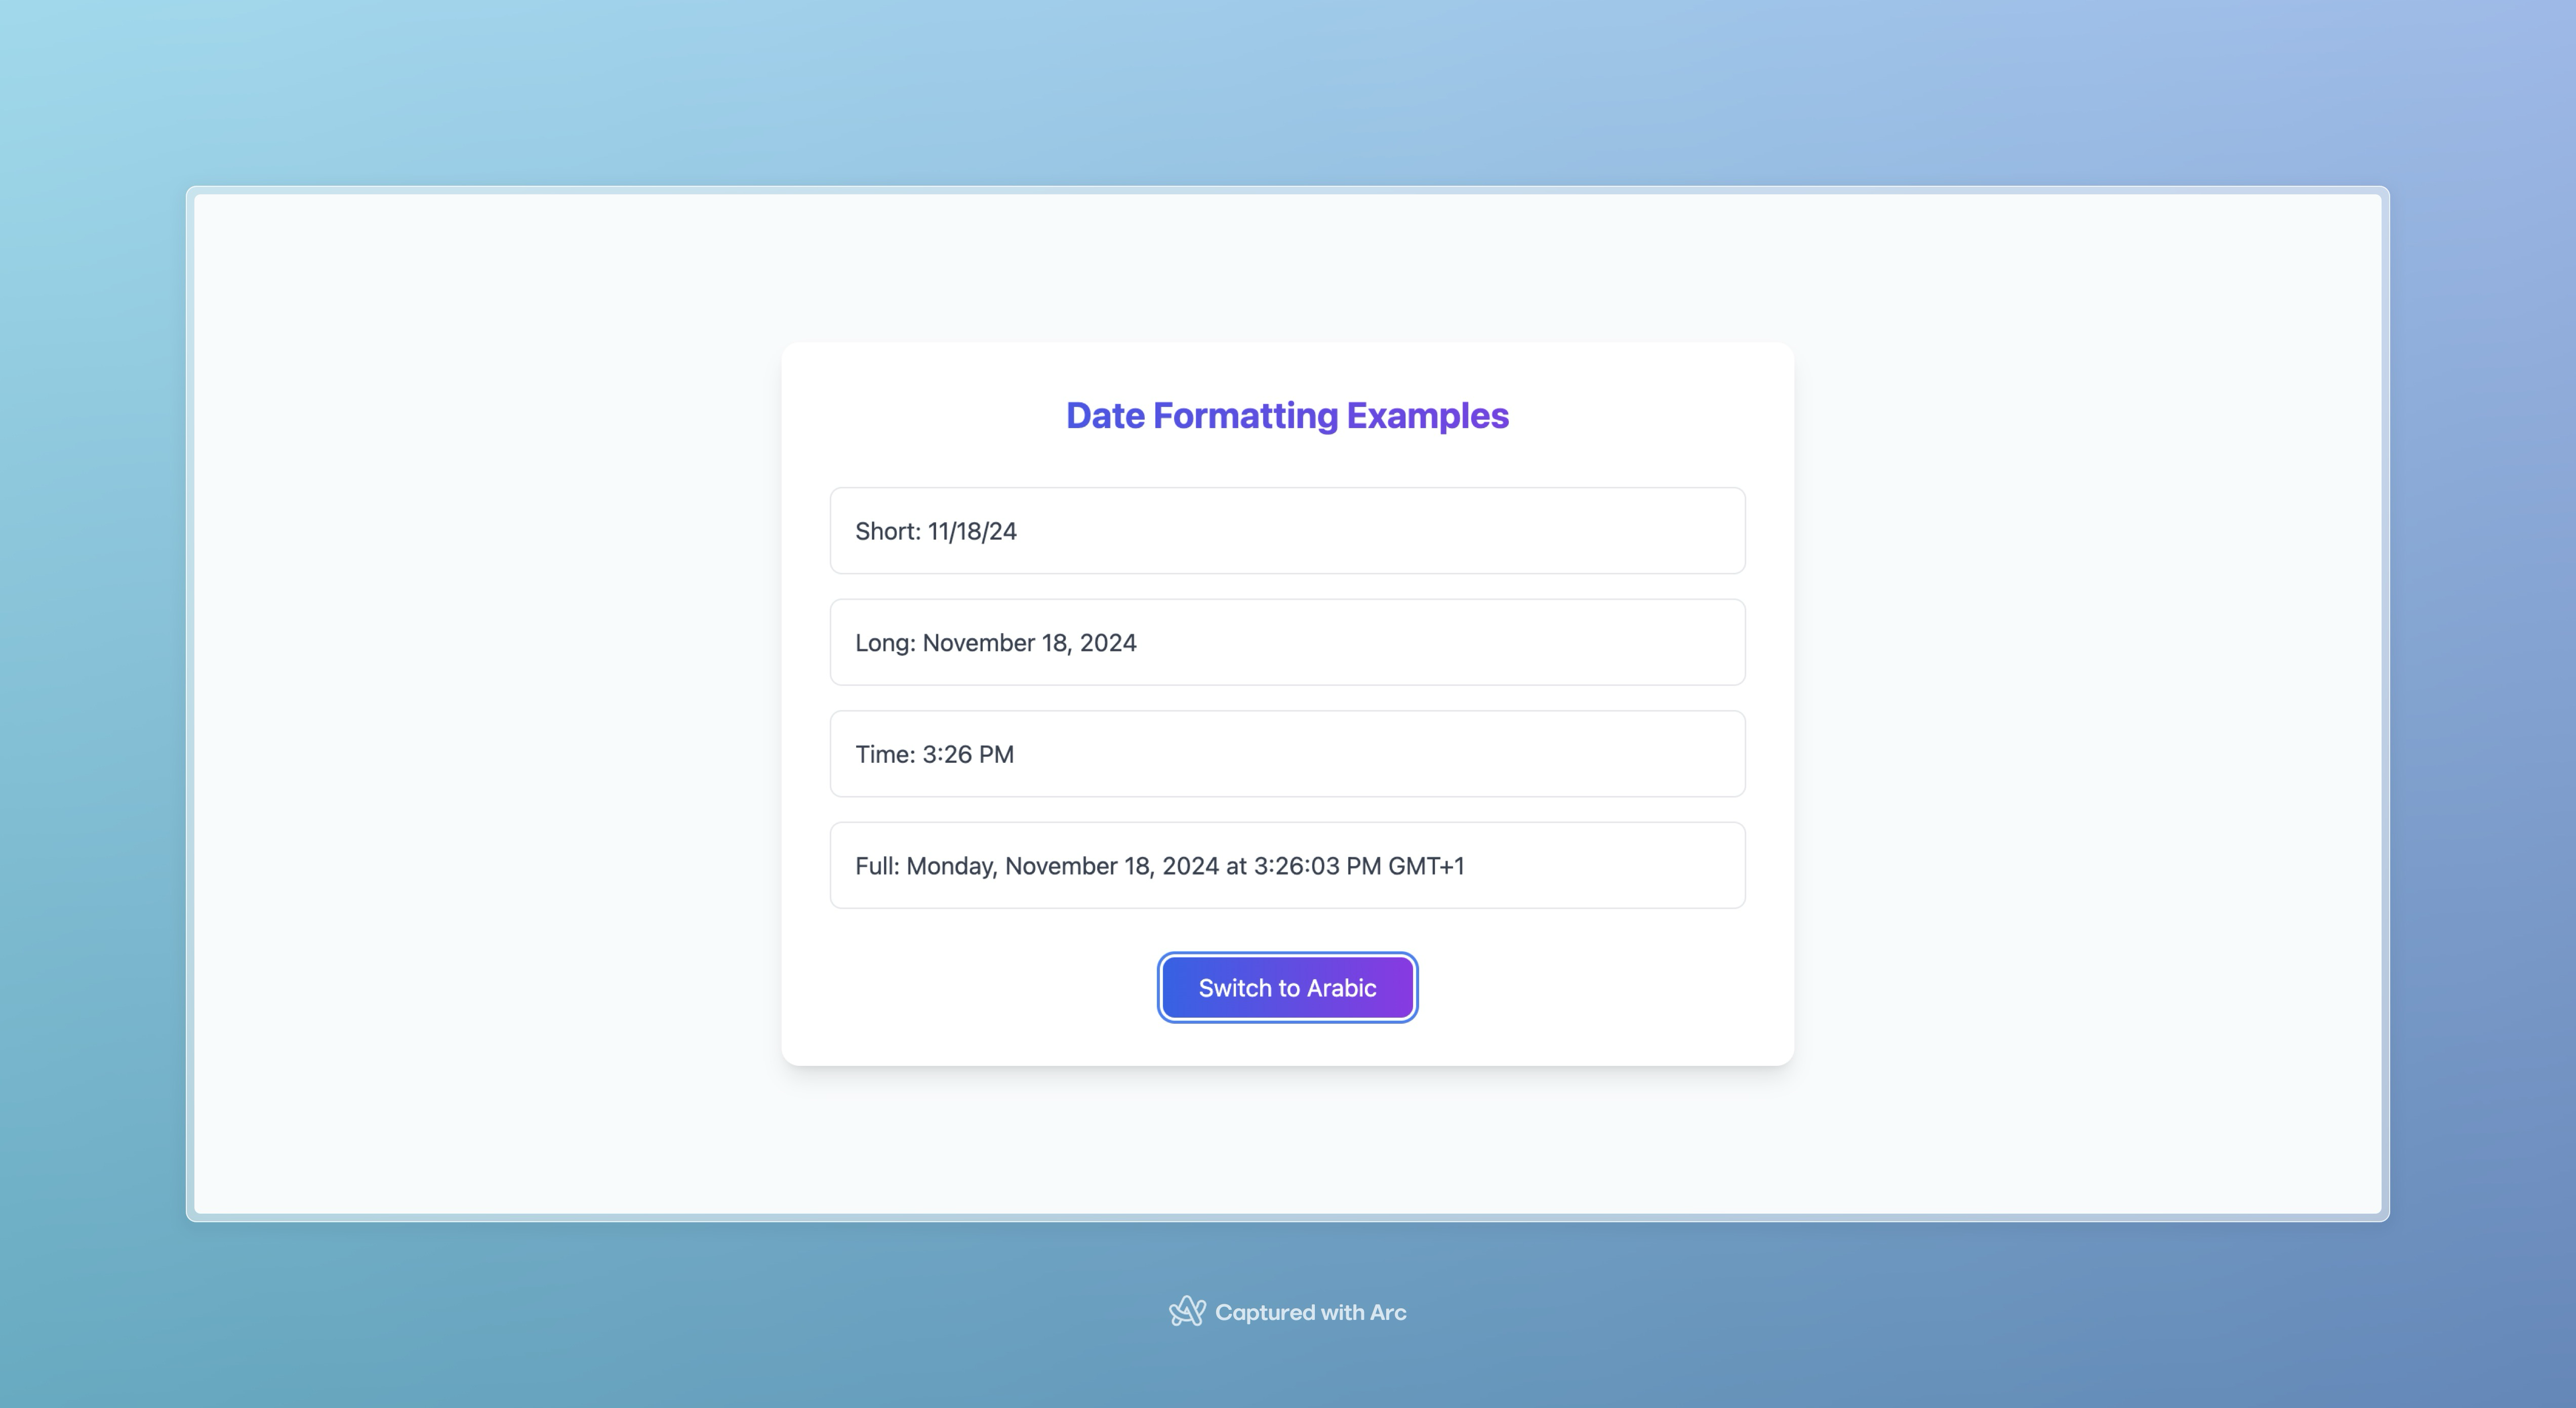
i18next's flexible interpolation system allows you to create custom format functions by leveraging the Intl API, which is widely supported in modern browsers. This enables advanced number formatting through custom interpolation functions. Let's examine a comprehensive implementation:
// i18n configuration:
import i18n, { FormatFunction } from "i18next";
import { initReactI18next } from "react-i18next";
import LanguageDetector from "i18next-browser-languagedetector";

// Import namespaces for each language
import enCommon from "../locales/en/common.json";
import enValidation from "../locales/en/validation.json";
import enAuth from "../locales/en/auth.json";

import deCommon from "../locales/de/common.json";
import deValidation from "../locales/de/validation.json";
import deAuth from "../locales/de/auth.json";

import arCommon from "../locales/ar/common.json";
import arValidation from "../locales/ar/validation.json";
import arAuth from "../locales/ar/auth.json";

i18n
  .use(LanguageDetector)
  .use(initReactI18next)
  .init({
    debug: true,
    lng: "ar",
    fallbackLng: "en",

    // Define default namespace
    defaultNS: "common",

    interpolation: {
      format: function (value, format, lng) {
        console.log({ value, format, lng });
        const numValue = Number(value);
        if (!isNaN(numValue)) {
          switch (format) {
            // Currency, Decimal, Percent, Compact
            case "currency":
              return new Intl.NumberFormat(lng, {
                style: "currency",
                currency: lng === "ar" ? "SAR" : "USD",
              }).format(numValue);
            case "decimal":
              return new Intl.NumberFormat(lng, {
                minimumFractionDigits: 2,
                maximumFractionDigits: 2,
              }).format(numValue);
            case "percent":
              return new Intl.NumberFormat(lng, {
                style: "percent",
                minimumFractionDigits: 2,
                maximumFractionDigits: 2,
              }).format(numValue);
            case "compact":
              return new Intl.NumberFormat(lng, {
                notation: "compact",
                compactDisplay: "short",
              }).format(numValue);

            // Units
            case "bytes":
              return new Intl.NumberFormat(lng, {
                style: "unit",
                unit: "byte",
                unitDisplay: "long",
              }).format(numValue);
            case "kg":
              return new Intl.NumberFormat(lng, {
                style: "unit",
                unit: "kilogram",
                unitDisplay: "long",
              }).format(numValue);
            case "meter":
              return new Intl.NumberFormat(lng, {
                style: "unit",
                unit: "meter",
                unitDisplay: "long",
              }).format(numValue);
            case "temperature":
              return new Intl.NumberFormat(lng, {
                style: "unit",
                unit: "celsius",
                unitDisplay: "long",
              }).format(numValue);
            default:
              return numValue.toString();
          }
        }
        return String(value);
      } as FormatFunction,
      escapeValue: false, // not needed for react as it escapes by default
    },

    resources: {
      en: {
        common: enCommon,
        validation: enValidation,
        auth: enAuth,
      },
      de: {
        common: deCommon,
        validation: deValidation,
        auth: deAuth,
      },
      ar: {
        common: arCommon,
        validation: arValidation,
        auth: arAuth,
      },
    },
  });

export default i18n;
for translations :
// en:
  "numberExample": {
    "title": "Number Formatting Examples",
    "currency": "Currency: {{value, currency}}",
    "decimal": "Decimal: {{value, decimal}}",
    "percent": "Percentage: {{value, percent}}",
    "compact": "Compact: {{value, compact}}",
    "bytes": "Bytes: {{value, bytes}}",
    "kg": "Weight: {{value, kg}}",
    "meter": "Length: {{value, meter}}",
    "temperature": "Temperature: {{value, temperature}}"
  },
// ar:
"numberExample": {
    "title": "أمثلة تنسيق الأرقام",
    "currency": "العملة: {{value, currency}}",
    "decimal": "العدد العشري: {{value, decimal}}",
    "percent": "النسبة المئوية: {{value, percent}}",
    "compact": "مختصر: {{value, compact}}",
    "bytes": "الحجم: {{value, bytes}}",
    "kg": "الوزن: {{value, kg}}",
    "meter": "الطول: {{value, meter}}",
    "temperature": "درجة الحرارة: {{value, temperature}}"
  },
Component implementation:
import { useTranslation } from "react-i18next";

export default function NumberFormats() {
  const { t, i18n } = useTranslation();
  const isRTL = i18n.language === "ar";

  const examples = [
    { type: "currency", value: 1234567.89 },
    { type: "decimal", value: 1234567.89 },
    { type: "percent", value: 0.8567 },
    { type: "compact", value: 1234567 },
    { type: "bytes", value: 1024 },
    { type: "kg", value: 75.5 },
    { type: "meter", value: 150 },
    { type: "temperature", value: 25 },
  ];

  return (
    <div className="min-h-screen flex items-center justify-center bg-gray-50">
      <div
        dir={isRTL ? "rtl" : "ltr"}
        className="max-w-2xl w-full mx-auto p-8 bg-white rounded-xl shadow-lg"
      >
        <div className="mb-8 text-center">
          <h2 className="text-2xl font-bold bg-gradient-to-r from-blue-600 to-purple-600 bg-clip-text text-transparent">
            {t("numberExample.title")}
          </h2>
        </div>

        <div className="space-y-4">
          {examples.map(({ type, value }) => (
            <div
              key={type}
              className="p-4 border border-gray-200 rounded-lg hover:border-blue-500 transition-colors duration-300"
            >
              <p className="text-gray-700">
                {t(`numberExample.${type}`, {
                  value,
                })}
              </p>
            </div>
          ))}
        </div>

        <div className="mt-8 text-center">
          <button
            onClick={() => i18n.changeLanguage(isRTL ? "en" : "ar")}
            className="px-6 py-2 bg-gradient-to-r from-blue-600 to-purple-600 text-white rounded-lg
                     hover:from-blue-700 hover:to-purple-700 transition-all duration-300
                     focus:outline-none focus:ring-2 focus:ring-blue-500 focus:ring-offset-2"
          >
            Switch to {isRTL ? "English" : "Arabic"}
          </button>
        </div>
      </div>
    </div>
  );
}
Expected result:
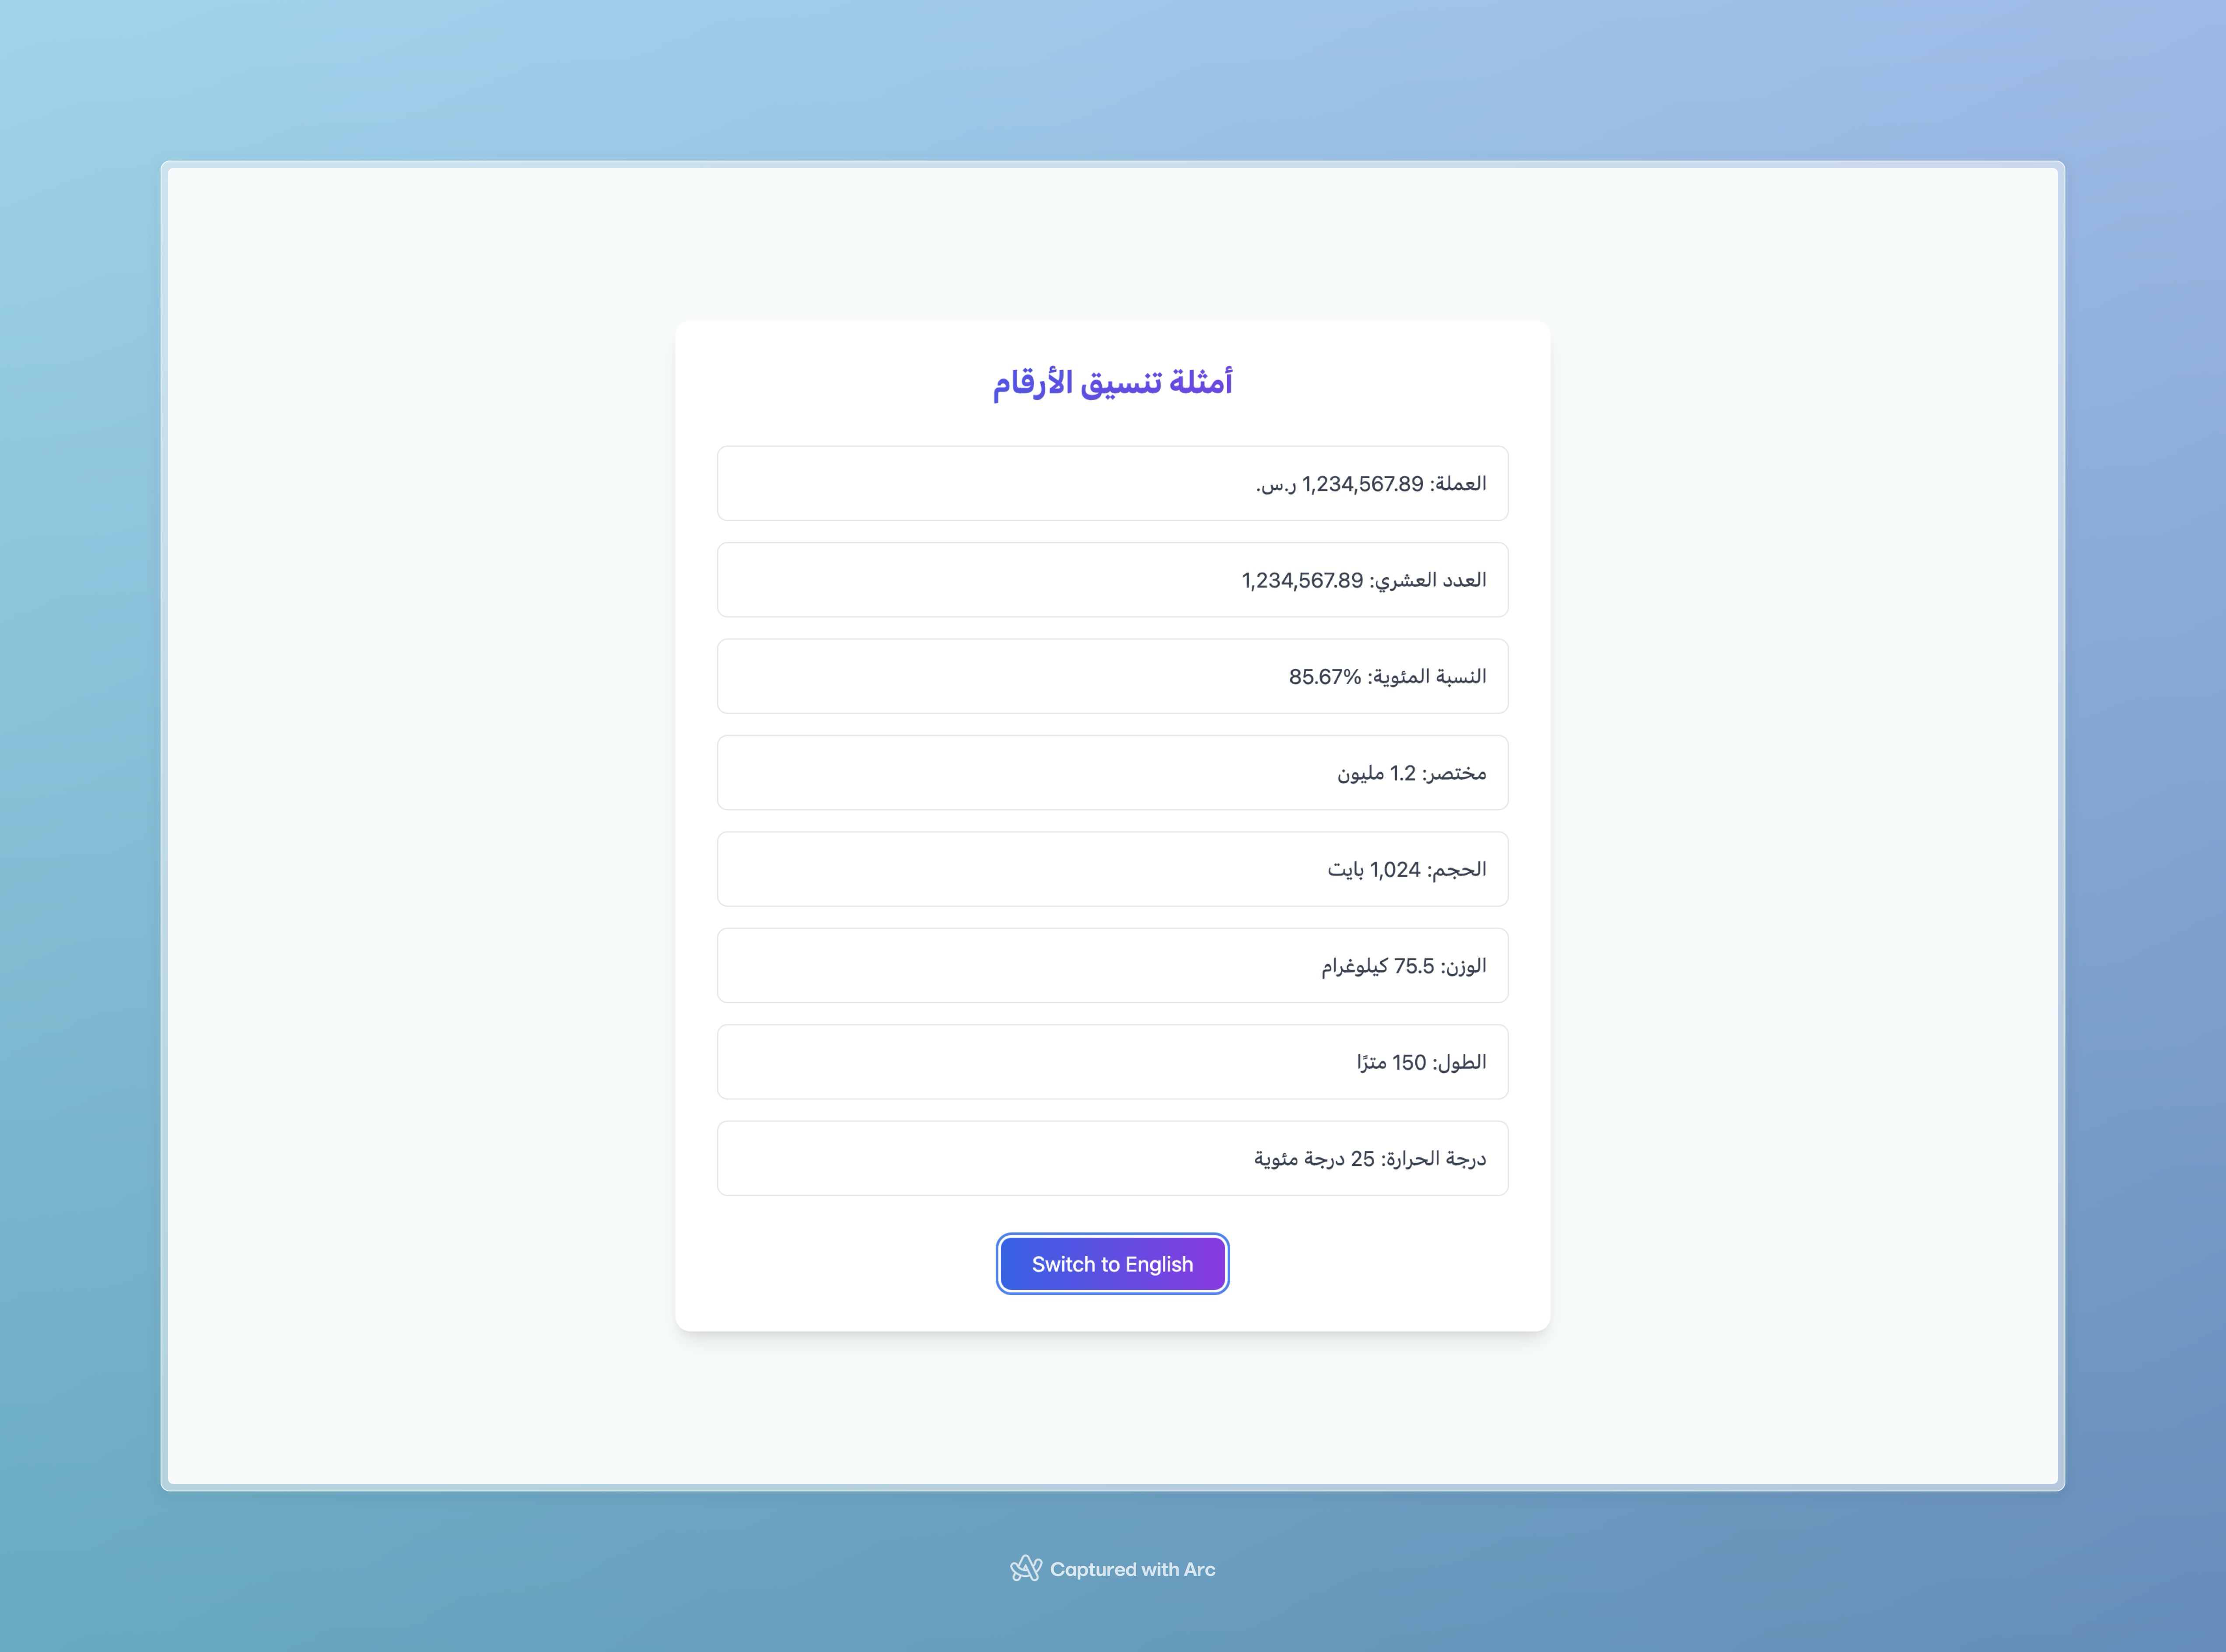
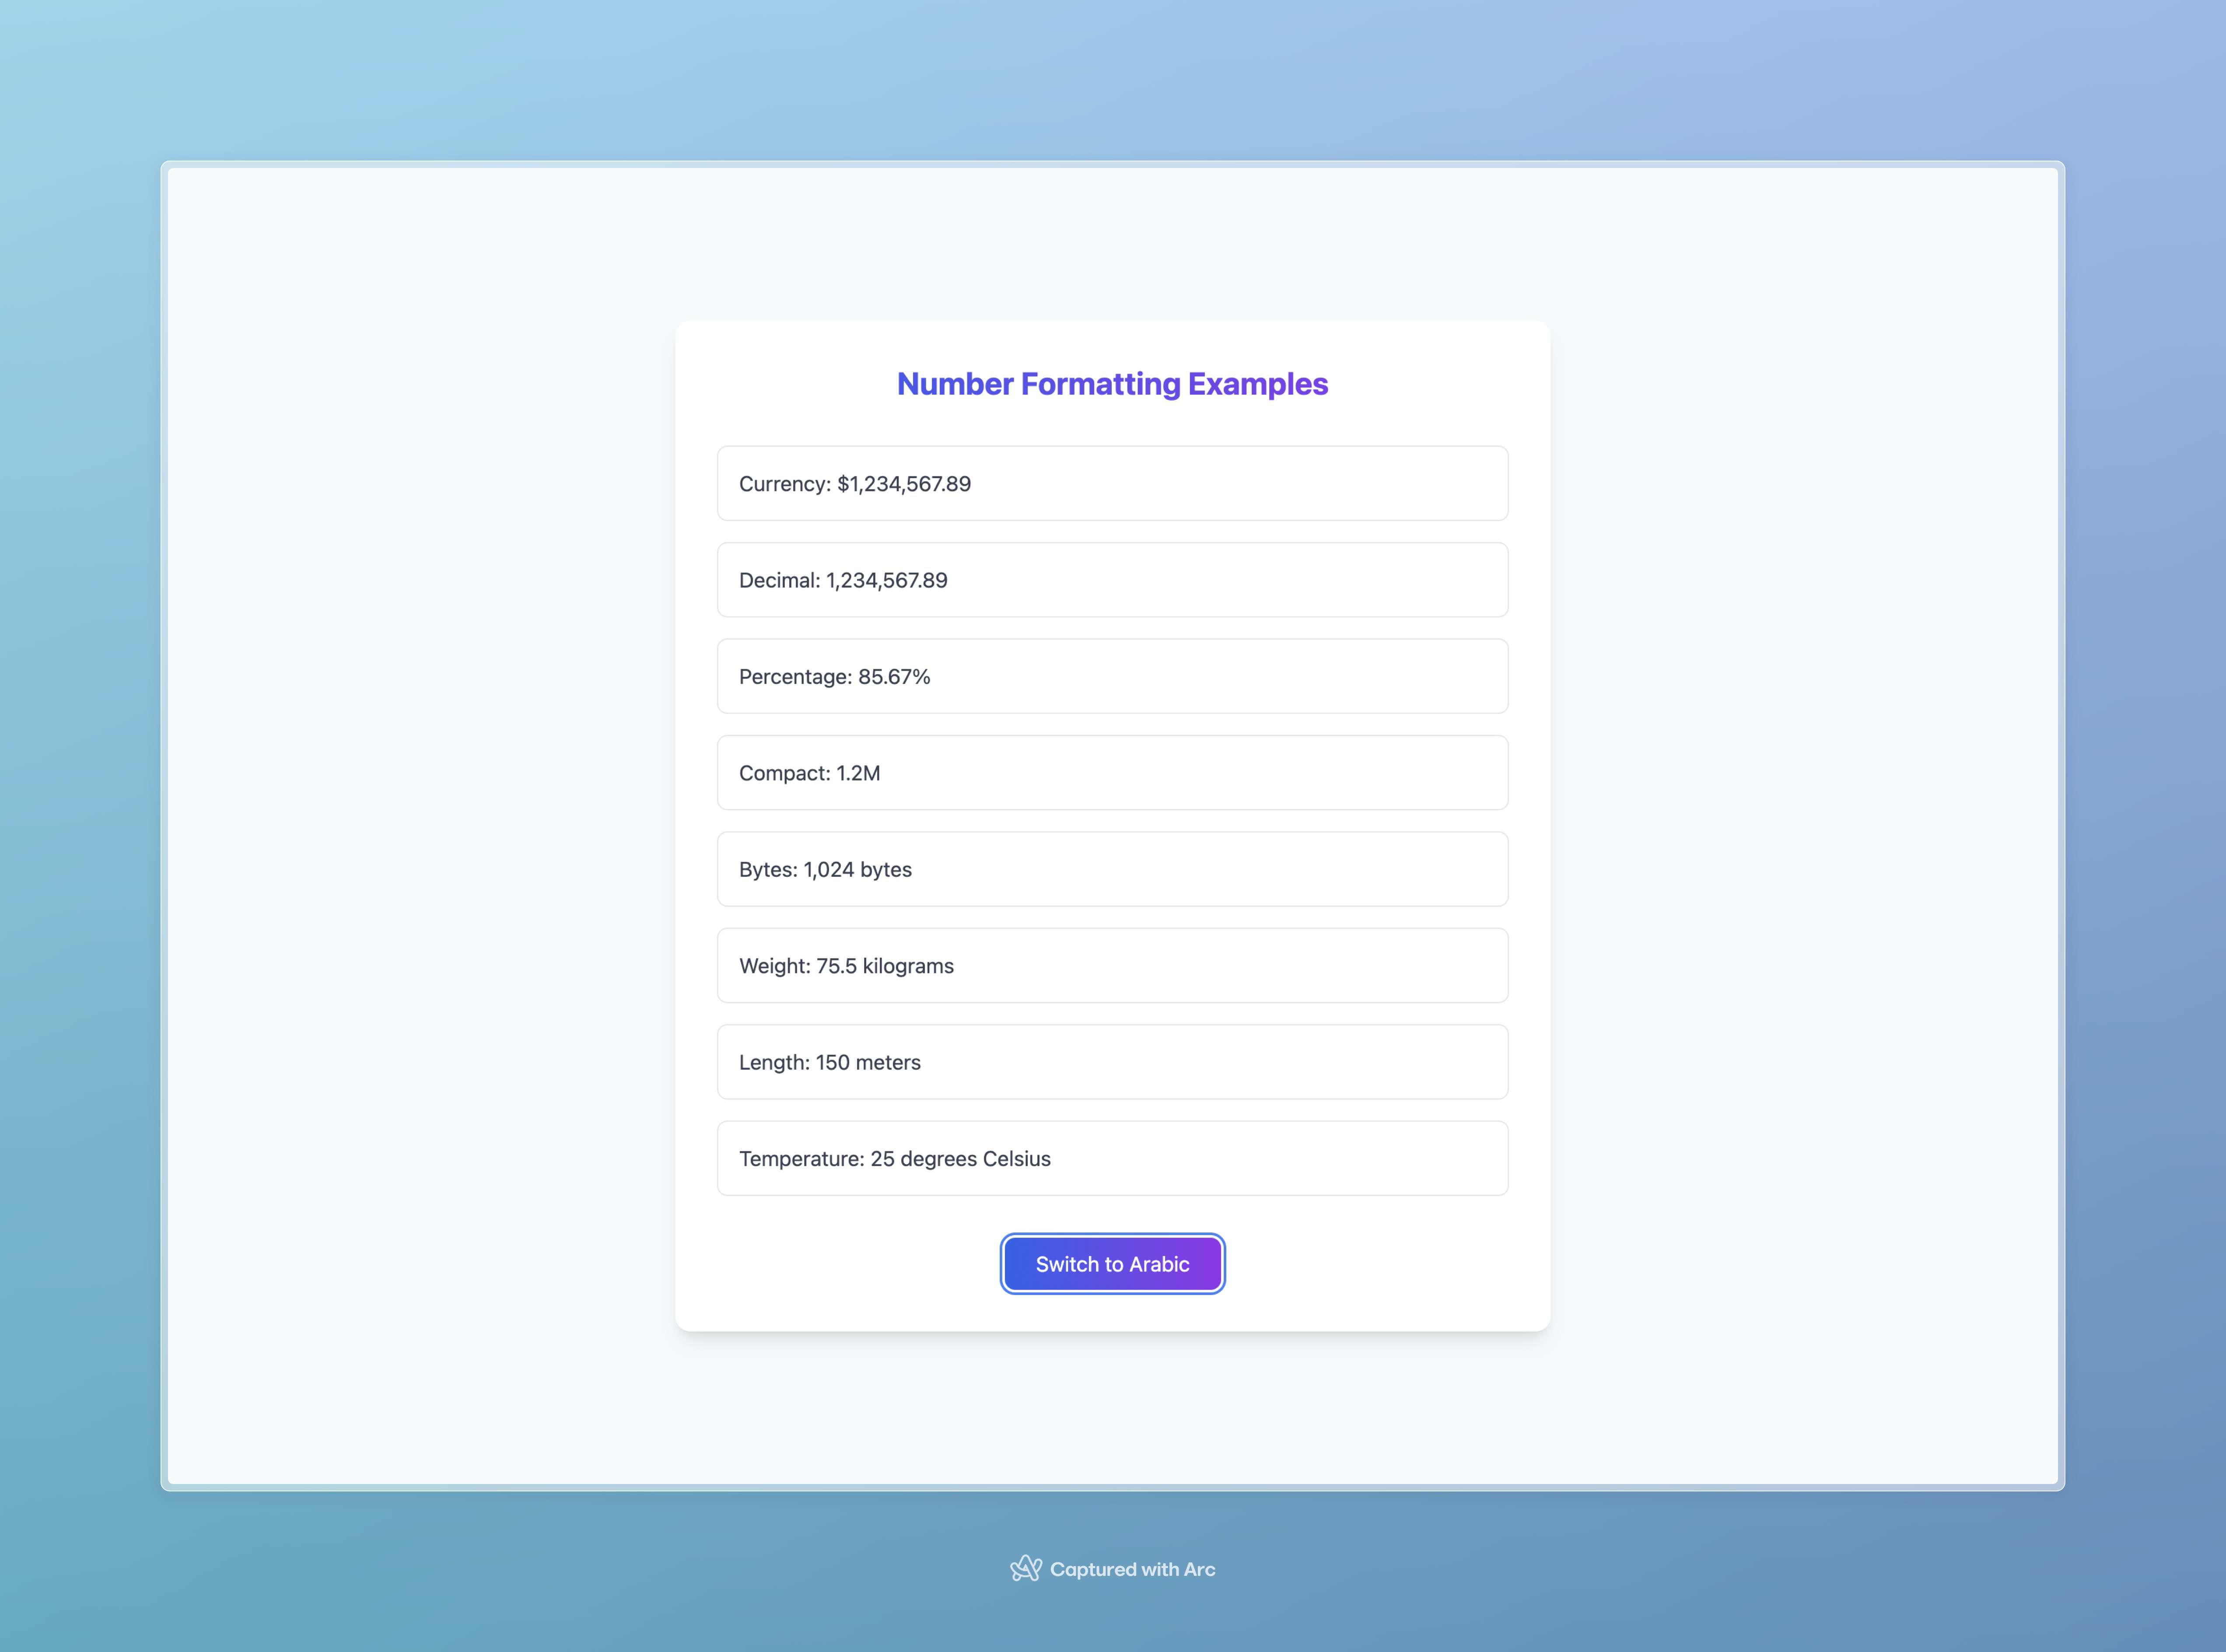
The custom format function provides flexibility beyond just Intl API usage. You can integrate other formatting libraries as fallbacks for browsers with limited Intl API support. Similarly, this approach can be applied to date formatting.
💡 Quick Link: For this section's code, check out the Formatting branch
Language Switching
A crucial aspect of supporting multiple languages is allowing users to choose their preferred language rather than relying solely on browser-detected settings. i18next provides comprehensive tools to handle language switching, loading, and configuration. It also manages language detection, changing, and initialization. Let's explore how to implement these features:
Language selector component
We've already implemented some of these features in previous sections. The useTranslation hook returns an i18n instance that we can use to change and retrieve the current language, as shown in the example below:
import { useTranslation } from "react-i18next";

export default function NumberFormats() {
  const { t, i18n } = useTranslation();
  const isRTL = i18n.language === "ar";
  return (
        <div className="mt-8 text-center">
          <button
            onClick={() => i18n.changeLanguage(isRTL ? "en" : "ar")}
            className="px-6 py-2 bg-gradient-to-r from-blue-600 to-purple-600 text-white rounded-lg
                     hover:from-blue-700 hover:to-purple-700 transition-all duration-300
                     focus:outline-none focus:ring-2 focus:ring-blue-500 focus:ring-offset-2"
          >
            Switch to {isRTL ? "English" : "Arabic"}
          </button>
        </div>
  );
}
i18n provides several useful functions and properties for language management:
i18n.language: Gets the currently loaded languagei18n.dir(): Returns the text direction (RTL/LTR) based on the current language, or for a specific language when passed as an argumenti18n.changeLanguage(): Asynchronous function that changes the active language. Returns a Promise, allowing error handling with try/catch
💡 Quick Link: For more details about API, check out this page
Events & Persisting language preference
Persisting the preference language of the user is most handled case you should covered in your application, i18n provides powerful events for make it easier for you
One important event for data persistence is languageChanged. This event fires when the language changes, allowing you to execute callback functions. Here's how to implement this functionality to save the preferred language in localStorage:
import i18n, { FormatFunction } from "i18next";
import { initReactI18next } from "react-i18next";
import LanguageDetector from "i18next-browser-languagedetector";

// Import namespaces for each language
import enCommon from "../locales/en/common.json";
import enValidation from "../locales/en/validation.json";
import enAuth from "../locales/en/auth.json";

import deCommon from "../locales/de/common.json";
import deValidation from "../locales/de/validation.json";
import deAuth from "../locales/de/auth.json";

import arCommon from "../locales/ar/common.json";
import arValidation from "../locales/ar/validation.json";
import arAuth from "../locales/ar/auth.json";
const getStoredLanguage = () => {
  const storedLanguage = localStorage.getItem("language");
  return storedLanguage || navigator.language.split("-")[0];
};
i18n
  .use(LanguageDetector)
  .use(initReactI18next)
  .init({
    debug: true,
    lng: getStoredLanguage(),
    fallbackLng: "en",
    // Define default namespace
    defaultNS: "common",
    interpolation: {
      escapeValue: false, // not needed for react as it escapes by default
    },
    resources: {
     //
    },
  });

i18n.on("languageChanged", (lng) => {
  localStorage.setItem("language", lng);
});

export default i18n;
💡 Quick Link: For this section's code, check out the persistence-events branch
💡 Quick Link: For more details about Events, check out this page
RTL Support
Several languages are written from right to left (RTL). While these languages are less common in Western web development, they serve millions of users globally. The main RTL languages include Arabic, Hebrew, and Persian.
Supporting RTL languages significantly expands your application's reach. Tailwind CSS v3 makes this easier with its built-in rtl: and ltr: modifiers, allowing you to create multi-directional layouts efficiently. (more details)
To enable Tailwind's RTL/LTR modifiers, we add a language change listener in our i18next configuration that updates the document's direction and language attributes:
i18n.on("languageChanged", (lng) => {
  localStorage.setItem("language", lng);
  // Set HTML lang attribute
  document.documentElement.lang = lng;
  // Set HTML dir attribute based on language
  document.dir = i18n.dir(lng);
});
document.dir = i18n.dir(i18n.language);
document.documentElement.lang = i18n.language;
Key RTL-aware classes in Tailwind CSS:
- Spacing Classes:
ps-instead ofpl-for padding-startpe-instead ofpr-for padding-endms-instead ofml-for margin-startme-instead ofmr-for margin-end
- Positioning Classes:
start-instead ofleft-for positioningend-instead ofright-for positioningtext-startinstead oftext-leftfor text alignment
- Flex Layout:
rtl:flex-row-reversefor reversing flex directionFlex items automatically adjust in RTL contexts
These logical properties ensure your layout works correctly in both LTR and RTL directions
💡 Quick Link: For this section's code, check out the rtl-support branch
Performance Optimization
Now that we've set up our internationalization system, let's optimize it for better performance. When dealing with multiple languages and translation files, it's crucial to consider bundle size and loading strategies. In this section, we'll explore how to optimize our i18next implementation using dynamic imports and file splitting
Now that we've set up our internationalization system, let's optimize it for better performance. When dealing with multiple languages and translation files, it's crucial to consider bundle size and loading strategies. In this section, we'll explore how to optimize our i18next implementation using dynamic imports and file splitting.
First, install the HTTP backend plugin:
pnpm add i18next-http-backend
- Setup
i18next-http-backend:
typescriptCopy// i18n.ts
import i18n from "i18next";
import { initReactI18next } from "react-i18next";
import HttpBackend from 'i18next-http-backend';
import LanguageDetector from "i18next-browser-languagedetector";

i18n
  .use(HttpBackend)
  .use(LanguageDetector)
  .use(initReactI18next)
  .init({
    backend: {
      loadPath: '/locales/{{lng}}/{{ns}}.json',
    },
    fallbackLng: "en",
    defaultNS: "common",

    // Disable suspense if needed
    react: {
      useSuspense: false
    }
  });

export default i18n;
- Translation File Structure:
public/
  locales/
    en/
      common.json     # Shared translations
      auth.json       # Authentication translations
      dashboard.json  # Dashboard-specific translations
    ar/
      common.json
      auth.json
      dashboard.json
- Lazy Loading Translations:
function Dashboard() {
  // Load dashboard translations only when needed
  const { t, i18n } = useTranslation('dashboard', {
    useSuspense: false
  });

  // Load multiple namespaces
  const { t } = useTranslation(['dashboard', 'common'], {
    useSuspense: false
  });

  return (
    <div>
      <h1>{t('dashboard:title')}</h1>
      <button>{t('common:actions.save')}</button>
    </div>
  );
}
By splitting translation files and implementing lazy loading, we achieve a smaller initial bundle size since only necessary translations are loaded. The on-demand translation loading means resources are fetched only when needed, while better caching capabilities ensure efficient resource management.
💡 Quick Link: For this section's code, check out the performance branch
Conclusion
This guide has walked you through implementing internationalization in modern web applications using i18next, from basic setup to handling complex formatting, plural rules, and RTL support. You can find the complete implementation and examples in the GitHub repository. While we've covered significant ground, there's always more to explore in the world of i18next and internationalization. If you need help implementing these features in your application or are interested in collaborating on i18n-related projects, feel free to reach out to me on LinkedIn or via email at contact@othmanekahtal.me. Stay tuned for more articles diving into advanced i18next features and internationalization patterns!
Subscribe to my newsletter
Read articles from Othmane Kahtal directly inside your inbox. Subscribe to the newsletter, and don't miss out.
Written by

Othmane Kahtal
Othmane Kahtal
Fullstack developer crafting elegant web solutions with React.js, TypeScript, graphQL, Node.js and AWS