Cloud DevOps - CI/CD with CodePipeline
 yyounos shaik
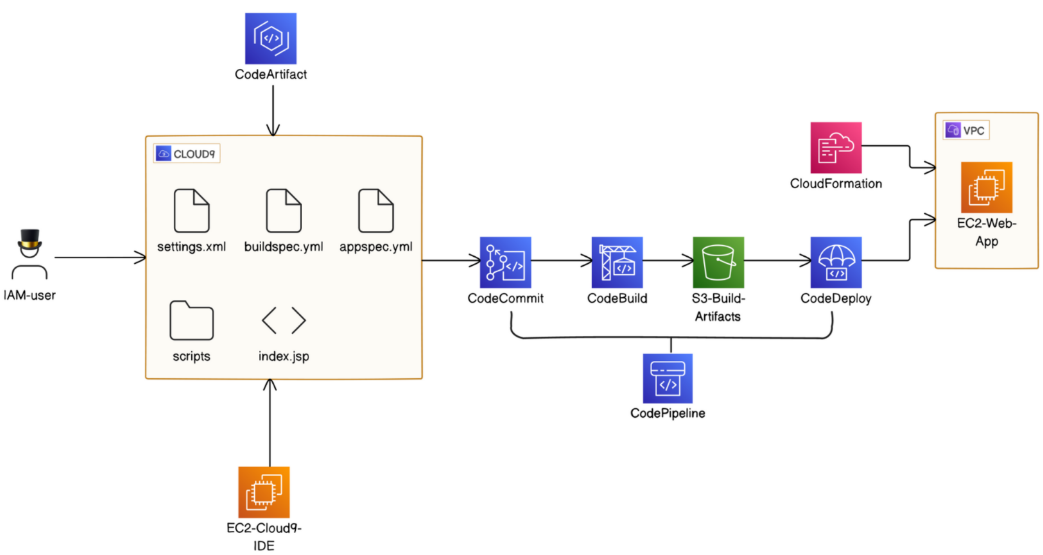
DIFFICULTY : MID-LEVEL TIME : 150 mins COST : 0$
WHAT YOU’LL NEED:
An AWS account - Create one here!
part-1 : Building an WebApp and IDE in AWS.
Part-4 : Pakcage an App with AWS CodeBuild.
part-5 : Deploy an app with CodeDeploy.
Part-6 : [optional] Automate with CloudFormation.
AWS SERVICES :
- CodePipeline
Summary
You're now on Project SEVEN (the final one!!) and it's going to be amazing! Get ready to dive into AWS CodePipeline!
You've used:
CodeCommit and CodeArtifact to save copies of your web app's code and its dependencies.
CodeBuild to compile and package your app's source code into a handy WAR file..
CodeDeploy to deploy that WAR file on servers, so users can see your web app!.
Now AWS CodePipeline is here to automate the integrations between CodeCommit, CodeBuild and CodeDeploy.
This is exactly how DevOps/Cloud engineers roll out updates to their applications and infrastructure—fast, reliable, and consistent! How exciting is that?!
Let’s Get Started…
Before diving into the steps, let's ask ourselves: what exactly is CodePipeline? We've reached the end of this series, and wow, look at all we've accomplished! What have we gained by doing all of this?
Imagine you make a change to your source code in your EC2 Terminal. For example, you add new lines of code to your index.jsp file. How would you push those changes through to the Web Server that is hosting your web app?
You would need to manually:
1. Commit your changes in EC2 and push them to the Git repository.
2. Build the application in CodeBuild to make sure it compiles and runs correctly.
3. Deploy the updated application to the web server using CodeDeploy.
With CodePipeline, these steps are automated. As soon as you push your changes to the main branch, CodePipeline automatically takes care of building and deploying your application. This makes the process faster and reduces the chance of errors - yay!
AWS CodePipeline is an incredible AWS service that automates the steps DevOps/cloud engineers take to release application updates! In this project, we're using CodePipeline to set up an automated pipeline with the CodeCommit, CodeBuild, and CodeDeploy components we created earlier in previous parts.
Step 1 : Update the missing resources
After deploying your CloudFormation template, you might see your resources are back, but wait—some files are missing! No worries, though! We're going to swiftly add those missing files to each of the services we've used to build this amazing CI/CD pipeline. Let's get them added right now!
Deploy your CloudFormation template
The previous project was all about automating the deployment of your web app’s infrastructure using a CloudFormation template into use!
You can do this project without creating the CloudFormation template from the previous project . It’s just the template will save you some time !
Search for CloudFormation console in your AWS management console.
Select Create stack, then select With new resources (standard).
Under the Specify template panel, select Upload a template file.
Select Choose file.
Upload the CloudFormation template you've created in the previous project!
Create a repository in AWS CodeCommit :
If CodeCommit is not available to you, simply switch to a region where it is available. Alternatively, you can use GitHub as your repository, push your files there, and then create the pipeline.
SKIP this step if you've deployed your CloudFormation template!
With your development environment and web app all set up, it's time to create a CodeCommit repository to store and manage your web app's code.
Search for the CodeCommit console in your AWS Management Console and open it in a new tab.
Don't forget to use the same Region as the one you used in EC2 terminal.
Click Create repository.
Name it yourname-web-project
Add a description: A web application for the home page.
Your First Commit:
Let's commit and push your initial code to CodeCommit. This saves your code changes and keeps your repository up to date.
Head back to the Cloud9 environment.
Set up your Git identity (replace your name and your email, but don't delete the "" quote marks) by running this command:.
  git config --global user.name "your name"
  git config --global user.email "your email"
Navigate your terminal to the web app project by running this command: cd yourname-web-project.
Initiate the local repo by running this command:
git init -b main.
On the CodeCommit console, select your yourname-web-project repository.
Select Clone URL .
Select Clone HTTPS. This will copy the repository's URL to your clipboard. The URL should follow this format: https://git-codecommit..amazonaws.com/v1/repos/ .
Set the remote origin to the CodeCommit URL you copied earlier (replace HTTPS CodeCommit repo URL with your own URL) by running this command in your EC2 terminal :
git remote add origin.
Now we can commit and push our code! Here are the commands for this:
  git add .
  git commit -m "Initial commit. Updated index.jsp."
  git push -u origin main
Hooray! You should now be able to refresh your CodeCommit page in the AWS Console and see the newly created files.
Now you have successfully pushed the files into the repository.
Connect the CodeArtifact Repository:
Once CodeArtifact is set up, let's connect it with your web app project! This is an important step that makes sure your project knows where to store and access its packages and dependencies.
In your webapp-packages repository, click View connection instructions.
In the popup, choose Mac & Linux for Operating system and mvn as package manager.
Copy the command in Step 3.
Run the command in your terminal in EC2 terminal.
To run the next few steps in the connection settings page in CodeArtifact, we'll have to update the settings.xml file.
Your settings.xml file doesn't exist yet, so let's create it first! In your EC2 terminal, run these commands:
echo $'\n' > settings.xml
Open the newly created settings.xml in EC2 file explorer on the left hand panel.
Switch tabs back to your CodeArtifact console, and follow the remaining steps in the Connection instructions dialog. i.e. copy the code in Steps 4, 5, and 6. Add them in between the tags in settings.xml.
Save your changes to settings.xml.
After connecting your web app to CodeArtifact, we're going to compile your application to test if the CodeArtifact connection is working properly.
Next, compile your application using this command: mvn -s settings.xml compile.
Head back to the CodeArtifact console.
Select your webapp-packages repository.
Review Your CodeBuild Project’s Setup
If you've deployed your CodeBuild project using a CloudFormation template, make sure to do this step!. Search for the CodeBuild console in your AWS Management Console.
Select your CodeBuild project i.e. yourname-web-build.
Select Edit at the top of the page.
Notice that the Source panel has a few fields missing!
why are they missing?
There are limitations to what can be set up with the CloudFormation template, in this case it’s specific CodeCommit repository that we want CodeBuild to get its source code from.
Complete the CodeBuild project's set up:
Repository: yourname-web-project.
Reference type: Branch.
Branch: main
Scroll to the bottom, and select Update Project.
Create your Deployment with CodeDeploy
After creating our deployment group, i.e. defining the resources that we want to deploy, we can now create a deployment!.
In your newly created yourname-web-deploy-group, click Create deployment.
For the Revision location, head back to your S3 console and click into your S3-build-artifacts-yourname bucket.
Click into your zip file, and copy its S3 URI.
Paste that S3 URI into the Revision location field.
Make sure .zip is still selected as the Revision file type.
Leave the other settings as default and click Create deployment.
The deployment will now begin. This should take around 30 seconds!
Let's head back to your EC2 console.
Select your WebServer EC2 instance, and click on open address.
When you click the open address link, a new tab will default to using https:// at the start of your link. Manually change that to http:// and try again.
If you see an error when opening the website make sure you are accessing the address using http and not https and check if your own IP address has’nt chnaged. check here: http://checkip.amazonaws.com/.
If your IP has changed, you’ll have to modify the security group of your EC2 instance to allow traffic from your new IP address.
Note: The changes in this step might be different for you compared to those shown in this blog. So, carefully check if all the services you added to the template are created after running it.
Step 2 : Set up Your Pipeline
Head to your CodePipeline console using the search bar or your handy left hand nvigation panel.
Choose Create Pipeline.

Enter yourname-web-pipeline as the pipeline name.
Keep the pipeline type to V2.
Choose Superseded for the Execution mode.
Choose to create a New service role and use the auto generated name.
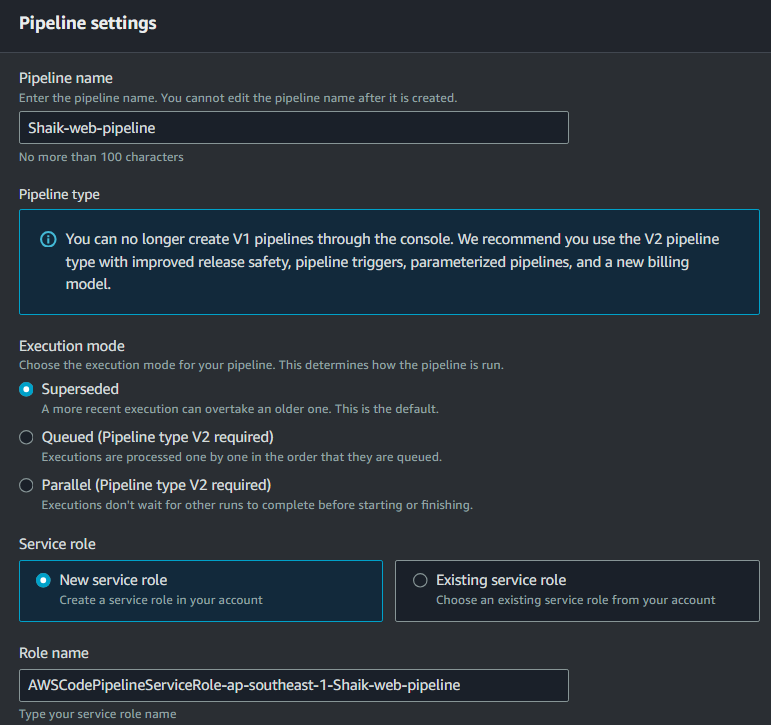
What are pipeline type and execution mode?
Pipeline type : Guess what? It's the version of CodePipeline we're using! We're going with V2 because it's the latest and greatest! Even though our pipeline today is pretty simple and could work with V1, V2 gives us so many more options for automations and workflows! It's perfect for enterprise-level applications!
Execution mode : This is where the magic happens! It decides how CodePipeline will handle multiple runs of your pipeline. Each execution is a complete run through the pipeline, from start (like committing your changes in Cloud9) to finish (like deploying your changes in CodeDeploy)! How exciting is that?
What do the different excution modes mean?
Superseded : This is the default mode. If multiple executions of a pipeline start, CodePipeline only runs the most recent one, stopping the older ones. This mode is useful when changes happen often, and only the latest state matters, so resources aren't wasted on outdated tasks.
Queued : In this mode, pipeline executions are processed one at a time in the order they started. This is helpful when each execution's result might affect the next or when you need strict control over the execution order.
Parallel : This mode allows multiple executions to run at the same time without waiting for others to finish. It's suitable for environments where executions don't affect each other, and we want to reduce wait time.
Leave other settings as default.
Click Next.
Now we’re at the source stage!
What is source stage?
Here, you’ll tell CodePipeline where your application will find the source code for your application.
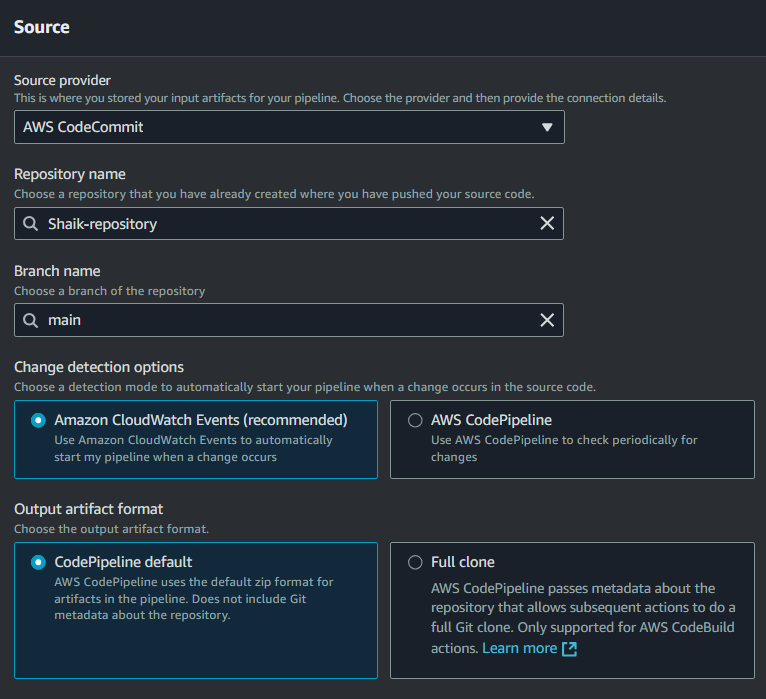
Under the source provider, select AWS CodeCommit.

Select the yourname-web-project as the repository.
Set the branch name to be main.
Leave the detection option as Amazon CloudWatch Events. Leave the output artifact format as CodePipeline default.
Click Next.
What does the Detection option setting mean?
The Detection option setting is how CodePipeline will figure out when something has changed in your source code and an execution of the pipeline should be triggered:
Amazon CloudWatch Events: This option uses real-time monitoring to catch any updates made, such as new code being committed, and triggers your pipeline right away. It's perfect for keeping things moving smoothly and quickly.
AWS CodePipeline: This option triggers a pipeline periodically - CodePipeline will check if any changes have been made in the last few hours, and trigger an execution if there's been any change to your source code.
What does the Output Artifact Format setting mean?
The Output Artifact Format setting determines how the data (e.g. source code from CodeCommit, build artifact from CodeBuild) are packaged and stored for other stages of the pipeline to use:
CodePipeline Default : This option packages artifacts in the most efficient way (zip files). It’s efficient for most pipelines and is the default use case for most scenarios!
Full Clone : This option creates a complete copy of the entire source repository as an artifact, including every file and folder present in the repository at the commit. Instead of build artifacts and compiled code, the full repository is used in the Build and Deploy stages! This option is useful for complex applications with multiple dependencies on each other, but it can take more time and storage space than the default option.
Onto the build stage!
What is a build stage?
The build stage in a CI/CD pipeline is where your app’s source code is compiled and transformed into artifacts the war file for our web app! we need to tell CodePipeline that we,ve set up our pipelne’s build stage in CodeBuild.
Select AWS CodeBuild as the build provider.
Make sure the region that gets selected is the same region as your CodeBuild project.
Select yourname-web-build as the project name.
Leave the build type as Single build.
Click Next.
Onto the deploy stage!
What is the deploy stage?
The deploy stage in AWS CodePipeline is where the build and tested code is deployed to its target environments, like production or staging servers. This stage makes the application or changes accessible to users. We need to tell CodePiepline that we,ve set up the deply stage in CodeDeploy.
Select AWS CodeDeploy as the deploy provider.
Select yourname-web-deploy as the application name.
Select yourname-web-deploy-group as the deployment group.
Click Next.
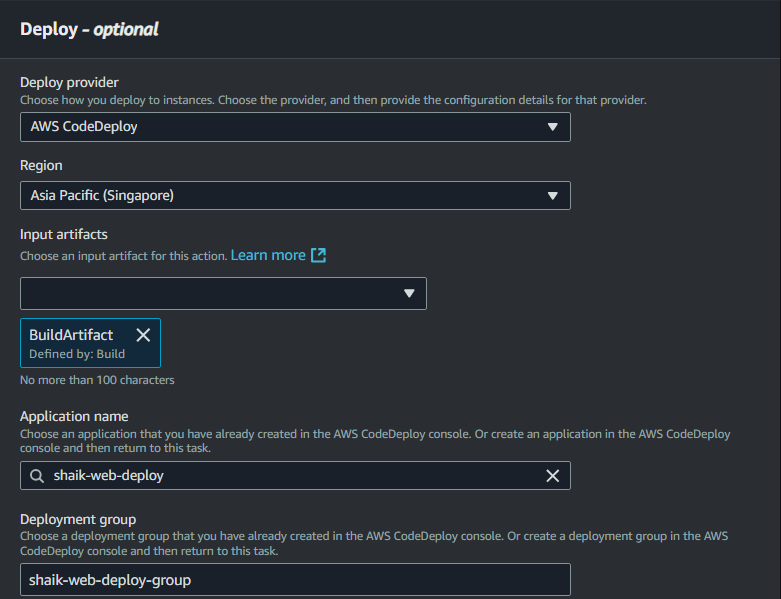
Review the pipeline settings and click create pipeline.
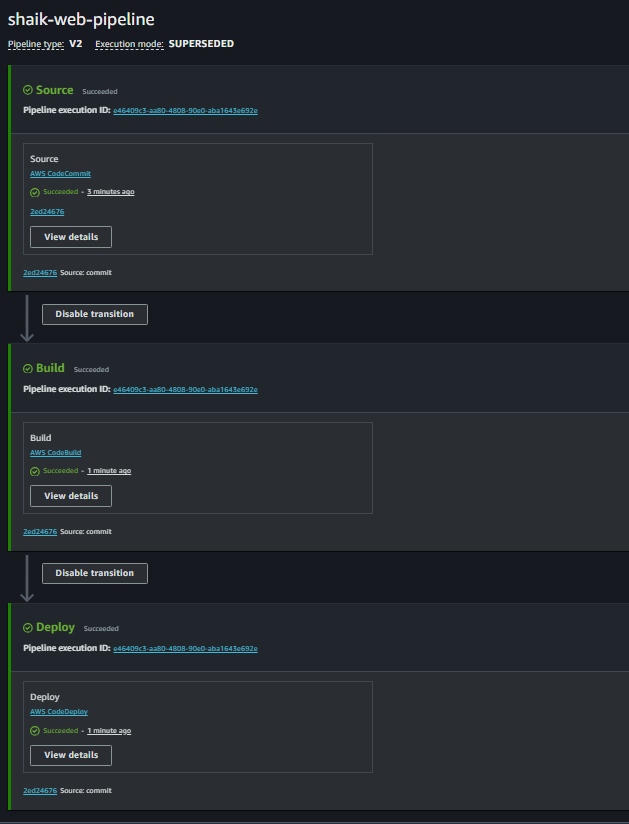
The whole pipeline will run for the first time.
Make sure all three stages of your pipeline complete successfully.
Step 3 : Release a Change
Well done, you have a fully managed CI/CD pipeline!
Let’s test if everything is working!
Head back to your EC2 terminal.
Make changes in the index.jsp file with the code updates you want to include. For example, if you want to add your portfolio, simply add a folder and import all the necessary files into your pipeline for deployment.
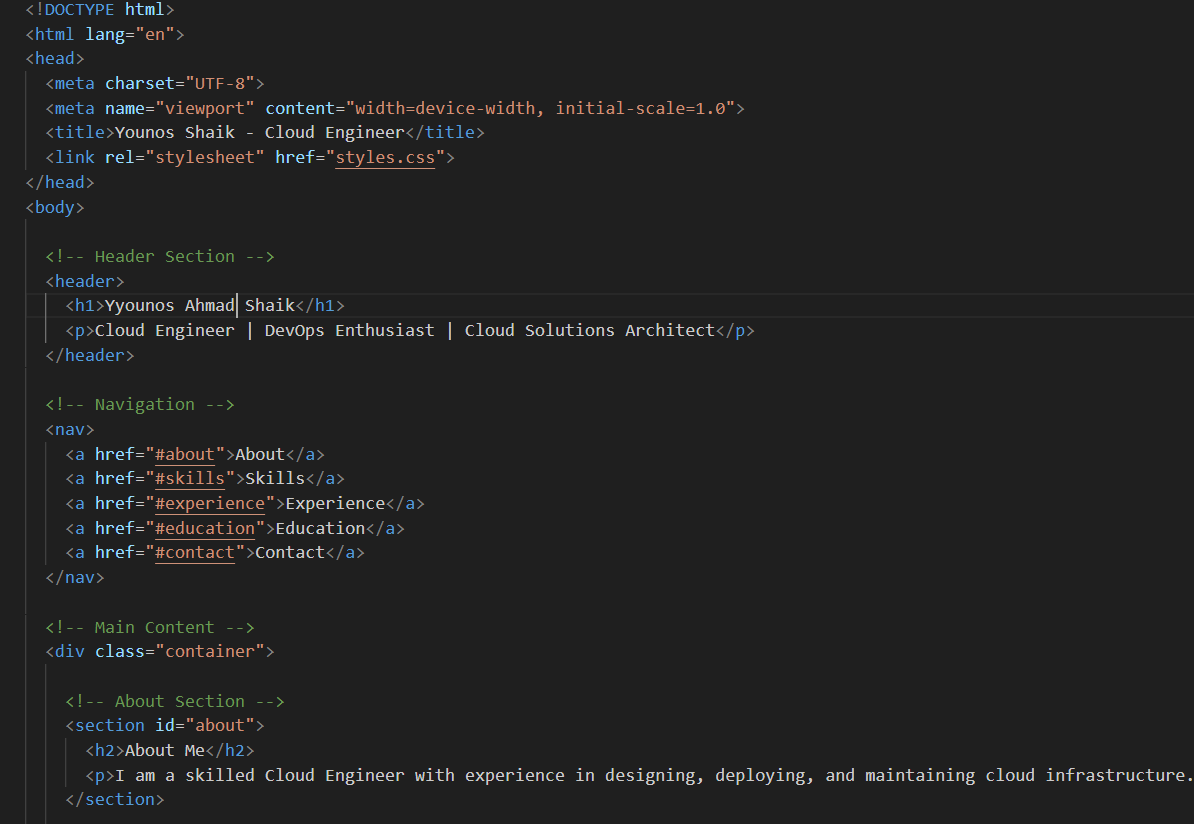
After making changes in Yourname-web-project now its time to add it into your respository i.e. CodeCommit Repository.
Run these commands:
  git add .
  git commit -m "Update index.jsp and upload image assets"
  git push -u origin main
Head back to your CodePipeline console.
Wait, did you notice the pipeline is restarting again?
The pipeline kicks into action automatically whenever you push new changes to your repository! That's right, when you commit in your local development environment and push those changes to your CodeCommit repository, the magic happens! This automation ensures that the latest version of your code is tested, built, and deployed without you having to lift a finger. How exciting is that?
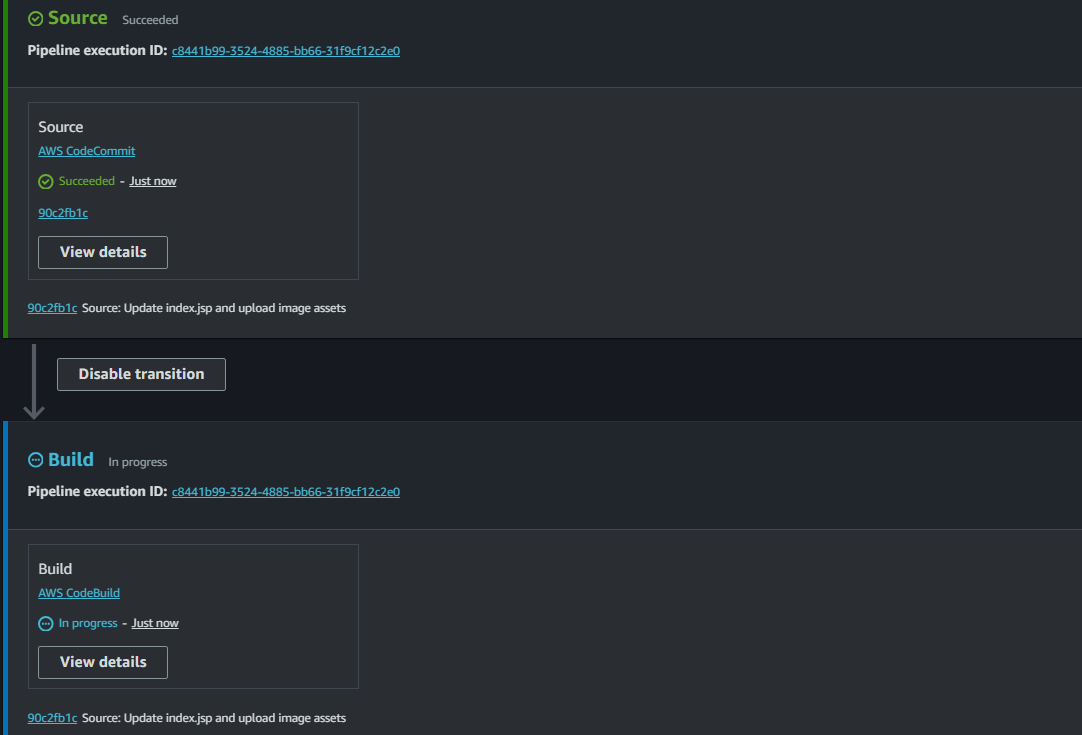
Wait for the pipeline to complete successfully.
You’ll see the source panel succeed first, followed by build and then finally deploy.
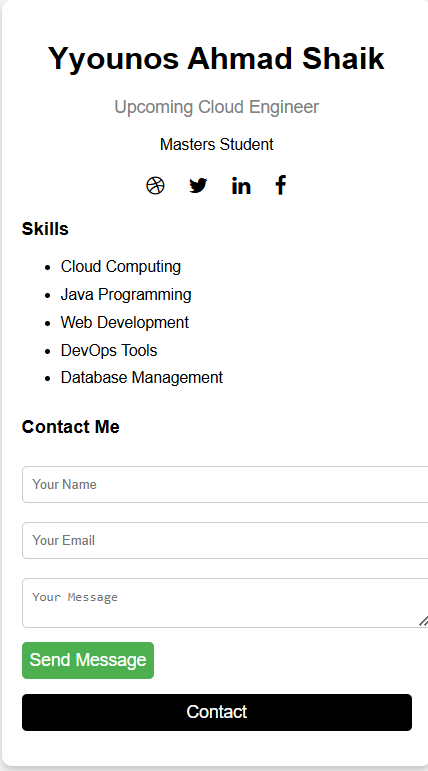
Once the pipeline has finished executitng, refresh the tab with your public IP address to see the changes.
Having trouble with your server? No worries, we've got this! Let's dive in and tackle those issues with enthusiasm and energy!
You can solve this by making few changes into your EC instance security group.
Go to security group in your EC2 console.
Select YournameEC2VPCStack::PublicSecurityGroup.
Select inbound rules under inbound rules tab.
Visit checkip.amazonaws.com to find your new IP address.
Copy your new IP address.
Head back to the EC2 console, and paste the copied IP address into the search bar.
Don't forget to add "/32" to the end of the address!
Select save rules.
Try visiting your updated security group public IP address.
Great! now you can see your website you made by making changes into your index.jsp file.
Step 4 : Trigger a Rollback
Switch tabs back to yoru CodePipeline console.
Scroll down to your Deploy panel, and select Start rollback.
What does a rollback mean?
A rollback means returning to an earlier, working version of your application - a super handy tool if the latest changes caused any issues! In this case, you only rolled back the deploy stage. This means your source code and build remain unchanged, but the application version on the server goes back to how it was before your latest commit.

Wait another 30 seconds for your deploy stage to update itself and display a Rollback tag!
Then wait another 1-2 minutes, until your rollback is successfull.
Refesh the tab with your web app open!
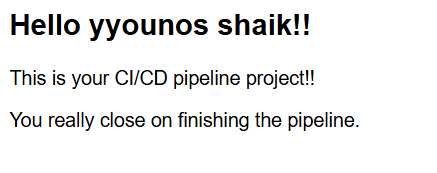
But it’s only a rollback of your deploy stage, so what’s happening at the source stage?
Switch tabs back into your CodePipeline console.
In the source panel of your pipeline, select the small hyperlinked text at the bottom of the panel.
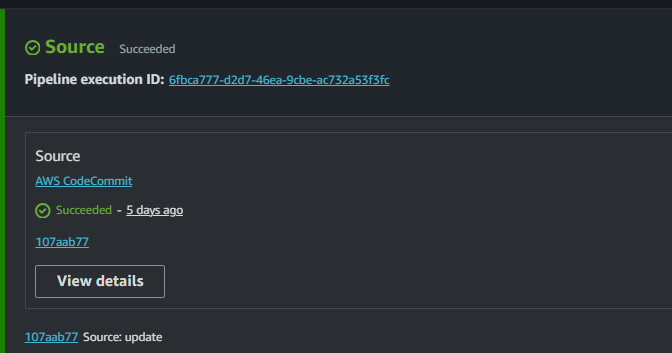
The link took us to a Commit overview page.
What does the Commit overview page do?
The Commit overview page is part of the CodeCommit console. It shows all the changes you've made to your source code in one commit. This includes details on which files were added, edited, or deleted! It's a really useful tool if a developer wants to check out their teammate's work.
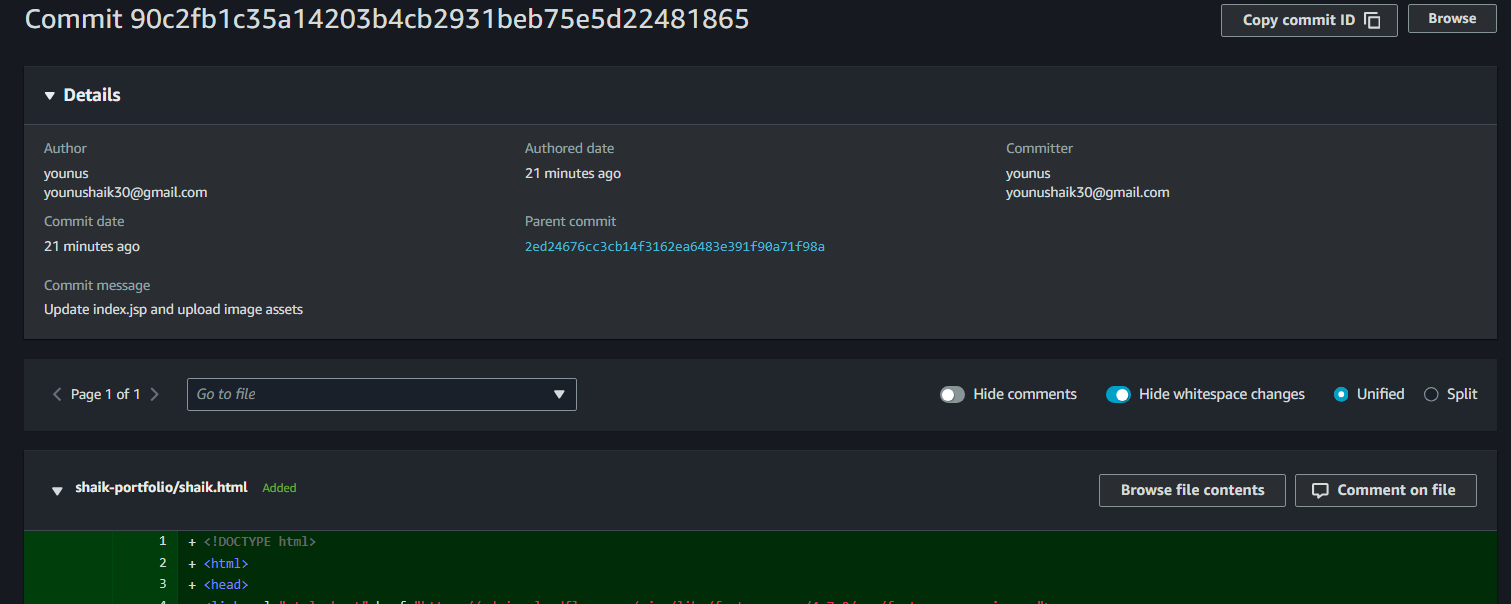
We rolled back the deploy stage, our website looks like how it did before we updated index.jsp But, the commit stage still reflects our latest changes to index.jsp.
Head back to your pipeline In CodePipeline.
Select Release change which updates all three stages to the latest version of the source code.

Refresh your Web server’s IPv4 address once more - your web app should look like the home page again!!!!
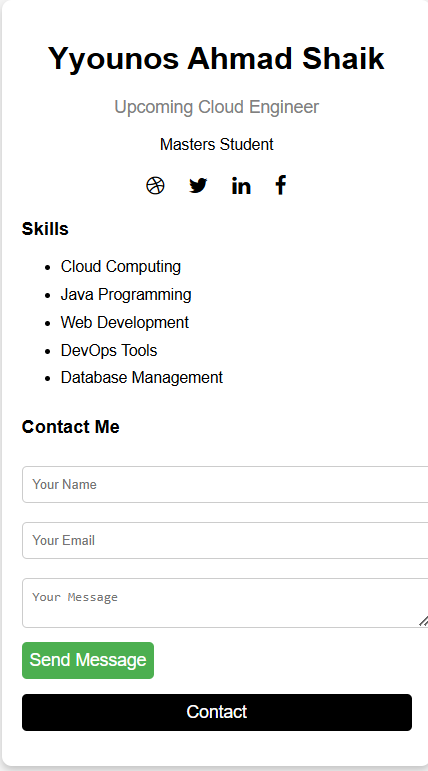
Nice Work!
You've just completed the project and finished the Cloud DevOps series!!! Kudos to you... you've mastered setting up your very own CI/CD pipeline with AWS CodePipeline. Well done!
Remember to delete your resources after you've taken screenshots of the projects to add them to your website or LinkedIn. Great job, and goodbye for now!
Subscribe to my newsletter
Read articles from yyounos shaik directly inside your inbox. Subscribe to the newsletter, and don't miss out.
Written by

yyounos shaik
yyounos shaik
An Aspring Cloud Engineer