Setting Up Your Mac Mini M4 for Software Development
 Manoj Kulkarni
Table of contents
- Introduction:
- Step 1: Checking for Software Updates
- Step 2: Install Xcode
- Step 3: Install Xcode Command Line Tools
- Step 4: Install Android Studio
- Step 5: Install Homebrew
- Step 6: Check For Java With Android Studio
- Step 7: Install Visual Studio Code
- Step 8: Install NVM
- Step 9: Install Node.js Using NVM
- Step 10: Install .NET 9.0
- Step 11: Install Fork
- Conclusion:

Introduction:
In this article, we will go through the process of installing all the necessary tools and software to develop iOS, Android, Web, and .NET applications on your Mac mini M4.
Step 1: Checking for Software Updates
Software updates ensure that we have latest security patches and OS improvements installed on our machine.
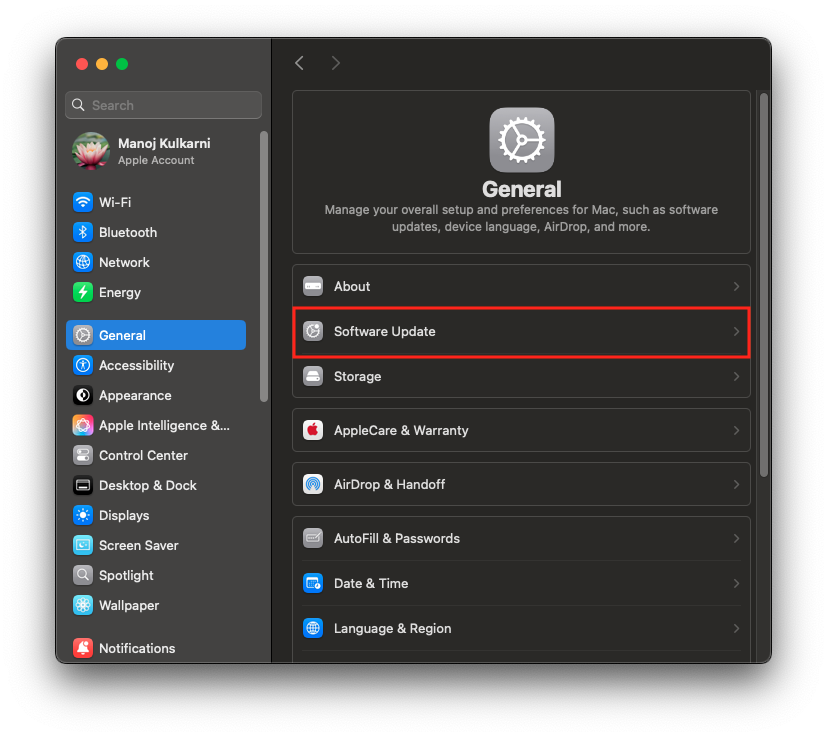
To check for software updates, goto System Settings=>General=>Software Update.

If you have any software update available to install, please install.
Step 2: Install Xcode
Xcode is Apple’s IDE for developing iOS and macOS applications. So it’s a must have tool in Apple ecosystem.
To install Xcode, open App Store, search for Xcode and hit install. It’s a big download, so it may take some time depending on your internet speed.
Step 3: Install Xcode Command Line Tools
Xcode command line tools are required for building mobile applications using MAUI or Flutter Or React Native for iOS platform.
There are two ways to install Xcode command line tools:
Execute below command in your terminal and follow the prompts.
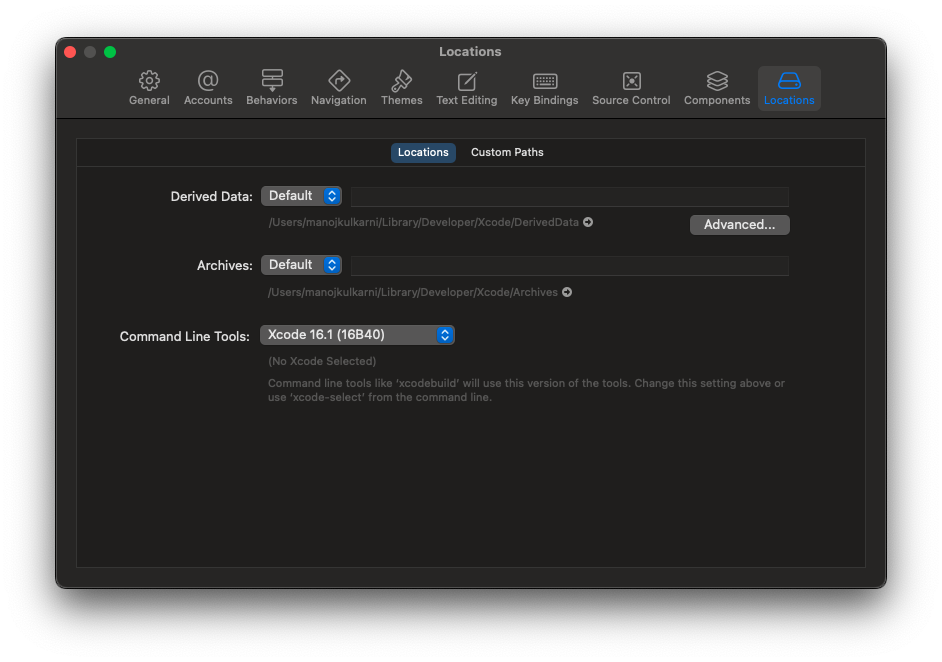
xcode-select —-installOpen Xcode, then choose Settings from the Xcode menu. Go to the Locations panel and install the tools by selecting the most recent version in the Command Line Tools dropdown as shown below.

Step 4: Install Android Studio
Android studio is an official IDE for android applications development. Android Studio comes with Android SDK and platform build tools which are required for developing android applications. We can also create emulators to test our applications on different Android SDK versions and form factors.
To install Android Studio, goto https://developer.android.com/studio and download the latest version of Android Studio as per your macOS chip (Intel or Apple silicon).
The setup wizard will guide you through downloading Android SDK and some additional tools.
Step 5: Install Homebrew
Homebrew is a super handy package manager that makes it easy to install all sorts of softwares.
To install Homebrew, open terminal and execute below command.
/bin/bash -c "$(curl -fsSL https://raw.githubusercontent.com/Homebrew/install/HEAD/install.sh)"
Just follow the prompts and once it’s done, you are ready to install other tools with simple commands! For example, if you want to install google chrome using Homebrew, then goto https://formulae.brew.sh and search for the google chrome. It will give you the command to install google chrome using Homebrew.
Link: https://brew.sh
Step 6: Check For Java With Android Studio
Android studio needs JAVA to work properly. So let’s make sure it is installed. We can check if JAVA is installed or not using java —version command.
If you see a version number, you are good to go. Otherwise you can install java using Homebrew by executing below command.
brew install openjdk@17
Step 7: Install Visual Studio Code
Visual Studio Code is a great lightweight code editor that supports tons of languages and tools.
There are two ways to install Visual Studio Code.
We can open up browser window, goto https://code.visualstudio.com and download Visual Studio Code for macOS.
We can install Visual Studio Code using Homebrew.
We already have installed Homebrew in Step 4, so we can install Visual Studio Code with a single command in terminal as shown below.
brew install --cask visual-studio-code
In many online blogposts or YouTube tutorials, you must have seen command code . which opens up current directory in Visual Studio Code. To set up code . command:
Open up Visual Studio Code
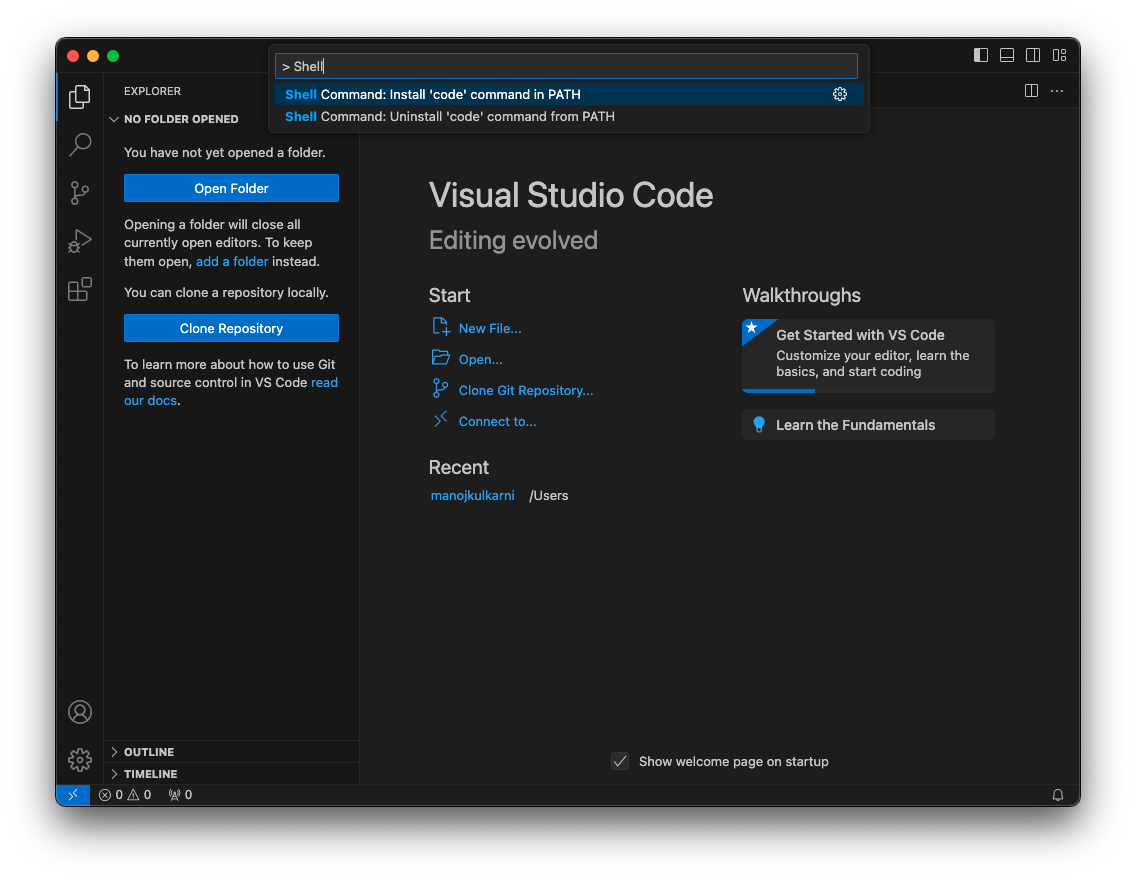
Press Command+Shift+P to open up command palette
Type ‘Shell Command: Install 'code' command in PATH’ and press enter as shown below.

To test it, go to any folder in terminal and type code . to open it in Visual Studio Code.
Step 8: Install NVM
NVM or Node Version Manager, allows you to easily to install and manage multiple versions of Node.js on your machine.
To install NVM, execute the below command in your terminal.
curl -o- https://raw.githubusercontent.com/nvm-sh/nvm/v0.40.1/install.sh | bash
For more information about NVM, visit https://github.com/nvm-sh/nvm
Step 9: Install Node.js Using NVM
Now that the NVM is setup, let’s install the latest version of Node.js. To install, execute below command in your terminal.
nvm install node
If you want to install specific version of Node.js, then execute below command in your terminal.
nvm install 18.20.5
Once installation is completed, you can check your Node version with node -v and switch between the versions easily with nvm use <Version> command.
Step 10: Install .NET 9.0
For .NET development, let’s install the .NET SDK. To install, execute below command in your terminal.
brew install --cask dotnet-sdk
Once it’s installed, we can check the version by running dotnet —-version command in terminal.
Step 11: Install Fork
Fork is a git client with easy to understand visual interface to manage git repositories.
To install fork, execute below command in your terminal.
brew install --cask fork
Link: https://fork.dev
I have also created a YouTube video regarding this topic, so if you would like to watch a video tutorial, then please go to https://youtu.be/CtXvkqfgi8c.
Conclusion:
In this article, we have set up our Mac mini M4 for software development. We have installed everything from Xcode, Xcode command-line-tools, Android Studio, Visual Studio Code, Node.js, .NET SDK and few other essential tools like NVM and fork. I hope you enjoyed reading the article.
Happy Coding!
Subscribe to my newsletter
Read articles from Manoj Kulkarni directly inside your inbox. Subscribe to the newsletter, and don't miss out.
Written by

Manoj Kulkarni
Manoj Kulkarni
I am programmer, blogger and foodie. I just love computers, coding and technical things. I spend most of my free time working on building my skill set by reading technical articles about new technologies or books on software development and try to keep my self updated as much as I can.